Contact SAMSUNG WORLDWIDE If you have any questions or comments relating to Samsung products, please contact the SAMSUNG customer care center. Comment contacter Samsung dans le monde Si vous avez des suggestions ou des questions concernant les produits Samsung, veuillez contacter le Service Consommateurs Samsung. Country CANADA U.S.A Customer Care Center 1-800-SAMSUNG(726-7864) 1-800-SAMSUNG(726-7864) Web Site www.samsung.com/ca www.samsung.com/us Address Samsung Electronics Canada Inc.
❑ Important Warranty Information Regarding Television Format Viewing N See the warranty card for more information on warranty terms. Wide screen format LCD Displays (16:9, the aspect ratio of the screen width to height) are primarily designed to view wide screen format full-motion video. The images displayed on them should primarily be in the wide screen 16:9 ratio format, or expanded to fill the screen if your model offers this feature and the images are constantly moving.
English Contents General Information Sound Control ■ List of Features......................................................................2 ■ Accessories...........................................................................2 ■ Viewing the Control Panel.....................................................3 ■ Viewing the Connection Panel...............................................4 ■ Remote Control.....................................................................
General Information N Figures and illustrations in this User Manual are provided for reference only and may differ from actual product appearance. Product design and specifications may be changed without notice in order to enhance product performance. ¦ List of Features ● ● ● ● ● Adjustable picture settings that can be stored in the TV’s memory. Automatic timer to turn the TV on and off. A special sleep timer.
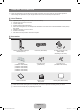
¦ Viewing the Control Panel N The product color and shape may vary depending on the model. N The front panel buttons can be activated by touching them with your finger. 1 23 4 5 6 78 1 SPEAKERS 2 REMOTE CONTROL SENSOR: Aim the remote control towards this spot on the TV. 3 SOURCEE: Toggles between all the available input sources. In the on-screen menu, use this button as you use the ENTERE button on the remote control. 4 MENU: Press to see an on-screen menu of your TV’s features.
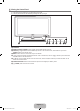
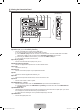
¦ Viewing the Connection Panel [TV Rear Panel] 1 2 [TV Side Panel] 3 4 5 1 6 7 ! 0 9 8 N The product color and shape may vary depending on the model. 1 HDMI IN 1(DVI), 2, 3, 4 / DVI AUDIO IN [R-AUDIO-L] – Connects to the HDMI jack of a device with an HDMI output. N No sound connection is needed for an HDMI to HDMI connection. N Use the HDMI IN 1 (DVI) jack for DVI connection to an external device.
¦ Remote Control N You can use the remote control up to a distance of about 23 feet from the TV. N The performance of the remote control may be affected by bright light. N The product color and shape may vary depending on the model. 1 POWER: Turns the TV on and off. 2 TV: Selects the TV mode directly 3 NUMERIC BUTTONS: Press to change the channel. 4 _: Press to select additional channels (digital) being broadcast by the same station. For example, to select channel ‘54-3’, press ‘54’, then press _ and ‘3’.
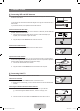
Connections ¦ Connecting VHF and UHF Antennas If your antenna has a set of leads that look like the diagram to the right, see ‘Antennas with 300 Ω Flat Twin Leads’ below. If your antenna has one lead that looks like the diagram to the right, see ‘Antennas with 75 Ω Round Leads’. If you have two antennas, see ‘Separate VHF and UHF Antennas’.
Connecting to a Cable Box that Descrambles Some Channels If your cable box descrambles only some channels (such as premium channels), follow the instructions below. You will need a twoway splitter, an RF (A/B) switch and four lengths of RF cable. (These items are available at most electronics stores.) ANT IN Incoming cable TV Rear Splitter RF (A/B) Switch Cable Box 1. Find and disconnect the cable that is connected to the ANT IN terminal on your cable box.
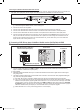
¦ Connecting a DVD / Blu-ray player / Cable Box / Satellite receiver (Set-Top Box) via DVI This connection can only be made if there is a DVI Output connector on the external device. TV Rear Panel DVD / Blu-ray player / Cable Box / Satellite receiver (Set-Top Box) 2 Audio Cable (Not supplied) 1 DVI to HDMI Cable (Not supplied) 1.
¦ Connecting a VCR TV Rear Panel TV Side Panel VCR Rear Panel 2 Audio Cable (Not supplied) 1 Video Cable (Not supplied) 1. Connect a Video Cable between the AV IN 1 [Y/VIDEO] or AV IN 2 [VIDEO] jack on the TV and the VIDEO OUT jack on the VCR. 2. Connect Audio Cables between the AV IN (1 or 2) jacks on the TV and the AUDIO OUT jacks on the VCR. N If you have a ‘mono’ (non-stereo) VCR, use a Y-connector (not supplied) to connect to the right and left audio input jacks of the TV.
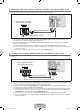
¦ Connecting an Amplifier / DVD Home Theater TV Rear Panel Amplifier/DVD Home Theater 1 Audio Cable (Not supplied) 1. Connect Audio Cables between the AUDIO OUT [R-AUDIO-L] jacks on the TV and Audio Input jacks on the Amplifier / DVD Home Theater. N When an audio amplifier is connected to the AUDIO OUT [R-AUDIO-L] jacks: Decrease the volume of the TV and adjust the volume level with the Amplifier’s volume control. N Each Amplifier/DVD Home Theater has a different back panel configuration.
¦ Connecting a Camcorder The side panel jacks on your TV make it easy to connect a camcorder to your TV. Using a Video Cable TV Side Panel Camcorder 1 Video Cable (Not supplied) 2 Audio Cable (Not supplied) 1. Connect a Video Cable between the AV IN 2 [VIDEO] jack on the TV and the VIDEO OUT jack on the camcorder. 2. Connect Audio Cables between the AV IN 2 [R-AUDIO-L] jacks on the TV and the AUDIO OUT jacks on the camcorder. N Each Camcorder has a different back panel configuration.
¦ Connecting a PC Using a D-Sub Cable TV Rear Panel PC 1 D-Sub Cable (Not supplied) 2 PC Audio Cable (Not supplied) 1. Connect a D-Sub Cable between PC IN [PC] connector on the TV and the PC output connector on your computer. 2. Connect a PC Audio Cable between the PC IN [AUDIO] jack on the TV and the Audio Out jack of the sound card on your computer. N When connecting a PC, match the color of the connection terminal to the cable. Using an HDMI/DVI Cable TV Rear Panel PC 2 3.
Operation ¦ Viewing the menus Button MENU RETURN R EXIT e Operations Display the main on-screen menu. Return to the previous menu. Exit the on-screen menu. Button ▲/▼/◄/►/ ENTERE Picture Before using the TV, follow the steps below to learn how to navigate the menu in order to select and adjust different functions. 1. Press the MENU button. The main menu is displayed on the screen. Its left side has the following icons: Picture, Sound, Channel , Setup, Input, Application, Support. 2.
¦ Plug & Play Feature When the TV is initially powered on, basic settings proceed automatically and subsequently. Plug & Play Select Language of the OSD. 1. Press the POWER P button on the remote control. N You can also use the POWER P button on the TV. Menu Language : English ► N The message Select Language of the OSD. is displayed. E Enter 2. Press the ▲ or ▼ button to select the language, then press the ENTERE button. The message Select ‘Home Use’ when installing this TV in your home. is displayed. 3.
Channel Control ¦ Configuring the Channel Menu ❑ Antenna → Air / Cable Channel Before your television can begin memorizing the available channels, you must specify the type of signal source that is connected to the TV (i.e. an Air or a Cable system). T Press the TOOLS button to display the Tools menu. You can also set the Antenna by selecting Tools → Switch to Cable (or Switch to Air).
Programmed Shows all current reserved Programs. N Select a channel in the All Channels, Added Channels or Favorite screen by pressing the ▲ / ▼ buttons, and pressing the ENTERE button. Then you can watch the selected channel. N Using the Color buttons with the Channel List – Green (Zoom): Enlarges or shrinks a channel number. – Yellow (Select): Selects multiple channel lists. You can perform the add / delete or add to Favorite / delete from Favorite function for multiple channels at the same time.
Channel List Option Menu (in Programmed) 1 / 1 / 2009 Programmed You can view, modify or delete a reservation. N Press the TOOLS button to use the option menu. Change Info Select to change a viewing reservation. 9:08 am 5 Info TV3 Change The 3:15 pm 2 TV3 5:50 pm 2 TV3 Zoom Select Cancel Schedules The Equalizer Information McMillan & Wife Select All Cancel Schedules Select to cancel a viewing reservation. Air Information T Tools E Information Select to view a viewing reservation.
Dynamic Contrast → Off / Low / Medium / High You can adjust the screen contrast so that the optimal contrast is provided. Gamma You can adjust the primary color (red, green, blue) Intensity. (-3 ~ +3) Color Space Color space is a color matrix composed of red, green and blue colors. Select your favorite color space to experience the most natural color. ● Native: Native Color Space offers deep and rich color tone.
N Temporary image retention may occur when viewing a static image on the set for more than two hours. N After selecting Zoom1, Zoom2 or Wide Fit: Press the ◄ or ► button to select Position, then press the ENTERE button. Press the ▲ or ▼ button to move the picture up and down. N After selecting Screen Fit in HDMI (1080i/1080p) or Component (1080i/1080p) mode, you made need to center the picture: Press the ◄ or ► button to select Position, then press the ENTERE button.
Display Modes If the signal from the system equals the standard signal mode, the screen is adjusted automatically. If the signal from the system doesn’t equal the standard signal mode, adjust the mode by referring to your videocard user guide; otherwise there may be no video. For the display modes listed below, the screen image has been optimized during manufacturing.
Sound Control ¦ Configuring the Sound Menu ❑ Mode → Standard / Music / Movie / Clear Voice / Custom ❑ Equalizer The sound settings can be adjusted to suit your personal preference. Mode Selects the sound mode among the predefined settings. Sound You can select a sound mode to suit your personal preferences. T Press the TOOLS button to display the Tools menu. You can also configure the sound mode by selecting Tools → Sound Mode.
❑ Speaker Select When you watch TV with it connecting to a Home theater, turn the TV speakers off so you can listen to sound from the Home theater’s (external) speakers. External Speaker: Used to listen to the sound of the External (Home Theater) Speakers. TV Speaker: Used to listen to the sound of the TV Speakers. N If you select External Speaker in the Speaker Select menu, the sound settings will be limited.
Timer 1 / Timer 2 / Timer 3 Three different on / off timer settings can be made. You must set the clock first. ● On Time: Set the hour, minute, am/pm, and activate/inactivate. (To activate the timer with the setting you’ve chosen, set to Activate.) ● Off Time: Set the hour, minute, am/pm, and activate/inactivate. (To activate the timer with the setting you’ve chosen, set to Activate.) ● Volume: Set the desired volume level.
Canadian English ● ● ● ● ● ● N C: Programming intended for children under age 8. C8+: Programming generally considered acceptable for children 8 years and over to watch on their own. G: General programming, suitable for all audiences. PG: Parental Guidance. 14+: Programming contains themes or content which may not be suitable for viewers under the age of 14. 18+: Adult programming. The V-Chip will automatically block any category that is ‘More restrictive’.
Caption Mode You can select the desired caption mode. N The availability of captions depends on the program being broadcast. ● Default / CC1~CC4 / Text1~Text4 (analog channels only) The Analog Caption function operates in either analog TV channel mode or when a signal is supplied from an external device to TV. (Depending on the broadcasting signal, the Analog Caption function may operate on digital channels.
Input / Support ¦ Configuring the Input Menu ❑ Source List Input Use to select TV or other external input sources such as DVD / Blu-ray players / Cable Box / Satellite receivers (Set-Top Box) connected to the TV. Use to select the input source of your choice. O Press the SOURCE button on the remote control to view an external signal source. Source List Edit Name TV, AV1, AV2, Component1, Component2, PC, HDMI1/DVI, HDMI2, HDMI3, HDMI4.
❑ Software Upgrade Samsung may offer upgrades for TV’s firmware in the future. Please visit Samsung.com or contact the Samsung call center at 1-800-SAMSUNG (726-7864) to receive information about downloading upgrades and using a USB drive. Upgrades will be possible by connecting a USB drive to the USB port located on your TV. USB drive N Insert a USB drive containing the firmware upgrade into the USB port on the side of the TV.
¦ Using the Media Play (USB) Menu Application 1. Press the MENU button. Press the ▲ or ▼ button to select Application, then press the ENTERE button. 2. Press the ▲ or ▼ button to select Media Play (USB), then press the ENTERE button. 3. Press the ▲ or ▼ button to select the corresponding USB Memory Device, then press the ENTERE button. N The Media Play (USB) menu differs depending on the USB Memory Device connected to TV. N Some devices may not be supported due to compatibility problems. 4.
❑ Viewing a Slide Show 1. Press the INFO button to display the option View, Start Slide Show, Delete, Delete All, Deselect All. 2. Press the ▲ or ▼ button to select Start Slide Show then press the ENTERE button. View Start Slide Show N During the slide show, files are displayed in order from the currently shown file. Delete N MP3 files can be automatically played during the Slide Show if the Default Background Delete All Deselect All Music is set to On.
❑ Using the Option Menu 1. Complete Steps 1 to 3 of ‘Using the Media Play (USB) Function’. (Refer to page 27) 2. Press the ◄ or ► button to move to Photo, then press the ENTERE button. The saved file information is displayed as a folder or file. 3. Press the ▲, ▼, ◄ and ► button to select a file, then press the ENTERE button. Pressing the button over a photo thumbnail displays the photo in full screen. 4.
Repeat Music Select to repeatedly play MP3 files in the current folder. You can select On or Off. Delete Select a MP3 files to delete. Press the ▲ or ▼ button to select Delete, then press the ENTERE button. N While removing files, don’t remove the USB memory device. N You cannot recover deleted music files. Delete All You can delete all files. Deselect all You can deselect all files.
Anynet+ ¦ Connecting Anynet+ Devices Anynet+ is a function that enables you to control all connected Samsung devices that support Anynet+ with your Samsung TV’s remote. The Anynet+ system can be used only with Samsung devices that have the Anynet+ feature. To be sure your Samsung device has this feature, check if there is an Anynet+ logo on it. To connect to a TV TV Anynet+ Device 1 HDMI 1.3 Cable Anynet+ Device 2 HDMI 1.3 Cable Anynet+ Device 3 HDMI 1.3 Cable Anynet+ Device 4 HDMI 1.
¦ Setting Up Anynet+ T Press the TOOLS button to display the Tools menu. You can also display Anynet+ menu by selecting Tools → Anynet+ (HDMI-CEC). ❑ Setup Anynet+ (HDMI-CEC) → Off / On Application To use the Anynet+ Function, Anynet+ (HDMI-CEC) must be set to On. N When the Anynet+ (HDMI-CEC) function is disabled, all the Anynet+ related operations are deactivated.
Anynet+ Menu The Anynet+ menu changes depending on the type and status of the Anynet+ devices connected to the TV. Anynet+ Menu View TV Device List Description Anynet+ mode changes to TV broadcast mode. Shows the Anynet+ device list. Shows the connected device menus. E.g. If a DVD recorder is connected, the disc menu of the DVD recorder will appear. Shows the play menu of the connected device. E.g. If a DVD recorder is connected, the play menu of the DVD recorder will appear.
¦ Listening through a Receiver (Home theater) You can listen to sound through a receiver instead of the TV speaker. Viwe TV 1. Press the TOOLS button. Press the ENTERE button to select Anynet+ (HDMI-CEC). Device List 2. Press the ▲ or ▼ button to select Receiver. Press the ◄ or ► button to select On or Off. Record : DVDR DVDR Menu 3. Press the EXIT button to exit. DVDR Operation N If your receiver supports audio only, it may not appear in the device list.
Appendix ¦ Troubleshooting If the TV seems to have a problem, first try this list of possible problems and solutions. If none of these troubleshooting tips apply, please visit Samsung.com or contact the Samsung call center at 1-800-SAMSUNG (726-7864). Problem Possible Solution Poor picture. Try another channel. / Adjust the antenna. / Check all wire connections. Poor sound quality. Try another channel. / Adjust the antenna. No picture or sound. Try another channel. / Press the SOURCE button.
Problem Possible Solution The picture appears distorted in the corner of the screen. If Screen Fit is selected with some external devices, the picture may appear distorted in the corner of the screen. This symptom is caused by the external devices, not TV. The ‘Resets all settings to the default values.’ message appears. This appears when you press and hold the EXIT button for a while. The product settings are reset to the factory defaults.
¦ Wall Mount Kit Specifications (VESA) Install your wall mount on a solid wall perpendicular to the floor. When attaching to other building materials, please contact your nearest dealer. If installed on a ceiling or slanted wall, it may fall and result in severe personal injury. N Standard dimensions for wall mount kits are shown in the table above. N When purchasing our wall mount kit, a detailed installation manual and all parts necessary for assembly are provided.
¦ Securing the TV to the Wall Caution: Pulling, pushing, or climbing on the TV may cause the TV to fall. In particular, ensure your children do not hang over or destabilize the TV; doing so may cause the TV to tip over, causing serious injuries or death. Follow all safety precautions provided on the included Safety Flyer. For added stability, install the anti-fall device for safety purposes, as follows.
¦ Specifications Model Name LN32B550 LN37B550 LN40B550 Screen Size (Diagonal) 32 inches (31.5 inches measured diagonally) 37 inches (37.0 inches measured diagonally) 40 inches (39.9 inches measured diagonally) PC Resolution (Optimum) 1920 x 1080 @ 60 Hz 1920 x 1080 @ 60 Hz 1920 x 1080 @ 60 Hz 10W x 2 10W x 2 10W x 2 31.3 X 3.0 X 20.6 inches (793.9 x 77.1 x 524.1 mm) 31.3 X 9.4 X 22.4 inches (793.9 x 240.0 x 569.7 mm) 36.1 X 3.1 X 23.3 inches (917.2 x 78.6 x 591.7 mm) 36.1 X 10.0 X 25.
¦ Dimensions LN32B550 TOP VIEW JACK PANEL DETAIL 5.2"H X 6.6"W 3.0 31.3 27.5 20.6 15.5 22.4 9.4 17.5 FRONT VIEW / SIDE VIEW 7.9 (200 mm) 7.9 (200 mm) REAR VIEW NOTE: All drawings are not necessarily to scale. Some dimensions are subject to change without prior notice. Refer to the dimensions prior to performing installation of your TV. Not responsible for typographical or printed errors. © 2009 Samsung Electronics America, Inc English - 41 BN68-01883E-00L02.
N37B550 TOP VIEW JACK PANEL DETAIL 5.2"H X 6.6"W 3.1 36.1 32.3 23.3 18.2 25.9 20.5 10.0 FRONT VIEW / SIDE VIEW 7.9 (200 mm) 7.9 (200 mm) REAR VIEW NOTE: All drawings are not necessarily to scale. Some dimensions are subject to change without prior notice. Refer to the dimensions prior to performing installation of your TV. Not responsible for typographical or printed errors. © 2009 Samsung Electronics America, Inc English - 42 BN68-01883E-00L02.
LN40B550 TOP VIEW JACK PANEL DETAIL 5.2"H X 6.6"W 3.1 38.7 34.9 24.7 19.7 26.6 20.5 10.0 FRONT VIEW / SIDE VIEW 7.9 (200 mm) 7.9 (200 mm) REAR VIEW NOTE: All drawings are not necessarily to scale. Some dimensions are subject to change without prior notice. Refer to the dimensions prior to performing installation of your TV. Not responsible for typographical or printed errors. © 2009 Samsung Electronics America, Inc English - 43 BN68-01883E-00L02.
LN46B550 TOP VIEW JACK PANEL DETAIL 5.2"H X 6.6"W 3.1 43.9 40.1 27.8 22.6 30.3 21.7 10.8 FRONT VIEW / SIDE VIEW 15.7 (400 mm) 15.7 (400 mm) REAR VIEW NOTE: All drawings are not necessarily to scale. Some dimensions are subject to change without prior notice. Refer to the dimensions prior to performing installation of your TV. Not responsible for typographical or printed errors. © 2009 Samsung Electronics America, Inc English - 44 BN68-01883E-00L02.
LN52B550 TOP VIEW JACK PANEL DETAIL 5.2"H X 6.6"W 3.1 49.5 45.5 31.4 25.7 33.6 21.7 12.0 FRONT VIEW / SIDE VIEW 15.7 (400 mm) 15.7 (400 mm) REAR VIEW NOTE: All drawings are not necessarily to scale. Some dimensions are subject to change without prior notice. Refer to the dimensions prior to performing installation of your TV. Not responsible for typographical or printed errors. © 2009 Samsung Electronics America, Inc English - 45 BN68-01883E-00L02.
TÉLÉVISEUR ACL Guide de l’utilisateur Imaginez les possibilités Merci d’avoir acheté un produit Samsung. Pour obtenir un service complet, veuillez enregistrer votre produit à: www.samsung.com/register Modèle BN68-01883E-00L02.
❑ Remarques importantes sur la garantie relative au format de l'image du téléviseur N Voir le bon de garantie pour avoir plus d'information sur les conditions de garantie. Le format écran large des écrans ACL (16:9, soit le rapport hauteur/largeur de l'image) est conçu principalement pour les vidéos plein écran à écran large.
Table des matières Renseignements généraux Commande du son ■ Liste des fonctions.................................................................2 ■ Accessoires...........................................................................2 ■ Présentation du panneau de commande..............................3 ■ Présentation du panneau de branchement...........................4 ■ Télécommande......................................................................5 ■ Insertion des piles dans la télécommande.......
Renseignements généraux N Les figures et illustrations de ce mode d’emploi ne sont fournies qu’à titre de référence. Elles peuvent différer du produit réel. La conception et les caractéristiques techniques du produit peuvent être modifiées sans préavis afin d’en améliorer la performance. ¦ Liste des fonctions ● ● ● ● ● Paramètres d'image modifiables pouvant être stockés dans la mémoire du téléviseur. Minuterie automatique pour allumer ou éteindre le téléviseur. Minuterie de mise en veille spéciale.
¦ Présentation du panneau de commande N La couleur et la forme du produit peuvent varier en fonction du modèle. N Les touches du panneau avant s'activent par effleurement. 1 23 4 5 6 78 1 HAUT-PARLEURS 2 CAPTEUR DE LA TÉLÉCOMMANDE : Orienter la télécommande vers le capteur sur le téléviseur. 3 SOURCEE : Permet de passer d'une source d'entrée à l'autre. Dans le menu à l'écran, utiliser ce bouton de la même manière que la touche ENTEREde la télécommande.
¦ Présentation du panneau de branchement [Panneau arrière du téléviseur] 1 2 3 [Panneau latéral du téléviseur] 4 5 1 6 7 ! 0 9 8 N La couleur et la forme du produit peuvent varier en fonction du modèle. 1 HDMI IN 1(DVI), 2, 3, 4 / DVI AUDIO IN [R-AUDIO-L] – À brancher à la prise HDMI d'un appareil doté d'une sortie HDMI. N Aucune connexion audio n'est nécessaire entre deux appareils HDMI. N Utilisez la prise HDMI IN 1 pour le branchement DVI vers un appareil externe.
¦ Télécommande N Vous pouvez utiliser la télécommande à une distance maximale du téléviseur d’environ 7 m. N Une lumière intense peut affecter le bon fonctionnement de la télécommande. N La couleur et la forme du produit peuvent varier en fonction du modèle. 1 POWER : Permet d’allumer et d’éteindre le téléviseur. 2 TV: Permet de sélectionner directement le mode TV. 3 TOUCHES NUMÉRIQUES : Appuyer sur cette touche pour changer de canal.
Connexions ¦ Connexion d'antennes VHF et UHF Si votre antenne comporte un câble semblable à celui de l'illustration de droite, reportez-vous à ‘Antennes avec câble bipolaire plat de 300 Ω’, ci-dessous. Si votre antenne est dotée d'un câble semblable à celui de l'illustration de droite, reportez-vous à la section ‘Antenne équipée de câbles ronds 75 Ω’. Si vous avez deux antennes, voir ‘Antennes VHF et UHF séparées’.
Branchement d'un câblosélecteur servant à débrouiller certains canaux Si votre câblosélecteur ne peut débrouiller que certains canaux (comme les canaux payants), suivez les instructions ci-dessous. Vous aurez besoin d'un séparateur bidirectionnel, d'un interrupteur RF (A/B) et de quatre longueurs de câble RF. (Ces éléments sont disponibles dans la plupart des magasins d'électronique.) ANT IN Câble d'arrivée Arrière du téléviseur Séparateur Interrupteur RF (A/B) Câblosélecteur 1.
¦ Branchement d’un lecteur DVD/Blu-ray/câblosélecteur ou récepteur satellite (boîtier décodeur) via DVI l n'est possible d'effectuer cette connexion que si l'appareil externe dispose d'un connecteur de sortie DVI. Panneau arrière du téléviseur Lecteur DVD/Blu-ray/câblosélecteur ou récepteur satellite (boîtier décodeur) 2 Câble audio (non fourni) 1 Câble DVI vers HDMI (non fourni) 1.
¦ Connexion d'un magnétoscope Panneau arrière du téléviseur Panneau latéral du téléviseur Panneau arrière du magnétoscope 2 Câble audio (non fourni) 1 Câble vidéo (non fourni) 1. Branchez un câble vidéo entre la prise AV IN 1 [Y/VIDEO] ou AV IN 2 [VIDEO] du téléviseur et la prise VDEO OUT du magnétoscope. 2. Branchez les câbles audio entre les prises AV IN (1 ou 2) du téléviseur et les prises AUDIO OUT du magnétoscope.
¦ Connexion d'un amplificateur/lecteur DVD de cinéma maison Panneau arrière du téléviseur Amplificateur/ lecteur DVD de cinéma maison 1 Câble audio (non fourni) 1. Branchez un câble audio entre les prises AUDIO OUT [R-AUDIO-L] du téléviseur et les prises d'entrée audio de l'amplificateur/ lecteur DVD de cinéma maison.
¦ Connexion d'un caméscope Les prises du panneau latéral facilitent la connexion d'un caméscope au téléviseur. Utilisation d’un câble vidéo Panneau latéral du téléviseur Caméscope 1 Câble vidéo (non fourni) 2 Câble audio (non fourni) 1. Branchez un câble vidéo entre la prise AV IN 2 [VIDEO] du téléviseur et la prise VDEO OUT du caméscope. 2. Branchez les câbles audio entre les prises AV IN 2 [R-AUDIO-L] du téléviseur et les prises AUDIO OUT du caméscope.
¦ Connexion d'un PC Utilisation d’un câble secondaire D Panneau arrière du téléviseur PC 1 Câble secondaire D (non fourni) 2 Câble audio de PC (non fourni) 1. Branchez un câble secondaire D entre le connecteur PC IN [PC] du téléviseur et le connecteur de sortie PC de votre ordinateur. 2. Branchez un câble audio PC entre la prise PC IN [AUDIO] du téléviseur et la prise de sortie audio de la carte son de l'ordinateur.
Fonctionnement ¦ Présentation des menus Touche MENU RETURN R EXIT e Opérations Afficher le menu principal à l’écran. Retourner au menu précédent. Quitter le menu à l’écran. Touche ▲/▼/◄/►/ ENTERE Image Avant d’utiliser votre téléviseur, suivez ces étapes pour comprendre comment naviguer dans le menu, pour sélectionner et régler différentes fonctions. 1. Appuyez sur la touche MENU. Le menu principal s’affiche à l’écran.
¦ Fonction Prêt à l'emploi Au moment de la mise en marche initiale du téléviseur, des paramètres de base sont proposés Prêt à l’emploi automatiquement et subséquemment. Select Language of the OSD. 1. Appuyez sur la touche POWER P de la télécommande. Menu Language : English ► N Il est aussi possible d'utiliser la touche POWER P du téléviseur. E Enter N Le message Select Language of the OSD. s'affiche. 2. Utilisez la touche ▲ ou ▼ pour sélectionner la langue, puis appuyez sur ENTERE.
Commande des canaux ¦ Configuration du menu des canaux ❑ Antenne → Air / Câble Chaîne Avant que votre téléviseur ne puisse commencer à mémoriser les canaux disponibles, vous devez spécifier le type de la source de signal branchée au téléviseur (c'est-à-dire une antenne ou le câble). T Appuyez sur la touche TOOLS pour afficher le menu Outils. Appuyez sur la touche TOOLS pour afficher le menu Outils.
Enregistrement par minuterie Afficher toutes les émissions actuellement réservées. N Sélectionnez un canal dans la liste Tous les canaux, Canaux ajoutés ou Favori en appuyant sur les touches ▲ / ▼ suivies de la touche ENTERE. Il est alors possible d'écouter le canal sélectionné. N Utilisation des touches de couleur avec la ‘Liste des canaux’ – Verte (Zoom) : Agrandit ou rapetisse un numéro de canal. – Jaune (Choisir) : Sélectionner plusieurs listes de canaux.
Menu d'options des listes de canaux (sous Enregistrement par minuterie) Information, modification Sélectionnez cette option pour modifier une réservation d'émission. Annuler horaires 1 / 1 / 2009 Enregistrement par minuterie Il est possible d'afficher, de modifier ou de supprimer une réservation. N Appuyez sur la touche TOOLS pour utiliser le menu d'options.
Contraste dynam. → Off / Basse / Moyen / Haute Vous pouvez régler le constraste de manière à l'optimiser. Gamma Il est possible de régler l'intensité des couleurs primaires (rouge, vert, bleu). (-3 ~ +3) Espace couleur L'espace couleur est une matrice composée des couleurs rouge, vert et bleu. Sélectionnez votre espace couleur préféré pour obtenir des couleurs les plus naturelles possibles. ● Standard : L'espace couleur natif offre des tons riches et pleins.
N Une rémanence d'image temporaire peut se produire si une image fixe est affichée à l'écran pendant plus de deux heures. N Après avoir sélectionné Zoom1, Zoom2 ou Format large : Appuyez sur la touche ◄ ou ► pour sélectionner Position, puis sur ENTERE. Appuyer sur la touche ▲ ou ▼ pour déplacer l'image vers le bas et le haut.
Modes d'affichage Si le signal du système équivaut au mode de signal standard, l'écran se règle automatiquement. Si le signal du système ne correspond pas au signal standard, réglez le mode en vous reportant, le cas échéant, au mode d’emploi de la carte vidéo; sinon, l’image pourrait ne pas apparaître. Pour les modes d'affichage figurant ci-dessous, l'image de l'écran a été optimisée durant la fabrication.
Commande du son ¦ Configuration du menu Sound ❑ Mode → Standard / Musique / Cinéma / Voix claire / Personnel ❑ Égaliseur L'utilisateur peut ajuster les paramètres audio selon ses préférences personnelles. Mode Sélectionne le mode sonore parmi des réglages prédéfinis. Son Vous pouvez sélectionner un mode sonore convenant à vos préférences personnelles. T Appuyez sur la touche TOOLS pour afficher le menu Outils. Il est également possible de régler le son en choisissant Outils → Son Mode.
❑ Sélect. le haut-parleur Lorsque vous écoutez un téléviseur branché à une chaîne de cinéma maison, coupez le son des haut-parleurs du téléviseur afin d’entendre celui des haut-parleurs (externes) de la chaîne. Haut-p. externe : Permet d'entendre le son des haut-parleurs externes (cinéma maison). Haut-parleur TV : Permet d'entendre le son des haut-parleurs du téléviseur. N Si vous sélectionnez Haut-p. externe dans le menu Sélect. le haut-parleur, les réglages du son seront limités.
Minuterie 1 / Minuterie 2 / Minuterie 3 Trois réglages de minuterie (mise en marche/arrêt) peuvent être effectués. Il faut d'abord régler l'horloge. ● Mise en marche: Réglez l’heure, les minutes, am/pm et activer/désactiver. (Pour activer la minuterie avec le réglage choisi, réglez à Activer.) ● Arrêt : Réglez l’heure, les minutes, am/pm et activer/désactiver. (Pour activer la minuterie avec le réglage choisi, réglez à Activer.) ● Volume : Réglez le volume au niveau désiré.
Anglais canadien ● ● ● ● ● ● N C : Émissions destinées aux enfants de moins de 8 ans. C8+ : Émissions convenant généralement aux enfants de 8 ans et plus, sans surveillance. G : Émissions grand public convenant à tous les auditoires. PG : Émissions à surveillance parentale. 14+ : Émissions dont la teneur peut ne pas convenir, en tout ou en partie, aux enfants de moins de 14 ans. 18+ : Émissions pour adultes. La fonction V-Chip bloque automatiquement toutes les catégories qui sont ‘plus restrictives’.
Mode de sous-titrage Vous pouvez sélectionner le mode de sous-titrage souhaité. N L'option de sous-titrage disponible dépend du programme diffusé. ● Par défaut / CC1~CC4 / Texte1~Texte4 (canaux analogiques seulement) La fonction des sous-titres analogique fonctionne en mode canaux analogiques ou lorsqu'un signal est fourni au téléviseur à partir d'un appareil externe. (Selon le signal émetteur, la fonction des sous-titres analogiques peut fonctionner sur les canaux numériques.
Entrée et soutien ¦ Configuration du menu d'entrée ❑ Liste source Entrée Cette option permet de sélectionner le téléviseur ou d’autres sources d’entrée externes comme les lecteurs DVD/Blu-ray/les câblosélecteurs ou les récepteurs satellite (boîtier décodeur) branchés au téléviseur. Permet de sélectionner la source d'entrée de votre choix. O Appuyez sur la touche SOURCE de la télécommande pour afficher une source de signal externe.
❑ Mise à niveau du logiciel Ultérieurement, Samsung mettra à disposition des mises à niveau du micrologiciel pour le téléviseur. Visitez Samsung.com ou communiquez avec le centre d’appel Samsung en composant 1-800SAMSUNG (726-7864) pour obtenir de l’information sur le téléchargement des mises à niveau et sur l’utilisation d’une clé USB. Pour obtenir les mises à niveau, branchez une clé USB au port USB de Clé USB votre téléviseur.
¦ Utilisation du menu Media Play (USB) Application 1. Appuyez sur la touche MENU. Appuyez sur la touche ▲ ou ▼ pour sélectionner Application, Anynet+ (HDMI-CEC) puis sur ENTERE. Media play (USB) 2. Appuyez sur les touches ▲ ou ▼ pour choisir Media Play (USB), puis sur la touche ENTERE. 3. Appuyez sur la touche ▲ ou ▼ pour sélectionner le dispositif de mémoire USB correspondant, puis appuyez sur la touche ENTERE.
❑ Lecture d’un diaporama 1. Appuyez sur la touche INFO pour afficher l’option View, Dém. Diaporama, Supprimer, Effacer tout, Désélect. tout. 2. Appuyez sur la touche ▲ ou ▼ pour choisir Dém. Diaporama puis sur ENTERE. View Dém. Diaporama N Pendant le diaporama, les fichiers s’affichent dans l’ordre, à partir du fichier affiché. Supprimer N Les fichiers MP3 peuvent être lus automatiquement pendant le diaporama si l’option Effacer tout Désélect. tout Default Music de fond est réglée à On.
❑ Le menu Option 1. Complétez les étapes de 1 à 3 de la section ‘La fonction Media Play (USB)’. (Reportez-vous à la page 27) 2. Appuyez sur la touche ◄ ou ► pour vous déplacer à Photo, puis sur ENTERE. L’information du fichier enregistré est affichée sous la forme d’un dossier ou d’un fichier. 3. Utilisez la touche ▲, ▼, ◄ et ► pour sélectionner un fichier, puis appuyez sur ENTERE. Si vous appuyez sur la touche pendant que vous vous trouvez sur une vignette, la photo apparaît en plein écran. 4.
Reprise de la musique Sélectionner pour répéter la lecture des fichiers MP3 dans le dossier courant. Vous pouvez sélectionner On ou Off. Supprimer Choisissez le fichier MP3 à supprimer. Appuyez sur la touche ▲ ou ▼ pour sélectionner Supprimer, puis sur ENTERE. N Ne pas retirer le dispositif de mémoire USB pendant la suppression de fichiers. N Vous ne pourrez pas récupérer des fichiers musicaux supprimés. Effacer tout Vous pouvez supprimer tous les fichiers. Désélect.
Anynet+ ¦ Connexion d'appareils Anynet+ Anynet+ est une fonction qui vous permet de contrôler tous les appareils Samsung connectés, qui sont compatibles avec le mode Anynet+, à l'aide de la télécommande Samsung. Le système Anynet+ peut être utilisé uniquement avec les appareils Samsung disposant de la fonction Anynet+. Pour vérifier que votre appareil Samsung dispose de cette fonction, assurez-vous qu'il comporte le logo Anynet+. Connexion à un téléviseur TV Anynet+ Appareil 1 Câble HDMI 1.
¦ Configuration d'Anynet+ T Appuyez sur la touche TOOLS pour afficher le menu Outils. Vous pouvez également afficher le menu Anynet+ en sélectionnant Outils → Anynet+ (HDMI-CEC). ❑ Configuration Anynet+ (HDMI-CEC) → Off / On Arrêt automatique → Non / Oui Régler un appareil Anynet+ de sorte qu'il s'arrête automatiquement lorsque le téléviseur est hors tension N La source active de la télécommande du téléviseur doit être réglée à TV afin de pouvoir utiliser la fonction Anynet+.
Anynet+ Le menu Anynet+ varie selon le type et l'état des appareils Anynet+ branchés au téléviseur. Anynet+ Menu Regarder téléviseur Liste appareils (device_name) Menu (device_name) Operation Enregistrer: (*recorder) Description Anynet+ au mode de diffusion téléviseur. Affiche la liste des appareils Anynet+. Affiche les menus des appareils branchés. Par exemple, si un enregistreur DVD est branché, le menu du disque de celui-ci s’affiche. Affiche les menus de lecteur des appareils branchés.
¦ Écoute par l'intermédiaire d'un récepteur (cinéma maison) Vous pouvez avoir le son par l'intermédiaire d'un récepteur, plutôt que par les haut-parleurs du Regarder téléviseur téléviseur. Liste appareils 1. Appuyez sur la touche TOOLS. pour sélectionner la fonction Anynet+ (HDMI-CEC). Enregistrer : DVDR DVDR MENU 2. Appuyez sur la touche ▲ ou ▼ pour sélectionner Récepteur. Appuyez sur la touche ◄ ou ► DVDR Operation pour sélectionner On ou Off. Récepteur : Arrêt 3.
Annexe ¦ Dépannage Le tableau ci-dessous dresse la liste des problèmes courants et suggère des solutions. Si aucun de ces conseils ne permet de corriger le problème, communiquer avec le service à la clientèle de Samsung en composant le 1-800-SAMSUNG (1-800-726-7864). Problème Solution possible Image de qualité médiocre. Essayez un autre canal. /Réglez l’antenne. /Vérifiez tous les branchements des câbles. Son de qualité médiocre. Essayez un autre canal. /Réglez l’antenne. Aucune image ou aucun son.
Problème Solution possible L’image n'est pas centrée sur l'écran. Réglez les positions horizontale et verticale. La position de l'écran doit être réglée à la source de sortie (c.-à-d. au récepteur) par un signal numérique. L'image semble déformée dans un angle de l'écran. la fonction Plein écran est sélectionnée avec certains appareils externes, l'image peut sembler déformée dans un angle de l'écran. Ce dommage est causé par les appareils externes et non par le téléviseur.
¦ Spécifications de l'ensemble d'installation murale (VESA) Installez votre support mural sur un mur massif perpendiculaire au plancher. Pour le fixer sur d'autres types de matériaux, veuillez communiquer avec votre détaillant. Si vous l'installez au plafond ou sur un mur incliné, il risque de tomber et de causer des blessures. N Les dimensions standard pour les ensembles de fixation murale figurent dans le tableau cidessus.
¦ Fixation du téléviseur au mur Mise en garde : Le fait de tirer, de pousser ou de monter sur le téléviseur peut en provoquer la chute. Il faut s'assurer que les enfants ne grimpent pas sur le téléviseur et qu'ils ne le déstabilisent pas, car il pourrait se renverser et causer des blessures sérieuses, voire la mort. Suivez toutes les mesures de sécurité indiquées dans la brochure. Pour une stabilité accrue, installez un dispositif anti-chute tel qu'indiqué ci-dessous.
¦ Spécifications Modèle Taille de l'écran (en diagonale) Résolution PC(optimale) Son (sortie) Dimensions (L x P x H) Sans support Avec support Poids Sans support Avec support LN32B550 LN37B550 LN40B550 32 pouces (31.5 pouces en diagonale) 37 pouces (37.0 pouces en diagonale) 40 pouces (39.9 pouces en diagonale) 1920 x 1080 @ 60 Hz 1920 x 1080 @ 60 Hz 1920 x 1080 @ 60 Hz 10W X 2 10W X 2 10W X 2 31.3 X 3.0 X 20.6 pouces (793.9 X 77.1 X 524.1 mm) 31.3 X 9.4 X 22.4 pouces (793.9 X 240.0 X 569.
¦ Dimensions LN32B550 VUE EN PLONGÉE DÉTAIL DU PANNEAU DES PRISES 5,2"H X 6,6"W 3.0 31.3 27.5 20.6 15.5 22.4 17.5 9.4 VUE AVANT/VUE LATÉRALE 7,9 (200 mm) 7,9 (200 mm) VUE ARRIÈRE REMARQUE : Les dessins ne sont pas nécessairement à l’échelle. Certaines dimensions pourraient être modifiées sans préavis. Vérifiez les dimensions avant d’installer votre téléviseur. Nous ne sommes pas responsables des erreurs de typographie ou d’impression.
N37B550 VUE EN PLONGÉE DÉTAIL DU PANNEAU DES PRISES 5,2"H X 6,6"W 3.1 36.1 32.3 23.3 18.2 25.9 20.5 10.0 VUE AVANT/VUE LATÉRALE 7,9 (200 mm) 7,9 (200 mm) VUE ARRIÈRE REMARQUE : Les dessins ne sont pas nécessairement à l’échelle. Certaines dimensions pourraient être modifiées sans préavis. Vérifiez les dimensions avant d’installer votre téléviseur. Nous ne sommes pas responsables des erreurs de typographie ou d’impression. © 2009 Samsung Electronics America, Inc Français - 42 BN68-01883E-00L02.
LN40B550 VUE EN PLONGÉE DÉTAIL DU PANNEAU DES PRISES 5,2"H X 6,6"W 3.1 38.7 34.9 24.7 19.7 26.6 20.5 10.0 VUE AVANT/VUE LATÉRALE 7,9 (200 mm) 7,9 (200 mm) VUE ARRIÈRE REMARQUE : Les dessins ne sont pas nécessairement à l’échelle. Certaines dimensions pourraient être modifiées sans préavis. Vérifiez les dimensions avant d’installer votre téléviseur. Nous ne sommes pas responsables des erreurs de typographie ou d’impression. © 2009 Samsung Electronics America, Inc Français - 43 BN68-01883E-00L02.
LN46B550 VUE EN PLONGÉE DÉTAIL DU PANNEAU DES PRISES 5,2"H X 6,6"W 3.1 43.9 40.1 27.8 22.6 30.3 21.7 10.8 VUE AVANT/VUE LATÉRALE 15,7 (400 mm) 15,7 (400 mm) VUE ARRIÈRE REMARQUE : Les dessins ne sont pas nécessairement à l’échelle. Certaines dimensions pourraient être modifiées sans préavis. Vérifiez les dimensions avant d’installer votre téléviseur. Nous ne sommes pas responsables des erreurs de typographie ou d’impression.
LN52B550 VUE EN PLONGÉE DÉTAIL DU PANNEAU DES PRISES 5,2"H X 6,6"W 3.1 49.5 45.5 31.4 25.7 33.6 21.7 12.0 VUE AVANT/VUE LATÉRALE 15,7 (400 mm) 15,7 (400 mm) VUE ARRIÈRE REMARQUE : Les dessins ne sont pas nécessairement à l’échelle. Certaines dimensions pourraient être modifiées sans préavis. Vérifiez les dimensions avant d’installer votre téléviseur. Nous ne sommes pas responsables des erreurs de typographie ou d’impression.