Contact SAMSUNG WORLDWIDE If you have any questions or comments relating to Samsung products, please contact the SAMSUNG customer care center. Comuníquese con SAMSUNG WORLDWIDE Si desea formular alguna pregunta o comentario en relación con los productos de Samsung, comuníquese con el centro de atención al cliente de SAMSUNG. Country Customer Care Center Web Site CANADA 1-800-SAMSUNG(726-7864) www.samsung.com U.S.A 1-800-SAMSUNG(726-7864) www.samsung.com Address Samsung Electronics Canada Inc.
Figures and illustrations in this User Manual are provided for reference only and may differ from actual product appearance. Product design and specifications may be changed without notice. Important Warranty Information Regarding Television Format Viewing ✎✎ See the warranty card for more information on warranty terms. Wide screen format LCD Displays (16:9, the aspect ratio of the screen width to height) are primarily designed to view wide screen format fullmotion video.
Contents Getting Started Advanced Features yy yy yy yy yy yy yy yy Network Connection................................................ 24 List of Features.......................................................... 4 Accessories............................................................... 4 Installing the LCD TV Stand....................................... 4 Viewing the Control Panel.......................................... 5 Viewing the Remote Control.......................................
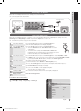
Getting Started List of Features yy Excellent Digital Interface & Networking: With a built-in HD digital tuner, nonsubscription HD broadcasts can be viewed without a cable box / STB (Set-Top-Box) satellite receiver. yy Media Play: Allows you to play music files, pictures, and movies saved on a USB or your PC. (P. 30) yy AllShare: AllShare connects your TV and compatible Samsung mobile phones/devices through a network. (P. 40) yy Self Diagnosis: You can check picture and sound operation. (P.
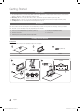
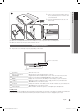
✎✎Place a soft cloth over the table to protect the TV, and then place the TV on the cloth screen side down. C x4 ✎✎Insert the Stand Guide into the slot of TV bottom side. (M4 X L12) 01 Getting Started 3 Side View ✎✎Make sure to distinguish between the front and back of each component when assembling them. ✎✎Make sure that at least two persons lift and move the TV. Viewing the Control Panel ✎✎The product color and shape may vary depending on the model.
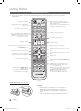
Getting Started Viewing the Remote Control ✎✎This is a special remote control for the visually impaired persons and has Braille points on the Power, Channel, Volume buttons. Turns the remote control light on and off. When on, the buttons become illuminated for a moment when pressed. (Using the remote control with this button set to off will reduce the battery usage time.) Turns the TV on and off. Displays and selects the available video sources. (P. 10) Press to directly access channels.
01 Getting Started Connecting to an Antenna When the TV is initially powered on, basic settings proceed automatically. ✎✎Connecting the mains and antenna. VHF/UHF Antenna Cable or Power Input ANT OUT PR R-AUDIO-L PB Y Plug & Play (Initial Setup) When the TV is initially powered on, a sequence of on-screen prompts will assist in configuring basic settings. Press the POWERP button. Plug & Play is available only when the Input source is set to TV.
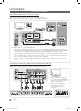
Connections Connecting to an AV Device Using an HDMI / DVI Cable: HD connection (up to 1080p) We recommend using the HDMI connection for the best quality HD picture. Available devices: DVD, Blu-ray player, HD cable box, HD satellite receiver (STB). W Y W R W R B BD/DVD player/ HD cable/Sat.
02 Connections Connecting to an Audio Device Using an Optical (Digital) or Audio (Analog) Cable Connection Available devices: Digital Audio System, Amplifier, Home Theater AUDIO IN DVD Home Theater PR R-AUDIO-L PB Y Digital audio system W Y W R W R G B OPTICAL Red White ✎✎DIGITAL AUDIO OUT (OPTICAL) xx When a Digital Audio System is connected to the DIGITAL AUDIO OUT (OPTICAL) jack, decrease the volume of both the TV and the system. R-AUDIO-L PR PB Y xx 5.
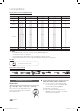
Connections Display Modes (D-Sub and HDMI/DVI Input) Optimal resolution is 1920 X 1080 @ 60Hz. Mode Resolution Horizontal Frequency (KHz) Vertical Frequency (Hz) Pixel Clock Frequency (MHz) Sync Polarity (H / V) 31.469 31.469 35.000 49.726 68.681 35.910 53.783 56.456 75.231 31.469 37.861 37.500 37.879 48.077 46.875 48.363 56.476 60.023 67.500 63.981 79.976 49.702 62.795 60.000 45.000 47.712 55.935 70.635 65.290 52.500 74.620 67.500 70.086 70.087 66.667 74.551 75.062 59.950 59.959 74.777 74.857 59.
OO MENUm → Input → Edit Name → ENTERE ■■ VCR / DVD / Cable STB / Satellite STB / PVR STB / AV Receiver / Game / Camcorder / PC / DVI PC / DVI Devices / TV / IPTV / Blu-ray / HD DVD / DMA: Name the device connected to the input jacks to make your input source selection easier. ✎✎ When a PC with a resolution of 1920 x 1080 @ 60Hz is connected to the HDMI IN 1(DVI) port, you should set to DVI PC mode under Edit Name.
Basic Features ✎✎Using the color buttons with the Channel List xx xx A A xx B A B C D Red (Antenna): Switches to Air or Cable. B Green C D (Zoom): Enlarges or shrinks a channel number. C Yellow D (Select): Selects multiple channel lists. Select desired channels and press the Yellow button to set all the selected channels at the same time. The c mark appears to the left of the selected channels. xx (Page): Move to next or previous page. POWER xx T (Tools): Displays the Channel List option menu.
1. Press the ENTERE button to select Stop. 2. Press the ◄ button to select Yes. 3. Press the ENTERE button. ✎✎This function is only available in Cable mode. Channel List OO MENUm → Channel → Channel List → ENTERE Channel List Option Menu t Set each channel using the Channel List menu options (Add/ Delete, Timer Viewing, Select All/ Deselect All). Option menu items may differ depending on the channel status. 1. Select a channel and press the TOOLS button.
Basic Features ¦¦ Adjusting picture settings ¦¦ Setting up the TV with your PC OO MENUm → Picture → Backlight → ENTERE Set the input source to PC. Backlight / Contrast / Brightness / Sharpness / Color / Tint (G/R) Your television has several setting options for picture quality control. ✎✎NOTE Auto Adjustment t OO MENUm → Picture → Auto Adjustment → ENTERE Adjust frequency values/positions and fine tune the settings automatically.
■■ 10p White Balance (Off / On): Controls the white balance in 10 point interval by adjusting the red, green, and blue brightness. Advanced Settings ✎✎ Available when the picture mode is set to Movie OO MENUm → Picture → Advanced Settings → ✎✎ Some external devices may not support this (available in Standard / Movie mode) Compared to previous models, new Samsung TVs have more precise pictures. Interval: Select interval to adjust. Red: Adjust the red level. Green: Adjust the green level.
P Basic Features SLEEP FAV.CH ■■ Size: Your cable box/satellite receiver P.MODE may have its own set of screen sizes as well. However, we highly recommend you use 16:9 mode most of the time. P.SIZE 16:9: Sets the picture to 16:9 wide mode. Zoom1: Use for moderate magnification. Zoom2: Use for a stronger magnification. Wide Fit: Enlarges the aspect ratio of the picture to fit the entire screen. MTSbasic (4:3) mode. 4:3: Sets the picture to ✎✎ Do not watch in 4:3 format for a long time.
POWER SLEEP Preferred Language ¦¦ Changing the Preset Sound Mode FAV.CH OO MENUm → Sound → SRS TheaterSound → ENTERE (digital channels only) Digital-TV broadcasts MTSare capable of simultaneous transmission of many audio tracks (for example, SLEEP of the program into foreign P.MODE simultaneous translations languages). ✎✎You can only select a language among the ones being S.MODE ■■ Music: Emphasizes music over voices. ■■ Movie: Provides the best sound for movies.
Basic Features SPDIF Output SPDIF (Sony Philips Digital Interface) is used to provide digital sound, reducing interference going to speakers and various digital devices such as a DVD player. ■■ Audio Format: During the reception of a digital TV broadcast, you can select the Digital Audio output (SPDIF) format from the options PCM or Dolby Digital. ✎✎ By connecting to 5.1ch speakers in a dolby digital setup, maximize your interactive 3D sound experience.
✎✎ When there is only one photo file in the USB, the Slide Show will not play. ✎✎ A folder with too long of a name cannot be selected. ✎✎ Each USB you use is assigned its own folder. When using more than one of the same type of USB, make sure the folders assigned to each USB have different names. Repeat: Select Once, Everyday, Mon~Fri, Mon~Sat, Sat~Sun or Manual to set at you convenience. If you select Manual, you can set up the day you want to activate the timer.
Basic Features Canadian French: You can block TV programs depending on their French Canadian rating. –– G: General / 8 ans+: Programming generally considered acceptable for children 8 years and over to watch on their own. / 13 ans+: Programming may not be suitable for children under the age of 13. / 16 ans+: Programming is not suitable for children under the age of 16. / 18 ans+: Programming restricted to adults. ✎✎ The V-Chip will automatically block any category that deals with more sensitive material.
Size: Options include Default, Small, Standard and Large. The default is Standard. Font Style: Options include Default and Styles 0 to 7. The default is Style 0. Foreground Color: Options include Default, White, Black, Red, Green, Blue, Yellow, Magenta and Cyan. You can change the color of the letter. The default is White. Background Color: Options include Default, White, Black, Red, Green, Blue, Yellow, Magenta and Cyan. You can change the background color of the caption. The default is Black.
Basic Features Support Menu ¦¦ Picture In Picture (PIP) OO MENUm → PIP t Support → ENTERE OO MENUm → Setup → PIP → ENTERE Self Diagnosis You can watch the TV tuner and one external video source simultaneously. PIP (Picture-in-Picture) does not function in the same mode. ■■ Picture Test: Use to check for picture problems. If the problem continues to occur, check the Color pattern. ✎✎NOTE xx For PIP sound, refer to the Sound Select instructions.
■■ By Online: Upgrade the software using the Internet. Software Upgrade can be performed by network connection or downloading the latest firmware from “www. samsung.com,” to a USB memory device. Current Version - the software already installed in the TV. ✎✎Software is represented as ‘Year/Month/Day_Version’. Software Upgrade Current Version 2011/01/18_000001 By USB ► By Online Alternative Software ----/--/--_----- ✎✎ First, configure your network.
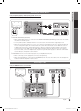
Advanced Features Network Connection You can set up your TV so that it can access the Internet through your local area network (LAN) using a wired or wireless connection. ¦¦ Connecting to a Wired Network You can attach your TV to your LAN using cable in three ways: yy You can attach your TV to your LAN by connecting the LAN port on the back of your TV to an external modem using a Cat 5 cable. See the diagram below.
Network Setup (Manual) Use the Automatic Network Setup when connecting your TV to a network that supports DHCP. To set up your TV’s cable network connection automatically, follow these steps: Use the Manual Network Setup when connecting your TV to a network that requires a Static IP address. How to set up automatically 1. Connect your TV to your LAN as described in the previous section. 2.
Advanced Features ¦¦ Connecting to a Wireless Network To connect your TV to your network wireless, you need a wireless router or modem and a Samsung Wireless LAN Adapter (WIS09ABGN, WIS09ABGN2, WIS10ABGN), which you connect to your TV’s side panel USB jack. See the illustration below.
The picture may appear corrupted or have static for some channels when the TV is connected to the Samsung Wireless LAN Adapter. In such a case, establish a connection using one of the following methods or connect the Samsung Wireless LAN Adapter using a USB cable in a place that is not affected by radio interference. Method 1 Connect using the USB right angle adapter How to set up using PBC(WPS) If your router has a PBC(WPS) button, follow these steps: 1.
Advanced Features How to set up automatically To set up the wireless connection automatically, follow these steps: 1. Follow Steps 1 through 6 in the “How to set up using PBC(WPS)”. (P. 27) 9. When done, press the Blue button on your remote. The Network Connecting screen appears. 10. Wait until the connection confirmation message is displayed, and then press the ENTERE button. The Network Setup screen re-appears. 2. Press the ▼ button to select Internet Protocol Setup, and then press the ENTERE button.
If the other methods do not work, you need to enter the Network setting values manually. Getting the Network Connection Values To get the Network setting values on most Windows computers, follow these steps: 1. Right click the Network icon on the bottom right of the screen. 2. In the pop-up menu, click Status. 3. On the dialog that appears, click the Support tab. 4. On the Support tab, click the Details button. The Network settings are displayed.
MTS Advanced Features Media Play CC Enjoy photos, music and/or movie files saved on a USB Mass Storage Class (MSC) device and/or your PC. MEDIA.P MediaPlay Videos OO MENUm → Application → Media Play → ENTERE SUM Change Device View Devices E Enter R Return ¦¦ Connecting a USB Device 1. Turn on your TV. 2. Connect a USB device containing photo, music and/or movie files to the USB 1 (HDD) or USB 2 jack on the side of the TV. USB Drive 3. When USB is connected to the TV, popup window appears.
04 Advanced Features ✎✎Functions that are not supported when connecting to a PC through a network: xx The Background Music and Background Music Setting functions. xx Sorting files by preference in the Photos, Music, and Videos folders. xx The � (REW) or µ (FF) button while a movie is playing. ✎✎The Divx DRM, Multi-audio, embedded caption does not supported. ✎✎Samsung PC Share manager should be permitted by the firewall program on your PC.
Advanced Features ¦¦ Screen Display Move to the desired file using the up/down/right/left buttons and then press the ENTERE or � (Play) button. The file is played. ✎✎Supports the View Devices and Contents Mode in Media Play homepage. Information: You can ascertain the selected file name and the number of files and page. Videos Movie 01.avi Movie 03.avi Movie 05.avi Sort List Section: Displays the sorting standard. Jan.10.2010 Jan.10.2010 Jan.10.2010 Movie 07.avi Movie 02.avi Movie 04.avi Movie 06.
File Extention *.avi *.mkv Container AVI MKV *.asf Video Codec Resolution Frame rate (fps) Bit rate (Mbps) Divx 3.11/4.x/5.1/6.0 1920x1080 6 ~ 30 8 XviD 1920x1080 6 ~ 30 8 H.264 BP/MP/HP 1920x1080 6 ~ 30 25 MPEG4 SP/ASP 1920x1080 6 ~ 30 8 Divx 4.x/5.1/6.0 1920x1080 6 ~ 30 8 XviD 1920x1080 6 ~ 30 8 MPEG4 SP/ASP 1920x1080 6 ~ 30 8 Window Media Video v9 1920x1080 6 ~ 30 25 H.
Advanced Features Playing movie continuously (Resume Play) If you exit the playing movie function, the movie can be played later from the point where it was stopped. 1. Select the movie file you want to play continuously by pressing the ◄ or ► button to select it from the file list section. 2. Press the � (Play) / ENTERE button. 00:04:03 / 00:07:38 1/1 Movie 01.avi 3. Select Play Continuously (Resume Play) by pressing the Blue button. The Movie will begin to play from where it was stopped.
Playing selected video/music/photo files 1. Press the Yellow button in the file list to select the desired file. 2. Repeat the above operation to select multiple files. Videos ✎✎ NOTE 2 files selected /Movie 01.avi Movie 01.avi Movie 02.avi Jan.10.2010 xx The c mark appears to the left of the selected files. xx To cancel a selection, press the Yellow button again. xx To deselect all selected files, press the TOOLS button Jan.10.2010 Movie 03.avi Movie 04.avi Jan.10.2010 Movie 05.avi Jan.10.
Advanced Features Videos/Music/Photos Play Option menu During playing a file, press the TOOLS button. Category Operation Videos Title You can move the other file directly. c Repeat Mode You can play movie and music files repeatedly. c Picture Size You can adjust the picture size to your preference. (Mode1 / Mode2 / Original) Music Photos c c Picture Setting You can adjust the picture setting. (p. 13~16) c Sound Setting You can adjust the sound setting. (p.
What is Anynet+? t Anynet+ is a function that enables you to control all connected Samsung devices that support Anynet+ with your Samsung TV’s remote. The Anynet+ system can be used only with Samsung devices that have the Anynet+ feature. To be sure your Samsung device has this feature, check if there is an Anynet+ logo on it.
Advanced Features Anynet+ Menu The Anynet+ menu changes depending on the type and status of the Anynet+ devices connected to the TV. Anynet+ Menu View TV Device List (device_name) MENU (device_name) INFO Recording: (*recorder) Stop Recording: (*recorder) Receiver Description Changes Anynet+ mode to TV broadcast mode. Shows the Anynet+ device list. Shows the connected device menus. E.g. If a DVD recorder is connected, the disc menu of the DVD recorder will appear.
You can listen to sound through a receiver (i.e Home Theater) instead of the TV speaker. 1. Select Receiver and set to On. 2. Press the EXIT button to exit. ✎✎ If your receiver supports audio only, it may not appear in the device list. ✎✎ The receiver will work when you have properly connected the optical in jack of the receiver to the DIGITAL AUDIO OUT (OPTICAL) jack of the TV. ✎✎ When the receiver (i.e Home Theater) is set to On, you can hear sound output from the TV’s Optical jack.
Advanced Features AllShare Message / Media / ScreenShare OO MENUm → Application → AllShare → ENTERE ¦¦ About AllShare Shows a list of mobile phones or connected devices which have been set up with this TV for using the Message, Media, or ScreenShare function. ✎✎The Media function is available in all mobile devices AllShare connects your TV and compatible Samsung mobile phones/ devices through a network. On your TV, you can view call arrivals, SMS messages and schedules set on your mobile phones.
Using ScreenShare Function If a call arrives while you are watching TV, the alarm window appears. Using ScreenShare, you can browse various web contents provided by the mobile phone. For example, the image below displays an access page for contents on a mobile. You can read the mobile’s files and view the phone book and calendar on the TV. Also, in the phone book, you can make a call to another person, or send to SMS.
Other Information Anti-theft Kensington Lock The Kensington Lock is not supplied by Samsung. It is a device used to physically fix the system when using it in a public place. The appearance and locking method may differ from the illustration depending on the manufacturer. Refer to the manual provided with the Kensington Lock for additional information on proper use. ✎✎Please find a “K” icon on the rear of the TV. A kensington slot is beside the “K” icon. To lock the product, follow these steps: 1.
Installing the Wall Mount Kit The wall mount kit (sold separately) allows you to mount the TV on the wall. For detailed information on installing the wall mount, see the instructions provided with the wall mount items. Contact a technician for assistance when installing the wall mount bracket. Samsung Electronics is not responsible for any damage to the product or injury to yourself or others if you elect to install the TV on your own.
Other Information Securing the TV to the Wall Caution: Pulling, pushing, or climbing on the TV may cause the TV to fall. In particular, ensure your children do not hang over or destabilize the TV. Doing so may cause the TV to tip over, causing serious injuries or death. Follow all safety precautions provided in the Safety Flyer included with your TV. For added stability and safety, you can purchase and install the anti-fall device as described below.
If the TV seems to have a problem, first try this list of possible problems and solutions. If none of these troubleshooting tips apply, visit samsung.com, then click on Support, or call Samsung customer service at 1-800-SAMSUNG. Issues Solutions and Explanations Poor picture First of all, please perform the Picture Test and confirm that your TV is properly displaying test image. • go to MENU - Support - Self Diagnosis - Picture Test (P.
Other Information Solutions and Explanations Issues No Picture, No Video The TV will not turn on. • Make sure the AC power cord is securely plugged in to the wall outlet and the TV. • Make sure the wall outlet is working. • Try pressing the POWER button on the TV to make sure the problem is not the remote. If the TV turns on, refer to ‘Remote control does not work’ below. • Ensure the Sleep Timer is set to Off in the Setup menu. (P.
Solutions and Explanations Others The cable/set top box remote control does not turn the TV on or off, or adjust the volume. • Program the Cable/Sat remote control to operate the TV. Refer to Cable/Sat user manual for SAMSUNG TV code. A “Mode Not Supported” message appears. • Check the supported resolution of the TV and adjust the external device’s output resolution accordingly. Refer to resolution settings in this manual. Caption on TV menu is greyed out.
Other Information Specifications Display Resolution 1920 x 1080 Environmental Considerations Operating Temperature Operating Humidity Storage Temperature Storage Humidity 50°F to 104°F (10°C to 40°C) 10% to 80%, non-condensing -4°F to 113°F (-20°C to 45°C) 5% to 95%, non-condensing Stand Swivel (Left / Right) -20˚ ~ 20˚ Model Name LN40D610 / LN40D630 LN40D610 / LN46D630 Screen Size (Diagonal) 40" Class (40.0" measured diagonally) 46" Class (45.
Manufactured under license from Dolby Laboratories. Dolby and the double-D symbol are trademarks of Dolby Laboratories. DivX Certified® to play DivX® video up to HD 1080p, including premium content. DivX®, DivX Certified® and associated logos are trademarks of DivX, Inc. and are used under license. 05 Other Information ¦¦ License ABOUT DIVX VIDEO: DivX® is a digital video format created by DivX, Inc. This is an official DivX Certified® device that plays DivX video. Visit www.divx.
Other Information Dimensions ■■ Front view / side view 7 1 2 5 3 6 8 4 (Unit: inches) Model name 1 2 3 4 5 6 7 8 LN40D610 / LN40D630 38.6 34.9 19.7 18.9 23.6 26.1 3.2 10.0 LN46D610 / LN46D630 43.9 40.1 22.6 19.5 26.5 29.0 3.2 10.8 ■■ Jack panel detail / rear view 5 1 6 2 4 3 (Unit: inches) Model name 1 2 3 4 LN40D610 / LN40D630 12.9 2.4 3.7 27.3 7.8 7.8 LN46D610 / LN46D630 15.8 3.4 3.6 31.5 15.7 15.
A AllShare Antenna Anynet+ AUDIO OUT Auto Adjustment Auto Program H 40 7 37 9 14 12 B Blanking Bracket Balance 42 17 10 42 20 12 17 8 10 38 9, 37 18 9 9 15 E Editing channels Energy Saving Equalizer External Speaker 12 14 17 17 F FAV.