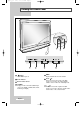
apollo_en 1/10/03 10:53 AM Page 1 LCD TV LW29A13W LW40A13W Owner’s Instructions Before operating the unit, please read this manual thoroughly, and retain it for future reference.
apollo_en 1/10/03 10:53 AM Page 2 Information in this document is subject to change without notice. © 2003 Samsung Electronics Co., Ltd. All rights reserved. Reproduction in any manner whatsoever without the written permission of Samsung Electronics Co., Ltd. is strictly forbidden. Samsung Electronics Co., Ltd. shall not be liable for errors contained herein or for incidental or consequential damages in connection with the furnishing, performance, or use of this material.
apollo_en 1/10/03 10:53 AM Page 3 Safety Instructions These illustrations represent precautions concerning your set. 75% 40° H 10% H 5° Do NOT expose your set to extreme temperature or humidity conditions. Do NOT expose your set to direct sunlight. Do NOT expose your set to any liquids. If your set is broken, do not try to repair it yourself. Contact qualified service personnel. During storm conditions (especially when there is lightning) unplug your set from the mains socket and aerial.
apollo_en 1/10/03 10:53 AM Page 4 Contents ◆ FOREWORD ■ ■ Safety Instructions .......................................................................................... Caution .......................................................................................................... 3 3 ◆ CONNECTING AND PREPARING YOUR TV ■ ■ ■ ■ ■ ■ ■ ■ ■ Viewing the Control Panel ............................................................................. Viewing the Connection Panel ..............................
apollo_en 1/10/03 10:53 AM Page 5 Contents ◆ USING ■ ■ ■ ■ ■ ■ ■ ■ ■ ◆ USING ■ ■ ■ ■ ■ ■ ■ ■ ◆ USING ■ ■ ■ ■ THE VARIOUS FUNCTIONS Setting the External Digital Sound (LW40A13W)............................................ Setting the Dolby Digital (LW40A13W).......................................................... Setting the Dolby Pro-Logic (LW40A13W) ..................................................... Selecting the Sound Mode.......................................................................
apollo_en 1/10/03 10:53 AM Page 6 Viewing the Control Panel 1 (Power) Turns ON/OFF your set. 2 Power Indicator 3 Remote Control Sensor 4 TV/VIDEO Displays a menu of all of the available input sources (TV, VIDEO, S-VIDEO, EXT1, EXT2, PC Analog, PC Digital). English-6 5 MENU Opens the OSD and selects the function. 6 ▼ C/P. ▲ Moves the selector up or down on the OSD. Increases or decreases the channel number. Switches on the TV when it is in Standby mode.
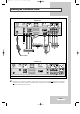
apollo_en 1/10/03 10:53 AM Page 7 Viewing the Connection Panel LW29A13W 7 8 1 3 2 5 4 Power Input LW40A13W 6 5 ☛ Whenever you connect an audio or video system to your set, ensure that all elements are switched off. Refer to the documentation supplied with your equipment for detailed connection instructions and associated safety precautions.
apollo_en 1/10/03 10:53 AM Page 8 Viewing the Connection Panel 1 Connecting an Aerial or Cable Television Network To view television channels correctly, a signal must be received by the set from one of the following sources: - An outdoor aerial - A cable television network - A satellite network 2 Connecting External A/V Devices - Connect RCA or S-VIDEO cable to an appropriate external A/V device such as VCR, DVD, or Camcorder.
apollo_en 1/10/03 10:53 AM Page 9 Viewing the Connection Panel 6 Connecting Digital Audio Inputs Connect RCA audio cables to a equipment with a digital output (to take digital sound). Connecting Speakers (depending on the model) 7 Connect the speaker audio cable to the external speaker output jack on the rear of your set making sure that the +, - polarities are correctly aligned. ➢ The speakers MUST have more than 7watts rating (impedance 8Ω). or Mount the brackets on the speaker and your set.
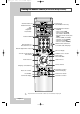
apollo_en 1/10/03 10:53 AM Page 10 Viewing the Remote Control (All Functions Except Teletext) Automatic switch-off VCR/DVD Functions: - Stop - Rewind - Play/Pause - Fast-Forward Television On/Off Numeric buttons for direct channel access Picture freeze (Not Available in PC mode) PIP Picture-In-Picture Functions: - PIP On/Off - PIP size selection (SIZE) - PIP channel selection (P▲/▼) (Not available for LW29A13W) - Interchange the main and sub picture (SWAP) - PIP freeze (STILL) : Not available - PIP
apollo_en 1/10/03 10:53 AM Page 11 Viewing the Remote Control (Teletext Functions) PIP Teletext reveal Teletext index Teletext display/ Mix both teletext information and the normal broadcast Teletext sub-page Teletext size selection Fastext topic selection English-11
apollo_en 1/10/03 10:53 AM Page 12 Inserting the Batteries in the Remote Control You must insert or replace the batteries in the remote control when you: ◆ Purchase your set ◆ Find that the remote control is no longer operating correctly 1 Remove the cover on the rear of the remote control by pressing the symbol downwards and then pulling firmly to remove it. 2 Insert two R03, UM4, “AAA” 1.
apollo_en 1/10/03 10:53 AM Page 13 Becoming Familiar with the Remote Control The remote control is used mainly to: ◆ Change channels and adjust the volume ◆ Set up your set using the on-screen menu system The following table presents the most frequently used buttons and their functions. PIP Button Viewing Function Menu Function Used to display the next stored channel. Used to select the previous menu option. P Used to display the previous stored channel. Used to select the next menu option.
apollo_en 1/10/03 10:53 AM Page 14 Choosing Your Language When you start using your set for the first time, you must select the language which will be used for displaying menus and indications. 1 Press the MENU button. Result: 2 Press the P Result: Function Time PIP Language DNIe English Off English-14 The main menu is displayed. or P button to select the Function. The options available in the Function group are displayed. + button.
apollo_en 1/10/03 10:53 AM Page 15 Storing Channels Automatically You can scan for the frequency ranges available to you (and availability depends on your country). Automatically allocated programme numbers may not correspond to actual or desired programme numbers. However you can sort numbers manually and clear any channels you do not wish to watch. 1 Channel Auto store Manual store Name Add/Erase Fine tune Channel sort Press the MENU button. Result: The main menu is displayed.
apollo_en 1/10/03 10:53 AM Page 16 Storing Channels Manually (continued) Channel Auto store Manual store Name Add/Erase Fine tune Channel sort You can store up to 100 channels, including those received via cable networks. When storing channels manually, you can choose: ◆ Whether or not to store each of the channels found ◆ The programme number of each stored channel which you wish to identify 1 Press the MENU button.
apollo_en 1/10/03 10:53 AM Page 17 Storing Channels Manually Channel Colour system Sound system Search Channel Program LNA Store 7 If you know the channel number to be stored, press the P or P button to select the Channel. Indicate the required number by + button. - or pressing the If you do not know the channel numbers, press the P button to select the Search. + button. - or Start the search by pressing the Result: 8 9 Press the P or P button to select the LNA.(LW40A13W) + button.
apollo_en 1/10/03 10:53 AM Page 18 Giving Channels Names If channel name information is broadcast when you store the channels either manually or automatically, the names are assigned to the channels directly. You can however change these names or assign new names as required. 1 Press the MENU button. Result: 2 Press the P Result: or P button to select the Channel. The options available in the Channel group are displayed.
apollo_en 1/10/03 10:53 AM Page 19 Skipping Unwanted Channels You can exclude the channels you chosen from the channels you scanned. When you scan through the stored channels, those you have chosen to skip are not displayed. All channels that you do not specifically choose to skip are displayed during scanning. 1 Press the MENU button. Result: 2 Press the P Result: The main menu is displayed. or P The options available in the Channel group are displayed.
apollo_en 1/10/03 10:53 AM Page 20 Sorting the Stored Channels Channel You can exchange the numbers of two channels, in order to: ◆ Modify the numeric order in which the channels have been automatically stored. Auto store Manual store Name Add/Erase Fine tune Channel sort ◆ Give easily remembered numbers to the channels that you watch most often. 1 Result: Channel sort From To Store P 1 ----P-? 2 P 1 ----P 3 ----? Channel sort From To Store The main menu is displayed.
apollo_en 1/10/03 10:53 AM Page 21 Changing the Picture Standard You can select the type of picture which best corresponds to your viewing requirements. 1 Press the MENU button. The main menu is displayed. Result: 2 Press the P or P button to select the Picture. The options available in the Picture group are displayed. Result: ➣ Picture Mode Custom Contrast Brightness Sharpness Colour Colour tone Normal You can also display simply by pressing the P.MENU (Picture Menu) button. 3 + button.
apollo_en 1/10/03 10:53 AM Page 22 Selecting the Picture Format You can select the picture format which best corresponds to your viewing requirements simply by pressing the “P.SIZE” (Picture Size) button. The following picture formats are available: ◆ 16:9 Sets the Normal picture in 16:9 Wide mode. ◆ Panorama Sets the picture in 16:9 Wide mode so that it can be shown like the Normal picture. ◆ Zoom 1 Expands the 4:3 aspect ratio screen size. ◆ Zoom 2 Expands the Zoom 1 screen size.
apollo_en 1/10/03 10:53 AM Page 23 Changing the Sound Standard You can select the type of special sound effect to be used when watching a given broadcast. 1 The main menu is displayed. Press the P Result: ➣ 3 or P button to select the Sound. The options available in the Sound group are displayed. You can also display simply by pressing the S.MENU (Sound Menu) button. - or Press the Result: 4 Custom Press the MENU button. Result: 2 Sound Mode Bass Treble + button. The Mode is selected.
apollo_en 1/10/03 10:53 AM Page 24 Enjoying the Dolby Sound (LW29A13W) Sound Mode Bass Treble Dolby Woofer Custom : : On Off This feature provides a home theater-like Dolby effect by mixing the left and right speakers. 1 Press the MENU button. Result: 2 Press the P Result: The main menu is displayed. or P button to select the Sound. The options available in the Sound group are displayed. + button.
apollo_en 1/10/03 10:53 AM Page 25 Setting the External Digital Sound (LW40A13W) You can enjoy Digital sound when the equipment with Digital output is connected to the television. 1 Press the MENU button. The main menu is displayed. Result: 2 Press the P or P button to select the Sound. The options available in the Sound group are displayed. Result: 3 Press the 4 Press the P or P button to select the Ext. audio. + button. - or Press the The Ext. audio menu is displayed.
apollo_en 1/10/03 10:53 AM Page 26 Setting the Dolby Digital (LW40A13W) You can enjoy Digital sound when the equipment with Digital output is connected to the television. Rear of the TV Sound Mode Custom Bass Treble Ext. audio Audio out Volume Int. mute Off Dolby Digital Sound Pro Logic : Dynamic range : Speaker set Press the MENU button. The main menu is displayed. Result: 2 Press the P or P button to select the Sound. The options available in the Sound group are displayed.
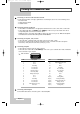
apollo_en 1/10/03 10:53 AM Page 27 Setting the Dolby Pro Logic (LW40A13W) In case of “Pro Logic : Auto” Output Input (Source) Main Left Center Main Right Surround Sub Woofer Right Left Mono ✔ ✔ PCM Stereo (L/R) ✔ ✔ Mono ✔ ✔ Lo/Ro ✔ ✔ Lt/Rt ✔ ✔ ✔ ✔ ✔ 5.
1/10/03 10:53 AM Page 28 Selecting the Sound Mode The “S.MODE” button displays/controls the processing and output of the audio signal. When power is switched on, the mode is automatically preset to either “Dual-I ” or “Stereo”, depending on the current transmission.
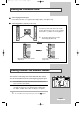
apollo_en 1/10/03 10:53 AM Page 29 Viewing the Picture In Picture (PIP) (continued) You can display a sub picture within the main picture of TV program or external A/V devices such as VCR or DVD. In this way you can watch TV program the video input from any connected devices while watching TV or other video input. 1 Press the P Result: The main menu is displayed. or P Press the 4 Press the P or P - or Press the Result: - or + button. On Video Small Main - or + button.
apollo_en 1/10/03 10:53 AM Page 30 Viewing the Picture In Picture (PIP) Function PIP TV/Video Size Locate Swap Sound sel : On Video Small Main 8 Press the P or P button to select the Locate. Move the sub + button. picture counterclockwise by pressing the ➣ ◆ When the size of sub picture is set to Double, this feature does not work. ◆ You can also move the sub picture simply by pressing the LOCATE button.
apollo_en 1/10/03 10:53 AM Page 31 Selecting the Sleep timer You can select a time period of between 10 and 240 minutes after your set automatically switches off. 1 Press the P Result: 3 Press the Result: 4 Press the Result: 5 English off Press the MENU button. Result: 2 Function Time PIP Language DNIe The main menu is displayed. or P button to select the Function. The options available in the Function group are displayed. - or + button. The Time is selected.
apollo_en 1/10/03 10:53 AM Page 32 Setting and Displaying the Current Time Function Time PIP Language DNIe You can set the television’s clock so that the current time is display by pressing the “DISPLAY” button. You must also set the time if you wish switch the television on or off automatically at the time you select.
apollo_en 1/10/03 10:53 AM Page 33 Switching the Television On and Off Automatically You can switch the television on or off automatically at the time you select. ➣ 1 The first step is to set the television’s clock (refer to “Setting and Displaying the Current Time” on the previous page). Press the P Result: 3 Press the Result: 4 Press the Result: 5 The main menu is displayed. or P button to select the Function. The options available in the Function group are displayed. - or + button.
apollo_en 1/10/03 10:53 AM Page 34 DNIe (Digital Natural Image engine) Function Time PIP Language DNIe English off Samsung’s New Technology bring you more detailed image with contrast enhancement and white enhancement. New image compensation algorithm gives brighter, cleare, to our customers. DNIe technology will fit every signals into your eyes. 1 Press the MENU button. Result: 2 Press the P Result: 3 The main menu is displayed. or P button to select the Function.
apollo_en 1/10/03 10:53 AM Page 35 Setting up Your PC Software (Based on Widows 2000 or XP) The Windows display-settings for a typical computer are shown below. But the actual screens on your PC will probably be different, depending upon your particular version of Windows and your particular video card. But even if your actual screens look different, the same, basic set-up information will apply in almost all cases. (If not, contact your computer manufacturer or Samsung Dealer.
apollo_en 1/10/03 10:53 AM Page 36 Adjusting the Contrast and Brightness ➣ Preset to the PC mode by pressing the VIDEO button. PC Image Image lock Position Colour adjust Recall Auto adjustment 1024x768 48.2kHz 59.9Hz 1 Result: 2 Press the Result: PC 4 Press the Result: Expand 1 The main menu is displayed. Press the P Result: 3 Image Contrast Brightness Size Press the MENU button. or P button to select the PC. The options available in the PC group are displayed. - or + button.
apollo_en 1/10/03 10:53 AM Page 37 Adjusting the Image Quality ➣ Preset to the PC mode by pressing the VIDEO button. This function doesn’t work in Digital input. This feature is used to fine tune and get the best image by removing noises that create unstable images with jitters and shimmers. 1 Press the MENU button. Result: 2 Press the P Result: The main menu is displayed. or P PC Image Image lock Position Colour adjust Recall Auto adjustment 1024x768 48.2kHz 59.9Hz button to select the PC.
apollo_en 1/10/03 10:53 AM Page 38 Adjusting the Colour ➣ Preset to the PC mode by pressing the VIDEO button. This function doesn’t work in Digital input. PC Image Image lock Position Colour adjust Recall Auto adjustment 1024x768 48.2kHz 59.9Hz PC Mode R G B Press the MENU button. Result: 2 Press the P Result: Press the P or P - or Press the - or + button. button to select the Colour adjust. + button. The options available in the Colour adjust group are displayed with the Mode is selected.
apollo_en 1/10/03 10:53 AM Page 39 Initializing the Image Settings ➣ Preset to the PC mode by pressing the VIDEO button. You can replace all image settings with the factory default values. 1 Press the MENU button. Result: 2 Press the P Result: 3 4 Press the or P button to select the PC. The options available in the PC group are displayed. - or Press the P or P - or Press the Result: 5 The main menu is displayed.
apollo_en 1/10/03 10:53 AM Page 40 Teletext Feature Most television channels provide written information services via teletext. Information provided includes: ◆ Television programme times ◆ News bulletins and weather forecasts ◆ Sports results ◆ Travel information This information is divided into numbered pages (see diagram). Part Contents A Selected page number. B Broadcasting channel identity. C Current page number or search indications. D Date and time. E Text. F Status information.
apollo_en 1/10/03 10:53 AM Page 41 Displaying the Teletext Information You can display Teletext information at any time on your set. ☛ For Teletext information to be displayed correctly, channel reception must be stable; otherwise: ◆ Information may be missing ◆ Some pages may not be displayed 1 Select the channel providing the Teletext service by pressing the P or P button. 2 Press the TTX/MIX button to activate the teletext mode. Result: The contents page is displayed.
apollo_en 1/10/03 10:53 AM Page 42 Selecting a Teletext Page The various topics included in the teletext pages are colour-coded, and can be selected by pressing the coloured buttons on the remote control. 1 Enter the three-digit page number given in the content by pressing the corresponding numeric buttons. Result: English-42 The current page counter is incremented and the page is then displayed.
apollo_en 1/10/03 10:53 AM Page 43 Troubleshooting: Before Contacting Service Personnel Before contacting Samsung after-sales service, perform the following simple checks. If you cannot solve the problem using the instructions below, note the model and serial number of your set and contact your local dealer. No sound or picture ◆ ◆ ◆ ◆ Normal picture but no sound ◆ Check the volume. ◆ Check whether the MUTE button has been pressed on the remote control.
apollo_en 1/10/03 10:53 AM Page 44 PowerSaver This set has a built-in power management system called PowerSaver. This system saves energy by switching your set into a low-power mode when it has not been used for a certain period of time. The available modes are “On”, “Standby”, “Sleep”, and “Deep Sleep”. PowerSaver operates with a VESA DPMS compliant video card installed in your computer. You use a software utility installed on your computer to set up this feature.
apollo_en 1/10/03 10:53 AM Page 45 Technical and Environmental Specifications (continued) Model LW29A13W LW40A13W Panel Size Display Size Type Pixel Pitch Viewing Angle 29” Diagonal 39.6” Diagonal 631.68 (H) x 397.01 (V) mm 862.08 (H) x 517.24 (V) mm a-si TFT active matrix 0.4935 (H) x 0.4935 (V) mm 0.6735 (H) x 0.
apollo_en 1/10/03 10:53 AM Page 46 Technical and Environmental Specifications Model LW29A13W LW40A13W Audio Characteristics Audio Input Audio Input (PC) Audio Output Speaker Output Headphone Output Frequency Response RCA Jack (L, R), 0.5Vrms (-9dB) 3.5Ø Stereo Jack, 0.5Vrms (-9dB) RCA Jack (L, R), 0.5Vrms (-9dB) Max. 10W Output (3.5Ø Stereo Jack, 8Ω) Max. 10mW Output (3.
apollo_en 1/10/03 10:53 AM Page 47 Wiring the Mains Power Supply Plug (UK Only) ◆ IMPORTANT NOTICE The mains lead on this equipment is supplied with a moulded plug incorporating a fuse. The value of the fuse is indicated on the pin face of the plug and, if it requires replacing, a fuse approved to BSI1362 of the same rating must be used. Never use the plug with the fuse cover omitted if the cover is detachable.
apollo_en 1/10/03 10:53 AM Memo English-48 Page 48
apollo_en 1/10/03 10:53 AM Page 49 Memo English-49
apollo_en 1/10/03 10:53 AM Page 50 - AFTER SALES SERVICE - Do not hesitate to contact your retailer or service agent if a change in the performance of your product indicates that a faulty condition may be present.