
User Manual


Samsung Solid State Drive 7
Desktop PC
1 Turn OFF the desktop PC power and disconnect
the power cable.
2 Remove the desktop PC cover.
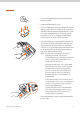
3 If you are adding the SSD as an additional storage
device, mount it in a 2.5” HDD bay. Next, connect
the SATA cable and power cable to the SSD. If your
PC is only equipped with 3.5” HDD bays, attach
the SSD to a 2.5” to 3.5” adapter bracket before
mounting it in an empty HDD bay or slot.
4 If you are replacing an existing HDD with the SSD,
disconnect all cables connected to the HDD and
then remove the HDD from the bay. Attach the
SSD in a 2.5” to 3.5 bracket and mount the bracket
in an empty HDD bay. Finally, properly connect
the SATA cable and power cable.
NOTE: Desktop PCs have multiple SATA ports,
depending on the PC chipset and
motherboard model. Samsung recommends
that the SSD be connected to the lowest
numbered SATA 6Gb/s port.
Although the 830 Series SSD is compatible
with both the SATA 3Gb/s and 6Gb/s ports,
for maximum performance the product
must be connected to a SATA 6Gb/s port.
Most Desktop PCs have 4~6 SATA ports,
and each SATA port is numbered on the
motherboard.
If SATA port numbers are not shown on the
motherboard or you are not sure about port
numbers, then you can simply install the
SSD on any available port.
Usually SATA 6Gb/s ports are indicated by
blue colors to distinguish itself. For more
information please refer to your PC or
motherboard user manuals.
5 Close the desktop PC cover and reconnect the PC
power cable.