Samsung SSD Data Migration v.3.
Legal Disclaimer SAMSUNG ELECTRONICS RESERVES THE RIGHT TO CHANGE PRODUCTS, INFORMATION AND SPECIFICATIONS WITHOUT NOTICE. Products and specifications discussed herein are for reference purposes only. All information discussed herein is provided on an “AS IS” basis, without warranties of any kind. This document and all information discussed herein remain the sole and exclusive property of Samsung Electronics.
Introduction The Samsung Data Migration software is designed to help users quickly, easily, and safely migrate all of their data – including their current operating system, application software, and user data – from their existing storage device (e.g. HDD) to their new Samsung SSD. Samsung Data Migration software is developed and distributed exclusively for owners of Samsung Solid State Drives (SSDs). Precautions 1. When cloning the content of the source drive (e.g.
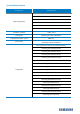
System Requirements Component Requirement Windows XP SP2 (32bit) Windows Vista (32/64bit) Windows 7 (32/64bit) Operating System Windows 8 (32/64bit) Windows 8.
Limitations 1. This software only supports the Windows operating systems listed in the User Manual. 2. This software only supports the Samsung SSDs listed in the User Manual. OEM storage devices provided through a computer manufacturer or supplied through another channel are not supported. 3. This software will run only if the operating system is installed on the Source Disk. It will not function on disks that lack an operating system installation. 4. On systems with two (2) drives or more (e.g.
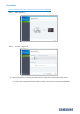
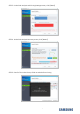
User Guide 1. (Normal Mode) If the Source Disk is smaller than the Target Disk STEP 1. Start migration STEP 2. Connect Target Disk ① If the Target Disk is connected, the status of the Target Disk is displayed on the screen. ※ You may need a separate M.2 PCIe/USB converter (connector) to connect an NVMe SSD.
STEP 3. Start cloning STEP 4. Cloning in progress STEP 5.
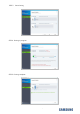
2. (Advanced Cloning) If the Source Disk is bigger than the Target Disk STEP 1. Start migration STEP 2. Connect Target Disk ① If the Target Disk is connected, the status of the Target Disk is displayed on the screen. ※ You may need a separate M.2 PCIe/USB converter (connector) to connect an NVMe SSD.
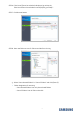
STEP 3. On the Disk Analysis and Cloning Settings screen, click [Next>>] STEP 4. On the Disk Analysis Summary screen, click [Next>>] STEP 5.
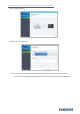
STEP 6. If the list of files to be excluded is displayed, go to Step 10, If the list of files to be excluded is not displayed, go to Step 7 STEP 7. Click Browse button STEP 8. Set a new folder to scan for files to exclude from cloning ① Select “Scan selected folders” or “Scan all folders” and click [Search].
STEP 9. Scan for files to exclude from cloning in the newly set path STEP 10. Select files to exclude from cloning ① Continue selecting files to exclude until the text below the Browse button changes to “Ready to clone to the Target Disk”.
STEP 11. In the screen for selecting files to exclude, click [Next>>] STEP 12. To clone everything except the selected file(s), go to Step 13. To delete the selected file(s) and clone everything else, go to Step 14. To save the selected file(s) to another storage device and continue cloning, go to Step 15. STEP 13. Cloning everything except the selected files ① Select the [Clone everything except the selected file(s)] option and then click the [Next>>] button.
STEP 14. Clone after deleting the selected files ① Select the [Delete the selected file(s) and continue cloning] option and then click the [Next>>] button. STEP 15. Cloning after saving the selected files on another storage device ① Select the [Save the selected file(s) to another storage device and continue cloning] option. ② Select the storage device where you want to save the selected file(s). ③ Click the [Next>>] button.
STEP 16. Start cloning STEP 17. Cloning in progress STEP 18.
May 2018 www.samsung.com/ssd www.samsungssd.com Design and contents of this manual are subject to change without notice. © 2018 Samsung Electronics, Co., Ltd. All rights reserved.