Contact SAMSUNG WORLD-WIDE If you have any questions or comments relating to Samsung products, please contact the SAMSUNG customer care center. Comment contacter Samsung dans le monde Si vous avez des suggestions ou des questions concernant les produits Samsung, veuillez contacter le Service Consommateurs Samsung. Country U.S.A CANADA Customer Care Center Web Site 1-800-SAMSUNG(726-7864) www.samsung.com/us 1-800-SAMSUNG(726-7864) www.samsung.com/ca Address Samsung Electronics America, Inc.
Important Warranty Information Regarding Television Format Viewing Wide screen format PDP Displays (16:9, the aspect ratio of the screen width to height) are primarily designed to view wide screen format full-motion video. The images displayed on them should primarily be in the wide screen 16:9 ratio format, or expanded to fill the screen if your model offers this feature and the images are constantly moving.
User Instructions Screen Image retention Do not display a still image (such as on a video game) on the plasma display panel for more than several minutes as it can cause screen image retention. This image retention is also known as “screen burn”. To avoid such image retention, refer to page 24 of this manual to reduce the degree of brightness and contrast of the screen when displaying a still image. Altitude The PDP can only operate normally at heights under 6500ft.
English Contents Connecting and Preparing Your TV Picture Control ■ ■ ■ ■ ■ ■ ■ Changing the Picture Settings.................................................. 22 List of Features........................................................................... 5 Checking Parts........................................................................... 5 Using the Stand-Base................................................................ 5 Viewing the Control Panel..............................................
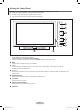
Connecting and Preparing Your TV List of Features Adjustable picture settings that can be stored in the TV’s memory. Automatic timer to turn the TV on and off. A special sleep timer. V-Chip function. Excellent Digital Interface & Networking : With a built-in HD digital tuner, non-subscription HD broadcasts can be viewed with no Cable Box/Satellite receiver (Set-Top Box) needed. • HDMI/DVI connection of your PC to this TV. • SRS TruSurround HD provides a virtual surround system.
Viewing the Control Panel The buttons on the lower-right panel control your TV’s basic features, including the on-screen menu. To use the more advanced features, you must use the remote control. N The product color and shape may vary depending on the model. N If you touch the front panel button, the each button will be operated. 1 SOURCE E Toggles between all the available input sources (TV, AV, Component1, Conponent2, HDMI1, HDMI2/DVI).
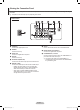
Viewing the Connection Panel Use the connection panel jacks to connect A/V components that will be connected continuously, such as Blu-Ray DVD Players or a VCR. N The product color and shape may vary depending on the model. TV Rear Panel 7 ANT IN Uses a 75Ω Coaxial connector for an Air/Cable Network. 1 POWER IN Connects the supplied power cord. 2 SERVICE Used for service only. 8 DIGITAL AUDIO OUT (OPTICAL) Connects to a Digital Audio component. 3 AUDIO OUT Connect to a Digital Audio component.
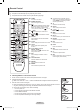
Remote Control You can use the remote control up to a distance of about 23 feet from the TV. N The product color and shape may vary depending on the model. N The performance of the remote control may be affected by bright light. 1 POWER Turns the TV on and off. 2 NUMERIC BUTTONS Press to change the channel. 3 4 5 6 7 8 9 0 ! $ Use these buttons in the DMA, Anynet+ modes. ( : This remote can be used to control recording on Samsung recorders with the Anynet+ feature) % TV Selects the TV mode directly.
Connections Connecting VHF and UHF Antennas If your antenna has a set of leads that look like this, see “Antennas with 300 Ω Flat Twin Leads” below. If your antenna has one lead that looks like this, see “Antennas with 75 Ω Round Leads.” If you have two antennas, see “Separate VHF and UHF Antennas.” ❑ Antennas with 300 Ω Flat Twin Leads If you are using an off-air antenna (such as a roof antenna or rabbit ears) that has 300 Ω twin flat leads, follow the directions below. 1.
❑ Connecting to a Cable Box that Descrambles Some Channels If your cable box descrambles only some channels (such as premium channels), follow the instructions below. You will need a two-way splitter, an RF (A/B) switch, and four lengths of Antenna cable. (These items are available at most electronics stores.) 1. Find and disconnect the cable that is connected to the ANT IN terminal on your cable box. N This terminal might be labeled “ANT IN”, “VHF IN” or simply, “IN”. ANT IN 2.
Connecting a DVD / Blu-Ray Player or Cable Box / Satellite receiver (Set-Top Box) via HDMI This connection can only be made if there is an HDMI Output jack on the external device. This connection will provide the highest quality picture. 1. Connect an HDMI Cable between the HDMI IN 1 or 2(DVI) jack on the TV and the HDMI jack on the DVD / Blu-Ray Player or Cable Box / Satellite receiver (Set-Top Box).
Connecting a DVD / Blu-Ray Player or Cable Box / Satellite receiver (Set-Top Box) via Component cables The rear panel jacks on your TV make it easy to connect a DVD/Blu-Ray Player or Cable Box / Satellite receiver (Set-Top Box) to your TV. 1. 2. Connect Component Cable between the COMPONENT IN (1 or 2) [Y, PB, PR] jacks on the TV and the COMPONENT [Y, PB, PR] jacks on the DVD / Blu-Ray Player or Cable Box / Satellite receiver(Set-Top Box).
Connecting a VCR ❑ Video Connection These instructions assume that you have already connected your TV to an antenna or a cable TV system (according to the instructions on pages 9~10). Skip step 1 if you have not yet connected to an antenna or a cable system. 1. Unplug the cable or antenna from the back of the TV. 2. Connect the cable or antenna to the ANT IN terminal on the back of the VCR. 3. Connect an Antenna Cable between the ANT OUT terminal on the VCR and the ANT IN terminal on the TV. 4.
Connecting a Digital Audio System The rear panel jacks on your TV make it easy to connect a Digital Audio System(Home theater/Receiver) to your TV. 1. Connect an Optical Cable between the DIGITAL AUDIO OUT (OPTICAL) jacks on the TV and the Digital Audio Input (OPTICAL) jacks on the Digital Audio System. When a Digital Audio System is connected to the DIGITAL AUDIO OUT (OPTICAL) jack : Decrease the volume of the TV, and adjust the volume level with the system’s volume control.
Connecting a PC ❑ Using an HDMI Cable 1. 2. Connect an HDMI/DVI cable between the HDMI IN 2(DVI) jack on the TV and the PC output jack on your computer. Connect a 3.5 mm Stereo plug to 2RCA cable between the DVI AUDIO IN [R-AUDIO-L] jack on the TV and the Audio Out jack of the sound card on your computer. TV Rear Panel PC 2 3.5 mm Stereo plug to 2 RCA Cable (Not supplied) 1 HDMI/DVI Cable (Not supplied) N Each PC has a different back panel configuration.
Operation Turning the TV On and Off Press the POWER button on the remote control. You can also use the POWER button on the TV. N It may take a while for your TV to power on. Changing Channels ❑ Using the Channel Buttons Press the CH or CH button to change channels. or CH button, the TV changes channels in sequence. You will see all the channels that the TV has memorized. (The TV must have memorized at least three channels). You will not see channels that were either erased or not memorized.
VOL Using the TOOLS Button CH You can use the TOOLS button to select your frequently used functions quickly and easily. The Tools menu changes CHLIST MENU FAV.CH depending on which external input mode you are viewing. 1. 2. Press the TOOLS button. The Tools menu will appear. Press the ▲/▼ button to select a menu, then press the ENTERE button. 3. Press the ▲/▼/◄/►/ ENTERE buttons to display, change, or use the selected items.
Viewing the Menus Before using the TV, follow the steps below to learn how to navigate the menu in order to select and adjust different functions. 1. 2. 3. 4. 5. Press the MENU button. The main menu is displayed on the screen. Its left side has the following icons: Picture, Sound, Channel , Setup, Input, Application, Support. Press the ▲ or ▼ button to select one of the icons. Press the ◄ or ► button to access the icon’s sub-menu. Press the ▲ or ▼ button to move to items in the menu.
Plug & Play Feature When the TV is initially powered on, basic settings proceed automatically and subsequently. N The Screen Saver is activated if there is no remote control key input for longer than 1 minute while Plug & Play is running. N The Screen Saver is activated if there is no operating signal for longer than 15 minutes. 1. 2. 3. Press the POWER button on the remote control. The message Menu Language, Store Demo, Channels, and Time will be set. is displayed.
Channel Control Storing Channels ❑ Antenna → Air / Cable T Press the TOOLS button to display Tools menu. You can also switch the antenna by selecting Tools → Switch to Cable (or Air) Channel Before your television can begin memorizing the available channels, you must specify the type of signal source that is connected to the TV (i.e. an Air or a Cable system). Antenna : Air ► Auto Program Clear Scrambled Channel ❑ Auto Program Channel List • Air: Air antenna signal. • Cable: Cable antenna signal.
❑ Channel List Tools Menu (in All Channels / Added Channels / Favorite) N Press the TOOLS button to use the option menu. N Option menu items may differ depending on the channel status. T Press the TOOLS button to display Tools menu. Air 7-1 9 9-1 10 10-1 11-1 19 Air Delete Add to Favorite Timer Viewing Channel Name Edit Select All Auto Program ♥ TV #7 Air ♥ TV #9 Air ♥ TV #10 ♥ TV #11 Air Zoom Select 6 N The “♥” symbol will be displayed and the channel will be set as a favorite.
VOL Picture Control CH MENU CHLIST Changing the Picture Settings FAV.CH ❑ Mode Picture You can select the type of picture which best corresponds to your viewing requirements. • Dynamic: Select a high-definition picture for bright environments. • Standard: Selects the optimal picture display for normal environments. This setting is convenient for most situations. • Movie: Selects a comfortable picture display for dark environments. O You can select these options simply by pressing the P.
White Balance You can adjust the color temperature for more natural picture colors. • R-Offset: Adjust the low level red intensity. • G-Offset: Adjust the low level green intensity. • B-Offset: Adjust the low level blue intensity. • R-Gain: Adjusts the high level red intensity. • G-Gain: Adjusts the high level green intensity. • B-Gain: Adjusts the high level blue intensity. • Reset: Resets the default white balance. N Changing the adjustment value will refresh the adjusted screen.
N Temporary image retention may occur when viewing a static image on the set for more than two hours. N After selecting Zoom1, Zoom2 or Wide Fit: Press the ◄ or ► button to select Position, then press the ENTERE button. Press the ▲ or ▼ button to move the picture up and down. Reset: Press the ◄ or ► button to select Reset, then press the ENTERE button. You can initialize the setting.
• Side Gray: When you watch TV with the screen ratio of 4:3, the screen is prevented from any damage by adjusting the white balance on both extreme left and right sides. To prevent the screen burn from happening, select Dark or Light. - Dark: When you set the screen ratio to 4:3, it darkens the left and right sides. - Light: When you set the screen ratio to 4:3, it brightens the left and right sides.
Sound Control VOL Changing the Sound Settings ❑ Mode CHLIST Sound You can select the sound mode to best suit the programming you’re watching. • Standard: This sound mode is for general purposes. • Music: Music mode enables you to listen to music as if you are sitting in a concert hall. • Movie: Movie mode enables you to experience live and full movie sound as if you are sitting in a movie theater. • Clear Voice: Emphasizes voice over other sounds.
❑ Speaker Select Multi-Track Sound Sound When you watch TV with it connecting to a Home theater, turn the TV speakers off so you can listen to sound from the Home theater’s (external) speakers. • External Speaker: Uses the external speakers(Home Theater) to output sound. • TV Speaker: Uses the TV speakers to output sound. N If you select External Speaker in the Speaker Select menu, the sound settings will be limited.
❑ V-Chip The V-Chip feature automatically locks out programs that are deemed inappropriate for children. The user must enter a PIN (personal ID number) before any of the V-Chip restrictions are set up or changed. N V-Chip function is not available in HDMI or Component mode. N The default PIN number of a new TV set is ‘0-0-0-0’. N If you forget the PIN, press the remote-control buttons in the following sequence, which resets the pin to ‘0-0-0-0’ : Power Off. → MMUTE → 8 → 2 → 4 → Power On.
Downloadable U.S. Rating Rating title Parental restriction information can be used while watching DTV channels Downloadable U.S. Rating N If information is not downloaded from the broadcasting station, the Downloadable U.S. ► 1/2 Humor Level Rating menu is deactivated. Allow All DH N Parental restriction information is automatically downloaded while watching DTV channels. MH Block All It may take several seconds. H N The Downloadable U.S.
❑ Melody V-Chip Caption Setup A melody sound can be set to come on when the TV is powered On or Off. • Off: Turns off the melody function. • Low: Sets the melody volume to low. • Medium: Sets the melody volume to medium. • High: Sets the melody volume to high. N The Melody does not play. - When no sound is output from the TV because the MUTE button has been pressed, - When no sound is output from the TV because the volume has been reduced to minimum with the VOL button.
Setting the Time Setting the clock is necessary in order to use the various timer features of the TV. Also, you can check the time while watching the TV. (Just press the INFO button.) ❑ Time Plug & Play Language Setup 1. Press the MENU button to display the menu. 2. Press the ▲ or ▼ button to select Setup, then press the ENTERE button. 3. Press the ▲ or ▼ button to select Time, then press the ENTERE button.
Source List / Edit Name ❑ Source List Input Use to select TV or other external input sources such as DVD / Blu-Ray players / Cable Boxes / Satellite / receivers (Set-Top Box) connected to the TV. Use to select the input source of your choice. Source List Edit Name TV, AV, Component1, Component2, HDMI1, HDMI2/DVI. N You can choose only those external devices that are connected to the TV. In the Source List, connected inputs will be highlighted and sorted to the top.
Display Modes If the signal from the system equals the standard signal mode, the screen is adjusted automatically. If the signal from the system doesn’t equal the standard signal mode, adjust the mode by referring to your videocard user guide; otherwise there may be no video. For the display modes listed below, the screen image has been optimized during manufacturing.
Signal Strength (Digital) Unlike analog channels, which can vary in reception quality from snowy to clear, digital (HDTV) channels have either perfect reception quality or you will not receive them at all. So, unlike analog channels, you cannot fine tune a digital channel. You can, however, adjust your antenna to improve the reception of available digital channels. N If the signal strength meter indicates that the signal is weak, physically adjust your antenna to increase the signal strength.
Anynet+ Connecting Anynet+ Devices Anynet+ is a function that enables you to control all connected Samsung devices that support Anynet+ with your Samsung TV’s remote. The Anynet+ system can be used only with Samsung devices that have the Anynet+ feature. To be sure your Samsung device has this feature, check if there is an Anynet+ logo on it. To connect to a TV 1. Connect the HDMI IN 1 or 2(DVI) jack on the TV and the HDMI OUT jack of the corresponding Anynet+ device using an HDMI cable.
❑ Setting Up Anynet+ The following settings help set the Anynet+ functions. You can also set the Anynet+ by selecting Tools → Anynet+ (HDMI-CEC) To use the Anynet+ Function, Anynet+ (HDMI-CEC) must be set to On 1. Press the MENU button. Press the ▲ or ▼ button to select Application, then press the ENTERE button. 2. Press the ▲ or ▼ button to select Anynet+ (HDMI-CEC), then press the ENTERE button. 3. Press the ▲ or ▼ to select Setup, then press the ENTERE button. 4.
N The Anynet+ function only works when the active source on the TV remote control is set to TV. N The button works only while in the recordable state. N You cannot control Anynet+ devices using the buttons on the TV. You can control Anynet+ devices only using the TV remote control. N The TV remote control may not work under certain conditions. In this case, reselect the Anynet+ device. N The Anynet+ functions do not operate with other manufacturers’ products.
Troubleshooting for Anynet+ Symptom Solution Anynet+ does not work. • Check if the device is an Anynet+ device. The Anynet+ system supports Anynet+ devices only. • Connect only one receiver (home theater). • Check if the Anynet+ device power cord is properly connected. • Check the Anynet+ device’s Video/Audio/HDMI 1.3 cable connections. • Check whether Anynet+ (HDMI-CEC) is set to On in the Anynet+ setup menu. • Check whether the TV remote control is in TV mode.
Appendix Troubleshooting If the TV seems to have a problem, first try this list of possible problems and solutions. If none of these troubleshooting tips apply, call Samsung customer service at 1-800-SAMSUNG. Problem Possible Solution Poor picture quality. Try another channel. Adjust the antenna. Check all wire connections. Poor sound quality. Try another channel. Adjust the antenna. No picture or sound. Try another channel. Press the SOURCE button. Make sure the TV is plugged in.
Preparation before installing the Wall-Mount Case A. Installing the SAMSUNG Wall-Mount Case B. Installing another company’s Wall-Mount 1. Install the Wall Mount with a torque range of 15kgf·cm or less. Use care as the parts can be damaged if the torque is out of the specified range. 2. Accessory Kit contains Holder–Ring [②] for installing other company’s Wall-Mount on Samsung TV. (Case B) N Screw down the hole [①] when installing wall-mount on the wall.
경고 주의 Securing the TV to the Wall Pulling, pushing, or climbing on the TV may cause the TV to fall. In particular, ensure your children do not hang 경고 Caution over or destabilize the TV; doing so may cause the TV to tip over, causing serious injuries or death. Follow all safety 주의 precautions provided on the included Safety Flyer. For added stability, install the anti-fall device for safety purposes, as follows.
Wall Mount Kit Specifications (VESA) Install your wall mount on a solid wall perpendicular to the floor. When attaching to other building materials, please contact your nearest dealer. If installed on a ceiling or slanted wall, it may fall and result in severe personal injury. Product Family inch VESA Spec.
Specifications Model Name PN42B430P2D PN50B430P2D 42 inch (42.3 inches measured diagonally) 50 inch (49.9 inches measured diagonally) PC Resolution 1024x768 @ 60 Hz 1360x768 @ 60 Hz Sound (Output) 10W x 2 10W x 2 41.5 x 26.6 x 2.8 inches (1055.0 x 667.4 x 73 mm) 41.5 x 28.6 x 12.4 inches (1055.5 x 728.7 x 316 mm) 48.4 x 29.7 x 2.8 inches (1230.2 x 755.7 x 73 mm) 48.4 x 32.1 x 12.4 inches (1230.2 x 816.8 x 316 mm) 53.5 lbs (24.3 kg) 61.7 lbs (28.0 kg) 70.1 lbs (31.8 kg) 78.2 lbs (35.
Dimensions (PN42B430P2D) TOP VIEW FRONT VIEW JACK PANEL DETAIL 7.2 x 3.7 inches SIDE VIEW REAR VIEW NOTE: All drawings not necessarily to scale. Some dimensions are subject to change without prior notice. Refer to dimensions on each unit prior to performing any carpentry. Not responsible for typographical or printed errors. © 2009 Samsung Electronics America, Inc. English - 44 BN68-02025A.
Dimensions (PN50B430P2D) TOP VIEW FRONT VIEW JACK PANEL DETAIL 7.2 x 3.7 inches SIDE VIEW REAR VIEW NOTE: All drawings not necessarily to scale. Some dimensions are subject to change without prior notice. Refer to dimensions on each unit prior to performing any carpentry. Not responsible for typographical or printed errors. © 2009 Samsung Electronics America, Inc. English - 45 BN68-02025A.
Información importante sobre la garantía relativa al formato de visualización del televisor Las pantallas PDP con formato de pantalla panorámica (16:9, la relación de aspecto ancho:alto de la pantalla) están diseñadas principalmente para visualizar vídeos de movimiento de formato panorámico. En estas pantallas debe ver las imágenes en el formato 16:9 de pantalla panorámica o ampliadas para llenar la pantalla si el modelo tiene esta opción, y en movimiento constante.
Instrucciones para el usuario Retención de imágenes en la pantalla No deje imágenes fijas visibles (como las de un videojuego) en el panel de la pantalla de plasma durante mucho tiempo, ya que se podría producir la retención de la imagen en la misma. Este fenómeno de retención de imágenes también se denomina “quemadura de pantalla”. Para evitar dicha retención de la imagen, consulte la página 24 de este manual para reducir el grado de brillo y contraste de la pantalla al mostrar una imagen fija.
Español Índice Conexión y preparación del televisor Control del sonido ■ ■ ■ ■ ■ ■ ■ Cambio de la configuración del sonido.................................... 26 Listado de características........................................................... 5 Comprobación de los componentes........................................... 5 Uso del soporte.......................................................................... 5 Aspecto general del panel de control.........................................
Conexión y preparación del televisor Listado de características Valores ajustables de la imagen que se pueden almacenar en la memoria del televisor. Temporizador automático para encender o apagar el televisor. Temporizador de desconexión especial. Función V-chip.
Aspecto general del panel de control Los botones de la parte inferior derecha del panel controlan las funciones básicas del televisor, incluidos los menús en pantalla. Para utilizar las funciones más avanzadas debe usarse el mando a distancia. N El color y la forma del producto pueden variar según el modelo. N Si toca el botón del panel frontal, se activan los botones. 1 SOURCEE Cambia entre todas las fuentes de entrada disponibles (TV, AV, Componente1, Componente2, HDMI1, HDMI2/DVI).
Aspecto general del panel de conexiones Use los terminales del panel de conexión para conectar componentes de A/V que estarán disponibles permanentemente, como un reproductor de Blu-ray/DVD o un aparato de vídeo. N El color y la forma del producto pueden variar según el modelo. Panel lateral del TV 1 POWER IN Permite conectar el cable de alimentación suministrado. 2 SERVICE Sólo para servicio. 7 ANT IN Usa un conector coaxial de 75 Ω para antena o red por cable.
Mando a distancia Puede utilizar el mando a una distancia del televisor de hasta 7 metros. N El color y la forma del producto pueden variar según el modelo. N El exceso de luz puede influir en el rendimiento del mando a distancia. 1 POWER Enciende y apaga el televisor. 2 BOTONES NUMÉRICOS Permiten cambiar de canal. 3 % TV Permite seleccionar canales adicionales Selecciona directamente el modo TV. (digitales y analógicos) emitidos por la misma emisora.
Conexiones Conexión de las antenas de VHF y UHF Si su antena tiene un juego de cables con este aspecto, consulte “Antenas con cables planos dobles de 300 Ω” a continuación. Si la antena tiene un cable con este aspecto, consulte “Antenas con cables coaxiales de 75 Ω”. Si tiene dos antenas, consulte “Antenas de VHF y UHF separadas”. ❑ Antenas con cables planos dobles de 300 Ω Si utiliza una antena externa (de azotea o de “cuernos”) de cables planos dobles de 300 Ω, siga las indicaciones siguientes. 1.
❑ Conexión al decodificador de cable que decodifica algunos canales Si su decodificador de cable decodifica únicamente algunos canales (como, por ejemplo, canales de suscripción), siga las instrucciones que se incluyen a continuación. Necesitará un separador de señales de dos vías, un conmutador RF (A/B) y cuatro extensiones de cable de antena. (Estos artículos están disponibles en la mayoría de las tiendas de electrónica.) 1.
Conexión de un reproductor de DVD/Blu-ray o receptor por cable/satélite (decodificador) a través de HDMI Esta conexión sólo se puede realizar si hay un terminal de salida de HDMI en el dispositivo externo. Esta conexión proporciona una imagen de la mayor calidad. 1. Conecte un cable HDMI entre el terminal HDMI IN 1 o 2(DVI) del televisor y el terminal HDMI del reproductor de DVD/Blu-ray o receptor por cable/satélite (decodificador).
Conexión de un reproductor de DVD/Blu-ray o receptor por cable/satélite (decodificador) a través de los cables de componentes Los terminales del panel posterior del televisor facilitan la conexión de un reproductor de DVD/Blu-ray o receptor por cable/ satélite (decodificador) al TV. 1. 2.
Conexión de un aparato de vídeo ❑ Conexión de vídeo En estas instrucciones se asume que ya ha conectado el TV a una antena o a un sistema de TV por cable (de acuerdo con las instrucciones de las páginas 9 y 10). Ignore el paso 1 si aún no ha conectado una antena o un sistema de cable. 1. Desenchufe el cable o la antena de la parte posterior del TV. 2. Enchufe el cable o la antena en el terminal ANT IN de la parte posterior del aparato de vídeo. 3.
Conexión de un sistema de audio digital Los terminales del panel posterior del televisor facilitan la conexión de un sistema de audio digital (Home Cinema/Receptor) al televisor. 1. Conecte un cable óptico entre los terminales DIGITAL AUDIO OUT (OPTICAL) y los terminales de entrada de audio digital (OPTICAL) del sistema de audio digital. Cuando un sistema de audio digital se conecta al terminal DIGITAL AUDIO OUT (OPTICAL): Reduzca el volumen del TV y ajuste el volumen con el control del sistema.
Conexión a un PC ❑ Uso del cable HDMI/DVI 1. Conecte un cable HDMI/DVI entre el terminal HDMI IN 2 del televisor y el terminal de salida PC del ordenador. 2. Conecte un cable estéreo miniclavija/2 RCA de 3,5 mm entre el terminal DVI IN (HDMI2) [L-AUDIO-R] del televisor y el terminal de salida de audio de la tarjeta de sonido del ordenador.
Funcionamiento Encendido y apagado del televisor Pulse el botón POWER del mando a distancia. También puede usar el botón POWER del televisor. N El televisor puede tardar unos segundos en encenderse. Cambio de canales ❑ Utilización de los botones de canal Pulse los botones CH o CH para cambiar de canal. o CH , el televisor cambia los canales secuencialmente. Verá todos los canales que ha memorizado el TV. (Debe haber un mínimo de tres canales memorizados.) No verá los canales borrados o no memorizados.
Uso del botón TOOLS VOL CH Se puede usar el botón TOOLS para seleccionar rápida y fácilmente las funciones que se usan con más frecuencia. El menú Herramientas cambia según el modo de entrada externo que se está viendo. 1. 2. Pulse el botón TOOLS. Aparece el menú Herramientas. Pulse los botones ▲/▼ para seleccionar un menú y, a continuación, pulse el botón ENTERE. 3. Pulse los botones ▲/▼/◄/►/ENTERE para ver, cambiar o usar las opciones seleccionadas.
Visualización de los menús Antes de utilizar el televisor, siga los pasos que se explican a continuación para aprender a desplazarse por el menú a fin de seleccionar y ajustar las diferentes funciones. 1. 2. 3. 4. 5. Pulse el botón MENU. El menú principal se muestra en la pantalla. En el lado izquierdo hay los siguientes iconos: Imagen, Sonido, Canal, Configuración, Entrada, Aplicaciones, Soporte técnico. Pulse los botones ▲ o ▼ para seleccionar uno de los iconos.
Función Plug & Play Cuando el televisor se enciende por primera vez, los valores se inician correlativamente de forma automática. N El salvapantallas se activa si durante más de 1 minuto no hay ninguna entrada desde el teclado del mando a distancia mientras Plug & Play está en ejecución. N El salvapantallas se activa si durante más de 15 minutos no se detecta ninguna señal de funcionamiento. 1. 2. 3. 4. 5. 6. 7. 8. 9. Plug & Play Pulse el botón POWER del mando a distancia.
Control de los canales Almacenamiento de canales ❑ Antena → Aire/Cable Canal Antes de empezar a memorizar los canales disponibles, debe indicar el tipo de origen de la señal conectada al TV (es decir, antena o sistema de cable). T Pulse el botón TOOLS para mostrar el menú Herramientas. Antena : Aire ► Prog. Auto También puede cambiar de antena seleccionando Herramientas → Cambiar a Cable(o Aire) Borrar canal encriptado Lista de canales Sintonia Fina ❑ Prog. Auto • Aire: Señal de antena aire.
❑ Menú de opciones de la lista de canales (en Todos los canales/Canales agregados/Favoritos) N Pulse el botón TOOLS para usar el menú de opciones. N Los elementos del menú de opciones pueden variar según el estado del canal. Agregar a Favoritos/Borrar de Favoritos Puede configurar como favoritos los canales que vea con más frecuencia. T Pulse el botón TOOLS para mostrar el menú Herramientas.
VOL Control de la imagen CH MENU CH LIST Cambio del tamaño de la imagen FAV.CH ❑ Modo Imagen Puede seleccionar el tipo de imagen que mejor cumpla sus requisitos de visualización. • Dinámico: Selecciona una imagen de alta definición para entornos muy iluminados. • Normal: Selecciona la mejor visualización de la imagen para entornos normales. Esta configuración es la más conveniente en la mayoría de situaciones. • Cine: Selecciona una visualización de imagen confortable en entornos oscuros.
Balance de blanco Se puede ajustar la temperatura del color para conseguir colores más naturales. • Bal. Rojo: Ajusta la intensidad del rojo en un nivel bajo. • Bal. Verde: Ajusta la intensidad del verde en un nivel bajo. • Bal. Azul: Ajusta la intensidad del azul en un nivel bajo. • Gan. Rojo: Ajusta la intensidad del rojo en un nivel alto. • Gan. Verde: Ajusta la intensidad del verde en un nivel alto. • Gan. Azul: Ajusta la intensidad del azul en un nivel alto.
N Después de seleccionar Zoom1, Zoom2 o Ajuste ancho N N N N Pulse los botones ◄ o ► para seleccionar Posición y, a continuación, pulse el botón ENTERE. Pulse los botones ▲ o ▼ para desplazar la imagen hacia arriba o hacia abajo. Reiniciar: Pulse los botones ◄ o ► para seleccionar Reiniciar y, a continuación, pulse el botón ENTERE. El televisor recupera la relación 16:9.
• Lateral gris: Cuando se ve la televisión con una relación de pantalla de 4:3, ésta se puede proteger de un posible daño si se ajusta el balance de blanco en ambos extremos, el izquierdo y el derecho. Para prevenir que la pantalla se queme, seleccione Oscuro o Claro. - Oscuro: Cuando se establece una relación de pantalla de 4:3, con esta opción se oscurecen ambos extremos, el izquierdo y el derecho.
Control del sonido Cambio de la configuración del sonido VOL ❑ Modo CH LIST Sonido Puede seleccionar el modo de sonido que mejor se ajuste al programa que está viendo. • Normal: Este modo de sonido es de aplicación general. • Música: El modo Música permite oír música como si se estuviera en una sala de conciertos. • Cine: El modo Cine proporciona un sonido completo de película en directo como si se estuviera en una sala de cine. • Voz clara: Realza las voces respecto de los sonidos.
❑ Seleccionar altavoz Sonido Multi-track Vol.Auto Sonido Cuando se ve el televisor conectado a un sistema Home Cinema, se debe apagar el altavoz del televisor para que la salida de audio del televisor utilice los altavoces del Home Cinema (externos). • Altavoz externo: Utiliza los altavoces externos (Home Cinema) para la salida de sonido. • Altavoz de TV: Utiliza los altavoces del TV para la salida de sonido.
❑ V-Chip La opción V-Chip bloquea automáticamente los programas que no se consideran apropiados para los menores. El usuario debe introducir primero un código PIN (número de identificación personal) para configurar o cambiar las restricciones de V-Chip. N La función V-Chip no está disponible en los modos HDMI o Componente. N El código PIN predeterminado para un televisor nuevo es ‘0-0-0-0’.
Clasificación U.S. Descargable Título de clasificación La información de la restricción paterna se puede usar mientras se ven los canales DTV. Clasificación U.S. Descargable N Si la información no se descarga desde la emisora, el menú Downloadable U.S. Rating ► 1/2 Nivel humor está desactivado. Perm. todo DH N La información de la restricción de bloqueo se puede descargar automáticamente mientras MH Bloq. todo se ven los canales DTV. Esto puede tardar algunos segundos. H N El menú Downloadable U.S.
❑ Melodía V-Chip Subtítulo Configuración Se puede establecer un sonido de melodía que se oiga cuando el televisor se encienda o se apague. • Apagado: Apaga la función de la melodía. • Bajo: Establece el volumen de la melodía en un nivel bajo. • Medio: Establece el volumen de la melodía en un nivel medio. • Alto: Establece el volumen de la melodía en un nivel alto. N La melodía no se reproduce.
Configuración de la hora ❑ Tiempo Plug & Play Idioma Configuración Para usar las diferentes funciones del temporizador del televisor es necesario configurar el reloj. Asimismo, se puede comprobar la hora mientras se ve la televisión. (Pulse el botón INFO.) Modo Juego ► : Apagado V-Chip 1. Pulse el botón MENU para ver el menú. 2. Pulse los botones ▲ o ▼ para seleccionar Configuración y, a continuación, pulse el botón ENTERE. 3.
Lista de Entradas/Editar Nombre ❑ Lista de Entradas Entrada Se utiliza para seleccionar TV u otras fuentes de entrada externas como reproductores DVD/Blu-ray/receptores por cable/ satélite (decodificadores) conectados al televisor. Permite seleccionar la fuente de entrada que se prefiera. Lista de Entradas Editar Nombre TV, AV, Componente1, Componente2, HDMI1, HDMI2/DVI. N Sólo se puede elegir los dispositivos externos que estén conectados al televisor.
Modos de pantalla Si la señal del sistema es igual al modo de señal estándar, la pantalla se ajusta automáticamente. Si la señal del sistema no es igual al modo de señal estándar, ajuste el modo consultando la guía del usuario de la tarjeta de vídeo; de lo contrario, puede no haber señal de vídeo. La imagen de pantalla se ha optimizado durante la fabricación para los siguientes modos de visualización.
Intensidad señal (Digital) AA diferencia de los canales analógicos, cuya calidad de recepción puede variar desde con nieve hasta nítida, los canales digitales (HDTV) tienen una calidad de recepción nítida o no hay recepción. Por ello, a diferencia de los canales analógicos, no se puede realizar una sintonización fina de un canal digital. Se puede, no obstante, ajustar la antena para mejorar la recepción de los canales digitales disponibles.
Anynet+ Conexión de dispositivos Anynet+ Anynet+ es una función que permite controlar todos los dispositivos Samsung conectados compatibles con Anynet+ por medio del mando a distancia del televisor Samsung. El sistema Anynet+ se puede utilizar sólo con los dispositivos Samsung que tengan la función Anynet+. Para asegurarse de que el dispositivo de Samsung tenga dicha función, compruebe si lleva el logotipo Anynet+. Para conectar al televisor 1.
❑ Configuración de Anynet+ Aplicaciones Los parámetros siguientes ayudan a configurar las funciones Anynet+. T Pulse el botón TOOLS para mostrar el menú Herramientas. También puede configurar Anynet+ seleccionando Herramientas → Anynet+ (HDMI-CEC) Para usar la función Anynet+, Anynet+ (HDMI-CEC) debe estar configurado como Encendido. 1. Pulse el botón MENU. Pulse los botones ▲ o ▼ para seleccionar Aplicaciones y, a continuación, pulse el botón ENTERE. 2.
N La función Anynet+ sólo funciona cuando la fuente activa del mando a distancia del televisor está ajustada en TV. N El botón funciona sólo cuando la grabación es posible. N Los dispositivos Anynet+ no se pueden controlar con los botones del TV. Los dispositivos Anynet+ sólo se pueden controlar mediante el mando a distancia del televisor. N El mando a distancia del televisor puede no funcionar en determinadas circunstancias. En ese caso, vuelva a seleccionar el dispositivo Anynet+.
Solución de problemas de Anynet+ Síntoma Anynet+ no funciona. Solución • Compruebe si el dispositivo es un dispositivo Anynet+. El sistema Anynet+ sólo admite dispositivos Anynet+. • Conecte sólo un receptor (sistema Home Cinema). • Compruebe si el cable de alimentación de Anynet+ está debidamente conectado. • Compruebe las conexiones de los cables de Vídeo/Audio/HDMI 1.3 del dispositivo Anynet+. • Compruebe si Anynet+ (HDMI-CEC) está establecido como Encendido en el menú de configuración de Anynet+.
Apéndice Resolución de problemas Si cree que el televisor tiene un problema, compruebe primero esta lista de posibles problemas y soluciones. Si ninguno de los consejos funciona, póngase en contacto con el centro de atención al cliente de Samsung o llame al 1-800-SAMSUNG. Problema Mala calidad de imagen. Calidad de sonido deficiente. No hay imagen ni sonido. No se percibe ningún sonido, o muy bajo, con el volumen al máximo. Las imágenes de desplazan verticalmente. El TV funciona de forma irregular.
Preparación antes de instalar el montaje mural. Caso A. Instalación del montaje mural SAMSUNG Caso B. Instalación del montaje mural de otra empresa 1. Instale el montaje mural con un par de apriete de 15 kgf cm o menos. Tenga en cuenta que las piezas se pueden dañar si el par de apriete es diferente del especificado. 2. El juego de accesorios incluye soporte y anilla [②] para la instalación en un montaje mural de otra empresa.
경고 주의 Fijación del televisor a la pared Tirar del televisor, empujarlo o colgarse de él puede provocar su caída. En especial, procure que los niños no se 경고 cuelguen del televisor ni lo desestabilicen; éste podría caerse sobre ellos y causarles lesiones graves o incluso 주의 la muerte. Siga las precauciones de seguridad del folleto de seguridad incluido con el producto. Para mejorar la Precaución estabilidad instale un dispositivo antivuelco, como se explica a continuación.
Especificaciones del equipo de montaje en la pared (VESA) Instale el montaje mural en una pared sólida, perpendicular al suelo. Para colocarlo en otros materiales de construcción, póngase en contacto con el distribuidor más cercano. Si se instala en el techo o en una pared inclinada, puede caerse y causar graves lesiones personales.
Especificaciones Nombre del modelo Tamaño de pantalla (diagonal) Resolución de PC Sonido (salida) PN42B430P2D PN50B430P2D 42 pulgadas (42.3 pulgadas medidas diagonalmente) 50 pulgadas (49.9 pulgadas medidas diagonalmente) 1024x768 @ 60 Hz 1360x768 @ 60 Hz 10W x 2 10W x 2 41.5 x 26.6 x 2.8 pulgadas (1055.0 x 667.4 x 73 mm) 41.5 x 28.6 x 12.4 pulgadas (1055.5 x 728.7 x 316 mm) 48.4 x 29.7 x 2.8 pulgadas (1230.2 x 755.7 x 73 mm) 48.4 x 32.1 x 12.4 pulgadas (1230.2 x 816.8 x 316 mm) 53.5 lbs (24.
Dimensiones (PN42B430P2D) VISTA SUPERIOR VISTA FRONTAL DETALLE DEL PANEL DE TERMINALES 7.2 x 3.7 pulgadas VISTA LATERAL VISTA POSTERIOR NOTA: No todos los dibujos están necesariamente a escala. Algunas dimensiones están sujetas a cambio sin previo aviso. Consulte las dimensiones de cada unidad antes de adaptar el mueble para el televisor. La empresa no se responsabiliza de los errores tipográficos o de impresión. © 2009 Samsung Electronics America, Inc. Español - 44 BN68-02025A_SPA.
Dimensiones (PN50B430P2D) VISTA SUPERIOR VISTA FRONTAL DETALLE DEL PANEL DE TERMINALES 7.2 x 3.7 pulgadas VISTA LATERAL VISTA POSTERIOR NOTA: No todos los dibujos están necesariamente a escala. Algunas dimensiones están sujetas a cambio sin previo aviso. Consulte las dimensiones de cada unidad antes de adaptar el mueble para el televisor. La empresa no se responsabiliza de los errores tipográficos o de impresión. © 2009 Samsung Electronics America, Inc. Español - 45 BN68-02025A_SPA.
This page is intentionally left blank. Español - 46 BN68-02025A_SPA.