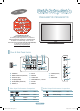
PN42A450P1D/ PN50A450P1D 1-800-SAMSUNG (7267864) Samsung Electronics America, Inc. 105 Challenger Road Ridgefield Park, NJ 07660-0511 Samsung Electronics Canada Inc., Customer Service 55 Standish Court Mississauga, Ontario L5R 4B2 Call center hours of operation (Mon-Sun 9AM-12AM EST). To register this product please visit www.samsung.com/global/register. Rear & Side Panel Jacks ($-) ).
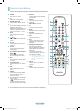
Remote Control Buttons You can use the remote control up to a distance of about 23 feet from the TV. 1 POWER Turns the TV on and off. 2 TV Selects the TV mode directly. % SOURCE Press to display all of the available video sources. ^ PRE-CH Tunes to the previous channel. CH Press to change channels. 2 3 NUMERIC BUTTONS Press to directly select a channel. W.LINK & 4 – W.LINK Press to select additional channels (digital and analog) being broadcast by the same station.
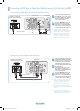
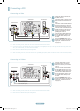
Connecting a DVD Player or Cable Box / Satellite receiver (Set-Top Box) via HDMI Connecting to HDMI (High Definition Multimedia Interface) TV Rear Panel DVD Player or Cable Box / Satellite receiver (Set-Top Box) HDMI Cable (Not supplied) TV Side Panel 1 Connect an HDMI Cable between the HDMI IN(1, 2 or 3) jack on the TV and the HDMI jack on the DVD Player or Cable Box / Satellite receiver (Set-Top Box).
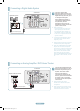
Connecting a DVD Player or Cable Box / Satellite receiver (Set-Top Box) via Component cables Connecting to Y, PB, PR TV Rear Panel 1 Connect Component Cables between the COMPONENT IN (1 or 2) [Y, PB, PR] jacks on the TV and the COMPONENT [Y, PB, PR] jacks on the DVD Player or Cable Box / Satellite receiver(Set-Top Box). 2 Connect Audio Cables between the COMPONENT IN (1 or 2) [RAUDIO-L] jacks on the TV and the AUDIO OUT jacks on the DVD Player or Cable Box / Satellite receiver (Set-Top Box).
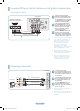
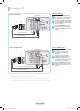
Connecting a VCR Connecting to Video TV Rear Panel TV Side Panel VCR Rear Panel Audio Cable (Not supplied) 2 1 2 3 4 5 Video Cable (Not supplied) 6 Antenna Cable (Not supplied) Unplug the cable or antenna from the back of the TV. Connect the cable or antenna to the ANT IN terminal on the back of the VCR. Connect an Antenna Cable between the ANT OUT terminal on the VCR and the ANT IN terminal on the TV.
Connecting a Digital Audio System TV Rear Panel 1 Digital Audio System Connect an Optical Cable between the DIGITAL AUDIO OUT (OPTICAL) jacks on the TV and the Digital Audio Input (OPTICAL) jacks on the Digital Audio System. When a Digital Audio System is connected to the DIGITAL AUDIO OUT (OPTICAL) terminal: Decrease the volume of the TV, and adjust the volume level with the system’s volume control.
Connecting a PC Using the D-Sub Cable Using the D-Sub Cable TV Rear Panel PC 1 Connect a D-Sub Cable between PC IN [PC] jack on the TV and the PC output jack on your computer. 2 Connect a PC Audio Cable between PC IN [AUDIO] jack on the TV and the Audio Out jack of the sound card on your computer.
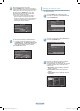
Turning the TV On and Off 2 Press the POWER button on the remote control. You can also use the POWER button on the TV. Press the ENTER button to select Antenna. Press the ▲ or ▼ button to select Air or Cable, then press the ENTER button. Press the EXIT button to exit. TV ➢ It may take a while before you see a full picture. Viewing the Menus 1 With the power on, press the MENU button. The main menu appears on the screen. Its left side has five icons: Picture, Sound, Channel, Setup, Input.
4 When selecting the Cable TV system: Press the ENTER button to start the auto program. Press the ▲ or ▼ to select the correct analog signal cable system source from among STD, HRC, and IRC, then press the ENTER button. If you have Digital cable TV, select the cable system signal source for both Analog and Digital. ● STD, HRC, and IRC identify various types of cable TV systems. Contact your local cable company to identify the type of cable system that exists in your particular area.
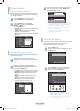
3 Picture Control Changing the Picture Standard Press the ◄ or ► button to decrease or increase the value of a particular item. Press the ENTER button. Press the EXIT button to exit. Cell Light You can select the type of picture which best corresponds to your viewing requirements. 1 Press the MENU button to display the menu. Press the ENTER button to select Picture. 2 Press the ENTER button to select Mode. Press the ▲ or ▼ button to select Dynamic, Standard, or Movie. Press the ENTER button.
Troubleshooting If the TV seems to have a problem, first try this list of possible problems and solutions. If none of these troubleshooting tips apply, call your nearest Samsung service center. Problem Possible Solution Poor picture quality. - Try another channel. - Adjust the antenna. - Check all wire connections. Poor sound quality. - Try another channel. - Adjust the antenna. No picture or sound. - No sound or sound is too low at maximum volume.
Contact SAMSUNG WORLD-WIDE If you have any questions or comments relating to Samsung products, please contact the SAMSUNG customer care center. Country Customer Care Center Web Site CANADA 1-800-SAMSUNG (7267864) www.samsung.com/ca U.S.A 1-800-SAMSUNG (7267864) www.samsung.com Address Samsung Electronics Canada Inc., Customer Service 55 Standish Court Mississauga, Ontario L5R 4B2 Canada Samsung Electronique Canada Inc.