Contact SAMSUNG WORLD-WIDE If you have any questions or comments relating to Samsung products, please contact the SAMSUNG customer care center. Contacte con SAMSUNG WORLD WIDE Si tiene alguna pregunta o comentario referente a nuestros productos, por favor contacte con nuestro Servicio de Atención al Cliente Country Customer Care Center Web Site CANADA 1-800-SAMSUNG (7267864) www.samsung.com/ca U.S.A 1-800-SAMSUNG (7267864) www.samsung.com Address Samsung Electronics Canada Inc.
Important Warranty Information Regarding Television Format Viewing Wide screen format PDP Displays (16:9, the aspect ratio of the screen width to height) are primarily designed to view wide screen format full-motion video. The images displayed on them should primarily be in the wide screen 16:9 ratio format, or expanded to fill the screen if your model offers this feature and the images are constantly moving.
User Instructions Screen Image retention Do not display a still image (such as on a video game) on the plasma display panel for more than several minutes as it can cause screen image retention. This image retention is also known as “screen burn”. To avoid such image retention, refer to page 23 of this manual to reduce the degree of brightness and contrast of the screen when displaying a still image. Altitude The PDP can only operate normally at heights under 6500ft.
English Contents General Information Channel Control ■ ■ ■ ■ ■ ■ ■ ■ ■ ■ List of Features...............................................................5 Accessories.....................................................................5 Viewing the Control Panel..............................................6 Viewing the Connection Panel........................................7 Remote Control...............................................................8 Installing Batteries in the Remote Control.......
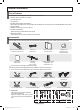
General Information List of Features • • • • • Adjustable picture settings that can be stored in the TV’s memory. Automatic timer to turn the TV on and off. A special sleep timer. V-Chip function. Excellent Digital Interface & Networking : With a built-in HD digital tuner, non-subscription HD broadcasts can be viewed with no Cable Box/Satellite receiver (SetTop Box) needed. • HDMI/DVI connection of your PC to this TV. • Excellent Picture Quality - DNIe technology provides life-like clear images.
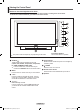
Viewing the Control Panel Buttons on the Lower-Right Part of the Panel The buttons on the lower-right panel control your TV’s basic features, including the on-screen menu. To use the more advanced features, you must use the remote control. ➢ The product color and shape may vary depending on the model. 1 SOURCE Toggles between all the available input sources (TV, AV1, AV2, S-Video, Component1, Component2, PC, HDMI1, HDMI2/DVI, HDMI3, USB).
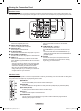
Viewing the Connection Panel Rear Panel Jacks Use the rear panel jacks to connect A/V components that will be connected continuously, such as VCR or DVD players. For more information on connecting equipment, see pages 9-15. The product color and shape may vary depending on the model. 1 POWER IN Connect the supplied power cord. 2 DIGITAL AUDIO OUT (OPTICAL) Connect to a Digital Audio component. 3 AUDIO OUT (R/L) Audio outputs to external devices.
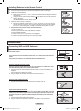
Remote Control You can use the remote control up to a distance of about 23 feet from the TV. 1 POWER Turns the TV on and off. ^ 2 TV Selects the TV mode directly. 3 NUMERIC BUTTONS Press to change the channel. 4 5 Press to select additional channels (digital and analog) being broadcast by the same station. For example, to select channel “54-3”, press “54”, then press “ ” and “3”. MUTE Press to temporarily cut off the sound. 6 VOL Press to increase or decrease the volume.
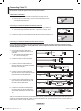
Installing Batteries in the Remote Control 1 Lift the cover at the back of the remote control upward as shown in the figure. 2 Install two AAA size batteries. ➢ Make sure to match the “+” and “–” ends of the batteries with the diagram inside the compartment. ➢ Using the remote control with the ON/OFF( ) light button set to On will reduce the battery usage time. ※ Use alkaline batteries for the remote control. 3 Close the cover as shown in the figure.
Connecting Cable TV To connect to a cable TV system, follow the instructions below. Cable without a Cable Box 1 Plug the incoming cable into the ANT IN terminal on the back of the TV. ➢ Because this TV is cable-ready, you do not need a cable box to view unscrambled cable channels. ANT IN Connecting to a Cable Box that Descrambles All Channels 1 Find the cable that is connected to the ANT OUT terminal on your cable box. ➢ This terminal might be labeled “ANT OUT”, “VHF OUT” or simply, “OUT”.
Connecting a DVD Player or Cable Box / Satellite receiver (Set-Top Box) via HDMI This connection can only be made if there is an HDMI Output jack on the external device. This connection will provide the highest quality picture. 1 Connect an HDMI Cable between the HDMI IN (1, 2 or 3) jack on the TV and the HDMI jack on the DVD Player or Cable Box / Satellite receiver (Set-Top Box).
Connecting a DVD Player or Cable Box / Satellite receiver (Set-Top Box) via Component cables The rear panel jacks on your TV make it easy to connect a DVD Player/Cable Box/Satellite receiver (Set-Top Box) to your TV. 1 Connect Component Cable between the COMPONENT IN (1 or 2) [Y, PB, PR] jacks on the TV and the COMPONENT [Y, PB, PR] jacks on the DVD Player or Cable Box / Satellite receiver(Set-Top Box).
Connecting a VCR Video Connection These instructions assume that you have already connected your TV to an antenna or a cable TV system (according to the instructions on pages ~10). Skip step 1 if you have not yet connected to an antenna or a cable system. 1 Unplug the cable or antenna from the back of the TV. Connect the cable or antenna to the ANT IN terminal on the back of the VCR. Connect an Antenna Cable between the ANT OUT terminal on the VCR and the ANT IN terminal on the TV.
Connecting a Digital Audio System The rear panel jacks on your TV make it easy to connect a Digital Audio System(Home theater/Receiver) to your TV. 1 Connect an Optical Cable between the DIGITAL AUDIO OUT (OPTICAL) jacks on the TV and the Digital Audio Input (OPTICAL) jacks on the Digital Audio System.
Connecting a PC Using the D-Sub Cable 1 Connect a D-Sub Cable between PC IN [PC] jack on the TV and the PC output jack on your computer. Connect a PC Audio Cable between the PC IN [AUDIO] jack on the TV and the Audio Out jack of the sound card on your computer. Using the D-Sub Cable TV Rear Panel PC PC Audio Cable (Not supplied) 1 D-Sub Cable (Not supplied) Using the HDMI/DVI Cable 1 Connect a HDMI/DVI cable between the HDMI IN 2 jack on the TV and the PC output jack on your computer.
Operation Turning the TV On and Off Press the POWER button on the remote control. You can also use the POWER button on the TV. ➢ It may take a while when your TV starts. Plug & Play Feature The first time you turn on your new TV, choose your basic settings for language, input source and channels, and time of day using the plug and play feature. The TV will store these settings in memory.
5 The TV will begin memorizing all of the available channels. ➢ To stop the search before it has finished, press the ENTER button with stop selected. After all the available channels are stored, the TV starts to remove scrambled channels (see page 47). The Auto program menu then reappears. Press the ENTER button when channel memorization is complete. The Clock Mode menu is displayed. Plug & Play Auto Program in Progress.
If you want to reset this feature... 1 2 Press the ENTER button to select Plug & Play. For further details on setting up options, refer to the pages 16~17. ➢ The Plug & Play feature is only available in the TV. Setup Press the MENU button to display the menu. Press the ▲ or ▼ button to select Setup, then press the ENTER button.
Adjusting the Volume Using the Volume Buttons 1 Press the VOL or VOL button to increase or decrease the volume. Using the Mute Button At any time, you can cut off the sound using the MUTE button. 1 Press MUTE and the sound cuts off. Mute will displayed on the screen. 2 To turn mute off, press the MUTE button again, or simply press the VOL VOL button. or Viewing the Display The display identifies the current channel and the status of certain audio-video settings.
Using the TOOLS Button You can use the TOOLS button to select your frequently used functions quickly and easily. The TOOLS menu changes depending on which external input mode you are viewing. 1 2 Press the TOOLS button. The TOOLS menu will appear. TOOLS Device List Picture Mode : Sound Mode : Add to Favorite Switch to Air Press the ▲/▼ button to select a menu, then press the ENTER button. 3 Press the ▲/▼/◄/►/ENTER buttons to display, change, or use the selected items.
Storing Channels in Memory (Automatic Method) 1 Antenna Channel Press the MENU button to display the menu. Press the ▲ or ▼ button to select Channel, then press the ENTER button. : Air Auto Program ► Channel List Clear Scrambled Channel 2 Press the ▲ or ▼ button to select Auto Program, then press the ENTER button. 3 Press the ▲ or ▼ button to select an antenna connection, then press the ENTER button. ➢ Air: Air antenna signal. Cable: Cable antenna signal. Auto: Air and Cable antenna signals.
To Select the Source Use to select TV or other external input sources such as DVD players or Cable Box/Satellite receivers (Set-Top Box) connected to the TV. Use to select the input source of your choice. 1 Input Press the MENU button to display the menu. Press the ▲ or ▼ button to select Input, then press the ENTER button. Source List Edit Name 2 Press the ENTER button to select Source List. Press the ▲ or ▼ button to select the signal source, then press the ENTER button.
Picture Control Changing the Picture Standard 1 Press the MENU button to display the menu. Press the ENTER button to select Picture. Picture You can select the type of picture which best corresponds to your viewing requirements. Mode :Standard Cell Light :7 Contrast : 90 Brightness : 45 Sharpness : 50 Color : 50 Tint (G/R) : G50/R50 ► Detailed Settings • Dynamic: Select the picture for high-definition in a bright room.
Adjusting the Detailed Settings Samsung’s new TVs allow you to make even more precise picture settings than previous models. See below to adjust detailed picture settings. Activating Detailed Settings 1 Picture Press the MENU button to display the menu. Press the ENTER button to select Picture. 2 Press the ENTER button to select Mode. Press the ▲ or ▼ button to select Standard or Movie, then press the ENTER button. ➢ Detailed Settings is available in Standard or Movie mode.
Changing the Color Space Color space is a color matrix composed of red, green and blue colors. Select your favorite color space to experience the most natural color. Detailed Settings 10 Press the ▲ or ▼ button to select Color Space, then press the ENTER button. Black Adjust : Off Dynamic Contrast : Medium Gamma :0 Color Space : Native ► White Balance Flesh Tone :0 Edge Enhancement : On Move 11 Press the ENTER button again to select Color Space.
Activating White Balance You can adjust the color temperature for more natural picture colors. Detailed Settings 17 Press the ▲ or ▼ button to select White Balance, then press the ENTER button. 18 Select the required option by pressing the ▲ or ▼ button, then press the ENTER button.
Activating xvYCC Setting the xvYCC mode to On increases detail and color space when watching movies from an external device (ie. DVD player) connected to the HDMI or Component IN jacks. 24 Press the ▲ or ▼ button to select xvYCC, then press the ENTER button. 25 Press the ▲ or ▼ button to select Off or On. Press the ENTER button. ➢ x vYCC is available when the picture mode is set to Movie, and the external input is set to Component or HDMI(Y,Cb,Cr) mode.
Changing the Screen Size Occasionally, you may want to change the size of the image on your screen. Your TV comes with six screen size options, each designed to work best with specific types of video input. Your cable box or satellite receiver may have its own set of screen sizes as well. In general, though, you should view the TV in 16:9 mode as much as possible. 1 Follow the Activating Picture Options instructions numbers 1 and 2. 2 Press the ▲ or ▼ button to select Size, then press the ENTER button.
16:9 Sets the picture to 16:9 wide mode. Zoom1 The screen size when Wide screen is vertically enlarged. Zoom2 The screen size when the Zoom1 screen is vertically enlarged. Wide Fit Enlarges the aspect ratio of the picture to fit the entire screen. 4:3 Sets the picture to 4:3 normal mode. Just Scan Use this function to see the full image without any cutoff when HDMI(720p/1080i/1080p), Component(1080i/1080p) or DTV(1080i) signals are input.
DNIe (Digital Natural Image engine) This TV includes the DNIe function to provide high visual quality. If you set DNIe to on, you can view the screen with the DNIe feature activated. 1 2 Follow the Activating Picture Options instructions numbers 1 and 2. (Refer to page 27) Press the ▲ or ▼ button to select DNIe, then press the ENTER button.
Setting the Film Mode The TV can be set to automatically sense and process film signals from all sources and adjust the picture for optimum quality. 1 2 Follow the Activating Picture Options instructions numbers 1 and 2. (Refer to page 27) Press the ▲ or ▼ button to select Film Mode, then press the ENTER button.
Reducing the Effects of Screen Burn If screen burn has occurred, you can select a white screen or scrolling to help remove screen burn artifacts. 1 Follow the Activating Picture Options instructions numbers 1 and 2. (Refer to page 27) 2 Press the ▲ or ▼ button to select Screen Burn Protection, then press the ENTER button.
Preventing Screen Burn-in To reduce the possibility of screen burn, this unit is equipped with screen burn prevention technology. This technology enables you to set picture movement up/ down (Vertical Line) and side to side (Horizontal Dot). The Time setting allows you to program the time between movement of the picture in minutes. 1 Follow the Activating Picture Options instructions numbers 1 and 2.
Resetting the Picture Settings to the Factory Defaults 2 Press the ▲ or ▼ button to select Picture Reset, then press the ENTER button. Press the ◄ or ► button to select OK or Cancel then press the ENTER button. Press the EXIT button to exit. ➢ Detailed Settings Picture Options Picture 1 To select the desired picture mode, follow the Changing the Picture Standard instructions numbers 1 and 2. (see page 23) Picture Reset ► Each mode can be reset.
Changing the Position of the PIP Window 4 Press the ▲ or ▼ button to select Position, then press the ENTER button. Press the ▲ or ▼ button to select the desired PIP window position, then press the ENTER button. ➢ In Double Window ( ) and Double Wide ( ) modes, Position cannot be selected. PIP PIP : Size : On Position : Air/cable : Cable Channel : Cable 3 Enter Move Return Air/Cable 5 Press the ▲ or ▼ button select Antenna, then press the ENTER button.
Sound Control Changing the Sound Standard You can select the sound mode to best suit the programming you’re watching. 1 Sound Press the MENU button to display the menu. Press the ▲ or ▼ button to select Sound, then press the ENTER button. Mode : Custom ► Equalizer 2 Press the ENTER button to select Mode. Press the ▲ or ▼ button to select Standard, Music, Movie, Speech, or Custom sound setting, then press the ENTER button.
4 Press the ▲ or ▼ button to select a particular frequency to adjust. Press the ◄ or ► button to increase or decrease the level of the particular frequency. • L/R Sound Balance Adjustment: To adjust the sound balance of the L/R speakers. • Bandwidth Adjustment (100Hz, 300Hz, 1kHz, 2kHz, 3kHz, 10kHz): To adjust the level of different bandwidth frequencies.
Choosing the Preferred Language The digital-TV transmission system is capable of simultaneous transmission of many audio tracks (for example, simultaneous translations of the program into foreign languages). Preferred language 1 Equalizer SRS TruSurround XT Sound 2 Press the MENU button to display the menu. Press the ▲ or ▼ button to select Sound, then press the ENTER button. Press the ▲ or ▼ button to select Preferred Language, then press the ENTER button.
Automatic Volume Control Reduces the difference in volume level among broadcasters. 1 Sound Press the MENU button to display the menu. Press the ▲ or ▼ button to select Sound, then press the ENTER button. 2 Press the ▲ or ▼ button to select Auto Volume, then press the ENTER button. 3 Press the ▲ or ▼ button to select Off or On, then press the ENTER button.
Listening to the Sound of the Sub (PIP) Picture When the PIP feature is activated, you can listen to the sound of the sub (PIP) picture. 1 Sound Press the MENU button to display the menu. Press the ▲ or ▼ button to select Sound, then press the ENTER button. Auto Volume : Off TV Speaker : On Sound Select : Main ► Sound Reset 2 Press the ▲ or ▼ button to select Sound Select, then press the ENTER button. 3 Press the ▲ or ▼ button to select Main or Sub, then press the ENTER button.
Channel Control Managing Channels Using this menu, you can Add/Delete or set Favorite channels and use the program guide for digital broadcasts. 1 2 Channel List Clear Scrambled Channel Fine Tune Signal Strength Press the ◄ button to select Added Channels. Press the ▲ or ▼ button to select All Channels, then press the ENTER button. Shows all currently available channels. Air Press the ▲ or ▼ button to select a channel to view, then press the ENTER button.
Erasing and Adding Channels You can delete or add a channel to display the channels you want. Press the MENU button. Press the ▲ or ▼ button to select Channel, then press the ENTER button. Press the ▲ or ▼ button to select Channel List, then press the ENTER button. : Air Auto Program Channel 1 Antenna Channel List Clear Scrambled Channel Fine Tune Signal Strength Press the ◄ button to select Added Channels. 3 Press the ▲ or ▼ button to select All Channels. Shows all currently available channels.
Setting Your Favorite Channels You can set channels you watch frequently as favorites. Press the MENU button. Press the ▲ or ▼ button to select Channel, then press the ENTER button. Press the ▲ or ▼ button to select Channel List, then press the ENTER button. : Air Auto Program Channel 1 Antenna Channel List Clear Scrambled Channel Fine Tune Signal Strength Press the ◄ button to select Added Channels. 3 Press the ▲ or ▼ button to select All Channels, then press the ENTER button.
1 Channel List Clear Scrambled Channel Fine Tune Signal Strength Added Channels Press the ▲ or ▼ button to select Timer Viewing, then press the ENTER button. The Reserve a Program (Timer Viewing) screen appears. Air 4 Press the ▲/▼/◄/► buttons to reserve a program and then press the ENTER button. Reserving a program has been completed. Press the EXIT button to exit. ➢ You can also reserve a program in the All Channels or Favorite menus using the same procedures.
Confirming a Viewing Reservation You can view, modify or delete a reservation. Antenna Press the MENU button. Press the ▲ or ▼ button to select Channel, then press the ENTER button. Press the ▲ or ▼ button to select Channel List, then press the ENTER button. : Air Auto Program Channel 1 Channel List Clear Scrambled Channel Fine Tune 2 Press the ◄ button to select Added Channels. Signal Strength 3 Press the ▲ or ▼ button to select Programmed, then press the ENTER button.
Labeling Channels - Analog Channels can labeled so that their call letters appear whenever the channel is selected. 1 Antenna : Air Auto Program Channel Press the MENU button. Press the ▲ or ▼ button to select Channel, then press the ENTER button. Press the ▲ or ▼ button to select Channel List, then press the ENTER button. Channel List Clear Scrambled Channel Fine Tune Signal Strength 2 Press the ▲ or ▼ button to select the channel to be assigned a new name, then press the TOOLS button.
Clearing Scrambled Channels - Digital The Clear Scrambled Channel function is used to filter out scrambled channels after Auto Program is completed. This process may take up to 20-30 minutes. 1 Auto Program Channel Press the MENU button. Press the ▲ or ▼ button to select Channel, then press the ENTER button. Press the ▲ or ▼ button to select Clear Scrambled Channel, then press the ENTER button. It searches scrambled channels, which are to be removed from the list.
Checking the Digital-Signal Strength Unlike analog channels, which can vary in reception quality from “snowy” to clear, digital (HDTV) channels have either perfect reception quality or you will not receive them at all. So, unlike analog channels, you cannot fine tune a digital channel. You can, however, adjust your antenna to improve the reception of available digital channels. 1 Press the ▲ or ▼ button to select Signal Strength, then press the ENTER button.
PC Display Using Your TV as a Computer (PC) Display Setting Up Your PC Software (Based on Windows XP) The Windows display-settings for a typical computer are shown below. The actual screens on your PC will probably be different, depending upon your particular version of Windows and your particular video card. However, even if your actual screens look different, the same basic set-up information will apply in almost all cases. (If not, contact your computer manufacturer or Samsung Dealer.
Setting up the TV with your PC How to Auto Adjust 1 Picture Use the Auto Adjust function to have the TV set automatically adjust the video signals it receives from the PC. The function also automatically fine-tunes the settings and adjusts the frequency values and positions. Press the MENU button to display the menu. Press the ▲ or ▼ button to select Picture, then press the ENTER button. Press the ▲ or ▼ button to select Auto Adjustment, then press the ENTER button.
Changing the Screen Position Adjust the PC’s screen positioning if it does not fit the TV Screen. Preset: Press the SOURCE button to select PC mode. 1 Press the MENU button to display the menu. Press the ▲ or ▼ button to select Picture, then press the ENTER button. Press the ▲ or ▼ button to select Screen, then press the ENTER button.
Time Setting Setting the Time Setting the clock is necessary in order to use the various timer features of the TV. Also, you can check the time while watching the TV. (Just press the INFO button.) Option 1: Setting the Clock Manually 1 Plug & Play Language Setup Press the MENU button to display the menu. Press the ▲ or ▼ button to select Setup, then press the ENTER button. Press the ▲ or ▼ button to select Time, then press the ENTER button.
Option 2: Setting the Clock Automatically The Clock can be set automatically if you are receiving a digital signal. Press the MENU button to display the menu. Press the ▲ or ▼ button to select Setup, then press the ENTER button. Press the ▲ or ▼ button to select Time, then press the ENTER button. Language Setup 1 Plug & Play : English Time ► V-Chip Caption External Settings Entertainment : Off Energy Saving : Off PIP SW Upgrade 2 Clock Press the ENTER button to select Clock.
Setting the On/Off Timer 1 Press the MENU button to display the menu. Press the ▲ or ▼ button to select Setup, then press the ENTER button. Press the ▲ or ▼ button to select Time, then press the ENTER button. Plug & Play Language Setup Use this feature to set the TV to turn on or off at a desired time. You must set the clock first. : English Time ► V-Chip Caption External Settings Entertainment : Off Energy Saving : Off PIP SW Upgrade 2 Three different On/Off Timer Settings can be made.
Setting the Sleep Timer 1 2 Press the MENU button to display the menu. Press the ▲ or ▼ button to select Setup, then press the ENTER button. Press the ▲ or ▼ button to select Time, then press the ENTER button. Plug & Play Setup The sleep timer automatically shuts off the TV after a preset time (30, 60, 90, 120, 150 and 180 minutes). Language : English Time ► V-Chip Caption External Settings Press the ▲ or ▼ button to select Sleep Timer, then press the ENTER button.
Function Description Selecting a Menu Language 1 Plug & Play Setup Press the MENU button to display the menu. Press the ▲ or ▼ button to select Setup, then press the ENTER button. Press the ▲ or ▼ button to select Language, then press the ENTER button. Language : English ► Time V-Chip Caption External Settings Entertainment : Off Energy Saving : Off PIP 2 Press the EXIT button to exit.
Using the V-Chip The V-Chip feature automatically locks out programs that are deemed inappropriate for children. The user must enter a PIN (personal ID number) before any of the V-Chip restrictions are set up or changed. ➢ V-Chip function is not available in HDMI, Component or PC mode. Setting Up Your Personal ID Number (PIN) 1 Language : English Time Setup Press the MENU button to display the menu. Press the ▲ or ▼ button to select Setup, then press the ENTER button.
How to Enable/Disable the V-Chip 1 Press the MENU button to display the menu. Press the ▲ or ▼ button to select Setup, then press the ENTER button. V-Chip Enter PIN 2 Press the ▲ or ▼ button to select V-Chip, then press the ENTER button. The message Enter PIN will appear. Enter your 4 digit PIN number. * * * * 0~9 Enter PIN 3 The V-Chip screen will appear. To enable the V-Chip feature, press the ENTER button so that the V-Chip Lock field is On.
4 The TV Parental Guidelines screen will appear. Press the ▲ or ▼ button to select one of the six aged based categories: • TV-Y: All children. The themes and elements in this program are specifically designed for a very young audience, including children from ages two to six. • TV-Y7: Directed to older children. The themes and elements in this program may include mild physical or comedic violence, or may frighten children under the age of seven. • TV-G: General audience.
How to Set up Restrictions Using “MPAA Ratings” (G, PG, PG-13, R, NC-17, X, NR ) 1 Language : English Time Setup The MPAA rating system uses the Motion Picture Association of America (MPAA) system, and its main application is for movies. When the V-Chip lock is on, the TV will automatically block any programs that are coded with objectionable ratings (either MPAA or TV-Ratings). V-Chip ► Caption Press the MENU button to display the menu.
How to Set up Restrictions Using “Canadian English” 1 Language : English Time Setup Press the MENU button to display the menu. Press the ▲ or ▼ button to select Setup, then press the ENTER button. V-Chip ► Caption External Settings Entertainment : Off Energy Saving : Off PIP SW Upgrade 2 Press the ▲ or ▼ button to select V-Chip, then press the ENTER button. The message Enter PIN will appear. Enter your 4 digit PIN number.
How to Set up Restrictions Using “Canadian French” 1 Language : English Time Setup Press the MENU button to display the menu. Press the ▲ or ▼ button to select Setup, then press the ENTER button. V-Chip ► Caption External Settings Entertainment : Off Energy Saving : Off PIP SW Upgrade 2 Press the ▲ or ▼ button to select V-Chip, then press the ENTER button. The message Enter PIN will appear. Enter your 4 digit PIN number.
Using the V-Chip for Digital channels Parental restriction information can be used while watching DTV channels. Press the MENU button to display the menu. Press the ▲ or ▼ button to select Setup, then press the ENTER button. : English Time Setup 1 Language V-Chip ► Caption External Settings Entertainment : Off Energy Saving : Off PIP SW Upgrade 2 Press the ▲ or ▼ button to select V-Chip, then press the ENTER button. The message Enter PIN will appear. Enter your 4 digit PIN number.
How to Reset the TV after the V-Chip Blocks a Channel (“Emergency Escape”) If the TV is tuned to a restricted channel, the V-Chip will block it. The screen will go blank and the following message will appear: 1 Press the ENTER button to select OK. To resume normal viewing, tune to a different channel using CH or CH button. Under certain conditions (depending on the rating of the local TV programs) the V-Chip might lock out all the channels.
Viewing Closed Captions (On-Screen Text Messages) - Digital The Digital Captions function operates on digital channels. 1 Time V-Chip Setup 2 Press the MENU button to display the menu. Press the ▲ or ▼ button to select Setup, then press the ENTER button. Caption ► External Settings Press the ▲ or ▼ button to select Caption, then press the ENTER button. Entertainment : Off Energy Saving : Off PIP 3 Press the ENTER button to select Caption.
Viewing Closed Captions (On-Screen Text Messages) - Analog The Analog Caption function operates in either analog TV channel mode or when a signal is supplied from an external device. (Depending on the broadcasting signal, the Analog Caption function may operate on digital channels.) 1 Time V-Chip Setup 2 Press the MENU button to display the menu. Press the ▲ or ▼ button to select Setup, then press the ENTER button.
Adjusting the TV On/Off Melody Sound The TV power on/off melody sound volume can be adjusted. 1 V-Chip Caption Setup 2 Press the MENU button to display the menu. Press the ▲ or ▼ button to select Setup, then press the ENTER button. Press the ▲ or ▼ button to select External Settings, then press the ENTER button. External Settings ► Entertainment : Off Energy Saving : Off PIP SW Upgrade 3 Press the ENTER button to select Melody.
Setting the Entertainment mode The Entertainment mode enables you to select the optimal display and sound for sports, cinema and games. Press the MENU button to display the menu. Press the ▲ or ▼ button to select Setup, then press the ENTER button. 2 Press the ▲ or ▼ button to select Entertainment, then press the ENTER button. 3 Press the ▲ or ▼ button to select Off, Sports, Cinema or Game, then press the ENTER button.
Upgrading the Software Samsung may offer upgrades for your TV’s firmware in the future. Please contact the Samsung call center at 1-800-SAMSUNG to receive information about downloading upgrades and using a USB drive. Upgrades will be possible by connecting a USB drive to the USB port. 1 Insert a USB drive containing the firmware upgrade into the USB Upgrade Port on the side of the TV. ➢ TV side Panel ($-) ). Software can not be upgraded through the LAN connection.
WISELINK Using the WISELINK Function This function enables you to view and listen to photo (JPEG) and audio files (MP3) saved on a USB Mass Storage Class (MSC) device. 1 Press the POWER button on the remote control or front panel. ➢ TV Side Panel ($-) ). The TV is powered on. 2 C onnect a USB device containing JPEG and/or MP3 files to the WISELINK jack (USB jack) on the side of the TV. ➢ If you enter the WISELINK mode with no USB device connected the message “No external storage device found.
Using the WISELINK Menu 1 Press the MENU button. Press the ▲ or ▼ button to select Application, then press the ENTER button. WISELINK USB 851.98MB/995.00MB Free PHOTO 2 Press the ▲ or ▼ button to select WISELINK, then press the ENTER button. ➢ The WISELINK menu is diplayed. Photo USB Device Music Setup Exit Press the W.LINK button on the remote control to display the WISELINK menu. Press the SOURCE button on the remote control repeatedly to select USB, then press the ENTER button.
Using the Photo List This menu shows Photo files and folders saved on an USB memory device. Photo List 1 Press the W.LINK button on the remote control to display the WISELINK menu. WISELINK 851.98MB/995.00MB Free USB PHOTO 2 Press the ◄ or ► button to select Photo, then press the ENTER button. This menu only shows files whose file extension is jpg. Files of other formats such as bmp or tiff will not be displayed. ➢ Photo files are displayed.
7 Help Items • Red(Device) button: Selects a connected device. • Green(Favorites Setting) button: Changes the favorites setting for the selected photo. Press this button repeatedly until the relevant value appears. • Yellow(Select) button: Selects photos from the photo list. Selected photos are marked with a symbol ( ) on the left. • TOOLS(Option) button: Displays the Slide Show, Play Current Group, Delete, Change Group info (in Color or Composition group),Information or Safe Remove menus.
Sorting the photos by month 1 Photo Select Monthly as the sorting standard in the Photo List. 2 Press the ◄ or ► buttons to select from the sublist of files grouped by Month. 3 Press the Tools button. 4 image_1.jpg Month Date Color Composition Folder Favorite : Jan : Jan.01.2008 Slide Show : Gray Play Current Group : : P-other : ★ ★ ★ Delete Information Preference Monthly Jan Press the ▲ or ▼ button to highlight Play Current Group.
Changing the color information 1 Select Color as the sorting standard in the Photo List and press the ◄ or ► button to select a photo. ➢ Changing the information of multiple files Press the ◄ or ► button to select the desired photo in the Photo list. Then press the yellow button. Repeat the above operation to select multiple photos. The ( ) mark appears to the left of the selected photo. 2 Press the TOOLS button. 3 Press the ▲ or ▼ button to select Change Group info. Press the ENTER button.
Deleting the Photo files 1 2 3 Press the ◄ or ► button to select the desired photo in the Photo list. image_1.jpg Month Date Color Composition Folder Favorite Press the TOOLS button. Press the ▲ or ▼ button to select Delete, then press the ENTER button. ➢ The Selected File(s): image... 1 File(s) Delete this file? message appear. ➢ When a read-only file is deleted, the This is read only file. Delete this file? message appear.
Viewing a Photo or Slide Show Viewing a photo 1 Press the W.LINK button on the remote control to display the WISELINK menu. 2 Press the ◄ or ► button to move to Photo, then press the ENTER button. ➢ Photo files are displayed. 3 Press the ◄ or ► button to select the desired photo in the Photo list. 4 Press the ENTER button over a photo icon. ➢ The currently selected photo is displayed in full screen. image_1.jpg USB Slide Show 440x440 Previous Next 104.
Using the option menu during a slide show (or Viewing a Photo) 1 During a slide show(or viewing a photo), Press the TOOLS button to set the option. 2 Press the ▲ or ▼ button to select the desired option. Then press the ENTER button. Start Slide Show (Stop Slide Show) You can start or stop a Slide Show. Press the ▲ or ▼ button to select Start Slide Show (or Stop Slide Show), then press the ENTER button.
Zoom You can zoom into images in full screen mode. Press the ▲ or ▼ button to select Zoom, then press the ENTER button. Press the ◄ or ► button repeatedly to increase or decrease the Zoom effect. (x1 → x2 → x4) To move the enlarged photo image, press the ENTER button, then press the ▲/▼/◄/► buttons. ➢ Note that when the enlarged picture is smaller than the original screen size, the location change function doesn’t work. ➢ ➢ ➢ The enlarged file is not saved.
Background Music Setting You can set the background music. Press the ▲ or ▼ button to select Background Music Setting, then press the ENTER button. ➢ If you turn off the Background Music, even if the Background Music Settings have been set up, the background music will not be played. ➢ Loading music files is needed to change BGM Mode. Play music files in music category to load. ➢ Background Music setting menu is displayed. Press the ◄ or ► button to select the desired BGM(Background music) mode.
Using the Music List This menu shows MP3 files from among the files saved on a USB memory device. 1 Press the W.LINK button on the remote control to display the WISELINK menu. WISELINK 851.98MB/995.00MB Free USB Music 2 Press the ◄ or ► button to select Music, then press the ENTER button. ➢ Music files are displayed. (REW) or ➢ To select a file on the previous / next group, press the (FF) button to move to the previous / next group.
Sorting Music List You can sort music files in the Music List by a particular standard. 1 Press the W.LINK button on the remote control to display the WISELINK menu. WISELINK 2 Press the ◄ or ► button to select Music, then press the ENTER button. ➢ Music files are displayed. 3 Press the ▲ or ▼ button to select a sorting standard. (Title, Artist, Mood, Genre, Folder, Preference) USB • Title: Sorts music files by the title. ➢ It sorts the Music titles in alphabetical order, and shows the music file.
Sorting the photos by genre 1 Music Select Genre as the sorting standard in the Music List. Gold 2 Press the ◄ or ► button to select from the sublist of files grouped by genre. 3 Once Ost 2007 Soundtrack ★★★ Delete Black Capricorn Day Sad Information ★★★ Synkronized 1999 Acid Jazz Exciting ★★★ Artist Genre Mood 5 Press ENTER button to play the selected group of music files from the sublist. Sorting the photos by folder USB Blues ▲ Device Favorites Setting ...
Deleting the Music files 1 Press the ◄ or ► button to select the desired music file in the music list. 2 Press the TOOLS button. 3 Press the ▲ or ▼ button to select Delete, then press the ENTER button. If Everyone Cared ➢ The (for example) Selected File(s): music file... 1 File(s) Delete this file? message appear. file(s)? message appear. Press the ◄ or ►button to select OK, then press the ENTER button. Lies Delete Glen Hansard All The Right Reas..
Playing a Music File Playing a music file 1 Press the W.LINK button on the remote control to display the WISELINK menu. Music If Everyone Cared 2 Press the ◄ or ► button to select Music, then press the ENTER button. ➢ Music files are displayed. 3 Pressing the ENTER button to select a music file to be played, then press the ENTER button. ➢ This menu only shows files with the MP3 file extension. Files with other file extensions are not displayed, even if they are saved on the same USB device.
Playing the selected music files 1 Press the W.LINK button on the remote control to display the WISELINK menu. 2 Press the ◄ or ► button to select Music, then press the ENTER button. 3 Press the ◄ or ► button to select the desired music file, then press the yellow button. Repeat the above operation to select multiple music. ➢ The ( ) mark appears to the left of the selected music files. Music 2File(s) Selected If Everyone Cared If You Want Me Marketa lrgl... Glen Hansard All The Right Reas..
Using the Setup Menu Setup displays the user settings of the WISELINK menu. 1 Press the W.LINK button on the remote control to display the WISELINK menu. 2 Press the ◄ or ► button to select Music, then press the ENTER button. 3 Press the ▲ or ▼ button to select the desired option. (Slide Show Speed, Music Repeat Mode, Screen Saver Run Time, Information, Safe Remove) 4 Press the ◄ or ► button to select the option, then press the ENTER button. WISELINK 851.98MB/995.
About Anynet+ What is Anynet+? Anynet+ is a function that enables you to control all connected Samsung devices that support Anynet+ with your Samsung TV’s remote. Connecting Anynet+ Devices The Anynet+ system can be used only with Samsung devices that have the Anynet+ feature. To be sure your Samsung device has this feature, check if there is an Anynet+ logo on it. To connect to a TV TV Anynet+ Device 1 Anynet+ Device 2 Anynet+ Device 3 HDMI 1.3 Cable HDMI 1.
Setting Up Anynet+ The following settings help set the Anynet+ functions. To use the Anynet+ Function, Anynet+ (HDMI-CEC) must be set to On 1 2 Press the ▲ or ▼ button to select Anynet+ (HDMI-CEC), then press the ENTER button. 3 Press the ▲ or ▼ button to select On, then press the ENTER button. ➢ The Anynet+ (HDMI-CEC) function is enabled. ➢ If you select Off, Anynet+ (HDMI-CEC) is disabled. ➢ When the Anynet+ (HDMI-CEC) function is disabled, all the Anynet+ related operations are deactivated.
Anynet+ Menu The Anynet+ menu changes depending on the type and status of the Anynet+ devices connected to the TV. Anynet+ Menu Description View TV Switches from Anynet+ to TV broadcast mode. Device List Displays the Anynet+ device list. Recording: (Device_Name) Starts a recording. (This menu works only for a device supporting recording.) (Device_Name) Menu Shows the menu of the connected device. Example: When a DVD Recorder is connected, the DVD Recorder’s title menu appears.
Listening through a Receiver (Home theater) You can listen to sound through a receiver instead of the TV speaker. 1 Press the TOOLS button. Press the ▲ or ▼ button to select Receiver, then press the ENTER button. TOOLS View TV Device List Recording : DVD DVD Menu DVD Menu Picture Size : Picture Mode : Sound Mode : 2 Press the ◄ or ► button to select to On, then press the ENTER button. Now you can listen to sound through the receiver. 3 Press the EXIT button to exit.
Appendix Troubleshooting If the TV seems to have a problem, first try this list of possible problems and solutions. If none of these troubleshooting tips apply, call your nearest Samsung service center. Problem Possible Solution Poor picture quality. Try another channel. Adjust the antenna. Check all wire connections. Poor sound quality. Try another channel. Adjust the antenna. No picture or sound. Try another channel. Press the SOURCE button. Make sure the TV is plugged in.
Auto Wall-mount adjustment (Sold separately) (PN50A550S1F) Once the auto wall mount is installed, the position of your TV can be easily adjusted. Auto Wall-Mount TV Rear Panel EX-LINK Cable (Not supplied) Entering the menu 1 Press the ▲, ▼, ◄ or ► button on your remote control. ➢ The Wall Mount Adjustment screen is displayed. ➢ If the Wall Mount Adjustment screen is not displayed when clicking on a direction button while watching your TV, use the menu to display that screen.
Wall Mount Kit Specifications (VESA) Install your wall mount on a solid wall perpendicular to the floor. When attaching to other building materials, please contact your nearest dealer. If installed on a ceiling or slanted wall, it may fall and result in severe personal injury. Product Family inch VESA Spec.
How to attach the Stand-Base Using the screws for securing the stand base and the monitor, firmly attach the monitor to the stand base. (The exterior of the set may be different from the picture.) When mounting your TV on a wall, install the cover (1) on the stand-base using two screws. Warning Firmly secure the stand to the TV before moving it, as the stand may fall and could cause serious injury. ➢ Two or more people should carry the TV.
Dimensions (PN50A550S1F) TOP VIEW FRONT VIEW JACK PANEL DETAIL 7.2 x 3.7 inches SIDE VIEW REAR VIEW NOTE: All drawings not necessarily to scale. Some dimensions are subject to change without prior notice. Refer to dimensions on each unit prior to performing any carpentry. Not responsible for typographical or printed errors. © 2008 Samsung Electronics America, Inc.
Dimensions (PN58A550S1F) TOP VIEW FRONT VIEW JACK PANEL DETAIL 7.2 x 3.7 inches SIDE VIEW REAR VIEW NOTE: All drawings not necessarily to scale. Some dimensions are subject to change without prior notice. Refer to dimensions on each unit prior to performing any carpentry. Not responsible for typographical or printed errors. © 2008 Samsung Electronics America, Inc.
The GNU General Public License (GPL) Version 2, June 1991 Copyright (C) 1989, 1991 Free Software Foundation, Inc. 59 Temple Place, Suite 330, Boston, MA 02111-1307 USA Everyone is permitted to copy and distribute verbatim copies of this license document, but changing it is not allowed. Preamble The licenses for most software are designed to take away your freedom to share and change it.
These requirements apply to the modified work as a whole. If identifiable sections of that work are not derived from the Program, and can be reasonably considered independent and separate works in themselves, then this License, and its terms, do not apply to those sections when you distribute them as separate works.
9. The Free Software Foundation may publish revised and/or new versions of the General Public License from time to time. Such new versions will be similar in spirit to the present version, but may differ in detail to address new problems or concerns. Each version is given a distinguishing version number.
GNU Lesser General Public License (LGPL) Version 2.1, February 1999 Copyright (C) 1991, 1999 Free Software Foundation, Inc. 59 Temple Place, Suite 330, Boston, MA 02111-1307 USA Everyone is permitted to copy and distribute verbatim copies of this license document, but changing it is not allowed. [This is the first released version of the Lesser GPL. It also counts as the successor of the GNU Library Public License, version 2, hence the version number 2.1.
TERMS AND CONDITIONS FOR COPYING, DISTRIBUTION AND MODIFICATION 0. This License Agreement applies to any software library or other program which contains a notice placed by the copyright holder or other authorized party saying it may be distributed under the terms of this Lesser General Public License (also called “this License”). Each licensee is addressed as “you”.
5. A program that contains no derivative of any portion of the Library, but is designed to work with the Library by being compiled or linked with it, is called a “work that uses the Library”. Such a work, in isolation, is not a derivative work of the Library, and therefore falls outside the scope of this License.
10. Each time you redistribute the Library (or any work based on the Library), the recipient automatically receives a license from the original licensor to copy, distribute, link with or modify the Library subject to these terms and conditions. You may not impose any further restrictions on the recipients’ exercise of the rights granted herein. You are not responsible for enforcing compliance by third parties with this License. 11.
END OF TERMS AND CONDITIONS How to Apply These Terms to Your New Libraries If you develop a new library, and you want it to be of the greatest possible use to the public, we recommend making it free software that everyone can redistribute and change. You can do so by permitting redistribution under these terms (or, alternatively, under the terms of the ordinary General Public License). To apply these terms, attach the following notices to the library.
This page is intentionally left blank.
This page is intentionally left blank.
Información importante sobre la garantía relativa al formato de visualización del televisor Las pantallas PDP con formato de pantalla panorámica (16:9, la relación de aspecto ancho:alto de la pantalla) están diseñadas principalmente para visualizar vídeos de movimiento de formato panorámico. En estas pantallas debe ver las las imágenes en el formato 16:9 de pantalla panorámica o ampliadas para llenar la pantalla si el modelo tiene esta opción, y en movimiento constante.
Instrucciones para el usuario Retención de imágenes en la pantalla No deje imágenes fijas visibles (como las de un videojuego) en el panel de la pantalla de plasma durante mucho tiempo, ya que se podría producir la retención de la imagen en la misma. Este fenómeno de retención de imágenes también se denomina “quemadura de pantalla”. Para evitar dicha retención de la imagen, consulte la página 23 de este manual para reducir el grado de brillo y contraste de la pantalla al mostrar una imagen fija.
Índice Español Información general ■ ■ ■ ■ ■ ■ Características...............................................................5 Accesorios......................................................................5 Aspecto general del panel de control............................. 6 Aspecto general del panel de conexiones...................... 7 Mando a distancia..........................................................8 Instalación de las pilas en el mando a distancia............
Información general Características • • • • • Valores ajustables de la imagen que se pueden almacenar en la memoria del televisor. Temporizador automático para encender o apagar el televisor. Temporizador de desconexión especial. Función V-chip. Excelente interfaz digital y capacidad de trabajo en red: El sintonizador digital HD incorporado permite ver las emisiones HD que no exigen una suscripción sin que sea necesario disponer de un receptor de televisión por cable/satélite (decodificador).
Aspecto general del panel de control Botones de la parte inferior derecha del panel Los botones de la parte inferior derecha del panel controlan las funciones básicas del televisor, incluidos los menús en pantalla. Para utilizar las funciones más avanzadas debe usarse el mando a distancia. Botones del panel frontal Toque cada botón para activar la función. ➢ El color y la forma del producto pueden variar según el modelo.
Aspecto general del panel de conexiones Tomas del panel posterior Use las tomas del panel posterior para conectar componentes de A/V que estarán disponibles permanentemente, como un vídeo o un reproductor de DVD. Si desea más información sobre la conexión del equipo, consulte las páginas 9-15. El color y la forma del producto pueden variar, según el modelo. 1 Botón de encendido Conexión para el cable de alimentación suministrado. 2 DIGITAL AUDIO OUT (OPTICAL) Conexión para un componente de audio digital.
Mando a distancia Puede utilizar el mando a una distancia del televisor de hasta 7 metros. 1 POWER Enciende y apaga el televisor. % Use estos botones en los modos DMA, WISELINK y Anynet+. ( : Este mando remoto se puede usar para controlar la grabación en las grabadoras de Samsung con la función Anynet+.) 2 TV Selecciona directamente el modo TV. 3 BOTONES NUMÉRICOS Se utilizan para cambiar el canal.
Instalación de las pilas en el mando a distancia 1 Levante la tapa de la parte posterior del mando a distancia, como se muestra en la ilustración. 2 Instale dos baterías de tamaño AAA. ➢ Asegúrese de que los extremos “+” y “-” de las pilas concuerdan con el diagrama del interior del compartimiento. ➢ El uso del mando a distancia con los botones de iluminación On/Off( ) establecidos en Encendidoreduce el tiempo de uso de las pilas. ※ Use pilas alcalinas en el mando a distancia.
Conexión de TV por cable Para conectar a un sistema de TV por cable, siga estas instrucciones. Cable sin decodificador de cable 1 Conecte el cable de entrada al terminal ANT IN de la parte posterior del televisor. ➢ Dado que el televisor tiene previsto el uso de televisión por cable, no se necesita un decodificador para ver canales de cable no codificados. ANT IN Conexión al decodificador de cable que decodifica todos los canales 1 Busque el cable conectado al terminal ANT OUT del decodificador.
Conexión de un reproductor de DVD o receptores de televisión por cable/ satélite (decodificadores) a través de HDMI Esta conexión sólo se puede realizar si hay una toma de salida de HDMI en el dispositivo externo. Esta conexión proporciona una imagen de la mayor calidad. 1 Conecte un cable HDMI entre el terminal HDMI IN (1, 2 o 3) del televisor y el terminal HDMI del reproductor de DVD o del receptor de televisión por cable/satélite (decodificador).
Conexión de un reproductor de DVD o receptores de televisión por cable/ satélite (decodificadores) a través de los cables de componentes Las tomas del panel posterior del televisor facilitan la conexión al televisor de un reproductor de DVD/receptor de cable/satélite (decodificador).
Conexión de un aparato de vídeo Conexión de vídeo En estas instrucciones se asume que ya ha conectado el TV a una antena o a un sistema de TV por cable (de acuerdo con las instrucciones de las páginas y 10). Ignore el paso 1 si aún no ha conectado una antena o un sistema de cable. 1 Desenchufe el cable o la antena de la parte posterior del TV. Conecte el cable o la antena al terminal ANT IN en la parte posterior del aparato de vídeo.
Conexión de un sistema de audio digital Las tomas del panel posterior del televisor facilitan la conexión de un sistema de audio digital (Home Cinema/ Receptor) al televisor. 1 Conecte un cable óptico entre el terminal DIGITAL AUDIO OUT (OPTICAL) del televisor y el terminal Digital Audio Input (OPTICAL) del sistema de audio digital.
Conexión a un PC Uso del cable D-Sub 1 Conecte un cable D-Sub entre el terminal PC IN [PC] del televisor y el terminal de salida PC del ordenador. Conecte un cable de audio PC entre el terminal PC IN [AUDIO] del televisor y el terminal de salida de audio de la tarjeta de sonido del ordenador.
Funcionamiento Encendido y apagado del televisor Pulse el botón POWER del mando a distancia. También puede usar el botón de encendido del televisor. ➢ El televisor puede tardar unos segundos en encenderse. Función Plug & Play La primera vez que se enciende el nuevo televisor, se debe elegir la configuración básica del idioma, fuente de entrada y canales, y la hora del día por medio de la función plug and play. El televisor almacenará esta configuración en la memoria.
5 El televisor empezará a memorizar todos los canales disponibles. Para detener la búsqueda antes de que finalice, pulse el botón ENTER con la opción de detener seleccionada. Una vez guardados todos los canales disponibles, el televisor inicia la eliminación de los canales codificados (ver página 47). A continuación, vuelve a mostrarse el menú Prog. Auto. Pulse el botón ENTER cuando se complete la memorización de canales. Aparece el menú Modo Reloj.
Si desea reiniciar esta función... 1 2 Pulse el botón ENTER para seleccionar Plug & Play. Si desea más detalles sobre las opciones de configuración, consulte las páginas 16 y 17. ➢ La función Plug & Play está disponible sólo en el modo TV. Configuración Pulse el botón MENU para mostrar el menú. Pulse los botones ▲ o ▼ para seleccionar Configuración; a continuación pulse el botón ENTER.
Ajuste del volumen Utilización de los botones de volumen 1 Pulse los botones VOL o VOL para subir o bajar el volumen. Utilización del botón Mute Puede interrumpir el sonido en cualquier momento pulsando el botón MUTE. 1 Pulse el botón MUTE y se corta el sonido. Mute se visualizará en la pantalla. 2 Para recuperar el sonido, vuelva a pulsar el botón MUTE o pulse los botones VOL o VOL . Visualización de la pantalla La pantalla identifica el canal actual y el estado de algunos ajustes de audio-vídeo.
Uso del botón TOOLS Se puede usar el botón TOOLS para seleccionar rápida y fácilmente las funciones que se usan con más frecuencia. El menú TOOLS cambia según el modo de entrada externo que se está viendo. 1 Pulse el botón TOOLS. Aparece el menú TOOLS . TOOLS 2 ulse los botones ▲/▼ para seleccionar un menú y, a continuación, pulse el botón P ENTER. 3 Pulse los botones ▲/▼/◄/►/ENTER para ver, cambiar o usar las opciones seleccionadas.
Almacenamiento de los canales en la memoria (método automático) 1 Antena Canal Pulse el botón MENU para mostrar el menú. Pulse los botones ▲ o ▼ para seleccionar Canal; a continuación pulse el botón ENTER. : Aire Prog. Auto ► Lista de canales Borrar canal encriptado 2 Pulse los botones ▲ o ▼ para seleccionar Prog. Auto y pulse el botón ENTER. 3 Pulse los botones ▲ o ▼para seleccionar una conexión de la antena y pulse el botón ENTER. ➢ Aire: Señal de antena Aire. Cable: Señal de antena por Cable.
Para seleccionar la fuente Úselo para seleccionar TV u otras fuentes de entrada externas como reproductores de DVD o receptores de cable y satélite (decodificadores), conectados al televisor. Permite seleccionar la fuente de entrada que se prefiera. 1 2 Pulse el botón ENTER para seleccionar Lista de Origen. Pulse los botones ▲ o ▼ para seleccionar el origen de la señal; a continuación pulse el botón ENTER.
Control de la imagen Cambio del formato de la imagen Puede seleccionar el tipo de imagen que mejor cumpla sus requisitos de visualización. 1 Imagen Pulse el botón MENU para mostrar el menú. Pulse el botón ENTER para seleccionar Imagen. Modo : Normal Luz de la celda :7 Contraste : 90 Brillo : 45 Definicón : 50 Color : 50 Tinte (V/R) : V50/R50 ► Configuración detallada Imagen 2 Pulse el botón ENTER para seleccionar Modo. Pulse los botones ▲ o ▼ para seleccionar Dinámico, Normal o Cine.
Ajuste de la configuración detallada Los nuevos televisores Samsung permiten una configuración más precisa de la imagen que los modelos anteriores. Consulte más adelante cómo realizar una configuración detallada. Activación de la configuración detallada Pulse el botón MENU para ver el menú. Pulse el botón ENTER para seleccionar Imagen. 2 Pulse el botón ENTER para seleccionar Modo. Pulse los botones ▲ o ▼ para seleccionar Normal o Película, a continuación, pulse el botón ENTER.
Cambio del espacio de color Espacio de color es una matriz de color compuesta por los colores rojo, verde y azul. Seleccione su gama favorita de color y disfrute de unos colores auténticamente naturales. 10 P ulse los botones ▲ o ▼ para seleccionar Espacio de color, y pulse el botón ENTER. Configuración detallada Ajuste del negro : Apagado Contraste Dinám.
Activación del balance de blanco Se puede ajustar la temperatura del color para conseguir colores más naturales. Configuración detallada Ajuste del negro 17 P ulse los botones ▲ o ▼ para seleccionar Balanceo de blanco y, a continuación, pulse el botón ENTER. 18 Seleccione la opción adecuada pulsando los botones ▲ o ▼ y, a continuación, pulse el botón ENTER. : Apagado Contraste Dinám.
Activación de xvYCC Si ajusta el modo xvYCC como Encendido, se aumenta el detalle y el espacio de color mientras se ven películas desde un dispositivo externo (por ejemplo, un reproductor de DVD) conectado a los terminales HDMI o Component IN. 24 P ulse los botones ▲ o ▼ para seleccionar xvYCC y, a continuación, pulse el botón ENTER. Configuración detallada Contraste Dinám.
Cambio del tamaño de la pantalla Es posible que alguna vez desee cambiar el tamaño de la imagen en la pantalla. El televisor se suministra con seis opciones de tamaño de la pantalla, cada una diseñada para que funcione lo mejor posible con tipos específicos de entrada de vídeo. Es posible que el receptor de cable o satélite tenga también su propia gama de tamaños de pantalla. Sin embargo, en general, debe ver el televisor en el modo 16:9 tanto como sea posible.
16:9 Establece la imagen en modo panorámico 16:9. Zoom1 Tamaño de pantalla cuando se amplía verticalmente el formato amplio. Zoom2 Tamaño de pantalla cuando se amplía verticalmente el formato Zoom1 (Zoom1). Ajuste ancho Amplía la relación de aspecto de la imagen para que se ajuste al ancho total de la pantalla. 4:3 Ajusta la imagen en modo normal 4:3.
DNIe (motor digital de imágenes naturales) Este televisor incluye la función DNIe con el fin de conseguir una gran calidad visual. Si ajusta DNIe en Encendido, podrá ver la pantalla con la función DNIe activada. 1 Siga las instrucciones 1 y 2 de Activación de las opciones de la imagen. (Consulte la página 27) 2 ulse los botones ▲ o ▼ para seleccionar DNIe y, a continuación, pulse el P botón ENTER. 3 ulse los botones ▲ o ▼ para seleccionar Apagado o Encendido o pulse el P botón ENTER.
Configuración de la función del modo de película El televisor se puede configurar para detectar automáticamente y procesar las señales de las películas procedentes de todas las fuentes y ajustar la imagen para conseguir una calidad óptima. 1 2 Siga las instrucciones 1 y 2 de Activación de las opciones de la imagen. (Consulte la página 27) Pulse los botones ▲ o ▼ para seleccionar Modo película y, a continuación, pulse el botón ENTER.
Reducción de los efectos de una pantalla quemada Si la pantalla se ha quemado, puede seleccionar una pantalla blanca o un patrón de señal para que le ayude a retirar los elementos quemados. 1 Siga las instrucciones 1 y 2 de Activación de las opciones de la imagen. (consulte la página 27) 2 Pulse los botones ▲ o ▼ para seleccionar Protección de Pantalla y, a continuación, pulse el botón ENTER. Opciones de imagen Tamaño : 16:9 Digital NR : Auto DNle : Apagado N.
Prevención del desgaste de la pantalla Esta pantalla está equipada con tecnología de prevención para reducir la posibilidad de que se queme. Esta tecnología permite definir el movimiento de la imagen arriba o abajo (línea vertical) y de lado a lado (punto horizontal). El ajuste del tiempo permite programar intervalos temporales entre los movimientos de la imagen en minutos. 1 Siga las instrucciones 1 y 2 de Activación de las opciones de la imagen.
Reajuste de los valores de la imagen a los valores predefinidos de fábrica 2 P ulse los botones ▲ o ▼ para seleccionar Reinicio de la imagen y pulse el botón ENTER. Pulse los botones ◄ o ► para seleccionar Aceptar o Cancelar y, a continuación, pulse el botón ENTER. Pulse el botón EXIT para salir. ➢ Configuración detallada Opciones de imagen Imagen 1 Para seleccionar el modo de imagen deseado, siga las instrucciones 1 y 2 de Cambio del formato de la imagen.
Cambio de la posición de la ventana PIP 4 Pulse los botones ▲ o ▼ para seleccionar Posición y, a continuación, pulse el botón ENTER. Pulse los botones ▲ o ▼ para seleccionar la posición de la ventana PIP que desea y pulse el botón ENTER. ➢ En los modos Ventana Doble ( ) y Ancho Doble ( ) la opción Posición no se puede seleccionar.
Control del sonido Cambio del estándar de sonido Puede seleccionar el modo de sonido que se ajuste al programa que se está viendo. 1 Sonido Pulse el botón MENU para mostrar el menú. Pulse los botones ▲ o ▼ para seleccionar Sonido; a continuación pulse el botón ENTER. Modo : Favorito ► Ecualizador Pulse el botón EXIT para salir. • • • • • Sonido 2 Pulse el botón ENTER para seleccionar Modo.
4 Pulse los botones ▲ o ▼ para elegir la frecuencia que desee ajustar. Pulse los botones ◄ o ► para aumentar o reducir el nivel de una frecuencia concreta. • Ajuste del balance de sonido I/D : Para ajustar el balance de sonido de los altavoces I/D. • Ajuste del ancho de banda (100Hz, 300Hz, 1kHz, 2kHz, 3kHz, 10kHz): Para ajustar el nivel de las diferentes frecuencias de ancho de banda.
Elección del idioma preferido El sistema de transmisión de TV digital permite transmitir simultáneamente muchas pistas de audio (por ejemplo, traducciones simultáneas del programa en otros idiomas). Idioma preferido 1 3 Equalizer Trusurround SRS XT Sonido 2 Pulse el botón MENU para mostrar el menú. Pulse los botones ▲ o ▼ para seleccionar Sonido; a continuación pulse el botón ENTER. Pulse los botones ▲ o ▼ para seleccionar Idioma preferido y, a continuación, pulse el botón ENTER.
Control automático de volumen Reduce las diferencias en el nivel de volumen entre las emisoras. 1 Pulse los botones ▲ o ▼ para seleccionar Vol. Auto.; a continuación pulse el botón ENTER. 3 Pulse los botones ▲ o ▼ para seleccionar Encendido o Apagado y, a continuación, pulse el botón ENTER. Pulse el botón EXIT para salir. Idioma preferido : English Sonido Multi-track : Estéreo Vol. Auto : Apagado Altavoz TV : Encendido Sel.
Audición del sonido de la imagen secundaria (PIP) Cuando se activa la función PIP se puede escuchar el sonido de la imagen secundaria (PIP). 1 Sonido Pulse el botón MENU para mostrar el menú. Pulse los botones ▲ o ▼ para seleccionar Sonido; a continuación pulse el botón ENTER. Vol.Auto : Apagado Altavoz TV : Encendido Sel. Sonido : Principal ► Reinicio del sonido 2 Pulse los botones ▲ o ▼ para seleccionar Sel. Sonido y, a continuación, pulse el botón ENTER.
Control de los canales Gestión de los canales Con este menú puede agregar y borrar los canales o configurarlos como favoritos y usar la guía de programas de las emisoras digitales. 1 Pulse el botón MENU para mostrar el menú. Pulse los botones ▲ o ▼ para seleccionar Canal; a continuación pulse el botón ENTER. Pulse los botones ▲ o ▼ para seleccionar Lista de canales y, a continuación, pulse el botón ENTER. Pulse el botón ◄ para seleccionar Canales agregados.
Supresión y adición de canales Puede suprimir o añadir un canal para que se muestren los canales que desee. Pulse el botón MENU. Pulse los botones ▲ o ▼ para seleccionar Canal; a continuación pulse el botón ENTER. Pulse los botones ▲ o ▼ para seleccionar Lista de canales y, a continuación, pulse el botón ENTER. Pulse el botón ◄ para seleccionar Canales agregados. 3 Pulse los botones ▲ o ▼ para seleccionar Todos los canales. Muestra todos los canales disponibles actualmente. Pulse el botón ENTER.
Pulse el botón ◄ para seleccionar Canales agregados. 3 ulse los botones ▲ o ▼ para seleccionar Todos los canales y, a continuación, P pulse el botón ENTER. Muestra todos los canales disponibles actualmente. Lista de canales Borrar canal encriptado Sintonia Fina Intensidad señal 6-1 7 Aire Canales agregados ulse los botones ▲ o ▼ para seleccionar Agregar a Favoritos, y pulse el P botón ENTER. Se mostrará el símbolo “♥“ y el canal se configurará como favorito.
Antena Lista de canales Borrar canal encriptado Sintonia Fina Intensidad señal 1 Pulse el botón MENU. Pulse los botones ▲ o ▼ para seleccionar Canal y, a continuación, pulse el botón ENTER. Pulse los botones ▲ o ▼ para seleccionar Lista de canales y, a continuación, pulse el botón ENTER. Canales agregados 2 Pulse los botones ▲ o ▼ para seleccionar un canal como favorito y pulse el botón TOOLS. 3 Pulse los botones ▲ o ▼ para seleccionar Visual. tempor. y pulse el botón ENTER.
Confirmación de una reserva de visualización Se puede ver, cambiar o borrar una reserva. Antena Canal 1 Pulse el botón MENU. Pulse los botones ▲ o ▼ para seleccionar Canal y, a continuación, pulse el botón ENTER. Pulse los botones ▲ o ▼ para seleccionar Lista de canales y, a continuación, pulse el botón ENTER. : Aire Prog. Auto Lista de canales Borrar canal encriptado Sintonia Fina Intensidad señal 2 Pulse el botón ◄ para seleccionar Canales agregados.
1 Pulse el botón MENU. Pulse los botones ▲ o ▼ para seleccionar Canal y, a continuación, pulse el botón ENTER. Pulse los botones ▲ o ▼ para seleccionar Lista de canales y, a continuación, pulse el botón ENTER. Sintonia Fina Intensidad señal 6 Aire Botones numéricos: Permiten introducir números. Botón rojo: Permite cambiar entre letras y caracteres en inglés. Botón verde: Permite borrar una letra o un carácter introducidos. Botón amarillo: Permite introducir un espacio vacío.
Supresión de los canales codificados digitales La función Borrar canal encriptado se usa para filtrar los canales codificados después de realizar una búsqueda automática. Puede tardar de 20 a 30 minutos. Prog. Auto Lista de canales Canal 1 Pulse el botón MENU. Pulse los botones ▲ o ▼ para seleccionar Canal y, a continuación, pulse el botónENTER. Pulse los botones ▲ o ▼ para seleccionar Borrar canal encriptado y pulse el botón ENTER. Busca los canales encriptados para borrarlos de la lista.
Comprobación de la potencia de la señal digital A diferencia de los canales analógicos, cuya calidad de recepción puede variar desde “nebuloso” a claro, los canales digitales (HDTV) tienen una calidad de recepción perfecta o no se reciben en absoluto. Por tanto, a diferencia de los canales analógicos, no puede sintonizar ningún canal digital. Puede, no obstante, ajustar la antena para mejorar la recepción de los canales digitales disponibles.
Pantalla del PC Utilización del televisor como pantalla del PC Configuración del software del PC (basado en Windows XP) A continuación se muestra la configuración de visualización de Windows para un ordenador típico. Probablemente la pantalla real de su PC sea distinta; dependerá de la versión concreta de Windows y de la tarjeta de vídeo que tenga. Aunque las pantallas reales sean diferentes, la información de configuración básica que se aplica en casi todos los casos es la misma.
Ajuste del televisor con el ordenador Cómo realizar un ajuste automático 1 2 Imagen Mediante la función de ajuste automático se puede establecer que el televisor se ajuste automáticamente de acuerdo con las señales de vídeo que recibe del ordenador. Esta función también ajusta automáticamente la configuración, los valores de frecuencia y la posición. Pulse el botón MENU para ver el menú. Pulse los botones ▲ o ▼ para seleccionar Imagen y, a continuación, pulse el botón ENTER.
Cambio de la posición de la pantalla ➢ Preselección: Pulse el botón ENTER para seleccionar el modo PC. Definición : 75 Ajuste Automático Imagen Ajuste la posición de la pantalla del PC si no se acopla a la pantalla del televisor. Pantalla ► Configuración detallada Opciones de imagen 1 Pulse el botón MENU para ver el menú. Pulse los botones ▲ o ▼ para seleccionar Imagen y, a continuación, pulse el botón ENTER.
Ajuste de la hora Configuración de la hora El ajuste del reloj es necesario para utilizar las distintas funciones de temporización del televisor. Además, podrá ver la hora mientras ve la televisión. (Pulse el botón INFO.) Opción 1: Ajuste manual del reloj 1 Plug & Play Idioma Configuración Pulse el botón MENU para ver el menú. Pulse los botones ▲ o ▼ para seleccionar Configuración y, a continuación, pulse el botón ENTER.
Opción 2: Ajuste automático del reloj El reloj puede ajustarse automáticamente cuando se recibe una señal digital. Pulse el botón MENU para ver el menú. Pulse los botones ▲ o ▼ para seleccionar Configuración y, a continuación, pulse el botón ENTER. Pulse los botones ▲ o ▼ para seleccionar Tiempo y, a continuación, pulse el botón ENTER.
Activación y desactivación del temporizador 1 Pulse el botón MENU para ver el menú. Pulse los botones ▲ o ▼ para seleccionar Configuración y, a continuación, pulse el botón ENTER. Pulse los botones ▲ o ▼ para seleccionar Tiempo y, a continuación, pulse el botón ENTER. Plug & Play Configuración Utilice esta función para que el televisor se encienda o apague a una hora concreta. Debe ajustar el reloj en primer lugar.
Ajuste del temporizador de desconexión 1 Pulse el botón MENU para ver el menú. Pulse los botones ▲ o ▼ para seleccionar Configuración y, a continuación, pulse el botón ENTER. Pulse los botones ▲ o ▼ para seleccionar Tiempo y, a continuación, pulse el botón ENTER. Plug & Play Configuración El temporizador de desconexión apaga automáticamente el televisor después de un período prefijado (30, 60, 90, 120, 150 y 180 minutos).
Descripción de las funciones Selección del idioma de los menús 1 Configuración Pulse el botón MENU para ver el menú. Pulse los botones ▲ o ▼ para seleccionar Configuración y, a continuación, pulse el botón ENTER. Pulse los botones ▲ o ▼ para seleccionar Idioma y, a continuación, pulse el botón ENTER. Plug & Play Idioma : Español ► Tiempo V-Chip Subtítulo Configuración externa Entretenimiento : Apagado Ahorro energía : Apagado PIP 2 Pulse el botón EXIT para salir.
Using the V-Chip La opción V-Chip bloquea automáticamente los programas que no se consideran apropiados para los menores. El usuario debe introducir primero un código PIN (número de identificación personal) para configurar o cambiar las restricciones de V-Chip. ➢ La función V-Chip no está disponible en los modos HDMI, Componente o PC. Configuración del código de identificación personal (PIN) 1 Idioma Configuración Pulse el botón MENU para mostrar el menú.
Activación/desactivación de V-Chip 1 2 Pulse el botón MENU para mostrar el menú. Pulse los botones ▲ o ▼ para seleccionar Configuración y, a continuación, pulse el botón ENTER. V-Chip Ingresar Código * Pulse los botones ▲ o ▼ para seleccionar V-Chip; a continuación pulse el botón ENTER. Se muestra el mensaje Ingresar Código. Escriba su código PIN de 4 dígitos. * * * 0~9 Ingresar Código 3 Regresar V-Chip Aparece la pantalla V-Chip.
4 Aparecerá la pantalla Guías pater. TV. Pulse los botones ▲ o ▼ para seleccionar una de las seis categorías basadas en la edad: • TV-Y:Todos los niños. Los temas y elementos de este programa están diseñados específicamente para audiencia muy joven, incluidos niños de edad entre los dos y seis años. • TV-Y7: Dirigido a niños más mayores. Los temas y elementos de este programa pueden incluir violencia física o cómica suave, o puede asustar a niños con una edad inferior a los 7 años.
Cómo configurar las restricciones utilizando “Clas. MPAA” (G, PG, PG-13, R, NC-17, X, NR) 1 Idioma Configuración El sistema de clasificación MPAA utiliza el sistema de la Asociación americana de cinematografía y se aplica principalmente en las películas. Cuando el bloqueo V-Chip está activado, el televisor bloquea automáticamente cualquier programa que tenga una determinada clasificación (ya sea según la clasificación MPAA o según la guía de programas de TV).
Cómo configurar las restricciones utilizando el sistema inglés canadiense Pulse el botón MENU para mostrar el menú. Pulse los botones ▲ o ▼ para seleccionar Configuración y, a continuación, pulse el botón ENTER. Idioma : Español Tiempo Configuración 1 V-Chip ► Subtítulo Configuración externa Entretenimiento : Apagado Ahorro energía : Apagado PIP Actualización del software 2 Pulse los botones ▲ o ▼ para seleccionar V-Chip y, a continuación, pulse el botón ENTER.
Cómo configurar las restricciones utilizando el sistema francés canadiense 1 Idioma Configuración Pulse el botón MENU para mostrar el menú. Pulse los botones ▲ o ▼ para seleccionar Configuración y, a continuación, pulse el botón ENTER. : Español Tiempo V-Chip ► Subtítulo Configuración externa Entretenimiento : Apagado Ahorro energía : Apagado PIP Actualización del software 2 Pulse los botones ▲ o ▼ para seleccionar V-Chip y, a continuación, pulse el botón ENTER.
Uso de V-Chip (V-Chip) con los canales digitales 1 Pulse el botón MENU para mostrar el menú. Pulse los botones ▲ o ▼ para seleccionar Configuración y, a continuación, pulse el botón ENTER. Idioma Configuración La información de la restricción paterna se puede usar mientras se ven los canales DTV.
Cómo reiniciar el televisor cuando el V-Chip bloquea un canal (“Escape de emergencia”) Si el televisor sintoniza un canal restringido, el V-Chip lo bloqueará. La pantalla quedará en blanco y aparecerá el siguiente mensaje: 1 Pulse el botón ENTER para seleccionar Aceptar. Para volver al modo de visualización normal, sintonice un canal diferente con los botones CH o CH . En ciertas condiciones (según la clasificación de los programas de televisión locales) la función V-Chip puede bloquear todos los canales.
Visión de subtítulos (mensajes de texto en pantalla) - Digital La función digital Subtítulo funciona en canales digitales. 2 Pulse el botón MENU para mostrar el menú. Pulse los botones ▲ o ▼ para seleccionar Configuración y, a continuación, pulse el botón ENTER. Pulse los botones ▲ o ▼ para seleccionar Subtítulo y, a continuación, pulse el botón ENTER. 3 Pulse el botón ENTER para seleccionar Subtítulo. Pulse los botones ▲ o ▼ para seleccionar Encendido y, a continuación, pulse el botón ENTER.
Visión de subtítulos (mensajes de texto en pantalla) - Analógico La función Subtítulo analógico funciona tanto en el modo de canal de televisión analógica como cuando la señal proviene de un dispositivo externo. (Dependiendo de la señal de transmisión, la función de Subtítulos analógicos puede funcionar en canales digitales.) 2 3 Pulse el botón MENU para mostrar el menú. Pulse los botones ▲ o ▼ para seleccionar Configuración y, a continuación, pulse el botón ENTER.
Ajuste de la melodía de encendido y apagado del televisor El volumen del sonido de la melodía del encendido y del apagado del televisor se puede configurar. 1 3 V-Chip Configuración 2 Pulse el botón MENU para mostrar el menú. Pulse los botones ▲ o ▼ para seleccionar Configuración y, a continuación, pulse el botón ENTER. Pulse los botones ▲ o ▼ para seleccionar Configuración externa y, a continuación, pulse el botón ENTER. Pulse el botón ENTER para seleccionar Melodía.
Configuración del modo Entretenimiento El modo Entretenimiento permite seleccionar la mejor visualización y el sonido óptimo para ver deportes y películas y para los juegos. Pulse el botón MENU para mostrar el menú. Pulse los botones ▲ o ▼ para seleccionar Configuración y, a continuación, pulse el botón ENTER. 2 Pulse los botones ▲ o ▼ para seleccionar Entretenimiento y, a continuación, pulse el botón ENTER.
Actualización del software Samsung puede ofrecer actualizaciones del firmware del televisor en el futuro. Póngase en contacto con el centro de llamadas de Samsung en 1-800-SAMSUNG para recibir información acerca de la descarga de las actualizaciones y del uso de un controlador USB. Las actualizaciones se pueden realizar conectando una unidad USB al puerto USB. 1 Inserte la unidad USB que contenga la actualización del firmware en el puerto de actualización USB del lateral del televisor.
WISELINK Uso de la función WISELINK Esta función permite ver archivos de fotos (JPEG) y escuchar archivos de audio (MP3) guardados en un dispositivo de clase de almacenamiento masivo (MSC) USB. 1 Pulse el botón POWER del mando a distancia o del panel frontal. Panel lateral del TV ➢ El televisor está encendido. 2 Conecte un dispositivo USB que contenga archivos JPEG o MP3 al terminal WISELINK (conector USB) que se encuentra en el lateral del televisor. ($-) ).
Uso del menú WISELINK 1 Pulse el botón MENU. Pulse los botones ▲ o ▼ para seleccionar Aplicaciones y, a continuación, pulse el botón ENTER. WISELINK USB 851.98MB/995.00MB Iibre PHOTO 2 Pulse los botones ▲ o ▼ para seleccionar WISELINK y, a continuación, pulse el botón ENTER. ➢ Se muestra el menú WISELINK. Photo USB Dispositivo Music Setup Salir Pulse el botón W.LINK del mando a distancia para mostrar el menú WISELINK.
Uso de la lista de fotos Este menú muestra carpetas y archivos de las fotos guardadas en un dispositivo de memoria USB. Lista de fotos 1 Pulse el botón W.LINK del mando a distancia para mostrar el menú WISELINK. 2 Pulse los botones ▲ o ▼ para seleccionar Photo y, a continuación, pulse el botón ENTER. ➢ Este menú sólo muestra los archivos con extensión jpg. Los archivos con otro formato como bmp o tiff no se muestran. ➢ Se muestran los archivos de fotos.
7 Elementos de ayuda • Botón rojo (Dispositivo): Selecciona el dispositivo conectado. • Botón verde (Configuración de favoritos): Cambia la configuración de favorito de la foto seleccionada. Pulse este botón varias veces hasta que se muestre el valor que desee. • Botón amarillo (Seleccione): Selecciona fotos en la lista de fotos. Las fotos seleccionadas se marcan con un símbolo ( ) situado a su izquierda.
Orden de las fotos por mes 1 Photo Seleccione Mensual como orden estándar de la lista de fotos. 2 Pulse los botones ◄ o ► para seleccionar en la lista secundaria de archivos agrupados por meses. Imagen_1.jpg Mes : Jun Fecha : Jun.01.2008 Secuencia Color : Gris Repr. grupo actual Composición : Carpeta : P-other Favoritos : ★ ★ ★ Borrar Información Preferencias 3 Pulse el botón TOOLS. 4 Pulse los botones ▲ o ▼ para resaltar Repr. grupo actual.
Cambio de la información del color 1 Seleccione Color como norma de clasificación en la lista de fotos y pulse los botones ◄ o ► para seleccionar una foto. ➢ C ambio de la información de varios archivos Pulse los botones ◄ o ► para seleccionar la foto que desee de la lista. A continuación pulse el botón amarillo. Repita el proceso anterior para seleccionar varias fotos. La marca ( ) aparece a la izquierda de la foto seleccionada. 2 Pulse el botón TOOLS.
Eliminación de archivos de fotos 3 Pulse los botones ◄ o ► para seleccionar la foto que desee de la lista. 4 Pulse el botón TOOLS. 5 Pulse los botones ▲ o ▼ para seleccionar Borrar y, a continuación, pulse el botón ENTER. ➢ A parece el mensaje Seleccionados: imagen_ 1.jpg 1 Archivos ¿Borrar arch. sel.?. ➢ C uando se borra un archivo de sólo lectura, aparece el mensaje Es un archivo de sólo lectura. ¿Borrar este archivo? 6 Pulse los botones ◄ o ► para seleccionar Aceptar y pulse el botón ENTER.
Visualización de una foto o una presentación Visualización de una foto 1 Pulse el botón W.LINK del mando a distancia para mostrar el menú WISELINK. Imagen_1.jpg 440x440 104.1KB 2008/1/1 2 Pulse los botones ◄ o ► para ir a Photo y pulse el botón ENTER. ➢ Se muestran los archivos de fotos. 3 4 Pulse los botones ◄ o ► para seleccionar la foto que desee de la lista. Pulse el botón ENTER sobre el icono de la foto. La foto seleccionada se muestra en toda la pantalla.
Uso del menú de opciones durante una presentación (o la visualización de una foto) 1 2 Durante una presentación (o la visualización de una foto), pulse el botón TOOLS para establecer una opción. Pulse los botones ▲ o ▼ para seleccionar la opción deseada. A continuación, pulse el botón ENTER. Inicio de una presentación (Detención de una presentación) Se puede iniciar o detener una presentación. Pulse los botones ▲ o ▼ para seleccionar Inic. vis. aut.
Ampliación Puede ampliar las imágenes en el modo de pantalla completa. Pulse los botones ▲ o ▼ para seleccionar Zoom y, a continuación, pulse el botón ENTER. Pulse los botones ◄ o ► para aumentar o reducir el efecto de la ampliación. (x1 → x2 → x4) Para mover una foto ampliada, pulse el botón ENTER y a continuación los botones ▲/▼/◄/►. ➢ Tenga en cuenta que si una imagen ampliada es menor que el tamaño de la pantalla original, la función de cambio de ubicación no está operativa.
Configuración de la música de fondo Se puede configurar la música de fondo. Pulse los botones ▲ o ▼ para seleccionar Configuración de la música de fondo y, a continuación, pulse el botón ENTER. ➢ Si se desactiva la opción Música de fondo, aunque se haya configurado Configurar música de fondo la música de fondo no se reproducirá. ➢ Es necesario cargar los archivos de música para cambiar BGM Mode. Reproduzca los archivos de música en la categoría de música para cargar.
Uso de la lista de música El menú muestra los archivos MP3 que se encuentran entre los archivos guardados en un dispositivo de memoria USB. 1 Press the W.LINK button on the remote control to display the WISELINK menu. WISELINK 851.98MB/995.00MB Iibre USB Music 2 Pulse los botones ▲ o ▼ para seleccionar Music y, a continuación, pulse el botón ENTER. ➢ Se muestran los archivos de música.
Clasificación de la lista de música Se pueden clasificar los archivos de música de la lista según una norma particular. 1 Pulse el botón W.LINK del mando a distancia para mostrar el menú WISELINK. 2 Pulse los botones ◄ o ► para seleccionar Music y pulse el botón ENTER. ➢ Se muestran los archivos de música. 3 Pulse los botones ▲ o ▼ para seleccionar una norma de clasificación.
Orden de las música por género 1 Music Seleccione Género como orden estándar de la lista de música. Gold 2 Pulse los botones ◄ o ► para seleccionar en la lista secundaria de archivos agrupados por género. 3 Pulse el botón TOOLS. 4 Pulse los botones ▲ o ▼ para resaltar Repr. grupo actual. Once Ost 2007 Soundtrack Triste Repr. grupo actual Borrar Black Capricorn Day Marketa lrgl...
Supresión de archivos de música 1 Pulse los botones ◄ o ► para seleccionar la música que desee de la lista. 2 Pulse el botón TOOLS. 3 Pulse los botones ▲ o ▼ para seleccionar Borrar y, a continuación, pulse el botón ENTER. ➢ Se muestra el mensaje (Por ejemplo) Selected File(s) :music file... Archivos seleccionados: 1 archivo de música... ¿Borrar este archivo?. ➢ Cuando se borra un archivo de solo lectura, aparece el mensaje Read-only file(s). Es un archivo de sólo lectura. ¿Borrar este archivo?.
Reproducción de un archivo de música Reproducción de un archivo de música 1 Pulse el botón W.LINK del mando a distancia para mostrar el menú WISELINK. 2 Pulse los botones ◄ o ► para seleccionar Music y pulse el botón ENTER. ➢ Se muestran los archivos de música. 3 Pulse el botón ENTER para seleccionar el archivo de música que se desea reproducir y pulse el botón ENTER. ➢ E ste menú sólo muestra archivos con la extensión MP3.
Reproducción de los archivos de música seleccionados 1 Pulse el botón W.LINK del mando a distancia para mostrar el menú WISELINK. 2 Pulse los botones ◄ o ► para seleccionar Music y pulse el botón ENTER. 3 Pulse los botones ◄ o ► para seleccionar el archivo de música que desee y, a continuación, pulse el botón amarillo. Repita el proceso anterior para seleccionar varios archivos de música. ➢ La marca ( ) aparece a la izquierda de los archivos de música seleccionados. Music 2archivoe selecc.
Uso del menú de configuración El menú de configuración muestra al usuario la configuración del menú WISELINK. 1 Pulse el botón W.LINK del mando a distancia para mostrar el menú WISELINK. 2 Pulse los botones ◄ o ► para seleccionar Setup y pulse el botón ENTER. 3 Pulse los botones ▲ o ▼ para seleccionar la opción deseada.
Acerca de Anynet+ ¿Qué es Anynet?+? Anynet+ es una función que permite controlar con el mando a distancia del televisor Samsung todos los dispositivos de Samsung conectados que sean compatibles con Anynet+. Conexión de dispositivos Anynet+ El sistema Anynet+ sólo se puede usar con dispositivos de Samsung que tengan la función Anynet+. Para asegurarse de que el dispositivo de Samsung tenga dicha función, compruebe si lleva el logotipo Anynet+.
Configuración de Anynet+ Los parámetros siguientes ayudan a configurar las funciones Anynet+. Para usar la función Anynet+, Anynet+ (HDMI-CEC) debe estar configurado como Encendido (On). 1 2 Pulse los botones ▲ o ▼ para seleccionar Anynet+ (HDMI-CEC) y, a continuación, pulse el botón ENTER. 3 Pulse los botones ▲ o ▼ para seleccionar Encendido y, a continuación, pulse el botón ENTER. ➢ La función Anynet+ (HDMI-CEC) está activada. ➢ Si selecciona Apagado, Anynet+ (HDMI-CEC) se desactiva.
Menú Anynet+ El menú Anynet+ cambia según el tipo y el estado de los dispositivos Anynet+ conectados al televisor. Menu Anynet+ Descripción Ver TV Cambia de Anynet+ al modo de emisión de TV. Lista Disp. Muestra la lista de dispositivos de Anynet+. Grabar: (Nombre_dispositivo) Comienza una grabación. (Este menú sólo funciona con dispositivos que admiten grabación.) Menú (Nombre_dispositivo)) Muestra el menú del dispositivo conectado.
Escucha a través de un receptor (sistema Home Cinema) Se puede escuchar sonido a través de un receptor en lugar de hacerlo mediante el altavoz del TV. 1 2 Pulse el botón TOOLS. Pulse los botones ▲ o ▼ para seleccionar Receptor y, a continuación, pulse el botón ENTER. Pulse los botones ◄ o ► para seleccionar Encendido y, a continuación, pulse el botón ENTER. Ahora podrá escuchar el sonido a través del receptor. 3 HERRAMIENTAS Ver TV Lista Disp.
Apéndice Resolución de problemas Si cree que el televisor tiene un problema, compruebe primero esta lista de posibles problemas y soluciones. Si no funciona ninguno de estos consejos, llame al centro de servicio técnico Samsung más cercano. Problema Posible solución Mala calidad de imagen. Pruebe con otro canal. Ajuste la antena. Compruebe las conexiones de todos los cables. Pruebe con otro canal. Ajuste la antena. Pruebe con otro canal. Pulse el botón SOURCE. Compruebe que el televisor esté enchufado.
Ajuste de montaje mural automático (se vende por separado) (PN50A550S1F) Una vez instalado el montaje mural automático, la posición del televisor se puede ajustar fácilmente. Montaje mural automático Panel posterior del TV Cable EX-LINK (no suministrado) Acceso al menú 1 Pulse los botones ▲, ▼, ◄ o ► del mando a distancia. ➢ Se muestra la pantalla Ajuste de montaje en pared.
Especificaciones del equipo de montaje mural (VESA) Instale el montaje mural en una pared sólida, perpendicular al suelo. Para colocarlo en otros materiales de construcción, póngase en contacto con el distribuidor más cercano. Si se instala en el techo o en una pared inclinada, puede caerse y causar graves lesiones personales.
Cómo montar el soporte base Utilizando los tornillos para asegurar el soporte y el monitor, fije firmemente el monitor al soporte. (Es posible que el exterior del equipo sea diferente del que se muestra en la imagen.) Cuando instale el televisor en una pared, fije la tapa (1) al soporte con dos tornillos. Advertencia Sujete firmemente el soporte al televisor antes de moverlo, ya que el soporte puede caer y causar lesiones graves. ➢ El televisor lo deben transportar dos o más personas.
Dimensiones (PN50A550S1F) VISTA SUPERIOR VISTA FRONTAL DETALLE DEL PANEL DE TERMINALES 7.2 x 3.7 pulgadas VISTA LATERAL VISTA POSTERIOR NOTA: No todos los dibujos están necesariamente a escala. Algunas dimensiones están sujetas a cambio sin previo aviso. Consulte las dimensiones de cada unidad antes adaptar el mueble para el televisor. La empresa no se responsabiliza de los errores tipográficos o de impresión. © 2008 Samsung Electronics America, Inc.
Dimensiones (PN58A550S1F) VISTA SUPERIOR VISTA FRONTAL DETALLE DEL PANEL DE TERMINALES 7.2 x 3.7 pulgadas VISTA LATERAL VISTA POSTERIOR NOTA: No todos los dibujos están necesariamente a escala. Algunas dimensiones están sujetas a cambio sin previo aviso. Consulte las dimensiones de cada unidad antes adaptar el mueble para el televisor. La empresa no se responsabiliza de los errores tipográficos o de impresión. © 2008 Samsung Electronics America, Inc.
Esta página se ha dejado en blanco expresamente.
Esta página se ha dejado en blanco expresamente.