BN68-00951A-00Eng 8/3/05 3:06 PM Page 1 PDP-TELEVISION (PLASMA DISPLAY PANEL) Owner’s Instructions Before operating the unit, please read this manual thoroughly, and retain it for future reference. ON-SCREEN MENUS Picture In Picture (PIP) Colour Weakness Enhancement Mode My Colour Control TELETEXT (Option) SRS TruSurroundXT Digital Natural Image engine This device is a Class B digital apparatus. Register your product at www.samsung.
BN68-00951A-00Eng 8/3/05 3:06 PM Page 2 User Instructions ◆ Screen Image retention Do not display a still image (such as on a video game or when hooking up a PC to this PDP) on the plasma monitor panel for more than 2 hours as it can cause screen image retention. This image retention is also known as “screen burn”. To avoid such image retention, reduce the degree of brightness and contrast of the screen when displaying a still image. ◆ Height The PDP can normally operate only under 2000m in height.
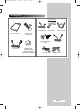
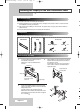
BN68-00951A-00Eng 8/3/05 3:06 PM Page 3 Checking Parts Sold Separately S-VIDEO Cable Owner’s Instructions HDMI Cable Remote Control/ AAA Batteries Component Cables (RCA) t.
BN68-00951A-00Eng 8/3/05 3:06 PM Page 4 Contents ◆ FOREWORD ■ User Instructions............................................................................................ 2 ◆ CONNECTING AND PREPARING YOUR DISPLAY ■ ■ ■ ■ ■ ■ ■ ■ ■ ■ ■ Control Panel................................................................................................. Infrared Remote Control ................................................................................ Inserting the Batteries in the Remote Control.......
BN68-00951A-00Eng 8/3/05 3:06 PM Page 5 Contents (continued) ◆ USING YOUR DISPLAY (continued) ■ ■ ■ ■ ■ ■ ■ ■ ■ ■ Customizing the Sound Settings ................................................................... Adjusting the Volume Automatically .............................................................. Setting the TruSurround XT........................................................................... Selecting the Internal Mute...................................................................
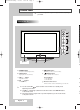
BN68-00951A-00Eng 8/3/05 3:06 PM Page 6 Control Panel ➢ The actual configuration of your TV may be different, depending on your model. ➢ Front of the TV Speaker a) a) SOURCE button e) Select the external input source. b) MENU button Display the on-screen menu. c) VOL +, - buttons Adjust the volume. d) CH , buttons Select channels. (ENTER) button Confirm your choice (Store or Enter). f) (POWER) button Press to turn the TV on and off.
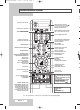
BN68-00951A-00Eng 8/3/05 3:06 PM Page 7 Control Panel (continued) ➢ The actual configuration of your TV may be different, depending on your model. Side of the TV Rear Panel a) HDMI/DVI IN Connect to the HDMI jack of a device with HDMI output. These inputs can also be used as a DVI connection with separate analog audio inputs. An optional HDMI/DVI cable will be necessary to make this connection.
BN68-00951A-00Eng 8/3/05 3:06 PM Page 8 Infrared Remote Control Y yo TURNS THE TV ON AND OFF PICTURE EFFECT SELECTION SOUND EFFECT SELECTION/ TELETEXT CANCEL WHEN YOU PRESS A BUTTON , ‘ ’ APPEARS ALONG WITH SELECTED MODE (TV, VCR, CABLE, DVD, OR STB) AND REMAINING BATTERIES ON LCD MAKE THE REMOTE CONTROL WORK FOR TV, VCR, CABLE, DVD, OR STB DIRECT CHANNEL SELECTION AUTOMATIC SWITCH-OFF/ TELETEXT SIZE SELECTION VOLUME INCREASE TEMPORARY SOUND SWITCH-OFF VOLUME DECREASE TELETEXT DISPLAY/ MIX BOT
BN68-00951A-00Eng 8/3/05 3:06 PM Page 9 Inserting the Batteries in the Remote Control You must insert or replace the batteries in the remote control when you: ◆ Purchase the television ◆ Find that the remote control is no longer operating correctly 1 Remove the cover on the rear of the remote control by pressing the symbol ( ) downwards and then pulling firmly to remove it. 2 Insert two R03, UM4, “AAA” 1.
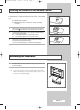
BN68-00951A-00Eng 8/3/05 3:06 PM Page 10 Installing the Display on the Wall Attachment Panel ➢ Refer to the correct installation guide according to your wall bracket. Installation Notes ◆ Contact a technician for installing the wall bracket. ◆ Samsung Electronics is not responsible for any damages to the product or harm to customers when the installation is done by the customer. ◆ This product is for installing on cement walls. The product may not stay in place when installed on plaster or wood.
BN68-00951A-00Eng 8/3/05 3:06 PM Page 11 Installing the Display on the Wall Attachment Panel (continued) t. To mount the product on the wall bracket ◆ The shape of the product may vary depending on the model. (The assemblies of the plastic hanger and the screw are the same) 1 Remove the 4 screws on the back of the product. 2 Insert the screw into the plastic hanger. (See the figure below) ☛ 3 Tighten the 4 screws in step 2 (plastic hanger + screw ) to the rear holes of the product.
BN68-00951A-00Eng 8/3/05 3:06 PM Page 12 Connecting to an Aerial or Cable Television Network To view television channels correctly, a signal must be received by the set from one of the following sources: ◆ An outdoor aerial ◆ A cable television network ◆ A satellite network 1 In these cases, connect the aerial or network input cable to the ANT IN jack on the rear of the television.
BN68-00951A-00Eng 8/3/05 3:06 PM Page 13 Switching Your Television On and Off The mains lead is attached to the rear of your television. 1 Plug the mains lead into an appropriate socket. Result: ➢ 2 The main voltage is indicated on the rear of the television and the frequency is 50 or 60Hz. Press the power button on the front of the television (or POWER ( ) button on the remote control) to switch the television on.
BN68-00951A-00Eng 8/3/05 3:06 PM Page 14 Familiarizing Yourself with the Remote Control The remote control is used mainly to: ◆ Change channels and adjust the volume. ◆ Set up the television using the on-screen menu system. The following table presents the most frequently used buttons and their functions. Button Viewing Function Menu Function Used to display the next stored channel. Used to display the previous stored channel. to - Used to display the corresponding channels.
BN68-00951A-00Eng 8/3/05 3:06 PM Page 15 Plug & Play Feature When the television is initially powered on, several basic customer settings proceed automatically and subsequently. The following settings are available. Plug & Play Start Plug & Play. OK 1 If the television is in standby mode, press the POWER ( on the remote control. Result: 2 ➢ 3 ) button. Exit Plug & Play English Language Français The Language menu is displayed.
BN68-00951A-00Eng 8/3/05 3:06 PM Page 16 Plug & Play Feature (continued) If you want to reset this feature... TV Setup Plug & Play Language : Time Child Lock Blue Screen : Melody : Colour Weakness : More Move 1 English 2 Off Off Off Enter Press the MENU ( Result: ) button. The main menu is displayed. Press the … or † button to select Setup. Result: The Setup menu is displayed. 3 Press the ENTER ( ) button. 4 Press the ENTER ( ) button again to select Plug & Play.
BN68-00951A-00Eng 8/3/05 3:06 PM Page 17 Storing Channels Automatically You can scan for the frequency ranges available to you (availability depends on your country). Automatically allocated programme numbers may not correspond to actual or desired programme numbers. However you can sort numbers manually and clear any channels you do not wish to watch. 1 Press the MENU ( Result: TV Channel Area Auto Store Manual Store Add/Delete Sort Name Fine Tune LNA ) button. The main menu is displayed.
BN68-00951A-00Eng 8/3/05 3:06 PM Page 18 Storing Channels Manually TV You can store television channels, including those received via cable networks. Channel Area Auto Store Manual Store Add/Delete Sort Name Fine Tune LNA : Asia/W.Europe When storing channels manually, you can choose: ◆ Whether or not to store each of the channels found. ◆ The programme number of each stored channel which you wish to identify.
BN68-00951A-00Eng 8/3/05 3:06 PM Page 19 Storing Channels Manually (continued) 9 If you know the number of the channel to be stored, see the following steps. TV Manual Store Programme Colour System Sound System Channel Search Store ◆ Press the … or † button to select Channel. Press the ENTER ( ) button. ◆ Press the … or † button to select C (Air channel) or S (Cable channel). : : : : : : P 1 AUTO BG C 05 175 MHz ? ◆ Press the √ button. ◆ Press the … or † button to select the required number.
BN68-00951A-00Eng 8/3/05 3:06 PM Page 20 Skipping Unwanted Channels TV Channel Area Auto Store Manual Store Add/Delete Sort Name Fine Tune LNA Move : Asia/W.Europe You can exclude the channels of your choice from the channel scan operation. When you scan through the stored channels, those that you have chosen to skip are not displayed. All channels that you do not specifically choose to skip are displayed during scanning. 1 : Off Press the MENU ( Result: Enter ) button.
BN68-00951A-00Eng 8/3/05 3:06 PM Page 21 Sorting the Stored Channels This operation allows you to change the programme numbers of stored channels. This operation may be necessary after using auto store. 1 Press the MENU ( Result: 2 ) button. The main menu is displayed. The Channel menu is displayed. 3 Press the ENTER ( 4 Press the … or † button to select Sort. Press the ENTER ( ) button. Move : Asia/W.Europe : Off Enter Return ) button.
BN68-00951A-00Eng 8/3/05 3:06 PM Page 22 Assigning Names to Channels TV Channel names will be assigned automatically when channel information is broadcast. These names can be changed, allowing you to assign new names. Channel Area Auto Store Manual Store Add/Delete Sort Name Fine Tune LNA : Asia/W.Europe 1 Result: 2 : Off Move TV Press the MENU ( Enter Return ) button. The main menu is displayed. Press the … or † button to select Channel. Result: The Channel menu is displayed.
s a BN68-00951A-00Eng 8/3/05 3:06 PM Page 23 Locking the Channel This feature allows you to prevent unauthorized users, such as children, from watching unsuitable programmes by muting out video and audio. Child Lock cannot be released using front panel buttons. Only remote control can release the Child Lock setting, so keep the remote control away from children. 1 Press the MENU ( Result: TV Setup Plug & Play Language : Time Child Lock Blue Screen : Melody : Colour Weakness : More ) button.
BN68-00951A-00Eng 8/3/05 3:06 PM Page 24 Using the LNA (Low Noise Amplifier) Feature TV This function is very useful in the situation that the TV is used in weak signal. LNA amplifies the TV signal in the weak signal area, a low-noise preamplifier boosts the incoming signal. Channel Area Auto Store Manual Store Add/Delete Sort Name Fine Tune LNA Move TV : Asia/W.Europe 1 Result: Enter Return Move : Asia/W.Europe ) button. The main menu is displayed.
BN68-00951A-00Eng 8/3/05 3:06 PM Page 25 Fine Tuning Channel Reception If the reception is clear, you do not have to fine tune the channel, as this is done automatically during the search and store operation. If the signal is weak or distorted, you may have to fine tune the channel manually. 1 Press the MENU ( Result: ) button. The main menu is displayed. TV Channel Area Auto Store Manual Store Add/Delete Sort Name Fine Tune LNA Press the … or † button to select Channel.
BN68-00951A-00Eng 8/3/05 3:06 PM Page 26 Displaying Information You can view the channel information and setting status you have selected by pressing the “INFO ( )” button on the remote control. The information displayed varies according to the selected source.
BN68-00951A-00Eng 8/3/05 3:06 PM Page 27 Customizing the Picture Settings Your television has several setting options that allow you to control the picture quality. 1 Press the MENU ( ) button. The main menu is displayed. Result: 2 Press the … or † button to select Picture. The Picture menu is displayed. Result: 3 Press the ENTER ( ) button. The Mode is selected. Result: 4 Press the ENTER ( ) button again. The Mode menu is displayed.
BN68-00951A-00Eng 8/3/05 3:06 PM Page 28 Setting the Picture (PC Mode) ➢ 1 TV Preset to the PC mode by pressing the SOURCE ( Press the MENU ( ) button. ) button. Setup Plug & Play Language : Time Child Lock Blue Screen : Melody : Colour Weakness : More Move Result: English Press the … or † button to select Setup. Result: Off Off Off Enter TV 2 Return The main menu is displayed. The Setup menu is displayed. 3 Press the ENTER ( 4 Press the … or † button to select PC.
BN68-00951A-00Eng 8/3/05 3:06 PM Page 29 Setting the Picture (PC Mode) ➢ 12 Preset to the PC mode by pressing the SOURCE ( Press the … or † button to select Auto adjustment. Press the ENTER ( ) button. Result: 13 ) button. TV PC Image Lock The screen quality and position are automatically reset. The settings are all finished, and the TV will automatically return to the previous picture.
BN68-00951A-00Eng 8/3/05 3:06 PM Page 30 Selecting the Picture Size TV You can select the picture size which best corresponds to your viewing requirements. Picture Mode : Size : Digital NR : DNIe Demo : My Colour Control Energy Saving : PIP Move TV Dynamic 16:9 On Off Standard Enter 1 Press the MENU ( Result: Size Result: Zoom Press the ENTER ( 4 Press the … or † button to select Size. Press the ENTER ( ) button. 5 Select the required option by pressing the … or † button.
BN68-00951A-00Eng 3:06 PM Page 31 Viewing the DNIe Demonstration This TV includes the DNIe function so as to provide a high visual quality. If you set DNIe Demo to On, you can view an applied DNIe and a normal picture on the screen, for demonstration purposes. Using this function, you can view the difference in the visual quality. 1 Press the MENU ( Result: TV Picture Mode : Size : Digital NR : DNIe Demo : My Colour Control Energy Saving : PIP ) button.
BN68-00951A-00Eng 8/3/05 3:06 PM Page 32 Setting the My Colour Control (Easy Control) TV This feature allows you to adjust colours according to your preferences, by adjusting skin, sky, and grass tones using the predefined settings (Blue, Green, Pink, Standard, and Custom) without affecting other colours on the screen.
y BN68-00951A-00Eng 8/3/05 3:06 PM Page 33 Setting the My Colour Control (Detail Control) This setting can be adjusted to suit your personal preferences. TV 1 Press the MENU ( Result: 2 The main menu is displayed. Press the … or † button to select Picture. Result: The Picture menu is displayed. 3 Press the ENTER ( 4 Press the … or † button to select My Colour Control. Press the ENTER ( ) button. Press the … or † button to select Detail Control. Press the ENTER ( ) button.
BN68-00951A-00Eng 8/3/05 3:06 PM Page 34 Setting the Blue Screen TV If no signal is being received or the signal is very weak, a blue screen automatically replaces the noisy picture background. If you wish to continue viewing the poor picture, you must set the Blue Screen mode to Off. Setup Plug & Play Language : Time Child Lock Blue Screen : Melody : Colour Weakness : More Move English 1 Off Off Off Press the MENU ( Result: Enter Return Press the … or † button to select Setup.
BN68-00951A-00Eng 8/3/05 3:06 PM Page 35 Using the Colour Weakness Enhancement Feature This feature adjusts the red, green, or blue colour to enhance the picture according to the user's particular colour weakness. 1 Press the MENU ( Result: 2 ) button. The main menu is displayed. The Setup menu is displayed. 3 Press the ENTER ( 4 Press the … or † button to select Colour Weakness. Press the ENTER ( ) button.
BN68-00951A-00Eng 8/3/05 3:06 PM Page 36 Using the Energy Saving Feature TV This feature adjusts the screen brightness automatically depending on the surrounding lighting conditions. Picture Mode : Size : Digital NR : DNIe Demo : My Colour Control Energy Saving : PIP Move TV Dynamic 16:9 On Off Standard Enter Move Press the MENU ( Result: Dynamic 16:9 On Off Result: The Picture menu is displayed. Press the ENTER ( 4 Press the … or † button to select Energy Saving.
BN68-00951A-00Eng 8/3/05 3:06 PM Page 37 Viewing the Picture in Picture (PIP) You can display a sub picture within the main picture of a TV program or external A/V devices. In this way you can monitor the video input from any connected devices while watching TV or other video input. 1 Press the MENU ( Result: 2 4 s 6 ) button. The main menu is displayed. Move The Picture menu is displayed. Press the ENTER ( ) button. TV The PIP is selected. Press the ENTER ( ) button again.
BN68-00951A-00Eng 8/3/05 3:06 PM Page 38 Viewing the Picture in Picture (PIP) Ea TV 11 PIP PIP Source Swap Size Position Programme : On : TV Move Enter TV : : :P Result: ➢ 1 Return PIP PIP Source Swap Size Position Programme Adjust : On : TV : : : Enter Press the … or † button to select Position. Press the ENTER ( ) button. The following options are available. - The Position menu is available when the Size is mode.
o BN68-00951A-00Eng 8/3/05 3:06 PM Page 39 Viewing the Picture in Picture (PIP) Easy functions of the remote control. Buttons Feature PIP Used to activate or deactivate the PIP function directly. SWAP Used to interchange the main picture and the sub picture. ➢ When the main picture is in the Video mode and the sub picture is in the TV mode, you might not hear the sound of main picture when pressing the SWAP ( ) button after changing the sub picture channel.
BN68-00951A-00Eng 8/3/05 3:06 PM Page 40 Using the Digital NR (Noise Reduction) Feature TV If the signal received by your television is weak, you can activate this feature to help reduce any static and ghosting that may appear on the screen.
BN68-00951A-00Eng 8/3/05 3:06 PM Page 41 Preventing Screen Burn-in To reduce the possibility of screen burn, this unit is equipped with screen burn prevention technology. This technology enables you to set picture movement up/down (Vertical Line) and side to side (Horizontal Dot). The Time setting allows you to program the time between movement of the picture in minutes. 1 Press the MENU ( Result: 2 TV ) button. The main menu is displayed. Move Press the … or † button to select Setup.
BN68-00951A-00Eng 8/3/05 3:06 PM Page 42 Reducing the Effects of Screen Burn If screen burn has occurred, you can select a white screen or signal pattern (rolling screen) to help remove screen burn artifacts. TV Setup Plug & Play Language : Time Child Lock Blue Screen : Melody : Colour Weakness : More Move TV English 1 Result: Off Off Off Enter Press the MENU ( Result: 3 Press the ENTER ( 4 Press the … or † button to select Screen Burn Protection. Press the ENTER ( ) button.
l BN68-00951A-00Eng 3:07 PM Page 43 Changing the Sound Standard You can select the type of special sound effect to be used when watching a given broadcast. 1 Press the MENU ( Result: TV Sound Mode Equalizer SRS TSXT Auto Volume Internal Mute ) button. The main menu is displayed. : Custom : Off : Off : Off Press the ▲ or ▼ button to select Sound. 2 Result: 3 The Sound menu is displayed. Press the ENTER ( Result: The Mode is selected.
BN68-00951A-00Eng 8/3/05 3:07 PM Page 44 Customizing the Sound Settings TV Your television has several settings which allow you to control the sound quality. Sound Mode Equalizer SRS TSXT Auto Volume Internal Mute : Custom 1 : Off : Off : Off Press the MENU ( Result: Enter R L Balance The Sound menu is displayed. Return Equalizer TV The main menu is displayed. Press the … or † button to select Sound. 2 Result: Move ) button.
BN68-00951A-00Eng 8/3/05 3:07 PM Page 45 Setting the TruSurround XT TruSurround XT is a patented SRS technology that solves the problem of playing 5.1 multichannel content over two speakers. TruSurround delivers a compelling, virtual surround sound experience through any two-speaker playback system, including internal television speakers. It is fully compatible with all multichannel formats.
BN68-00951A-00Eng 8/3/05 3:07 PM Page 46 Selecting the Internal Mute TV If you want to hear the sound through separate speakers, cancel the internal amplifier. Sound Mode Equalizer SRS TSXT Auto Volume Internal Mute : Custom 1 Press the MENU ( : Off : Off : Off Result: Result: Enter TV The Sound menu is displayed. Return Sound Mode Equalizer SRS TSXT Auto Volume Internal Mute The main menu is displayed. Press the … or † button to select Sound. 2 Move ) button.
BN68-00951A-00Eng 8/3/05 3:07 PM Page 47 Selecting the Sound Mode (depending on the model) The “DUAL I-II” button displays/controls the processing and output of the audio signal. When power is switched on, the mode is automatically preset to either “DUAL-I ” or “Stereo”, depending on the current transmission.
BN68-00951A-00Eng 8/3/05 3:07 PM Page 48 Setting and Displaying the Current Time TV You can set the television’s clock so that the current time is displayed by pressing the “INFO ( )” button. You must also set the time if you wish to use the automatic on or off timers. Setup Plug & Play Language : Time Child Lock Blue Screen : Melody : Colour Weakness : More Move TV English 1 Off Off Off Enter Result: Move TV 12 : 00 am : Off 00 : 00 am Off 00 : 00 am Off Enter ) button.
d BN68-00951A-00Eng 8/3/05 3:07 PM Page 49 Setting the Sleep Timer You can select a time period of between 30 and 180 minutes after which the television automatically switches to Standby mode. 1 Press the MENU ( Result: TV ) button. The main menu is displayed. Press the … or † button to select Setup. 2 Result: The Setup menu is displayed. 3 Press the ENTER ( 4 Press the … or † button to select Time. Press the ENTER ( ) button.
BN68-00951A-00Eng 8/3/05 3:07 PM Page 50 Switching the Television On and Off Automatically You can set the on or off timers so that the television will: TV ◆ Switch on automatically and tune to the channel of your choice at the time you select. Setup Plug & Play Language : Time Child Lock Blue Screen : Melody : Colour Weakness : More Move ◆ Switch off automatically at the time you select.
BN68-00951A-00Eng 8/3/05 3:07 PM Page 51 Switching the Television On and Off Automatically (continued) 10 Press the … or † button to select Off Timer. Press the ENTER ( ) button. Result: 11 Time Clock Set Sleep Timer On Timer Off Timer The Off Timer menu is displayed. Select Hour, Minute, or am/pm by pressing the œ or √ button. Set these by pressing the … or † button. ➢ You can set the hour and minute directly by pressing the numeric buttons on the remote control.
BN68-00951A-00Eng 8/3/05 3:07 PM Page 52 Viewing an External Signal Source TV Use the remote control to switch between viewing signal from connected equipment, such as VCR, DVD, Set-Top box, and the TV source (broadcast or cable).
V BN68-00951A-00Eng 8/3/05 3:07 PM Page 53 Teletext Feature Most television channels provide written information services via teletext. Information provided includes: ◆ Television programme times ◆ News bulletins and weather forecasts ◆ Sports results ◆ Travel information The teletext pages are organized according to six categories: Part A B C D E F ➢ Contents Selected page number. Broadcasting channel identity. Current page number or search indications. Date and time. Text. Status information.
BN68-00951A-00Eng 8/3/05 3:07 PM Page 54 Displaying the Teletext Information You can display Teletext information at any time on your television. Teletext information to be displayed correctly, ☛ For channel reception must be stable; otherwise: ◆ Information may be missing ◆ Some pages may not be displayed 1 Select the channel providing the Teletext service by pressing the P or button. 2 Press the TTX/MIX ( Result: 3 English - 54 The contents page is displayed.
n. t BN68-00951A-00Eng 8/3/05 3:07 PM Page 55 Selecting Display Options When you have displayed a Teletext page, you can select various options to suit your requirements. To display... Press the...
BN68-00951A-00Eng 8/3/05 3:07 PM Page 56 Selecting a Teletext Page You can enter the page number directly by pressing the numeric buttons on the remote control. 1 Enter the three-digit page number given in the content by pressing the corresponding numeric buttons. Result: 2 The current page counter is incremented and the page is then displayed. If the selected page is linked with several secondary pages, the secondary pages are displayed in sequence.
BN68-00951A-00Eng 8/3/05 3:07 PM Page 57 Connecting to the External Devices “AV OUT” are used for the equipment with an RGB output, such as video game devices or video disc players.
BN68-00951A-00Eng 8/3/05 3:07 PM Page 58 Connecting to the RCA Input ➢ The RCA (VIDEO + AUDIO L /R) connectors are used for equipment, such as camcorders, video disc players, and some video game devices. Side of the TV Camcorder Rear of the TV Video game device Video disc player ➢ Please be sure to match the colour coded input terminals and cable jacks.
BN68-00951A-00Eng 8/3/05 3:07 PM Page 59 Connecting to the Component Input Rear of the TV ① The “COMPONENT IN 1” connectors are ① DVD ② used for equipment with a DVD output. (480i/480p/576i/576p/1080i) DTV receiver ② The “COMPONENT IN 2” connectors are used for DTV receiver. (480i/480p/576i/576p/1080i) ➢ Please be sure to match the color coded input terminals and cable jacks. Connecting to the PC Input ➢ The “PC IN” (video) and “AUDIO” connectors are used for interfacing with your PC.
BN68-00951A-00Eng 8/3/05 3:07 PM Page 60 Connecting to the HDMI Input ➢ The “HDMI/DVI IN” connector is used for equipment with an HDMI out. Rear of the TV DTV Set-Top Box Connecting to the HDMI/DVI Compatible ➢ The “HDMI/DVI IN” connector is used for equipment with a DVI out.
BN68-00951A-00Eng 8/3/05 3:07 PM Page 61 Connecting Home Theater System Use the “AV OUT” ports of the PDP for Home Theater System Connections. Rear of the TV Connecting the Home Theater System ① Connect the monitoring audio out L and R jacks of the AV OUT on the rear-side connection panel of the PDP TV to the AUDIO IN jacks of the DVD Home Theater System (or AV Receiver) using the audio cable. ② Press the SOURCE ( ) button to select the desired external device connected to the PDP TV.
BN68-00951A-00Eng 8/3/05 3:07 PM Page 62 Setting up Your PC Software (Windows only) The Windows display-settings for a typical computer are shown below. But the actual screens on your PC will probably be different, depending upon your particular version of Windows and your particular video card. But even if your actual screens look different, the same, basic set-up information will apply in almost all cases. (If not, contact your computer manufacturer or Samsung Dealer.
BN68-00951A-00Eng 8/3/05 3:07 PM Input Mode (PC) Both screen position and size will vary depending on the type of PC monitor and its resolution. The table below shows all of the display modes that are supported: Video Signal Resolution (Dot X Line) Vertical frequency (Hz) Horizontal frequency (kHz) Vertical polarity Horizontal polarity 640 x 350 720 x 400 70.086 70.087 59.940 70.000 72.809 75.000 56.250 60.317 70.000 72.188 75.000 60.004 70.069 72.000 75.029 31.469 31.469 31.469 35.000 37.
BN68-00951A-00Eng 8/3/05 3:07 PM Page 64 Programming the Remote Control for Other Components Your TV comes equipped with a universal remote control. In addition to controlling the TV, the universal remote control can also operate a VCR, Cable box, DVD, and some Samsung Set-top boxes (even if your VCR, Cable box and DVD are made by manufacturers other than Samsung). ➢ VCR The remote control might not be compatible with all VCRs, DVD players, Cable boxes, and Set-Top Boxs.
BN68-00951A-00Eng 8/3/05 3:07 PM Page 65 Programming the Remote Control for Other Components (continued) VCR Remote Control Codes Admiral 020 Aiwa 025 Akai 027, 004, 032 Audio Dynamics 007, 026 Bell&Howell 018 Broksonic 022 Candle 002, 006, 003, 015, 008, 055 Canon 021, 056 Citizen 002, 006, 003, 015, 008, 055 Colortyme 007 Craig 002, 024 Curtis Mathes 002, 017, 007, 008, 021, 025, 056, 064, 066 Daewoo 003, 015, 010, 011, 012, 013, 014, 016 DBX 007, 026 Dimensia 017 Dynatech 034 Emerson 001, 003, 006,
BN68-00951A-00Eng 8/3/05 3:07 PM Page 66 Programming the Remote Control for Other Components (continued) Cable Box (CATV) Remote Control Codes Anvision GI Hamlin Hitachi Jerrold Macom Magnavox Oak Panasonic Philips Pioneer RCA Regal Regency SA Samsung Scientific Atlanta Sprucer Stargate 2000 Sylvania Texscan Tocom Universal Viewstar Wamer amex Zenith English - 66 017, 018 041 003, 024, 031 025, 030 038, 039 025, 030 019, 023, 028 026 003, 022, 027, 037, 044 019, 021, 023, 028 018, 020, 004, 044 014,
BN68-00951A-00Eng 8/3/05 3:07 PM Page 67 Troubleshooting: Before Contacting Service Personnel Before contacting Samsung after-sales service, perform the following simple checks. If you cannot solve the problem using the instructions below, note the model and serial number of the television and contact your local dealer. No sound or picture ◆ Check that the mains lead has been connected to a wall socket. ◆ Check that you have pressed the power button (On/Off) and the POWER ( ) button.
BN68-00951A-00Eng 8/3/05 3:07 PM Page 68 - AFTER SALES SERVICE - Do not hesitate to contact your retailer or service agent if a change in the performance of your product indicates that a faulty condition may be present.