Contact SAMSUNG WORLD-WIDE If you have any questions or comments relating to Samsung products, please contact the SAMSUNG customer care centre. Country AUSTRIA BELGIUM Customer Care Centre Web Site 0800-SAMSUNG(726-7864) www.samsung.com/at 0032 (0)2 201 24 18 www.samsung.com/be 844 000 844 www.samsung.com/cz CZECH REPUBLIC Distributor pro Českou republiku: Samsung Zrt., česka organizační složka Vyskočilova 4, 14000 Praha 4 DENMARK 70 70 19 70 www.samsung.com/dk EIRE 0818 717 100 www.
User Instructions Screen Image retention Do not display a still image (such as on a video game or when hooking up a PC to this PDP) on the plasma monitor panel for more than 2 hours as it can cause screen image retention. This image retention is also known as “screen burn”. To avoid such image retention, reduce the degree of brightness and contrast of the screen when displaying a still image. Height The PDP can normally operate only under 2000m in height.
General Information Function Description Time Features ............................................... 35 Language / Change PIN / Parental Lock / Subtitle / Teletext Language / Preference / Light Effect / Melody/ Entertainment / Energy Saving / PIP ..................................... 36 Upgrading the Software ................................ 39 Common Interface ........................................ 40 User Instructions .............................................
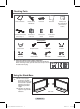
Checking Parts Owner’s Instructions Remote Control/ AAA Batteries Power Cord Cloth-Clean Cover-Bottom / Screws (2ea) (Refer to page 71) Ferrite Core for Power Cord Ferrite Core for S-Video Ferrite Core for Component Warranty Card/ Safety Guide Manual (Not available in all locations) Sold Separately Antenna Cable Component Cables Audio Cables PC Cable Scart Cable PC Audio Cable HDMI Cable HDMI/DVI Cable Core (Power Cord, S-Video, Component) ¯ Ferrite The ferrite cores are used to shield th
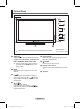
Control Panel Front Panel ¯ The product colour and shape may vary depending on the model. 1 SOURCE Toggles between all the available input sources (TV, Ext.1, Ext.2, AV, S-Video, Component, PC, HDMI1, HDMI2/DVI, HDMI3, HDMI4, USB). ¯ In the on-screen menu, use this button as you would use the ENTER button on the remote control. 2 MENU Press to see an on-screen menu of your TV’s features. Front Panel buttons Touch each button to operate.
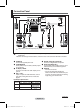
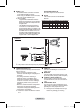
Connection Panel Rear Panel 1 or 9 Cable Television Network or 2 3 4 5 6 ¯ The product colour and shape may vary depending on the model. 7 8 you connect an audio or video system to your set, ensure that all elements are Whenever switched off. When connecting an external device, match the colour of the connection terminal to the cable. 1 POWER IN Connect the supplied power cord. 2 COMPONENT IN Audio (AUDIO L/R) and video (Y/PB/PR) inputs for Component.
8 HDMI IN 1, 2, 3 - No additional Audio connection is needed for an HDMI to HDMI connection. - When using an HDMI/DVI cable connection, you must use the HDMI IN 2 jack. ¯ What is HDMI? - “High Definition Multimedia interface” allows the transmission of high definition digital video data and multiple channels of digital audio. - The HDMI/DVI terminal supports DVI connection to an extended device with the appropriate cable (not supplied).
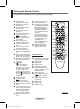
Viewing the Remote Control The performance of the remote control may be affected by bright light. 1 POWER button (turns the TV on and off) 2 Selects the TV and DTV mode directly 3 Number buttons for direct channel access 4 One/Two-digit channel selection 5 Temporary sound switch-off 6 Volume increase Volume decrease 7 Electronic Program Guide (EPG) display 8 Use to quickly select frequently used functions.
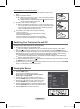
Installing Batteries in the Remote Control 1 2 3 Lift the cover at the back of the remote control upward as shown in the figure. Install two AAA size batteries. Make sure to match the “+” and “–” ends of the batteries with the diagram inside the compartment. Using the remote control with the ON/OFF( ) light button set to On will reduce the battery usage time. Close the cover as shown in the figure.
Plug & Play Feature When the television is initially powered on, several basic customer settings proceed automatically and subsequently.The following settings are available. If you accidentally select the wrong country for your TV, the characters on the screen may be wrongly displayed. Any functions related to Digital TV (DVB) will only work in countries or areas where DVB-T (MPEG2) digital terrestrial signals are broadcasted. Please confirm with your local dealer if you can receive DVB-T signals.
stop the search before it has finished, press the ¯ To ENTER button with stop selected. 6 Press the ◄ or ► button to select Yes, then press the ENTER button. The Auto Store menu then reappears. Press the ENTER button when channel memorization is completed. The message Set the Clock Mode is displayed. Press the ENTER button. Press the ▲ or ▼ button to select Manual for setting the current time manually, then press the ENTER button. The message Set current date and time. is displayed.
Using the TOOLS Button You can use the TOOLS button to select your frequently used functions quickly and easily. The “TOOLS” menu changes depending on which external input mode you are viewing. 1 Press the TOOLS button. Tools The Tools menu will appear. Device List 2 Press the ▲ or ▼ button to select a menu, then press the Picture Mode : Standard ENTER button. Sound Mode : Standard 3 Press the ▲/▼/◄/►/ENTER buttons to display, change, or Sleep Timer : Off use the selected items.
Editing Device Names Source List Input You can give a name to the external source. 1 Press the MENU button to display the menu. 2 Press the ▲ or ▼ button to select Input, then press the ENTER button. 3 Press the ▲ or ▼ button to select Edit Name, then press the ENTER button. 4 Press the ▲ or ▼ button to select the external source to be edited, then press the ENTER button. 5 Select the required device by pressing ▲ or ▼, then press the ENTER button.
Storing Channels Automatically Channel You can scan for the frequency ranges available to you (availability depends on your country). Automatically allocated programme numbers may not correspond to actual or desired programme numbers. However you can sort numbers manually and clear any channels you do not wish to watch. 1 Press the MENU button to display the menu. 2 Press the ▲ or ▼ button to select Channel, then press the ENTER button.
Storing Channels Manually Channel You can store television channels, including those received via cable networks. When storing channels manually, you can choose: Whether or not to store each of the channels found. The programme number of each stored channel which you wish to identify. 1 Press the MENU button to display the menu. 2 Press the ▲ or ▼ button to select Channel, then press the Auto Store ENTER button.
Viewing the EPG (Electronic Programme Guide) Information The EPG (Electronic Programme Guide) information is provided by the broadcasters. Programme entries may appear blank or out of date as a result of the information broadcast on a given channel. The display will dynamically update as soon as new information becomes available. Auto Store Manual Store Channel 1 Press the MENU button to display the menu. 2 Press the ▲ or ▼ button to select Channel, then press the ENTER button.
Viewing All Channels Mini Guide Default Guide Channel Show all currently available channels. To use the Channel List function, first run Auto Program. 1 Press the MENU button. Press the ▲ or ▼ button to select Channel, then press the ENTER button. Press the ▲ or ▼ button to select Channel List, then press the ENTER button. :Mini Guide Channel List Channel Mode : Added Channels Child Lock : On Fine Tune Signal Information LNA 3 Press the ◄ button to select Added Channels.
Erasing and Adding Channels Mini Guide Default Guide Channel : Mini Guide Channel List Channel Mode : Added Channels Child Lock :On Fine Tune Signal Information LNA 824 825 Added Channels You can delete or add a channel to display the channels you want. 1 Press the MENU button. Press the ▲ or ▼ button to select Channel, then press the ENTER button. Press the ▲ or ▼ button to select Channel List, then press the ENTER button. 2 Press the ◄ button to select Added Channels.
Setting Your Favourite Channels Channel You can set channels you watch frequently as Favourite. Mini Guide 1 Press the MENU button. Default Guide : Mini Guide Press the ▲ or ▼ button to select Channel, then press the Channel List ENTER button. Channel Mode : Added Channels Press the ▲ or ▼ button to select Channel List, then Child Lock : On press the ENTER button. Fine Tune 2 Press the ◄ button to select Added Channels.
Reserving a Program (Time Viewing) 4 Press the ▲ or ▼ button to select Timer Viewing, then press the ENTER button. You can also reserve a program in the All Channels or Favourites menus using the same procedures. ¯ For information on how to confirm a viewing reservation, refer to page 21. Only memorized channels can be reserved. ¯ You can set the channel, month, day, year, hour and minute directly by pressing the number buttons on the remote control.
Confirming a Viewing Reservation You can view, modify or delete a reservation. 2 3 Press the MENU button. Press the ▲ or ▼ button to select Channel, then press the ENTER button. Press the ▲ or ▼ button to select Channel List, then press the ENTER button. Press the ◄ button to select Added Channels. Press the ▲ or ▼ button to select Programmed, then press the ENTER button. You can view the program reservations.
Assigning Names to Channels Editing the Channel Name-Analogue 1 2 3 4 6 7 8 Default Guide : Mini Guide Channel List Channel Mode : Added Channels Child Lock : On Fine Tune Signal Information LNA 824 825 Added Channels 5 Press the MENU button to display the menu. Press the ▲ or ▼ button to select Channel, then press the ENTER button. Press the ▲ or ▼ button to select Channel List, then press the ENTER button.
Sorting the Stored Channels - Analogue Mini Guide Default Guide Channel : Mini Guide Channel List Channel Mode : Added Channels Child Lock : On Fine Tune Signal Information LNA 824 825 Added Channels This operation allows you to change the programme numbers of the stored channels. This operation may be necessary after using the auto store. 1 Press the MENU button to display the menu. 2 Press the ▲ or ▼ button to select Channel, then press the ENTER button.
Selecting and Deselecting All Channels 1 Added Channels Press the MENU button. Press the ▲ or ▼ button to select Channel, then press the ENTER button. Press the ▲ or ▼ button to select Channel List, then press the ENTER button. Press the ▲ or ▼ button to select the Channel to be assigned a new name, then press the TOOLS button. Press the ▲ or ▼ button to select Select All or Deselect All, then press the ENTER button. You can select(or Deselect) all channel in the channel list.
Locking Channels Channel This feature allows you to prevent unauthorized users, such as children, from watching unsuitable programmes by muting out video and audio. Child Lock cannot be released using the buttons on the side. Only the remote control can release the Child Lock setting, so keep the remote control away from children. Locking channels Channel List 1 Press the MENU button to display the menu.
Viewing Signal Information Child Lock Channel You can get information about the signal status. 1 Press the MENU button to display the menu. Press the ▲ or ▼ button to select Channel, then press the ENTER button. 2 Press the ▲ or ▼ button to select Signal Information , then press the ENTER button. 3 Press the EXIT button to exit. If the signal status is poor, the No Signal. message is displayed. While viewing a Digital channel, this function can be selected.
Changing the Picture Standard Picture You can select the type of picture which best corresponds to your viewing requirements. 1 Press the MENU button to display the menu. 2 Press the ENTER button to select Picture. 3 Press the ENTER button again to select Mode. 4 Select the required mode by pressing the ▲ or ▼ button, then press the ENTER button. Available modes: Dynamic, Standard, Movie The settings values may vary depending on the input source. 5 Press the EXIT button to exit.
Configuring Detailed Settings on the Picture ¯ Detailed Settings is available in Standard or Movie mode. ¯ In PC mode, you can only make changes to Dynamic Contrast, Gamma and White Balance from among the Detailed Settings items. Picture You can set detailed picture settings. 1 Press the MENU button to display the menu. 2 Press the ENTER button to select Picture. 3 Press the ▲ or ▼ button to select Detailed Settings, then press the ENTER button.
Flesh Tone:-15~+15 You can emphasize the pink tone in the picture. Press the ◄ or ► button until you reach the optimal setting. Changing the adjustment value will refresh the adjusted screen. Edge Enhancement: Off/On You can emphasize object boundaries. xvYCC: Off/On Setting the xvYCC mode to On increases detail and colour space when watching movies from an external device (ie. DVD player) connected to the HDMI or Component IN jacks. You must set the Picture Mode to Movie to enjoy this feature.
Positioning and Sizing the screen using Zoom − Resizing the screen using the Zoom enables the positioning and sizing of the screen to up/down direction using the ▲ or ▼ button as well as the screen size. − Move the screen up/down using the ▲ or ▼ button after selecting the Position by pressing the ◄ or ► button. − Resize the screen vertically using the ▲ or ▼ button after selecting the Size by pressing the ◄ or ► button.
Screen Burn Protection To reduce the possibility of screen burn, this unit is equipped with screen burn prevention technology. This technology enables you to set picture movement up/down (Vertical Line) and side to side (Horizontal Dot). The Time setting allows you to program the time between movement of the picture in minutes. − Pixel Shift: Using this function, you can minutely move pixels on the PDP in horizontal or vertical direction to minimize after image on the screen.
Sound Features 1 2 Sound Press the MENU button to display the menu. Press the ▲ or ▼ button to select Sound, then press the ENTER button. 3 Select the required option by pressing the ▲ or ▼ button, then press the ENTER button. Available options: Mode, Equalizer, SRS TruSurround XT, Audio Language, Audio Format, Audio Description, Auto Volume, TV Speaker, Sound Select, Sound Reset 4 When you are satisfied with your setting, press the ENTER button. 5 Press the EXIT button to exit.
Audio Description: Audio Description/ Volume This is an auxiliary audio function that provides an additional audio track for visually challenged persons. This function handles the Audio Stream for the Audio Description, when it is sent along with the Main audio from the broadcaster. Users can turn the Audio Description On or Off and control the volume. − Audio Description : On/Off − Volume : 0~100 Volume is active when Audio Description is set to On.
Selecting the Sound Mode (depending on the model) The DUAL I-II button displays/controls the processing and output of the audio signal. When power is switched on, the mode is automatically preset to either “DUAL-I” or “Stereo”, depending on the current transmission. Easy Setting 1 2 3 Tools Press the TOOLS button on the remote control. Press the ▲ or ▼ button to select Dual I-II. Press the ◄ or ► button to select the required option.
Time Features 1 2 4 5 6 Clock You can set the television clock so that the current time is displayed when pressing the INFO button on the remote control. You must also set the time if you wish to use the automatic on or off timers. Option 1: Setting the Clock Manually − Clock Mode Press the ENTER button to select Clock Mode. Press the ▲ or ▼ button to select Manual, then press the ENTER button − Clock Set Press the ◄ or ► button to select Day, Month, Year, Hour, Minute or am/pm.
Language / Change PIN / Parental Lock / Subtitle / Teletext Language / Preference / Light Effect / Melody / Entertainment / Energy Saving / PIP 1 2 Setup Press the MENU button to display the menu. Press the ▲ or ▼ button to select Setup, then press the ENTER button. Plug & Play ► 3 Select the required option by pressing the ▲ or ▼ button, Language : English then press the ENTER button.
Setup Preference Sub title This menu consists of 6 sub-menus: Teletext Language : ---Primary Audio Language, Secondary Audio Language, Primary Subtitle Language, Secondary Subtitle Preference ► Language, Primary Teletext Language, and Secondary Light Effect : Watching TV Teletext Language (depending on the Country).
Setup Energy Saving: Off/Low/Medium/High This feature adjusts the screen brightness depending on the surrounding lighting conditions. − Off: Switches off the Energy Saving mode. − Low: Operates in standard mode regardless of the surrounding illumination. − Medium: Enters Medium power saving mode regardless of the surrounding illumination. − High: Enters maximum power saving mode regardless of the surrounding illumination.
Upgrading the Software To keep your product up-to-date with new Digital Television features then software upgrades are periodically broadcast as part of the normal Television signal. It will automatically detect these signals and display the software upgrade banner. You are given the option to install the upgrade. 1 Insert a USB drive containing the firmware upgrade into the USB Upgrade Port on the side of the TV.
Common Interface This contains information on CAM inserted in the CI slot and displays it. You can install the CAM anytime whether the TV is ON or OFF. ¯ Installing the CI Card a. Purchase the CI CAM module by visiting your nearest dealer or by phone. b. Insert the CI CARD into the CAM in the direction of the arrow until it fits. c. Insert the CAM with the CI CARD installed into the common interface slot.
Setting up Your PC Software (Based on Windows XP) The Windows display-settings for a typical computer are shown below. But the actual screens on your PC will probably be different, depending upon your particular version of Windows and your particular video card. But even if your actual screens look different, the same, basic set-up information will apply in almost all cases. (If not, contact your computer manufacturer or Samsung Dealer.
Input Mode (PC) Both screen position and size will vary depending on the type of PC monitor and its resolution. The table below shows all of the display modes that are supported: D-Sub Input Mode Resolution Horizontal Frequency (kHz) Vertical Frequency (Hz) Pixel Clock Frequency (MHz) Sync Polarity (H/V) IBM 640 x 350 720 x 400 31.469 31.469 70.086 70.087 25.175 28.
Setting the PC ¯ Preset to the PC mode by pressing the SOURCE button. Mode :Standard Cell Light :7 Contrast : 95 Brightness : 45 Sharpness : 20 ► Auto Adjustment Screen Adjustment Detailed Settings Picture Press the MENU button to display the menu. Press the ▲ or ▼ button to select Picture, then press the ENTER button. 3 Select the required option by pressing the ▲ or ▼ button, then press the ENTER button. 4 When you are satisfied with your setting, press the ENTER button.
Screen Adjustment: Coarse/Fine/Position/Image Reset : 20 Auto Adjustment Picture - Coarse/Fine The purpose of picture quality adjustment is to remove or reduce picture noise. If the noise is not removed by Fine-tuning alone, then adjust the frequency as best as possible (coarse) and Finetune again. After the noise has been reduced, re-adjust the picture so that it is aligned on the center of screen. 1 Press the ▲ or ▼ button to select Coarse or Fine, then press the ENTER button.
Using the WISELINK Function This function enables you to view and listen to photo (JPEG) and audio files (MP3) saved on a USB Mass Storage Class (MSC) device. 1 Press the POWER button on the remote control or front panel. The TV is powered on. 2 Connect a USB device containing JPEG and/or MP3 files to the WISELINK jack (USB jack) on the side of the TV.
Using the WISELINK Menu 1 Press the MENU button. Press the ▲ or ▼ button to select Application, then press the ENTER button. 2 Press the ▲ or ▼ button to select WISELINK, then press the ENTER button. WISELINK 851.98MB/995.00MB Free USB PHOTO ¯ The WISELINK menu is diplayed. Photo Music Setup Device USB Exit Press the W.LINK button on the remote control to display the WISELINK menu. 3 Press the SOURCE button on the remote control repeatedly to select USB, then press the ENTER button.
Screen Display 1 Currently selected photo Shows the currently selected photo. 2 Photo Information Window Shows information about the currently selectedphoto. You can change the Color, Compositon, and Favorite. Photo 2 image_1.jpg Month Date Color Composition Folder Favorite 1File(s) Selected6 : Jan : Jan.01.
Sorting Photo List WISELINK 851.98MB/995.00MB USB You can sort photos in the Photo List by a particular standard. 1 Press the W.LINK button on the remote control to display the WISELINK menu. 2 Press the ◄ or ► button to select Photo, then press the ENTER button. Photo files are displayed. 3 Press the ▲ or ▼ button to select a sorting standard. (Monthly, Timeline, Color, Composition, Folder, ¯ PHOTO Photo Music Setup USB Exit Device Photo image_1.jpg Month : Jan Preference) Date : Jan.01.
Color Sorts photos by color. image_1.jpg Photo Month : Jan You can change the photo color information. Silde Show Date : Jan.01.2008 Play Current Group Color : Gray 1 Select Color as the sorting standard in the Photo List. Composition : Delete Folder : P-other 2 Press the ◄ or ► button to select from the sublist of Favorite : ) ) ) Change Group files grouped by color. To move to the previous / next group, press the (REW) or (FF) button. 3 Press the TOOLS button.
Folder Sorts photos by folder. If there are many folders in USB, the photos files are shown in order in each folder. The photo file in the Root folder is shown first and the others are shown in alphabetical order by name. 1 Select Folder as the sorting standard in the Photo List. ¯ 2 Press the ◄ or ► button to select from the sublist of files grouped by folder. To move to the previous / next group, press the (REW) or (FF) button. ¯ 3 4 Photo image_1.
Deleting the Photo files 1 2 3 4 5 Photo Press the ◄ or ► button to select the desired photo in the Photo list. Press the TOOLS button. Press the ▲ or ▼ button to select Delete, then press the ENTER button. ¯ The Selected Files : Delete this file? message appear. Press the ◄ or ►button to select OK, then press the ENTER button. ¯ The photo is deleted. ¯ When a read-only file is deleted, the “Read-only file(s). Delete the files?” message appear.
Viewing a Photo or Slide Show Photo Viewing a Slide Show 1 2 3 4 5 Press the W.LINK button on the remote control to display the WISELINK menu. Press the ◄ or ► button to move to Photo, then press the ENTER button. ¯ Photo files are displayed. Press the ◄ or ► button to select the desired photo in the Photo list. Press the TOOLS button. Press the ▲ or ▼ button to select Slide Show, then press the ENTER button. ¯ All files in the photo list will be used for the Slide Show.
Viewing a photo 1 Press the W.LINK button on the remote control to display the WISELINK menu. 2 Press the ◄ or ► button to move to “Photo”, then press the ENTER button. Photo files are displayed. 3 image_1.jpg 104.1KB 2008/1/1 ¯ Press the ◄ or ► button to select the desired photo in the Photo list. Then Press the Yellow button to select only one file. USB 4 440x440 Slide Show Previous Next Option Return Press the ENTER button over a photo icon.
Zoom You can zoom into images in full screen mode. Press the ▲ or ▼ button to select Zoom, then press the ENTER button. Press the ◄ or ► button repeatedly to increase or decrease the Zoom effect. (x1 → x2 → x4) To move the enlarged photo image, press the ENTER button, then press the ▲/▼/◄/► buttons. Note that when the enlarged picture is smaller than the original screen size, the location change function doesn’t work. The enlarged file is not saved.
Background Music Setting You can set the background music. Press the ▲ or ▼ button to select Background Music Setting, then press the ENTER button. If you turn off the Background Music, even if the Background Music Settings have been set up, the background music will not be played. Loading music files is needed to change BGM Mode. Play music files in music category to load. Background Music setting menu is displayed. Press the ◄ or ► button to select the desired BGM (Background music) mode.
Using the Music List This menu shows MP3 files from among the files saved on a USB memory device. 1 Press the W.LINK button on the remote control to display the WISELINK menu. 2 Press the ◄ or ► button to select Music, then press the ENTER button. ¯ Music files are displayed. ¯ Press the (Play)/ ENTER button over a music icon to play the music. ¯ To select a file on the previous / next group, press WISELINK 851.98MB/995.
Sorting Music List You can sort music files in the Music List by a particular standard. 1 2 3 Press the W.LINK button on the remote control to display the WISELINK menu. Press the ◄ or ► button to select Music, then press the ENTER button. Music files are displayed. Press the ▲ or ▼ button to select a sorting standard. (Title, Artist, Mood, Genre, Folder, Preference) Music files are sorted according to the newly selected sorting standard.
Mood Music Sorts music files by the mood. Gold ¯ You can change the music mood information. Interference Marketa lrgl... Once Ost 2007 Soundtrack Once Ost 2007 Soundtrack 1 Select Mood as the sorting standard in the Music List. 2 Press the ◄ or ► buttons to select from the sublist of files grouped in alphabetical order. ) ) ) Sad (REW) or the (FF) button to move to the previous / next group.
Folder Sorts music files by the folder. ¯ 1 2 Music If there are many folders in USB, the files are shown in order in each folder. The music file in the Root folder is shown first and the others are shown in alphabetical order by name. Select Folder as the sorting standard in the Music List. Press the ◄ or ► button to select from the sublist of files grouped by folder. ¯ To move a file on the previous / next group, press 3 4 5 Gold If You Want Me Interference Marketa lrgl...
Deleting the Music files 1 2 3 Press the ◄ or ► button to select the desired music in the music list. Press the TOOLS button. Press the ▲ or ▼ button to select Delete, then press the ENTER button. The (for example) Selected Files: Delete this file? message appear. Press the ◄ or ►button to select OK, then press the ENTER button. The music is deleted. When a read-only file is deleted, the Read-only files. Delete the files? message appear. If you select Cancel, the deletion is cancelled.
Playing a Music File Playing a music file 1 Press the W.LINK button on the remote control to display the WISELINK menu. 2 Press the ◄ or ► button to select Music, then press the ENTER button. Music files are displayed. Music If Everyone Cared 3 ¯ Pressing the ◄ or ► button to select a music file to be played, then press the ENTER button. This menu only shows files with the MP3 file extension.
Playing the selected music files 1 Press the W.LINK button on the remote control to display the WISELINK menu. Music 2File(s) Selected If Everyone Cared 2 Press the ◄ or ► button to select Music, then press the ENTER button. 3 Press the ◄ or ► button to select the desired music file, then press the yellow button. Repeat the above operation to select multiple music. The ( ) mark appears to the left of the selected music files. 4 Press the (Play) / ENTER button. Only the selected file is played.
Using the Setup Menu Setup displays the user settings of the WISELINK menu. 1 Press the W.LINK button on the remote control to display the WISELINK menu. 2 Press the ◄ or ► button to select Music, then press the ENTER button. 3 Press the ▲ or ▼ button to select the desired option. (Slide Show Speed, Music Repeat Mode, Screen Saver Run Time, Information, Remove Safely) 4 Press the ◄ or ► button to select the option, then press the ENTER button. WISELINK 851.98MB/995.
What is Anynet+? Anynet+ is an AV network system that enables an easy-to-use AV interface for users by controlling all connected AV devices through the Anynet+ menu when Samsung Electronics AV devices are connected. Connecting Anynet+ Devices The Anynet+ system supports AV devices supporting Anynet+ only. Check if there is an Anynet+ mark on the AV device to be connected to the TV. To directly connect to TV TV Anynet+ Device 1 HDMI 1.3 Cable Anynet+ Device 2 HDMI 1.
Setting Up Anynet+ The following settings are to use Anynet+ functions. Using the Anynet+ Function 2 3 ¯ ¯ ¯ Press the MENU button. Press the ▲ or ▼ button to select Application, then press the ENTER button. Press the ▲ or ▼ button to select Anynet+ (HDMI-CEC), then press the ENTER button. Press the ▲ or ▼ button to select On, then press the ENTER button. The Anynet+ (HDMI-CEC) function is enabled. If you select Off, Anynet+ (HDMI-CEC) is disabled.
Anynet+ Menu The Anynet+ menu changes depending on the type and status of the Anynet+ devices connected to the TV. Anynet+ Menu View TV Select Device Record Menu on Device Device Operation Receiver Setup Description + Switches from Anynet to TV broadcast mode. Your TV connects to the corresponding device. Starts a recording. (This menu works only for a device supporting recording.) Shows the menu of the connected device. Example. When a DVD Recorder is connected, the DVD Recorder’s title menu appears.
Listening through a Receiver Tools You can listen to sound through a receiver instead of the TV speaker. 1 Press the TOOLS button. View TV Device List Press the ▲ or ▼ button to select Receiver, then press the ENTER button. Recording : DVD 2 Press the ◄ or ► button to select to On, then press the ENTER button. DVD Menu Now you can listen to sound through the receiver. DVD Menu 3 Press the EXIT button to exit.
Teletext Feature (depending on the model) Most television stations provide written information services via teletext. The index page of the teletext service gives you information on how to use the service. In addition, you can select various options to suit your requirements by using the remote control buttons. For teletext information to be displayed correctly, channel reception must be stable. Otherwise, information may be missing or some pages may not be displayed.
The teletext pages are organized according to six categories: Part A B C D E F Contents Selected page number. Broadcasting channel identity. Current page number or search indications. Date and time. Text. Status information. FASTEXT information.
Wall Mount Kit Specifications (VESA) Install your wall mount on a solid wall perpendicular to the floor. When attaching to other building materials, please contact your nearest dealer. If installed on a ceiling or slanted wall, it may fall and result in severe personal injury. Product Family inch VESA Spec.
Auto Wall - mount adjustment (Sold separately) (PS50A676) Once the auto wall mount is installed, the position of your TV can be easily adjusted. Auto Wall-Mount Rear Panel Serial Cable(1P to 1P)(Not supplied) Entering the menu 1 ¯ ¯ Setup Press the ▲, ▼, ◄ or ► button on your remote control. The Wall Mount Adjustment screen is displayed. If the Wall Mount Adjustment screen is not displayed when clicking on a direction button while watching your TV, use the menu to display that screen.
Moving to the remembered position Complete Step 1 of Entering the menu. Wall-Mount Adjustment Pressing a Color (Red, Green, Yellow) button moves the auto wall Position 1 mount to the saved position. You can move the wall mount to one of the 3 pre-set positions by pressing the Red (Position 1), Green (Position 2) or Yellow (Position 3) buttons. If you adjust the positon after moving to a pre-set position, the Position 1 2 3 position display will disappear.
Troubleshooting Before contacting the Samsung after-sales service, perform the following simple checks. If you cannot solve the problem using the instructions below, note the model and serial number of the television and contact your local dealer. No sound or picture Check that the mains lead has been connected to a wall socket. Check that you have pressed the (Power) button (On/Off) on the front panel or press the POWER button on the remote control. Check the picture contrast and brightness settings.
Specifications The descriptions and characteristics in this booklet are given for information purposes only and are subject to modification without notice.
This page is intentionally left blank.
Correct Disposal of This Product (Waste Electrical & Electronic Equipment) (Applicable in the European Union and other European countries with separate collection systems) This marking shown on the product or its literature, indicates that it should not be disposed with other household wastes at the end of its working life.
Instructions d’utilisation Rémanence à l’écran Ne figez pas d’images (telle qu’une image de jeu vidéo ou de PC branché à l’écran à plasma) sur l’écran du moniteur à plasma pendant plus de deux heures car cela peut entraîner une rémanence à l’écran. Cette rémanence est également appelée “brûlure d’écran”. Pour éviter la rémanence, réduisez le niveau de contraste ou de luminosité de l’écran lorsque vous affichez une image figée.
Sommaire Description des fonctions Fonctions d’horloge....................................... 35 Langue / Modifier PIN / Verrouillage parental / Sous-titres / Langue Télétexte / Préférence / Effet lumineux / Mélodie / Divertissement / Mode éco. / PIP............................................. 36 Mise à niveau du logiciel... ............................ 39 Interface commune ....................................... 40 Instructions d’utilisation ...................................
Vérification des pièces Manuel d’utilisation Télécommande/ piles AAA Cordon d’ alimentation Chiffon de nettoyage Capot inférieur/ Vis (2ea) (Reportez-vous à la page 71) Tore magnétique pour cordon d’ alimentation Tore magnétique pour S-Vidéo Tore magnétique pour composants Carte de garantie/ Manuel de sécurité (Non disponible dans tous les pays) Vendu séparément Câble d’antenne Câbles composants Câbles audio Câble PC Câble SCART Câble audio PC Câble HDMI Câble HDMI/DVI ¯ Tore magnétiqu
Panneau de configuration Panneau avant (ou latéral) ¯ La couleur et la forme du produit peuvent varier en fonction du modèle. 1 Boutons en façade Touchez les boutons pour les actionner. SOURCE Affiche un menu de toutes les sources disponibles en entrée (TV, Ext.1, Ext.2, AV, S-Vidéo, Composant, PC, HDMI1, HDMI2/ DVI, HDMI3, HDMI4, USB). 4 ¯ Dans le menu du téléviseur, ce bouton a 5 Témoin d’alimentation Clignote et s’éteint lorsqu’il est sous tension et s’allume en mode Veille.
Panneau de connexion Panneau arrière 1 ou 9 Télévision câblée Réseau ou 2 3 4 5 6 7 8 ¯ La couleur et la forme du produit peuvent varier en fonction du modèle. En cas de branchement d’un système audio ou vidéo sur le téléviseur, vérifiez que tous les appareils sont éteints. Lorsque vous branchez un périphérique externe, faites correspondre les couleurs de la borne de connexion et du câble. 1 ENTREE ALIMENTATION Permet de raccorder le cordon d’alimentation fourni.
8 HDMI IN 1,2,3 − Aucune connexion audio supplémentaire n’est nécessaire pour une connexion HDMI - HDMI. − Lorsque vous utilisez une connexion avec câble HDMI/DVI, vous devez utiliser la borne HDMI IN2. Qu’est-ce que HDMI ? − “High Definition Multimedia interface” permet la transmission de données vidéo numériques haute définition et plusieurs canaux de son numérique. − Le terminal HDMI/DVI prend en charge la connexion DVI vers un périphérique raccordé avec le câble adéquat (non fourni).
Présentation de la télécommande Une lumière intense peut affecter le bon fonctionnement de la télécommande. 1 Bouton POWER (permet d’allumer et d’éteindre le téléviseur) 2 Sélectionne directement le mode TV et DTV 3 Pavé numérique pour l’accès direct aux canaux 4 Sélection de canaux à 1 ou 2 chiffres 5 Suppression temporaire du son 6 Augmentation du volume Réduction du volume 7 Affichage de l’EPG (Guide électronique des programmes) 8 Permet de sélectionner rapidement les fonctions fréquemment utilisées.
Insertion des piles dans la télécommande 1 2 3 Soulevez le couvercle situé à l’arrière de la télécommande comme indiqué sur la figure. Placez deux piles AAA. Assurez-vous de faire correspondre les bornes “+” et “-” des piles avec le schéma situé à l’intérieur du compartiment. Utiliser la télécommande avec le bouton lumineux MARCHE/ ARRET( ) réglé sur Marche permet de réduire la durée d'utilisation de la pile. Refermez le couvercle comme indiqué sur la figure.
Fonction Plug & Play Lorsque vous allumez le téléviseur pour la première fois, plusieurs réglages de base s’effectuent l’un après l’autre de manière automatique. Les réglages disponibles sont les suivants : Si vous sélectionnez par erreur un pays incorrect pour votre téléviseur, il se peut que les caractèresaffichés à l’écran soient incorrects.
interrompre la recherche avant la fin, ¯ Pour appuyez sur le bouton ENTER lorsque Arrêter est 6 sélectionné. Appuyez sur le bouton ◄ ou ► pour sélectionner Oui, puis appuyez sur le bouton ENTER. Le menu Mémorisation Auto s’affiche. Appuyez sur le bouton ENTER une fois la mémorisation des chaînes terminée. Le message Régler le mode horloge s’affiche. Appuyez sur le bouton ENTER.
Utilisation du bouton TOOLS Vous pouvez utiliser le bouton TOOLS pour sélectionner simplement et rapidement les fonctions que vous utilisez le plus souvent. Le menu OUTILS change en fonction du mode d’entrée externe affiché. 1 2 3 Appuyez sur le bouton TOOLS. Le menu Outils s’affiche. Appuyez sur le bouton ▲ ou ▼ pour sélectionner un menu, puis sur le bouton ENTER. Appuyez sur les boutons ▲/▼/◄/►/ENTER pour afficher, modifier ou utiliser les éléments sélectionnés.
Modification du nom des périphériques Liste Source Entrée Vous pouvez modifier le nom de la source externe. 1 Appuyez sur le bouton MENU pour afficher le menu. 2 Appuyez sur le bouton ▲ ou ▼ pour sélectionner Entrée, puis sur le bouton ENTER. 3 Appuyez sur le bouton ▲ ou ▼ pour sélectionner Modif. Nom, puis sur le bouton ENTER. 4 Appuyez sur le bouton ▲ ou ▼ pour sélectionner la source externe à modifier, puis sur le bouton ENTER.
Mémorisation automatique des chaînes Vous pouvez chercher les plages de fréquence disponibles par balayage (leur disponibilité dépend de votre pays). Il est possible que les numéros de programme attribués automatiquement ne correspondent pas aux numéros de programme souhaités ou réels. Vous pouvez toutefois trier les numéros manuellement et supprimer les chaînes que vous ne souhaitez pas regarder. 1 2 4 ¯ ¯ ¯ 5 ¯ Canal 3 Appuyez sur le bouton MENU pour afficher le menu.
Mémorisation manuelle des chaînes Canal Vous pouvez mémoriser les chaînes de télévision, y compris celles reçues via les réseaux câblés. Lors de la mémorisation manuelle des chaînes, vous pouvez choisir : de mémoriser ou non chaque chaînes trouvée ; le numéro du programme qui vous servira à identifier chaque chaîne mémorisée. 1 Appuyez sur le bouton MENU pour afficher le menu. 2 Appuyez sur le bouton ▲ ou ▼ pour sélectionner Canal, Mémorisation Auto puis appuyez sur le bouton ENTER.
Voir les informations relatives au Guide de programme électronique (GPE) Les informations relatives au Guide de programme électronique (EPG) sont fournies par les émetteurs. Les entrées de programmes peuvent apparaître en blanc ou ne pas être à jour en raison de l’information diffusée sur un canal donné. L’affichage fera une mise à jour automatique dès qu’une nouvelle information sera disponible. Mémorisation Auto Appuyez sur le bouton MENU pour afficher le menu.
Gestion des chaînes Ce menu permet d’ajouter/supprimer ou définir des chaînes favorites et d’utiliser le guide des programmes pour les émissions numériques. 1 Mini Guide Par défaut Canal Appuyez sur le bouton MENU. Appuyez sur le bouton ▲ ou ▼ pour sélectionner Canal, puis appuyez sur le bouton ENTER. Appuyez sur le bouton ▲ ou ▼ pour sélectionner Liste des chaînes, puis appuyez sur le bouton ENTER.
Suppression et ajout de chaînes Vous pouvez supprimer ou ajouter une chaîne afin d’afficher les chaînes de votre choix. 1 Mini Guide Par défaut Canal 2 Appuyez sur le bouton MENU. Appuyez sur le bouton ▲ ou ▼ pour sélectionner Canal, puis appuyez sur le bouton ENTER. Appuyez sur le bouton ▲ ou ▼ pour sélectionner Liste des chaînes, puis appuyez sur le bouton ENTER.
Sélection de vos chaînes favorites Vous pouvez définir comme favorites les chaînes que vous regardez souvent. 1 Canal Appuyez sur le bouton MENU. Mini Guide Appuyez sur le bouton ▲ ou ▼ pour sélectionner Canal, Par défaut : Mini Guide puis appuyez sur le bouton ENTER. Liste des chaînes Appuyez sur le bouton ▲ ou ▼ pour sélectionner Liste Mode Canal : Chaînes ajoutées des chaînes, puis appuyez sur le bouton ENTER.
Réservation d’un programme (Visionnage minuteur) Si vous réservez un programme que vous souhaitez regarder, la chaîne bascule automatiquement sur la chaîne réservée dans la liste de chaînes, même si vous êtes en train de regarder une autre chaîne. Pour réserver un programme, réglez d’abord l’heure actuelle. Voir page 35. Les chaînes réservées ne peuvent être réglées que si elles se trouvent dans la Liste des chaînes (voir page 17).
Vérification d’une réservation Vous pouvez afficher, modifier ou supprimer une réservation. 1 3 Par défaut : Chaînes ajoutées Verr Parental : Marche Informations de signal LNA 824 825 : Arrêt UKTV Gold UKTV style 1 C -- 2 3 4 5 6 7 8 C -C -C -C -C -C -C -- Type de canal Zoom Sélection Option Programmé 2008/2/3 Tous 3:15 1 Air Quincy, M.E 4:15 2008/2/4 2:14 2008/2/5 2:15 2 Air The Equalizer 3 Air McMillan & Wife 4 Air M.
Attribution de noms aux chaînes Les noms des chaînes sont automatiquement attribués lorsque des informations sur les chaînes sont diffusées. Ces noms peuvent être modifiés, ce qui vous permet d’attribuer ceux de votre choix. Modification d’un numéro de chaîne - analogique 3 4 5 6 Appuyez sur le bouton MENU pour afficher le menu. Appuyez sur le bouton ▲ ou ▼ pour sélectionner Canal, puis appuyez sur le bouton ENTER.
Tri des chaînes mémorisées - analogique 1 2 3 4 5 7 8 9 Par défaut : Mini Guide Liste des chaînes Mode Canal : Chaînes ajoutées Verr Parental : Marche Réglage fin Informations de signal LNA 824 825 Chaînes ajoutées 6 Appuyez sur le bouton MENU pour afficher le menu. Appuyez sur le bouton ▲ ou ▼ pour sélectionner Canal, puis appuyez sur le bouton ENTER. Appuyez sur le bouton ▲ ou ▼ pour sélectionner Liste des chaînes, puis appuyez sur le bouton ENTER. Appuyez sur le bouton TOOLS.
Sélection et désélection de toutes les chaînes 1 Chaînes ajoutées Appuyez sur le bouton MENU. 824 Television 825 UKTV style Appuyez sur le bouton ▲ ou ▼ pour sélectionner Canal, 1 C -puis appuyez sur le bouton ENTER. Ajouter aux favoris 2 C -Appuyez sur le bouton ▲ ou ▼ pour sélectionner Liste Ecoute programmée 3 w C -des chaînes, puis appuyez sur le bouton ENTER. Modifi.
Verrouillage de Chaînes Canal Cette fonction, qui bloque la vidéo et coupe le son, vous permet d’éviter toute utilisation non autorisée, par des enfants par exemple, qui pourraient visionner des programmes ne leur étant pas destinés. Le verrouillage parental ne peut pas être désactivé en utilisant les touches du panneau latéral. Il ne peut être désactivé qu’à partir de la télécommande ; conservez donc la télécommande hors de portée des enfants.
Affichage des informations du signal Vous pouvez obtenir des informations relatives à l’état du signal. 1 3 Verr Parental : Marche Réglage fin Canal 2 Appuyez sur le bouton MENU pour afficher le menu. Appuyez sur le bouton ▲ ou ▼ pour sélectionner Canal, puis appuyez sur le bouton ENTER. Appuyez sur le bouton ▲ ou ▼ pour sélectionner Informations de signal, puis appuyez sur le bouton ENTER. Appuyez sur le bouton EXIT pour quitter le menu. Si le signal est faible, le message Aucun signal s’affiche.
Réglage du mode d’image Vous pouvez sélectionner le type d’image qui correspond le mieux à vos exigences d’affichage. 4 Appuyez sur le bouton MENU pour afficher le menu. Appuyez sur le bouton ENTER pour sélectionner Image. Appuyez à nouveau sur le bouton ENTER pour sélectionner Mode. Sélectionnez le mode désiré en appuyant sur le bouton ▲ ou ▼, puis appuyez sur le bouton ENTER. Modes disponibles: Dynamique, Standard ou Cinéma La valeur des paramètres peut varier en fonction de la source d’entrée.
Réglage des détails de l’image Vous pouvez configurer des réglages détaillés de l’image. 4 5 6 ¯ Appuyez sur le bouton MENU pour afficher le menu. Appuyez sur le bouton ENTER pour sélectionner Image. Appuyez sur le bouton ▲ ou ▼ pour sélectionner Réglages des détails, puis appuyez sur le bouton ENTER. Sélectionnez l’option désirée en appuyant sur le bouton ▲ ou ▼, puis appuyez sur le bouton ENTER. Options disponibles : Réglage des noirs, Contraste dynam.
Carnation : -15 à +15 Vous pouvez accentuer la nuance de rose de l’image. Appuyez sur le bouton ◄ ou ► pour obtenir le réglage qui convient. ¯ La modification des valeurs de réglage permet d’actualiser l’écran que vous venez de retoucher. Amélioration des bords : Arrêt/Marche Vous pouvez faire ressortir la bordure des objets.
Positionnement et redimensionnement de l’écran à l’aide du zoom − Le redimensionnement de l’écran à l’aide de la fonction Zoom permet de positionner et de redimensionner l’image vers le haut ou le bas en utilisant le bouton ▲ ou ▼. − Déplacez l’écran vers le haut ou le bas à l’aide du bouton ▲ ou ▼ après avoir sélectionné Position en appuyant sur le bouton ◄ ou ►. – Redimensionnez l’écran verticalement à l’aide du bouton ▲ ou ▼ après avoir sélectionné Size en appuyant sur le bouton ◄ ou ►.
Protection anti-brûlure d’écran Pour réduire le risque de brûlure d’écran, cet écran est équipé d’ une technologie de protection contre les brûlures. Cette fonction permet de régler le mouvement de l’image de bas en haut (ligne verticale) et de gauche à droite (point horizontal). Le paramètre Intervalle permet de programmer la durée (en minutes) séparant les mouvements de l’image.
Fonctions audio 1 2 4 5 Mode: Standard/Musique/Cinéma/Parole/Personnalisé Vous pouvez sélectionner le type d’effet sonore souhaité lorsque vous regardez un programme donné. Réglage simple 1 Appuyez sur le bouton TOOLS de la télécommande. 2 Appuyez sur le bouton ▲ ou ▼ pour sélectionner Mode Son. 3 Appuyez sur le bouton ◄ ou ► pour sélectionner l’ option de votre choix. 4 Appuyez sur le bouton EXIT ou TOOLS pour quitter le menu.
Format audio: MPEG/Dolby Digital Lorsque le son est émis à la fois par le haut-parleur principal et le récepteur audio, un effet d’écho peut se produire en raison de la différence de vitesse de décodage entre le haut-parleur principal et le récepteur audio. Dans ce cas, utilisez la fonction TV Speaker. Cette fonction peut être sélectionnée pendant que vous regardez une chaîne numérique. Vous pouvez sélectionner une langue uniquement parmi les langues diffusées.
Sélection du mode Son (en fonction du modèle) Le bouton DUAL I-II affiche/commande le traitement et la sortie du signal audio. A la mise sous tension, le mode est préréglé automatiquement soit sur “DUAL-I” soit sur “Stéréo”, en fonction de la transmission en cours. Réglages simple 1 Appuyez sur le bouton TOOLS de la télécommande. 2 Appuyez sur le bouton ▲ ou ▼ pour sélectionner Dual I-II. 3 Appuyez sur le bouton ◄ ou ► pour sélectionner l’option de votre choix.
Fonctions d’horloge 3 4 5 6 Appuyez sur le bouton MENU pour afficher le menu. Appuyez sur le bouton ▲ ou ▼ pour sélectionner Configuration puis appuyez sur le bouton ENTER. Appuyez sur le bouton ▲ ou ▼ pour sélectionner Horloge, puis appuyez sur le bouton ENTER. Sélectionnez l’option désirée en appuyant sur le bouton ▲ ou ▼, puis appuyez sur le bouton ENTER.
Langue / Modifier PIN / Verrouillage parental / Sous-titres / Langue Télétexte / Préférence / Effet lumineux / Mélodie / Divertissement / Mode éco. / PIP 1 2 4 5 Configuration 3 Appuyez sur le bouton MENU pour afficher le menu. Appuyez sur le bouton ▲ ou ▼ pour sélectionner Configuration puis appuyez sur le bouton ENTER. Sélectionnez l’option désirée en appuyant sur le bouton ▲ Plug & Play ► ou ▼, puis appuyez sur le bouton ENTER.
Configuration Préférence Sub title Ce menu comporte 6 sous-menus : Langue du télétexte : ---Première Langue Audio, Deuxième Langue Audio, Première Langue de Sous-titres, Deuxième Langue de Préférence ► Sous-titres, Première Langue Télétexte et Deuxième Effet lumineux : En marche Langue Télétexte (selon le pays).
Configuration Mode économique : Arrêt/Bas/Moyen/Élevé Cette fonction règle la luminosité en fonction des conditions d’éclairage. − Arrêt: désactive le mode d’économie d’énergie. − Bas: fonctionne en mode standard, quel que soit l’éclairage ambiant. − Moyen: active le mode d’économie d’énergie moyen, quel que soit l’éclairage ambiant. − Élevé: active le mode d’économie d’énergie maximale, quel que soit l’éclairage ambiant. Image secondaire : Arrêt Mode éco.
Mise à niveau du logiciel Samsung peut vous proposer des mises à niveau pour le micrologiciel de votre téléviseur. Contactez le centre d’appel Samsung au 3260 SAMSUNG pour recevoir des informations sur le téléchargement de mises à niveau et l’utilisation d’une clé USB. Les mises à jour s’effectuent en connectant une clé USB au port USB. 1 Insérez la clé USB contenant la mise à niveau du micrologiciel dans le port de mise à niveau USB situé sur le côté du téléviseur.
Interface commune Contient des informations relatives au module CAM inséré dans la fente CI (Interface commune) et les affiche. ¯ Vous pouvez installer la carte CAM que le téléviseur soit allumé ou éteint. Installation de la carte d’interface commune (CI) a. Achetez le module CAM en vous rendant chez le revendeur le plus proche ou par téléphone. b. Insérez la carte CI dans le module CAM dans le sens de la flèche jusqu’à ce qu’elle soit emboîtée. c.
Configuration de votre logiciel PC (basée sur Windows XP) Les paramètres d’affichage Windows indiqués ci-dessous sont ceux d’un ordinateur type. Toutefois, il se peut que les écrans de votre PC soient différents, en fonction de votre version de Windows et de votre carte vidéo. Cependant, même si les affichages diffèrent, les informations de configuration de base s’appliquent dans la plupart des cas. (Dans le cas contraire, contactez le fabricant de votre ordinateur ou votre revendeur Samsung.
Mode d’entrée (PC) La taille et la position de l’écran varient en fonction du type de moniteur du PC et de sa résolution. Le tableau ci-dessous indique tous les modes d’affichage pris en charge: Entrée D-Sub Mode Résolution Fréquence horizontale (kHz) Fréquence verticale (Hz) Fréquence d’ horloge pixels (MHz) Polarité synchronisée (H/V) IBM 640 x 350 720 x 400 31.469 31.469 70.086 70.087 25.175 28.
Réglage du PC ¯ Préréglez le mode PC en appuyant sur le bouton Image Mode :Standard ► Luminosité des cellules : 7 Contraste : 95 Luminosité : 45 Netteté : 20 Réglage Automatique Ecran Réglages des détails Image SOURCE. Appuyez sur le bouton MENU pour afficher le menu. Appuyez sur le bouton ▲ ou ▼ pour sélectionner Image, puis appuyez sur le bouton ENTER. 3 Sélectionnez l’option désirée en appuyant sur le bouton ▲ ou ▼, puis appuyez sur le bouton ENTER.
Écran : Réglage de base/Réglage précis/ Position/ Netteté : 20 Réglage Automatique Image Réinitialiser Image - Réglage de base/Réglage précis En réglant la qualité de l’image, l’objectif est de réduire voir éliminer les parasites visuels. Si ces parasites ne sont pas éliminés après une syntonisation précise, réglez la fréquence afin d’obtenir la meilleure image possible (Réglage de base) puis effectuez à nouveau une syntonisation précise.
Utilisation de la fonction WISELINK Connexion d’un périphérique USB Cette fonction vous permet d’afficher des photos (JPEG) Panneau latéral du téléviseur et d’écouter des fichiers audio (MP3) enregistrés sur un périphérique de stockage de masse USB. 1 Appuyez sur le bouton POWER de la télécommande ou de la façade. Le téléviseur est sous tension. 2 Connectez un périphérique USB contenant des fichiers JPEG et/ou MP3 dans la prise WISELINK (prise USB) située sur le côté du téléviseur.
Utilisation du menu WISELINK 1 2 Appuyez sur le bouton MENU. Appuyez sur le bouton ▲ ou ▼ pour sélectionner Application, puis appuyez sur le bouton ENTER. Appuyez sur le bouton ▲ ou ▼ pour sélectionner WISELINK, puis appuyez sur le bouton ENTER. Le menu WISELINK s’affiche. WISELINK 851.98MB/995.00MB Libre SUM PHOTO ¯ Photo Music Setup Périph. SUM Retour Appuyez sur le bouton W.LINK de la télécommande pour afficher le menu WISELINK.
Affichage 1 Photo actuellement sélectionnée Affiche la photo actuellement sélectionnée. 2 Fenêtre d’informations sur la photo Affiche des informations sur la photo actuellement sélectionnée. Vous pouvez modifier les paramètres Couleur, Compo. et Favori. 3 Photo image_1.jpg Mois Date Couleur Compo. Dossier Favori 2 1Fich. sél. 6 : Jan : Jan.01.2008 : Gris : : P-other : ) ) ) 1 Préf. Mois 3 Jan Nov 4 ▲ Ordre de tri actuel Date Appuyez sur le bouton ▲ Périph.
Tri de la liste des photos Vous pouvez trier les photos dans la Liste des photos dans un ordre particulier. 1 2 Appuyez sur le bouton W.LINK de la télécommande pour afficher le menu WISELINK. Appuyez sur le bouton ◄ ou ► pour sélectionner Photo, puis appuyez sur le bouton ENTER. Les fichiers photo s’affichent. Appuyez sur le bouton ▲ ou ▼ pour sélectionner un ordre de tri. (Mois, Date, Couleur, Compo., Dossier, Préf.) Les photos sont triées selon le nouvel ordre de tri sélectionné.
Couleur Trie les photos par couleur. image_1.jpg Photo Vous pouvez modifier les informations de couleur de la Mois : Jan Diaporama Date : Jan.01.2008 photo. Lire gp act. Couleur : Gris 1 Sélectionnez Couleur comme ordre de tri dans la Liste des Compo. : Supprimer Dossier : P-other photos. Favori : ) ) ) Changer gp 2 Appuyez sur le bouton ◄ ou ► pour sélectionner des fichiers dans la liste secondaire des fichiers groupés par couleur.
Dossier Trie les photos par dossier. image_1.jpg Photo S’il y a beaucoup de dossiers sur le périphérique USB, Mois : Jan Diaporama Date : Jan.01.2008 les fichiers photo sont affichés dans l’ordre dans chaque Lire gp act. Couleur : Gris Compo. : dossier. Le fichier photo dans le dossier racine est affiché Supprimer Dossier : P-other en premier, suivi des autres en ordre alphabétique. Favori : ) ) ) Information 1 Sélectionnez Dossier comme ordre de tri dans la Liste des photos.
Suppression d’un fichier photo 1 2 3 Appuyez sur le bouton ◄ ou ► pour sélectionner la photo voulue dans la Liste des photos. Appuyez sur le bouton TOOLS. Appuyez sur le bouton ▲ ou ▼ pour sélectionner Supprimer, puis appuyez sur le bouton ENTER. Le message Suppr. ce fichier? apparaît. Appuyez sur le bouton ◄ ou ► pour sélectionner OK, puis appuyez sur le bouton ENTER. La photo est supprimée. Lorsqu’un fichier en lecture seule est supprimé, le message Fichier en lect.seule.Suppr.? s’affiche.
Visualisation d’un diaporama Visualisation d’un diaporama 1 2 Photo Appuyez sur le bouton W.LINK de la télécommande pour afficher le menu WISELINK. Appuyez sur le bouton ◄ ou ► pour sélectionner Photo, puis appuyez sur le bouton ENTER. Les fichiers photo s’affichent. Appuyez sur le bouton ◄ ou ► pour sélectionner la photo voulue dans la Liste des photos. Appuyez sur le bouton TOOLS. Appuyez sur le bouton ▲ ou ▼ pour sélectionner Diaporama, puis appuyez sur le bouton ENTER.
Affichage d’une photo 1 Appuyez sur le bouton W.LINK de la télécommande pour afficher le menu WISELINK. Appuyez sur le bouton ◄ ou ► pour sélectionner Photo, puis appuyez sur le bouton ENTER. Les fichiers photo s’affichent. Appuyez sur le bouton ◄ ou ► pour sélectionner la photo voulue dans la Liste des photos. Appuyez sur le bouton jaune pour ne sélectionner qu’un fichier. Appuyez sur le bouton ENTER sur une icône de photo. La photo actuellement sélectionnée s’affiche en plein écran. 2 20/22 image_1.
Zoom Vous pouvez zoomer sur les images lorsque vous êtes en mode Plein écran. Appuyez sur le bouton ▲ ou ▼ pour sélectionner Zoom, puis appuyez sur le bouton ENTER. Appuyez plusieurs fois sur le bouton ◄ ou ► pour augmenter ou réduire l’effet de zoom. (x1 → x2 → x4) Pour déplacer l’image agrandie, appuyez sur le bouton ENTER, puis sur ▲/▼/◄/►. Notez que lorsque la taille de l’image agrandie est inférieure à celle de l’écran, la fonction de déplacement est inopérante.
Configuration du fond musical Vous pouvez définir un fond musical. Appuyez sur le bouton ▲ ou ▼pour sélectionner Paramètres de musique de fond, puis appuyez sur le bouton ENTER. Si vous désactivez la fonction Fond musical, aucune musique ne sera diffusée, même si les réglages Paramètres de musique de fond ont été effectués. Le changement de fond musical exige le chargement de fichiers musicaux. Lisez des fichiers musicaux dans la catégorie voulue. Le menu “Paramètres de musique de fond” s’affiche.
Utilisation de la liste de musiques Ce menu permet d’afficher des fichiers MP3 enregistrés sur une unité de stockage USB. WISELINK 1 Appuyez sur le bouton W.LINK de la télécommande pour afficher le menu WISELINK. 2 Appuyez sur le bouton ◄ ou ► pour sélectionner Music, puis appuyez sur le bouton ENTER. Les fichiers musicaux s’affichent. Appuyez sur le bouton (Lecture) / ENTER sur une icône de musique pour lire le fichier musical en question.
Tri de la liste de musiques Vous pouvez trier les fichiers musicaux dans la Liste des musiques dans un ordre particulier. 1 2 3 WISELINK 851.98MB/995.00MB Libre SUM Appuyez sur le bouton W.LINK de la télécommande MUSIC pour afficher le menu WISELINK. Appuyez sur le bouton ◄ ou ► pour sélectionner Music, puis appuyez sur le bouton ENTER. Les fichiers musicaux s’affichent. Appuyez sur le bouton ▲ ou ▼ pour sélectionner un ordre de tri. (Titre, Artiste, Ambiance, Genre, Photo Music Setup Dossier, Préf.
Ambiance Trie les fichiers musicaux par humeur. Music Vous pouvez modifier les informations d’humeur de la musique. Thanks I Love You Better than yesterday 1 Sélectionnez Ambiance comme ordre de tri dans la liste Lire gp act. Jee Darby Supprimer Catherine des musiques. Changer gp 2 Appuyez sur le bouton ◄ ou ► pour sélectionner des Information fichiers dans la liste secondaire des fichiers groupés par Energique ) ) ) Triste ) ) ) Calme ) ) ) humeur.
Dossier Trie les fichiers musicaux par dossier. Music S’il y a beaucoup de dossiers sur le périphérique USB, les fichiers sont affichés dans l’ordre dans chaque dossier. Thanks I Love You Better than yesterday Le fichier musical dans le dossier racine est affiché en Lire gp act. Jee Darby Supprimer Catherine premier, suivi des autres en ordre alphabétique. Information 1 Sélectionnez Dossier comme ordre de tri dans la liste des Retrait sécurisé Energique ) ) ) Triste ) ) ) Calme ) ) ) musiques.
Suppression d’un fichier musical 1 2 3 4 Appuyez sur le bouton ◄ ou ► pour sélectionner le fichier musical voulu dans la liste des musiques. Appuyez sur le bouton TOOLS. Appuyez sur le bouton ▲ ou ▼ pour sélectionner Supprimer, puis appuyez sur le bouton ENTER. Le message Suppr. ce fichier? apparaît. Appuyez sur le bouton ◄ ou ► pour sélectionner OK, puis appuyez sur le bouton ENTER. Le fichier musical est supprimé. Lorsqu’un fichier en lecture seule est supprimé, le message Fichier en lect.seule.
Lecture d’un fichier musical Lecture d’un fichier musical 1 2 3 Appuyez sur le bouton W.LINK de la télécommande pour afficher le menu WISELINK. Appuyez sur le bouton ◄ ou ► pour sélectionner Music, puis appuyez sur le bouton ENTER. Les fichiers musicaux s’affichent. Appuyez sur le bouton ◄ ou ► pour sélectionner un fichier musical à lire, puis appuyez sur le bouton ENTER. Ce menu affiche uniquement les fichiers portant l’extension MP3.
Lecture des fichiers musicaux sélectionnés 1 2 3 Appuyez sur le bouton W.LINK de la télécommande pour afficher le menu WISELINK. Appuyez sur le bouton ◄ ou ► pour sélectionner Music, puis appuyez sur le bouton ENTER. Appuyez sur le bouton ◄ ou ► pour sélectionner le fichier musical voulu, puis appuyez sur le bouton jaune. Répétez l’opération ci-dessus pour sélectionner plusieurs fichiers musicaux. La marque s’affiche à gauche du fichier musical sélectionné. (Lecture) / ENTER.
Utilisation du menu Configuration Ce menu affiche les paramètres utilisateur pour le menu WISELINK. 1 2 3 4 Appuyez sur le bouton W.LINK de la télécommande pour afficher le menu WISELINK. Appuyez sur le bouton ◄ ou ► pour sélectionner Setup, puis appuyez sur le bouton ENTER. Appuyez sur le bouton ▲ ou ▼ pour sélectionner l’option de votre choix. (Vitesse du diaporama, Mode Répétition Musique, Délai éco.
Qu’est-ce que Anynet+? Anynet+ est un système de réseau AV qui fournit une interface AV conviviale aux utilisateurs, en contrôlant tous les appareils AV connectés via le menu Anynet+ lorsque des appareils AV Samsung Electronics sont connectés. Connexion d’appareils Anynet+ Le système Anynet+ ne prend en charge que les appareils AV compatibles Anynet+. Assurez-vous que l’appareil AV connecté au téléviseur porte bien un label Anynet+. Connexion directe au téléviseur TV Appareil Anynet+ 1 Câble HDMI 1.
Configuration d’Anynet+ Les fonctions d’Anynet+ emploient les réglages suivants. Utilisation de la fonction Anynet+ Application WISELINK Appuyez sur le bouton MENU pour afficher le menu. Anynet+ (HDMI-CEC) ► Appuyez sur le bouton ▲ ou ▼ pour sélectionner Application, puis appuyez sur le bouton ENTER. 2 Appuyez sur le bouton ENTER pour sélectionner Liste source. Appuyez sur le bouton ▲ ou ▼ pour sélectionner Anynet+ (HDMI-CEC), puis appuyez sur le bouton ENTER.
Menu Anynet+ Le menu Anynet+ varie selon le type et l’état des appareils Anynet+ connectés au téléviseur. Menu Anynet+ Description Voir télévision Passe d’Anynet+ au mode de diffusion TV. Sélection appareil Le téléviseur se connecte à l’appareil correspondant. Enregistrer Démarre l’enregistrement (ce menu ne fonctionne qu’avec un appareil capable d’enregistrer). Menu du Périphérique Affiche le menu de l’appareil connecté. Exemple : Si un enregistreur de DVD est connecté, son menu titre s’affiche.
Ecoute via un récepteur Le son peut être émis par l’intermédiaire d’un récepteur au lieu de l’enceinte du téléviseur. Outils Appuyez sur le bouton TOOLS. Appuyez sur le bouton ▲ ou ▼ pour sélectionner Récepteur. Voir télévision 2 Appuyez sur le bouton ◄ ou ► pour sélectionner Marche. Le son est Liste d’appareils désormais émis via le récepteur. Enregistrer : DVD 3 Appuyez sur le bouton EXIT pour quitter.
Fonction de télétexte (en fonction du modèle) La plupart des canaux de télévision proposent des services d’informations via le télétexte. La page d’index du télétexte contient des instructions sur l’utilisation de ce service. Vous pouvez en outre sélectionner différentes options à l’aide des boutons de la télécommande. Pour que l’affichage des informations de télétexte soit correct, la réception des chaînes doit être stable.
Les pages télétexte sont organisées en six catégories : Catégorie A B C D E F Sommaire Numéro de la page sélectionnée Identité du canal émetteur Numéro de la page actuelle ou indications de recherche Date et heure Texte Informations sur l’état Informations FASTEXT informations télétexte sont souvent réparties sur plusieurs ¯ Les pages qui s’affichent l’une après l’autre.
Caractéristiques du kit de fixation murale (VESA) Installez votre fixation murale sur un mur solide perpendiculaire au sol. Si vous souhaitez la fixer sur d’autres matériaux de construction, veuillez prendre contact avec votre revendeur le plus proche. Si vous l’installez au plafond ou sur un mur non droit, elle peut tomber et provoquer des blessures corporelles graves.
Ajustement du support mural (vendu séparément) (PS50A676) Grâce à l’installation d’un support mural, vous pouvez régler facilement la position de votre téléviseur. Support mural automatique Panneau arrière Serial Cable(1P to 1P)(Not supplied) Entrée dans le menu 2 Langue ► : Français Horloge Modifier PIN Verrouillage parental Sous-titres Langue du télétexte : ---- Préférence Ajustement fixation murale ► ¯ ¯ Plug & Play ► Appuyez sur le bouton ▲, ▼, ◄ ou ► de votre télécommande.
Accès à la position mémorisée ► Exécutez l’étape 1 de la procédure Accès au menu. Ajustement fixation murale Position 1 Appuyez sur un bouton de couleur (Rouge, Vert ou Jaune) pour déplacer le support mural vers la position enregistrée. Vous pouvez déplacer le support mural sur l’une des trois positions prédéfinies en appuyant sur le bouton Rouge (Position 1), Vert (Position 2) ou Jaune (Position 3).
Dépannage Avant de contacter le service après-vente Samsung, effectuez les vérifications élémentaires suivantes.Si vous ne pouvez pas résoudre le problème en suivant les instructions ci-dessous, notez le modèle et le numéro de série de votre téléviseur et contactez votre revendeur local. Aucune image ou aucun son Vérifiez que le cordon d’alimentation est branché à une prise secteur.
Caractéristiques Les descriptions et caractéristiques fournies dans ce manuel sont données à titre indicatif seulement et sont susceptibles d’être modifiées sans préavis.
Cette page est laissée intentionnellement en blanc.
Comment éliminer ce produit (déchets d’équipements électriques et électroniques) (Applicable dans les pays de l’Union Européen et aux autres pays européens disposant de systémes de collecte sélective) Ce symbole sur le produit ou sa documentation indique qu’il ne doit pas être éliminé en fin de vie avec les autres déchets ménagers.