
User Manual


English - 9
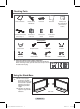
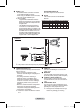
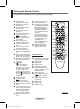
Installing Batteries in the Remote Control
1 Lift the cover at the back of the remote control upward as shown in the
figure.
2 Install two AAA size batteries.
¯
Make sure to match the “+” and “–” ends of the batteries with the
diagram inside the compartment.
Using the remote control with the ON/OFF(
) light button set to
On will reduce the battery usage time.
3 Close the cover as shown in the figure.
¯
Remove the batteries and store them in a cool and dry place if you
won’t be using the remote control for a long time. The remote control
can be used up to about 23 feet from the TV. (Assuming typical TV
usage, the batteries last for about one year.)
¯
If the remote control doesn’t work! Check the following:
1. Is the TV power on?
2. Are the plus and minus ends of the batteries reversed?
3. Are the batteries drained?
4. Is there a power cut, or is the power cord unplugged?
5. Is there a special fluorescent light or a neon sign nearby?
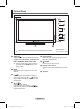
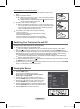
Switching Your Television On and Off
The mains lead is attached to the rear of the television.
1 Plug the mains lead into an appropriate socket.
¯
The main voltage is indicated on the rear of the television and the frequency is 50 or 60Hz.
2 Press the
(Power) button (On/Off) on the front of the television or press the POWER button on
the remote control to switch the television on. The channel that you were watching last is re-selected
automatically. If you have not yet stored any channels, no clear picture appears. Refer to “Storing
Channels Automatically” on page 14 or “Storing Channels Manually” on page 15.
¯
If the television is initially powered on, several basic customer settings proceed automatically.
Refer to “Plug & Play Feature” on page 10.
3 To switch the television off, press the
(Power) button (On/Off) on the front of the television or press
the POWER button on the remote control.
4 To switch the TV on, press the
(Power) button (On/Off) on the front of the TV or press the POWER
button or number buttons on the remote control.
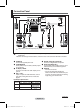
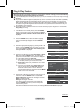
Viewing the Menus
1 Press the MENU button.
The main menu is displayed on the screen.
Its left side has six icons: Picture, Sound, Channel,
Setup, Input, and Application
2 Press the ▲ or ▼ button to select one of the icons.
Press the ENTER button to access the icon’s sub-menu.
3 Press the ▲ or ▼ button to move to items in the menu.
Press the ENTER button to enter items in the menu.
4 Press the ▲/▼/◄/► button to change the selected items.
Press the RETURN button to return to the previous menu.
5 Press the EXIT button to exit from the menu.
Mode : Standard
Cell Light : 7
Contrast : 95
Brightness : 45
Sharpness : 50
Colour : 50
Tint (G/R) : G50/R50
Detailed Settings
Picture
3\URSH3%1$LQGE