Contact SAMSUNG WORLD-WIDE If you have any questions or comments relating to Samsung products, please contact the SAMSUNG customer care centre. Country Customer Care Centre Web Site EIRE 0818 717 100 www.samsung.com/ie U.K 0845 SAMSUNG(7267864) www.samsung.com/uk Plasma TV user manual imagine the possibilities Thank you for purchasing this Samsung product. To receive more complete service, please register your product at www.samsung.com/register Model Serial No.
User Instructions English ■ ■ ■ ■ ■ ■ ■ ■ ■ ■ Screen Image retention Do not display a still image (such as on a video game or when hooking up a PC to this PDP) on the plasma monitor panel for more than 2 hours as it can cause screen image retention. This image retention is also known as “screen burn”. To avoid such image retention, reduce the degree of brightness and contrast of the screen when displaying a still image. Height The PDP can normally operate only under 2000m in height.
English Trademark & Label License Notice TruSurround HD, SRS and symbol are trademarks of SRS Labs, Inc. TruSurround HD technology is incorporated under license from SRS Labs, Inc. Manufactured under license from Dolby Laboratories. Dolby and the double-D symbol are trademarks of Dolby Laboratories. DivX Certified to play DivX video, including premium content. Symbol Press Note One-Touch Button TOOLS © 2009 Samsung Electronics Co., Ltd. All rights reserved. BN68-02113G_Eng.
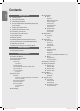
Contents English Getting Started 6 Checking Parts 6 Using the Stand-Base 6 Assembling the Cables 7 How to assemble the Stand-Base (depending on the model) 7 Viewing the Control Panel 8 Viewing the Connection Panel 10 Connecting a AV device 11 Connecting an audio device 11 Connecting a PC 12 Remote Control 13 Installing Batteries in the Remote Control 13 Using the Remote Control Backlight Buttons 13 Switching On and Off 13 Placing Your Television in Standby Mode Basic Operation 14 Plug & Pl
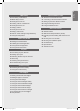
English Media Play Home Network Centre 43 Connecting a USB Device 81 About the Home Network Centre 44 Media Play Function 81 Connecting to the Home Network Centre 46 Sorting the Photo List 83 Setting Up the Home Network Centre 48 Viewing a Photo or Slide Show 84 Using the Message Function 50 Sorting the Music List 85 Using the Media Function 51 Playing a Music 53 Sorting the Movie List 54 Playing a Movie File 56 Picture / Music Settings Using Media Play 57 Using the Setup Menu Media Play-DLN
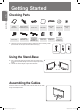
Getting Started English Checking Parts Getting Started Owner’s Instructions Remote Control/ AAA Batteries (2ea) Power Cord Screw (4ea) Cover-Bottom (PS50B650 only) Cover-Bottom / Screws (2ea) (PS58B680 / PS63B680 only) Cloth-Clean Holder-Wire Cable Ferrite Core for Ferrite Core for Power Cord Headphone Program CD Holder-Ring (4ea) Ferrite Core for Power Cord (PS63B680 only) ■ The ferrite core is used to shield the cable from interference.
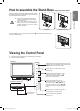
How to assemble the Stand-Base (depending on the model) ■ Firmly secure the stand to the TV before moving it, as the stand may fall and could cause serious injury. ■ Two or more people should carry the TV. Never lay the TV on the floor because of possible damage to the screen. Always store the TV upright. 주의 (PS50B650) (PS58B680/PS63B680) Getting Started 경고 주의 English 경고 Using the screws for securing the stand base and the monitor, firmly attach the monitor to the stand base.
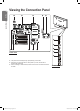
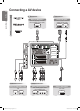
Viewing the Connection Panel English 1 2 3 4 5 Getting Started ! @ 0 9 8 7 6 TV Rear Panel 3 @ # ■ The product colour and shape may vary depending on the model. ■ Whenever you connect an audio or video system to your set, ensure that all elements are switched off. ■ When connecting an external device, match the colour of the connection terminal to the cable. BN68-02113G_Eng.
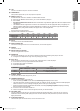
1 LAN Connect a LAN cable to this port to connect to the Network 480i X X O HDMI/DVI 50Hz HDMI/DVI 60Hz Component 480p X O O 576i X X O 576p O X O 720p O O O 1080i O O O Getting Started 3 HDMI IN 1, 2(DVI), 3, 4 No additional Audio connection is needed for an HDMI to HDMI connection. ■ When using an HDMI/DVI cable connection, you must use the HDMI IN 2 (DVI) jack.
HD connection HDMI/DVI HD connection Getting Started Using an HDMI Cable Using a DVI Cable DVD / Blu-Ray player / HD Cable Box / HD Satellite receiver (STB) DVD / Blu-Ray player / Cable Box / Satellite receiver (STB) HDMI OUT DVI OUT AUDIO OUT Normal PC/COMPONENT EXT/VIDEO W R Y Audio/Video connection R R R W W W R R Y B G B English Best Connecting a AV device G 10 Component connection Using an Audio/Video Cable Using a Component Cable Using a Scart Cable VCR DVD / Blu
Analog Audio connection OPTICAL (Digital) Using a Audio Cable AUDIO (Analog) AUDIO IN Getting Started Amplifier / DVD Home Theater Normal English Best Connecting an audio device Digital Audio connection Using an Optical Cable Digital Audio System OPTICAL Connecting a PC HD connection Using a D-Sub Using an HDMI Cable Cable HDMI OUT HD connection Using D-Sub Cable Using anaHDMI/DVI Cable AUDIO OUT DVI OUT Using Cable Using a a D-Sub D-Sub Cable AUDIO OUT BN68-02113G_Eng.
Remote Control English You can use the remote control up to a distance of about 23 feet from the TV. ■ The performance of the remote control may be affected by bright light. Getting Started Press to backlight the buttons on the remote. This function is convenient for using at night or when the room is dark. (Using the remote control with the ON/OFF( ) light button set to On will reduce the battery usage time.) (p.13) POWER button (turns the TV on and off) Selects the TV mode directly. (p.
Installing Batteries in the Remote Control Lift the cover at the back of the remote control upward as shown in the figure. English Install two AAA size batteries. ■ Make sure to match the ‘+’ and ‘–’ ends of the batteries with the diagram inside the compartment. Replace the cover. ■ Remove the batteries and store them in a cool, dry place if you won’t be using the remote control for a long time.
English Basic Operation Plug & Play Feature Basic Operation When the TV is initially powered on, basic settings proceed automatically and subsequently. 1 2 3 4 5 6 Press the POWER button on the remote control. Select the OSD Language. menu is automatically displayed. Select the appropriate language by pressing the ▲ or ▼ button. Press the ENTERE button to confirm your choice. Press the ◄ or ► button to select Store Demo or Home Use, then the ENTERE button.
Using the Menus 15 English Viewing the Menus 3 Press the ▲ or ▼ button to select one of the icons. Then press the ENTERE button to access the icon’s sub-menu. Picture 2 With the power on, press the MENU button. The main menu appears on the screen. The menu’s left side has icons: Picture, Sound, Channel, Setup, Input, Application, Support. Press the EXIT button to exit. ■ The on-screen menus disappear from the screen after about one minute.
Channel Menu English Channel Description Using the Menus ■ Digital Channel You can change the country for digital channels. ■ Analogue Channel You can change the country for analogue channels. • The PIN number input screen appears. Enter your 4 digit PIN number. Channel Option Country Country Manual Store Full Guide Mini Guide Default Guide : Full Guide Channel List Channel Mode Auto Store ► Auto Store : Added Ch.
Channel Option Using the Menus BN68-02113G_Eng.indb 17 17 Description Scans for a channel manually and stores it in the TV’s memory. ■ Digital Channel (Digital) Manual store for digital channels. • Channel: Set the Channel number using the ▲, ▼ or number (0~9) buttons. • Frequency: Set the frequency using the number (0~9) buttons. • Bandwidth: Set the bandwidth using the ▲, ▼buttons. When it has finished, channels are updated in the channel list. ■ Analogue Channel Manual store for analogue channel.
7 8 9 0 Channel 18 Option Description English Full Guide / Mini Guide / Default Guide The EPG (Electronic Programme Guide) information is provided by the broadcasters. Programme entries may appear blank or out of date as a result of the information broadcast on a given channel. The display will dynamically update as soon as new information becomes available. ■ Full Guide Displays the programme information as time ordered One hour segments.
Channel Option • • Using the Colour buttons with the Channel List Red (Channel Type): Toggle between your TV, Radio, Data/Other and All. Green (Zoom): Enlarges or shrinks a channel number. Yellow (Select): Selects multiple channel lists. Channel Status Display Icons A ♥ \ c ( ) An Analogue channel. A channel set as a Favourite. A locked channel. A channel selected by pressing the A programme currently being broadcast.
Channel Option English Channel List Using the Menus ■ Add to Favourite / Delete from Favourite You can set channels you watch frequently as favourites. • The “♥” symbol will be displayed and the channel will be set as a favourite. • All favourite channels will be shown on Favourite menu. ■ Lock / Unlock You can lock a channel so that the channel cannot be selected and viewed. This function is available only when the Child Lock is set to On. • The PIN number input screen appears.
Channel Option BN68-02113G_Eng.indb 21 If the reception is clear, you do not have to fine tune the channel, as this is done automatically during the search and store operation. If the signal is weak or distorted, you may have to fine tune the channel manually. • Fine tuned channels that have been saved are marked with an asterisk * on the right-hand side of the channel number in the channel banner. • If you do not store the fine-tuned channel in memory, adjustments are not saved.
Picture Menu English Picture Option Description You can select the type of picture which best corresponds to your viewing requirements. ■ Dynamic / Standard / Eco / Movie Cell Light / Contrast / Brightness / Sharpness / Colour / Tint (G/R) Your television has several setting options that allow you to control the picture quality. ■ Cell Light: Adjusts the pixel brightness. ■ Contrast: Adjusts the contrast level. ■ Brightness: Adjusts the brightness level. ■ Sharpness: Adjusts the sharpness.
Picture Option BN68-02113G_Eng.indb 23 : 50 Tint (G/R) : G50/R50 Advanced Settings ► Picture Options Picture Reset Using the Menus Customizing the Colour Space Adjusts the Colour range to suit your preference. Colour is available when Colour Space is set to Custom. Colour → Red / Green / Blue / Yellow / Cyan / Magenta Red / Green / Blue: In Colour, you can adjust the RGB values for the selected colour. Reset: Resets the colour space to the default values.
Option English Picture Options Using the Menus BN68-02113G_Eng.indb 24 Description ■ Colour Tone → �� Cool / Normal / Warm1 / Warm2 / Warm3 You can select the most comfortable colour tone to your eyes. • The adjusted values are stored according to the selected Picture mode. • Warm1, Warm2 or Warm3 is only activated when the picture mode is Movie. ■ Size You can select the picture size which best corresponds to your viewing requirements. • Auto Wide: Sets the picture in Auto Wide format.
Picture Option Using the Menus ■ 1080 Full HD Motion Demo → Off / On Samsung's new generation PDP panels deliver stunning Full HD motion clarity when viewing fast action sports, movies, and games. • This function is not available in PC, Game or Media Play mode. ■ Film Mode You can optimize the picture mode for watching movies. • Off: Turn the Film Mode function off. • Auto1: Improves the picture quality for fast motion scenes. • Auto2: Allows a smoother text motion on fast motion scenes.
Picture 26 Option English Picture Reset Description ■ Reset Picture Mode / Cancel Resets all picture settings to the default values. • Select a picture mode to be reset. The reset is performed for each picture mode. Option Auto Adjustment Screen Description Auto Adjustment allows the PC screen of set to self-adjust to the incoming PC video signal. The values of fine, coarse and position are adjusted automatically. The purpose of picture quality adjustment is to remove or reduce picture noise.
Display Modes 27 D-Sub and HDMI/DVI Input Mode MAC VESA CVT Horizontal Frequency (kHz) Vertical Frequency (Hz) Pixel Clock Frequency (MHz) Sync Polarity (H/V) 640 x 350 31.469 70.086 25.175 +/- 720 x 400 31.469 70.087 28.322 -/+ 640 x 480 35.000 66.667 30.240 -/- 832 x 624 49.726 74.551 57.284 -/- 1152 x 870 68.681 75.062 100.000 -/+ 720 x 576 35.910 59.950 32.750 -/+ 1152 x 864 53.783 59.959 81.750 -/+ 44.772 59.855 74.500 -/+ 56.456 74.777 95.750 -/+ 75.
Sound Menu English Sound Option Mode Description Using the Menus You can select the type of special sound effect to be used when watching a given broadcast. ■ Standard / Music / Movie / Clear Voice / Custom Equalizer The sound settings can be adjusted to suit your personal preferences. ■ Mode: You can select a sound mode to suit your personal preferences. ■ Balance: Controls the balance between the right and left speakers.
Sound Option 29 Description Speaker Select External Speaker Mute Sound Output Video No Signal Mute Mute Sound Select When the PIP feature is activated, you can listen to the sound of the sub (PIP) picture. ■ Main: Listen to the sound of the main picture. ■ Sub: Listen to the sound of the sub picture. You can select this option when PIP is set to On. Sound Reset ■ Reset All / Reset Sound Mode / Cancel You can restore the Sound settings to the factory defaults.
Setup Menu Option Description Using the Menus Language You can set the menu language. Time ■ Clock Setting the clock is necessary in order to use the various timer features of the TV. • Clock Mode You can set up the current time manually or automatically. Auto: Set the current time automatically using the time from the digital broadcast. Manual: Set the current time to a manually specified time. • Clock Set You can set the current time manually.
Setup Menu 31 Option Description Child Lock This feature allows you to prevent unauthorized users, such as children, from watching unsuitable programmes by muting out video and audio. ■ Before the setup screen appears, the PIN number input screen appears. Enter your 4 digit PIN number. ■ The default PIN number of a new TV set is '0-0-0-0'. You can change the PIN by selecting Change PIN from the menu. ■ You can lock some channels in Channel List. Parental Lock BN68-02113G_Eng.
Setup 32 Option English Subtitle Description Using the Menus You can activate and deactivate the subtitles. Use this menu to set the Subtitle Mode. Normal under the menu is the basic subtitle and Hard of hearing is the subtitle for a hearing-impaired person. ■ Subtitle → Off / On: Switches subtitles off or on. ■ Mode → Normal / Hard of hearing: Sets the subtitle mode. ■ Subtitle Language: Set the subtitle language.
Setup Option Energy Saving This feature adjusts the brightness of the TV in order to reduce power consumption. When watching TV at night, set the Energy Saving mode option to High to reduce eye fatigue as well as power consumption. ■ Off: Turns off the energy saving function. ■ Low: Sets the TV to low energy saving mode. ■ Medium: Sets the TV to medium energy saving mode. ■ High: Sets the TV to high energy saving mode. BN68-02113G_Eng.indb 33 ■ Press the TOOLS button to display Tools menu.
PIP Setup 34 Option Description English ■ PIP You can display a sub picture within the main picture of set programme me or video input. In this way, you can watch the picture of set programme me or video input from any connected equipment while watching the main picture. • Size → / / / You can select a size of the sub-picture. If main picture is in HDMI mode, Size is not available. • Position → / / / You can select a position of the sub-picture. In Double ( , ) mode, Position cannot be selected.
You can connect the LAN port and the TV directly depending on your network status. 35 TV Rear Panel English The LAN Port on the Wall ■ The terminals (the position of the port and the type) of the external device may differ depending on the manufacturer. ■ If the IP address allocation by the DHCP server has failed, turn the external modem off, turn it on again after at least 10 seconds and then try again.
Network Connection - Wireless You can connect to the network wirelessly through a wireless IP sharer. English Connect the ‘Samsung Wireless LAN Adapter’ into the USB1(HDD) or USB2 terminal of the TV. TV Side Panel Using the Menus The LAN Port on the Wall Wireless IP sharer Samsung Wireless LAN Adapter LAN Cable ■ You must use the ‘Samsung Wireless LAN Adapter’(WIS09ABGN) to use a wireless network. ■ Samsung’s Wireless LAN adapter is sold separately.
Setting the Network 37 Game Mode : Off BD Wise : Off Network Type : Cable Network Setup Child Lock ► : On Change PIN Using the Menus Network Setup Select Cable or Wireless as the method to connect to the network. ■ Cable Connect to the network using a cable. ■ Wireless Connect to the network wirelessly.
Setup English Option Network Setup Description Using the Menus ■ Cable Network Setup-Manual To connect the TV to the LAN using a static IP address, you must set up the Internet Protocol (IP). 1. Set Network Type to Cable. 2. Select Cable Network Setup. 3. Set Internet Protocol Setup to Manual. 4. Set up IP Address, Subnet Mask, Gateway and DNS Server. • Press the number buttons on the remote control when you set the Network manually. 5. Select Network Test to check the network connectivity.
Setup 39 Description ■ Ad-hoc: You can connect to a mobile device without an access point through the ‘Samsung Wireless LAN Adapter’ by using a peer to peer network. The existing network system may have limited functionality. Do you want to change the network connection? Yes No Using the Menus How to connect to new Ad-hoc 1. Choose Select a network, then a device list is displayed. 2. While in the device list, press the Blue button on the remote or select Ad-hoc.
Input Menu Option Source List Using the Menus Edit Name BN68-02113G_Eng.indb 40 Description Use to select TV or other external input sources such as DVD players or Cable Box / Satellite receivers (Set-Top Box) connected to the TV. Use to select the input source of your choice. ■ TV, Ext.1, Ext.2, AV, Component, PC, HDMI1, HDMI2/ DVI, HDMI3, HDMI4, USB. • You can choose only those external devices that are connected to the TV.
Support menu 41 Option Description You can view legal notice and general disclaimer regarding third party contents and services. ■ General Disclaimer This is full legal notice service regarding the Internet@TV. • The General Disclaimer may differ depending on the country. • You can move the previous or next page by pressing the ◄ or ► button. Product Guide The Product Guide gives you information on the most important features of this TV. ■ For more detailed information, select the desired item.
Support Option English Software Upgrade Description Using the Menus To keep your product up-to-date with new Digital Television features then software upgrades are periodically broadcast as part of the normal Television signal. It will automatically detect these signals and display the software upgrade banner. You are given the option to install the upgrade. ■ By USB Insert a USB drive containing the firmware upgrade into TV.
Media Play 43 English Connecting a USB Device Press the POWER button to turn the TV on. TV Side Panel Media Play 1 2 Connect a USB device containing photo, music and movie files to the USB jack on the side of the TV. Using the Remote Control Button in Media Play Menu Button ▲/▼/◄/► Operations Move the cursor and select an item. ENTERE Select the currently selected item. Play or pause the files while playing the slide show, music, or movie files.
Media Play Function English This function enables you to view and listen to photo, music and movie files saved on a USB Mass Storage Class (MSC) device. It might not work properly with unlicensed multimedia files. Media Play Entering the Media Play (USB & DLNA) Menu 1 Press the MENU button. Press the ▲ or ▼ button to select Application, then press the ENTERE button. 2 Press the ▲ or ▼ button to select Media Play (USB & DLNA), then press the ENTERE button. ■ The Media Play menu is displayed.
Screen Display Timeline ▶ 2 2009 Mar ▶ Preference Basic View ▶ 3 1 Colour Nov Apr Jun Mar.01.2009 Media Play 1/67 c ◀ ▶ IMG_03496 IMG_03496 .JPG .JPG 5 USB Device Folder IMG_0335.JPG 6 Favorites Setting English Photo 45 4 Select IMG_0343 .JPG IMG_03496 .JPG 1File(s) Selected T Tools R Return Current Sort Standard: This field shows the current standard for sorting files. View Groups: The sorting group including the currently selected photo is highlighted.
Sorting the Photo List 4 Press the MEDIA.P button on the remote control to display the Media Play menu. Photo Preference Basic View Timeline 2009 Mar ▶ Media Play ▶ Press the ◄ or ► button to select Photo, then press the ENTERE button. ▶ 1 2 3 Colour Apr Folder Nov Jun Mar.01.2009 1/67 Press the ▲ button twice, then press the ◄ or ► button to select a sorting standard in the Photo list.
Photo List Tools Menu Description You can play a Slide Show using only the photo files in the currently selected sorting group. You can change the Colour information of photo files. ■ The group information of the current file is updated and the file is moved to the new group. ■ To change the information of multiple files, select the files you want by pressing the Yellow button. The photo file information including the name, the size, the resolution, the date modified and the path is displayed.
Viewing a Photo or Slide Show English Viewing a Slide Show Media Play 1 2 3 4 5 r Normal IMG_0335.JPG 3648x2432 2009/3/15 1/4 Press the MEDIA.P button on the remote control to display the Media Play menu. Press the ◄ or ► button to select Photo, then press the ENTERE button. Press the ◄ or ► button to select the desired photo in the Photo list. USB E Pause lr Previous/Next T Tools R Return Press the TOOLS button.
Slide Show Tools Menu Stop Slide Show / Start Slide Show Slide Show Speed Rotate Zoom Background Music Picture Setting / Sound Setting Information Remove Safely BN68-02113G_Eng.indb 49 You can start or stop a Slide show. ■ Normal / Fast / Slow You can select the slide show speed only during the slide show. • You can also change the speed of the Slide Show by pressing the (REW) or (FF) button during the Slide Show.
Sorting the Music List Media Play Press the ▼ button to move to the File List Section. Press the ENTERE button to start playing music in the order selected by the user. ■ The information of the music files is automatically set. ■ The Mood information extracted from a music file may differ from the expectations of the user. ■ You can change the Mood and Preference. ■ Music files for which information cannot be displayed are set to Unclassified.
Music List Tools Menu Music Preference Folder Basic View ▶ ▶ Title Artist 3/4 Description Play Current Group Change Group (When the Sort key is Mood) Information Remove Safely Information Mr A-Z Remove Safely ▶ 2009 NPKI Pop NPKI usermanual ../ folder name/ USB Sky Heaven When I Dream Select Device Select T T Tools Tools R Upper Folder R Upper Folder ■ Alternatively, select a music file from the music list and press the INFO button to view the information.
Playing the Music Group English Media Play 1 2 3 4 Press the ◄ or ► button to select a sorting standard.(Basic View, Title, Artist, Mood, Genre, Folder, Preference) Press the ▼ button, then Press the ◄ or ► button to select the desired group. Press the ▼ button, then press the TOOLS button. Press the ▲ or ▼ button to select Play Current Group, then press the ENTERE button. Playing the selected Music Files 1 2 Press the ◄ or ► button to select the desired music file in the music list.
Sorting the Movie List Timeline Tiltle ▶ Apr.27.2009 1/5 Press the ◄ or ► button to select Movie, then press the ENTERE button. ◀ ▶ Press the ▲ button twice, then press the ◄ or ► button to select a sorting standard in the Movie list. (Basic View, Timeline, Title, Folder, Preference) ■ The movie files are sorted according to the newly selected sorting standard. ■ To move to the previous/next group, press the (REW) or (FF)� button.
Playing a Movie File Media Play 1 2 3 4 r 00:00:02 / 00:01:55 r English Playing a movie file 1/3 MOVIE_000.avi Press the MEDIA.P button on the remote control to display the Media Play menu. Press the ◄ or ► button to select Movie, then press the ENTERE button Pressing the ◄ or ► button to select a movie to be played. USB E Pause lr Jump T Tools R Return Press the (Play)/ENTERE button. ■ The selected file is displayed at the top with its playing time.
Playing the movie group English Press the ▼ button, then press the TOOLS button. Media Play 1 2 3 4 55 Press the ◄ or ► button to select a sorting standard.(Basic View, Timeline, Title, Folder, Preference) Press the ▼ button, then Press the ◄ or ► button to select the desired group. Press the ▲ or ▼ button to select Play Current Group, then press the ENTERE button. Playing the selected Movie Files 1 2 3 Press the ◄ or ► button to select the desired movie file in the movie list.
English Picture / Music Settings Using Media Play When watching a Slide Show or listening to music using Media Play, you can set the picture and sound. Media Play Picture Setting 1 2 3 Press the TOOLS button during a Slide Show or while music is playing. Press the ▲ or ▼ button to select Picture Setting. Press the ◄ or ► button to select the Picture Mode (Dynamic, Standard, Eco, or Movie). ■ When selecting Dynamic, Eco, you can't adjust Dynamic Contrast, Black Tone.
Using the Setup Menu Media Play USB : USB 851.98MB/995.00MB Free SETUP Press the ◄ or ► button to select Setup, then press the ENTERE button. Press the ▲ or ▼ button to select the desired option. Photo USB Music Movie Setup Device e Exit Press the ◄ or ► button to select the option. ■ To exit Media Play mode, press the MEDIA.P button on the remote control. Option Use Colour View Music Repeat Mode Cont.
English Media Play-DLNA Setting the DLNA Network Media Play-DLNA DLNA allows you to watch pictures, musics and videos saved on your PC or on your TV through a network connection in Media Play mode. This removes the need to copy them to a USB storage device and then connect the device to your TV. To use DLNA, the TV must be connected to the network and the DLNA application must be installed on your PC.
Installing the DLNA Application System Requirements Insert the Programme CD supplied with this TV into your PC. 20MB of free hard disk space is needed for the programme installation. ■ If you share files, up to 20MB of hard disk drive space is required for each 100 files. ■ If you cancel file sharing, the hard disk drive space used for the thumbnail information is also freed.
Using the DLNA Application English Programme Screen Display Media Play-DLNA 1 2 3 4 8 5 6 7 Option File 1 2 3 4 5 6 7 8 Menus: The following application menus are provided : File, Share, Server, and Help. Click to share the selected PC server folder. Click to cancel sharing. Click to refresh the PC folder and files. Click to synchronize the share status. The folders and files of the PC to be shared are listed. Folders shared by the user are listed.
Option Share Description Media Play-DLNA 61 English ■ Sharing a Folder You can share a folder from your PC to the TV. The maximum number of folders that can be shared is 32. Yo����������������������������������������� ur PC������������������������������������ will operate as a server to the TV. Method 1: Select a folder in My Computer, select the Share menu and then select the Share Folder sub-menu.
Option Share Description English ■ Setting the Access Permission To enable the TV to find your PC, the TV must be set to Set Device Policy in the Access Permission Settings window. In addition, the PC server and the TV must be on the same subnet. Method: Select the Share menu and select Set Device Policy. Rejected items are represented in gray. You can change the access permissions by using the Allow Accept / Deny button. To delete an item, select the item and select Delete Item.
Anynet+ 63 English Connecting Anynet+ Devices Anynet+ What is Anynet+? Anynet+ is a function that enables you to control all connected Samsung devices that support Anynet+ with your Samsung TV’s remote. The Anynet+ system can be used only with Samsung devices that have the Anynet+ feature. To be sure your Samsung device has this feature, check if there is an Anynet+ logo on it. To connect to a TV TV Anynet+ Device 1 HDMI 1.3 Cable Anynet+ Device 2 HDMI 1.
To connect to Home Theatre 64 English TV Anynet+ Device 1 Home Theatre Anynet+ HDMI 1.3 Cable Optical Cable HDMI 1.3 Cable Anynet+ Device 2 HDMI 1.3 Cable Anynet+ Device 3 Anynet+ Device 4 HDMI 1.3 Cable HDMI 1.3 Cable 1 2 ■ ■ ■ ■ ■ ■ ■ Connect the HDMI IN (1, 2(DVI), 3 or 4) jack on the TV and the HDMI OUT jack of the corresponding Anynet+ device using an HDMI cable. Connect the HDMI IN jack of the home theater and the HDMI OUT jack of the corresponding Anynet+ device using an HDMI cable.
Setting Up Anynet+ Description ■ Press the TOOLS button to display Tools menu. You can also display Anynet+ menu by selecting Tools → Anynet+(HDMI-CEC). Anynet+(HDMI-CEC) : On Auto Turn Off : Yes U Move E Enter Anynet+ ■ Anynet+ (HDMI-CEC) → Off / On To use the Anynet+ Function, Anynet+ (HDMI-CEC) must be set to On. • When the Anynet+ (HDMI-CEC) function is disabled, all the Anynet+ related operations are deactivated.
Anynet+ Menu English The Anynet+ menu changes depending on the type and status of the Anynet+ devices connected to the TV. Option Description Anynet+ View TV Anynet+ mode changes to TV broadcast mode. Device List Shows the Anynet+ device list. (device_name) MENU Shows the connected device menus. E.g. If a DVD recorder is connected, the disc menu of the DVD recorder will appear. (device_name) INFO Shows the play menu of the connected device. E.g.
Recording 67 3 Press the TOOLS button. Press the ENTERE button to select Anynet+ (HDMI-CEC). Press the ▲ or ▼ button to select Recording : (device_name), then press the ENTERE button. Recording begins. ■ When there is more than one recording device When multiple recording devices are connected, the recording devices are listed. Press the ▲ or ▼ button to select a recording device and press the ENTERE button. Recording begins.
Troubleshooting for Anynet+ English Symptom Anynet+ does not work. Solution Anynet+ • • • • • • • • • • I want to start Anynet+. • • I want to exit Anynet+. • • • Check if the device is an Anynet+ device. The Anynet+ system supports Anynet+ devices only. Connect only one receiver (home theatre). Check if the Anynet+ device power cord is properly connected. Check the Anynet+ device’s Video/Audio/HDMI 1.3 cable connections. Check whether Anynet+ (HDMI-CEC) is set to On in the Anynet+ setup menu.
Content Library 69 English Activating the Content Library 1 2 Press the MENU button. Press the ▲ or ▼ button to select Application, then press the ENTERE button. 3 Press the ◄ or ► button to select an icon (Gallery, Cooking, Children, Wellness, Content Management ), then press the ENTERE button.
Using the Content Library English Option Gallery Content Library Cooking Children Wellness BN68-02113G_Eng.indb 70 Description This function plays a Slideshow with high resolution images and background music and produces various atmospheres. Using the Gallery function of the TV, you can change your home atmosphere. ■ Press INFO button to see the credit and detail information in English for the imagery (currently, the credit supports English only).
Option Content Management 71 English Content Management Cooking Children Wellness Content Management Gallery R Return e Exit Content Library BN68-02113G_Eng.indb 71 Description ■ My Contents The use of contents is the same as in using the TV memory contents. Also, you can delete and play the each contents. ■ USB You can download the contents onto a USB memory device and play them on your TV. The contents on the external USB device are played directly.
English Internet@TV You can use various internet services containing useful information and entertaining content If you have some problems while using a widget service, please contact to content provider. In the widget, press the Green button and get information of contact or refer to help website for widget provider information. ■ English may be only supported in widget service depending on region. ■ This function may not be supported depending on your country.
8 11 Internet@TV tests the network connection. ■ If the test fails, configure your network again. ■ For more information, refer to ‘Setting the Network’. Save this name The guided setup is complete. A tutorial on how to use Internet@TV is next. ■ Select Continue to view the tutorial. ■ Select Exit setup to start using Internet@TV now. ■ To run the tutorial again, select Profile Widget → System Setting → Repeat Tutorial.
English All content and services accessible through this device belong to third parties and are protected by copyright, patent, trademark and/or other intellectual property laws. Such content and services are provided solely for your personal noncommercial use. You may not use any content or services in a manner that has not been authorized by the content owner or service provider.
Using the Profile Widget PROFILE The Profile Widget configures your user profile. You can set up multiple profiles, and each profile maintains its own list of widgets. The Switch Profile menu allows you to switch to a different user profile. ■ At least two profiles must be registered. If you want to add a profile, refer to ‘Administrative Controls’.
From the Profile Widget you can Sign in to Yahoo!® using your Yahoo! ID. 76 English ■ If you have a Yahoo! ID, you can access your personalized content using the Yahoo! TV Widgets. ■ All Yahoo! TV Widgets that are installed are automatically signed-in with your profile’s Yahoo! ID. ■ If you have no Yahoo! account, visit www.yahoo.com and create an account. ■ You may fail to log in with an ID created on the Yahoo website in a country that does not support Internet@TV.
Using the Yahoo!® Weather Widget ■ Add New City by entering the name of the city. Once the search results are displayed, select the city you want and press the ENTERE button. ■ Delete City by selecting the city you want to delete from the city list. Press the ENTERE button and confirm the deletion. ■ Changing the Temperature Indication Mode You can change the temperature indication mode to Imperial or Metric. For example, Imperial will show temperatures in Fahrenheit and Metric in Celsius.
Using the Yahoo!® Flickr Widget English The Flickr Widget can provide you access to your favorite photos from friends and family while watching TV. Share your photos with your family on your big screen TV through a slideshow. ■ Personalize the Flickr Widget by logging in with your Yahoo! ID. ■ For detailed procedures on log in, refer to the ‘Using the Profile Widget’ instructions. ■ For more information on Flickr, visit http://www.flickr.com.
Using the Yahoo!® Finance Widget English FINANCE My Stocks To remove a stocks symbol, plase select it from the list below. Internet@TV View stock information and the latest stock news with the Yahoo!® Finance Widget. Press the green button to set up your stocks. Use the Add New Symbol menu to enter the name of a new stock. ■ Select the stock you want to add from the search results and select the Add Symbol menu and press the ENTERE button. • The selected stock is added to the My Stocks list.
Help Website English Country Austria Internet@TV Belgium Czech Denmark Website www.samsung.com → Produkte → Fernseher → medi@2.0 → Internet@TV www.samsung.com → Producten → televisies → medi@2.0 → Internet@TV www.samsung.com → Produits → téléviseurs → medi@2.0 → Internet@TV www.samsung.com → Produkty → televizory → medi@2.0 → Internet@TV www.samsung.com → Produkter → stue & soveværelse → medi@2.0 → Internet@TV Finland www.samsung.com → Tuotteet → kodinelektroniikka → medi@2.
Home Network Centre 81 English About the Home Network Centre Home Network The Home Network Centre connects the TV and mobile phones through a network. You can view call arrivals, text message contents, and schedules set on the mobile phone on the TV using the Home Network Centre. In addition, you can play the media contents saved on the mobile phones such as videos, photos and music by controlling them onto the TV via the network.
Connecting through a Wire / Wireless IP Sharer 82 TV Side Panel English Mobile phone Wire/Wireless IP sharer Samsung Wireless LAN Adapter or Home Network LAN Cable TV Side Panel Mobile phone Wire/Wireless IP sharer Samsung Wireless LAN Adapter or LAN Cable Connect the LAN port of the TV and the Wire/Wireless IP sharer using the LAN cable or connect the USB1(HDD) or USB2 port of the TV and the ‘Samsung Wireless LAN Adapter’ ■ For the procedures to set up the wire/wireless sharer and the mobile
Setting Up the Home Network Centre Message Setup BN68-02113G_Eng.indb 83 Description Shows a list of mobile phones which have been set up with this TV to use the message function (the call arrivals, text message contents and schedules set on the mobile phone). ■ Allowed Allows the mobile phone. ■ Denied Blocks the mobile phone. ■ Delete Deletes the mobile phone from the list. • This function just deletes the name from the list.
Using the Message Function English Home Network Using this function, you can view the call arrivals, text message contents and schedules set on the mobile phone through the alarm window while watching TV. ■ To disable this Message alarm window, set Message to Off in Setup of the Home Network Centre. ■ The alarm window appears for 20 seconds. If no key is pressed or if Cancel is selected, it appears up to three times at 5 minute intervals.
Using the Media Function 85 English Media will be played from “Unknown Device 13” Home Network An alarm window appears informing the user that the media contents (videos, photos, music) sent from the mobile phone will be displayed on the TV. The contents are played automatically 3 seconds after the alarm window appears. If you press the RETURN or EXIT button when the alarm window appears, the Media Contents are not played.
English Other Information Teletext Feature Other Information Most television stations provide written information services via Teletext. The index page of the Teletext service gives you information on how to use the service. In addition, you can select various options to suit your requirements by using the remote control buttons. ■ For Teletext information to be displayed correctly, channel reception must be stable. Otherwise, information may be missing or some pages may not be displayed.
Wall Mount Kit Specifications (VESA) Product Family PDP-TV VESA Spec. (A * B) 19" ~22" 100 * 100 23"~29" 200 * 100 30"~40" 200 * 200 46"~55" 400 * 400 57"~70" 800 * 400 80" ~ 1400 * 800 42"~ 50" 400 * 400 58"~ 63" 600 * 400 70" ~ 800 * 400 80" ~ 1400 * 800 Standard Screw Quantity M4 M6 4 Other Information LCD-TV inch 87 English Install your wall mount on a solid wall perpendicular to the floor. When attaching to other building materials, please contact your nearest dealer.
English Preparing before installing Wall- Mount on the wall Case A. Installing SAMSUNG Wall-Mount Case B. Installing other company’s Wall-Mount Other Information 1 2 경고 Install Wall Mount with the torque range of 15kgf·cm or less. Make sure that parts can be damaged if the torque is out of the specified range. Accessory Kit contains Holder–Ring [②] for installing other company’s Wall-Mount on Samsung TV. (Case B) ■ screw down the hole [①] when installing wall-mount on the wall.
Securing the Installation Space 10 cm 10 cm • When installing the product with a stand When installing the product with a wall-mount 10 cm 10 cm 10 cm 10 cm 10 cm 10 cm 10 cm 10 cm 10 cm 10 cm Other Information • 89 English Keep the required distances between the product and other objects (e.g. walls) to ensure proper ventilation. Failing to do so may result in fire or a problem with the product due to an increase in the internal temperature of the product.
Specifications English The descriptions and characteristics in this booklet are given for information purposes only and are subject to modification without notice.
Software License ❑ 91 English This product uses parts of the software from the Independent JPEG Group. This product uses parts of the software owned by the Freetype Project (www. freetype.org). This product uses some software programs which are distributed under the GPL/LGPL license. Accordingly, the following GPL and LGPL software source codes that have been used in this product can be provided after asking to vdswmanager@samsung.com.
2. Basic Permissions. All rights granted under this License are granted for the term of copyright on the Program, and are irrevocable provided the stated conditions are met. This License explicitly affirms your unlimited permission to run the unmodified Program. The output from running a covered work is covered by this License only if the output, given its content, constitutes a covered work. This License acknowledges your rights of fair use or other equivalent, as provided by copyright law.
English 7. Source conveyed under this section must be accompanied by the Installation Information. But this requirement does not apply if neither you nor any third party retains the ability to install modified object code on the User Product (for example, the work has been installed in ROM).
English 12. 13. 14. 15. 16. 17. license” is any express agreement or commitment, however denominated, not to enforce a patent (such as an express permission to practice a patent or covenant not to sue for patent infringement). To “grant” such a patent license to a party means to make such an agreement or commitment not to enforce a patent against the party.
English You should have received a copy of the GNU General Public License along with this program. If not, see . Also add information on how to contact you by electronic and paper mail. If the program does terminal interaction, make it output a short notice like this when it starts in an interactive mode: Copyright (C) This program comes with ABSOLUTELY NO WARRANTY; for details type `show w’.
English 2. 3. 4. 5. 6. those activities but which are not part of the work. For example, Corresponding Source includes interface definition files associated with source files for the work, and the source code for shared libraries and dynamically linked subprograms that the work is specifically designed to require, such as by intimate data communication or control flow between those subprograms and other parts of the work.
English 7. or with, or specifically for use in, a User Product, and the conveying occurs as part of a transaction in which the right of possession and use of the User Product is transferred to the recipient in perpetuity or for a fixed term (regardless of how the transaction is characterized), the Corresponding Source conveyed under this section must be accompanied by the Installation Information.
English 12. 13. 14. 15. 16. 17. ❑ a “patent license” is any express agreement or commitment, however denominated, not to enforce a patent (such as an express permission to practice a patent or covenant not to sue for patent infringement). To “grant” such a patent license to a party means to make such an agreement or commitment not to enforce a patent against the party.
MERCHANTABILITY or FITNESS FOR A PARTICULAR PURPOSE. See the GNU General Public License for more details. You should have received a copy of the GNU General Public License along with this program. If not, see . Copyright (C) This program comes with ABSOLUTELY NO WARRANTY; for details type `show w’. This is free software, and you are welcome to redistribute it under certain conditions; type `show c’ for details.
Warning! Important Safety Instructions Please read the appropriate section that corresponds to the marking on your Samsung product before attempting to install the product. CAUTION RISK OF ELECTRIC SHOCK DO NOT OPEN CAUTION: TO REDUCE THE RISK OF ELECTRIC SHOCK, DO NOT REMOVE COVER (OR BACK). THERE ARE NO USER SERVICEABLE PARTS INSIDE. REFER ALL SERVICING TO QUALIFIED PERSONNEL. This symbol indicates that high voltage is present inside.
Wiring the Mains Power Supply Plug (UK Only) IMPORTANT NOTICE The mains lead on this equipment is supplied with a moulded plug incorporating a fuse. The value of the fuse is indicated on the pin face of the plug and, if it requires replacing, a fuse approved to BSI1362 of the same rating must be used. Never use the plug with the fuse cover omitted if the cover is detachable. If a replacement fuse cover is required, it must be of the same colour as the pin face of the plug.
Correct Disposal of This Product (Waste Electrical & Electronic Equipment) (Applicable in the European Union and other European countries with separate collection systems) This marking on the product, accessories or literature indicates that the product and its electronic accessories (e.g. charger, headset, USB cable) should not be disposed of with other household waste at the end of their working life.