ELECT PLASMA DISPLAY PS42P2S Owner’s Instructions Before operating the unit, please read this manual thoroughly, and retain it for future reference.
Safety Instructions ENG ◆ Do not place the PDP on an unstable cart, stand, tripod, bracket, table, or floor where it can fall. ◆ Do not expose the PDP to extreme temperature conditions or to extreme humidity conditions. ◆ Do not expose the PDP to direct sunlight and other sources of heat. ◆ Do not expose the PDP to any liquids. ◆ Never put objects of any kind into the television, and do not place a water-containing vessel on the PDP.
Caution ENG CAUTION RISK OF ELECTRIC SHOCK DO NOT OPEN ! CAUTION: TO PREVENT ELECTRICAL SHOCK, DO NOT REMOVE REAR COVER, NO USER SERVICEABLE PARTS INSIDE. REFER SERVICING TO QUALIFIED SERVICE PERSONNEL. The lightning flash and arrow head within the triangle is a warning sign alerting you of “dangerous voltage” inside the product. ☛ The exclamation point within the triangle is a warning sign alerting you of important instructions accompanying the product.
ENG Contents (continued) ◆ FOREWORD ■ ■ ■ ■ Safety Instructions .................................................................................................... User Instructions ....................................................................................................... Caution ..................................................................................................................... Checking Parts ..................................................................................
ENG Contents ◆ CONNECTING AND OPERATING A PC ■ ■ ■ ■ ■ ■ ■ ■ ■ ■ ■ ■ Connecting a PC....................................................................................................... Setting up Your Display Plug and Play ..................................................................... Preset Signals........................................................................................................... Setting up Your PC Software ................................................................
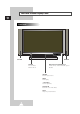
Your New Plasma Display Panel ENG Front Panel SPEAKER SPEAKER POWER Remote Control Signal Receiver Press to turn the PDP on and off. Aim the remote control towards this spot on the PDP. SOURCE External input selection. MENU Menu display. - VOLUME + Volume adjustment. ▼ SELECT ▲ Control the cursor in the Menu. MUTE Temporary sound switch-off.
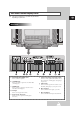
Your New Plasma Display Panel ➢ The actual configuration on your PDP may be different, depending on your model. ENG Rear Panel a) External Speaker Outputs (8Ω) Connect external speakers. b) S-VIDEO Input Connect a S-Video signal from an S-VHS VCRs or DVD players. c) VIDEO Input Connect a video signal from external sources like VCRs or DVD players. f) Component2 (480p/576p/720p/1080i) Connect a video signal from external sources like Set-top box or DVD players (480p/576p/ 720p/1080i).
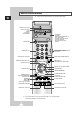
Remote Control Buttons ➢ ENG Some remote control buttons do not operate with the PDP.
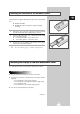
Inserting the Batteries in the Remote Control ENG You must insert or replace the batteries in the remote control when you: ◆ Purchase the PDP ◆ Find that the remote control is no longer operating correctly 1 Remove the cover on the rear of the remote control by pressing the symbol downwards and then pulling firmly to remove it. 2 Insert two R03, UM4, “AAA” 1.
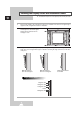
Installing the Display on the Wall Attachment Panel ➢ ENG Wall attachment panel is sold separately. Check with your dealer 1 Check for the stability of the wall where the PDP is to be installed. If the wall is not enough strong to support the PDP, strengthen the wall before installation. 2 Fix the wall attachment panel on the wall using bolts as shown in the figure: Fixing bolts must protrude from the wall appox. 1.5cm.
Installing the Display on the Wall Attachment Panel ENG 4 Remove four large screws from the rear side of the display. Insert the bolts, dish-type washers, and insulation rubber into the four screw-holes as shown in the figure: Bolt Insulation rubber 5 Put the insulation rubber point protruding from the rear top of the display in the groove on the top of the wall attachment panel.
Separating the Display from the Wall Attachment Panel ENG Remove the fixing bolts from both sides (left and right) of the wall attachment panel. Lift and pull the bottom of the display a small amount, to separate the insulation rubber point from the bottom of the wall attachment panel. Lift the display and separate the insulation rubber point from the groove on top of the wall attachment panel.
Connecting Speakers ENG Connect the speaker audio cable to the external speaker output jack on the rear of the PDP matching the “+” and “-” ends of the cable with the diagram on the PDP. ➢ The speakers MUST have more than 7watts rating (impedance 8Ω). Connecting PDP and Speakers Fix the bracket onto the guide pole located on the rear of speaker and fasten the screws. After removing the three screws on the PDP, clamp the speaker and the PDP together and fasten the screws.
Connecting Your VCR or Cable Box ENG Rear panel ◆ Connect a Video/S-Video cable between the Video/S-Video output jack on the VCR/Cable box and the Video input jack on the PDP. - For better video, you can use a S-Video cable. ◆ Connect an Audio cable between the Audio output jack on the VCR/Cable box and the Audio input jack on the PDP. Videotape Playback VCR/Cable Box 14 1 Turn on PDP and select the Video or S-Video mode (if S-Video jack is connected) by pressing the Source on the remote control.
Connecting a DVD Playar or Set-top Box ENG Rear panel Setop Box ◆ Connect a Video cable between the Component Video output jack on the Settop Box and the Component Video input jack (Component2) on the PDP. ◆ Connect an Audio cable between the Audio output jack on the Set-top Box and the Audio input jack on the PDP. DVD Player ◆ Connect a Video cable between the Component Video output jack on the DVD Player and the Component Video input jack (Component1 or Component2) on the PDP.
Switching On and Off ENG Front panel The mains lead is attached to the rear of the PDP. 1 2 Plug the mains lead into an appropriate socket. ➢ The main voltage is indicated on the rear of the display and the frequency is 50 or 60Hz. Press the POWER ( ) button on the front panel or remote control to switch the display on. ➣ If your Monitor isn’t turned on when the power button is pressed... press the SELECT button to check if the Monitor mode has been chosen.
Choosing Your Language ENG When you start using your PDP for the first time, you must select the language which will be used for displaying menus and indications. SETUP Color System 1 Auto Digital NR Off Press the Menu button. Auto Power On On Result: Panel Lock Off The main menu is displayed. Miscellaneous 2 Move the joystick up or down to select the SETUP menu and press the joystick button. 3 Move the joystick up or down to select the Miscellaneous menu and press the joystick button.
Using the Various Setup Menus ENG SETUP Ã Color System Auto Digital NR Off Auto Power On On Panel Lock Off ◆ Color System You can use your PDP in many countries. Each country has its own broadcasting standard. Depending on your country, the color systems are displayed in the order given.
Using Automatic Picture Settings ENG You can select the picture effect which best corresponds to your viewing requirements. The following picture effects are available in the order given: ◆ Custom, Standard, Sports, Movie, Mild, Dynamic. ➣ 1 In the PC mode, you can select Custom, High, Middle or Low. Ã Select Contrast Brightness Sharpness Color Color Tone Move Custom ¨ Normal Select Press the Menu button, then press the joystick button to enter the PICTURE menu.
Customizing the Picture ENG PICTURE Select Your PDP has several settings which allow you to control picture quality: Custom Contrast Brightness Sharpness Color Color Tone Move ◆ Contrast, Brightness, Sharpness, Color, Color Tone, Tint (NTSC only). ➣ Normal Adjust Contrast Exit 1 Press the Menu button, then press the joystick button to enter the PICTURE menu. 2 Move the joystick up or down to select the required option. 3 To adjust the... Move the joystick...
Changing the Picture format ENG You can select the picture format which best corresponds to your viewing requirements by simply pressing the “P.Size” button. The following picture formats are available; ◆ Wide, Panorama, 14:9, 4:3, Zoom1, Zoom2, Stretch. Wide Panorama 14:9 Sets the picture to 16:9 wide mode. Use this mode for the wide aspect ratio of a panoramic picture. Magnify the size of the picture more than 4:3. 4:3 Zoom1 Zoom2 Sets the picture to 4:3 normal mode.
Adjusting the Volume ENG ◆ Press the + button to increase the volume (cursor moves to the right) ◆ Press the - button to decrease the volume (cursor moves to the left) You can switch the sound off temporarily, for example you may wish to answer the telephone. Front panel 1 Press the Mute button. Result: The sound is switched off and Mute is displayed. 2 When you wish to turn the sound back on at the same volume as before, press the Mute button again (or either of the volume buttons).
Using Automatic Sound Settings ENG You can select the type of special sound effect to be used when watching a given broadcast. The following sound effects are available in the order given: ◆ Custom, Standard, Music, Movie, Speech. 1 Press the Menu button. Result: The menus available are displayed. 2 Move the joystick up or down to select the SOUND menu and press the joystick button. Result: The Select option is selected.
Setting the Current Time ENG You can set the clock so that the current time is displayed when you press the “Display” button. You must also set the time if you wish to use the automatic On/Off timers. TIME Clock 10 : 30 On Time 0 : 00 Off Off Time 0 : 00 Off Sleep Timer On Time Volume Move ➣ Off The clock will be re-set when pressing the POWER button on the front panel or remote control. 10 Select Exit 1 Press the Menu button. Result: The menus available are displayed.
Setting the Sleep Timer ENG You can select a time period of between 10 and 360 minutes after which the PDP automatically switches to Standby mode. TIME Clock 1 2 3 Press the Menu button. Result: The menus available are displayed. On Time 6 : 00 On Off Time 23 : 00 On Move the joystick up or down to select the TIME menu and press the joystick button. On Time Volume à 10 Min.
Viewing the Picture in Picture (PIP) ENG à Select PIP AV1(V) ➣ Double Exit PIP Select Move On à Source Swap Size Locate AV1(V) Press the Menu button. Result: The menus available are displayed. 2 Move the joystick up or down to select the PIP menu and press the joystick button. Result: The Select option is selected. 3 Set to On by moving the joystick left or right. Result: The options available in the PIP group are displayed.
Viewing the Picture in Picture (PIP) ENG You can enjoy the “PIP” feature by simply using the remote control. Features Description PIP ON Used to operate On/Off function of PIP directly. Swap Used to interchange the main picture and the sub picture. Locate Used to move the sub picture. ➣ Size ➣ Not available in the Double mode. Used to select the type of sub picture (Double, Large, Small).
Displaying Informations ENG You can display the time and general informations by simply pressing the “Display” button. The followings are available: ◆ Modes of selected picture, sound and surround ◆ Color system ◆ Horizontal and vertical resolutions (in PC mode) ◆ Sleep timer Picture Custom Sound Custom ◆ Current time (when the time is set) Surround Concert ◆ External input mode.
Teletext Feature ENG Most television channels provide written information services via teletext. Information provided includes: ◆ Television programme times ◆ News bulletins and weather forecasts ◆ Sports results ◆ Travel information This information is divided into numbered pages (see diagram). Part Contents A Selected page number. B Broadcasting channel identity. C Current page number or search indications. D Date and time. E Text. F Status information. FASTEXT information.
Displaying the Teletext Information ENG You can display Teletext information at any time on your television. Teletext information to be displayed correctly, ☛ For channel reception must be stable; otherwise: ◆ Information may be missing ◆ Some pages may not be displayed 1 Press the Text/Off button to activate the teletext mode. Result: 2 Press the Text/Off button again. Result: 30 The contents page is displayed. It can be redisplayed at any time by pressing the (index) button.
Adjusting the Teletext Contrast ENG You can adjust the Contrast of Teletext display which best corresponds to your viewing requirements. SETUP Color System 1 Auto Digital NR Off Press the Menu button. Auto Power On On Result: Panel Lock Off The main menu is displayed. Miscellaneous 2 Move the joystick up or down to select the SETUP menu and press the joystick button. 3 Move the joystick up or down to select the Miscellaneous menu and press the joystick button.
Selecting a Teletext Page ENG You can enter the page number directly by pressing the numeric buttons on the remote control. 1 Enter the three-digit page number given in the content by pressing the corresponding numeric buttons. Result: The current page number is incremented until the requested page is reached. That page is then displayed. If the selected page is linked with several secondary pages, the secondary pages are displayed in turn.
Connecting a PC ENG ◆ Connect a PC cable (15pin) between the PC and PDP. Rear panel ◆ Connect an Audio cable between the Audio output jack on the PC and the Audio input jack (PC) on the PDP. Viewing the PC screen: 1 Turn on PDP and select the PC mode by pressing the Source (or Source/PC) button on the remote control. 2 Turn on PC and check for PC system requirements. (Refer to pages 35~37 for PC system requirements.) 3 Adjust the PC screen. (Refer to page 38.
Setting up Your Display Plug and Play ENG Our adoption of the new VESA® Plug and Play solution eliminates complicated and time consuming setup. It allows you to install your monitor in a Plug and Play compatible system without the usual hassles and confusion. Your PC system can easily identify and configure itself for use with your display. This monitor automatically tells the PC system its Extended Display Identification data (EDID) using Display Data Channel (DDC) protocols.
Setting up Your PC Software (Windows only) ENG The Windows display-settings for a typical computer are shown below. But the actual screens on your PC will probably be different, depending upon your particular version of Windows and your particular video card. On the windows screen, select in the following sequence: Start ➞ Settings ➞ Control Panel. ➡ When the control panel screen appears, click on “Display” and a display dialog-box will appear. ➡ Select the “Settings” tab in the display dialog-box.
PC Input Mode (42”) ENG Both screen position and size will vary depending on the type of PC monitor and its resolution. The table below shows all of the display modes that are supported: Standard Dot x Line Vertical frequency (Hz) Horizontal frequency (kHz) Vertical polarity Horizontal polarity VGA 640 x 480 85.0 43.3 N N 75.0 37.5 N N 72.8 37.9 N N SVGA XGA 59.9 31.5 N N 720 x 400 70.1 31.5 P N 800 x 600 85.1 53.7 P P 75.0 46.9 P P 72.2 48.1 P P 60.3 37.
PC Input Mode (50”) ENG Standard Dot x Line Vertical frequency (Hz) Horizontal frequency (kHz) Vertical polarity Horizontal polarity VGA 640 x 350 70.086 31.469 N P 85.080 37.861 N P 640 x 400 85.080 37.861 P N 720 x 400 70.087 31.469 P N 85.039 37.927 P N 59.940 31.469 N N 72.809 37.861 N N 75.000 37.500 N N 85.008 43.269 N N 60.000 29.838 P N 72.000 35.156 P N 75.000 36.072 P N 85.000 37.650 P N 56.250 42.925 N/P N/P 60.317 37.
Controlling the Screen Color ENG PICTURE Select Adjust Exit 1 Press the Menu button, then press the joystick button to enter the PICTURE menu. 2 Move the joystick up or down to select the Color Control menu and move the joystick left or right. 3 To... Move the joystick... Move to the each option (R-Red, G-Green, B-Blue) up or down. Adjust the each option left or right. COLOR CONTROL R G B Move Preset to the PC mode by using the Source button.
Adjusting the Screen Quality ENG This feature is to remove or reduce picture noise, causing a tremble of screen and insecure boundary of image. ➢ 1 Image Lock Preset to the PC mode by using the Source button. Press the Menu button. Result: The main menu is displayed. 2 Move the joystick up or down to select the SETUP menu and press the joystick button. Result: The Image Lock menu is selected. 3 Press the joystick button again.
Initializing the Frequency, Phase, and Position ENG IMAGE LOCK ➢ Preset to the PC mode by using the Source button. Frequency Phase 1 Press the Menu button. Result: The main menu is displayed. 2 Move the joystick up or down to select the SETUP menu and press the joystick button. Result: The Image Lock menu is selected. 3 Press the joystick button again. Result: The options available in the IMAGE LOCK group are displayed. 4 Move the joystick up or down to select the Auto Adjustment menu.
Enjoying the PIP Feature in PC mode ENG ➢ Preset to the PC mode by using the Source button. PIP Select 1 Press the Menu button. Result: The menus available are displayed. 2 Move the joystick up or down to select the PIP menu and press the joystick button. Result: The Select option is selected. 3 Set to On by moving the joystick left or right. Result: The options available in the PIP group are displayed.
Multiple Display Control (MDC) ENG A multiple display control is an application allowing various displays to be easily and simultaneously operated on a PC. RS-232C, a standard of serial communication, is used for the communication between a PC and a display. Therefore, a serial cable should be connected between the serial port on a PC and the serial port on a display.
Setting the Multiple Display Control (MDC) ENG 1 Press the Menu button. Result: The main menu is displayed. 2 Move the joystick up or down to select the SETUP menu and press the joystick button. 3 Move the joystick up or down to select the Miscellaneous menu and press the joystick button. 4 Move the joystick up or down to select the ID Setup option. Enter ID setup number by using the joystick. 5 Move the joystick up or down to select the ID Input option.
Installing the Multiple Display Control (MDC) ENG 1 Click the setup.exe file in CD-ROM, and the following screen appears and then the basic files for setup are copied. 2 Select the program installation folder of your choice and click on the button to begin setup. 3 Select the program group of your choice and click the Continue to continue installation.
Viewing the Main Screen ENG The program starts operating when entering the following sequence: Start ➜ Program ➜ Multiple Display Control. ➣ The remote control Enable/Disable function operates whether or not the power is On/Off. This applies to all the displays connected to the MDC. However, regardless of the status in which the MDC was shut down, the remote control signal receiving function of all the displays is initialized to Enable when the MDC is closed.
Confirming the Port ENG ◆ The Multiple Display Control uses only “COM1”. This control operates with neither “COM2” nor another port. ◆ To check which port is installed, enter “Control Panel ➜ System ➜ Device Manager ➜ Ports”. ◆ If another port is installed except the “COM1” port, you can change to “COM1” from the “Device Manager” if you’re using Windows 2000 or XP (please refer to the following chapter). For all other operating systems, the change may be made from your PC BIOS Setup.
Controlling the Power ➣ The Power Control function is available for all the displays are connected. ENG Click “Power Control” of the main icons and the Power Control screen appears. Info Grid shows some basic information necessary to Power Control. Œ Power Status ´ Input Source ˇ Aspect Ratio ¨ On Timer Status ˆ Off Timer Status Click “Select All” or mark ‘✔’ in the check box to select the display you want to control. Power Control can control some functions of the ‘✔’ marked display.
Controlling the Input Source The Input Source control function is available for only the displays are powered On. ENG Click “Input Source” of the main icons and the Input Source control screen appears. Info Grid shows some basic information necessary to Input Source control. Œ Power : Shows the power status of the current display. ´ Input : Shows what Input Source is used for the current display. Click “Select All” or mark ‘✔’ in the check box to select the display you want to control.
Controlling the Aspect Ratio (Video/S-Video/Component1,2) The Aspect Ratio control function is available for only the displays are powered On. ➣ ENG This function doesn’t operate in TTX mode. Click Aspect of the main icons and the Aspect Ratio control screen appears. Info Grid shows some basic information necessary to Aspect Ratio control. Œ Power : Shows the status of power of the current display. ´ Aspect : Shows which aspect ratio the current display has.
Controlling the Time The Time control function is available for only the displays are powered On. ENG ➣ This function doesn’t operate in TTX mode. Click “Time” of the main icons and the Time control screen appears. Info Grid shows some basic information necessary to the Time control. Œ Current Time : Set the current time of the selected display. To change the current Time, first change the PC Time. ´ On Time Setup : Set the hour, minute of On Time, volume of the selected display.
Setting the Picture (Video/S-Video/Component1,2) You can only control Displays for which the Power Status is ON. If you have not selected a setup the value displayed will be the Factory Default Value. ➣ ENG This function doesn’t operate in TTX mode. Click “Settings” of the main icons and the Settings control screen appears. Info Grid shows some basic information necessary to the Settings control. When each of functions is selected, the set value of the selected function is displayed on the screen.
Setting the Audio You can only control Displays for which the Power Status is ON. If you have not selected a setup the value displayed will be the Factory Default Value. ENG ➣ This function doesn’t operate in TTX mode. Click “Settings“ of the main icons and the Settings control screen appears. Info Grid shows some basic information necessary to the Settings control. When each of unction is selected, the set value of the selected function is displayed on the screen.
Displaying the Setting Values of Various Displays ENG ◆ No selection: It displays the factory default value. ◆ Select one display: It receives and displays the setting value for the selected one display. ◆ When you have already selected one display (ID1) and add to select another display (ID3): The program, which have displayed the settings value of ID1, receives and displays the value of ID3. ◆ Select all sets at once by using “Select All”: It returns to the factory default value.
Care and Maintenance ENG With proper care, your PDP will give you many years of service. Please follow these guidelines to get the maximum performance from your PDP. ◆ Identifying Problems - Do not put the PDP near extremely hot, cold, humid or dusty places. - Do not put the PDP near appliances that create magnetic fields. - Keep the ventilation openings clear. - Do not place the PDP on a rough and slanted surface, such as cloth or paper. ◆ Liquids - Do not handle liquids near or on the PDP.
Troubleshooting ENG Before contacting Service Personnel, perform the following simple checks. If you cannot solve the problem using the instructions below, note the model and serial number of the PDP and contact your local dealer. Problem Possible Solution Poor picture. ◆ Check all wire connections. The power indicator is amber blinking. ◆ The monitor is using its power management system. Check the power management utility on your computer. Your remote control does not operate the monitor.
- AFTER SALES SERVICE - Do not hesitate to contact your retailer or service agent if a change in the performance of your product indicates that a faulty condition may be present.