PDP-TELEVISION (PLASMA DISPLAY PANEL) Owner’s Instructions Before operating the unit, please read this manual thoroughly, and retain it for future reference. ON-SCREEN MENUS Picture In Picture (PIP) Energy Saving TELETEXT (Option) SRS TruSurround XT Digital Natural Image engine Register your product at www.samsung.com/global/register Record your Model and Serial number here for future reference. ▪ Model _______________ ▪ Serial No. _______________ BN68-01094R-00Eng.
User Instructions Screen Image retention Do not display a still image (such as on a video game or when hooking up a PC to this PDP) on the plasma monitor panel for more than 2 hours as it can cause screen image retention. This image retention is also known as “screen burn”. To avoid such image retention, reduce the degree of brightness and contrast of the screen when displaying a still image. Height The PDP can normally operate only under 2000m in height.
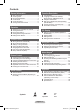
Contents Function Description General Information User Instructions ............................................. 2 Checking Parts................................................ 4 Using the Stand-Base ..................................... 4 Control Panel ................................................. 5 Connection Panel............................................ 6 Viewing the Remote Control .......................... 8 Operation Switching Your Television On and Off ............
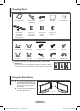
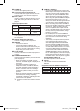
Checking Parts Owner’s Instructions Remote Control/ AAA Batteries Power Cord Cloth-Clean Cover-Bottom / Screws (2ea) (PS-50P96FD, Refer to page 58) Ferrite Core for Power Cord/ S-Video Cable Ferrite Core for Side-AV / S-VIDEO Ferrite Core for Headphone Registration Card Sold Separately S-Video Cable Antenna Cable Component Cables Audio Cables Video Cable PC Cable Scart Cable PC Audio Cable HDMI Cable HDMI/DVI Cable Ferrite Core (Power Cord, Audio/Video Cable, S-Video Cable, ➢ Headphone)
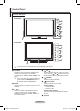
Control Panel Front (or Side) Panel PS-50P96FD PS-63P76FD ➢ The product colour and shape may vary depending on the model. 1 SOURCE Displays a menu of all of the available input sources (TV, Ext.1, Ext.2, AV, S-Video, Component, PC, HDMI1, HDMI2, HDMI3, and DTV). In the on-screen menu, use this button as you would use the ENTER/OK button on the remote control. (PS-50P96FD) ➢ 4 CH Press to change channels. In the on-screen menu, use the CH buttons as you use the ▲ and ▼ buttons on the remote control.
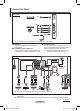
Connection Panel Side Panel 1 2 or 3 ➢ The product colour and shape may vary depending on the model. 1 HDMI IN 3 Connect to the HDMI jack of a device with HDMI output. 2 S-VIDEO or VIDEO / AUDIO L/R Video (S-Video or Video) and audio inputs for external devices, such as a camcorder or VCR. 3 Headphones jack You can connect a set of headphones if you wish to watch a television programme without disturbing the other people in the room. Prolonged use of headphones at a high volume may damage your hearing.
1 POWER IN Connect the supplied power cord. 2 Connecting external Audio Devices Connect RCA audio signals from the TV to an external source, such as Audio equipment. 3 EXT 1, EXT 2 Inputs or outputs for external devices, such as VCR, DVD, video game device or video disc players. Input/Output Specification Connector EXT 1 EXT 2 Input Output Video Audio(L/R) RGB Video + Audio(L/R) Only TV or DTV ✔ ✔ ✔ output is available. Output you can ✔ ✔ choose.
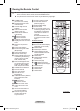
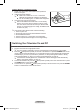
Viewing the Remote Control ➢ This is a special remote control for the visually impaired persons, and has Braille points on the Power, Channel, Volume, STOP, and PLAY/PAUSE buttons. The performance of the remote control may be affected by bright light.
Installing Batteries in the Remote Control 1 2 3 Lift the cover at the back of the remote control upward as shown in the figure. Install two AAA size batteries. Make sure to match the “+” and “–” ends of the batteries with the diagram inside the compartment. Do not mix battery types, i.e. alkaline and manganese. Close the cover as shown in the figure. Remove the batteries and store them in a cool and dry place if you won’t be using the remote control for a long time.
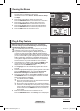
Viewing the Menus 1 2 3 4 5 Press the MENU button. The main menu is displayed on the screen. Its left side has five icons: Picture, Sound, Channel, Setup, and Input. Press the ▲ or ▼ button to select one of the icons. Press the ENTER/OK button to access the icon’s sub-menu. Press the ▲ or ▼ button to move to items in the menu. Press the ENTER/OK button to enter items in the menu. Press the ▲/▼/◄/► button to change the selected items. Press the RETURN button to return to the previous menu.
6 Select your country or area by pressing the ▲ or ▼ button. Plug & Play Press the ENTER/OK button. Some DTV functions may not be available. The message Some DTV functions may not be available. Digitally Scan? Digitally Scan? is displayed. No Yes This function is supported for all countries except for the following 6 countries: the United Kingdom, Austria, France, Move Enter Skip Germany, Italy, Spain. If your country supports the DTV functions, the message is Plug & Play not displayed.
15 Press the ◄ or ► button to select Month, Day, Year, Hour, or Minute. Set these by pressing the ▲ or ▼ button. You can set the Month, Day, Year, Hour, or Minute directly by pressing the numeric buttons on the remote control. 16 Press the ENTER/OK button to confirm your setting. The message Enjoy your viewing is displayed. When you have finished, press the ENTER/OK button. Even if the ENTER/OK button is not pressed, the message will automatically disappear after several seconds.
Editing Device Names You can give a name to the external source. 1 Press the MENU button to display the menu. 2 Press the ▲ or ▼ button to select Input, then press the ENTER/OK button. 3 Press the ▲ or ▼ button to select Edit Name, then press the ENTER/OK button. 4 Press the ▲ or ▼ button to select the external source to be edited, then press the ENTER/OK button. 5 Select the required device by pressing ▲ or ▼, then press the ENTER/OK button.
Storing Channels Manually ➢ Not available in DTV or external input mode. You can store television channels, including those received via cable networks. When storing channels manually, you can choose: Whether or not to store each of the channels found. The programme number of each stored channel which you wish to identify. 1 Press the MENU button to display the menu. 2 Press the ▲ or ▼ button to select Channel, then press the ENTER/OK button.
Adding / Locking Channels ➢ Not available in DTV or external input mode. Using the Channel Manager, you can conveniently lock or add TV channels. 1 Press the MENU button to display the menu. 2 Press the ▲ or ▼ button to select Channel, then press the ENTER/OK button. 3 Press the ▲ or ▼ button to select Channel Manager, then press the ENTER/OK button. Adding channels Using the Channel List, you can add channels.
Sorting the Stored Channels Not available in DTV or external input mode. ➢ This operation allows you to change the programme numbers of the stored channels. This operation may be necessary after using the auto store. 1 Press the MENU button to display the menu. 2 Press the ▲ or ▼ button to select Channel, then press the ENTER/OK button. 3 Press the ▲ or ▼ button to select Sort, then press the ENTER/ OK button.
Fine Tuning Channel Reception ➢ Not available in DTV or external input mode. If the reception is clear, you do not have to fine tune the channel, as this is done automatically during the search and store operation. If the signal is weak or distorted, you may have to fine tune the channel manually. 1 Press the MENU button to display the menu. 2 Press the ▲ or ▼ button to select Channel, then press the ENTER/OK button. 3 Press the ▲ or ▼ button to select Fine Tune, then press the ENTER/OK button.
Changing the Picture Standard You can select the type of picture which best corresponds to your viewing requirements. 1 Press the MENU button to display the menu. 2 Press the ENTER/OK button to select Picture. 3 Press the ENTER/OK button again to select Mode. 4 Select the required mode by pressing the ▲ or ▼ button, then press the ENTER/OK button. Available modes: Dynamic, Standard, Movie The settings values may vary depending on the input source. (ex.
Configuring Detailed Settings on the Picture You can set detailed picture settings. 1 Press the MENU button to display the menu. 2 Press the ENTER/OK button to select Picture. 3 Press the ▲ or ▼ button to select Detailed Settings, then press the ENTER/OK button. 4 Select the required option by pressing the ▲ or ▼ button, then press the ENTER/OK button.
Selecting the Picture Size You can select the picture size which best corresponds to your TV Picture viewing requirements. More Size : Auto Wide 1 Press the MENU button to display the menu. Screen Mode : 16 : 9 Digital NR : Auto 2 Press the ENTER/OK button to select Picture. Active Colour : On DNIe : On 3 Press the ▲ or ▼ button to select Size, then press the ENTER/ Movie Plus : On OK button.
Digital NR / Active Colour / DNIe / Movie Plus 1 2 3 4 5 TV Picture Press the MENU button to display the menu. More Press the ENTER/OK button to select Picture. : Auto Wide Size Select the required option by pressing the ▲ or ▼ button, then : 16 : 9 Screen Mode : Auto Digital NR press the ENTER/OK button.
Sound Features 1 2 3 4 5 TV Sound Press the MENU button to display the menu. Mode : Custom Press the ▲ or ▼ button to select Sound, then press the Equalizer ENTER/OK button. SRS TS XT : Off : Off Auto Volume Select the required option by pressing the ▲ or ▼ button, then Internal Mute : Off Sound Select : Main press the ENTER/OK button.
Selecting the Sound Mode (depending on the model) The DUAL I-II button displays/controls the processing and output of the audio signal. When power is switched on, the mode is automatically preset to either “DUAL-I” or “Stereo”, depending on the current transmission.
Time Features 1 2 TV Setup Press the MENU button to display the menu. Plug & Play Press the ▲ or ▼ button to select Setup, then press the Language : English ENTER/OK button. Time Game Mode : Off 3 Press the ▲ or ▼ button to select Time, then press the Blue Screen : Off Melody : Off ENTER/OK button. PC 4 Select the required option by pressing the ▲ or ▼ button, then Home Theatre PC : Off press the ENTER/OK button.
Language / Blue Screen / Melody / Energy Saving / HDMI Black Level 1 2 3 4 5 TV Setup Press the MENU button to display the menu. Plug & Play Press the ▲ or ▼ button to select Setup, then press the Language : English ENTER/OK button. Time Game Mode : Off Select the required option by pressing the ▲ or ▼ button, then Blue Screen : Off Melody : Off press the ENTER/OK button.
Using the Game Mode When connecting to a game console such as PlayStationTM or TV Setup XboxTM, you can enjoy a more realistic gaming experience by Plug & Play Language : English selecting game menu. Time Game Mode : Off 1 Press the MENU button to display the menu. Blue Screen : Off 2 Press the ▲ or ▼ button to select Setup, then press the Melody : Off PC ENTER/OK button. Home Theatre PC : Off 3 Press the ▲ or ▼ button to select Game Mode, then press the More ENTER/OK button.
Wall- mount adjustment (Sold separately) (PS-50P96FD) Once the wall mount is installed, the position of your TV can be easily adjustable. Rear Panel Auto Wall-Mount Serial Cable(1P to 1P)(Not supplied) Entering the menu 1 2 3 Press the MENU button to display the menu. Press the ▲ or ▼ button to select Setup, then press the ENTER/OK button. Press the ▲ or ▼ button to select Wall-Mount Adjustment, then press the ENTER/OK button. Adjust to the desired position using the ▲/▼/◄/► buttons.
Viewing the Picture in Picture (PIP) You can display a sub picture within the main picture. In this TV Setup way you can watch TV programme or monitor the video input More Adjustment Wall-Mount from any connected devices. Energy Saving : Off HDMI Black Level : Normal 1 Press the MENU button to display the menu. PIP 2 Press the ▲ or ▼ button to select Setup, then press the Screen Burn Protection ENTER/OK button. 3 Press the ▲ or ▼ button to select PIP, then press the ENTER/ OK button.
Screen Burn Protection To reduce the possibility of screen burn, this unit is equipped with screen burn prevention technology. This technology enables you to set picture movement up/down (Vertical Line) and side to side (Horizontal Dot). The Time setting allows you to programme the time between movement of the picture in minutes. 1 Press the MENU button to display the menu. 2 Press the ▲ or ▼ button to select Setup, then press the ENTER/OK button.
Setting up Your PC Software (Based on Windows XP) The Windows display-settings for a typical computer are shown below. But the actual screens on your PC will probably be different, depending upon your particular version of Windows and your particular video card. But even if your actual screens look different, the same, basic set-up information will apply in almost all cases. (If not, contact your computer manufacturer or Samsung Dealer.
Display Modes Both screen position and size will vary depending on the type of PC monitor and its resolution. The resolutions in the table are recommended.
Setting the PC ➢ Preset to the PC mode by pressing the SOURCE button. 1 2 3 4 5 6 Press the MENU button to display the menu. Press the ▲ or ▼ button to select Setup, then press the ENTER/OK button. Press the ▲ or ▼ button to select PC, then press the ENTER/ OK button. Select the required option by pressing the ▲ or ▼ button, then press the ENTER/OK button. Available options: Image Lock, Position, Auto Adjustment, Image Reset When you are satisfied with your setting, press the ENTER/OK button.
Setting the Home Theatre PC You can view higher quality pictures by configuring the screen TV Setup settings in PC Mode. Plug & Play Language : English If you set the Home Theatre PC function to On, you can Time configure the Detailed Settings (when Picture Mode is set to Game Mode : Off Blue Screen : Off Standard or Movie) as in PC Mode. Melody : Off PC 1 Press the MENU button to display the menu. Home Theatre PC : Off 2 Press the ▲ or ▼ button to select Setup, then press the More ENTER/OK button.
Previewing the DTV Menu System ➢ The company does not guarantee the normal operation of the DTV menu for countries other than the 6 supported countries (England, Germany, France, Italy, Spain, Austria) because only these country standards are supported. In addition, when the country of the broadcast stream differs from the country selected by the current user, the string appearing in the channel banner, Info, Guide, Channel List, etc. may not be displayed properly. Available in DTV mode.
Language Audio Language Subtitle Language Teletext Language Preference Language Audio Language Subtitle Language Teletext Language Preference Primary Audio Language Secondary Audio Language Primary Subtitle Language Secondary Subtitle Language Primary Teletext Language Secondary Teletext Language Move Enter Exit ➢ The sub-items of the CI Menu may vary depending on the CAM model.
Operating the DTV Menu Viewing the DTV Menu After installing your antenna system and TV with appropriate connectors. Plug in the AC main power and switch on the TV. Press the D.MENU button to bring up the DTV menu. The main menu appears on the screen. Its left side has four icons: Guide, Channel, Setup, and Language. 1. Channel This menu consists of 4 sub-menus: Auto Store, Manual Store, Edit Favourite Channels, and Channel List.
Channel 1.3 Edit Favourite Channels You can edit your favourite channels using the colour buttons. Auto Store In the case of DTV mode, OK or Select can be used as the Manual Store ENTER/OK button. Edit Favourite Channels Press the red button in the Edit Favourite Channels menu Channel List to display all currently stored channels. Press the ▲ or ▼ button to select a channel you want. Press the ENTER/OK button.
Channel List 1.4 Channel List All Channels-All You can display a list of all channels or your favourite channels. BBC TWO 1. Test Card ‘M’... 40. BBC NEWS24 806 arte Press the ▲ or ▼ button to select Channel List, then 51. BBCi 2. BBC TWO 800 ARD-MHP-DATA 3. Vida003b press the ENTER/OK button. 801 ARD-OnLine-K.. 4. Vida004b 802 BBC ONE 5. Vida005b It can be displayed simply by pressing the CH LIST 803 MDR FERNSE.. 6. Vida006b 804 NDR FERNSEH.. 7. BBC THREE button. 30.
To view programme information, press the ▲/▼/◄/► button to select a programme of your choice, then press the INFO button. Information such as the channel number, programme title and running time, status bar, and brief summary of the highlighted programme will be displayed in the top right corner of the screen. If there is a lengthy summary, “…” will be displayed, press the INFO button for the full summary text. Six channels are displayed.
2.4 All Channels and Favourite Channels In the EPG menu, you can display all channels or favourite channels. Press the green button repeatedly to toggle between the all and favourite channels list. When the favourite channel list has not been set up: − The message The favourite list is empty. Would you like to choose your favourite now? is displayed. − Select Yes. The Edit Favourite Channels menu is displayed. If you select No, all channels will remain unchanged.
Language 3.2 Preference This menu consists of 6 sub-menus: Audio Language Primary Audio Language, Secondary Audio Language, Subtitle Language Primary Subtitle Language, Secondary Subtitle Language, Teletext Language Primary Teletext Language, and Secondary Teletext Preference Language. Using this feature, users can select one of the languages (English, German, Italian, Swedish, French, Welsh, Gaelic, Move Enter Return Irish, Danish, Finnish, Norwegian, Spanish, Czech, and Preference Greek).
4. Setup This menu consists of 8 sub-menus: Menu Transparency, Parental Lock, Subtitle, Subtitle Mode, Audio Format, Digital Text, Time Zone, and System. 4.1 Menu Transparency You can set the translucency of the on-screen menu. Press the ▲ or ▼ button to select required option (High, Medium, Low, or Opaque), then press the ENTER/OK button.
Setup 4.3 Subtitle / Subtitle Mode / Audio Format / Digital Text You can use various settings to suit your personal preferences. Menu Transparency : Medium Press the ▲ or ▼ button to select required menu (Subtitle, Parental Lock Subtitle Mode, Audio Format or Digital Text), then press Subtitle : On the ENTER/OK button. The options of the selected menu Subtitle Mode : Normal are displayed. Audio Format : PCM Press the ▲ or ▼ button to select required option, then press the ENTER/OK button.
4.5 System This menu consists of 5 sub-menus: Product Information, Signal Information, Software Upgrade, Common Interface, and Reset. − Product Information You can view your product information. For service or repair, please contact a Samsung approved dealer. Press the ENTER/OK button with Product Information selected. The product information menu is displayed. − Software Version / Firmware Version − Signal Information You can get information about the signal status.
− Common Interface Installing the CI Card Application Info. a. Purchase the CI CAM module by visiting your nearest Type: CA dealer or by phone. Manufacturer: Canal Plus b. Insert the CI CARD into the CAM in the direction of Info: Top Up TV the arrow until it fits. c. Insert the CAM with the CI CARD installed into the common interface slot. Insert the CAM in the direction of the arrow, right Return up to the end so that it is parallel with the slot. CI Menu d.
What is Anynet+? Anynet+ is an AV network system that enables an easy-to-use AV interface for users by controlling all connected AV devices through the Anynet+ menu when Samsung Electronics AV devices are connected. Connecting Anynet+ Devices The Anynet+ system supports AV devices supporting Anynet+ only. Check if there is an Anynet+ mark on the AV device to be connected to the TV. To directly connect to TV TV Anynet+ Device 1 Anynet+ Device 2 Anynet+ Device 3 HDMI 1.3 Cable HDMI 1.
Setting Up Anynet+ The following settings are to use Anynet+ functions. Using the Anynet+ Function 1 2 TV P1 View TV Press the Anynet+ button. Press the ▲ or ▼ button to select Setup, then press the ENTER/OK button. Press the ENTER/OK button to select Anynet+ (HDMI-CEC), then press the ENTER/OK button. Select Device Record Menu on Device Device Operation Receiver Setup Move Return 3 ➢ ➢ ➢ Press the ▲ or ▼ button to select On, then press the ENTER/ OK button.
Anynet+ Menu The Anynet+ menu changes depending on the type and status of the Anynet+ devices connected to the TV. Anynet+ Menu View TV Select Device Record Menu on Device Device Operation Receiver Setup Description Switches from Anynet+ to TV broadcast mode. Your TV connects to the corresponding device. Starts a recording. (This menu works only for a device supporting recording.) Shows the menu of the connected device. Example. When a DVD Recorder is connected, the DVD Recorder’s title menu appears.
Listening through a Receiver You can listen to sound through a receiver instead of the TV speaker. 1 Press the Anynet+ button. TV P1 Press the ▲ or ▼ button to select Receiver, then press the ENTER/OK button. View TV 2 Press the ◄ or ► button to select to On, then press the Select Device ENTER/OK button. Record Now you can listen to sound through the receiver. Menu on Device 3 Press the EXIT button to exit.
Teletext Feature (depending on the model) Most television stations provide written information services via teletext. The index page of the teletext service gives you information on how to use the service. In addition, you can select various options to suit your requirements by using the remote control buttons. For teletext information to be displayed correctly, channel reception must be stable. Otherwise, information may be missing or some pages may not be displayed.
The teletext pages are organized according to six categories: Part A B C D E F Contents Selected page number. Broadcasting channel identity. Current page number or search indications. Date and time. Text. Status information. FASTEXT information.
Wall Mount Kit Specifications (VESA) Install your wall mount on a solid wall perpendicular to the floor. When attaching to other building materials, please contact your nearest dealer. If installed on a ceiling or slanted wall, it may fall and result in severe personal injury. Product Family LCD-TV PDP-TV inch VESA Spec.
Setting Up Your Remote Control After it has been set up properly, your remote control can operate in five different modes: TV, VCR, Cable, DVD, or Set-Top Box. Pressing the corresponding button on the remote control allows you to switch between these modes, and control whichever piece of equipment you choose. The remote control might not be compatible with all DVD Players, VCRs, Cable boxes, and Set-Top Boxes. Setting Up the Remote to Operate Your VCR 1 Turn off your VCR.
Setting Up the Remote to Operate Your DVD 1 Turn off your DVD. 2 Press the DVD button on your TV’s remote control. 3 Press the SET button on your TV’s remote control. 4 Using the number buttons on your remote control, enter three digits of the DVD code listed on page 57 of this manual for your brand of DVD. Make sure you enter three digits of the code, even if the first digit is a “0”. (If more than one code is listed, try the first one.) 5 Press the POWER button on the remote control.
Remote Control Codes VCR Brand SAMSUNG ADMIRAL AIWA AKAI AUDIO DYNAMICS BELL&HOWELL BROKSONIC CANDLE CANON CITIZEN COLORTYME CRAIG CURTIS MATHES DAEWOO DB DIMENSIA DYNATECH ELECTROHOME EMERSON FISHER FUNAI GENERAL ELECTRIC GO VIDEO LG(Goldstar) HARMAN KARDON HITACHI INSTANT REPLAY JC PENNEY JCL KENWOOD KLH LIOYD LOGIK LXI JVC MAGNAVOX MARANTZ MARTA KONIA ORION MEI MEMOREX MGA MIDLAND MINOLTA Code 000 001 002 003 004 005 077 078 079 020 025 004 027 032 007 026 018 022 002 003 006 008 015 055 021 056 002 00
CABLE BOX Brand SAMSUNG GI HAMLIN HITACHI JERROLD MACOM MAGNAVOX OAK PANASONIC PHILIPS PIONEER RCA REGAL Code 000 001 002 003 004 005 006 007 041 003 024 031 025 030 038 039 025 030 019 023 028 026 003 022 027 037 044 019 021 023 028 004 018 020 044 014 022 040 003 Brand REGENCY SA SCIENTIFIC ATLAN SPRUCER STARGATE 2000 SYLVANIA TEXSCAN TOCOM UNIVERSAL VIEWSTAR WARNER AMEX ZENITH Code 015 023 042 043 042 043 022 036 016 016 032 033 034 019 021 023 028 046 017 029 035 037 045 SAMSUNG SET-TOP BOX Product
SAMSUNG DVD Product DVD DVDR BD Record VCR COMBO VCR Record DHR COMBO Code 000 001 002 003 004 005 006 007 008 009 010 011 012 013 Product Home Theater VCR COMBO HDD Record COMBO TWIN TRAY COMBO STB DVD COMBO DVD Receiver AV Receiver Code 014 015 016 017 018 019 020 021 DVD Brand ANAM AUDIOVOX AUDIOLOGIC ANABA APEX DIGITAL AIWA BROKSONIC BLAUPUNKT B&K CURTIS MATHES CYBER HOME CLARION CIRRUS CINEVISION DAEWOO DENON FARENHEIT FISHER GPX GO VIDEO GE GREENHILL HITACHI HITEKER HOYO HARMAN / KARDON IRT INTEGR
How to assemble the Stand-Base (depending on the model) Using the screws for securing the stand base and the monitor, firmly attach the monitor to the stand base. (The exterior of the set may be different from the picture.) PS-50P96FD PS-63P76FD Warning Firmly secure the stand to the TV before moving it, as the stand may fall and could cause serious injury. Two or more people should carry the TV. Never lay the TV on the floor because of possible damage to the screen. Always store the TV upright.
Specifications The descriptions and characteristics in this booklet are given for information purposes only and are subject to modification without notice.
Warning! Important Safety Instructions Please read the appropriate section that corresponds to the marking on your Samsung product before attempting to install the product. CAUTION RISK OF ELECTRIC SHOCK DO NOT OPEN CAUTION: TO REDUCE THE RISK OF ELECTRIC SHOCK, DO NOT REMOVE COVER (OR BACK). THERE ARE NO USER SERVICEABLE PARTS INSIDE. REFER ALL SERVICING TO QUALIFIED PERSONNEL. This symbol indicates that high voltage is present inside.
Wiring the Mains Power Supply Plug (UK Only) IMPORTANT NOTICE The mains lead on this equipment is supplied with a moulded plug incorporating a fuse. The value of the fuse is indicated on the pin face of the plug and, if it requires replacing, a fuse approved to BSI1362 of the same rating must be used. Never use the plug with the fuse cover omitted if the cover is detachable. If a replacement fuse cover is required, it must be of the same colour as the pin face of the plug.
This page is intentionally left blank. BN68-01094R-00Eng.
Correct Disposal of This Product (Waste Electrical & Electronic Equipment) (Applicable in the European Union and other European countries with separate collection systems) This marking shown on the product or its literature, indicates that it should not be disposed with other household wastes at the end of its working life.
Contact SAMSUNG WORLDWIDE If you have any questions or comments relating to Samsung products, please contact the SAMSUNG customer care centre. Country REPUBLIC OF IRELAND U.K Customer Care Centre 0818 717 100 0870 SAMSUNG (7267864) Web Site www.samsung.com/uk www.samsung.com/uk BN68-01094R-00 BN68-01094R-00Eng.