
User Manual
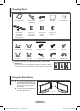
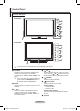
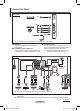
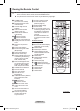
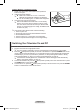
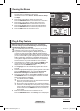
Table Of Contents
- User Instructions
- Contents
- Checking Parts
- Using the Stand-Base
- Control Panel
- Connection Panel
- Viewing the Remote Control
- Switching Your Television On and Off
- Viewing the Menus
- Plug & Play Feature
- Viewing External Signal Sources
- Editing Device Names
- Storing Channels Automatically
- Storing Channels Manually
- Adding / Locking Channels
- Sorting the Stored Channels
- Assigning Names to Channels
- Fine Tuning Channel Reception
- LNA (Low Noise Amplifier)
- Changing the Picture Standard
- Customizing the Picture Settings
- Configuring Detailed Settings on the Picture
- Selecting the Picture Size
- Selecting the Screen Mode
- Digital NR / Active Colour / DNIe / Movie Plus
- Freezing the Current Picture
- Sound Features
- Selecting the Sound Mode (depending on the model)
- Time Features
- Language / Blue Screen / Melody / Energy Saving /
- Using the Game Mode
- Wall- mount adjustment (Sold separately) (PS-50P96FD)
- Viewing the Picture in Picture (PIP)
- Screen Burn Protection
- Setting up Your PC Software (Based on Windows XP)
- Display Modes
- Setting the PC
- Setting the Home Theatre PC
- Previewing the DTV Menu System
- Displaying Programme Information
- Operating the DTV Menu
- What is Anynet+?
- Connecting Anynet+ Devices
- Setting Up Anynet+
- Scanning and Switching between Anynet+ Devices
- Recording
- Listening through a Receiver
- Check Points before Requesting Service
- Teletext Feature (depending on the model)
- Wall Mount Kit Specifications (VESA)
- Setting Up Your Remote Control
- How to assemble the Stand-Base (depending on the model)
- Troubleshooting
- Specifications

English - 7
1
POWER IN
Connect the supplied power cord.
2
Connecting external Audio Devices
Connect RCA audio signals from the TV to an
external source, such as Audio equipment.
3
EXT 1, EXT 2
Inputs or outputs for external devices, such as
VCR, DVD, video game device or video disc
players.
Input/Output Specification
Connector
Input Output
Video Audio(L/R) RGB Video + Audio(L/R)
EXT 1
✔ ✔ ✔
Only TV or DTV
output is available.
EXT 2
✔ ✔
Output you can
choose.
4
COMPONENT IN
Audio (AUDIO L/R) and video (Y/PB/PR) inputs
for Component.
5
DIGITAL AUDIO OUT (OPTICAL)
Connect to a Digital Audio Component.
6
SERVICE
− Connector for service.
− Connect the serial jack between the
electro-motion wall mount bracket and your
TV when you want to adjust the TV viewing
angle using your remote control.
7
PC IN / AUDIO
Connect to the video and audio output jack on
your PC.
8
COMMON INTERFACE Slot
Insert CI (Common Interface) card into the slot.
(refer to page 45)
− When not inserting “CI CARD” in some
channels, “Scramble Signal” is displayed on
the screen.
− The pairing information containing a
telephone number, CI CARD ID, Host ID,
and other information will be displayed in
about 2~3 minutes. If an error message
is displayed, please contact your service
provider.
− When the channel information configuration
has finished, the message “Updating
Completed” is displayed, indicating that the
channel list is now updated.
➢
Insert the CI-Card in the direction marked
on it.
9
HDMI IN 1, HDMI IN 2
− Connect to the HDMI jack of a device with
HDMI output. These inputs can also be used
as a DVI connection with separate analog
audio inputs. An optional HDMI/DVI cable
will be necessary to make this connection.
When using the optional HDMI/DVI adapter,
the DVI analog audio inputs on your TV
allow you to receive left and right audio from
your DVI device. (Not compatible with PC)
− When connecting this product via HDMI or
DVI to a Set Top Box, DVD Player or Games
Console etc, make sure that it has been
set to a compatible video output mode as
shown in the table below. Failure to observe
this may result in picture distortion, image
breakup or no picture.
− Do not attempt to connect the HDMI/DVI
connector to a PC or Laptop Graphics Card.
(This will result in a blank screen being
displayed)
− The TV may not output sound and pictures
may be displayed with abnormal color
when DVD players/Cable Boxes/Satellite
receivers supporting HDMI versions older
than 1.3 are connected. When connecting
an older HDMI cable and there is no sound,
connect the HDMI cable to the HDMI IN
1 jack and the audio cables to the DVI IN
(HDMI2) [R-AUDIO-L] jacks on the back of
the TV. If this happens, contact the company
that provides the external device to confirm
the HDMI version, then request an upgrade.
DVI IN (HDMI 2) AUDIO L/R
DVI audio outputs for external devices.
0
ANT IN
75Ω Coaxial connector for Aerial/Cable
Network.
Supported modes for HDMI and Component
480i 480p 576i 576p 720p 1080i 1080p
HDMI/DVI 50Hz X X X O O O O
HDMI/DVI 60Hz X O X X O O O
Component O O O O O O O
BN68-01094R-00Eng.indd 7 2007-05-29 ¿ÀÀü 10:43:02