
User Manual


20_ setting up
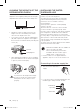
ALIGNING THE HEIGHTS OF THE
REFRIGERATOR DOORS
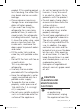
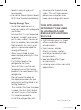
If the Fridge door is lower than the Freezer door,
adjust the door height by turning the door height
adjustment bolt at the bottom of the Fridge door.
Height difference
• Turning it counter clockwise increases the
height of the door and turning it clockwise
decreases the height of the door.
• Loosen the screw (1), turn the adjusting bolt
(2) with a spanner to align the door height to
the Freezer door and then fix it by fastening the
screw (1).
(1) Screw
(2) Adjusting bolt
• After adjusting the height, be sure to install the
protective rubber inserts as shown in the figure
to protect your feet from injury.
If you increase the height of the Fridge
door by too much, the switch may be
damaged or the door may not close
properly.
CAUTION
INSTALLING THE WATER
DISPENSER LINE
A water dispenser with a filter is one of the helpful
features on your new refrigerator.
To help promote better health, the water filter
removes unwanted particles from your water.
However, it does not sterilize or destroy
microorganisms.
You may need to purchase a water purifying
system to do that.
The water line also connects to the ice maker.
For the ice maker to operate properly, water
pressure of 20-125psi (138 ~ 862kPa) is required.
If the refrigerator is installed in an area with low
water pressure (below 20 psi), you can install a
booster pump to compensate for the low pressure.
After you have connected the water line, make
sure the water storage tank inside the refrigerator
is properly filled.
To do this, press the water dispenser lever until the
water runs from the water outlet.
• Water line installation kits are available at
extra cost from your dealer.
We recommend using a water line
installation kit that contains copper
tubing and ¼” compression nut.
• Use the new hose-sets supplied with the
appliance only. Do not re-use an old hose set.
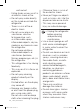
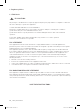
Connecting to the water supply line
1. First, shut off the main water
supply.
2. Locate the nearest cold water drinking line and
install the pipe clamp and shut off valve.
Pipe clamp
Cold water line
Shut off valve
DA68-02935A-10.indb 20 2018. 7. 9. �� 4:53
setting up _21
01 SETTING UP
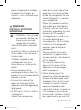
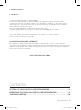
3. Connect the water line installation kit to the
shut off valve.
Shut off valve
Pipe clamp
Cold water line
Water line installation kit
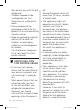
Connecting the water supply line to
the refrigerator.
There are several items that you need to purchase
to complete this connection.
You may find these items sold as a kit at your local
hardware store.
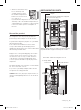
Use Copper Tubing Use Plastic Tubing
• ¼” copper tubing
• ¼” compression nut
(1pc)
• Ferrule (2pc)
• ¼” plastic tubing
→ Molded end (Bulb)
• ¼” compression nut
(1pc)
Compression Nut
(1/4”) (Assembled)
Ferrule
(Not supplied)
Plastic Tubing
(Assembled)
Compression
Fitting (Assembled)
Molded end
(Bulb)
Compression
nut (B) (1/4”)
(Not supplied)
or
Copper tubing
(Not supplied)
Plastic tubing (B)
(Not supplied)
Household water supply line
Refrigerator
1. Connect the household water line to the
assembled compression fitting.
- If you are using copper tubing, slip the
compression nut (B) (not supplied) and
ferrule (not supplied) on the copper tubing (not
supplied) as shown.
- If you are using plastic tubing (B) , insert the
molded end (Bulb) of the plastic tubing (B) into
the compression fitting.
Do not use without the molded end (Bulb)
of the plastic tubing (B).
2. Tighten the compression nut (B) onto the
compression fitting.
Do not over-tighten the compression nut (B) .
3. Turn the water on and check for any leakage.
If you find water drops or leakage in the
connection areas, turn off the main water
supply. Check the connections and, if
necessary, tighten.
4. Flush 1 gallon of water through the filter before
drinking or using the water from the refrigerator.
(Flush approximately 6 minutes.) To flush, press
a large glass or cup against the water dispenser
lever. Fill the glass, empty it into the kitchen sink
after it is filled, and then repeat.
5. After you turn on the refrigerator, let the ice
maker make ice for 1 to 2 days. Over that
period of time, throw out the first 1 or 2 buckets
of ice the freezer makes to ensure all impurities
have been removed from the water line.
Only connect the water line to a drinkable
water source.
If you have to repair or disassemble the water line,
cut off 1/4“ of the plastic tubing to make sure you
get a snug, leak-free connection.
You can test the water line quickly using a
paper cup. Under normal conditions, the
water dispenser can fill a 5.75 oz. (170cc)
cup in about 10 seconds.
CAUTION
DA68-02935A-10.indb 21 2018. 7. 9. �� 4:53
DA68-02935A-11.indd 20 2020-10-16 3:02:10