| Safety Symbols | Power | Installation | Using and Cleaning | Safety Symbols Make sure to follow the directions below to prevent accidents and damage to the product. Failure to follow the accompanying directions may lead to serious injury or death. Failure to follow the accompanying directions may lead to minor personal injury or property damage.
Do not connect more than one appliance to a single outlet, as an overheated outlet may cause fire. Do not use force to pull the power cord. Don't place anything heavy on the power cord, as this may cause electric shock or fire. Make sure to turn the power off and disconnect the power plug from the outlet before moving the product. Make sure to disconnect the connection cables from other devices as well.
| Safety Symbols | Power | Installation | Using and Cleaning Installation When installing the product on a cabinet or shelf, do not let the front end of the product project beyond its front edge. z Failing to do so, may cause the product to fall, resulting in a product malfunction or personal injury. Do not place the power cord near a heater, as the power cord may melt, causing electric shock or fire.
| Safety Symbols | Power | Installation | Using and Cleaning | Using and Cleaning Do not insert any metal objects such as forks, wire, or gimlets, or flammable items such as paper or matches into the ports at the back of the product, as this may cause electric shock or fire. z If water or any foreign substance enters the product, make sure to turn the product off disconnect the power plug from the outlet, and contact a service center. Never disassemble, repair, or modify the product yourself.
disconnect the power plug. z Using the product without verifying that it has not been damaged may cause electric shock or fire. Please contact a service center. Correct Disposal of This Product (Waste Electrical & Electronic Equipment) - Europe only (Applicable in the European Union and other European countries with separate collection systems) This marking shown on the product or its literature, indicates that it should not be disposed with other household waste at the end of its working life.
| Features | Components | Front | Back | Side (Buttons) | Features Expand the memory capacity with a memory card. Enjoy stored images immediately. By connecting a SD or MMC/MS/XD memory card of your digital camera to your digital photo frame, you can enjoy images quickly and easily. This also provides a way to expand the memory capacity of the frame. Stylish design With its sleek and clean, high class design, your digital photo frame doubles as an ornament for your desk or table.
(Colors may differ for each product.
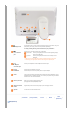
The Kensington lock is a device used to physically secure the system when using it in a public place. (The locking device has to be purchased separately.) Kensington lock For using a locking device, please contact where you purchased it. Connect a PC or an external device using a USB cable. USB connection Down stream Connect your digital photo frame to a USB-supporting storage Up stream Connect your digital photo frame to a PC's USB port with a port device with a USB cable. USB cable.
[ ] Power Button Turns the product on or off. Hold down the power button at the right of the product for about 2 seconds. Power Indicator Shows the power status. When the product is powered on, the power light turns on. [MENU] Menu Button Displays the menu window at the bottom left corner of the screen. [VOL +] Volume Button Adjusts the sound volume when playing music files or movies. [ ] Up Button Used for moving up. [ ] Left Button Used for moving left.
| Power | USB | Memory Card | | USB | Memory Card | Connecting the Power Connect the power adapter to the terminal at the back of the product. Connect the power cord to the power adapter. Plug the power cord for the product into a nearby outlet. Press the button on the side of the product to turn the product on.
Down Stream Used to connect an external USB-supporting device to your digital photo frame. Port This product does not support USB card readers. Only USB storage is supported. The external devices connected to your Digital Photo Frame are not recognized by your PC. When connecting an external device to the down stream port, use the USB cable provided with the external device.
Favorites Mainly stores photos. Recent Temporarily stores the last displayed photo. imagecashe Stores as many Web Photos (photos from the Windows Live or RSS) to the cache as were used in the images folder. If you copy your photos from your PC to the imagecashe, they are invisible and cannot be viewed with your Digital Photo Frame. The capacity of this product is 64 MB. If the capacity is exceeded, no further files can be stored. Do not turn off the product while saving, playing, or deleting a file.
| Buttons | Photos, Web Photos | Music | Video | Settings | Settings | Buttons Control Buttons Button Description Turns the product on or off. Hold down the power button on the side of the product for about 2 seconds. MENU Opens the on-screen menu and exits from the menu. VOL +, VOL - Push the button to adjust volume. These buttons allow you to adjust items in the menu. ∧,∨,<,> ENTER Activates a highlighted menu item. BACK | Buttons Use this button to step one step back in the menu.
Thumbnail List Menu When pressing the MENU button, the on-screen menu is displayed on the screen. Sub OSD Upper OSD Start Slide Show Description Start Slide Show Yes, No Delete This copies your photos from the connected external device to the Favorites folder on the Frame Memory of your digital photo frame. Delete Yes, No Delete the file. (This is enabled when Photos is selected.
While a slide show is in progress, stars (★) are displayed according to the grade set by Windows Media Rate Photos Player. -. You can only use images shared by Windows Media Player on your PC while your digital photo frame is connected to it. Photo Aspect Original, Fit To Width, Fit To Screen Select an aspect ratio for images to display. Set as Background Sets the image being displayed in the slide show as the background image for the main screen.
Copy the file being played back in the Frame Favorites. Copy to Frame Memory This copies music from the connected external device to the root directory of the Frame Memory in your digital photo frame. You cannot use the music under the Frame Memory.. Delete Delete the file. Play Menu When pressing the MENU button, the on-screen menu is displayed on the screen.
Description Memory Card, USB, Frame Memory(:default value) Video Source Select a connected media storage device. You can only select an external device which is currently connected. Playback Mode Once, Continuous You can playback movie files either Once or Continuously. Copy to Frame Memory Delete This copies file from the connected external device to the root directory of the Frame Memory in your digital photo frame. Delete the file.
Sub OSD Upper OSD Default Computer Language Description By using the wireless LAN connection search function, you can reset the current connection and reselect the computer from which you are receiving photos. English, Deutsch, Español, Français, Italiano, Русский, Português Select a language to use for your product. Time Zone Date and Time You can select the Time Zone that you are in. Select a Time Zone. Month, Day, Year, Hour, Minute, am/pm Enter and set the Month, Day, Year, Hour, Minute, am or pm.
Firmware Update Please visit www.samsung.com for the latest firmware update. Yes, No Reset Settings Reverts the product settings to factory defaults. Model, Firmware, Copyright Product Information View the product information. Management Web Go to [Settings]-[Management Web Address] in your Photo Frame and then open this URL using Internet Explorer on your PC. When connected, the Welcome page will be displayed.
Initial Settings Installation Program Guide and User Recommendations Settings for Sharing Photos on your PC - Configuring Your Windows Settings for Sharing Photos on your PC - Configuring Your Photo Frame Viewing the Photos from Windows Live Space Viewing the Photos via RSS Setting up Rating and Tags (VISTA:Tags, XP:Labels) on a PC I want to update firmware.
Ensure that the settings are confi gured as shown below. Otherwise, your PC may not be displayed in the list or you may not be able to connect to it. In Vista, select Control Panel > Network and Sharing Center > Customize. Check whether the Location type is set to Private. Select Digital Photo Frame from the Windows Media Player > Library > Media Sharing list. Check whether it is set to Allow. Installation Program Guide and User Recommendations Windows XP We highly recommend installing .Net Framework 3.0.
In the [Add To Library] window, select [My personal folders] under the [Select the folders to monitor] section and select the folder containing photos and click [Add]. Select the folder to share and click [OK] to add it. When you click [OK], the [Add To Library] window is closed and the [Add to Library by Searching Computer] is displayed. Wait until it finishes the operation and click [Close] when it is completed.
Sharing Settings for Accepting Connections from Your Photo Frame In the [Library] tab, click on [Media Sharing]. In the [Media Sharing] window, check the [Share my media] checkbox under [Sharing settings]. If no [Available device] is displayed in the [Media Sharing] window, proceed to steps 4. If displayed, proceed to step 5. In the [Media Sharing] window, click [Networking] and check whether the current network is set to [Private network]. If not, set it to [Private Network].
In the [Media Sharing] window, click [Settings]. The [Media Sharing-Default Settings] window is displayed. In the [Media Sharing-Default Settings] window, set the [Media Type] to [Picture], both [Star ratings] and [Parental ratings] to [All ratings] or a required rating under the [Default Settings] section. If you want to add a device or computer which tries to connect to the library to the list automatically, check the [Add new devices and computers automatically] checkbox.
Checking Computer Connections Check whether the PC icon is displayed at the top left of the screen. If the PC icon[ ] is displayed, move to the Main screen. If not, move to [Settings]-[Default Computer]. In the [Default Computer] window, select the PC you want to connect your Digital Photo Frame to. If a required PC is not displayed, click on [Refresh List] to update the list and select it. If connected, you will be returned to the [Settings] screen.
You can view the shared photos on the connected computer via Playlists, Tags, Dates, Folders, and Ratings. Viewing the Photos from Windows Live Space Checking Windows Live Space and Uploading Photos If you have no MSN account (MSN Hotmail, MSN Messenger, Passport account), please create one. Go to and login to Windows Live Space (http://spaces.live.com/) with your MSN account. If you do not have a space, create a space and enter it. In your space, change to edit mode.
frame appears. When connected, the Welcome page will be displayed. On the Welcome page, enter the password displayed in the [Settings]-[Management Password] screen of your Digital Photo Frame in the [Password] box and click [Sign in]. You can change the password (default: Admin) in the Settings of the Samsung Photo Frame Web Configuration. On the Samsung Photo Frame Web Configuration page, click the [Web Photos] tab and add the space address (for example, if it is 'http://test.space.live.
and upload photos, we will get photos from other peoples Flickr. Connect to http://www.flickr.com/ and click on Explore Flickr. Click on the marked part, as shown in the figure on the left. You are now in the Flickr of that person and a list of photos will be displayed. Scroll down to the bottom of that page and click on the [Feed] icon located there. When clicked, an XML page is displayed, as shown in the figure on the left. Copy the address displayed in the Internet Explorer Address box.
Setting up Rating and Tags (VISTA:Tags, XP:Labels) on a PC Windows VISTA Click Start - All Programs - Windows Photo Gallery to launch the Windows Photo Gallery. If you select Info at the top of the Windows Photo Gallery screen, the photo information pane appears on the right. Select a photo and change the Rating or Tags in the right information pane. Windows XP Click Start - All Programs - Microsoft Digital Image Starter Edition 2006 - Microsoft Digital Image Starter Edition 2006 Library.
| Specifications | Supported Files Specifications Items Panel Specifications Type 7" TFT Resolution 800 x 480 Brightness 200cd/㎡ Contrast Ratio 300 : 1 Interface Digital 6 bit JPEG. MPEG4. WMV9 Supported Formats * JPEG max Image Resolution 3200x2400(8Mb) (Progressive JPEG is not supported.) Built-in Memory 64Mb Network Wi-Fi 802.11b/g 2.4GHz 54Mbps Audio 1 W x 1 built-in speaker USB 2.0 USB (One up stream (host) and one down stream (slave).
Networking Wi-Fi. DHCP from AP. Image from RSS feed Information Memory Information. file information. status information I/O Device Key (8 keys) Memory Card Auto detection and GUI for selection File Management Image copy. delete Networking Control Dimensions General (WxHxD) Weight Power Supply 209.4 x 149.4 x 87.4 mm / 8.24 x 5.88 x 3.44 inch 600 g / 1.3 lb AC 100 ~ 240 VAC( ±10 %).
| Troubleshooting | Terminology | Service Centers | Declaration of Conformity | Troubleshooting This section lists various problems and solutions encountered by users while using the digital photo frame. When encountering a problem, first check the list below and follow the suggested action if one matches your problem. If the problem still persists, contact or visit the nearest service center. Symptoms My Digital Photo Frame does not turn on.
The screen is displayed but there is no Try to change the Volume menu using the buttons on the right side of the sound for MPEG4 and WMV9 movies. product. Freezing may happen depending on the status of the movie file. Breakings could happen during playback depending on the type and size of The movie freezes at some points. movie file.(High bps contents) Movie file formats : MPEG 4, WMV9 Resolution : Less than 1024 x 768 This product has no built-in battery.
MP3 is a high quality audio compression technology. It provides a 50 times higher compression than CD. Because it provides high quality and a low size MP3 (MPEG Audio Layer-3) for its compression ratio, it is commonly used on the Internet and for FM radio transmissions, etc. An audio file formatted in the MP3 format is called an MP3 file. JPEG is an image compression technology. It provides the smallest loss of all image compression technologies.
Samsung Electronics web site http://www.samsung.com If you have any questions or comments relating to Samsung products, please contact the SAMSUNG customer care center. North America U.S.A 1-800-SAMSUNG (7267864) http://www.samsung.com CANADA 1-800-SAMSUNG (7267864) http://www.samsung.com/ca MEXICO 01-800-SAMSUNG (7267864) http://www.samsung.com/mx Latin America ARGENTINE 0800-333-3733 http://www.samsung.com/ar BRAZIL 4004-0000 http://www.samsung.
NORWAY 815-56 480 http://www.samsung.com/no POLAND 0 801 801 881 http://www.samsung.com/pl PORTUGAL 80 8 200 128 http://www.samsung.com/pt REPUBLIC OF IRELAND 0818 717 100 http://www.samsung.com/uk SLOVAKIA 0800-SAMSUNG (7267864) http://www.samsung.com/sk SPAIN 902 10 11 30 http://www.samsung.com/es SWEDEN 0771-400 200 http://www.samsung.com/se SWITZERLAND 0800-7267864 http://www.samsung.com/ch U.K 0870 SAMSUNG (7267864) http://www.samsung.com/uk CIS ESTONIA 800-7267 http://www.