* Some of the contents in this manual may differ from your phone, depending on the software installed or your service provider. ELECTRONICS World Wide Web www.samsungmobile.com Printed in Korea Code No.: GH68-04715A English. 12/2003. Rev. 1.
Contents Important Safety Precautions ...................... 7 Unpacking .................................................... 9 Your Phone ................................................ 10 Phone Layout .................................................... Display............................................................. Backlight .......................................................... Service Light..................................................... 10 13 16 16 Getting Started ....................
Contents Contents Phonebook Menu........................................ 52 Phone Settings........................................... 94 Find Name (Phonebook 1.1) ................................... Add Entry (Phonebook 1.2) .................................... Speed List (Phonebook 1.3).................................... Copy All to Phone (Phonebook 1.4) ......................... Delete All (Phonebook 1.5) ..................................... Own Number (Phonebook 2.1)................................
Contents Using ALS (Alternate Line Service) .......... 139 Solving Problems ..................................... 141 Access Codes ........................................... 144 Phone Password ............................................... PIN................................................................. PIN2 ............................................................... PUK ................................................................ PUK2 .........................................................
Important Safety Precautions Read these guidelines before using your wireless phone. Failure to comply with them may be dangerous or illegal. Road Safety at All Times Do not use a hand-held phone while driving; park the vehicle first. Switching Off When Refuelling Do not use the phone at a refuelling point (service station) or near fuels or chemicals. Switching Off in Aircraft Wireless phones can cause interference. Using them in aircraft is both illegal and dangerous.
Important Safety Precautions Unpacking Sensible Use Use only in the normal position (held to the ear). Avoid unnecessary contact with the antenna when the phone is switched on. Your package contains the following items: Emergency Call Ensure the phone is switched on and in service. Key in the emergency number for your present location, then press the key. If certain feature are in use, you may need to deactivate those features before you can make an emergency call.
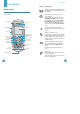
Your Phone Your Phone Key(s) Phone Layout The following illustrations show the main elements of your phone. Service light Earpiece Ear-microphone jack Display (soft keys) Description Perform the functions indicated by the text above them, on the bottom line of the display. In Menu Mode, scroll through the menu options. In Idle Mode, the Left key enters the New SMS message writing screen, the Right key enters the Incoming call’s melody setting menu and the Up key enters the Calendar menu.
Your Phone Key(s) Your Phone Description (continued) When pressed and held in Idle Mode, quickly accesses your voice mail server. Display Display Layout The display has three areas: Enters numbers, letters and some special characters. Used for various purposes in different functions. When pressed and held while entering a phone number, the key enters a pause. When pressed and held in Idle Mode, the key enters or exits the Quiet Mode.
Your Phone Icons Icon Icon Description Shows the received signal strength. The more the number of bars, the stronger the signal. Appears when a call is in progress. When your SIM card supports ALS (Alternate Line Service), this icon may appears with the number 1,2, or both. For example , , . Appears when you are out of a service area. When it displays, you cannot make or receive calls. Appears when you have new or unchecked voice messages.
Your Phone Getting Started Backlight The display and the keypad are illuminated by a backlight. When you press any key the backlight illuminates. It turns off if no key is pressed within a given period of time, depending on the Backlight menu option. See page 96 for further details. Note: The backlight remains on at all times when the phone is connected to an optional car kit. Service Light The service light’s activity depends on the Service light menu option. See page 102.
Getting Started Removing the SIM Card Getting Started 2. Slide the battery up towards the catch until it locks into place. To remove the SIM card, slide the card out of the holder, as shown. Installing/Removing/Charging the Battery Your phone is powered by a rechargeable Li-ion battery. Use only approved batteries and chargers. Ask your local Samsung dealer for further details. Note: You must fully charge the battery before using your phone for the first time.
Getting Started Charging the Battery by Using the Travel Adapter Getting Started Low Battery Indicator Note: The phone can be used while the battery is being charged, but this causes the battery to charge more slowly. When the battery is weak and only a few minutes of talk time remain, the battery sensor informs you in the following ways: an empty battery icon flashes ( ), you hear a warning tone and a message repeats at regular intervals on the display. 1.
Getting Started Getting Started Switching the Phone On or Off Selecting Functions and Options To switch the phone on: Your phone offers a set of functions that allow you to customise your phone. These functions are arranged in menus and sub-menus, accessed via the two soft keys marked and . Each menu and sub-menu allows you to view and alter the settings of a particular function. 1. Hold down the switches on. key until the phone 2.
Getting Started Getting Started To view various functions/options available or select the one is required: Locking or Unlocking the Keypad 1. Press the appropriate soft key. You can lock the keypad to avoid pressing keys by mistake. 2. To select the: • function displayed • option highlighted Press the Select soft key. To lock the keypad automatically, use the Auto key lock option (Menu 4.3). See page 96. view the next function or Down key.
Call Functions Call Functions Making an International Call Making a Call 1. Press and hold the 0 key for the international prefix. The + character appears. Using the Number Keypad 2. Enter the country code, area code and phone number and press the key. When the idle screen is displayed, enter the area code and phone number, and press the key. Making a Call from Phonebook Note: If you have set the Auto redial option (Menu 4.
Call Functions 3. To dial the number, press the Call Functions key. To view each call record, see “Call Records” on page 86. Speed-Dialling from Phonebook Once you have stored numbers in the Phonebook, you can dial a number simply by pressing one or two keys. For further details, see page 56.
Call Functions Adjusting the Volume During a call, if you wish to adjust the earpiece volume, press the up or down volume key on the left side of the phone. When you hear a sound, such as ringtone, you can also adjust the earpiece volume. But it is not fixed. Call Functions The Mute icon disappears and your correspondent can hear you. Muting/Sending Key Tones You can turn the key tones off or on during a call. When the Mute keys option is selected, your phone does not transmit the key tones.
Call Functions 2. Make the second call in the normal way. To switch between the two calls, simply press the Swap soft key. The current call is placed on hold and the call on hold is reactivated so that you can continue conversing with the other person. To end the call on hold, press the Options soft key and select the End held call option. When you want to finish, end each call normally by pressing the key.
Call Functions Note: You can also scroll through the Phonebook from the beginning, by pressing the Up or Down key. 4. To view the highlighted entry, press the Ok soft key. For further details about the Phonebook feature, see page 52. Using the Message Service You can read or write a new message during a call. 1. Press the Options soft key. 2. Press the Up or Down key to highlight the Message option. Press the Select soft key. 3.
Call Functions Call Functions Or, select the End current option to end the call in progress. 3. Answer the new call by pressing the 3. End the multi-party call by pressing the key. key. Having a Private Conversation With One Participant 1. Press the Options soft key and select the Split option. Press the Select soft key. 2. Press the Up or Down key to highlight a participant and press the Select soft key. Now you can talk privately with that person.
Entering Text Entering Text Changing the Text Input Mode At many times while you are using your phone, you need to enter text, such as when storing a name in the Phonebook, writing a new message, creating your personal greeting or scheduling events on your calendar. You are provided with the following text input modes: • T9 mode* This mode allows you to enter words with only one keystroke per letter.
Entering Text Entering Text Quickly Changing the Text Input Mode To switch between the Press and hold the Number and previous mode key. Symbol and previous mode key. ABC and T9 modes right soft key. Using the T9 Mode dictionary. To type words not found in the T9 mode, change the text input mode to the ABC mode, or proceed as follows: 1. Press the Spell soft key, or press the right soft key and select the Add word option. 2.
Entering Text Entering Text Scrolling • Language select; see page 39 To move the cursor to the left or right within the text, press the Left or Right key. • Input mode (Menu 4.4.2); see page 97 Clearing Letters and Words List of the characters available To clear the letter to the left of the cursor, press the C key. You can clear all of the letters on the display by pressing and holding the C key. Key Characters in the Order Displayed 1 .
Entering Text Scrolling To move the cursor to the left or right within the text, press the Left or Right key. Clearing Letters and Words To clear the letter to the left of the cursor, press the C key. You can clear all of the letters on the display by pressing and holding the C key. Returning to the Previous Screen When the text input field is cleared, press and hold the C key to return to the previous screen. Using the Symbolic Mode The Symbolic mode enables you to enter symbols in your text.
Using the Menus The phone offers a range of functions that allow you to tailor the phone to your needs. These functions are arranged in menus and sub-menus. Accessing a Menu Function The menus and sub-menus can be accessed by pressing the Menu soft key or Phonebook soft key in Idle Mode, then scrolling with the navigation keys. 1. In Idle Mode, press the Menu to access the main menu or press the Phonebook soft key to access Phonebook menu. 2. Scroll through the menus using the Left or Right key. 3.
Using the Menus Using the Menus You can also access the menus and sub-menus by entering the corresponding menu number. Main Menu Example: To access the Voice mail menu option, press the Menu soft key, 1, 3 in Idle Mode. 1. Messages List of Menu Functions Various menus let you check or change your phone settings. The following list shows the menu structure. The numbers assigned to each menu option may not match the menu number on the phone. It depends on the services supported by your SIM card.
Using the Menus Using the Menus 2.5 Call time 2.5.1 Last call time 2.5.2 Total sent 2.5.3 Total received 2.5.4 Reset timers 2.6 Call costs* 2.6.1 Last call cost 2.6.2 Total cost 2.6.3 Max cost 2.6.4 Reset counters 2.6.5 Set max cost 2.6.6 Price/Unit 3. Sound settings (see page 90) 3.1 Incoming calls 3.1.1 Default melodies 3.1.2 My sounds 3.1.3 Ring volume 3.1.4 Alert type 3.2 Messages 3.2.1 Short message 3.2.2 Multimedia message 3.3 Power on/off 3.4 Connection tone 3.5 Key tone 3.6 Minute minder 3.
Using the Menus 6.1 Call diverting 6.1.1 Divert always 6.1.2 Busy 6.1.3 No reply 6.1.4 Unreachable 6.1.5 Cancel all 6.2 Call barring 6.2.1 All outgoing 6.2.2 International 6.2.3 International except to home 6.2.4 All incoming 6.2.5 Incoming while abroad 6.2.6 Cancel all 6.2.7 Change barring password 6.3 Call waiting 6.3.1 Voice calls 6.3.2 Fax calls 6.3.3 Data calls 6.3.4 Cancel all 6.4 Network selection 6.5 Caller ID 6.6 Active Line* 7. Funbox Using the Menus 7.2.4 Memory status 7.3 JAVA world 7.3.
Phonebook Menu Phonebook Menu Changing the Phone Memory Entries Phonebook offers the following features: • Phonebook: allows you to find, create or set up the speed-dialling feature and manage Phonebook entries. • Management: allows you to create or remove your own number, set up caller groups and check the memory status. • Services: allows you to use the service directory depending on your SIM card. Find Name Scroll to the category that you want to edit by pressing the Left or Right key.
Phonebook Menu Change name This option allows you to change the name of the entry. To clear the old name, press the C key. For more information about how to enter characters, see page 38. Send message This option allows you to send a message to the number. For more information about how to send a message, see page 62. Copy This option allows you to copy the entry from the phone’s memory to the SIM card, and vice versa. Delete entry This option allows you to delete the entry from Phonebook.
Phonebook Menu Phonebook Menu 8. If you want to change the entry, use the options. for information about how to do it, see page 54. 4. When you have finished, press the the key to exit. If you want to return to Idle Mode, press the soft key or the key. Editing the Speed-dial Entries Storing a Number in Idle Mode As soon as you start to enter a number, Save appears above the left soft key to allow you to store the number in Phonebook. Continue the procedure from step 1 on page 54 to store the number.
Phonebook Menu Phonebook Menu Dialling a Number Stored in the SIM Card Once you have stored phone numbers in your SIM card, you can dial them easily whenever required. 1. Scroll to the desired memory and place a check mark ahead of it by pressing the Select soft key. Selecting All places check marks on all of the memories. To dial a number stored in the SIM card: 1. Enter the number of the SIM card location where the number you want to dial is stored. 2.
Phonebook Menu Phonebook Menu 6. When you have finished, press the the key to exit. soft key or • View image: shows the image to display when a call comes in from a member in the group. To remove one of your numbers: 1. Select the entry you want to delete from the Own number list and press the Select soft key. 2. Scroll to Delete by pressing the Up or Down key and press the Select soft key. 3. Change the setting as required and press the Select soft key. 4.
Messages Messages This menu allows you to create, send, read and save messages with the Short Message Service (SMS: text message), Enhanced Message Service (EMS: message including simple image, animation or melody) and Multimedia Message Service (MMS: message supporting the presentation of various media types, such as full colour images and polyphonic ring tones). Voice mails are also available. Note: This feature is only available if your service provider’s network supports it.
Messages To view a message, scroll to it and press the Select soft key. The screen shows the: Messages New Message (Menu 1.1.2) • date and time when the message was received. Using this menu, you can write messages, containing text, images and melodies. • memory where the message was stored; for the SIM card or for the phone’s memory. 1. Create a message. • message contents. You can scroll to the next or previous message by pressing the Left or Right key.
Messages Messages • Preset messages: allows you to add a preset message to your text. Select one of nine messages stored in the Preset messages menu option (Menu 1.4). See page 80. Outbox (Menu 1.1.3) • Save message: allows you to save the message so that it can be sent later. You can read the message in Outbox. When the Outbox menu option is selected, the list of messages you have sent or saved displays with the: 3. When you have finished entering your message, choose Send from the options. 4.
Messages Messages Transfer: allows you to transfer the message from the SIM card to the phone’s memory or vice versa. Delete All (Menu 1.1.4) You can delete all messages stored in the SIM card and phone’s memory in this menu. 1. Scroll to a message box and place a check mark ahead of it by pressing the Select soft key. Selecting All places check marks on all of the message boxes. 2. If necessary, repeat step 1 to check another box. 3. When you have finished checking, press the Ok soft key. 4.
Messages If Message reception sets to Manual (for details, see page 83), when the New message icon ( ) appears on the display, you have to retrieve messages in Inbox. You select a message with the icon such as , and in Inbox. Then you can select retrieve or delete message by pressing the Options soft key. Messages • message status; for a read message, for a message to read, for a read notification message and for a notification message to read.
Messages Messages Cut media: extracts the picture or sound, so that you can set them as a wallpaper or ringtone or you can send them as a multimedia message. Cut address: extracts phone numbers, email addresses or URL addresses in the text, so that you can call the number or send a message to the number or save it in your Phonebook. Properties: shows you detailed information about the message. Move to My folder: moves the message to the My folder for later use. New Message (Menu 1.2.
Messages 2. Press the Opt. soft key to use the following options. • Preview: shows your message as it will display on the recipient’s phone. To go back to the message screen, press the Edit soft key. To send the message, press the Send soft key and go to step 4. • Send: allows you to send the message to another person. Refer to the next steps. • Add page: allows you to add up to 10 pages. You can move to each page using the Left or Right key on the message screen.
Messages Outbox (Menu 1.2.3) Outbox stores messages that you sent, you failed to send and you cancelled sending. When the Outbox menu option is selected, the list of messages you have sent or saved displays with the: • message’s subject or No subject if the message had no subject. • recipient’s phone number, or name if stored in Phonebook. • message status; for a sent message, for a message that failed to send or you cancelled sending, for a delivered report.
Messages Delete: deletes the message. Messages Voice Mail (Menu 1.3) Replay: replays the message. Send: send the message. When you receive a voice mail, your phone displays the icon and you hear an alert. Cut media: extracts the picture or sound, so that you can set them as a wallpaper or ringtone or you can send them as a multimedia message. Connect To Voice Mail (Menu 1.3.
Messages Messages Preset Messages (Menu 1.4) Using this menu, you can preset up to nine messages that you use most frequently. When you access this menu, the preset message list displays. 1. Scroll to a message or an empty entry by pressing the Up or Down key. 2. Press the Select soft key and enter a new message or change the old message. For further details about entering characters, see page 38. 3. Press the Ok soft key to save the message. Read: lets you read the received broadcast messages.
Messages Settings Messages (Menu 1.6) Short Message (Menu 1.6.1) Using this menu, you can set up default SMS information. The following options are available: Service centre: allows you to store or change the number of your SMS centre required when sending messages. You must obtain this number from your service provider. Validity period: allows you to set the length of time your messages are stored at the message centre while attempts are made to deliver them.
Messages Current profile: allows you to select one profile to use currently. Messages • Bearer: select the bearer to be used for each type of network accesses. Profile setting: allows you to set up to five profiles. - GPRS only: it only works in GPRS network. • Profile name: enter the name of the profile. - GSM only: it only works in GSM network. • Server URL: enter the address of profile server. • GSM setting: allows you to change the proxy settings for the GSM network.
Call Records Call Records • delete the current call record from the list. Via this menu, you can view the: • delete all of the call records. • calls you missed, received or dialled. • paste the number into the Phonebook. • cost of your calls. • length of your calls. Note: You can access the numbers in the three types of call records by pressing the key in Idle Mode. Missed Calls (Menu 2.1) Dialled Calls (Menu 2.3) This option lets you view the last 20 dialled numbers.
Call Records Call Time Call Records (Menu 2.5) This option lets you view the timers for calls made and received. Notes: • If your SIM card supports the ALS (Alternate Line Service) feature, you must first select the appropriate line. • The actual time invoiced for calls by your service provider may vary, depending on network features, rounding-off for billing purposes and others. The following timers are available: Last call time: the length of the last call.
Sound Settings Sound Settings You can use the Sound Settings feature to customise various settings, such as the: • ring tone, volume and type for incoming calls or messages. • volume for the voice prompt. • sounds made when your call is connected or when you press a key. • Quiet Mode to which your phone switches when you hold down the key. Incoming Calls (Menu 3.1) This option allows you to set up the ringer for incoming calls.
Sound Settings Sound Settings Light only: only the service light is switched on. The phone neither rings nor vibrates. Tone: each key, when pressed, makes a different sound. Repetition: allows you to specify how often the phone informs you of a new message. You can choose either Once or Periodic. Beep: each key, when pressed, makes the same sound. Power On/Off To adjust the key tone volume, press the volume keys on the left side of the phone in Idle Mode. (Menu 3.
Phone Settings Phone Settings Display Many different features of your phone can be customised to suit your preferences via the Phone Settings menu. Greeting Message (Menu 4.1) (Menu 4.2) You can change the background image and the colour of the components on the display according to your preference and needs. Wallpaper (Menu 4.2.1) This menu option allows you to set a greeting message to be displayed briefly when the phone is switched on.
Phone Settings Phone Settings Backlight (Menu 4.2.3) You can specify how long the phone uses the backlight. Select how long the backlight remains on after the last key is pressed. Language (Menu 4.4) You can select a different language for the display text and text input modes. The following options are available: LCD Contrast (Menu 4.2.4) Text language: allows you to change the language of the display text, such as menus, options or warning messages.
Phone Settings Disable: the phone connects directly to the network when you switch it on. Enable: you must enter the PIN each time the phone is switched on. To change your PIN, see the Change PIN menu option. See below. Change PIN (Menu 4.5.2) This feature allows you to change your current PIN to a new one, provided that the PIN Check feature is enabled. You must enter the current PIN before you can specify a new one. Once you have entered a new PIN, you are asked to confirm it by entering it again.
Phone Settings Phone Settings To unlock the SIM, enter the SIM lock code. Auto Redial FDN Mode (Menu 4.5.7) With the Auto Redial function, the phone makes up to ten attempts to redial a phone number after an unsuccessful call. The FDN (Fixed Dial Number) mode, if supported by your SIM card, allows you to restrict your outgoing calls to a limited set of phone numbers. (Menu 4.6) Note: The interval between two call attempts varies.
Phone Settings Fax Mode Phone Settings (Menu 4.9) Reset Settings (Menu 4.11) You can use your phone as a modem for faxing when it is connected to computing devices. You need to purchase a data kit from your local Samsung dealer. This menu option allows you to reset your phone to its default configuration. You can reset the sound settings, phone settings or all of the settings together. In this menu, you can enable the fax mode on your phone. 1.
Organiser Organiser • Call: calls you need to make. The Organiser feature enables you to: • view the calendar and/or write a memo or to do list. • set the current date and time, and find out what time it is in various cities around the world. • set the alarm so that the phone rings at a specific time. • use your phone as a calculator, unit convertor, timer or stopwatch. New Memo (Menu 5.1) This menu option allows you to create a new memo.
Organiser Organiser 10. You can choose the following option by pressing the Options soft key: The following options are available when you press the Options soft key on the Calendar display: • Add: allows you to add a new memo on the day. Add memo: allows you to add a new memo on the day. • Delete: allows you to delete the memo. • Edit: allows you to edit the memo. Go to date: allows you to enter a particular date and then schedule an event on that date.
Organiser 4. Follow the procedure from Step 4 on page 105 onwards to save the memo. Organiser To Do List (Menu 5.3) This menu allows you to view a list of tasks. Viewing Your Calendar Memos To create a new memo of the To do list type: A date that has a memo associated with it is highlighted in a red box. If you select a date when events have already been scheduled, the number of memos of each type is shown at the bottom of the calendar. 1. Write the memo about your task and press the Ok soft key.
Organiser Copy: allows you to copy the task to a different date. Delete: allows you to delete the task. Delete all: allows you to delete all of tasks from the list. Organiser To select your time zone: 1. Select the city corresponding to your time zone by pressing the Left or Right key one or more times. The local date and time display. 2. Press the Set soft key. Clock (Menu 5.4) This option allows you to change the current time and date displayed.
Organiser Alarm Organiser (Menu 5.5) This option allows you to set an alarm to ring at a specific time. You can set up to three alarms or set the phone to ring an alarm when it is switched off. To set an alarm: 1. Select either Morning call, Alarm1 or Alarm2 by pressing the Up or Down key. The icon means that no alarm is currently set. The icon means that an alarm has already been set. 2. Press the Select soft key. 5. Repeat Step 4 to change each setting. 6.
Organiser Calculator Organiser Conversion (Menu 5.6) (Menu 5.7) You can use the phone as a calculator. The calculator performs basic arithmetic functions, such as addition, subtraction, multiplication, division and remainder calculations. This menu option allows you to convert from one type of unit to another. To perform a calculation: 1. Scroll to the type of conversion to be performed from Currency, Length, Weight, Volume, Area and Temperature, and press the Select soft key. 1.
Organiser Organiser Units Available Type Units Currency EUR FRF ATS PTE LUF Length DEM ESP BEF GRD ITL NLG FIM IEP mm km yard cm in mile m ft g grain kg oz ton pound Volume cm3 in3 gal m3 ft3 l yd3 Area cm2 in2 acre m2 ft2 a yd2 °C °F Weight Temperature Even if you exit the Timer screen, the timer will continue running. After the specified time has expired, the phone informs you by playing a melody and displaying a text notification.
Network Services Network Services • Voice calls only These menu functions are network services. Please contact your service provider to check their availability and subscribe to them, if you wish. Call Diverting (Menu 6.1) Note: The call divert options may be different depending on your SIM card and those not supported by your network operator may not be shown. This network service enables incoming calls to be rerouted to the number that you specify.
Network Services Network Services Deactivating Specific Call Diverting Options Cancel all: all call barring options are deactivated; calls can be made and received normally. 1. Select the call diverting option to be deactivated. You can specify individual call barring options for each of the following call types: • Voice calls only 2. Select the type of calls to which this option applies. • Fax calls only (not available when line 2 is in use) 3. Press the Remove soft key.
Network Services 4. Enter your call barring password supplied by your service provider. The phone sends your settings to the network and the network’s acknowledgement displays. You can also deactivate all call barring options by selecting the Cancel all option. Network Services Call Waiting (Menu 6.3) This network service informs you when someone is trying to reach you during another call.
Network Services Network Selection Network Services (Menu 6.4) The Network Selection feature enables you to automatically or manually select the network used when roaming outside your home area. Note: You can select a network other than your home network only if it has a valid roaming agreement with your home network. To indicate to automatically or manually select the network when roaming: 1. Press the Up or Down key until the appropriate option highlights and press the Select soft key.
Fun Box Fun Box The Fun box menu contains several fun options: • WWW services To exit the browser, press the key at any time. The phone returns to Idle Mode. • Media box • JAVA world WWW Services To scroll through the screen, use the Up and Down keys. Navigating the WAP Browser (Menu 7.1) Your phone comes equipped with a WAP (Wireless Application Protocol) Browser, making it possible for you to access the Wireless Web.
Fun Box Fun Box 2. Highlight the required option using the Up or Down key. Messages: allows you to read or write an SMS message. For details, see page 62. 3. Press the Media box: allows you to use your Media box. For details, see page 132. soft key to select the option. 4. If necessary, select the secondary option by pressing the Up or Down key and then press the soft key. Note: The WAP Browser menus may vary, depending on your version of the browser.
Fun Box Go to URL (Menu 7.1.3) This menu option allows you to manually enter the URL address of the Web site that you wish to access. Enter the URL address and press the Ok soft key. For further information about how to enter text, see page 38. Clear Cache (Menu 7.1.4) This menu option allows you to clear the information stored in the cache, the phone’s temporary memory used to store the most recently accessed Web pages. Proxy settings (Menu 7.1.
Fun Box Fun Box Current Proxy (Menu 7.1.6) Images (Menu 7.2.1) This menu option allows you to activate one of the proxies you set up to use the WAP connection. This option allows you to view the images extracted from EMS or MMS, downloaded from the WAP sites, the EasyStudio PC software or multimedia messages. Push messages (Menu 7.1.7) To view an image, press the View soft key. This menu allows you to set to be received and read push messages.
Fun Box Delete All (Menu 7.2.3) This option deletes all of the images and sounds in the Media box. Images: Press the Yes soft key to delete it, otherwise press the No soft key. Sounds: 1. Scroll to a sound box and place a check mark ahead it by pressing the Select soft key. Selecting All places check marks on all of the boxes. 2. If necessary, repeat step 1 to check another box. 3. When you have finished checking, press the Ok soft key. 4.
Fun Box Fun Box SnowBallFight Key Commands The goal of this game is to challenge and defeat the snowball fight champions of four different teams. 4/6 or Left/Right: move left or right Accessing a game After loading the game, press any key twice to go to the first menu screen. At the first menu screen, press key to play a game, or press key to access the main menu of this game. Play: allows you to start a new game or a saved game.
Fun Box Continue: allows you to continue the last game you played. The menu is only available when a game has already been played. High score: shows you the high score table. How to play: shows you the instruction of this game. Option: allows you to set the sound on or off Playing a game Your score goes up when you remove the bubbles. Only when more than 3 same coloured bubbles line up horizontally or diagonally, they disappear.
Using ALS (Alternate Line Service) Solving Problems You can set up call diverting via the Call diverting menu option (Menu 6.1). This service reroutes incoming calls on the line of your choice to a specified number. For further details, see page 118. Viewing Call Information You can view call times and last call cost information for each line. For further details, see page 88. Before contacting the after-sales service, perform the following simple checks.
Solving Problems “No service” displays • The network connection was lost. You may be in a weak reception area (in a tunnel or surrounded by buildings). Move and try again. • You are trying to access an option for which you have not taken out a subscription with your service provider. Contact the service provider for further details. Solving Problems The phone starts beeping and “Battery Low” flashes on the display The battery is insufficiently charged. Replace the battery and recharge it.
Access Codes Access Codes PIN2 There are several access codes that are used by your phone and its SIM card. These codes help you protect the phone against unauthorised use. Some access codes can be changed using the Security menu option (Menu 4.5). See page 97 for further details. Phone Password The Phone lock feature (see page 98) uses the phone password to protect your phone against unauthorised use. The phone password is supplied with the phone and is preset to “00000000” at the factory.
Access Codes You cannot change the PUK2. If you lose the code, contact your service provider. Call Barring Password The 4-digit call barring password is required when you use the Call Barring function. You obtain the password from your service provider when you subscribe to this function. You can change this password using the Call barring menu option (Menu 6.2). For further details, see page 122.
Health and Safety Information Precautions When Using Batteries • Never use any charger or battery that is damaged in any way. • Use the battery only for its intended purpose. • If you use the phone near the network’s base station, it uses less power; talk and standby time are greatly affected by the signal strength on the cellular network and the parameters set by the network operator. • Battery charging time depends on the remaining battery charge and the type of battery and charger used.
Health and Safety Information 2. When available, use a hands-free device. If possible, add an extra layer of convenience and safety to your wireless phone with one of the many hands-free accessories available today. 3. Position your wireless phone within easy reach. Be able to access your wireless phone without removing your eyes from the road. If you get an incoming call at an inconvenient time, let your voice mail answer it for you. 4.
Health and Safety Information Electronic Devices Most modern electronic equipment is shielded from radio frequency (RF) signals. However, certain electronic equipment may not be shielded against the RF signals from your wireless phone. Consult the manufacturer to discuss alternatives. Pacemakers Pacemaker manufacturers recommend that a minimum distance of 15 cm (6 inches) be maintained between a wireless phone and a pacemaker to avoid potential interference with the pacemaker.
Health and Safety Information use of radio equipment in fuel depots (fuel storage and distribution areas), chemical plants or where blasting operations are in progress. Areas with a potentially explosive atmosphere are often but not always clearly marked.
Health and Safety Information • For vehicles equipped with an air bag, remember that an air bag inflates with great force. Do not place objects, including both installed or portable wireless equipment in the area over the air bag or in the air bag deployment area. If wireless equipment is improperly installed and the air bag inflates, serious injury could result. • Switch off your phone before boarding an aircraft.
Glossary Glossary GPRS (General Packet Radio Service) To help you understand the main technical terms and abbreviations used in this booklet and take full advantage of the features of your mobile phone, here are a few definitions. ALS (Alternate Line Service) Capability of associating two lines with one SIM card. With this service, you can make and receive calls on either line, as required. Call Barring Ability to restrict outgoing and incoming calls.
Glossary Roaming Use of your phone when you are outside your home area (when travelling for example). SIM (Subscriber Identification Module) Card containing a chip with all the information required to operate the phone (network and memory information, as well as the subscriber’s personal data). The SIM card fits into a small slot on the back of the phone and is protected by the battery.
Index A ABC mode • 38, 42 Access codes • 144 Accessories • 9 Active line select • 125 service, use • 139 Alarm, set • 112 Alert type • 91 ALS • 139 Auto redial, set • 101 Autopower alarm • 113 B background image, set • 95 Backlight • 15, 96 Barring calls • 120 Battery charging • 20 installing • 18 low battery indicator • 21 precautions • 148 removing • 19 Browser, WAP • 126 C Calculator • 114 Calendar • 106 Caller groups • 60 ID • 125 Calls alert type • 91 answering • 29 a second call • 32 barring • 120 c
Index Index F M O FDN mode • 100 Fixed Dial Number mode • 100 Fun box • 126 Functions, select • 23 Maintenance • 156 Media box • 132 Memory status, phonebook • 61 Memos making • 104, 107 viewing 108 Menu scrolling • 45 Messages MMS • 68 SMS • 62 Messages • 62 alert types • 91 broadcast • 80 deleting • 68, 85 greeting • 94 inbox • 62 outbox • 67 preset • 80 ring tone • 91 voice mail • 79 writing • 65 Microphone, mute • 30 Minute minder • 93 Missed calls • 28, 86 Multi-party calls making • 34 private co
Index T T9 mode • 38, 40 Text entering • 38 input modes • 38 language • 97 Time setting • 110 world • 110 Timer • 116 To do list • 109 Tone connection • 92 keypad • 92 message • 91 power on/off • 92 Travel adapter • 20 V Volume call ringer • 90 earpiece • 30 W Waiting call • 32, 123 WAP Browser • 126 World time • 110 WWW Services • 126 164
165 ➃ Press the Select soft key to confirm. ➂ Scroll with the Up or Down key through the list of options until the required option is selected. ➁ Scroll with the Left or Down key through the main menus until you reach the required menu. ➀ Press the Menu soft key in Idle Mode. Each of the two soft keys ( and ) performs the function indicated by the text above them, on the bottom line on the display.
Dial a Number in Your SIM Card SpeedDial Redial the Last Number Press and hold the 1 key. Enter the SIM location, press the key, and press the key. In Idle Mode, hold down the appropriate key (2 to 9). Or, press the key and the key. Press the key twice. Listen to Your Voice Mail Store Numbers in Phonebook Search for a Number in Phonebook ➀ Enter the number. ➁ Press the Save soft key. ➂ Select the memory type and ress the Select soft key.