Outdoor unit SH09BPD SH12BPD SH09BPDX SH12BPDX ENGLISH DEUTSCH E§§HNIKA Split-type Room Air Conditioner (Cool and Heat) Aire acondicionado doméstico sistema Split (Refrigeración y Calefacción) Climatiseur de type Séparé (Refroidissement et Chauffage) Condizionatore d’aria per ambienti ad unità Separate (Raffreddamento e Riscaldamento) Aparelho de ar condicionado tipo Split (Refrigeração e Aquecimento) Geteilte raumklimaanlage (Kühlen und Wärmen) ¢IAIPOYMENO K§IMATI™TIKO ¢øMATIOY (æ‡ÍË Î·È £¤ÚÌ·ÓÛË) POR
Safety Precautions The following safety precautions must be taken when using your air conditioner. WARNING INSTALLING THE UNIT Risk of electric shock. • Can cause injury or death. • Disconnect all remote electric power supplies before servicing, installing or cleaning. • This must be done by the manufacturer or its service agent or a similar qualified person in order to avoid a hazard. ◆ The unit should not be installed by the user.
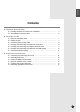
ENGLISH Contents ◆ PREPARING THE INSTALLATION ■ Deciding on Where to Install the Air Conditioner ........................................ ■ Air Conditioner and Accessories ................................................................. 4 6 ◆ INSTALLING THE UNIT ■ Fixing the Installation Plate ......................................................................... ■ Purging the Unit ..........................................................................................
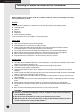
PREPARING THE INSTALLATION Deciding on Where to Install the Air Conditioner When deciding on the location of the air conditioner with the owner, the following restrictions must be taken into account. General Do NOT install the air conditioner in a location where it will come into contact with the following elements: ◆ Combustible gases ◆ Saline air ◆ Machine oil ◆ Sulphide gas ◆ Special environmental conditions If you must install the unit in such conditions, first consult your dealer.
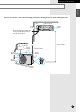
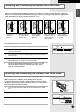
ENGLISH PREPARING THE INSTALLATION Respect the clearances and maximum lengths indicated in the diagram below when installing the unit. 300 mm or more 125 mm or more 125 mm or more Wrap the refrigerant pipes and the drain hose up in the absorbent pad and the vinyl tape, refer to page 13.
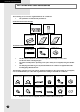
PREPARING THE INSTALLATION Air Conditioner and Accessories The following accessories are supplied with the air conditioner. ➢ The quantities are indicated in parentheses.
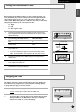
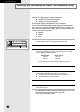
INSTALLING THE UNIT ENGLISH Fixing the Installation Plate Before fixing the installation plate to a wall or window frame, you must determine the position of the 65 mm hole through which the cable, piping and hose pass to connect the indoor unit up to the outdoor unit. When facing the air conditioner in position on the wall, the piping and cable can be connected from the: ◆ Right ◆ Left ◆ Rear (right or left) 2 If you are fixing the indoor unit to a... Then follow Steps... Wall 3.
INSTALLING THE UNIT Connecting the Assembly Cable The outdoor unit is powered from the indoor unit via the assembly cable. If the outdoor unit is more than 7.5 metres away from the indoor unit, the cable must first be extended to a maximum of 15 metres. N1 1 2 Indoor unit N1 1 2 N1 1 N1 1 2 1 Extend the assembly cable if necessary. 2 Open the front grille by pulling on the tabs on the lower right and left sides of the indoor unit. 3 Remove the screw securing the connector cover.
INSTALLING THE UNIT ENGLISH Installing and Connecting the Indoor Unit Drain Hose Care must be taken when installing the drain hose for the indoor unit to ensure that any condensed water is correctly drained outside. When passing the drain hose through the 65 mm hole drilled in the wall, check that none of the following situations occur. 5 cm less The hose must NOT slope upwards. The end of the drain hose must NOT be placed in water. Do NOT bend the hose in different directions.
INSTALLING THE UNIT Installing and Connecting the Indoor Unit Assembly Piping There are two refrigerant pipes of different diameters: ◆ A smaller one for the liquid refrigerant ◆ A larger one for the gas refrigerant A short length of piping is already fitted to the air conditioner. You must extend this piping using assembly piping (optionally supplied).
INSTALLING THE UNIT ENGLISH Cutting/Extending the Piping 7.5 metres of piping is supplied with the air conditioner(Optional). This length can if necessary be: ◆ Extended to a maximum of 15 metres ◆ Shortened as required ☛ If more than 7.
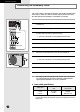
COMPLETING THE INSTALLATION Connecting Up and Purging the Circuit The outdoor unit is loaded with sufficient R410A refrigerant for 7.5 metres of piping. The air in the indoor unit and in the pipe must be purged. If air remains in the refrigeration pipes, it will affect the compressor, reduce to cooling/heating capacity and could lead to a malfunction. Refrigerant for air purging is not charged in the outdoor unit. Use Vacuum Pump as shown at the figure.
COMPLETING THE INSTALLATION ENGLISH Performing Leak Tests Before completing the installation (insulation of the cables, hose and piping and fixing of the indoor unit to the installation plate), you must check that there are no gas leaks. To check for gas leaks on the... Then, using a leak detector, check the... Indoor unit Flare nuts at the end of sections C and D. Outdoor unit Valves on sections A and B.
COMPLETING THE INSTALLATION Fixing the Outdoor Unit in Position The outdoor unit must be installed on a rigid and stable base to avoid any increase in the noise level and vibration, particularly if the outdoor unit is to be installed close to a neighbour. If it is to be installed in a location exposed to strong winds or at a height, the unit must be fixed to an appropriate support (wall or ground).
COMPLETING THE INSTALLATION ENGLISH Explaining Operations to the Owner Before leaving the premises on which you have installed the air conditioner, you should explain the following operations to the owner, making reference to the appropriate pages in the owner’s instruction booklet. 1 How to start and stop the air conditioner. 2 How to select the operating mode and adjust the temperature and fan settings. 3 How to adjust the air flow direction. 4 How to set the timers.
THIS AIR CONDITIONER IS MANUFACTURED BY: ESTE AIRE ACONDICIONADO HA SIDO FABRICADO POR: CE CLIMATISEUR EST FABRIQUE PAR: QUESTO CONDIZIONATORE D’ARIA È PRODOTTO DA: ESTE APARELHO DE AR CONDICIONADO É FABRICADO POR: DIESE KLIMAANLAGE IST FABRIZIERT VON: AYTH H ™Y™KEYH KATA™KEYA™THKE A¶O: ELECTRONICS