TA350 TA550 LED TV MONITOR (MFM TV) user manual imagine the possibilities Thank you for purchasing this Samsung product. To receive more complete service, please register your product at www.samsung.
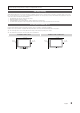
Figures and illustrations in this User Manual are provided for reference only and may differ from actual product appearance. Product design and specifications may be changed without notice. Still image warning Avoid displaying still images (such as jpeg picture files) or still image elements (such as TV channel logos, panorama or 4:3 image format, stock or news bars at screen bottom etc.) on the screen. Constant displaying of still picture can cause ghosting of screen, which will affect image quality.
Contents Getting Started 4 4 11 11 12 13 14 Safety Precautions List of Features Accessories Installing the Stand Viewing the Control Panel Viewing the Remote Control Connections 15 15 15 16 18 19 20 Connecting to an Antenna Plug & Play (Initial Setup) Connecting to an AV Device Connecting to an Audio Device Connecting to a PC Changing the Input Source Basic Features 20 21 21 24 24 27 28 How to Navigate Menus Using the INFO button (Now & Next guide) Using the Channel Menu Channel Menu Picture Menu
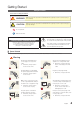
Getting Started Safety Precautions Icons used for safety precautions Warning Failing to follow the precautions marked with this sign may result in a serious injury or even a fatality. Caution Failing to follow the precautions marked with this sign may result in a personal injury or property damage. Do not perform. Must be followed. This symbol indicates that high voltage is present inside. It is dangerous to make any kind of contact with any internal part of this product.
Getting Started Caution Avoid unplugging the power plug while the product is operating. yy Otherwise, it may damage the product due to electric shock. ! When unplugging the power plug from the wall outlet, make sure to hold it by the plug and not by the cord. yy Otherwise, it may result in electric shock or fire. ! ! Make sure to use only the power cord supplied by our company. In addition, do not use the power cord of another electric appliance. yy Otherwise, it may result in electric shock or fire.
Getting Started ! Avoid installing the product in a location exposed to direct sunlight and installing the product near a heat source such as a fireplace or heater. yy This may shorten the product life cycle or cause fire. Avoid installing the product where children may reach it. yy If a child touches the product, the product may fall and this may result in injury. yy Since the front part is heavier, install the product on a flat and stable surface.
Getting Started ¦¦ Cleaning Related Warning Before cleaning the product, unplug the power cord. yy Otherwise, it may result in electric shock or fire. When cleaning the product, do not spray water directly over the product parts. yy Make sure that water does not enter the product. yy Otherwise, it may result in fire, electric shock or a problem with the product. Avoid spraying cleansing agent directly onto the product.
Getting Started ! ! If the product generates a strange noise, a burning smell, or smoke, unplug the power plug immediately and contact a service center. yy Otherwise, it may result in electric shock or fire. Avoid letting children hang or climb onto the product. yy Otherwise, it may result in the product falling and this may result in injury or death. If you drop the product or the case is damaged, turn the power off and unplug the power cord. Contact a service center.
Getting Started Avoid placing a liquid container such as a vase, flowerpot, beverage, cosmetics or drugs, or a metal object over the product. yy If water or substances enter the product, turn the power off, unplug the power cord and contact a service center. yy Otherwise, it may result in a problem with the product, electric shock or fire. Do not press down hard on the product. The product may become deformed or damaged.
Getting Started ! It is important to give your eyes some rest (5 minutes every hour) when viewing the product screen for long periods of time. yy This will alleviate any eye strain. Since the display panel is hot after using it for a long time, do not touch the product. Keep the small accessories in a location out of the reach of children. Take care when adjusting the angle of the product or the height of the stand. yy If your hand or finger is caught, you may be injured.
Getting Started List of Features yy Excellent Digital Interface & Networking: With a built-in HD digital tuner, nonsubscription HD broadcasts can be viewed without a cable box / STB (Set-Top-Box) satellite receiver (Set-Top Box). yy My Contents: Allows you to play music files, pictures and movies saved on a USB device (p. 33). yy Self Diagnosis: You can check whether picture or sound operate normally (p. 32). Accessories ✎✎Please make sure the following items are included with your TV.
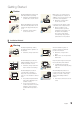
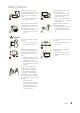
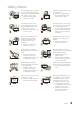
Getting Started Installing the Stand ✎✎Before assembling the product, place the product down on a flat and stable surface so that the screen is facing downwards. 1 Insert the Stand Connector into the Stand in the direction shown by the figure. 4 Place a soft cloth over the table to protect the product and place the product onto the cloth so that the front of the product is facing downwards. 2 Check if the Stand Connector is firmly connected.
Getting Started Viewing the Control Panel ✎✎The product color and shape may vary depending on the model. ✎✎Contact with objects other than your finger may switch on the LED touchpad. Control Panel Speakers Remote control sensor Aim the remote control towards this spot on the TV. Power Indicator Blinks and turns off when the power is on and lights up in standby mode. Toggles between all the available input sources.
Getting Started Viewing the Remote Control ✎✎This is a special remote control for the visually impaired persons and has Braille points on the Power, Channel and Volume buttons. POWER SOURCE Turns the TV on and off. Selects the HDMI mode directly. Displays and selects the available video sources. HDMI Have direct access to channels. Not Available. Returns to the previous channel. Brazil only : Press to select additional channels (digital) being broadcasted by the same station.
Connections Connecting to an Antenna When the TV is initially powered on, basic settings proceed automatically. ✎✎Connecting the power cord and antenna. VHF/UHF Antenna Cable or ANT OUT Plug & Play (Initial Setup) When the TV is initially powered on, a sequence of on-screen prompts will assist in configuring basic settings. Press the POWERP button. Plug & Play is available only when the Input Source is set to TV. ✎✎To return to the previous step, press the Red button.
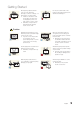
Connections Connecting to an AV Device Using an HDMI or an HDMI to DVI Cable: HD connection (up to 1080p) Available devices: DVD, Blu-ray player, HD cable box, HD STB (Set-Top-Box) satellite receiver HDMI OUT Device DVI OUT W AUDIO OUT R R W Red Device R-AUDIO-L White ✎✎HDMI IN 1(DVI), 2 / PC/DVI AUDIO IN xx For better picture and audio quality, connect to a digital device using an HDMI cable. xx An HDMI cable supports digital video and audio signals, and does not require an audio cable.
Connections Using a Component (up to 1080p) or Audio/Video (480i only) Cable Available devices: DVD, Blu-ray player, cable box, STB satellite receiver, VCR Device Device AUDIO OUT R-AUDIO-L W AUDIO OUT PR PB Y R-AUDIO-L R B G R W VIDEO OUT Y W R G B R W R R COMPONENT OUT W R B G R W Red White Red Blue Green Red White Y Yellow Y R ✎✎To obtain the best picture quality, the Component connection is recommended over the A/V connection.
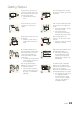
Connections Connecting to an Audio Device Using an Optical (Digital) or an Audio (Analog) Cable Connection Available devices: Digital Audio System, Amplifier, DVD home theater Digital Audio System OPTICAL ✎✎DIGITAL AUDIO OUT (OPTICAL) xx When a Digital Audio System is connected to the DIGITAL AUDIO OUT (OPTICAL) jack, decrease the volume of both the TV and the system. xx 5.1 CH (channel) audio is available when the TV is connected to an external device supporting 5.1 CH.
Connections Connecting to a PC Using an HDMI cable or an HDMI to DVI cable or a D-sub cable ✎✎Connecting through the HDMI cable may not be supported depending on the PC. HDMI OUT DVI OUT AUDIO OUT AUDIO OUT PC IN AUDIO OUT AUDIO OUT PC OUT Display Modes (D-Sub and HDMI/DVI Input) Optimal resolution is 1920 X 1080 @ 60 Hz. Display Mode Mode Resolution Horizontal Frequency (kHz) Vertical Frequency (Hz) Pixel Clock (MHz) Sync Polarity (H/V) IBM 640 x 350 70 Hz 31.469 70.086 25.
Connections Changing the Input Source Edit Name OO SOURCE → TOOLS → Edit Name → ENTERE Source OO SOURCE → Source SOURCE Use to select TV or an external input sources such as a DVD / Blu-ray player / cable box / STB satellite receiver. ■■ VCR / DVD / Cable STB / Satellite STB / PVR STB / AV Receiver / Game / Camcorder / PC / DVI PC / DVI Devices / TV / IPTV / Blu-ray / HD DVD / DMA: Name the device connected to the input jacks to make your input source selection easier.
Basic Features Using the INFO button (Now & Next guide) The display identifies the current channel and the status of certain audio-video settings. The Now & Next guide shows daily TV program information for each channel according to the broadcasting time. yy Scroll ◄ / ► to view information for a desired program while watching the current channel. 05.1 Fri, 1 Jan 2:10 am DTV Air 05.
Basic Features 3. Press the l / r / u / d buttons to set Antenna, Channel, Repeat, Date, and Start Time. xx Antenna: Select the desired broadcasting signal. xx Channel: Select the desired channel. xx Repeat: Select Once, Manual, Sat~Sun, Mon~Fri or Everyday to set at your convenience. If you select Manual, you can set the day you want. The c mark indicates the date is selected. ✎✎ xx Date: you can set desired date. xx Start Time: You can set start time you want.
Basic Features ¦¦ Using the Channel Channel Manager OO CONTENT → Watch TV → Channel Manager → ENTERE Using Channel Manager, you can add, edit, or delete Added and Favorite channels. You can also add and edit the channel names - for analog channels. yy ( ) Added Ch.: Shows all added channels. yy ( ) All Channels: Shows all currently available channels. Includes channels that have not been added. yy ( ) Favorites 1 - 5: Shows five favorite channels. ✎✎Using the colored buttons with the Channel Manager.
Basic Features Channel Menu Picture Menu ¦¦ Memorizing Channels ¦¦ Changing the Preset Picture Mode OO MENUm → Channel → ENTERE OO MENUm → Picture → Picture Mode → ENTERE Antenna (Air / Cable) t Picture Mode Before your television can begin memorizing the available channels, you must specify the type of signal source that is connected to the TV. Select your preferred picture type. ✎✎If the antenna is connected to ANT 1 IN (AIR), select Air and if it is connected to ANT 2 IN (CABLE), select Cable.
Basic Features Backlight / Contrast / Brightness / Sharpness / Color / Tint (G/R) Your television has several setting options for picture quality control. ✎✎NOTE xx When you make changes to Backlight, Contrast, Brightness, Sharpness, Color or Tint (G/R) the OSD will be adjusted accordingly. 4. When done, Press the ENTERE button. ✎✎ If you want to reset the pictures to its original position, select Reset in the Position screen, and then press ENTERE. The picture will be reset to its default position.
Basic Features Using Your TV as a Computer (PC) Display Setting Up Your PC Software (Based on Windows XP) Depending on the version of Windows and the video card, the actual screens on your PC will probably look different, but the same basic set-up information will apply in most cases. (If not, contact your computer manufacturer or Samsung Dealer.) 1. Click on “Control Panel” on the Windows start menu. 2. Click on “Appearance and Themes” in the “Control Panel” window and a display dialog-box will appear. 3.
Basic Features Picture Options Reset Picture (OK / Cancel) OO MENUm → Picture → Picture Options → Resets your current picture mode to its default settings. ENTERE Sound Menu ✎✎In PC mode, you can only make changes to the Color Tone.
Basic Features ✎✎ When Speaker Select is set to External ¦¦ Sound Settings Speaker. OO MENUm → Sound → ENTERE –– TV Speaker: Off, External Speaker: On ✎✎ When Speaker Select is set to TV Speaker. –– TV Speaker: On, External Speaker: On Broadcast Audio Options ✎✎ If there is no video signal, both speakers will be ■■ Audio Language (digital channels only): Change the default value for audio languages. ✎✎The available language may differ depending on the broadcast.
Basic Features Time Zone: Select your time zone. This function is only available when the Clock Mode is set to Auto. ✎✎ ✎✎NOTE xx If there is no music file on the USB device or the folder containing a music file is not selected, the Timer function does not operate correctly. Using the Sleep Timer xx When there is only one photo file in the USB, ■■ Sleep Timer t : Automatically shuts off the TV after a preset period of time. (30, 60, 90, 120, 150 and 180 minutes). the Slide Show will not play.
Basic Features ¦¦ Locking Programs OO MENUm → System → Security → ENTERE Security ✎✎The PIN input screen appears, Enter your 4 digit PIN number. ✎✎The default PIN number of a new TV set is “0-0-0-0”. ■■ Channel Lock (Off / On): Lock channels, to prevent unauthorized users, such as children, from watching unsuitable program. ✎✎ Available only when the Input Source is set to TV.
Basic Features General Anynet+ (HDMI-CEC)t ■■ Max. Power Saving (Off / On): Turn off PC monitor when PC is not used for certain length of time to reduce power consumption. For details on set up options, refer to the “Anynet+ (HDMICEC)” instructions. ✎✎ Available only PC mode. ■■ Game Mode (Off / On): When connecting to a game console such as PlayStation™ or Xbox™, you can enjoy a more realistic gaming experience by selecting the game menu.
Basic Features Support Menu Software Upgrade OO MENUm → Support → ENTERE Software Upgrade can be performed downloading the latest firmware from “www.samsung.com,” to a USB memory device. Current Version - the software already installed in the TV. Self Diagnosis ✎✎Self Diagnosis might take few seconds, this is part of ✎✎Software is represented as “Year/Month/Day_Version.” Software Upgrade the normal operation of the TV. ■■ Picture Test: Use to check for picture problems.
Advanced Features Using the My Contents Enjoy photos, music and/or movie files saved on a USB Mass Storage Class (MSC) 1. Press the CONTENT button. My Contents 2. Press the u / d / l / r button to select desired menu (Videos, Photos, Music), then press the ENTERE button. OO CONTENT → My Contents → ENTERE Videos Photos Music Source Watch TV ¦¦ Connecting a USB Device 1. Turn on your TV. 2.
Advanced Features xx The power-saving mode of some external hard disk drives may be released automatically when connected to the TV. xx If a USB extension cable is used, the USB device may not be recognized or the files on the device may not be read. xx If a USB device connected to the TV is not recognized, the list of files on the device is corrupted or a file in the list is not played, connect the USB device to a PC, format the device and check the connection.
Advanced Features yy Supported Video Formats File Extension Video Codec Resolution Frame rate (fps) Bit rate (Mbps) Divx 3.11 / 4.x / 5.1 / 6.0 1920x1080 6 ~ 30 8 XviD 1920x1080 6 ~ 30 8 H.264 BP / MP / HP 1920x1080 6 ~ 30 25 MPEG4 SP / ASP 1920x1080 6 ~ 30 8 Motion JPEG 640x480 6 ~ 30 8 Divx 3.11 / 4.x / 5.1 / 6.0 1920x1080 6 ~ 30 8 Container *.avi *.mkv *.asf *.wmv *.mp4 AVI MKV ASF ASF 3GPP *.vro VRO VOB *.mpg *.mpeg PS *.ts *.tp *.
Advanced Features Playing movie continuously (Resume Play) If you exit the playing movie function, the movie can be played later from the point where it was stopped. 1. Select the movie file you want to play continuously by pressing the ◄ or ► button to select it from the file list section. 2. Press the � (Play) / ENTERE button. 3. Select Play Continuously (Resume Play) by pressing the } button. The Movie will begin to play from where it was stopped. ✎✎ The } button is available when resuming play.
Advanced Features Photos Viewing a Photo (or Slide Show) 1. Press the ◄ / ► / ▲ / ▼ button to select the desired file in the file list. Nomal 2. Press the ENTERE button. 01/01/2011 –– When a selected photo is displayed, press the ENTERE button to start the slide show. –– During the slide show, all files in the file list will be displayed in order. –– When you press the � (Play) button in the file list, the slide show will be started immediately.
Advanced Features Anynet+ (HDMI-CEC) What is Anynet+? t Anynet+ is a function that enables you to control all connected Samsung devices that support Anynet+ with your Samsung TV’s remote. The Anynet+ system can be used only with Samsung devices that have the Anynet+ feature. To be sure your Samsung device has this feature, check if there is an Anynet+ logo on it. ✎✎NOTE xx You can only control Anynet+ devices using the TV remote control, not the buttons on the TV.
Advanced Features Anynet+ Menu The Anynet+ menu changes depending on the type and status of the Anynet+ devices connected to the TV. Anynet+ Menu View TV Device List Recording: (*recorder) (device_name) MENU (device_name) Tools Description Changes Anynet+ mode to TV broadcast mode. Shows the Anynet+ device list. Starts recording immediately using the recorder. (This is only available for devices that support the recording function.) Shows the connected device menus. E.g.
Advanced Features ¦¦ Recording You can make a recording of a TV Program using a Samsung recorder. 1. Select Recording. ✎✎ When there are more than two recording devices xx When multiple recording devices are connected, the recording devices are listed. Select one recording device in the Device List. ✎✎ When the recording device is not displayed, select Device List and press the a button to search devices. 2. Press the EXIT button to exit.
Advanced Features ¦¦ Troubleshooting for Anynet+ Problem Anynet+ does not work. Possible Solution • • • • • • • • • • I want to start Anynet+. • • Check if the device is an Anynet+ device. The Anynet+ system supports Anynet+ devices only. Only one receiver (home theater) can be connected. Check if the Anynet+ device power cord is properly connected. Check the Anynet+ device’s Video/Audio/HDMI cable connections. Check whether Anynet+ (HDMI-CEC) is set to On in the Anynet+ setup menu.
Other Information Installing the Device Driver ✎✎If you install the device driver, you can set up the appropriate resolution and frequency for the product. The device driver is included on the CD supplied with the product. If the supplied drive file is corrupted, please visit the Samsung Electronics website (www.samsung.com), and download the driver. 1. Insert the driver installation CD into the CD-ROM drive. 2. Click on Windows Driver. 3.
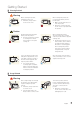
Other Information Attaching a Wall Mount/Desktop Stand Preparing before installing Wall-Mount/Desktop Stand 1. Turn the product off and unplug the power cord from the wall outlet. 2. Place a soft cloth or cushion on a flat surface to protect the panel and place the product face down. 3. Separate the screw at the rear of the product. 4. Pull the stand in the direction of the arrow as shown in the figure to separate it.
Other Information xx Samsung shall not be held liable for any damage to the product or injury caused by using a wall mount/desktop stand that is not compatible with the specifications or due to an installation not performed by an authorized installation engineer. xx When installing the product using a wall mount, purchase a wall mount that provides at least 10 cm (3.93 inches) of space from the wall. xx Use the wall mount according to the international specifications.
Other Information Troubleshooting If the TV seems to have a problem, first try this list of possible problems and solutions. If none of these troubleshooting tips apply, visit “www.samsung.com,” then click on Support, or contact a Samsung customer service center. Issues Solutions and Explanations PC Connection A Mode Not Supported message appears. • Set your PC’s output resolution so it match the resolutions supported by the TV (p. 19).
Other Information Issues The speakers are making an inappropriate noise. Solutions and Explanations • • • Check cable connections. Make sure a video cable is not connected to an audio input. For antenna or Cable connections, check the signal strength. Low signal level may cause sound distortion. Perform the Sound Test as explained above. No Picture, No Video The TV won’t turn on. • • • Make sure the AC power cord is securely plugged in to the wall outlet and the TV.
Other Information Issues Solutions and Explanations You see small particles when you look closely at the edge of the frame of the TV. • This is part of the product’s design and is not a defect. The PIP menu is not available. • PIP functionality is only available when you are using a HDMI, PC or Component source. ✎✎This panel uses a panel consisting of sub pixels which require sophisticated technology to produce. However, there may be a few bright or dark pixels on the screen.
Other Information License TheaterSound, SRS and the symbol are trademarks of SRS Labs, Inc. TheaterSound technology is incorporated under license from SRS Labs, Inc. Manufactured under license from Dolby Laboratories. Dolby and the double-D symbol are trademarks of Dolby Laboratories. Manufactured under license under U.S. Patent #’s: 5,451,942; 5,956,674; 5,974,380; 5,978,762; 6,487,535 & other U.S. and worldwide patents issued & pending. DTS and the Symbol are registered trademarks. & DTS 2.
Other Information Specifications Environmental considerations Operating Temperature : 50°F ~ 104°F (10°C ~ 40°C) Humidity : 10 % ~ 80 %, non-condensing Storage Temperature : -4°F ~ 113°F (-20°C ~ 45°C) Humidity : 5 % ~ 95 %, non-condensing VESA Mounting Interface 75 mm × 75 mm Tilt -2° ~ 22° Model Name T24A350 T22A550 T24A550 T27A550 Screen Size (Diagonal) 24 inches (61 cm) 21.
Other Information Index A Amplify Antenna Anynet+ (HDMI-CEC) Auto Adjustment Auto Volume F 27 24 38 25 28 37 27 14 26 25 C Change PIN Channel Menu Clock Color Tone Component Connecting to a PC Connecting to an Audio Device 30 24 28 27 17 19 18 D DIGITAL AUDIO OUT DivX® VOD D-sub Dynamic Dynamic Contrast 27 24 26 Receiver Remote Control Repeat Mode RGB Only Mode Rotate 38 38 S H HDMI Home Theater B Background Music Balance L/R Batteries Black Tone Brightness Film Mode Fine Tune Flesh Tone R I
Contact SAMSUNG WORLDWIDE If you have any questions or comments relating to Samsung products, please contact the SAMSUNG customer care center.