Contact SAMSUNG WORLDWIDE If you have any questions or comments relating to Samsung products, please contact the SAMSUNG customer care centre. Country Customer Care Centre Web Site EIRE U.K 0818 717 100 0845 SAMSUNG (7267864) www.samsung.com/ie www.samsung.com/uk LCD TV user manual imagine the possibilities Thank you for purchasing this Samsung product. To receive more complete service, please register your product at www.samsung.com/register Model Serial No. BN68-01996D-00 BN68-01996D-Cover.
Information on Use English Precautions When Displaying a Still Image A still image may cause permanent damage to the TV screen. Do not display a still image and partially still image on the LED panel for more than 2 hours as it can cause screen image retention. This image retention is also known as screen burn. To avoid such image retention, reduce the degree of brightness and contrast of the screen when displaying a still image.
English Trademark & Label License Notice TruSurround HD, SRS and symbol are trademarks of SRS Labs, Inc. TruSurround HD technology is incorporated under license from SRS Labs, Inc. Manufactured under license from Dolby Laboratories. Dolby and the double-D symbol are trademarks of Dolby Laboratories. DivX® Certified to play DivX® video, including premium content. Symbol Note One-Touch Button TOOLS Button Press © 2009 Samsung Electronics Co., Ltd. All rights reserved. BN68-01996D_Eng.
Contents English Getting Started 6 Installing the Stand 6 Disconnecting the Stand 7 Installing the Wall Mount Kit 7 Assembling the Cables 8 Anti-Theft Kensington Lock 8 Preparing before installing Wall-Mount 8 Securing the Installation Space 9 Securing the TV to the Wall 10 Accessories 11 Viewing the Control Panel 12 Viewing the Connection Panel 14 Connections 15 Mini Remote Control 15 Installing Batteries in the Remote Control 16 Viewing the Remote Control 17 Pairing the Remote Control
45 Connecting a USB Device 46 Media Play Function 47 Sorting the Photo List 49 Viewing a Photo or Slide Show 51 Sorting the Music List 52 Playing a Music 82 Setting Up the Home Network Centre 83 Using the Message Function 84 Using the Media Function Other Information 85 Teletext Feature 86 Using Your TV as a Computer (PC) Display 54 Sorting the Movie List 87 Troubleshooting: Before Contacting Service Personnel 55 Playing a Movie File 88 Specifications 58 Using the Setup Menu Media Play-DLNA 59 Se
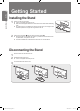
English Getting Started Installing the Stand Getting Started 1 Attach your LED TV to the stand. ■ Two or more people should carry the TV. ■ Make sure to distinguish between the front and back of the stand when assembling them. ■ To make sure the TV is installed on the stand at a proper level, do not apply excess downward pressure to the upper left of right sides of the TV. 2 1 2 Fasten screws at position 1 and then fasten screws at position 2. ■ Stand the product up and fasten the screws.
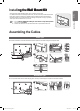
Installi������������������ ng the ����������� Wall Mount ��� Kit ■ Do not i��������������������������������������������������������������������������������� nstall your Wall Mount Kit while your TV is turned on. It may result in personal injury due to elec����������� tric shock. Remove the stand and cover the bottom hole with a cap and fasten with screw. Getting Started ■ English Wall mount items (sold separately) allow you to mount the TV on the wall.
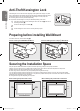
Anti-Theft Kensington Lock English The Kensington Lock is a device used to physically fix the system when using it in a public place. The appearance and locking method may differ from the illustration depending on the manufacturer. Refer to the manual provided with the Kensington Lock for proper use. ■ The locking device has to be purchased separately. ■ The location of the Kensington Lock may be different depending on its model.
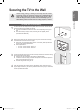
Securing the TV to the Wall Getting Started 1 English Caution: Pulling, pushing, or climbing on the TV may cause the TV to fall. In particular, ensure your children do not hang over or destabilize the TV; doing so may cause the TV to tip over, causing serious injuries or death. Follow all safety precautions provided on the included Safety Flyer. For added stability, install the anti-fall device for safety purposes, as follows.
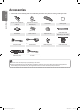
Accessories English ■ Please make sure the following items are included with your LED TV. If any items are missing, contact your dealer.
Viewing the Control Panel 11 The product colour and shape may vary depending on the model. The front panel buttons can be activated by touching it with your finger. English ■ ■ Press to change channels. In the on-screen menu, use the z buttons as you would use the ▼ and ▲ buttons on the remote control. Getting Started Press to increase or decrease the volume. In the on-screen menu, use the Y buttons as you would use the ◄ and ► buttons on the remote control.
Viewing the Connection Panel English ■ The product colour and shape may vary depending on the model. [TV Rear Panel] # Getting Started @ 0 ! 0 9 8 1 2 3 4 5 67 Power Input 1 KENSINGTON LOCK (depending on the model) The Kensington Lock (optional) is a device used to physically fix the system when used in a public place. If you want to use a locking device, contact the dealer where you purchased the TV. ■ The location of the Kensington Lock may be different depending on its model.
6 COMPONENT IN Connects Component video / audio. ■ When connecting, use the appropriate connector. 13 English 7 PC IN Connects to the video output jacks on your PC. ■ If your PC supports an HDMI connection, you can connect this to the HDMI IN 1(DVI), 2, 3 or 4 terminal. ■ If your PC supports a DVI connection, you can connect this to the HDMI IN 1(DVI) / PC/DVI AUDIO IN terminal. Getting Started 8 PC/DVI AUDIO IN Connect to the audio output jack on your PC. DVI audio outputs for external devices.
Connections English Best 14 Getting Started Normal OPTICAL (Digital) AUDIO (Analog) Digital Audio connection Using an Optical Cable Digital Audio System OPTICAL HD connection Using an HDMI Cable HDMI OUT HD connection Using an HDMI/DVI Cable AUDIO OUT DVI OUT Using a D-Sub Cable AUDIO OUT BN68-01996D_Eng.
Mini Remote Control The Mini Remote Control is a simplified remote control that consists of the power, channel and volume buttons only. Television Standby button. 4 1 2 3 3 2 < : Next channel / > : Previous channel Getting Started 1 2 3 4 15 English ■ + : Volume increase / – : Volume decrease IrDA transmitter ■ Use the Mini Remote Control so that this part faces the TV. ■ The items color and shape may vary depending on the model.
Viewing the Remote Control English ■ ■ ■ You can use the remote control up to a distance of about 23 feet from the TV. The performance of the remote control may be affected by bright light. The product colour and shape may vary depending on the model. Getting Started Senses brightness of surroundings and determines whether turn on the backlight of the remote control button or not. You can find a button more conveniently when using remote control in the dark place. Turns the TV on and off.
Pairing the Remote Control ❑ Auto Pairing ■ ■ When the TV is turned off (Standby mode) 1 2 Press the POWER(P) button on the RF remote control. ■ The remote control enters pairing mode. 3 Pairing mode is completed. ■ A buzzer goes off. Basic Operation An automatic pairing method that completes the pairing of the TV and the remote control internally without user intervention when a user operates the remote control after purchasing a TV with a RF remote control.
Finding the Remote Control English Basic Operation 1 Press the Volume (-) button on the front panel of the TV and hold it down for 10 seconds. The TV will transmit a signal to find the remote control. 2 The remote control will generate an alarm sound for 30 seconds. Search for the remote control from the location where the sound is heard the loudest. ■ The remote control will generate an alarm sound for 30 seconds.
Basic Operation 19 English Placing Your Television in Standby Mode 1 2 Press the POWERP button on the remote control. ■ The screen is turned off and a standby indicator appears on your set. To switch your set back on, simply press the POWERP button again. ■ Do not leave your set in standby mode for long periods of time (when you are away on holiday, for example). It is best to unplug the set from the mains and aerial.
Press the MENU button. Press the ▲ or ▼ button to select Setup, then press the ENTERE button. Press the ENTERE button again to select Plug & Play. Setup English Basic Operation 1 2 3 If you want to reset this feature... Plug & Play Menu Language Time Broadcast Security Network General Enter your 4 digit PIN number. ■ The default PIN number of a ������������������������ new��������������������� TV set is ‘0-0-0-0’.
Using the Menus 21 English Viewing the Menus MENU button Display the main on-screen menu. Using the Menus Menu provides one button access for controlling your TV. It enables you to perform a variety of tasks intuitively with a control panel on the screen rather than a variety of remote control button presses. RETURN button Return to the previous menu. ENTERE / Wheel buttons Move the cursor and select an item. Select the currently selected item. Confirm the setting.
Channel 22 Option English Auto Store Using the Menus Manual Store Description ❑ Air / Cable Antenna source to memorize ■ Digital & Analogue: Digital and Analogue channels. ■ Digital: Digital channels. ■ Analogue: Analogue channels. When selecting Cable → Digital & Analogue or Cable → Digital: Provide a value to scan for cable channels. ■ Search Mode → Full / Network /Quick ■ Quick Network ID: Displays the network identification code. Frequency: Displays the frequency for the channel.
4 5 6 7 8 9 Channel 0 Option 23 Description The EPG (Electronic Programme Guide) information is provided by the broadcasters. Programme entries may appear blank or out of date as a result of the information broadcast on a given channel. The display will dynamically update as soon as new information becomes available. English Full Guide / Mini Guide / Default Guide ❑ Full Guide Using the Menus ■ You can also display the guide menu simply by pressing the GUIDE button.
Channel Option English Channel List Description Using this menu, you can add / delete or set favourites channels and use the programme guide for digital broadcasts. ❑ All Channels Shows all currently available channels. Using the Menus ❑ Added Channels Shows all added channels. ■ You can select these options by simply pressing the CH LIST button on the remote control. ■ To select the favourites channels you have set up, press the FAV. CH button on the remote control.
Channel Option ❑ Timer Viewing ■ Only memorized channels can be reserved. Using the Menus If you reserve a programme you want to watch, the channel is automatically switched to the reserved channel in the Channel List; even when you are watching another channel. To reserve a programme, set the current time first. ■ You can set the channel, day, month, year, hour and minute directly by pressing the number buttons on the remote control. ■ Reserving a programme will be shown in the Programmed menu.
Picture Menu Mode Using the Menus Backlight / Contrast / Brightness / Sharpness / Colour / Tint(G/R) Advanced Settings Description Selects the type of picture settings that best correspond to your viewing preferences or requirements. Presets a higher brightness, contrast, and sharpness to the picture. ■ D������ yn���� amic Recommended for use in bright room conditions. ■ Standard Recommended for use in a normal viewing condition.
Picture Option BN68-01996D_Eng.indd 27 ■ Advanced Settings is available in Standard or Movie mode. ■ In PC mode, you can only make changes to Dynamic Contrast, Gamma and White Balance from among the Advanced Settings items. ■ Colour is available when Colour Space is set to Custom. ■ In Colour, you can adjust the RGB values for the selected colour. ■ To reset the adjusted RGB value, select Reset.
Picture Option English Picture Options Using the Menus BN68-01996D_Eng.indd 28 Description ■ Size Changes the screen shape in terms of height and width. Also known as Aspect Ratio. Auto Wide: Enables the correct picture size to match the original video signal. 16:9: Sets the picture aspect ratio to fill the screen. Wide Zoom: Enlarges the middle part of the picture. Zoom: Magnifies the picture contents horizontally and vertically.
Picture Option Using the Menus Picture Reset 29 English Picture Options Description ■ 200Hz Motion Plus → Off / Clear / Standard / Smooth / Custom / Demo Removes drag from fast scenes with a lot of movement to provide a clearer picture. If you enable 200 Hz Motion Plus, noise may appear on the screen. If this occurs, set 200Hz Motion Plus to Off. Off: Switches 200Hz Motion Plus off. Clear: Sets 200Hz Motion Plus to minimum. Standard: Sets 200Hz Motion Plus to medium.
Sound Menu English Sound Option Mode SRS TruSurround HD Audio Language Audio Format Audio Description Auto Volume Speaker Select BN68-01996D_Eng.indd 30 ■ Standard: Selects the normal sound mode. ■ Music: Emphasizes music over voices. ■ Movie: Provides the best sound for movies. ■ Clear Voice: Emphasizes voice over other sounds. ■ Custom: Recalls your customized sound settings. The sound settings can be adjusted to suit your personal preferences.
Selecting the Speaker Mute Sound Output Mute Mute Using the Menus TV Speaker External Speaker Video No Signal 31 English RF / AV / Component / PC / HDMI Sound Output Audio Out (Optical) to Sound System RF / AV / Component / PC / HDMI Sound Output TV’s Internal Speakers Sound Option Sound Select Description When the PIP feature is activated, you can listen to the sound of the sub (PIP) picture. ■ You can select this option when PIP is set to On.
Setup Menu Menu Language Time Description You can set the menu language. Plug & Play Setup English Setup Option Menu Language ❑ Clock Using the Menus Setting the clock is necessary in order to use the various timer features of the TV. If you disconnect the power cord, you have to set the clock again. ■ Clock Mode You can set up the current time manually or automatically. Auto: Set the current time automatically using the time from the digital broadcast.
Setup Option 33 Description ❑ Subtitle Using the Menus You can activate and deactivate the subtitles. Use this menu to set the Subtitle Mode. Normal under the menu is the basic subtitle and Hard of hearing is the subtitle for a hearing-impaired person. ■ Subtitle Switches subtitles on or off. ■ Mode Sets the subtitle mode. ■ Subtitle Language Set the subtitle language.
Setup 34 Option English Broadcast Using the Menus Security Description ❑ Common Interface ■ CI Menu This enables the user to select from the CAM-provided menu. Select the CI Menu based on the menu PC Card. ■ Application Info. This contains information on CAM inserted in the CI slot and displays it. The Application Info inserting is about the CI CARD. You can install the CAM anytime whether the TV is ON or OFF. 1. Purchase the CI CAM module by visiting your nearest dealer or by phone. 2.
Setup Option ❑ Energy Saving This feature adjusts the brightness of the TV in order to reduce power consumption. When watching TV at night, set the Energy Saving mode option to High to reduce eye fatigue as well as power consumption. If you select Picture Off, the screen is turned off and you can only hear the sound. Press any button to get out of Picture Off. ❑ Menu Transparency You can set the Transparency of the menu. ❑ Melody A melody sound can be set to come on when the TV is powered On or Off.
PIP Setup 36 Option English General Description Using the Menus ❑ PIP You can use the PIP feature to simultaneously watch the TV tuner and one external video source. This product has one built-in tuner, which does not allow PIP to function in the same mode. Please see ‘PIP Settings’ below for details. ■ If you select the PIP picture sound, refer to page 31. ■ PIP You can activate or deactivate the PIP function. ■ Size → Õ / à / À / Œ You can select a size of the sub-picture.
Network Connection 37 ❑ Network Connection - Cable 1 2 Connect the LAN port on the rear panel of the TV and the external modem with a LAN Cable. Connect the Modem port on the wall and the external modem with a Modem Cable. The Modem Port on the Wall TV Rear Panel External Modem (ADSL / VDSL / Cable TV) 2 Modem Cable Using the Menus ■ LAN Connection for a DHCP Environment The procedures to set up the network using Dynamic Host Configuration Protocol (DHCP) are described below.
■ LAN Connection for Static IP Environment The procedures to set up the network using a static IP address are described below. You have to manually enter the IP address, subnet mask, gateway, and DNS that are provided by your Internet Service Provider (ISP). English Connect the LAN port on the rear panel of the TV and the LAN port on the wall using the LAN cable. The LAN Port on the Wall TV Rear Panel Using the Menus LAN Cable You can connect the LAN via a Sharer (Router).
Setting the Network 39 Network Setup ❑ Cable Network Setup Network ▶ General (when Network Type is set to Cable) ■ Please check if the LAN cable is connected. Internet Protocol Setup → Auto / Manual Network Test: You can test or confirm the network connection status after setting up the network. ■ The menu is activated only if the ‘Samsung Wireless LAN Adapter’ is connected.
Setup 40 Option English Network Setup Description Cable Network Setup-Manual Using the Menus To connect the TV to the LAN using a static IP address, you must set up the Internet Protocol (IP). 1. Set Network Type to Cable. 2. Select Cable Network Setup. 3. Set Internet Protocol Setup to Manual. 4. Set up IP Address, Subnet Mask, Gateway and DNS Server. ■ Press the number buttons on the remote control when you set the Network manually. 5. Select Network Test to check the network connectivity.
Setup Option 41 Description Ad-hoc: You can connect to a mobile device without an access point through the ‘Samsung Wireless LAN Adapter’ by using a peer to peer network. The existing network system may have limited functionality. Do you want to change the network connection? Yes Wireless Network Setup-Auto If you want to connect AP, AP should support DHCP. Only devices which support Ad-hoc mode can be connected without DHCP. 1. Set Network Type to Wireless. 2.
Input Menu Source List Using the Menus Edit Name BN68-01996D_Eng.indd 42 Description Use to select TV or other external input sources such as DVD / Blu-ray players / Cable Box / Satellite receivers (Set-Top Box) connected to the TV. Use to select the input source of your choice. ■ TV / Ext. / AV / Component / PC / HDMI1/DVI / HDMI2 / HDMI3 / HDMI4 / USB1 / USB2 You can choose only those external devices that are connected to the TV.
Support menu 43 Picture Quality Legal Notice ▶ Product Guide Self Diagnosis Software Upgrade HD Connection Guide Contact Samsung Using the Menus Product Guide Support Legal Notice Description View the Legal Notice and General Disclaimer regarding Third Party Contents and Service. ■ The General Disclaimer may differ depending on the country. The Product Guide gives you information on the most important features of this TV. The descriptions provided by this function are in English only.
Support 44 Option English Self Diagnosis Using the Menus Software Upgrade HD Connection Guide Contact Samsung BN68-01996D_Eng.indd 44 Description ■ Signal Information (digital channels only) Unlike analogue channels, which can vary in reception quality from ‘snowy’ to clear, digital (HDTV) channels have either perfect reception quality or you will not receive them at all. So, unlike analogue channels, you cannot fine tune a digital channel.
Media Play - USB Device TV Rear Panel Press the POWER button to turn the TV on. or Connect a USB device containing photo, music and/or movie files to the USB1(HDD) or USB2 jack on the side of the TV. When the Application selection screen is displayed, press the ENTERE button to select Media Play (USB & DLNA). USB Drive Using the Remote Control Button in Media Play Menu Button Wheel (▲/▼/◄/►) ENTERE ∂/∑ RETURN TOOLS ∫ π/μ INFO MEDIA.
Media Play Function English This function enables you to view and listen to photo, music and/or movie files saved on a USB Mass Storage Class (MSC) device. ■ It might not work properly with unlicensed multimedia files. Entering the Media Play (USB & DLNA) Menu Media Play - USB Device 1 Press the MENU button. Press the ▲ or ▼ button to select Application, then press the ENTERE button. 2 Press the ▲ or ▼ button to select Media Play (USB & DLNA), then press the ENTERE button.
1 Current Sort key: This field shows the current standard for sorting files. Press the ◄ or ► button to change the standard for sorting files. 2 View Groups:������������������������������������������������������������� Shows ������������������������������������������������������������ the detailed groups of the files sorted according the selected Sort key. The sort group where the currently selected file is contained is highlighted.
English Media Play - USB Device 1 2 3 4 Photo List Option Menu Press the MEDIA.P button. Basic View Timeline Colour Press the ◄ or ► button to select Photo, then press the ENTERE button. Press the ◄ or ► button to select the desired photo file. ■ Selecting Multiple Photos Press the ◄ or ► button to select the desired photo file. Then press the Yellow button. Repeat the above operation to select multiple photo files. The mark c appears to the selected photo file. Folder 5/15 1231.
Viewing a Photo or Slide Show Viewing a Slide Show English Press the ▼ button to select the File List Section. Colour Preference Folder Basic View Timeline Press the TOOLS button. Press the ▲ or ▼ button to select Slide Show, then press the ENTERE button. ■ All files in the File List Section will be used for the Slide Show. ■ During the slide show, files are displayed in order from the currently shown file. ■ The Slide Show progresses in the order sorted in the File List Section.
Alternatively 50 English 1 2 3 Media Play - USB Device 1 2 In the File List Section, press the Yellow buttons to select the desired photos. Press the TOOLS button. Press the ▲ or ▼ button to select Slide Show, then press the ENTERE button. ■ The selected files will be used for the Slide Show. Slide Show Option Menu During a slide show (or when viewing a photo), press the TOOLS button to set the option. Press the ▲ or ▼ button to select the desired option, then press the ENTERE button.
Sorting the Music List 51 Press the ◄ or ► button to select Music, then press the ENTERE button. Press the ▲ button to move to the Sort key Section. Press the ◄ or ► button to select a sorting standard. (Basic View, Title, Artist, Mood, Genre, Folder, Preference) ■ The Music files are sorted according to the newly selected sorting standard. Press the ▼ button to move to the File List Section. Press the ENTERE button to start playing music in the order selected by the user.
Change Group Info (When the Sort key is Mood) Media Play - USB Device Description Play Current Group English Option 52 Deselect All (When at least one file is selected) Information Using this menu, you can only play music files in the currently selected sorting group. You can change the mood information of music files. The group information of the current file is updated and the file is moved to the new group. ■ To change the information of multiple files, select files by pressing the Yellow button.
Press the ▲ button to move to the Sort key Section. English Press the ◄ or ► button to select a sorting standard. Press the ▼ or ENTERE button to move to the Group List Section. Media Play - USB Device 1 2 3 4 Playing the Music Group Press the ∂ (Play) button. The files of the selected group will start playing. Alternatively 1 Select a sort key and then in the File List Section, select the files contained in the desired group.
Sorting the Movie List English You can sort movies in the Movie List by a particular standard. Media Play - USB Device 1 2 3 4 5 Title Press the MEDIA.P button. Folder Preference Press the ◄ or ► button to select Movie, then press the ENTERE button. Press the ▲ button to move to the Sort key Section. Press the ◄ or ► button to select a sorting standard. (Basic View, Timeline, Title, Folder, Preference) ■ The movie files are sorted according to the newly selected sorting standard.
Option Description Play Current Group ■ Press the INFO button to viewing the information. Media Play - USB Device Remove Safely The movie file information including the name, the size, the date modified and the path is displayed. You can remove the device safely from the TV. English Deselect All (When at least one file is selected) Information 55 Using this menu, you can only play movie files in the currently selected sorting group. You can deselect all files.
File Extension Container 56 English *.asf ASF Media Play - USB Device *.wmv (VC1) *.mp4 MP4 (SMP4) *.3gp 3GPP *.vro (ps) VRO / VOB *.mpg *.mpeg (ps) others (ts) Video Decoder Divx 3.11 Divx 4.x Divx 5.1 Divx 6.0 XviD H.264 BP H.264 MP H.264 HP MPEG-4 SP MPEG-4 ASP Window Media Video v9 H.264 BP H.264 MP H.264 HP MPEG-4 SP MPEG-4 ASP XVID H.264 BP H.264 MP H.264 HP MPEG-4 SP MPEG-4 ASP MPEG2 MPEG1 MPEG1 (Programme Stream) MPEG2 (Programme Stream) MPEG2 (Transport Stream) H.
Alternatively Select a Sort key and then in the File List Section, select the files contained in the desired group. ■ To move to the previous/next group, press the π (REW) or µ (FF) button. 2 3 Press the TOOLS button. 4 5 Press the ▲ or ▼ button to select Play Current Group, then press the ENTERE button. ■ The movie files in the sorting group including the selected file are played.
Option Caption Setting English Media Play - USB Device Information Remove Safely Description You can set the captions for the movie. ■ Caption You can turn the captions for the movie on or off. ■ Caption Language You can set the caption language. ■ Caption Size You can change the font size of the captions. ■ Caption Sync You can adjust the caption sync. ■ Caption Sync Reset You can reset the adjusted caption sync. The movie file information is displayed. You can remove the device safely from the TV.
Media Play-DLNA 59 English Setting the DLNA Network Media Play-DLNA DLNA allows you to watch pictures, musics and videos saved on your PC or on your TV through a network connection in Media Play mode. This removes the need to copy them to a USB storage device and then connect the device to your TV. To use DLNA, the TV must be connected to the network and the DLNA application must be installed on your PC.
Installing the DLNA Application English To play content on the PC on the TV, you have to first install the application. To use the DLNA function smoothly, use the programme in the CD-ROM supplied with the TV or use the Samsung PC Share Manager programme corresponding to the TV model that can be downloaded from the Samsung web site. Media Play-DLNA System Requirements 1 2 Insert the Programme CD supplied with this TV into your PC.
Using the DLNA Application 61 English The Programme Screen Layout 1 4 5 Option File 6 7 Menus: The following application menus are provided : File, Share, Server, and Help. Click to share the selected PC server folder. Click to cancel sharing. Click to refresh the PC folder and files. Media Play-DLNA 2 3 1 2 3 4 5 6 7 Click to synchronize the share status. The folders and files of the PC to be shared are listed. Folders shared by the user are listed.
Option Share Description English Media Play-DLNA ■ Sharing a Folder You can share a folder from your PC to the TV. The maximum number of folders that can be shared is 32. Yo����������������������������������������� ur PC������������������������������������ will operate as a server to the TV. Method 1: Select a folder in My Computer, select the Share menu and then select the Share Folder sub-menu.
Option Share Description Help Media Play-DLNA Server 63 English ■ Setting the Access Permission To enable the TV to find your PC, the TV must be set to Set Device Policy in the Access Permission Settings window. In addition, the PC server and the TV must be on the same subnet. Method: Select the Share menu and select Set Device Policy. Rejected items are represented in gray. You can change the access permissions by using the Allow Accept / Deny button.
English Anynet+ Connecting Anynet+ Devices Anynet+ What is Anynet+? Anynet+ is a function that enables you to control all connected Samsung devices that support Anynet+ with your Samsung TV’s remote. The Anynet+ system can be used only with Samsung devices that have the Anynet+ feature. To be sure your Samsung device has this feature, check if there is an Anynet+ logo on it. To connect to a TV TV Anynet+ Device 1 HDMI 1.3 Cable Anynet+ Device 2 HDMI 1.3 Cable Anynet+ Device 3 HDMI 1.
Setting Up Anynet+ Description Setup Media Play (USB & DLNA) Anynet+ (HDMI-CEC) Application Content Library Internet@TV Home Network Centre Anynet+ ■ Anynet+ (HDMI-CEC) To use the Anynet+ Function, Anynet+ (HDMI-CEC) must be set to On. Whe������ n t��� he Anynet+ (HDMI-CEC) function is disabled, all the Anynet+ related operations are deactivated. ■ Auto Turn Off Setting an Anynet+ Device to turn Off automatically when the TV is turned Off.
Anynet+ Menu English The Anynet+ menu changes depending on the type and status of the Anynet+ devices connected to the TV. Option Description Anynet+ View TV Anynet+ mode changes to TV broadcast mode. Device List Shows the Anynet+ device list. (device_name) Menu Shows the connected device menus. E.g. If a DVD recorder is connected, the disc menu of the DVD recorder will appear. (device_name) INFO Shows the play menu of the connected device. E.g.
Recording 67 3 Press the TOOLS button. Press the ENTERE button to select Anynet+ (HDMICEC). Press the ▲ or ▼ button to select Recording Immediately and press the ENTERE button. Recording begins. ■ When there is more than one recording device. When multiple recording devices are connected, the recording devices are listed. Press the ▲ or ▼ button to select a recording device and press the ENTERE button. Recording begins.
Troubleshooting for Anynet+ English Problem Possible Solution ● Check if the device is an Anynet+ device. The Anynet+ system supports Anynet+ devices only. ● Connect only one receiver (home theatre). ● Check if the Anynet+ device power cord is properly connected. ● Check the Anynet+ device’s Video/Audio/HDMI 1.3 cable connections. ● Check whether Anynet+ (HDMI-CEC) is set to On in the Anynet+ setup menu. ● Check whether the TV remote control is in TV mode.
Content Library 69 English Using the Content Library Content Library The Content Library allows you to enjoy various content on your TV. You can use the default content stored in the TV memory or you can enjoy new content using a USB device. Using the Content Library Menu Press the MENU button. Press the ▲ or ▼ button to select Application, then press the ENTERE button.
Using the Contents English You can use enjoy content stored in the TV memory. ■ To return to Content Library main menu, press the EXIT button. Option Gallery Content Library Cooking Game Children Wellness BN68-01996D_Eng.indd 70 Description This function plays a Slideshow with high resolution images and background music and produces various atmospheres. Using the Gallery function of the TV, you can change your home atmosphere.
Using the Content Management 71 Option Content Management USB Setup BN68-01996D_Eng.indd 71 Description ■ You can select multiple content items by selecting content items repeatedly and pressing the Yellow button. You can check the content saved in the TV memory for each subitem of the Content Library. ■ Select a content item and press the ENTERE button. You can play or delete the selected content item. You can check the content saved on the USB device for each subitem of the Content Library.
English Internet@TV If you have some problems while using a widget service, please contact to content provider. In the widget, press the Green button and get information of contact or refer to help website for widget provider information. Internet@TV Getting Started with Internet@TV Internet@TV provides an integrated Internet and television experience powered by the Yahoo!® Widget Engine.
9 Internet@TV tests the network connection. ■ If the test fails, configure your network again. ■ For more information, refer to page 37~41 10 The guided setup is complete. A tutorial on how to use Internet@TV is next. ■ Select Continue to view the tutorial. ■ Select Exit setup to start using Internet@TV now. ■ To run the tutorial again, select Profile Widget → System Setting → Repeat Tutorial. 11 Press the INTERNET@ button on the remote control to display the Internet@TV user interface.
English Internet@TV All content and services accessible through this device belong to third parties and are protected by copyright, patent, trademark and/or other intellectual property laws. Such content and services are provided solely for your personal noncommercial use. You may not use any content or services in a manner that has not been authorized by the content owner or service provider.
Using the Profile Widget PROFILE The Profile Widget configures your user profile. You can set up multiple profiles, and each profile maintains its own list of widgets. The Switch Profile menu allows you to switch to a different user profile. ■ At least two profiles must be registered. If you want to add a profile, refer to page 75.
From the Profile Widget you can Sign in to Yahoo!® using your Yahoo! ID. 76 English ■ If you have a Yahoo! ID, you can access your personalized content using the Yahoo!®! TV Widgets. ■ All Yahoo!®! TV Widgets that are installed are automatically signed-in with your profile’s Yahoo! ID. ■ If you have no Yahoo! account, visit www.yahoo.com and create an account. ■ You may fail to log in with an ID created on the Yahoo website in a country that does not support Internet@TV.
Using the Yahoo!® Weather Widget ■ Add New City by entering the name of the city. Once the search results are displayed, select the city you want and press the ENTERE button. ■ Delete City by selecting the city you want to delete from the city list. Press the ENTERE button and confirm the deletion. ■ Changing the Temperature Indication Mode You can change the temperature indication mode to Imperial or Metric. For example, Imperial will show temperatures in Fahrenheit and Metric in Celsius.
English Using the Yahoo!® Flickr Widget Internet@TV The Flickr Widget can provide you access to your favourite photos from friends and family while watching TV. Share your photos with your family on your big screen TV through a slideshow. ■ Personalize the Flickr Widget by logging in with your Yahoo! ID. ■ For detailed procedures on log in, refer to page 76. ■ For more information on Flickr, visit http://www.flickr.com. ■ Your Photos shows photos you have registered with Flickr website.
Using the Yahoo!® Finance Widget 79 FINANCE My Stocks To remove a stocks symbol, plase select it from the list below. Internet@TV ■ Select the stock you want to add from the search results and select the Add Symbol menu and press the ENTERE button. The selected stock is added to the My Stocks list. ■ Use the Import Symbols From Yahoo!® menu to retrieve your Yahoo!® Finance portfolio. The Merge Symbols menu merges the symbols in the Yahoo!® Finance Widget with the symbols from your portfolio.
Help Website English Country Austria Internet@TV Belgium Czech Denmark Website www.samsung.com → Produkte → Fernseher → medi@2.0 → Internet@TV www.samsung.com → Producten → televisies → medi@2.0 → Internet@TV www.samsung.com → Produits → téléviseurs → medi@2.0 → Internet@TV www.samsung.com → Produkty → televizory → medi@2.0 → Internet@TV www.samsung.com → Produkter → stue & soveværelse → medi@2.0 → Internet@TV Finland www.samsung.com → Tuotteet → kodinelektroniikka → medi@2.
Home Network Centre 81 English About the Home Network Centre Connecting to the Home Network Centre Home Network The Home Network Centre connects the TV and mobile phones through a network. You can view call arrivals, text message contents, and schedules set on the mobile phone on the TV using the Home Network Centre. In addition, you can play the media contents saved on the mobile phones such as videos, photos and music by controlling them onto the TV via the network.
Setting Up the Home Network Centre English Option Message Home Network Media Setup BN68-01996D_Eng.indd 82 Description Shows a list of mobile phones which have been set up with this TV to use the message function (the call arrivals, text message contents and schedules set on the mobile phone). ■ Allowed Allows the mobile phone. ■ Denied Blocks the mobile phone. ■ Delete Deletes the mobile phone from the list. This function just deletes the name from the list.
Using the Message Function 83 English Using this function, you can view the call arrivals, text message contents and schedules set on the mobile phone through the alarm window while watching TV. ■ To disable this Message alarm window, set Message to Off in Setup of the Home Network Centre. ■ The alarm window appears for 20 seconds. If no key is pressed or if Cancel is selected, it appears up to three times at 5 minute intervals.
Using the Media Function English Home Network An alarm window appears informing the user that the media contents (videos, photos, music) sent from the mobile phone will be displayed on the TV. The contents are played automatically 3 seconds after the alarm window appears. If you press the RETURN or EXIT button when the alarm window appears, the Media Contents are not played. ■ To turn off the media contents transmission from the mobile phone, set Media to Off in Setup of the Home Network Centre.
Other Information 85 English Teletext Feature 1 : (exit) Exit from the Teletext display. 2 6 (index) Used to display the index (contents) page at any time while you are viewing Teletext. 3 5 (reveal) Used to display the hidden text (answers to quiz games, for example). To display normal screen, press it again. 4 4 (size) Press to display the double-size letters in the upper half of the screen. For lower half of the screen, press it again. To display normal screen, press it once again.
Using Your TV as a Computer (PC) Display English Setting Up Your PC Software (Based on Windows XP) Other Information The Windows display-settings for a typical computer are shown below. The actual screens on your PC will probably be different, depending upon your particular version of Windows and your particular video card. However, even if your actual screens look different, the same basic set-up information will apply in almost all cases.
● ● ● ● Check that the mains lead has been connected to a wall socket. Check that you have pressed the button on your set. Check the picture contrast and brightness settings. Check the volume. Normal picture but no sound ● Check the volume. ● Check whether the MUTEM button has been pressed on the remote control. ● Check the Speaker Select settings. Screen is black and power indicator light blinks steadily ● On your computer check; Power, Signal Cable. ● The TV is using its power management system.
Specifications English Model Name UE40B8000 Screen Size (Diagonal) 40 inch Power Consumption Standby <0.1W Other Information PC Resolution (Optimum) Sound (Output) Dimensions (WxDxH) Without Stand With stand Weight With Stand Environmental Considerations Operating Temperature Operating Humidity Storage Temperature Storage Humidity 1920 x 1080 @ 60 Hz 10W X 2 998.2 x 31 x 612.8 mm 998.2 x 257.
Warning! Important Safety Instructions Please read the appropriate section that corresponds to the marking on your Samsung product before attempting to install the product. CAUTION RISK OF ELECTRIC SHOCK DO NOT OPEN This symbol indicates that high voltage is present inside. It is dangerous to make any kind of contact with any internal part of this product. CAUTION: TO REDUCE THE RISK OF ELECTRIC SHOCK, DO NOT REMOVE COVER (OR BACK). THERE ARE NO USER SERVICEABLE PARTS INSIDE.
Wiring the Mains Power Supply Plug (UK Only) IMPORTANT NOTICE The mains lead on this equipment is supplied with a moulded plug incorporating a fuse. The value of the fuse is indicated on the pin face of the plug and, if it requires replacing, a fuse approved to BSI1362 of the same rating must be used. Never use the plug with the fuse cover omitted if the cover is detachable. If a replacement fuse cover is required, it must be of the same colour as the pin face of the plug.
● This product uses parts of the software from the Independent JPEG Group. ● This product uses parts of the software owned by the Freetype Project (www.freetype.org). ● This product uses some software programs which are distributed under the GPL/LGPL license. Accordingly, the following GPL and LGPL software source codes that have been used in this product can be provided after asking to vdswmanager@ samsung.com.
A “covered work” means either the unmodified Program or a work based on the Program. To “propagate” a work means to do anything with it that, without permission, would make you directly or secondarily liable for infringement under applicable copyright law, except executing it on a computer or modifying a private copy. Propagation includes copying, distribution (with or without modification), making available to the public, and in some countries other activities as well.
a) The work must carry prominent notices stating that you modified it, and giving a relevant date. b) The work must carry prominent notices stating that it is released under this License and any conditions added under section 7. This requirement modifies the requirement in section 4 to “keep intact all notices”. c) You must license the entire work, as a whole, under this License to anyone who comes into possession of a copy.
The requirement to provide Installation Information does not include a requirement to continue to provide support service, warranty, or updates for a work that has been modified or installed by the recipient, or for the User Product in which it has been modified or installed. Access to a network may be denied when the modification itself materially and adversely affects the operation of the network or violates the rules and protocols for communication across the network.
10. Automatic Licensing of Downstream Recipients. Each time you convey a covered work, the recipient automatically receives a license from the original licensors, to run, modify and propagate that work, subject to this License. You are not responsible for enforcing compliance by third parties with this License. An “entity transaction” is a transaction transferring control of an organization, or substantially all assets of one, or subdividing an organization, or merging organizations.
14. Revised Versions of this License. The Free Software Foundation may publish revised and/or new versions of the GNU General Public License from time to time. Such new versions will be similar in spirit to the present version, but may differ in detail to address new problems or concerns. Each version is given a distinguishing version number.
GNU Lesser General Public License (LGPL) Version 3, 29 June 2007 Copyright (C) 2007 Free Software Foundation, Inc. Everyone is permitted to copy and distribute verbatim copies of this license document, but changing it is not allowed. Preamble The GNU General Public License is a free, copyleft license for software and other kinds of works. The licenses for most software and other practical works are designed to take away your freedom to share and change the works.
1. Source Code. The “source code” for a work means the preferred form of the work for making modifications to it. “Object code” means any non-source form of a work. A “Standard Interface” means an interface that either is an official standard defined by a recognized standards body, or, in the case of interfaces specified for a particular programming language, one that is widely used among developers working in that language.
A compilation of a covered work with other separate and independent works, which are not by their nature extensions of the covered work, and which are not combined with it such as to form a larger program, in or on a volume of a storage or distribution medium, is called an “aggregate” if the compilation and its resulting copyright are not used to limit the access or legal rights of the compilation’s users beyond what the individual works permit.
When you convey a copy of a covered work, you may at your option remove any additional permissions from that copy, or from any part of it. (Additional permissions may be written to require their own removal in certain cases when you modify the work.) You may place additional permissions on material, added by you to a covered work, for which you have or can give appropriate copyright permission.
11. Patents. A “contributor” is a copyright holder who authorizes use under this License of the Program or a work on which the Program is based. The work thus licensed is called the contributor’s “contributor version”.
15. Disclaimer of Warranty. THERE IS NO WARRANTY FOR THE PROGRAM, TO THE EXTENT PERMITTED BY APPLICABLE LAW. EXCEPT WHEN OTHERWISE STATED IN WRITING THE COPYRIGHT HOLDERS AND/OR OTHER PARTIES PROVIDE THE PROGRAM “AS IS” WITHOUT WARRANTY OF ANY KIND, EITHER EXPRESSED OR IMPLIED, INCLUDING, BUT NOT LIMITED TO, THE IMPLIED WARRANTIES OF MERCHANTABILITY AND FITNESS FOR A PARTICULAR PURPOSE. THE ENTIRE RISK AS TO THE QUALITY AND PERFORMANCE OF THE PROGRAM IS WITH YOU.
LICENSE ISSUES The OpenSSL toolkit stays under a dual license, i.e. both the conditions of the OpenSSL License and the original SSLeay license apply to the toolkit. See below for the actual license texts. Actually both licenses are BSD-style Open Source licenses. In case of any license issues related to OpenSSL please contact openssl-core@openssl.org. OpenSSL License Copyright (c) 1998-2007 The OpenSSL Project. All rights reserved.
Correct Disposal of This Product (Waste Electrical & Electronic Equipment) (Applicable in the European Union and other European countries with separate collection systems) This marking on the product, accessories or literature indicates that the product and its electronic accessories (e.g. charger, headset, USB cable) should not be disposed of with other household waste at the end of their working life.
Korrekt avfallshantering av produkten (elektriska och elektroniska produkter) Denna markering på produkten, tillbehören och i manualen anger att produkten och de elektroniska tillbehören (t.ex. laddare, headset, USB-kabel) inte bör sorteras tillsammans med annat hushållsavfall när de kasseras. Till förebyggande av skada på miljö och hälsa bör dessa föremål hanteras separat för ändamålsenlig återvinning av beståndsdelarna.
Правилно третиране на изделието след края на експлоатационния му живот (Отпадъци, представляващи електрическо и електронно оборудване)(Важи за държавите на Европейския съюз и други европейски държави със системи за разделно сметосъбиране) Този знак, поставен върху изделието, негови принадлежности или печатни материали, означава, че продуктът и принадлежностите (например зарядно устройство, слушалки, USB кабел) не бива да се изхвърлят заедно с другите битови отпадъци, когато изтече експлоатационният му живот
Õige viis toote kasutuselt kõrvaldamiseks (elektriliste ja elektrooniliste seadmete jäätmed) Selline tähistus tootel või selle tarvikutel või dokumentidel näitab, et toodet ega selle elektroonilisi tarvikuid (nt laadija, peakomplekt, USBkaabel) ei tohi kasutusaja lõppemisel kõrvaldada koos muude olmejäätmetega.
Correct disposal of batteries in this product (Applicable in the European Union and other European countries with separate battery return systems.) This marking on the battery, manual or packaging indicates that the batteries in this product should not be disposed of with other household waste at the end of their working life. Where marked, the chemical symbols Hg, Cd or Pb indicate that the battery contains mercury, cadmium or lead above the reference levels in EC Directive 2006/66.
KKorrekt bortskaffelse af batterierne i dette produkt (Gælder i EU og andre europæiske lande med særlige retursystemer for batterier). Mærket på dette batteri, dokumentationen eller emballagen betyder, at batterierne i dette produkt efter endt levetid ikke må bortskaffes sammen med andet husholdningsaffald. Mærkning med de kemiske symboler Hg, Cd eller Pb betyder, at batteriet indeholder kviksølv, cadmium eller bly over grænseværdierne i EU-direktiv 2006/66.
Správná likvidace baterií v tomto výrobku (Platí v Evropské unii a dalších evropských zemích s vlastními systémy zpětného odběru baterií.) Tato značka na baterii, návodu nebo obalu znamená, že baterie v tomto výrobku nesmí být na konci své životnosti likvidovány společně s jiným domovním odpadem. Případně vyznačené symboly chemikálií Hg, Cd nebo Pb upozorňují na to, že baterie obsahuje rtuť, kadmium nebo olovo v množství překračujícím referenční úrovně stanovené směrnicí ES 2006/66.