Country AUSTRIA BELGIUM Customer Care Centre 0810 - SAMSUNG (7267864, € 0.07/min) 02-201-24-18 Web Site PORTUGAL SLOVAKIA SPAIN SWEDEN www.samsung.com/at www.samsung.com/be (Dutch) www.samsung.com/be_fr (French) 800 - SAMSUNG (800-726786) www.samsung.com/cz Samsung Zrt., česká organizační složka, Oasis Florenc, Sokolovská394/17, 180 00, Praha 8 70 70 19 70 www.samsung.com/dk 030 - 6227 515 www.samsung.com/fi 01 48 63 00 00 www.samsung.com/fr 01805 - SAMSUNG (726-7864 € 0,14/Min) www.samsung.
Figures and illustrations in this User Manual are provided for reference only and may differ from actual product appearance. Product design and specifications may be changed without notice. Digital TV notice 1. 2. 3. 4. 5. 6. Functionalities related to Digital TV (DVB) are only available in countries/areas where DVB-T (MPEG2 and MPEG4 AVC) digital terrestrial signals are broadcasted or where you are able to access to a compatible DVB-C (MPEG2 and MPEG4 AAC) cable-TV service.
Contents Getting Started 4 Connections 8 11 4 5 6 7 7 Accessories Viewing the Control Panel Viewing the Remote Control Connecting to an Antenna Plug & Play (Initial Setup) 8 Connecting to an AV Device 9 Connecting to an Audio Device 10 Changing the Input Source 11 11 11 13 15 17 19 22 How to Navigate Menus Using the INFO button (Now & Next guide) Planning Your Viewing Channel Menu Picture Menu Sound Menu Setup Menu Support Menu Advanced Features 23 23 24 30 37 40 Connecting to a PC Network Conne
Getting Started Accessories ✎✎Please make sure the following items are included with your LED TV. If any items are missing, contact your dealer. ✎✎The items’ colours and shapes may vary depending on the models. ✎✎Cables not included in the package contents can be purchased separately.
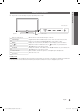
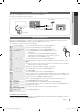
01 Getting Started Viewing the Control Panel ✎✎The product colour and shape may vary depending on the model. Power Indicator Speakers Remote control sensor Remote control sensor Aim the remote control towards this spot on the TV. SOURCEE Toggles between all the available input sources. In the on-screen menu, use this button as you would use the ENTERE button on the remote control. Displays an on-screen menu, the OSD (on screen display) of your TV’s features.
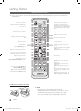
Getting Started Viewing the Remote Control ✎✎This is a special remote control for the visually impaired persons and has Braille points on the Power, Channel and Volume buttons. Turns the TV on and off. POWER ON/OFF Turns the remote control light on or off. When on, the buttons become illuminated for a moment when pressed. (Using the remote control with this button set to ON will reduce the battery usage time.) SOURCE Displays and selects the available video sources (p. 10).
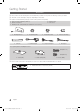
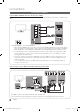
01 Getting Started Connecting to an Antenna When the TV is initially powered on, basic settings proceed automatically. ✎✎Preset: Connecting the mains and antenna. VHF/UHF Antenna Cable or ANT OUT Power Input Plug & Play (Initial Setup) When the TV is initially powered on, a sequence of on-screen prompts will assist in configuring basic settings. Press the POWERP button. Plug & Play is available only when the Input source is set to TV. ✎✎To return to the previous step, press the Red button.
Connections Connecting to an AV Device Using an HDMI or HDMI/DVI cable: HD connection (up to 1080p) Available devices: DVD, Blu-ray player, HD cable box, HD STB (Set-Top-Box) satellite receiver, cable box, satellite receiver (STB) DVD / Blu-ray player HDMI OUT DVD / Blu-ray player DVI OUT R W AUDIO OUT R White W Red R-AUDIO-L ✎✎HDMI IN 1(DVI), 2, 3, 4, PC/DVI AUDIO IN xx When using an HDMI/DVI cable connection, you must use the HDMI IN 1(DVI) jack for video.
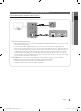
02 Connections Connecting to an Audio Device Using an Optical (Digital) or Headphone Cable Connection Available devices: digital audio system, amplifier, DVD home theatre digital audio system OPTICAL ✎✎DIGITAL AUDIO OUT (OPTICAL) xx When a Digital Audio System is connected to the DIGITAL AUDIO OUT (OPTICAL) jack, decrease the volume of both the TV and the system. xx 5.1 CH (channel) audio is available when the TV is connected to an external device supporting 5.1 CH.
Connections CONNECTIONS COMMON INTERFACE Slot To watch paid channels, the “CI or CI+ CARD” must be inserted. yy If you don’t insert the “CI or CI+ CARD,” some channels will display the message “Scrambled Signal”. yy The pairing information containing a telephone number, the “CI or CI+ CARD” ID the Host ID and other information will be displayed in about 2~3 minutes. If an error message is displayed, please contact your service provider.
Basic Features TTX/MIX PRE-CH Using the INFO button (Now & Next guide) Before using the TV, follow the steps below to learn how to navigate the menu and select and adjust different functions. CH LIST MENU MIDEA.P GUIDE TOOLS INFO RETURN EXIT 3 1 2 A B C 4 D Ⳓ ⳓ 1 ENTERE / Direction button: Move the cursor and select an item.P.MODE Confirm S.MODE the setting.DUAL The display identifies the current channel INFO and the status of certain audio-video settings.
Basic Features Using Scheduled View Guide 2:10 Tue 1 Jun DTV Air 800 five Family Affairs 18:00 - 18:30 Drama Tanya confesses all to a stunned Babs. Conrad is anxious to hear... 800 five 800 800 )Family Affairs )Dark Angel Channels: Shows the channel list according to channel type. ■■ * My Channels: Shows the group of the channel. ■■ Scheduled: Shows all the currently reserved programmes.
The PIN input screen appears. Enter your 4 digit PIN number. ■■ Digital Channel: Change the country for digital channels. * My Channels (in Channel Manager) Shows all favourite channels. ■■ Edit My Channels t: You can set the selected channels to desired my channels group. ✎✎The “*” symbol will be displayed and the channel will be set as a my channel. 1. Select a channel and press the TOOLS button. 2. Add or delete a channel in the my channel groups you want among 1, 2, 3 and 4.
Basic Features ✎✎Channel mode xx P (programme mode): When tuning is complete, the broadcasting stations in your area have been assigned to position numbers from P0 to P99. You can select a channel by entering the position number in this mode. xx C (aerial channel mode) / S (cable channel mode): These two modes allow you to select a channel by entering the assigned number for each aerial broadcasting station or cable channel. ¦¦ Editing Channels Channel Manager Option Menu (in Channel Manager) 1.
¦¦ Changing the Preset Picture Mode ■■ No-Signal Power Off (Off / 15 min / 30 min / 60 min): To avoid unnecessary energy consumption, set how long you want the TV to remain on if it's not receiving a signal. ✎✎ Disabled when the PC is in power saving mode. ¦¦ Changing the Picture Options Mode Select your preferred picture type. ■■ Dynamic: Suitable for a bright room. ■■ Standard: Suitable for a normal environment. P.MODE ■■ Natural: Suitable for reducing eye strain.
Basic Features ■■ Colour Space (Auto / Native): Adjust the range of colours available to create the image. Wide Zoom: Magnifies the picture size more than 4:3. Adjusts the Position by using ▲, ▼ buttons. ■■ White Balance: Adjust the colour temperature for a more natural picture. Zoom: Magnifies the 16:9 wide pictures vertically to fit the screen size. Adjusts the Position or Size by using ▲, ▼ button. R-Offset / G-Offset / B-Offset: Adjust each colour’s (red, green, blue) darkness.
Auto Visualisation: When changing analogue channels, displays the intensity of the current signal and defines the screen noise filter. Only available for analogue channels. ✎✎ Using Your TV as a Computer (PC) Display Setting Up Your PC Software (Based on Windows XP) Depending on the version of Windows and the video card, the actual screens on your PC may differ in which case the same basic set-up information will almost always be applied. (If not, contact your computer manufacturer or Samsung Dealer.) 1.
Basic Features ¦¦ Adjusting Sound Settings Equalizer Adjusts the sound mode (standard sound mode only). ■■ Balance L/R: Adjusts the balance between the right and left speaker. ■■ 100Hz / 300Hz / 1kHz / 3kHz / 10kHz (Bandwidth Adjustment): Adjusts the level of specific bandwidth frequencies. ■■ Reset: Resets the equalizer to its default settings. ¦¦ Sound Systems, Etc.
Audio Format: During the reception of a digital TV broadcast, you can select the Digital Audio output (SPDIF) format from the options PCM or Dolby Digital. By connecting to 5.1ch speakers in a Dolby Digital setup, maximize your interactive 3D sound experience. ✎✎ Audio Delay: Correct audio-video sync problems, when watching TV or video, and when listening to digital audio output using an external device such as an AV receiver (0ms ~ 250ms).
Basic Features On Time / Off Time: Set the hour, minute, and activate / inactivate. (To activate timer with the setting you’ve chosen, set to Activate.) Volume: Set the desired volume level. Source: Select TV or USB content to be played when the TV is turned on automatically. (USB can be selected only when a USB device is connected to the TV) Antenna (when the Source is set to TV): Select ATV or DTV. Channel (when the Source is set to TV): Select the desired channel.
¦¦ Picture In Picture (PIP) ■■ Game Mode (Off / On): When connecting to a game console such as PlayStation™ or Xbox™, you can enjoy a more realistic gaming experience by selecting game mode. PIP t ✎✎NOTE xx Precautions and limitations for game mode –– To disconnect the game console and connect another external device, set Game Mode to Off in the setup menu. –– If you display the TV menu in Game Mode, the screen shakes slightly. xx Game Mode is not available when the input source is set to TV or PC.
Basic Features Support Menu Installing the Latest Version Self Diagnosis ✎✎Self Diagnostic might take few seconds, this is part of the normal operation of the TV. ■■ Picture Test (Yes / No): Use to check for picture problems. ■■ Sound Test (Yes / No): Use the built-in melody sound to check for sound problems. ✎✎ If you hear no sound from the TV’s speakers, before performing the sound test, make sure Speaker Select is set to TV Speaker in the Sound menu.
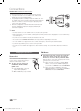
Advanced Features 04 Advanced Features Connecting to a PC Using an HDMI/DVI Cable / a D-sub Cable AUDIO OUT DVI OUT AUDIO OUT PC OUT Display Modes (D-Sub and HDMI/DVI Input) Optimal resolution is 1920 X 1080 @ 60 Hz. Mode Resolution Horizontal Frequency (KHz) Vertical Frequency (Hz) Pixel Clock Frequency (MHz) Sync Polarity (H / V) IBM 640 x 350 720 x 400 31.469 31.469 70.086 70.087 25.175 28.322 +/-/+ MAC 640 x 480 832 x 624 1152 x 870 35.000 49.726 68.681 66.667 74.551 75.062 30.
Advanced Features Network Connection You can set up your TV so that it can access the Internet through your local area network (LAN) using a wired or wireless connection. ¦¦ Connecting to a Wired Network You can attach your TV to your LAN using cable in three ways: yy You can attach your TV to your LAN by connecting the LAN port on the back of your TV to an external modem using a Cat 5 cable. See the diagram below.
Network Setup (Manual) Use the Automatic Network Setup when connecting your TV to a network that supports DHCP. To set up your TV’s cable network connection automatically, follow these steps: Use the Manual Network Setup when connecting your TV to a network that requires a Static IP address. How to set up automatically To get the Network connection values on most Windows computers, follow these steps: 1. Right click the Network icon on the bottom right of the screen. 1.
Advanced Features ¦¦ Connecting to a Wireless Network To connect your TV to your network wirelessly, you need a wireless router or modem and a Samsung Wireless LAN Adapter (WIS09ABGN), which you connect to your TV’s back or side panel USB jack. See the illustration below.
The picture may appear corrupted or have static for some channels when the TV is connected to the Samsung Wireless LAN Adapter. In such case, establish a connection using one of the following methods: Method 1 Connect using the USB right angle adapter Method 2 Connect via an extension cable 04 Advanced Features Notice or Network Setup (PBC (WPS)) How to set up using PBC (WPS) If your router has a PBC (WPS) button, follow these steps: 1. Connect your TV to your LAN as described in the previous section.
Advanced Features How to set up automatically To set up the wireless connection automatically, follow these steps: 1. Follow Steps 1 through 6 in the “How to set up using PBC (WPS)” (p. 27). 2. Press the ▼ button to select Internet Protocol Setup, and then press the ENTERE button. Press the ▲ or ▼ button to select Auto, and then press the ENTERE button. 3. Press the ▲ button to go to Select a Network, and then press the ENTERE button. The Network function searches for available wireless networks.
If the other methods do not work, you need to enter the Network setting values manually. Getting the Network Connection Values To get the Network connection values on most Windows computers, follow these steps: 1. Right click the Network icon on the bottom right of the screen. 2. In the pop-up menu, click Status. 3. On the dialog that appears, click the Support tab. 4. On the Support tab, click the Details button. The Network settings are displayed.
Advanced Features Media Play MEDIA.P MediaPlay Enjoy photos, music and/or movie files saved on a USB Mass Storage Class (MSC) device and/or your PC. Videos Change Device SUM View Devices E Enter R Return ¦ Connecting a USB Device 1. Turn on your TV. TV Rear Panel 2. Connect a USB device containing photo, music and/or movie files to the USB 1 (HDD) or USB 2 jack on the side of the TV. 3. When USB is connected to the TV, popup window appears. Then you can select Media Play.
04 Advanced Features ✎✎No supported functions when connecting to the PC through network: xx The Background Music and Background Music Setting functions. xx Sorting files by preference in the Photos, Music, and Videos folders. xx The � (REW) or µ (FF) button while a movie is playing. ✎✎The Divx DRM, Multi-audio, embedded caption does not supported. ✎✎Samsung PC Share manager should be permitted by the firewall programme on your PC.
Advanced Features ¦¦ Screen Display Move to the file you desired using the up/down/right/left buttons and then press the ENTERE or � (Play) button. The file is played. ✎✎Supports the View Devices and Home in Media Play homepage. Information: You can ascertain the selected file name and the number of files and page. Videos Movie 01.avi Movie 03.avi Movie 05.avi Sort List Section: Displays sorting standard. Jan.10.2010 Jan.10.2010 Jan.10.2010 Movie 07.avi Movie 02.avi Movie 04.avi Movie 06.
File Extension Video Codec Resolution Frame rate (fps) Bit rate (Mbps) Divx 3.11 / 4.x / 5.1 / 6.0 1920x1080 6 ~ 30 8 XviD 1920x1080 6 ~ 30 8 H.264 BP / MP / HP 1920x1080 6 ~ 30 25 MPEG4 SP / ASP 1920x1080 6 ~ 30 8 Container *.avi *.mkv AVI MKV *.asf ASF *.wmv ASF *.mp4 1920x1080 6 ~ 30 8 XviD 1920x1080 6 ~ 30 8 H.264 BP / MP / HP 1920x1080 6 ~ 30 25 MPEG4 SP / ASP 1920x1080 6 ~ 30 8 Window Media Video v9 1920x1080 6 ~ 30 25 H.
Advanced Features Playing movie file continuously (Resume Play) If you exit the playing Videos function, it can be played later from the point where it was stopped. 1. Select the movie file you want to play continuously by pressing the ◄ or ► button to select it from the file list section. 2. Press the � (Play) / ENTERE button. 00:04:03 / 00:07:38 1/1 Movie 01.avi 3. Select Play Continuously (Resume Play) by pressing the Blue button. The Movie will begin to play from where it was stopped.
Playing the selected video/music/photo files 1. Press the Yellow button in the file list to select the desired file. Videos 2 files selected /Movie 01.avi 2. Repeat the above operation to select multiple files. Movie 01.avi ✎✎ NOTE Movie 02.avi Jan.10.2010 Movie 03.avi xx The c mark appears to the left of the selected files. xx To cancel a selection, press the Yellow button again. xx To deselect all selected files, press the TOOLS button Jan.10.2010 Movie 04.avi Jan.10.2010 Movie 05.avi Jan.10.
Advanced Features Videos/Music/Photos Play Option menu During playing a file, press the TOOLS button. Category Operations Videos Music Photos Title You can move the other file directly. > Repeat Mode You can play movie and music files repeatedly. > Picture Size You can adjust the picture size for preference. > Picture Setting You can adjust the picture setting. (p. 15, 16, 17) > Sound Setting You can adjust the sound setting. (p.
What is Anynet+? t Anynet+ is a function that enables you to control all connected Samsung devices that support Anynet+ with your Samsung TV’s remote. The Anynet+ system can be used only with Samsung devices that have the Anynet+ feature. To be sure your Samsung device has this feature, check if there is an Anynet+ logo on it. To connect to Home Theatre Home Theatre TV Rear Panel Anynet+ Device 1 Anynet+ Device 2, 3, 4 04 Advanced Features Anynet+ Optical Cable HDMI Cable HDMI Cable HDMI Cable 1.
Advanced Features Anynet+ Menu The Anynet+ menu changes depending on the type and status of the Anynet+ devices connected to the TV. Anynet+ Menu View TV Device List (device_name) MENU (device_name) INFO Recording: (*recorder) Stop Recording: (*recorder) Receiver Description Changes Anynet+ mode to TV broadcast mode. Shows the Anynet+ device list. Shows the connected device menus. E.g. If a DVD recorder is connected, the disc menu of the DVD recorder will appear.
You can listen to sound through a receiver (i.e Home Theatre) instead of the TV Speaker. 1. Select Receiver and set to On. 2. Press the EXIT button to exit. ✎✎ If your receiver supports audio only, it may not appear in the device list. ✎✎ The receiver will work when you have properly connected the optical in jack of the receiver to the DIGITAL AUDIO OUT (OPTICAL) jack of the TV. ✎✎ When the receiver (i.e Home Theatre) is set to On, you can hear sound output from the TV’s Optical jack.
Advanced Features AllShare Message / Media / ScreenShare ¦¦ About AllShare AllShare connects your TV, mobile phones and other devices which are compatible through a network. On your TV, you can view call arrivals, SMS messages and schedules set on your mobile phones. In addition, you can play media contents including videos, photos and music saved on your mobile phones or the other devices (such as your PC) by controlling them on the TV via the network.
Using ScreenShare Function If a call arrives while you are watching TV, the alarm window appears. Screenshare displays the same web page as provide in mobile. Using ScreenShare, you can open the various contents saved in a mobile phone. For example, the image below displays an access page for contents from a mobile. You can read the mobile’s various files and view the phone book and calendar on the TV. Also, in phone book, you can make a call to other person, or can send to SMS.
Other Information Analogue Channel Teletext Feature The index page of the Teletext service gives you information on how to use the service. For Teletext information to be displayed correctly, channel reception must be stable. Otherwise, information may be missing or some pages may not be displayed. ✎✎You can change Teletext pages by pressing the numeric buttons on the remote control. 1 / (Teletext on/mix): Activates the Teletext mode for the current channel.
05 Other Information Assembling the Cables Stand Type Enclose the cables in the Cable Tie so that the cables are not visible through the transparent stand. 1 1 2 3 2 3 Wall-Mount Type ✎✎Do not pull the cables too hard when arranging them. This may cause damage to the product’s connection terminals. English [UC5100]BN68-02656B-00L04.
Other Information Installing the Wall Mount Assembling the Blanking Bracket When installing the TV onto a wall, attach the Blanking Bracket as shown. Blanking Bracket Assembling Power-Cord When Installing the TV onto a wall, attach the Power-Cord as Shown. 1 2 3 1. Remove the screw shown in the first picture above. 2. Attach the power cord clamp to the power cord. 3. Mount the power cord clamp to the TV, using the removed screw, as shown. Preparing before installing Wall-Mount Case A.
✎✎ The wall mount kit is not supplied, but sold separately. Install your wall mount on a solid wall perpendicular to the floor. When attaching to other building materials, please contact your nearest dealer. If installed on a ceiling or slanted wall, it may fall and result in severe personal injury. ✎✎NOTE xx Standard dimensions for wall mount kits are shown in the table below. xx When purchasing our wall mount kit, a detailed installation manual and all parts necessary for assembly are provided.
Other Information Anti-theft Kensington Lock The Kensington Lock is not supplied by Samsung. It is a device used to physically fix the system when using it in a public place. The appearance and locking method may differ from the illustration depending on the manufacturer. Refer to the manual provided with the Kensington Lock for additional information on proper use. 1 2 ✎✎Please find a “K” icon on the rear of the TV. A kensington slot is beside 3 the “K” icon. 1.
If you have any questions about the TV, first refer to this list. If none of these troubleshooting tips apply, please visit “www. samsung.com,” then click on Support, or contact the call centre listed on the back-cover of this manual. Issues Solutions and Explanations Picture Quality First of all, please perform the Picture Test and confirm that your TV is properly displaying test image. (go to MENU - Support - Self Diagnosis - Picture Test) (p.
Other Information Issues Solutions and Explanations There is no picture/Video. • • • • Check cable connections (remove and reconnect all cables connected to the TV and external devices). Set your external devices’ (Cable/Set top Box, DVD, Blu-ray etc) video outputs to match the connections to the TV input. For example, if an external device’s output is HDMI, it should be connect to an HDMI input on the TV. Make sure your connected devices are powered on.
Solutions and Explanations You see small particles when you look closely at the edge of the frame of the TV. • This is part of the product’s design and is not a defect. The PIP menu is not available. • PIP functionality is only available when you are using a HDMI, PC or components source (p. 21). The message “Scramble signal” or “Weak Signal/No Signal” appears. • • If you are using a CAM CARD (CI/CI+), check that it is installed into the common interface slot.
Other Information Specifications Panel native 1920 x 1080 @ 60 Hz Environmental Considerations Operating Temperature Operating Humidity Storage Temperature Storage Humidity TV System Colour/Video System 10°C to 40°C (50°F to 104°F) 10% to 80%, non-condensing -20°C to 45°C (-4°F to 113°F) 5% to 95%, non-condensing Analogue: B/G, D/K, L, I (Depending on your country selection) Digital: DVB-T/DVB-C Analogue: PAL, SECAM, NTSC-4.43, NTSC-3.58, PAL60 Digital: MPEG-2 MP@ML, MPEG-4, H.264/AVC MP@L3, MP@L4.
A AllShare Amplify Antenna Anynet+ Auto Adjustment Auto Volume F 40 17 13 37 17 18 B Background Music Balance L/R Basic View Batteries Black Tone Blanking Bracket Brightness 36 18 35 6 15 44 15 C Component 8 Cable Tie 4, 43 Change PIN 20 Channel Manager 12 Channel Menu 13 Clock 19 Colour Tone 16 Connecting to an Audio Device 9 Connecting to a PC 23 17 14 16 13 H HDMI Headphones Home Theatre 8, 37 9 9, 37 I Installation Space 2 L Language Licence Lock 20 49 14 M Media Play Melody Menu Transparenc
Die Abbildungen und Illustrationen in diesem Handbuch dienen nur zur Information und können vom tatsächlichen Aussehen des Geräts abweichen. Änderungen an Ausführung und technischen Daten vorbehalten. Hinweis zu Digitalfernsehen 1. 2. 3. 4. 5. 6.
Inhalt Erste Schritte 4 Anschlüsse 8 11 4 5 6 7 7 Zubehör Bedienfeld Fernbedienung Verbinden mit einer Antenne Plug & Play (Anfangseinstellung) 8 Anschließen an ein AV-Gerät 9 Anschließen an ein Audiogerät 10 Signalquellen wählen 11 11 11 13 15 17 19 22 Navigieren in den Menüs Verwenden der INFO Taste (Elektronische Programmzeitschrift) Fernsehplanung Kanalmenü Bildmenü Tonmenü Einstellungsmenü Unterstützungsmenü Erweiterte Funktionen 23 23 24 30 37 40 Anschließen an einen PC Netzwerkverbindung
Erste Schritte Zubehör ✎✎Überprüfen Sie die Verpackung Ihres LED-Fernsehgeräts auf Vollständigkeit. Falls Komponenten fehlen sollten, setzen Sie sich bitte mit Ihrem Händler in Verbindung. ✎✎Farbe und Form der Teile können sich je nach Modell unterscheiden. ✎✎Kabel, die nicht zum Paketinhalt gehören, können gesondert erworben werden.
01 Bedienfeld Erste Schritte ✎✎Form und Farbe des Geräts können sich je nach Modell unterscheiden. Netzanzeige Lautsprecher Fernbedienungssensor Fernbedienungssensor Richten Sie die Fernbedienung auf diesen Sensor am Fernsehgerät. SOURCEE Schaltet zwischen allen verfügbaren Signalquellen um. Im Bildschirmmenü können Sie diese Taste wie die ENTERE auf der Fernbedienung verwenden. Drücken Sie diese Taste, um die Funktionen des Fernsehgeräts in einem Bildschirmmenü anzuzeigen.
Erste Schritte Fernbedienung ✎✎Dies ist eine spezielle Fernbedienung für Personen mit eingeschränktem Sehvermögen. Die Netztaste sowie die Tasten zum Einstellen des Senders und der Lautstärke sind in Braille beschriftet. Ein- und Ausschalten des Fernsehgeräts. POWER ON/OFF Hiermit wird die Beleuchtung der Fernbedienung ein- und ausgeschaltet. Wenn sie eingeschaltet ist, werden die Tasten beim Drücken kurz beleuchtet.
01 Verbinden mit einer Antenne Erste Schritte Wenn das Fernsehgerät zum ersten Mal eingeschaltet wird, werden automatisch die Grundeinstellungen vorgenommen. ✎✎Voreinstellung: Anschließen ans Stromnetz und an die Fernsehantenne. VHF/UHF-Antenne Kabel oder ANT OUT Netzanschluss Plug & Play (Anfangseinstellung) Wenn das Fernsehgerät erstmals eingeschaltet wird, helfen eine Reihe aufeinanderfolgender Abfragen beim Durchführen der Grundeinstellungen. Drücken Sie die Taste POWERP.
Anschlüsse Anschließen an ein AV-Gerät Mit Hilfe eines HDMI oder HDMI/DVI-Kabels: HD-Anschluss (max. 1080p) Verfügbare Geräte: DVD, Blu-ray-Player, HD-Kabelreceiver, HD-Satellitenreceiver, Kabelreceiver, Satellitenreceiver DVD / Blu-ray player HDMI OUT DVD / Blu-ray player DVI OUT R W AUDIO OUT R Weiß W Rot R-AUDIO-L ✎✎HDMI IN 1(DVI), 2, 3, 4, PC/DVI AUDIO IN xx Eine Verbindung über HDMI/DVI-Kabel kann nur über den Videoanschluss HDMI IN 1(DVI) erfolgen.
02 Anschließen an ein Audiogerät Anschlüsse Mit Hilfe des optischen Anschlusses (digital) oder des Anschlusses für das Kopfhörerkabel Verfügbare Geräte: Digital-Audiosystem, Verstärker, DVD-Heimkino Digital Audio-System OPTICAL ✎✎DIGITAL AUDIO OUT (OPTICAL) xx Wenn ein Digital Audio-System mit dem DIGITAL AUDIO OUT (OPTICAL)-Anschluss verbunden ist, reduzieren Sie die Lautstärke von Fernsehgerät und System. xx 5.
Anschlüsse ANSCHLÜSSE COMMON INTERFACE-STECKPLATZ Um Bezahlsender zu sehen, müssen Sie eine „CI“ oder „CI+“-Karte einsetzen. yy Wenn Sie keine „CI“ oder „CI+“-Karte einsetzen, wird bei einigen Kanälen die Meldung „Gestörtes Signal“ angezeigt. yy Die Verbindungsinformationen mit Telefonnummer, Kennung der „CI“ oder „CI+“-Karte, Hostkennung und anderen Angaben wird nach ungefähr 2 bis 3 Minuten angezeigt. Wenn eine Fehlermeldung angezeigt wird, wenden Sie sich bitte an Ihren Dienstanbieter.
Grundfunktionen TTX/MIX PRE-CH Verwenden der INFO Taste (Elektronische Programmzeitschrift) CH LIST MENU MIDEA.P GUIDE TOOLS INFO RETURN EXIT 3 1 2 4 Auf dem Bildschirm werden der aktuelle Kanal INFO und bestimmte Audio/Video-Einstellungen angezeigt. Die elektronische Programmführer zeigt entsprechend der Sendezeit für jeden Kanal tagesaktuelle Fernsehprogramminformation an.
Grundfunktionen Verwenden der Programmieransicht ■■ TV-Programm 2:10 Di 1. Jun DTV Air 800 five Drama Scheduled: Anzeigen aller vorgemerkten Programme. Kanal-Manager Tanya confesses all to a stunned Babs. Conrad is anxious to hear... xx Programmieransicht 18:30 Heute 19:15 Heute * Eigene Kanäle: Anzeigen der Gruppe des Senders. ■■ ✎✎Verwenden der Farbtasten in Verbindung mit dem Family Affairs 18:00 - 18:30 800 five ■■ Sender: Anzeigen der Senderliste anhand des Sendertyps.
■■ Digitaler Sender: Sie können das Land für die digitalen Sender ändern. (im Kanal-Manager) Hiermit zeigen Sie alle Favoritenkanäle an. ■■ Eigene Kanäle bearbeiten t: Sie können die gewählten Sender zu der gewünschten Gruppe eigener Sender hinzufügen. ✎✎Das Symbol „*“ wird angezeigt, und der Sender wird als Eigene Kanäle festgelegt. 1. Wählen Sie einen Kanal und drücken Sie die Taste TOOLS. 2. Sie können einen Kanal der Gruppen 1, 2, 3 und 4 der eigenen Kanäle hinzufügen oder löschen. 3.
Grundfunktionen ✎✎Kanalmodus xx P (Programm-Modus): Nach Abschluss der Einstellungen sind die Sender lhrer Region unter den Programmplätzen P0 bis maximal P99 gespeichert. In diesem Modus können Sie Sender durch Eingabe des Programmplatzes auswählen. xx C (Terrestrische Kanäle) / S (Kabelkanäle): In diesen beiden Modi können Sie Sender durch Eingabe der Nummer anwählen, die dem terrestischen Sender oder dem Kabelkanal zugeordnet ist.
Modus t Wählen Sie Ihren bevorzugten Bildtyp aus. ■■ Dynamisch : Für helle Zimmer geeignet. ■■ Standard: Für normale Umgebungen geeignet. ✎✎ Deaktiviert, wenn der PC im Stromsparmodus läuft. ¦¦ Ändern der Bildoptionen P.MODE ■■ Natürlich: Für geringe Augenbelastung geeignet. Natürlich ist im PC-Modus nicht verfügbar. ✎✎ ■■ Film: Geeignet für ds Anzeigen von Filmen in einem abgedunkelten Zimmer.
Grundfunktionen ■■ Farbraum (Auto / Nativ): Stellen Sie den Bereich der Farben ein, aus denen das Bild erstellt wird. ■■ Weißabgleich: Einstellen der Farbtemperatur für ein natürlicheres Bild. R-Offset / G-Offset / B-Offset: Einstellen der Dunkelheit jeder Farbe (Rot, Grün und Blau). R-Gain / G-Gain / B-Gain : Sie können die Helligkeit jeder Farbe (Rot, Grün und Blau) einstellen. Zurückset.: Hiermit setzen Sie den Weißabgleich auf die Standardwerte zurück. ■■ Hautton: Betonen des Rosaanteils im „Hautton“.
✎✎ ■■ MPEG-Rauschfilter (Aus / Gering / Mittel / Hoch / Auto): Reduziert das MPEG-Rauschen, um besserte Bildqualität zu ermöglichen. ■■ HDMI-Schwarzp. (Normal / Gering): Sie können den Schwarzwert direkt auf dem Bildschirm auswählen, um die Bildschirmtiefe anzupassen. ✎✎ Nur im HDMI-Modus (RGB-Signale) verfügbar.
Grundfunktionen ¦¦ Anpassen der Toneinstellungen Equalizer Anpassen des Tonmodus (nur im Standardmodus). ■■ Balance L/R: Anpassen der Balance zwischen dem linken und dem rechten Lautsprecher. ■■ 100Hz / 300Hz / 1 kHz / 3 kHz / 10 kHz (Einstellung der Frequenzbänder): Einstellen der Lautstärke für die unterschiedlichen Frequenzbänder. ■■ Zurückset.: Zurücksetzen der Equalizereinstellungen auf die Standardwerte. ¦¦ Tonsystem, usw.
✎✎ Zeit ■■ Uhr : Die Uhr muss eingestellt werden, damit Sie die verschiedenen Timerfunktionen des Fernsehgeräts verwenden können. OO Jedes Mal, wenn Sie die Taste INFO drücken, wird die aktuelle Zeit angezeigt. ✎✎ Wenn Sie das Netzkabel ziehen, müssen Sie die Uhr erneut einstellen. Uhrmodus (Auto / Manuell) Je nach Sendestation und Signal ist die automatisch eingestellte Zeit möglicherweise nicht korrekt. In diesem Fall müssen Sie die Zeit manuell einstellen.
Grundfunktionen Anschaltzeit / Ausschaltzeit: Stellen Sie Stunde und Minute ein und aktivieren bzw. deaktivieren Sie die Funktion. (Wenn Sie mit den Einstellungen fertig sind, aktivieren Sie den Timer mit Aktivieren.) Lautstärke: Stellen Sie die gewünschte Lautstärke ein. Quelle: Sie können den TV oder USB-Inhalt einstellen, der beim automatischen Einschalten des Fernsehers wiedergegeben wird.
■■ Spielemodus (Aus / Ein): Wenn Sie eine Spielekonsole wie PlayStation™ oder Xbox™ anschließen, können Sie durch Auswählen des Spielemodus ein realitätsnaheres Spielerlebnis genießen. PIP t ✎✎HINWEIS xx Vorsichtsmaßnahmen und Einschränkungen im Spielemodus –– Wenn Sie die Spielekonsole wieder vom Gerät trennen und ein anderes externes Gerät anschließen möchten, deaktivieren (Aus) Sie den Spielemodus mit Hilfe des Einrichtmenüs. –– Wenn Sie im Spielemodus das TV-Menü anzeigen, zittert das Bild leicht.
Grundfunktionen Unterstützungsmenü Installieren der aktuellsten Version Eigendiagnose ✎✎Der Selbsttest kann einige Minuten dauern. Dies ist eine normale Funktion des Fernsehgeräts. ■■ Bildtest (Ja / Nein): Dient zur Analyse von Bildproblemen. ■■ Audiotest (Ja / Nein): Verwenden Sie die integrierte Melodie, um Tonprobleme zu ermitteln.
Erweiterte Funktionen 04 Anschließen an einen PC Erweiterte Funktionen Mit Hilfe eines HDMI/DVI-Kabels oder eines D-Sub-Kabels AUDIO OUT DVI OUT AUDIO OUT PC OUT Anzeigemodi (D-Sub- und HDMI/DVI-Eingang) Die optimale Auflösung beträgt 1920 x 1080 bei 60 Hz. Modus Auflösung Horizontalfrequenz (KHz) Vertikalfrequenz [Hz] Pixeltaktfrequenz (MHz) Sync-Polarität (H x V) IBM 640 x 350 720 x 400 31.469 31.469 70.086 70.087 25.175 28.322 +/-/+ MAC 640 x 480 832 x 624 1152 x 870 35.000 49.
Erweiterte Funktionen Netzwerkverbindung Sie können Ihr Fernsehgerät so einrichten, dass es über Ihr lokales Netzwerk (LAN) und eine Kabel- oder WLAN-Verbindung auf das Internet zugreifen kann. ¦¦ Verbindung mit einem Kabelnetzwerk herstellen Sie können Ihr Fernsehgerät auf dreierlei Weise an Ihr LAN anschließen: yy Sie können Ihr Fernsehgerät über den LAN-Anschluss auf der Rückseite des Geräts direkt über ein CAT5-Kabel an ein externes Modem und Ihr LAN anschließen. Siehe nachfolgende Abbildung.
Eingang einrichten (Manuell) Verwenden Sie Eingang einrichten - automatisch, wenn Sie Ihr Fernsehgerät an ein Netzwerk anschließen, das DHCP unterstützt. Um die Kabelnetzwerkverbindung Ihres Fernsehgeräts automatisch einzurichten, gehen Sie folgendermaßen vor: Verwenden Sie Eingang einrichten - manuell, wenn Sie Ihr Fernsehgerät an ein Netzwerk anschließen, das eine statische IPAdresse erfordert.
Erweiterte Funktionen ¦¦ Verbindung mit einem Drahtlosnetzwerk herstellen Um Ihr Fernsehgerät drahtlos an Ihr Netzwerk anzuschließen, benötigen Sie einen Funkrouter oder ein Funkmodem sowie einen Samsung WLAN-Adapter (WIS09ABGN), den Sie mit dem hinteren oder seitlichen USB-Anschluss verbinden. Siehe nachfolgende Abbildung.
04 Hinweis Methode 1 Erweiterte Funktionen Das Bild kann bei manchen Kanälen gestört oder verrauscht sein, wenn das Fernsehgerät an den WLAN-Adapter von Samsung angeschlossen ist. Stellen Sie die Verbindung in solch einem Fall mit einer der folgenden Methoden her: Methode 2 Verbinden mit Hilfe des USB-90°-Adapters Verbinden mit Hilfe eines Verlängerungskabels oder Eingang einrichten (PBC (WPS)) 7. Drücken Sie die rote Taste Ihrer Fernbedienung . 8.
Erweiterte Funktionen So konfigurieren Sie automatisch 2. Wählen Sie durch Drücken der Taste ▼ die Option IPKonfiguration, und drücken Sie dann die ENTERE. Wählen Sie durch Drücken der Tasten ▲ oder ▼ die Option Auto, und drücken Sie dann die ENTERE. 3. Wählen Sie ▲Wählen Sie ein Netzwerk durch Drücken der Taste ▲, und drücken Sie dann die ENTERE. Die Netzwerkfunktion sucht nach verfügbaren Funknetzwerken. Nach Abschluss der Suche wird eine Liste der verfügbaren Netzwerke angezeigt. 4.
Wenn keine andere Methode funktioniert, müssen Sie die Werte für die Netzwerkkonfiguration manuell eingeben. Es kann sein, dass Ihr Fernseher keine Internetverbindung aufbauen kann, weil Ihr ISP die MAC-Adresse (eine eindeutige Kennnummer) Ihres PCs oder Modems registriert hat, und anhand dieser die Authentifizierung vornimmt, wenn Sie sich mit dem Internet verbinden. Auf diese Weise soll unbefugter Zugriff verhindert werden.
Erweiterte Funktionen Media Play MEDIA.P Mit dieser Funktion können Sie auf einem USBSpeichermedium (MSC) oder Ihrem PC gespeicherte Foto-, Musik und/oder Filmdateien anzeigen bzw. wiedergeben. MediaPlay Videos SUM Gerät wechseln Geräte anzeigen E Eingabe R Zurück ¦ Anschließen eines USB-Geräts 1. Schalten Sie den Fernseher ein. 2. Schließen Sie ein USB-Gerät mit Foto-, Musik und/oder Filmdateien an die USB 1 (HDD) oder USB 2-Buchse seitlich am Fernsehgerät an. 3.
04 ✎✎Die folgenden Funktionen werden beim Anschluss an einen PC über das Netzwerk nicht unterstützt: ✎✎Divx DRM, Multi-Audio und eingebettete Beschriftung werden nicht unterstützt. ✎✎Sie müssen Samsung PC Share Manager in der Firewall Ihres PCs freigeben. ✎✎Bei Verwendung von Media Play über eine Netzwerkverbindung, wirken die folgenden Funktionen entsprechend der Konfiguration des Servers: xx Die Sortiermethode kann variieren. xx Möglicherweise wird die Funktion zur Suche von Szenen nicht unterstützt.
Erweiterte Funktionen ¦¦ Bildschirmanzeige Navigieren Sie mit den Pfeiltasten (Auf/Ab/Rechts/Links) zu der gewünschten Datei und drücken Sie dann die ENTERE oder die Taste � (Wiedergabe). Die Datei wird wiedergegeben. ✎✎Unterstützt Geräte anzeigen und Start auf der Startseite von Media Play. Information: Hier können Sie den Namen der gewählten Datei sowie die Anzahl der Dateien und Seiten überprüfen. Videos Movie 01.avi Movie 03.avi Movie 05.
04 yy Unterstützte Videoformate Container *.avi *.mkv AVI MKV *.asf ASF *.wmv ASF *.mp4 MP4 Video-Codec Auflösung Framerate (f/s) Bitrate (Mbps) Divx 3.11/4.x/5.1/6.0 1920x1080 6 ~ 30 8 XviD 1920x1080 6 ~ 30 8 H.264 BP/MP/HP 1920x1080 6 ~ 30 25 MPEG4 SP / ASP 1920x1080 6 ~ 30 8 Divx 3.11/4.x/5.1/6.0 1920x1080 6 ~ 30 8 XviD 1920x1080 6 ~ 30 8 H.264 BP/MP/HP 1920x1080 6 ~ 30 25 MPEG4 SP / ASP 1920x1080 6 ~ 30 8 Window Media Video V. 9 1920x1080 6 ~ 30 25 H.
Erweiterte Funktionen Filmwiedergabe fortsetzen (Wiedergabe fortsetzen) Wenn Sie die Videowiedergabefunktion verlassen, kann die Wiedergabe später ab dem Punkt fortgesetzt werden, an dem Sie unterbrochen haben. 1. 2. 3. Wählen Sie die Filmdatei, dessen Wiedergabe Sie fortsetzen möchten. Drücken Sie dazu in der Dateiliste auf ◄ oder ►. Drücken Sie auf � (Wiedergabetaste) / ENTERE. Wählen Sie mit der blauen Taste die Funktion für Ununterbrochen abspielen (Wiedergabe fortsetzen).
04 ¦¦ Wiedergabe mehrerer Dateien 1. 2. Drücken Sie die gelbe Taste in der Dateiliste, um die gewünschte Datei auszuwählen. 2 Dat. ausgew. /Movie 01.avi Movie 01.avi Movie 02.avi Jan.10.2010 Movie 03.avi Wiederholen Sie den obigen Vorgang, um mehrere Dateien auszuwählen. ✎✎ HINWEIS Jan.10.2010 Movie 07.avi xx Drücken Sie die gelbe Taste noch einmal, um die Auswahl Jan.10.2010 Movie 06.avi Movie 09.avi Jan.10.2010 Movie 10.avi Jan.10.2010 SUM Jan.10.2010 Movie 08.avi Jan.10.
Erweiterte Funktionen Optionsmenü für die Video/Musik/Fotowiedergabe Drücken Sie während der Wiedergabe die Taste TOOLS. Kategorie Vorgang Videos Musik Fotos Titel Sie können die andere Datei direkt verschieben. > Wiederholmod. Sie können Film- und Musikdateien wiederholt abspielen. > Bildformat Sie können Bildformat entsprechend Ihren Wünschen anpassen. > Bildeinstellungen Sie können die Bildeinstellungen festlegen. (S.
04 Anynet+ Bei Anynet+ handelt es sich um eine Funktion, mit der Sie alle angeschlossenen Samsung-Geräte, die Anynet+ unterstützen, mit der Fernbedienung für Ihr Samsung-Fernsehgerät steuern können. Das Anynet+-System unterstützt nur Anynet+-fähige Samsung-Geräte. Wenn Sie wissen möchten, ob Ihr Samsung-Gerät diese Funktion unterstützt, suchen Sie das Anynet+-Logo auf Ihrem Gerät.
Erweiterte Funktionen Anynet+-Menü Der Inhalt des Anynet+-Menüs hängt vom Typ und Status der an das Fernsehgerät angeschlossenen Anynet+-Geräte ab. Anynet+-Menü Fernsehen Geräteliste (geräte_name) MENU (geräte_name).INFO Aufnahme: (*Aufnahmegerät) Aufnahme anhalten: (*Aufnahmegerät) Empfänger Beschreibung Wechsel vom Anynet+-Modus zum Fernsehmodus. Anzeige der Anynet+-Geräteliste. Hiermit öffnen Sie die Menüs der angeschlossenen Geräte. Wenn z. B.
04 ¦¦ Tonwiedergabe mit einem Receiver 2. Erweiterte Funktionen Sie können die Tonwiedergabe über einen Receiver (d. h. Heimkinosystem) anstelle des TV-Lautsprechers laufen lassen. 1. Wählen Sie Empfänger und aktivieren Sie ihn Ein. Zum Beenden drücken Sie die Taste EXIT. ✎✎ Wenn Ihr Receiver nur Audiosignale unterstützt, wird er in der Geräteliste möglicherweise nicht angezeigt.
Erweiterte Funktionen AllShare Message / Medien / ScreenShare ¦¦ Informationen zu AllShare AllShare verbindet Ihr Fernsehgerät und Ihre Mobiltelefone und Ihre anderen zum Fernseher kompatiblen Geräte über ein Netzwerk mit Ihrem Fernsehgerät. Auf Ihrem Fernseher können Sie eingehende Aufrufe, SMS-Nachrichten und Zeitpläne anzeigen, die auf Ihren Mobiltelefonen gespeichert sind. Außerdem können Sie die auf Mobiltelefonen oder anderen Geräten (z. B.
Verwenden der ScreenShare-Funktion Wenn ein Anruf eingeht, während Sie fernsehen, wird das Alarmfenster geöffnet. Screenshare zeigt die gleiche Website wie das Mobilgerät an. Mit Hilfe von ScreenShare können Sie die verschiedenen Inhalte von einem Mobiltelefon öffnen. Zum Beispiel zeigt die nachfolgende Abbildung eine Zugriffsseite für den Inhalt von einem Mobiltelefon. Sie können die verschiedenen Dateien des Mobiltelefons und das Telefonbuch und den Kalender auf dem Fernseher anzeigen.
Weitere Informationen Videotext für Analogkanäle Auf der Videotext-Indexseite finden Sie Verwendungshinweise zum Videotext. Damit Videotextinformationen korrekt angezeigt werden können, muss der Empfang stabil sein. Andernfalls können Informationen unvollständig sein oder einige Seiten nicht angezeigt werden. ✎✎Sie können die Videotextseiten durch Drücken der Zifferntasten auf der Fernbedienung wechseln. 1 / (Videotext an/mix): Aktiviert den Videotextmodus des aktuellen Kanals.
05 Verlegen der Kabel Weitere Informationen Typ des Standfußes Verstecken Sie die Kabel im Kabelschlauch, damit sie durch den transparenten Standfuß hindurch nicht zu sehen sind. 1 1 2 3 2 3 Ausführung für Wandhalterung ✎✎Ziehen Sie beim Ordnen der Kabel nicht zu fest daran. Auf diese Weise kann es zu Beschädigungen der Geräteanschlüsse kommen. Deutsch [UC5100]BN68-02656B-00L04.
Weitere Informationen Anbringen der Wandhalterung Montieren der Montagehalterung Wenn Sie das Fernsehgerät an einer Wand montieren, bringen Sie die Montagehalterung in der dargestellten Weise an. Montagehalterung Anbringen des Netzkabels Wenn Sie das Fernsehgerät an einer Wand montieren, bringen Sie das Netzkabel in der dargestellten Weise an. 1 2 3 1. Entfernen Sie die oben in der ersten Abbildung dargestellten Schraube. 2. Bringen Sie die Kabelklammer am Netzkabel an. 3.
05 Spezifikation (VESA) der Wandhalterung Montieren Sie die Wandhalterung an einer soliden Wand, die senkrecht zum Boden steht. Bei Installation auf anderen Trägermaterialien wenden Sie sich bitte an Ihren Fachhändler. Bei Montage an einer Decke oder schrägen Wand kann es herunterfallen und zu Verletzungen kommen. ✎✎HINWEIS xx Die Standardabmessungen der Wandhalterung finden Sie in der nachfolgenden Tabelle.
Weitere Informationen Kensington-Schloss als Diebstahlsicherung Das Kensington-Schloss gehört nicht zum Lieferumfang Ihres Samsung-Geräts. Ein Kensington-Schloss dient zur physischen Sicherung des Systems bei Verwendung in öffentlichen Bereichen. Je nach Hersteller können Aussehen und Verriegelungsverfahren von der Abbildung abweichen. Weitere Informationen zur richtigen Anwendung entnehmen Sie bitte der Bedienungsanleitung des KensingtonSchlosses.
05 Fehlerbehebung Problem Lösungen und Erklärungen Bildqualität Führen Sie zu allererst den Bildtest durch, um zu bestätigen, dass Ihr Fernsehgerät das Testbild korrekt anzeigt. (Wechseln Sie zu MENU - Unterstützung - Eigendiagnose - Bildtest) (Seite 22). Wenn das Testbild richtig angezeigt wird, kann das schlechte Bild durch die Signalquelle oder das Signal verursacht sein. Das Fernsehbild ist nicht so gut wie im Geschäft.
Weitere Informationen Problem Kein Bild/Video. Lösungen und Erklärungen • • • • Überprüfen Sie die Kabelverbindungen. Unterbrechen Sie kurzzeitig alle Kabelverbindungen zwischen dem Fernsehgerät und den externen Geräten. Stellen Sie den Videoausgang Ihres externen Geräts (Kabel-/Satellitenreceiver, DVD-/Blu-ray-Player) so ein, dass er zur Verbindung mit dem Fernsehgerät passt. Zum Beispiel: Wenn der HDMI-Ausgang des externen Geräts verwendet wird, schließen Sie es an den HDMI-Eingangs Ihres Fernsehers an.
Lösungen und Erklärungen 05 Problem • Dies ist Teil des Produktdesigns und kein Defekt. Das PIP-Menü ist nicht verfügbar. • PIP-Funktionen stehen nur zur Verfügung, wenn Sie eine HDMI-, PC- oder Komponentensignalquelle anzeigen (Seite 21). Die Meldung „Verschlüsseltes Signal“ oder „Kein Signal/Schwaches Signal“ wird angezeigt. • Wenn Sie ein CAM (mit „CI“ oder „CI+“-Karte) verwenden, überprüfen Sie, ob es richtig in den CI-Steckplatz (Common Interface) eingesetzt wurde.
Weitere Informationen Technische Daten Bildschirm (nativ) 1920 x 1080 bei 60 Hz Umgebungsbedingungen Betriebstemperatur Luftfeuchtigkeit (bei Betrieb) Lagerungstemperatur Luftfeuchtigkeit (Lagerung) TV-System Fernsehnorm/Videosystem: 10° C bis 40° C 10% bis 80%, nicht kondensierend -20° C bis 45° C 5% bis 95%, nicht kondensierend Analog: B/G, D/K, L, I (je nach eingestelltem Land) Digital: DVB-T/DVB-C Analog: PAL, SECAM, NTSC-4.43, NTSC-3.58, PAL60 Digital: MPEG-2 MP@ML, MPEG-4, H.264/AVC MP@L3, MP@L4.
Alle wählen AllShare Anschließen an ein Audiogerät Anschließen an einen PC Anynet+ Aufnahme Aufstellbereich Auto. Lautst. Autom.
Les figures et illustrations contenues dans ce mode d'emploi sont fournies pour référence uniquement. Elles peuvent différer de l'aspect réel du produit. La conception et les spécifications du produit sont susceptibles d'être modifiées sans préavis. Avis concernant le téléviseur numérique 1. 2. 3. 4. 5. 6.
Contenu Mise en route 4 Connexions 8 11 4 5 6 7 7 Accessoires Présentation du panneau de configuration Présentation de la télécommande Raccordement à une antenne Plug & Play (configuration initiale) 8 Connexion à un périphérique AV 9 Connexion à un système audio 10 Changement de la source d'entrée 11 11 11 13 15 17 19 22 Navigation dans les menus Utilisation du bouton INFO (Guide Now & Next) Planification des émissions à regarder Menu Canal Menu Image Menu Son Menu Configuration Menu Assistance Fon
Mise en route Accessoires ✎✎Vérifiez que les éléments suivants sont fournis avec votre téléviseur à LED. S'il manque des éléments, contactez votre revendeur. ✎✎Les couleurs et les formes des éléments peuvent varier en fonction des modèles. ✎✎Les câbles qui ne se trouvent pas dans le contenu de l'emballage peuvent être achetés séparément.
01 Présentation du panneau de configuration Mise en route ✎✎La couleur et la forme du produit peuvent varier en fonction du modèle. Témoin d'alimentation Haut-parleurs Capteur de la télécommande Capteur de la télécommande Dirigez la télécommande vers ce point du téléviseur. SOURCEE Bascule entre toutes les sources d'entrée disponibles. Dans le menu du téléviseur, ce bouton a la même fonction que le bouton ENTERE de la télécommande.
Mise en route Présentation de la télécommande ✎✎Ceci est une télécommande spéciale destinée aux malvoyants. Elle dispose de points Braille sur les boutons Power, Channel et Volume. Permet d'allumer et d'éteindre le téléviseur.. POWER ON/OFF Active ou désactive l'éclairage de la télécommande. Lorsque l'éclairage est activé, les boutons enfoncés restent allumés pendant quelques instants. (Utiliser la télécommande avec ce bouton réglé sur ON réduit la durée de vie de la pile.
01 Raccordement à une antenne Mise en route Lorsque vous allumez le téléviseur pour la première fois, des réglages de base s'effectuent de manière automatique. ✎✎Préréglage: connexion du câble d'alimentation et de l'antenne. Antenne VHF/UHF Câble ou ANT OUT Entrée de l'alimentation Plug & Play (configuration initiale) Lorsque le téléviseur est allumé pour la première fois, plusieurs invites s'affichent pour vous aider à configurer les réglages de base. Appuyez sur le bouton POWERP.
Connexions Connexion à un périphérique AV Utilisation d'un câble HDMI ou HDMI/DVI: connexion HD (jusqu'à 1080p) Périphériques disponibles: lecteur DVD, lecteur Blu-ray, décodeur câble HD, récepteur satellite HD (boîtier décodeur), décodeur câble, récepteur satellite (décodeur) Lecteur DVD/ Blu-ray HDMI OUT Lecteur DVD/ Blu-ray DVI OUT R W AUDIO OUT R W Rouge Blanc R-AUDIO-L ✎✎HDMI IN 1(DVI), 2, 3, 4, PC/DVI AUDIO IN xx Lorsque vous utilisez une connexion avec câble HDMI/DVI, vous devez utiliser la
02 Connexion à un système audio Connexions Utilisation d'une connexion Optique (Numérique) ou d'une sortie casque Périphériques disponibles: système audio numérique, amplificateur, système home cinéma DVD système audio numérique OPTICAL ✎✎DIGITAL AUDIO OUT (OPTICAL) xx Lorsqu'un système audio numérique est relié à la prise DIGITAL AUDIO OUT (OPTICAL), baissez le volume du téléviseur et du système. xx Le mode audio 5.
Connexions Emplacement COMMON INTERFACE pour les connexions Pour regarder les chaînes payantes, la carte d'interface commune (CI(CI+) CARD) doit être insérée. yy Si vous ne l'insérez pas, certaines chaînes afficheront le message "Signal brouillé". yy Les informations de pairage contenant un numéro de téléphone, l'ID de la carte d'interface commune (CI(CI+) CARD), l'ID de l'hôte et d'autres informations s'afficheront dans 2 ou 3 minutes. Si un message d'erreur s'affiche, contactez votre fournisseur d'accès.
Fonctions de base PRE-CH TTX/MIX CH LIST MENU MIDEA.P GUIDE TOOLS INFO RETURN EXIT 3 1 2 A 1 B 4 L'affichage identifie la chaîne en cours et l'état de INFO certains paramètres audio et vidéo. Le Guide Now & Next affiche des informations quotidiennes sur les programmes de télévision en fonction de l'heure de diffusion. yy Faites défiler à l'aide des boutons ◄, ► pour afficher des informations sur le programme de votre choix, tout en regardant la chaîne actuelle.
Fonctions de base Utilisation de l'option Diffusion programmée Guide 2:10 Mar 1 Jui DTV Air 800 five Family Affairs 18:00 - 18:30 Drama Tanya confesses all to a stunned Babs. Conrad is anxious to hear... 800 five 800 800 )Family Affairs )Dark Angel Mode aff. ■■ * Mes chaînes: affiche le groupe du canal. ■■ Programmé: affiche tous les programmes réservés actuellement. Gestion chaînes five five xx Information E Annuler 1 Chaînes: affiche la liste des chaînes selon le type de chaîne.
■■ Chaîne numérique: permet de changer de pays pour les chaînes numériques. (dans Gestion chaînes) Affiche toutes les chaînes favorites. ■■ Modifier mes chaînes t: vous pouvez définir les chaînes sélectionnées dans le groupe Mes chaînes souhaité. ✎✎Le symbole "*" s'affiche et la chaîne est définie en tant que Ma chaîne. 1. Sélectionnez une chaîne et appuyez sur le bouton TOOLS. Ajoutez ou supprimez une chaîne dans les groupes Ma chaîne de votre choix: 1, 2, 3 ou 4. 3.
Fonctions de base ✎✎Mode Canal xx P (Mode Programme): à la fin du réglage, des numéros de position compris entre P0 et P99 sont attribués aux stations de radiodiffusion de votre région. Dans ce mode, vous pouvez sélectionner un chaîne en saisissant son numéro de position. xx C (antenne) / S (câble): ces deux modes vous permettent de sélectionner une chaîne en entrant le numéro affecté à chaque station de radiodiffusion (antenne) ou canal (câble).
✎✎ Il est désactivé lorsque le PC est en mode d'économie d'énergie. Mode Sélectionnez le type d'image que vous préférez. ■■ Dynamique: adapté à un environnement lumineux. ¦¦ Modification des options d'image P.MODE ■■ Standard: adapté à un environnement normal. ■■ Naturel: permet de réduire la fatigue oculaire. ✎✎ L'option Naturel n'est pas disponible en mode PC. ■■ Cinéma: convient au visionnage de films dans une pièce sombre.
Fonctions de base ■■ Espace de couleur (Auto. / Natif): permet de régler la gamme des couleurs disponibles pour créer l'image. ■■ Balance blancs: permet de régler la température des couleurs pour que l'image soit plus naturelle. Aj. Rouge / Aj. Vert / Aj. Bleu: Réglez la profondeur de chaque couleur (rouge, vert, bleu). Régl. Rouge / Régl. vert / Régl. bleu: Réglez la luminosité de chaque couleur (rouge, vert, bleu). Réinit.: rétablit les paramètres Balance blancs par défaut.
✎✎ Configuration de votre logiciel PC (instructions basées sur Windows XP) En fonction de la version de Windows et de la carte vidéo, il se peut que les écrans de votre PC présentent un aspect différent. Dans ce cas, les mêmes informations de paramétrage de base seront presque toujours d'application. Dans le cas contraire, contactez le fabricant de votre ordinateur ou votre revendeur Samsung. 1. Cliquez sur "Panneau de configuration" dans le menu Démarrer de Windows.
Fonctions de base ¦¦ Réglage des paramètres sonores Egaliseur Cette fonction permet de régler le mode de son (mode de son standard uniquement). ■■ Balance G/D: règle la balance entre les haut-parleurs droit et gauche. ■■ 100Hz / 300Hz / 1kHz / 3kHz / 10kHz (Réglage de la bande passante): permet de régler le niveau de fréquence de la bande passante.
✎✎ Retard Audio: permet de corriger la différence audio-vidéo, lorsque vous regardez la télévision ou une vidéo, et d'écouter une sortie audio numérique à l'aide d'un périphérique externe tel qu'un récepteur AV (0 ms ~ 250 ms). ■■ Comp Dolby Digital (Line / RF): cette fonction réduit la disparité entre un signal Dolby Digital et un signal vocal (à savoir, Audio MPEG, HE-AAC, Son ATV).
Fonctions de base Période d'activation / Période de désactivation: sélectionnez l'heure, les minutes et l'action Activer/Désactiver. (Pour activer le minuteur selon les réglages définis, choisissez Activer.) Volume: permet de sélectionner le volume désiré. Source: sélectionnez le contenu TV ou USB à lire lors de la mise sous tension automatique du téléviseur. (L'option USB peut uniquement être sélectionnée lorsqu'un périphérique USB est connecté au téléviseur.
■■ Mode Jeu (Arrêt / Activé): En reliant le téléviseur à une console de jeu telle que PlayStation™ ou Xbox™, vous pouvez profiter d'une expérience de jeu plus réaliste en sélectionnant le mode de jeu. PIP t ✎✎REMARQUE xx Précautions et limitations pour le mode de jeu –– Pour déconnecter la console de jeux et connecter un autre périphérique externe, définissez Mode Jeu sur Arrêt dans le menu de configuration. –– Si vous affichez le menu du téléviseur en Mode Jeu, l'écran tremble légèrement.
Fonctions de base Menu Assistance Installation de la version la plus récente Diagnostic automatique ✎✎Le diagnostic automatique peut prendre quelques minutes ; ce phénomène est normal. ■■ Test de l'image (Oui / Non): utilisez cette option pour rechercher d'éventuels problèmes d'image. ■■ Test du son (Oui / Non): utilisez la mélodie intégrée pour rechercher d'éventuels problèmes sonores.
Fonctions avancées 04 Connexion à un ordinateur Fonctions avancées Utilisation d'un câble HDMI/DVI / D-Sub AUDIO OUT DVI OUT AUDIO OUT PC OUT Modes d'affichage (Entrées D-Sub et HDMI/DVI) La résolution optimale est de 1920 X 1080 à 60 Hz.
Fonctions avancées Connexion réseau Vous pouvez configurer votre téléviseur de telle sorte qu'il puisse accéder à Internet par le biais de votre réseau local (LAN) à l'aide d'une connexion câblée ou sans fil. ¦¦ Connexion à un réseau câblé Vous pouvez connecter votre téléviseur au réseau local de trois manières différentes: yy En connectant le port LAN situé à l'arrière du téléviseur à un modem externe à l'aide d'un câble de catégorie 5. Voir le schéma cidessous.
Config. du réseau (Manuel) Utilisez l'option Config. du réseau Auto. lors de la connexion du téléviseur à un réseau prenant en charge le protocole DHCP. Pour configurer automatiquement la connexion réseau par câble de votre téléviseur, procédez comme suit : Utilisez l'option Config. du réseau Manuel lors de la connexion du téléviseur à un réseau qui nécessite une adresse IP statique. 1. Connectez votre téléviseur au réseau local en suivant la procédure décrite à la section précédente. 2.
Fonctions avancées ¦¦ Connexion à un réseau sans fil Pour établir une connexion sans fil entre le téléviseur et le réseau, vous avez besoin d'un routeur ou d'un modem et d'un adaptateur LAN sans fil Samsung (WIS09ABGN), que vous connectez à la prise USB située sur le panneau latéral ou arrière du téléviseur. Voir l'illustration ci-dessous.
04 Avis Méthode 1 Méthode 2 Connexion à l'aide de l'adaptateur USB à angle droit Connexion via un câble d'extension Fonctions avancées L'image peut apparaître altérée ou statique pour certaines chaînes lorsque le téléviseur est connecté à l'adaptateur LAN sans fil Samsung. Le cas échéant, établissez une connexion à l'aide de l'une des méthodes suivantes : ou Config. du réseau (PBC(WPS)) 7. Appuyez sur le bouton rouge de votre télécommande. 8.
Fonctions avancées Procédure de configuration automatique 8. Pour configurer automatiquement la connexion sans fil, procédez comme suit : 1. Suivez les étapes 1 à 6 de la section "Configuration à l'aide de la méthode PBC (WPS)" (p. 27). 2. Appuyez sur le bouton ▼ pour sélectionner Config. prot. Internet, puis sur le bouton ENTERE. Appuyez sur le bouton ▲ ou ▼ pour sélectionner Auto., puis sur ENTERE. 3. Appuyez sur le bouton ▲ pour accéder à l'option Sélectionnez un réseau, puis sur le bouton ENTERE.
Si les autres méthodes ne fonctionnent pas, vous devez saisir manuellement les valeurs de configuration du réseau. Il se peut que la connexion échoue car votre fournisseur d'accès Internet a enregistré, de manière permanente, l'adresse MAC (numéro d'identification unique) de votre ordinateur ou modem et qu'il utilise cette adresse à des fins d'authentification chaque fois que vous vous connectez à Internet. Cela a pour but d'empêcher tout accès non autorisé.
Fonctions avancées Media Play MEDIA.P Vous pouvez lire les photos, la musique et/ou les films enregistrés sur un périphérique USB de type MSC et/ou sur votre ordinateur. MediaPlay Vidéos SUM Changer pér. Afficher périph. E Entrer R Retour ¦ Connexion d'un périphérique USB 1. Allumez votre téléviseur. 2. Connectez un périphérique USB contenant des fichiers photo, de la musique et/ou des films à la prise USB 1 (HDD) ou USB 2 située sur le côté du téléviseur. 3.
04 ✎✎Fonctions non prises en charge lors de la connexion à l'ordinateur via le réseau: Fonctions avancées xx Fonctions Fond musical et Paramètres de musique de fond. xx Tri des fichiers par préférence dans les dossiers Photos, Musique et Vidéos. xx Bouton � (Retour arrière) ou µ (Avance rapide) pendant la lecture d'un film. ✎✎Les sous-titres intégrés multi-audio Divx DRM ne sont pas pris en charge. ✎✎Samsung PC Share Manager doit être autorisé par le pare-feu de l'ordinateur.
Fonctions avancées ¦¦ Affichage Accédez au fichier de votre choix à l'aide des boutons haut/bas/droite/gauche et appuyez ensuite sur le bouton ENTERE ou � (Lecture). La lecture du fichier commence. ✎✎Prise en charge de Afficher périph. et Accueil dans la page d'accueil Media Play. Information: Vous pouvez vérifier le nom du fichier sélectionné, le nombre de fichiers, ainsi que la page. Vidéos 1/1 Page /Movie 01.avi Movie 01.avi Movie 03.avi Movie 05.
Codec vidéo Résolution Fréquence d'images (i/s) Débit binaire (Mbps) Divx 3.11 / 4.x / 5.1 / 6.0 1920x1080 6 ~ 30 8 XviD 1920x1080 6 ~ 30 8 H.264 BP / MP / HP 1920x1080 6 ~ 30 25 Conteneur *.avi *.mkv AVI MKV *.asf ASF *.wmv ASF *.mp4 MP4 *.3gp 3GPP *.vro VRO VOB *.mpg *.mpeg PS *.ts *.tp *.trp MPEG4 SP / ASP 1920x1080 6 ~ 30 8 Divx 3.11 / 4.x / 5.1 / 6.0 1920x1080 6 ~ 30 8 XviD 1920x1080 6 ~ 30 8 H.
Fonctions avancées Lecture d'un fichier vidéo en continu (Reprendre la lecture) Si vous quittez la fonction de lecture de vidéos, il est possible de reprendre la lecture ultérieurement, au point où vous l'avez arrêtée. 1. Pour sélectionner le fichier film que vous souhaitez lire en continu, appuyez sur le bouton ◄ ou ► dans la section Liste de fichiers. 2. Appuyez sur le bouton � (Lecture) / ENTERE. 3. Sélectionnez Lecture en continu (Reprendre la lecture) en appuyant sur le bouton bleu.
04 ¦¦ Lecture de plusieurs fichiers 1. Appuyez sur le bouton jaune dans la liste des fichiers pour sélectionner le fichier de votre choix. 2. Répétez l'opération ci-dessus pour sélectionner plusieurs fichiers. Vidéos Movie 01.avi ✎✎ REMARQUE Movie 03.avi Jan.10.2010 Movie 04.avi Jan.10.2010 Movie 05.avi xx Pour annuler votre sélection, appuyez de nouveau sur le Jan.10.2010 Movie 07.avi TOOLS et sélectionnez Désélectionner tout. Jan.10.2010 Movie 10.avi Jan.10.2010 SUM Jan.10.2010 Movie 08.
Fonctions avancées Menu des options de lecture de vidéos/musique/photos Pendant la lecture d'un fichier, appuyez sur le bouton TOOLS. Catégorie Opérations Vidéos Musique Photos Titre Vous pouvez déplacer directement l'autre fichier. > Mode Répétition Vous pouvez lire des fichiers musicaux et vidéo en boucle. > Format de l'image Vous pouvez régler le format de l'image suivant vos préférences. > Réglage de l'image Vous pouvez régler les paramètres d'image. (p.
04 Anynet+ Anynet+ est une fonction qui vous permet de contrôler tous les périphériques Samsung connectés compatibles Anynet+ avec votre télécommande Samsung. Le système Anynet+ peut être utilisé uniquement avec les appareils Samsung disposant de la fonction Anynet+. Pour être sûr que votre appareil Samsung dispose de cette fonction, vérifiez qu'il comporte le logo Anynet+.
Fonctions avancées Menu Anynet+ Le menu Anynet+ varie selon le type et l'état des appareils Anynet+ connectés au téléviseur. Menu Anynet+ Voir télévision Liste d'appareils (nom_appareil) MENU (nom_appareil) INFO Enregistrement: (*enregistreur) Arrêter Enr.: (*enregistreur) Récepteur Description Fait basculer le mode Anynet+ en mode de diffusion TV. Affiche la liste des appareils Anynet+. Affiche les menus de l'appareil connecté. Par exemple, si un graveur DVD est connecté, son menu de disque s'affiche.
04 ¦¦ Ecoute via un récepteur 2. Appuyez sur le bouton EXIT pour quitter le menu. ✎✎ Si votre récepteur ne prend en charge que l'audio, il se peut qu'il ne figure pas dans la liste d'appareils. ✎✎ Le récepteur fonctionnera lorsque vous aurez correctement raccordé la prise d'entrée optique du récepteur à la prise DIGITAL AUDIO OUT (OPTICAL) du téléviseur. ✎✎ Lorsque le récepteur (p. ex. Home cinéma) est activé, vous pouvez écouter le son sortant de la prise optique du téléviseur.
Fonctions avancées AllShare Message / Média / ScreenShare ¦¦ A propos de AllShare AllShare connecte votre téléviseur, vos téléphones portables et d'autres appareils compatibles par l'intermédiaire d'un réseau. Vous pouvez ainsi être averti, sur l'écran de votre téléviseur, de la réception d'appels, lire des messages SMS ou encore afficher les programmes définis sur votre téléphone portable.
Utilisation de la fonction ScreenShare Si vous recevez un appel alors que vous regardez la télévision, la fenêtre d'alarme s'affiche. ScreenShare affiche la même page Web que celle fournie sur le téléphone portable. La fonction ScreenShare vous permet d'ouvrir les différents types de contenu enregistrés sur un téléphone portable. Ainsi, l'image de droite illustre une page d'accès au contenu d'un téléphone portable.
Informations supplémentaires Fonction Télétexte de chaîne analogique La page d'index du télétexte contient des instructions sur l'utilisation du service. Pour que les informations du télétexte s'affichent correctement, la réception des chaînes doit être stable. Autrement, des informations pourraient manquer ou certaines pages ne pas s'afficher. ✎✎Vous pouvez changer de page de télétexte en appuyant sur les boutons numériques de la télécommande.
05 Assemblage des câbles Informations supplémentaires Type support Insérez les câbles dans l'attache de câble, de telle sorte qu'ils ne soient pas visibles à travers le pied transparent. 1 1 2 3 2 3 Type montage mural ✎✎Ne tirez pas trop sur les câbles lorsque vous les manipulez. Les bornes de connexion du produit risqueraient d’être endommagées. Français [UC5100]BN68-02656B-00L04.
Informations supplémentaires Installation du support mural Assemblage du cache Si vous fixez le téléviseur à un mur, attachez le cache de la manière indiquée sur le dessin. Cache Assemblage du cordon d'alimentation Si vous fixez le téléviseur à un mur, attachez le cordon d'alimentation comme illustré. 1 2 3 1. Retirez la vis illustrée dans la première image ci-dessus. 2. Fixez l'attache du cordon d'alimentation à ce dernier. 3.
05 Caractéristiques du kit de fixation murale (VESA) Installez votre fixation murale sur un mur solide perpendiculaire au sol. Si vous souhaitez la fixer sur d'autres matériaux de construction, veuillez prendre contact avec votre revendeur le plus proche. Si vous l'installez au plafond ou sur un mur non droit, la fixation risque de tomber et de provoquer de graves blessures. ✎✎REMARQUE xx Les dimensions standard pour tous les kits de fixation murale sont indiquées dans le tableau ci-dessous.
Informations supplémentaires Verrou antivol Kensington Le verrou antivol Kensington n'est pas fourni par Samsung. L'antivol Kensington est un dispositif utilisé pour fixer physiquement le système lorsqu'il est utilisé dans un endroit public. L'aspect du verrou et la méthode de verrouillage peuvent différer de l'illustration en fonction du fabricant. Consultez le manuel fourni avec le verrou Kensington pour obtenir des instructions d'utilisation supplémentaires.
05 Dépannage Problèmes Solutions et explications Qualité de l'image Exécutez tout d'abord le Test de l'image pour vérifier que votre téléviseur affiche correctement l'image de test. (Accédez à MENU - Assistance - Diagnostic automatique - Test de l'image) (p. 22) Si l'image de test s'affiche correctement, sa qualité médiocre peut être due à la source ou au signal. La qualité de l'image affichée par le téléviseur n'est pas aussi bonne que dans le magasin.
Informations supplémentaires Problèmes Une image/vidéo est affichée. Solutions et explications • • • • Vérifiez le raccordement des câbles (retirez tous les câbles connectés au téléviseur et aux appareils externes, puis rebranchez-les). Réglez les sorties vidéo de vos périphériques externes (décodeur câble/boîtier décodeur, DVD, Blu-ray, etc.) pour faire correspondre les connexions à l'entrée du téléviseur.
Solutions et explications 05 Problèmes • Elles font partie de la conception du produit et ne constituent pas un défaut. Le menu PIP n'est pas disponible. • La fonctionnalité PIP n'est disponible que lorsque vous utilisez une source HDMI, PC ou Composant (p. 21). Message "Scramble signal" ou "Weak Signal/ No Signal". • • Si vous utilisez une CARTE CAM (CI/CI+), vérifiez qu'elle est installée dans la fente de l'interface commune.
Informations supplémentaires Caractéristiques techniques Résolution native du panneau 1920 x 1080 à 60 Hz Considérations environnementales Température de fonctionnement Humidité en cours de fonctionnement Température de stockage Humidité sur le lieu de stockage Système TV Système de couleur/vidéo de 10 °C à 40 °C (de 50 °F a 104 °F) de 10% à 80%, sans condensation de -20 °C à 45 °C (de -4 °F a 113 °F) de 5% à 95%, sans condensation Analogique: B/G, D/K, L, I (en fonction de votre pays) Numérique: DVB-T/D
Aff.
Le figure e le illustrazioni presenti in questo Manuale dell'utente sono fornite unicamente a titolo di riferimento e possono differire da quelle del prodotto attuale. Le specifiche e il design del prodotto possono variare senza preavviso. Avviso relativo alla trasmissione TV digitale 1. 2. 3. 4. 5. 6.
Contenuti Per iniziare 4 4 5 6 7 7 Accessori Vista del Pannello di controllo Vista del telecomando Collegamento all’antenna Plug & Play (Impostazione iniziale) 8 Collegare un dispositivo AV 9 Collegamento a un dispositivo audio 10 Cambiare la sorgente di ingresso Funzioni base 11 11 11 13 15 17 19 22 Come scorrere i menu Uso del tasto INFO (Guida Now & Next) Pianificare la visione Menu Canale Menu Immagine Menu Suono Menu Impostazione Menu Supporto Funzioni avanzate 23 23 24 30 37 40 Collegamento
Per iniziare Accessori ✎✎Controllare che nella confezione del TV LED siano contenuti i seguenti componenti. Se eventuali componenti risultassero mancanti, contattare il rivenditore. ✎✎La forma e il colore dei componenti possono variare in base al modello. ✎✎Eventuali cavi non forniti in dotazione possono essere acquistati separatamente.
01 Vista del Pannello di controllo Per iniziare ✎✎La forma e il colore del prodotto possono variare in base al modello. Indicatore di alimentazione Altoparlanti Sensore del telecomando Sensore del telecomando Puntare il telecomando in direzione di questo punto sul televisore. SOURCEE Alterna tutte le sorgenti d’ingresso disponibili. Nel menu OSD, utilizzare questo tasto come si usa il tasto ENTERE del telecomando. Visualizza attraverso un menu OSD (on screen display) le funzioni del televisore.
Per iniziare Vista del telecomando ✎✎Questo speciale telecomando, progettato per aiutare chi ha problemi di vista, presenta punti in braille sui tasti Power, Channel e Volume. Spegne e accende il televisore. POWER ON/OFF Accende/Spegne la luce del telecomando. Questa funzione attiva l'illuminazione momentanea dei tasti quando questi vengono premuti. (L'uso del telecomando con questo tasto impostato su On riduce l'uso della batteria.) SOURCE Visualizza e seleziona le sorgenti video disponibili (p. 10).
01 Collegamento all'antenna Per iniziare Quando il televisore viene acceso per la prima volta, le impostazioni di base vengono visualizzate automaticamente. Preimpostato: Collegare l'alimentazione e l'antenna. Antenna VHF/UHF Cavo o ANT OUT Ingresso alimentazione Plug & Play (Impostazione iniziale) Alla prima accensione del televisore, vengono visualizzate alcune schermate che aiutano l'utente a configurare le impostazioni di base. Premere il tasto POWERP.
Collegamenti Collegare un dispositivo AV Uso di un cavo HDMI o HDMI/DVI: Connessione HD (fino a 1080p) Dispositivi disponibili: Lettore DVD, Blu-ray, ricevitore via cavo HD, ricevitore satellitare HD STB (Set-Top-Box), ricevitore via cavo, ricevitore satellitare (STB) Lettore DVD / Blu-ray HDMI OUT Lettore DVD / Blu-ray DVI OUT R W AUDIO OUT R W Rosso Bianco R-AUDIO-L ✎✎HDMI IN 1(DVI), 2, 3, 4, PC/DVI AUDIO IN xx Quando si effettua una connessione mediante cavo HDMI/DVI, è necessario utilizzare il
02 Collegamento a un dispositivo audio Collegamenti Uso di un collegamento ottico (digitale) o cuffie Dispositivi disponibili: sistema audio digitale, amplificatore, DVD home theatre sistema audio digitale OPTICAL ✎✎DIGITAL AUDIO OUT (OPTICAL) xx Quando un sistema audio digitale è collegato alla porta DIGITAL AUDIO OUT (OPTICAL), ridurre il volume sia del televisore sia del sistema. xx L'audio 5.
Collegamenti Slot per CONNESSIONI COMMON INTERFACE Per visualizzare canali a pagamento, è necessario inserire una “SCHEDA CI o CI+”. yy Se non si inserisce una “SCHEDA CI o CI+”, alcuni canali visualizzeranno il messaggio “Segnale criptato”. yy Le informazioni di pairing che contengono un numero telefonico, l’ID della "SCHEDA CI o CI+", l’ID host e altri dati verranno visualizzati entro 2~3 minuti. Se viene visualizzato un messaggio di errore, contattare il fornitore del servizio.
Funzioni base PRE-CH TTX/MIX Uso del tasto INFO (Guida Now & Next) Prima di utilizzare il televisore, seguire questi passaggi per imparare a scorrere i menu, selezionando e regolando le diverse funzioni. CH LIST Il display identifica il canale corrente e lo stato di INFO determinate impostazioni audio e video. La guida Now & Next mostra le informazioni relative alla programmazione giornaliera di ogni canale in base all'orario di trasmissione.
Funzioni base Uso di Vista programmazione ■■ Guida 2:10 Mar 1 Giu DTV Air 800 five Family Affairs 18:00 - 18:30 Tanya confesses all to a stunned Babs. Conrad is anxious to hear... 800 800 )Family Affairs )Dark Angel Mod vis. Programmato: Mostra tutti i programmi attualmente prenotati. five five canale. xx Giallo (Seleziona): Selezionare i canali desiderati e premere il tasto giallo per impostare tutti i canali selezionati contemporaneamente.
■■ Canale digitale: Cambiare la nazione per i canali digitali. (in Gestione canali) Mostra tutti i canali preferiti. ■■ Canale analogico: Cambiare la nazione per i canali analogici. ■■ Modifica Miei canali t : E' possibile impostare i canali selezionati nel gruppo Mio canale. ✎✎Il simbolo “*” verrà evidenziato e il canale verrà impostato nel gruppo Mio canale. 1. Selezionare un canale e premere il tasto TOOLS. 2. Aggiungere o eliminare un canale nei gruppi Mio canale quali 1, 2, 3 e 4. 3.
Funzioni base ✎✎Mod. Canale xx P (modalità Programma): Una volta completata la sintonizzazione, alle emittenti della propria area viene assegnato un numero compreso tra P0 e P99. In questa modalità, è possibile selezionare un canale digitandone il numero corrispondente. xx C (modalità canale antenna) / S (modalità canale cavo): Queste due modalità permettono di selezionarne un canale digitandone il numero ad esso assegnato per ogni stazione via etere o canale via cavo.
energetico. Modalità Selezionare il tipo di immagine preferita. ■■ Dinamica: Adatta per un ambiente illuminato. ■■ Standard: Adatta per condizioni di luce normali. ✎✎ Disabilitata quando il PC è in modalità risparmio ¦¦ Modifica delle Opzioni immagine P.MODE ■■ Naturale: Adatta per ridurre l'affaticamento della vista. Naturale non è disponibile in modalità PC. ✎✎ ■■ Film: Adatta per la visione di film in un ambiente poco illuminato.
Funzioni base ■■ Spazio colore (Automatico / Nativa): Regolare l'intervallo dei colori disponibili per creare l'immagine. ■■ Bilan bianco: Regolare la temperatura colore per ottenere immagini più naturali. R-Offset / G-Offset / B-Offset: Regolare l'intensità di ogni colore (rosso, verde, blu). R-Gain / G-Gain / B-Gain: Regolare la luminosità di ogni colore (rosso, verde, blu). Reset: Ripristina il valore Bilan bianco alle impostazioni predefinite.
✎✎ ■■ Filtro disturbo MPEG (Off / Basso / Medio / Alto / Automatico): Riduce il disturbo MPEG per una migliore qualità delle immagini. ■■ Livello di nero HDMI (Normale / Basso): Consente di selezionare il livello di nero dello schermo per regolare la profondità dell'immagine. ✎✎ Disponibile solo in modalità HDMI (segnali RGB).
Funzioni base ¦¦ Regolare le impostazioni audio Equalizzatore Regola la modalità audio (solo modalità audio standard). ■■ Bilanciamento L/R: Controlla il bilanciamento degli altoparlanti sinistro e destro. ■■ 100Hz / 300Hz / 1kHz / 3kHz / 10kHz (Regolazione larghezza di banda): Regola il livello di specifiche frequenze di banda. ■■ Reset: Ripristina l'equalizzatore alle impostazioni predefinite. ¦¦ Sistemi audio, ecc.
✎✎ Ritardo audio: Usata per correggere la mancata corrispondenza audio-video durante la visione del televisore o di un video e ascoltando un canale digitale mediante un dispositivo esterno, come per esempio un ricevitore AV (0ms ~ 250ms). ■■ Comp Dolby Digital (Line / RF): Questa funzione minimizza la disparità dei segnali tra un segnale dolby digital e un segnale vocale (per es. audio MPEG, HE-AAC, audio ATV).
Funzioni base Orario TV on / Orario TV off: Per impostare l’ora e i minuti e attivare / disattivare l'opzione. (Per attivare il timer con l'impostazione desiderata, impostare su Attiva.) Volume: Selezionare il livello del volume desiderato. Sorgente: Selezionare il contenuto TV o USB da riprodurre quando il televisore viene acceso automaticamente.
■■ Modalità gioco (Off / On): Durante la connessione a una console per videogiochi come PlayStation™ o Xbox™, il gioco sarà più realistico selezionando la modalità gioco. PIP t ✎✎NOTA xx Precauzioni e limitazioni per la modalità gioco –– Per scollegare una console per videogiochi e collegare un altro dispositivo esterno, impostare Modalità gioco su Off nel menu di impostazione. –– Visualizzando il menu TV in Modalità gioco si potrebbe verificare un leggero sfarfallio.
Funzioni base Menu Supporto Installare la versione più recente Auto diagnosi ✎✎La funzione di auto diagnosi potrebbe richiedere alcuni secondi; questa operazione rientra nel normale funzionamento del televisore. ■■ Test immagine (Sì / No): Utilizzato per controllare eventuali problemi di visualizzazione delle immagini. ■■ Test audio (Sì / No): Usare la melodia predefinita per verificare eventuali problemi audio.
Funzioni avanzate 04 Collegamento a un PC Funzioni avanzate Uso di un Cavo HDMI/DVI / D-sub AUDIO OUT DVI OUT AUDIO OUT PC OUT Modalità di visualizzazione (ingresso D-Sub e HDMI/DVI) La risoluzione ottimale è 1920 X 1080 a 60 Hz.
Funzioni avanzate Connessione di rete E' possibile impostare il televisore in modo da poter accedere a Internet attraverso una LAN con un collegamento via cavo o wireless. ¦¦ Collegamento a una rete cablata Vi sono tre modi per collegare il televisore alla LAN via cavo: yy E' possibile collegare il televisore alla LAN connettendo la porta LAN sul retro del televisore a un modem esterno mediante un cavo Cat 5. Vedere lo schema riportato sotto.
Impostazione rete (Manuale) Durante la connessione del televisore a una rete che supporta il protocollo DHCP, configurare Impostazione rete su Auto. Per impostare automaticamente la connessione di rete via cavo del televisore, seguire questi passaggi: Configurare Impostazione rete su Manuale quando si collega il televisore a una rete che richiede un indirizzo IP statico. 1. Collegare il televisore alla LAN come descritto nella sezione precedente. 2.
Funzioni avanzate ¦¦ Collegamento a una rete wireless Per collegare il televisore a una rete wireless, è necessario disporre di un router o di un modem wireless e di un adattatore LAN wireless Samsung (WIS09ABGN) da collegare al jack USB sul pannello posteriore o laterale del televisore. Vedere la figura riportata sotto.
04 Avviso Metodo 1 Metodo 2 Mediante l'adattatore angolare USB Mediante un cavo di prolunga Funzioni avanzate In caso di collegamento del televisore con un adattatore LAN wireless Samsung, alcuni canali potrebbero visualizzare le immagini in modo anomalo o presentare scariche statiche. In tal caso, effettuare un collegamento mediante uno dei seguenti metodi: o Impostazione rete (PBC (WPS)) 7. Premere il tasto Rosso del telecomando. 8. Premere il tasto PBC (WPS) sul router entro due minuti.
Funzioni avanzate Procedura per l'impostazione automatica 8. Per impostare automaticamente l'accesso a una connessione wireless, seguire questi passaggi: 1. Seguire i passaggi da 1 a 6 della “Procedura per l'impostazione mediante PBC (WPS)” (pag. 27). 2. Usare il tasto ▼ per selezionare Impostazione IP, quindi premere ENTERE. Premere ▲ o ▼ per selezionare Automatico, quindi premere ENTERE. 3. Premere il tasto ▲ per passare a Seleziona una rete, quindi premere ENTERE.
Se gli altri metodi non funzionano, digitare le impostazioni di rete manualmente. Il televisore potrebbe non essere in grado di collegarsi a Internet perché l'ISP ha registrato in modo permanente l'indirizzo MAC (un numero di identificazione univoco) del PC o del modem in uso; ciò consente l'autenticazione dell'utente a ogni accesso a Internet in modo da evitare l'accesso non autorizzato.
Funzioni avanzate Media Play MEDIA.P Godetevi le fotografie, la musica o i film salvati su un dispositivo USB Mass Storage Class (MSC) e/o sul PC. MediaPlay Video SUM Camb dispos Visual. dispos. E Conferma R Ritorna ¦ Collegamento di un dispositivo USB 1. Accensione del televisore. 2. Collegare un dispositivo USB contenente foto, musica e/o filmati al jack USB 1 (HDD) o USB 2 sul pannello laterale del televisore. 3.
04 ✎✎Nessuna funzione è supportata in caso di collegamento al PC tramite rete: Funzioni avanzate xx Funzioni Musica di sottof e Impostazione musica di sottofondo. xx Ordinamento dei file in base alle preferenze nelle cartelle Foto, Musica e Video. xx Premere i tasti � (REW) o µ (FF) durante la riproduzione di un film. ✎✎Le didascalie incorporate, Divx DRM, Multi-audio, non sono supportate. ✎✎Samsung PC Share Manager deve essere autorizzato dal programma firewall del PC.
Funzioni avanzate ¦¦ Visualizzazione a schermo Posizionarsi sul file desiderato usando i tasti su/giù/sinistra/destra, quindi premere ENTERE o � (Riproduci). Il file selezionato verrà visualizzato. ✎✎Supporta Visual dispositivi e Home nella homepage Media Play. Informazioni: E' possibile verificare il nome del file selezionato e il numero di file e di pagine. Video Movie 01.avi Jan.10.2010 Movie 03.avi Jan.10.2010 Movie 05.avi Sezione Elenco ordinamento: Visualizza lo standard di ordinamento. Jan.
*.avi *.mkv Contenitore AVI MKV *.asf ASF *.wmv ASF *.mp4 MP4 *.3gp 3GPP *.vro VRO VOB *.mpg *.mpeg PS *.ts *.tp *.trp Codec Video Risoluzione Frame rate (fps) Bit rate (Mbps) Divx 3.11 / 4.x / 5.1 / 6.0 1920x1080 6 ~ 30 8 XviD 1920x1080 6 ~ 30 8 H.264 BP / MP / HP 1920x1080 6 ~ 30 25 MPEG4 SP / ASP 1920x1080 6 ~ 30 8 Divx 3.11 / 4.x / 5.1 / 6.0 1920x1080 6 ~ 30 8 XviD 1920x1080 6 ~ 30 8 H.
Funzioni avanzate Riproduzione continua di filmati (Riprendi riprod.) Uscendo dalla funzione di riproduzione di un filmato, la sua riproduzione può essere ripresa in seguito a partire dal punto nel quale era stata interrotta. 1. Selezionare il filmato da riprodurre in modo continuo premendo il tasto ◄ o ► per selezionarlo nella sezione elenco file. 2. Premere il tasto � (Riproduci) / ENTERE. 3. Selezionare Ripr in continuo (Riprendi riprod.) premendo il tasto blu.
04 ¦¦ Riproduzione di più file 1. Premere il tasto giallo per selezionare il file desiderato tra quelli riportati in elenco. 2. Ripetere l'operazione per selezionare più file. Video Movie 01.avi ✎✎ NOTA Movie 03.avi Jan.10.2010 Movie 04.avi Jan.10.2010 Movie 05.avi xx Per annullare una selezione, premere nuovamente li tasto Jan.10.2010 Movie 07.avi selezionare Deseleziona tutto. Jan.10.2010 Movie 10.avi Jan.10.2010 SUM Jan.10.2010 Movie 08.avi Movie 09.
Funzioni avanzate Menu Opzioni riproduzione Video/Musica/Foto Durante la riproduzione di un file, premere TOOLS. Categoria Operazioni Videos (Video) Music (Musica) Photos (Foto) Titolo E' possibile spostare l'altro file direttamente. > Modalità Ripeti E’ possibile riprodurre ripetutamente filmati o brani musicali. > Formato immagine E' possibile regolare la dimensione dell'immagine in base alle proprie preferenze. > Impostazioni immagine E' possibile regolare l'impostazione dell'immagine. (p.
04 Anynet+ Anynet+ è una funzione che permette di controllare mediante il telecomando del televisore Samsung tutti i dispositivi Samsung collegati che supportano Anynet+. Il sistema Anynet+ può essere usato solo con i dispositivi Samsung dotati della funzione Anynet+. Per controllare se il dispositivo Samsung in uso è dotato di questa funzione, verificare la presenza del logo Anynet+.
Funzioni avanzate Menu Anynet+ Il menu Anynet+ può variare a seconda del tipo e dello stato del dispositivo Anynet+ collegato al televisore. Menu Anynet+ Visualizza TV Elenco dispositivi (nome_dispositivo) MENU (nome_dispositivo) INFO Registrazione: (*registratore) Interrompere registrazione: (*registratore) Ricevitore Descrizione La modalità Anynet+ passa alla modalità di trasmissione TV. Visualizza l'elenco dei dispositivi Anynet+. Mostra i menu del dispositivo collegato.
04 ¦¦ Ascolto tramite il ricevitore 2. Premere EXIT per uscire. ✎✎ Se il ricevitore supporta solo l’audio, potrebbe non comparire nell’elenco dei dispositivi. ✎✎ Il ricevitore è operativo solo se è collegata in modo appropriato la porta Optical In del ricevitore alla porta DIGITAL AUDIO OUT (OPTICAL) del televisore. ✎✎ Quando il ricevitore (per es. un home theatre) è impostato su On, è possibile ascoltare l'audio dall'uscita ottica del televisore.
Funzioni avanzate AllShare Messag / Media / ScreenShare ¦¦ Informazioni su AllShare AllShare collega il televisore a telefoni cellulari e altri dispositivi compatibili mediante una rete. Sul televisore è possibile visualizzare le chiamate in arrivo, gli SMS e i promemoria impostati sul proprio cellulare. Inoltre, è possibile riprodurre contenuti multimediali compresi video, foto e musica memorizzati sul proprio cellulare o su altri dispositivi (per es il PC) e controllarli sul televisore mediante la rete.
Uso della funzione ScreenShare Se arriva una chiamata mentre si guarda il televisore, viene visualizzata la finestra degli allarmi. Screenshare visualizza la stessa pagina web del cellulare. Mediante la funzione ScreenShare, è possibile aprire i vari contenuti memorizzati nel cellulare. Ad esempio, l'immagine sotto visualizza una pagina di accesso per i contenuti provenienti da un cellulare. E' possibile leggere i vari file contenuti nel cellulare e visualizzare la rubrica e il calendario sul televisore.
Altre informazioni Funzione Teletext dei canali analogici La pagina dell’indice del servizio Teletext contiene informazioni sull’uso del servizio. Per visualizzare correttamente le informazioni del servizio Teletext è necessario che la ricezione del canale sia stabile. In caso contrario, alcune informazioni potrebbero essere perse o alcune pagine potrebbero non essere visualizzate correttamente. ✎✎E’ possibile cambiare le pagine Teletext premendo i tasti numerici sul telecomando.
05 Assemblaggio dei cavi Altre informazioni Tipo piedistallo Racchiudere i cavi nel fermacavi in modo che non siano visibili attraverso il piedistallo trasparente. 1 1 2 2 3 3 Tipo montaggio a parete ✎✎Non tirare eccessivamente i cavi durante la loro disposizione. In caso contrario, i terminali di connessione del prodotto potrebbero subire danni. Italiano [UC5100]BN68-02656B-00L04.
Altre informazioni Installazione del supporto a parete Montaggio della staffa preforata Durante l'installazione del televisore a parete, fissare la staffa preforata come mostrato di seguito. Staffa preforata Collegamento del cavo di alimentazione Durante l'installazione del televisore a parete, fissare il cavo di alimentazione come mostrato di seguito. 1 2 3 1. Rimuovere la vite indicata nella prima immagine in alto. 2. Fissare il morsetto del cavo di alimentazione al cavo stesso. 3.
05 Specifiche del kit di montaggio a parete (VESA) Installare il supporto su una parete solida perpendicolare al pavimento. Se il supporto deve essere fissato ad altri tipi di materiale, consultare il rivenditore di zona. Una installazione a soffitto o su pareti inclinate può provocare la caduta dell’unità e lesioni personali. ✎✎NOTA xx Nella tabella sotto riportata vengono indicate le dimensioni standard dei kit di montaggio a parete.
Altre informazioni Blocco antifurto Kensington Il blocco Kensington non è fornito da Samsung. Si tratta di un dispositivo che assicura fisicamente il sistema qualora utilizzato in luogo pubblico. L’aspetto del dispositivo e il metodo di blocco possono variare in base alla marca del prodotto. Per informazioni sull’uso, consultare il manuale fornito insieme al blocco Kensington. 1 2 ✎✎Trovare l’icona “K” sul retro del televisore. L’alloggiamento del blocco 1. Kensington si trova di fianco all’icona “K”.
05 Risoluzione dei problemi Problemi Soluzioni e spiegazioni Qualità dell'immagine Per prima cosa, eseguire il Test immagine per confermare che il televisore sia in grado di visualizzare correttamente l'immagine di prova. (accedere a MENU - Supporto - Auto diagnosi - Test immagine) (p. 22) Se l'immagine di prova viene visualizzata correttamente, la scarsa qualità dell'immagine potrebbe essere causata dalla sorgente o dal segnale.
Altre informazioni Problemi There is picture/Video. Soluzioni e spiegazioni • • • • Verificare le connessioni dei cavi (scollegare e ricollegare tutti i cavi del televisore e dei dispositivi esterni). Impostare le uscite video dei dispositivi esterni (ricevitore via cavo/STB, lettore DVD, Blu-ray, ecc) in modo che le connessioni corrispondano agli ingressi del televisore. Ad esempio, se l'uscita di un dispositivo esterno è HDMI, deve essere collegata a un ingresso HDMI sul televisore.
Soluzioni e spiegazioni 05 Problemi • Ciò non costituisce un difetto ma fa parte del design del prodotto. Il menu PIP non è disponibile. • La funzione PIP è disponibile solo quando il segnale proviene da una sorgente HDMI, PC o component (p. 21). Sullo schermo compare Il messaggio “Segnale criptato” o “Segnale debole/Nessun segnale”. • Se si sta utilizzando un modulo CAM CARD (CI/CI+), verificare che sia installato nell'alloggiamento common interface.
Altre informazioni Specifiche Pannello nativo 1920 x 1080 a 60 Hz Caratteristiche ambientali Temperatura di esercizio Umidità di esercizio Temperatura di stoccaggio Umidità di stoccaggio Sistema TV Sistema colore/video Da 10°C a 40°C (Da 50°F a 104°F) Da 10% a 80%, senza condensa Da -20°C a 45°C (Da -4°F a 113°F) Da 5% a 95%, senza condensa Analogico: B/G, D/K, L, I (in base alla nazione selezionata) Digitale: DVB-T/DVB-C Analogico: PAL, SECAM, NTSC-4.43, NTSC-3.
H Aggiornamento software AllShare Altoparlante esterno Altoparlante TV Amplificazione Antenna Anynet+ Auto diagnosi 22 40 18 18 17 13 37 22 B Batterie Bilan bianco Bilanciamento L/R Blocco 6 16 18 14 Caldo Cambia PIN Collegamento a un dispositivo audio Collegamento a un PC Component Connessione di rete Contr.
Altre informazioni ¦¦ Diagrammi a blocchi Main Board Chip Set 52 Italiano [UC5100]BN68-02656B-00L04.
This page is intentionally left blank. [UC5100]BN68-02656B-00L04.