Country AUSTRIA BELGIUM Customer Care Centre 0810 - SAMSUNG (7267864, € 0.07/min) 02-201-24-18 Web Site PORTUGAL SLOVAKIA SPAIN SWEDEN www.samsung.com/at www.samsung.com/be (Dutch) www.samsung.com/be_fr (French) 800 - SAMSUNG (800-726786) www.samsung.com/cz Samsung Zrt., česká organizační složka, Oasis Florenc, Sokolovská394/17, 180 00, Praha 8 70 70 19 70 www.samsung.com/dk 030 - 6227 515 www.samsung.com/fi 01 48 63 00 00 www.samsung.com/fr 01805 - SAMSUNG (726-7864 € 0,14/Min) www.samsung.
Figures and illustrations in this User Manual are provided for reference only and may differ from actual product appearance. Product design and specifications may be changed without notice. Digital TV notice 1. 2. 3. 4. 5. 6. Functionalities related to Digital TV (DVB) are only available in countries/areas where DVB-T (MPEG2 and MPEG4 AVC) digital terrestrial signals are broadcasted or where you are able to access to a compatible DVB-C (MPEG2 and MPEG4 AAC) cable-TV service.
Contents Getting Started 4 Connections 8 12 4 5 6 7 7 Accessories Viewing the Control Panel Viewing the Remote Control Connecting to an Antenna Plug & Play (Initial Setup) 8 Connecting to an AV Device 10 Connecting to an Audio Device 11 Changing the Input Source 12 12 12 14 17 20 22 26 How to Navigate Menus Using the INFO button (Now & Next guide) Planning Your Viewing Channel Menu Picture Menu Sound Menu Setup Menu Support Menu Advanced Features 27 27 28 35 44 47 50 Connecting to a PC Network C
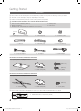
Getting Started Accessories ✎✎Please make sure the following items are included with your LED TV. If any items are missing, contact your dealer. ✎✎The items’ colours and shapes may vary depending on the models. ✎✎Cables not included in the package contents can be purchased separately.
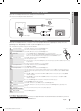
01 Getting Started Viewing the Control Panel ✎✎The product colour and shape may vary depending on the model. Power Indicator Remote control sensor Speakers Power Indicator Blinks and turns off when the power is on and lights up in standby mode. Remote control sensor Aim the remote control towards this spot on the TV. SOURCEE Toggles between all the available input sources. In the on-screen menu, use this button as you would use the ENTERE button on the remote control.
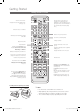
Getting Started Viewing the Remote Control POWER Turns the TV on and off. ON/OFF Turns the remote control light on or off. When on, the buttons become illuminated for a moment when pressed. (Using the remote control with this button set to On will reduce the battery usage time.) SOURCE Displays and selects the available video sources (p. 11). Have direct access to channels. Alternately select Teletext ON / Double / Mix / OFF. PRE-CH TTX/MIX Cuts off the sound temporarily. MUTE Changes channels.
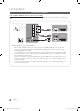
01 Getting Started Connecting to an Antenna When the TV is initially powered on, basic settings proceed automatically. ✎✎Preset: Connecting the mains and antenna. Satellite Antenna ANT 2 IN ANT 1 IN (SATELLITE) (AIR / CABLE) VHF/UHF Antenna Cable or ANT OUT Power Input Plug & Play (Initial Setup) When the TV is initially powered on, a sequence of on-screen prompts will assist in configuring basic settings. Press the POWERP button. Plug & Play is available only when the Input source is set to TV.
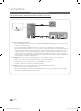
Connections Connecting to an AV Device Using an HDMI or HDMI/DVI cable: HD connection (up to 1080p) Available devices: DVD, Blu-ray player, HD cable box, HD STB (Set-Top-Box) satellite receiver, cable box, satellite receiver (STB) HDMI OUT DVI OUT PC IN R W Red White DVD / Blu-ray player DVD / Blu-ray player AUDIO OUT R-AUDIO-L ✎✎HDMI IN 1(DVI), 2, 3, 4, PC/DVI AUDIO IN xx When using an HDMI/DVI cable connection, you must use the HDMI IN 1(DVI) jack.
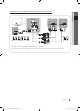
02 Connections Using a Component (up to 1080p) or Audio/Video (480i only) Cable and Scart Cable Available devices: VCR, DVD, Blu-ray player, cable box, STB satellite receiver DVD / Blu-ray player COMPONENT OUT VCR / DVD PR PB Y R B G VCR AUDIO OUT AUDIO OUT R-AUDIO-L R-AUDIO-L VIDEO OUT P R W R W Y R G B R EXT B G R W Y Red White Yellow R W Red White W R Blue Green Y W R Red ✎✎In Ext. mode, DTV Out supports MPEG SD Video and Audio only.
Connections Connecting to an Audio Device Using an Optical (Digital) or Audio (Analogue) Cable or Headphone Connections Available devices: digital audio system, amplifier, DVD home theatre digital audio system OPTICAL ✎✎DIGITAL AUDIO OUT (OPTICAL) xx When a digital audio system is connected to the DIGITAL AUDIO OUT (OPTICAL) jack, decrease the volume of both the TV and the system. xx 5.1 CH (channel) audio is available when the TV is connected to an external device supporting 5.1 CH.
02 Connections CONNECTIONS COMMON INTERFACE Slot To watch paid channels, the “CI or CI+ CARD” must be inserted. yy If you don’t insert the “CI or CI+ CARD,” some channels will display the message “Scrambled Signal”. yy The pairing information containing a telephone number, the “CI or CI+ CARD” ID the Host ID and other information will be displayed in about 2~3 minutes. If an error message is displayed, please contact your service provider.
Basic Features TTX/MIX PRE-CH MUTE How to Navigate Menus Using the INFO button (Now & Next guide) Before using the TV, follow the steps below to learn how to CH LIST navigate the menu and select and adjust different functions. MENU CONTENT GUIDE TOOLS INFO RETURN EXIT 3 1 2 A B C 4 D 1 ENTERE / Direction button: Move the cursor and select an item. Confirm the setting. I-II MEDIA.P INTERNET DUAL @TV 2 RETURN button: Returns to the previous menu.
Guide 2:10 Tue 1 Jun DTV Air 800 five Family Affairs 18:00 - 18:30 ■■ Channels: Shows the channel list according to channel type. ■■ * My Channels: Shows the group of the channel. ■■ Satellite: Shows the channel list according to satellite signal. ■■ Scheduled: Shows all the currently reserved programmes. Drama Tanya confesses all to a stunned Babs. Conrad is anxious to hear...
Basic Features Channel Menu ¦¦ Using Favourite Channels ¦¦ Returning Channels * My Channels (in Channel Manager) Shows all favourite channels. Antenna (Air / Cable / Satellite) ■■ Edit My Channels t: You can set the selected channels to desired my channels group. ✎✎The “*” symbol will be displayed and the channel will be set as a my channel. 1. Select a channel and press the TOOLS button. 2. Add or delete a channel in the my channel groups you want among 1, 2, 3 and 4.
Satellite System Setup ■■ Channel Type (All / TV / Radio): Select the Channel type to memorise. The PIN input screen appears. Enter your 4 digit PIN number. Satellite System Setup is available when Antenna is set to Satellite. Before running Auto Store, set Satellite System Setup. Then channel scan is run normally. ■■ Satellite: Selects the satellite to scan. ■■ Scan Mode (All Channels / Free Channels Only): Selects the scanning mode of the selected satellite.
Basic Features –– Go to Stored Position: Rotates the antenna to the stored satellite position. –– Antenna Position: Adjusts and stores the antenna position for the selected satellite. –– Store Current Position: Stores current position as the selected positioner limit. –– Signal Quality: Display the current status of broadcasting signal. Installer Mode: Sets limits to the scope of movement of satellite antenna or reset the position. Generally, installation guide uses this function.
(in Channel Manager) You can view, modify or delete a show you have reserved to watch. ■■ Change Info: Change a show you have reserved to watch. ■■ Cancel Schedules: Cancel a show you have reserved to watch. ■■ Information: Display a show you have reserved to watch. (You can also change the reservation information.) ■■ Select All / Deselect All: Select or deselect all reserved programmes. Channel List Transfer The PIN input screen appears. Enter your 4 digit PIN number. Imports or exports the channel map.
Basic Features ¦¦ Changing the Picture Options Advanced Settings (available in Standard / Movie mode) You can adjust the detailed setting for the screen including colour and contrast. ✎✎In PC mode, you can only make changes to Dynamic Contrast, Gamma, White Balance and LED Motion Plus.
✎✎In PC mode, you can only make changes to the Colour Tone, Size and Auto Protection Time. Colour Tone : Normal ► Size : Auto Wide Screen Mode : 16:9 Digital Noise Filter : Auto MPEG Noise Filter : Auto HDMI Black Level : Normal Film Mode : Off options may vary. xx The available items may differ depending on the selected mode. xx In PC mode, only 16:9 and 4:3 modes can be adjusted. xx Settings can be adjusted and stored for each external device connected to an input of the TV.
Basic Features ■■ 100Hz Motion Plus (Off / Clear / Standard / Smooth / Custom / Demo): Removes drag from fast scenes with a lot of movement to provide a clearer picture. ✎✎ If noise occurs on the screen, please set up the 100Hz Motion Plus to Off. If 100Hz Motion Plus is Custom, you can set up the Blur Reduction, Judder Reduction or Reset manually. ✎✎ If 100Hz Motion Plus is Demo, you can compare the difference of on and off modes. Blur Reduction: Adjusts the blur reduction level from video sources.
To equalize the volume level on each channel, set to Normal. SRS TruSurround HD (Off / On) t (standard sound mode only) This function provides a virtual 5.1 channel surround sound experience through a pair of speakers or headphones using HRTF (Head Related Transfer Function) technology. SRS TruDialog (Off / On) (standard sound mode only) This function allows you to increase the intensity of a voice over background music or sound effects so that dialog can be heard more clearly.
Basic Features ■■ Dolby Digital Comp (Line / RF): This function minimizes signal disparity between a dolby digital signal and a voice signal (i.e. MPEG Audio, HE-AAC, ATV Sound). ✎✎ Select Line to obtain dynamic sound, and RF to reduce the difference between loud and soft sounds at night time. Line: Set the output level for signals greater or less than -31dB (reference) to either -20dB or -31dB. RF: Set the output level for signals greater or less than -20dB (reference) to either -10dB or -20dB.
■■ Timer 1 / Timer 2 / Timer 3: Three different on / off timer settings can be made. You must set the clock first. Timer 1 On Time ▲ Inactivate ▼ 00 00 00 00 Repeat: Select Once, Everyday, Mon~Fri, Mon~Sat, Sat~Sun or Manual to set at you convenience. If you select Manual, you can set up the day you want to activate the timer. The c mark indicates the day is selected.
Basic Features Network (Network Type / Network Setup / Network Test / SWL(Samsung Wireless Link) / SWL connect) ¦¦ Other Features Language For details on set up options, refer to the “Network Connection” instructions (p. 28). ■■ Menu Language: Set the menu language. ■■ Teletext Language: Set a desired language for teletext. ✎✎ English is the default in cases where the selected language is unavailable in the broadcast.
✎✎ Available when connecting Samsung products that support BD Wise through a HDMI cable. ■■ Menu Transparency (Bright / Dark): Se t the Transparency of the menu. ■■ Melody (Off / Low / Medium / High): Set so that a melody plays when the TV is turned on or off. ¦¦ Common Interface ■■ CI Menu: This enables the user to select from the CAMprovided menu. Select the CI Menu based on the menu PC Card.
Basic Features Support Menu Installing the Latest Version Self Diagnosis ✎✎Self Diagnostic might take few seconds, this is part of the normal operation of the TV. ■■ Picture Test (Yes / No): Use to check for picture problems. ■■ Sound Test (Yes / No): Use the built-in melody sound to check for sound problems. ✎✎ If you hear no sound from the TV’s speakers, before performing the sound test, make sure Speaker Select is set to TV Speaker in the Sound menu.
Advanced Features 04 Advanced Features Connecting to a PC Using an HDMI/DVI Cable / a D-sub Cable DVI OUT AUDIO OUT PC IN AUDIO OUT PC OUT Display Modes (D-Sub and HDMI/DVI Input) Optimal resolution is 1920 X 1080 @ 60 Hz. Mode Resolution Horizontal Frequency (KHz) Vertical Frequency (Hz) Pixel Clock Frequency (MHz) Sync Polarity (H / V) IBM 640 x 350 720 x 400 31.469 31.469 70.086 70.087 25.175 28.322 +/-/+ MAC 640 x 480 832 x 624 1152 x 870 35.000 49.726 68.681 66.667 74.551 75.
Advanced Features Network Connection You can set up your TV so that it can access the Internet through your local area network (LAN) using a wired or wireless connection. ¦¦ Connecting to a Wired Network You can attach your TV to your LAN using cable in three ways: yy You can attach your TV to your LAN by connecting the LAN port on the back of your TV to an external modem using a Cat 5 cable. See the diagram below.
Network Setup (Manual) Use the Automatic Network Setup when connecting your TV to a network that supports DHCP. To set up your TV’s cable network connection automatically, follow these steps: Use the Manual Network Setup when connecting your TV to a network that requires a Static IP address. How to set up automatically To get the Network connection values on most Windows computers, follow these steps: 1. Right click the Network icon on the bottom right of the screen. 1.
Advanced Features ¦¦ Connecting to a Wireless Network To connect your TV to your network wirelessly, you need a wireless router or modem and a Samsung Wireless LAN Adapter (WIS09ABGN), which you connect to your TV’s back or side panel USB jack. See the illustration below. ✎✎ To use the SWL(Samsung Wireless Link) function, connect to the USB 1 (HDD) port.
The picture may appear corrupted or have static for some channels when the TV is connected to the Samsung Wireless LAN Adapter. In such case, establish a connection using one of the following methods: Method 1 Connect using the USB right angle adapter Method 2 Connect via an extension cable 04 Advanced Features Notice or Network Setup (Samsung Auto Configuration) This function is available in APs (Access Points) that support Samsung Auto Configuration.
Advanced Features Network Setup Select a network : Not Selected ► Internet Protocol Setup : Auto IP Address : Subnet Mask : Gateway : DNS : Auto DNS Server : PBC(WPS) U Move E Enter R Return 7. Press the Red button on your remote. 8. Press the PBC (WPS) button on your router within 2 minutes. Your TV player automatically acquires all the network setting values it needs and connects to your network. 9.
Network Setup (Manual) You can connect to a mobile device without an access point through the “Samsung Wireless LAN Adapter” by using a peer to peer network. If the other methods do not work, you need to enter the Network setting values manually. ✎✎This function is available when SWL(Samsung Wireless Link) is set to Off. How to connect to new Ad-hoc device 1. Follow Steps 1 through 6 in the “How to set up using PBC (WPS)” (p. 31). 2. Choose Select a network. A list of devices/networks appears. 3.
Advanced Features SWL(Samsung Wireless Link) This function lets you connect a Samsung device that supports the PBC (WPS) to your TV. You can connect devices to the TV even if a sharer is not connected to the TV. ✎✎To use the Internet@TV, the AP (access point) must be connected to the wireless network. ✎✎If a Samsung Wireless LAN Adapter is connected to the USB 2 port, the network may not operate normally. We recommend to connecting it to the USB 1 (HDD) port. ✎✎Only sharers using the 2.
MEDIA.P Enjoy recorded tv, photos, music and/or movie files saved on a USB Mass Storage Class (MSC) device and/or your PC. 04 Advanced Features Media Play MediaPlay Videos SUM View Devices E Enter R Return Change Device ¦ Connecting a USB Device TV Rear Panel 1. Turn on your TV. 2. Connect a USB device containing recorded tv, photo, music and/or movie files to the USB 1 (HDD) or USB 2 jack on the side of the TV. 3. When USB is connected to the TV, popup window appears.
Advanced Features ✎✎No supported functions when connecting to the PC through network: xx The Background Music and Background Music Setting functions. xx Sorting files by preference in the Photos, Music, and Videos folders. xx The � (REW) or µ (FF) button while a movie is playing. ✎✎The Divx DRM, Multi-audio, embedded caption does not supported. ✎✎Samsung PC Share manager should be permitted by the firewall programme on your PC.
Move to the file you desired using the up/down/right/left buttons and then press the ENTERE or � (Play) button. The file is played. ✎✎Supports the View Devices and Home in Media Play homepage. Information: You can ascertain the selected file name and the number of files and page. Videos /Movie 01.avi Movie 01.avi Movie 03.avi Movie 05.avi Sort List Section: Displays sorting standard. Jan.10.2010 Jan.10.2010 Jan.10.2010 Movie 07.avi Movie 02.avi Jan.10.2010 Movie 04.avi Jan.10.2010 Movie 06.
Advanced Features Using the Timeshift Mode function t If you missed a live broadcast, you can see from the recorded broadcast using this feature. When the Timeshift Mode is set to Auto, the TV stores the channel you watch currently to record automatically. When the Timeshift Mode is set to Manual, if you press the � (Play) button, the TV stores the channel from the point of view you want to record.
04 Advanced Features Videos Playing Video 1. Press the ◄ or ► button to select Videos, then press the ENTERE button in the Media Play menu. 2. Press the ◄/►/▲/▼ button to select the desired file in the file list. 3. Press the ENTERE button or � (Play) button. –– The selected file is displayed on the top with its playing time. –– If video time information is unknown, play time and progress bar are not displayed. –– During playing the video, you can search using the ◄ and ► button.
Advanced Features Other Restrictions ✎✎ NOTE xx If there are problems with the contents of a codec, the codec will not be supported. xx If the information for a Container is incorrect and the file is in error, the Container will not be able to play correctly. xx Sound or video may not work if the contents have a standard bitrate/frame rate above the compatible Frame/sec listed in the table above. xx If the Index Table is in error, the Seek (Jump) function is not supported.
Playing Music 1. Press the ◄ or ► button to select Music, then press the ENTERE button in the Media Play menu. Playlist 2. Press the ◄/►/▲/▼ button to select the desired file in the file list. 3. Press the ENTERE button or � (Play) button. –– During playing the music, you can search using the ◄ and ► button. –– � (REW) and µ (FF) buttons do not function during play. I Love You Jhon I Love you Jhon 1st Album Pop 2010 4.
Advanced Features ¦¦ Playing the Multiple Files Playing the selected recorded TV/video/music/photo files 1. Press the Yellow button in the file list to select the desired file. Videos 2. Repeat the above operation to select multiple files. 2 files selected /Movie 01.avi Movie 01.avi ✎✎ NOTE Movie 02.avi Jan.10.2010 Movie 03.avi xx The c mark appears to the left of the selected files. xx To cancel a selection, press the Yellow button again.
During playing a file, press the TOOLS button. Category Operations Recorded TV Videos Music Photos Title You can move the other file directly. > > Repeat Mode You can play recorded tv, movie and music files repeatedly. > > Picture Size You can adjust the picture size for preference. > > Picture Setting You can adjust the picture setting. (p. 17, 18, 19, 20) > > Sound Setting You can adjust the sound setting. (p.
Advanced Features Anynet+ What is Anynet+? t Anynet+ is a function that enables you to control all connected Samsung devices that support Anynet+ with your Samsung TV’s remote. The Anynet+ system can be used only with Samsung devices that have the Anynet+ feature. To be sure your Samsung device has this feature, check if there is an Anynet+ logo on it.
The Anynet+ menu changes depending on the type and status of the Anynet+ devices connected to the TV. Anynet+ Menu View TV Device List (device_name) MENU (device_name) INFO Recording: (*recorder) Stop Recording: (*recorder) Receiver Description Changes Anynet+ mode to TV broadcast mode. Shows the Anynet+ device list. Shows the connected device menus. E.g. If a DVD recorder is connected, the disc menu of the DVD recorder will appear. Shows the play menu of the connected device. E.g.
Advanced Features ¦¦ Listening through a Receiver You can listen to sound through a receiver (i.e Home Theatre) instead of the TV Speaker. 1. Select Receiver and set to On. 2. Press the EXIT button to exit. ✎✎ If your receiver supports audio only, it may not appear in the device list. ✎✎ The receiver will work when you have properly connected the optical in jack of the receiver to the DIGITAL AUDIO OUT (OPTICAL) jack of the TV. ✎✎ When the receiver (i.
¦ Getting Started with Internet@TV @TV INTERNET Recommended Internet@TV brings useful and entertaining contents and services directly from the web to your TV. My Applications Samsung Apps by Date 1/1 04 Advanced Features Internet@TV Settings Login B Mark as Favourite Sort by R Return ✎ NOTE x Configure the network settings before using Internet@TV. For more information, refer to “Network Connection” (p. 28). x x x x x x Unsupported fonts within the provider’s content will not display normally.
Advanced Features ■■ System Setup Account Login For a application with multiple account, use ◄ and ► to access the different account. Login ✎✎ ✎✎ You must have Ticker application downloaded on admin User account : Ticker Autorun (Off / On): Enable/disable ticker autorun upon powering on the TV. The Ticker application provides useful News, Weather, and Stock Market information. The Ticker application on Internet@TV must be downloaded to use this feature. Internet@TV to use this feature.
Using the Samsung Apps by category Samsung Apps Samsung Apps is a store for downloading applications to be used on Samsung TV/AV equipment. Users can enjoy a variety of contents like videos, music, photos, games, useful information etc. using the downloaded applications. Additional applications will be available hereafter.
Advanced Features AllShare Message / Media / ScreenShare ¦¦ About AllShare AllShare connects your TV, mobile phones and other devices which are compatible through a network. On your TV, you can view call arrivals, SMS messages and schedules set on your mobile phones. In addition, you can play media contents including videos, photos and music saved on your mobile phones or the other devices (such as your PC) by controlling them on the TV via the network.
Using ScreenShare Function If a call arrives while you are watching TV, the alarm window appears. Screenshare displays the same web page as provide in mobile. Using ScreenShare, you can open the various contents saved in a mobile phone. For example, the image below displays an access page for contents from a mobile. You can read the mobile’s various files and view the phone book and calender on the TV. Also, in phone book, you can make a call to other person, or can send to SMS.
Other Information Analogue Channel Teletext Feature The index page of the Teletext service gives you information on how to use the service. For Teletext information to be displayed correctly, channel reception must be stable. Otherwise, information may be missing or some pages may not be displayed. ✎✎You can change Teletext pages by pressing the numeric buttons on the remote control. 1 / (Teletext on/mix/off): Activate the Teletext mode after selecting the channel providing the Teletext service.
05 Other Information Assembling the Cables Stand Type Enclose the cables in the Cable Tie so that the cables are not visible through the transparent stand. (The stand shape may vary depending on the model.) 1 1 2 3 2 3 Wall-Mount Type ✎✎Do not pull the cables too hard when arranging them. This may cause damage to the product’s connection terminals. English [UC6800]BN68-02842A-00L04.
Other Information Installing the Wall Mount Assembling the Blanking Bracket When installing the TV onto a wall, attach the Blanking Bracket as shown. Blanking Bracket Assembling Power-Cord When Installing the TV onto a wall, attach the Power-Cord as Shown. 1 2 3 1. Remove the screw shown in the first picture above. 2. Attach the power cord clamp to the power cord. 3. Mount the power cord clamp to the TV, using the removed screw, as shown. Preparing before installing Wall-Mount Case A.
✎✎ The wall mount kit is not supplied, but sold separately. Install your wall mount on a solid wall perpendicular to the floor. When attaching to other building materials, please contact your nearest dealer. If installed on a ceiling or slanted wall, it may fall and result in severe personal injury. ✎✎NOTE xx Standard dimensions for wall mount kits are shown in the table below. xx When purchasing our wall mount kit, a detailed installation manual and all parts necessary for assembly are provided.
Other Information Anti-theft Kensington Lock The Kensington Lock is not supplied by Samsung. It is a device used to physically fix the system when using it in a public place. The appearance and locking method may differ from the illustration depending on the manufacturer. Refer to the manual provided with the Kensington Lock for additional information on proper use. 1 TV Rear 2 ✎✎Please find a “K” icon on the rear of the TV. A kensington slot is beside 3 the “K” icon. 1.
If you have any questions about the TV, first refer to this list. If none of these troubleshooting tips apply, please visit “www. samsung.com,” then click on Support, or contact the call centre listed on the back-cover of this manual. Issues Solutions and Explanations Picture Quality First of all, please perform the Picture Test and confirm that your TV is properly displaying test image. (go to MENU - Support - Self Diagnosis - Picture Test) (p.
Other Information Issues Solutions and Explanations There is no picture/Video. • • • • Check cable connections (remove and reconnect all cables connected to the TV and external devices). Set your external devices’ (Cable/Set top Box, DVD, Blu-ray etc) video outputs to match the connections to the TV input. For example, if an external device’s output is HDMI, it should be connected to an HDMI input on the TV. Make sure your connected devices are powered on.
Solutions and Explanations Others The picture won’t display in full screen. • • HD channels will have black bars on either side of the screen when displaying up scaled SD (4:3) contents. Black bars on the top and bottom will appear during movies that have aspect ratios different from your TV. Adjust the picture size options on your external device or TV to full screen. The remote control does not work. • • • Replace the remote control batteries with the poles (+/–) in the right direction.
Other Information ¦¦ Licence TheaterSound, SRS and the symbol are trademarks of SRS Labs, Inc. TheaterSound technology is incorporated under licence form SRS Lab, Inc. Manufactured under licence from Dolby Laboratories. Dolby and the double-D symbol are trademarks of Dolby Laboratories. Manufactured under licence under U.S. Patent #’s: 5,451,942; 5,956,674; 5,974,380; 5,978,762; 6,487,535 & other U.S. and worldwide patents issued & pending. DTS and the Symbol are registered trademarks. & DTS 2.
UE32C6800 UE37C6800 32 inches 37 inches Sound (Output) Dimensions (WxDxH) Body With stand 10W x 2 771 X 29.9 X 480 mm 771 X 240 X 543 mm 894 X 29.9 X 550 mm 894 X 255 X 614 mm Weight Without Stand With Stand 8.3 kg 11.1 kg 10.8 kg 14.4 kg Model Name UE40C6800 UE46C6800 Screen Size (Diagonal) 40 inches 46 inches Sound (Output) Dimensions (WxDxH) Body With stand 10W x 2 958 X 29.9 X 585 mm 958 X 255 X 649 mm 1093 X 29.9 X 660 mm 1093 X 275 X 723 mm Weight Without Stand With Stand 12.
Other Information Index A F AllShare Amplify Antenna Anynet+ AUDIO OUT Auto Adjustment Auto Volume 50 20 14 44 10 20 21 B Background Music Balance L/R Basic View Batteries Black Tone Blanking Bracket Brightness 43 20 42 6 18 54 17 C Cable Tie 4, 53 Change PIN 23 Channel Menu_ 14 Clock 22 Colour Tone 18 Component 9 Connecting to a PC 27 Connecting to an Audio Device 10 R 19 17 18 14 H HDMI Headphones Home Theatre 8, 44 10 10, 44 I Installation Space Internet@TV 2 47 L Language Licence Lock 24 6
05 Other Information This page is intentionally left blank. English [UC6800]BN68-02842A-00L04.
Die Abbildungen und Illustrationen in diesem Handbuch dienen nur zur Information und können vom tatsächlichen Aussehen des Geräts abweichen. Änderungen an Ausführung und technischen Daten vorbehalten. Hinweis zu Digitalfernsehen 1. 2. 3. 4. 5. 6.
Inhalt Erste Schritte 4 Anschlüsse 8 Grundfunktionen 12 4 5 6 7 7 Zubehör Bedienfeld Fernbedienung Verbinden mit einer Antenne Plug & Play (Anfangseinstellung) 8 Anschließen an ein AV-Gerät 10 Anschließen an ein Audiogerät 11 Signalquellen wählen 12 Navigieren in den Menüs 12 Verwenden der INFO Taste (Elektronische Programmzeitschrift) 12 Fernsehplanung 14 Kanalmenü 17 Bildmenü 20 Tonmenü 22 Einstellungsmenü 26 Unterstützungsmenü 27 27 28 35 44 47 50 Anschließen an einen PC Netzwerkverbindung Me
Erste Schritte Zubehör ✎✎Überprüfen Sie die Verpackung Ihres LED-Fernsehgeräts auf Vollständigkeit. Falls Komponenten fehlen sollten, setzen Sie sich bitte mit Ihrem Händler in Verbindung. ✎✎Farbe und Form der Teile können sich je nach Modell unterscheiden. ✎✎Kabel, die nicht zum Paketinhalt gehören, können gesondert erworben werden.
01 Erste Schritte Bedienfeld ✎✎Form und Farbe des Geräts können sich je nach Modell unterscheiden. Netzanzeige Fernbedienungssensor Lautsprecher Netzanzeige Fernbedienungssensor SOURCEE MENUm Y z P(Netz) Beim Einschalten des Fernsehgeräts blinkt die Netzleuchte kurz und erlischt anschließend. Im Standbymodus leuchtet die Anzeige permanent. Richten Sie die Fernbedienung auf diesen Sensor am Fernsehgerät. Schaltet zwischen allen verfügbaren Signalquellen um.
Erste Schritte Fernbedienung POWER Ein- und Ausschalten des Fernsehgeräts. ON/OFF SOURCE Hiermit wird die Beleuchtung der Fernbedienung ein- und ausgeschaltet. Wenn sie eingeschaltet ist, werden die Tasten beim Drücken kurz beleuchtet. (Wenn Sie die Fernbedienung mit angeschalteter Hintergrundbeleuchtung verwenden, verkürzt dies die Lebensdauer der Batterie.) Anzeigen und Auswählen aller verfügbaren Videosignalquellen (S. 11). Direkter Zugriff auf die Kanäle.
01 Erste Schritte Verbinden mit einer Antenne Wenn das Fernsehgerät zum ersten Mal eingeschaltet wird, werden automatisch die Grundeinstellungen vorgenommen. ✎✎Voreinstellung: Anschließen ans Stromnetz und an die Fernsehantenne.
Anschlüsse Anschließen an ein AV-Gerät Mit Hilfe eines HDMI oder HDMI/DVI-Kabels: HD-Anschluss (max. 1080p) Verfügbare Geräte: DVD, Blu-ray-Player, HD-Kabelreceiver, HD-Satellitenreceiver, Kabelreceiver, Satellitenreceiver HDMI OUT DVI OUT PC IN R DVD / Blu-ray-Player DVD / Blu-ray-Player AUDIO OUT W R-AUDIO-L Rot Weiß ✎✎HDMI IN 1(DVI), 2, 3, 4, PC/DVI AUDIO IN xx Eine Verbindung über HDMI/DVI-Kabel kann nur über den HDMI IN 1(DVI)-Anschluss erfolgen.
02 Anschlüsse Verwenden von Komponentenkabeln (bis 1080p), Audio/Video-Kabeln (nur 480i)Kabel oder Scartkabeln Verfügbare Geräte: Videorekorder, DVD-Player, Blu-ray-Player, Kabelreceiver, Satellitenreceiver DVD / Blu-ray player COMPONENT OUT VCR / DVD PR PB Y R B G VCR AUDIO OUT AUDIO OUT R-AUDIO-L R-AUDIO-L VIDEO OUT P R W R W Y R G B R EXT B G R W Y Rot Weiß Gelbe R W Rot Weiß W R Blau Grün Y W R Rot ✎✎Im Ext-Modus unterstützt DTV Out nur MPEG SD-Video und -A
Anschlüsse Anschließen an ein Audiogerät Mit einem Glasfaserkabel (digital) oder einem (analogen) Audiokabel oder dem Kopfhöreranschlusses Verfügbare Geräte: Digital-Audiosystem, Verstärker, DVD-Heimkino Digital-Audiosystem OPTICAL ✎✎DIGITAL AUDIO OUT (OPTICAL) xx Wenn ein Digital Audio-System mit dem DIGITAL AUDIO OUT (OPTICAL)-Anschluss verbunden ist, reduzieren Sie die Lautstärke von Fernsehgerät und System.
02 Anschlüsse ANSCHLÜSSE COMMON INTERFACE-STECKPLATZ Um Bezahlsender zu sehen, müssen Sie eine “CI” oder “CI+”-Karte einsetzen. yy Wenn Sie keine “CI” oder „CI+”-Karte einsetzen, wird bei einigen Kanälen die Meldung „Gestörtes Signal” angezeigt. yy Die Verbindungsinformationen mit Telefonnummer, Kennung der „CI” oder „CI+”-Karte, Hostkennung und anderen Angaben wird nach ungefähr 2 bis 3 Minuten angezeigt. Wenn eine Fehlermeldung angezeigt wird, wenden Sie sich bitte an Ihren Dienstanbieter.
Grundfunktionen PRE-CH TTX/MIX Navigieren in den Menüs MUTE Vor dem ersten Einsatz des Fernsehgeräts führen Sie die folgenden Schritte aus, um zu erfahren, wie Sie im Menü navigieren und verschiedeneCH Funktionen auswählen und LIST einstellen. MENU CONTENT GUIDE TOOLS INFO RETURN EXIT 3 1 2 A B C 4 D 1 ENTERE / Richtungstaste: CursorI-IIbewegen und Elemente auswählen. Einstellungen bestätigen. MEDIA.P INTERNET DUAL @TV 2 Taste RETURN: Zurück zum vorherigen Menü.
TV-Programm 2:10 Di 1. Jun DTV Air 800 five Family Affairs 18:00 - 18:30 ■■ Sender: Anzeigen der Senderliste anhand des Sendertyps. ■■ * Eigene Kanäle: Anzeigen der Gruppe des Senders. ■■ Satellit: Anzeigen der Senderliste anhand des Satellitensignals. ■■ Scheduled: Anzeigen aller vorgemerkten Programme. Drama Tanya confesses all to a stunned Babs. Conrad is anxious to hear...
Grundfunktionen Kanalmenü ¦¦ Verwenden von Favoriten ¦¦ Zurücksetzen von Kanälen * Eigene Kanäle (im Kanal-Manager) Hiermit zeigen Sie alle Favoritenkanäle an. Antennentyp (Terrestrisch / Kabel / Satellit) ■■ Eigene Kanäle bearbeiten t: Sie können die gewählten Sender zu der gewünschten Gruppe eigener Sender hinzufügen. ✎✎Das Symbol „*” wird angezeigt, und der Sender wird als Eigene Kanäle festgelegt. 1. Wählen Sie einen Kanal und drücken Sie die Taste TOOLS. 2.
Satellitensystem einrichten ■■ Sendertyp (Alle / TV / Radio): Wählen Sie einen Sendertyp zum Speichern aus. Der Eingabefenster für die PIN wird geöffnet. Geben Sie nun Ihre vierstellige PIN ein. Die Option Satellitensystem einrichten ist verfügbar, wenn TV-Empfang auf Satellit eingestellt ist. Ehe Sie Autom. Senderspeich. ausführen, nehmen Sie die Einstellungen unter Satellitensystem einrichten vor. Dann wir die Kanalsuche normal durchgeführt. ■■ Satellit: Auswählen des Satelliten zum Durchsuchen.
Grundfunktionen –– Zu gespeicherter Position wechseln: Schwenken der Antenne zur gespeicherten Satellitenpositionen. –– Antennenposition: Einstellen und Speichern der Antennenposition des gewählten Satelliten. –– Aktuelle Position speichern: Speichern der aktuellen Position als gewähltes Positionierlimit. –– Signalqualität: Zeigen Sie den aktuellen Status des Sendesignals an. Installationsmodus: Einstellen der Begrenzungen für den Bewegungsumfang der Satellitenantenne oder Zurücksetzen der Position.
(im Kanal-Manager) Mit dieser Menüoption können Sie eine vorgemerkte Sendung anzeigen, ändern oder löschen. ■■ Info ändern: Mit dieser Menüoption können Sie die Vormerkung einer Sendung ändern. ■■ Programmierung abbrechen: Mit dieser Menüoption können Sie die Vormerkrung einer Sendung stornieren. ■■ Information: Anzeigen einer vorgemerkten Sendung. (Sie können auch die Vormerkinformationen auswählen). ■■ Alle wählen / Alle abwählen: Wählen oder Abwählen aller vorgemerkten Programme. Listenübertr.
Grundfunktionen ¦¦ Ändern der Bildoptionen Erweiterte Einstellungen (verfügbar nur im Modus Standard / Film) Sie können verschiedene Detaileinstellungen für Ihren Fernseher vornehmen, unter anderem für Farbe und Kontrast. ✎✎Im PC-Modus können Sie nur Optimalkontrast, Gamma, Weißabgleich und LED Motion Plus einstellen. Erweiterte Einstellungen Schwarzton : Aus ► Optimalkontrast : Mittel Schattendurchzei.
✎✎PC-Modus können Sie nur Farbtemp., Größe und Autom. Schutzzeit einstellen. ✎✎HINWEIS Bildoptionen Farbtemp. : Normal ► Größe : Autom. Breit Bildschirmmodus : 16:9 Digit. Rauschfilter : Auto MPEG-Rauschfilter : Auto HDMI-Schwarzp. : Normal Filmmodus variieren. vom ausgewählten Modus variieren. xx Im PC-Modus können nur die Modi 16:9 und 4:3 eingestellt werden.
Grundfunktionen ■■ 100Hz Motion Plus (Aus / Klar / Standard / Glätten / Benutzerdef. / Demo): Beseitigt das Verschwimmen schneller Szenen mit viel Bewegung und sorgt für ein klareres Bild. Im Fall von Bildrauschen sollten Sie 100Hz Motion Plus deaktivieren Aus. Wenn 100Hz Motion Plus auf Benutzerdef. eingestellt ist, können Sie Unschärfemind., Judder-Minderung einstellen oder ein manuelles Zurückset. durchführen.
SRS TruSurround HD (Aus / Ein) t (nur im Standardtonmodus) Diese Funktion ermöglicht durch HRTF-Technologie (Head Related Trasfer Function) virtuellen 5.1 Kanalton bei einem einzigen Lautsprecherpaar oder Kopfhörer. SRS TruDialog (Aus / Ein) (nur im Standardtonmodus) Mitr dieser Funktion können SIe die Lautstärke einer Stimme gegenüber der Hintergrundmusik oder den Toneffekten erhöhen, so dass Dialoge besser zu verstehen sind.
Grundfunktionen ■■ Dolby Digital-Komp. (Line / RF): Diese Funktion minimiert die Lautstärkeunterschiede zwischen einem Dolby Digital-Signal und einem Sprachsignal (d.h. MPEG-Audio, HE-AAC, ATV-Ton). Wählen Sie Line, um Ton mit großer Dynamik zu erzielen, und RF, um beispielsweise bei Nacht die Lautstärkeunterschiede zwischen lauten und leisen Tönen zu reduzieren. Line: Hiermit stellen Sie die Lautstärke von Signalen mit mehr oder weniger als -31 dB (Bezugswert) auf entweder -20 dB oder -31 dB ein.
■■ Timer 1 / Timer 2 / Timer 3: Sie können drei verschiedene Einstellungen für den Ein-/Ausschalttimer vornehmen. Voraussetzung dafür ist, dass Sie die Uhr gestellt haben. Timer 1 ▲ 00 ▼ 00 Ausschaltzeit 00 Deaktiv. Lautstärke Quelle 10 Wiederh. Einmal 00 TV-Empfang TV So Mo. Di. Mi. ¦¦ Sperren von Programmen Kanal ATV Sicherheit 1 Do. Fr. Sa L Verschieben U Einstellen E Eingabe R Zurück Anschaltzeit / Ausschaltzeit: Stellen Sie Stunde und Minute ein und aktivieren bzw.
Grundfunktionen ¦¦ Weitere Funktionen Sprache ■■ Menüsprache: Einstellen der Menüsprache ■■ Teletextsprache: Einstellen der gewünschten Teletextsprache. Englisch ist der Standardwert in Fällen, wo die ausgewählte Sprache für die Sendung nicht verfügbar ist.
✎✎ Verfügbar nur, wenn Sie über ein HDMI-Kabel Geräte von Samsung anschließen, die über BD Wise verfügen. ■■ Menütransparenz (Hell / Dunkel): Stellen Sie die Transparenz des Menüs ein. ■■ Melodie (Aus / Gering / Mittel / Hoch): Verwenden Sie diese Funktion, wenn Sie möchten, dass beim Ein- oder Ausschalten des Fernsehgeräts eine Melodie abgespielt wird. ¦¦ Common Interface ■■ CI-Menü: Hiermit kann der Benutzer seine Auswahl in dem vom CAM-Modul bereitgestellten Menü treffen.
Grundfunktionen Unterstützungsmenü Installieren der aktuellsten Version Eigendiagnose ✎✎Der Selbsttest kann einige Minuten dauern. Dies ist eine normale Funktion des Fernsehgeräts. ■■ Bildtest (Ja / Nein): Dient zur Analyse von Bildproblemen. ■■ Audiotest (Ja / Nein): Verwenden Sie die integrierte Melodie, um Tonprobleme zu ermitteln.
Erweiterte Funktionen 03 Grundfunktionen Anschließen an einen PC Mit Hilfe eines HDMI/DVI-Kabels oder eines D-Sub-Kabels DVI OUT AUDIO OUT PC IN AUDIO OUT PC OUT Anzeigemodi (D-Sub- und HDMI/DVI-Eingang) Die optimale Auflösung beträgt 1920 x 1080 bei 60 Hz.
Erweiterte Funktionen Netzwerkverbindung Sie können Ihr Fernsehgerät so einrichten, dass es über Ihr lokales Netzwerk (LAN) und eine Kabel- oder WLAN-Verbindung auf das Internet zugreifen kann. ¦¦ Verbindung mit einem Kabelnetzwerk herstellen Sie können Ihr Fernsehgerät auf dreierlei Weise an Ihr LAN anschließen: yy Sie können Ihr Fernsehgerät über den LAN-Anschluss auf der Rückseite des Geräts direkt über ein CAT5-Kabel an ein externes Modem und Ihr LAN anschließen. Siehe nachfolgende Abbildung.
Eingang einrichten (Manuell) Verwenden Sie Eingang einrichten - automatisch, wenn Sie Ihr Fernsehgerät an ein Netzwerk anschließen, das DHCP unterstützt. Um die Kabelnetzwerkverbindung Ihres Fernsehgeräts automatisch einzurichten, gehen Sie folgendermaßen vor: Verwenden Sie Eingang einrichten - manuell, wenn Sie Ihr Fernsehgerät an ein Netzwerk anschließen, das eine statische IP-Adresse erfordert. So konfigurieren Sie automatisch 1.
Erweiterte Funktionen ¦¦ Verbindung mit einem Drahtlosnetzwerk herstellen Um Ihr Fernsehgerät drahtlos an Ihr Netzwerk anzuschließen, benötigen Sie einen Funkrouter oder ein Funkmodem sowie einen Samsung WLAN-Adapter (WIS09ABGN), den Sie mit dem hinteren oder seitlichen USB-Anschluss verbinden. Siehe nachfolgende Abbildung. ✎✎ Um die Funktion SWL(Samsung Wireless Link) verwenden zu können, müssen Sie die Verbindung über den Anschluss USB 1 (HDD) herstellen.
04 Erweiterte Funktionen Hinweis Das Bild kann bei manchen Kanälen gestört oder verrauscht sein wenn das Fernsehgerät an den WLAN-Adapter von Samsung angeschlossen ist.
Erweiterte Funktionen Eingang einrichten Wählen Sie ein Netzwerk : Nicht gewählt ► IP-Konfiguration : Auto IP-Adresse : Teilnetzmaske : Gateway : DNS : Auto DNS-Server : PBC (WPS) U Verschieben E Eingabe R Zurück 5. Wenn das Sicherheitsfenster zur Eingabe der PIN geöffnet wird, fahren Sie mit Schritt 6 fort. Wenn das Fenster für die Netzwerkverbindung geöffnet wird, fahren Sie mit Schritt 10 fort. 6. Wählen Sie mit den Tasten ▲ oder ▼ die Option Sicherheit oder PIN.
Eingang einrichten (Manuell) Mit dem „Samsung Wireless LAN Adapter” können Sie die Verbindung zu einem Mobilgerät mit Hilfe eines Peer-to-PeerNetzwerks auch ohne Zugriffspunkt herstellen. Wenn keine andere Methode funktioniert, müssen Sie die Werte für die Netzwerkkonfiguration manuell eingeben. ✎✎Diese Funktion ist verfügbar, wenn SWL(Samsung Wireless Link) deaktiviert ist Aus. So stellen Sie eine Verbindung mit einem neuen Ad-hoc-Netzwerk her 1.
Erweiterte Funktionen SWL(Samsung Wireless Link) Ihr Fernsehgerät bekommt keine Verbindung mit dem Internet Mit dieser Funktion können Sie ein Samsung-Gerät anschließen, dass PBC (WPS) mit Ihrem Fernsehgerät unterstützt. Sie können auch dann Geräte an Ihren Fernseher anschließen, wenn kein Sharer an das Fernsehgerät angeschlossen ist.
MEDIA.P 04 Erweiterte Funktionen Media Play MediaPlay Mit dieser Funktion können Sie auf einem USB-Speichermedium (MSC) oder Ihrem PC gespeicherte Fernsehsendungen, Foto-, Musik und/oder Filmdateien Videos SUM Change Device View Devices E Enter R Return ¦ Anschließen eines USB-Geräts 1. Schalten Sie den Fernseher ein. Rückseite des Fernsehgeräts 2. Schließen Sie ein USB-Gerät mit Fernsehaufnahmen, Foto-, Musik und/oder Filmdateien an die USB 1 (HDD) oder USB 2-Buchse seitlich am Fernsehgerät an.
Erweiterte Funktionen ✎✎Die folgenden Funktionen werden beim Anschluss an einen PC über das Netzwerk nicht unterstützt: xx Die Funktionen für die Hintergrundmusik und die Einstellung der Hintergrundmusik. xx Benutzerdefinierte Sortierung von Dateien in den Ordnern Fotos, Musik und Film. xx Die Tasten � (Rücklauf) oder µ (Vorlauf), während ein Film abgespielt wird. ✎✎Divx DRM, Multi-Audio und eingebettete Beschriftung werden nicht unterstützt.
Navigieren Sie mit den Pfeiltasten (Auf/Ab/Rechts/Links) zu der gewünschten Datei und drücken Sie dann die ENTERE oder die Taste � (Wiedergabe). Die Datei wird wiedergegeben. ✎✎Unterstützt Geräte anzeigen und Start auf der Startseite von Media Play. Information: Hier können Sie den Namen der gewählten Datei sowie die Anzahl der Dateien und Seiten überprüfen. Videos /Movie 01.avi Movie 01.avi Movie 03.avi Movie 05.avi Abschnitt mit der Sortierliste: Anzeige der Sortierreihenfolge: Jan.10.2010 Jan.10.
Erweiterte Funktionen ✎✎HINWEIS xx Videoaufnahmen werden durch das DRM-System (DRM, Digitaler Urheberschutz) geschützt und können werden auf einem PC noch auf anderen Fernsehgeräten abgespielt werden. Dies gilt auch nach einem eventuellen Tausch der Hauptplatine des Fernsehgeräts. xx Übertragungen von Datendiensten können nicht aufgezeichnet werden. xx Die Aufnahme- wie auch Timeshift-Modus-Funktion sind je nach Bildqualität und freiem Speicherplatz auf der Festplatte möglicherweise nicht verfügbar.
Wiedergabe von Videos 1. Wählen Sie durch Drücken der Tasten ◄ oder ► die Option Videos, und drücken Sie dann im Media Play-Menü auf die ENTERE. 2. Wählen Sie die gewünschte Datei mit den Tasten ◄ / ► / ▲ / ▼ aus der Dateiliste aus. 3. Drücken Sie auf die ENTERE oder die � (Wiedergabetaste). –– Die ausgewählte Datei wird zusammen mit der Abspieldauer oben angezeigt. –– Wenn die Zeitinformationen für das Video nicht vorhanden sind. werden Wiedergabezeit und Fortschrittsbalken nicht angezeigt.
Erweiterte Funktionen Weitere Einschränkungen ✎✎ HINWEIS xx Wenn es Probleme mit dem Inhalt eines Codecs gibt, wird der Codec nicht unterstützt. xx Wenn die Informationen für einen Container falsch sind und die Datei einen Fehler aufweist, wird der Container nicht korrekt abgespielt. xx Ton oder Bild stehen möglicherweise nicht zur Verfügung, wenn der Inhalt ein Standardbitrate/Framerate aufweist, die über dem in der obigen Tabelle aufgeführten Wert der kompatiblen Framerate (Frames/Sekunde) liegt.
Wiedergeben von Musik 1. Wählen Sie durch Drücken der Tasten ◄ oder ► die Option Musik, und drücken Sie dann im Media Play-Menü auf die ENTERE Playlist 2. Wählen Sie die gewünschte Datei mit den Tasten ◄ / ► / ▲ / ▼ aus der Dateiliste aus. 3. Drücken Sie auf die ENTERE oder die � (Wiedergabetaste). –– Während der Wiedergabe des musik können Sie mit den Tasten ◄ und ► suchen. –– Die Tasten � (Rücklauf) und µ (Vorlauf) sind bei der Wiedergabe funktionslos.
Erweiterte Funktionen ¦¦ Wiedergabe mehrerer Dateien Abspielen ausgewählter TV-Aufzeichnung / Video / Musik / Fotodateien 1. Drücken Sie die gelbe Taste in der Dateiliste, um die gewünschte Datei auszuwählen. Videos 2 files selected /Movie 01.avi 2. Wiederholen Sie den obigen Vorgang, um mehrere Dateien auszuwählen. Movie 01.avi Movie 02.avi Jan.10.2010 ✎✎ HINWEIS Movie 03.avi Jan.10.2010 Movie 04.avi Jan.10.2010 Movie 05.
Drücken Sie während der Wiedergabe die Taste TOOLS. Kategorie Vorgang Recorded TV Videos Music Photos Titel Sie können die andere Datei direkt verschieben. > > Wiederholungsmodus Sie können Fernsehaufnahmen, Film- und Musikdateien wiederholt abspielen. > > Bildformat Sie können Bildformat entsprechend Ihren Wünschen anpassen. > > Bildeinstellungen Sie können die Bildeinstellungen festlegen (S. 17~23). > > Toneinstellungen Sie können die Toneinstellungen festlegen. (S. 23, 24, 25).
Erweiterte Funktionen Anynet+ Was ist Anynet+? t Bei Anynet+ handelt es sich um eine Funktion, mit der Sie alle angeschlossenen Samsung-Geräte, die Anynet+ unterstützen, mit der Fernbedienung für Ihr Samsung-Fernsehgerät steuern können. Das Anynet+-System unterstützt nur Anynet+-fähige Samsung-Geräte. Wenn Sie wissen möchten, ob Ihr Samsung-Gerät diese Funktion unterstützt, suchen Sie das Anynet+-Logo auf Ihrem Gerät.
Der Inhalt des Anynet+-Menüs hängt vom Typ und Status der an das Fernsehgerät angeschlossenen Anynet+-Geräte ab. Anynet+-Menü Fernsehen Geräteliste (geräte_name) MENU (geräte_name) INFO Aufnahme: (*Aufnahmegerät) Aufnahme anhalten: (*Aufnahmegerät) Empfänger Beschreibung Wechsel vom Anynet+-Modus zum Fernsehmodus. Anzeige der Anynet+-Geräteliste. Hiermit öffnen Sie die Menüs der angeschlossenen Geräte. Wenn z. B. ein DVD-Recorder angeschlossen ist, wird das DVD-Menü des DVD-Recorders angezeigt.
Erweiterte Funktionen ¦¦ Tonwiedergabe mit einem Receiver Sie können die Tonwiedergabe über einen Receiver (d. h. Heimkinosystem) anstelle des TV-Lautsprechers laufen lassen. 1. Wählen Sie Empfänger und aktivieren Sie ihn Ein. 2. Zum Beenden drücken Sie die Taste EXIT. ✎✎ Wenn Ihr Receiver nur Audiosignale unterstützt, wird er in der Geräteliste möglicherweise nicht angezeigt.
¦ Erste Schritte mit Internet@TV @TV INTERNET Empfohlen Internet@TV bringt nützliche und unterhaltende Inhalte und Dienste direkt aus dem Internet auf Ihr Fernsehgerät. Eigene Anwendungen Samsung Apps nach Datum 1/1 04 Erweiterte Funktionen Internet@TV Einstell. Login B Als Favoriten mark. Sortieren nach R Zurück ✎ HINWEIS x Konfigurieren Sie die Netzwerkeinstellungen, bevor Sie Internet@TV verwenden. Weitere Informationen finden Sie unter „Netzwerkverbindung” (S. 28).
Erweiterte Funktionen ■■ Systemkonfiguration Anmeldung beim Konto Bei einer Anwendung mit mehreren Konten verwenden Sie ◄ und ► für den Zugriff auf die verschiedenen Konten. Login admin User account: Ticker Autorun (Off / On): Ticker beim Einschalten des Fernsehers aktiviert/deaktiviert. Die Anwendung Ticker stellt Nachrichten sowie Wetter- und Marktinformationen zur Verfügung. Sie müssen die Anwendung Ticker von Internet@TV herunterladen, damit Sie die Funktion verwenden können.
Samsung Apps Samsung Apps ist ein Speicher, aus dem Sie Anwendungen herunterladen können, die auf Ihren Samsung TV/AV-Geräten verwendet werden können. Mit Hilfe der heruntergeladenen Anwendungen können die Benutzer eine Vielzahl von Inhalten (z. B. Videos, Musik, Fotos, Spiele, nützliche Informationen usw.) nutzen. Zusätzlichen Anwendungen später dazukommen.
Erweiterte Funktionen AllShare Meldung / Medien / ScreenShare ¦¦ Informationen zu AllShare AllShare verbindet Ihr Fernsehgerät und Ihre Mobiltelefone und Ihre anderen zum Fernseher kompatiblen Geräte über ein Netzwerk mit Ihrem Fernsehgerät. Auf Ihrem Fernseher können Sie eingehende Aufrufe, SMS-Nachrichten und Zeitpläne anzeigen, die auf Ihren Mobiltelefonen gespeichert sind. Außerdem können Sie die auf Mobiltelefonen oder anderen Geräten (z. B.
Verwenden der ScreenShare-Funktion Wenn ein Anruf eingeht, während Sie fernsehen, wird das Alarmfenster geöffnet. Screenshare zeigt die gleiche Website wie das Mobilgerät an. Mit Hilfe von ScreenShare können Sie die verschiedenen Inhalte von einem Mobiltelefon öffnen. Zum Beispiel zeigt die Abbildung auf der rechten Seite eine Zugriffsseite für den Inhalt von einem Mobiltelefon. Sie können die verschiedenen Dateien des Mobiltelefons und das Telefonbuch und den Kalender auf dem Fernseher anzeigen.
Weitere Informationen Videotext für Analogkanäle Auf der Videotext-Indexseite finden Sie Verwendungshinweise zum Videotext. Für die korrekte Anzeige von Teletextinformationen muss der Senderempfang einwandfrei sein. Andernfalls können Informationen unvollständig sein oder einige Seiten nicht angezeigt werden. ✎✎Sie können die Videotextseiten durch Drücken der Zifferntasten auf der Fernbedienung wechseln. 1 / (Videotext an/mix): Aktiviert den Videotextmodus des aktuellen Kanals.
05 Weitere Informationen Verlegen der Kabel Typ des Standfußes Verstecken Sie die Kabel im Kabelschlauch, damit sie durch den transparenten Standfuß hindurch nicht zu sehen sind. 1 1 2 2 3 3 Ausführung für Wandhalterung ✎✎Ziehen Sie beim Ordnen der Kabel nicht zu fest daran. Auf diese Weise kann es zu Beschädigungen der Geräteanschlüsse kommen. Deutsch [UC6800]BN68-02842A-00L04.
Weitere Informationen Anbringen der Wandhalterung Montieren der Montagehalterung Wenn Sie das Fernsehgerät an einer Wand montieren, bringen Sie die Montagehalterung in der dargestellten Weise an. Montagehalterung Anschließen des Netzkabels Wenn Sie das Fernsehgerät an einer Wand montieren, bringen Sie das Netzkabel in der dargestellten Weise an. 1 2 3 1. Entfernen Sie die oben in der ersten Abbildung dargestellten Schraube. 2. Bringen Sie die Kabelklammer am Netzkabel an. 3.
✎✎ Die Wandhalterung wird nicht mitgeliefert, ist aber gesondert erhältlich. Montieren Sie die Wandhalterung an einer soliden Wand, die senkrecht zum Boden steht. Bei Installation auf anderen Trägermaterialien wenden Sie sich bitte an Ihren Fachhändler. Bei Montage an einer Decke oder schrägen Wand kann es herunterfallen und zu Verletzungen kommen. ✎✎HINWEIS xx Die Standardabmessungen der Wandhalterung finden Sie in der nachfolgenden Tabelle.
Weitere Informationen Kensington-Schloss als Diebstahlsicherung Das Kensington-Schloss gehört nicht zum Lieferumfang Ihres SamsungGeräts. Ein Kensington-Schloss dient zur physischen Sicherung des Systems bei Verwendung in öffentlichen Bereichen. Je nach Hersteller können Aussehen und Verriegelungsverfahren von der Abbildung abweichen. Weitere Informationen zur richtigen Anwendung entnehmen Sie bitte der Bedienungsanleitung des Kensington-Schlosses.
Bei Fragen zum Fernsehgerät schauen Sie zuerst in dieser Liste nach. Wenn keiner dieser Tipps zur Fehlerbehebung weiterhilft, öffnen Sie die Website „www.samsung.com” und klicken Sie dort auf „Support” oder wenden Sie sich an das in der Liste auf der letzten Seite angegebene Callcenter. Problem Lösungen und Erklärungen Bildqualität Führen Sie zu allererst den Bildtest durch, um zu bestätigen, dass Ihr Fernsehgerät das Testbild korrekt anzeigt.
Weitere Informationen Problem Lösungen und Erklärungen Kein Bild, kein Video Der Fernseher kann nicht eingeschaltet werden. • • • Das Fernsehgerät schaltet sich automatisch aus. • • • • Kein Bild/Video. • • • • Vergewissern Sie sich, dass das Netzkabel sicher mit der Wandsteckdose und dem Fernsehgerät verbunden ist. Vergewissern Sie sich, dass die Netzsteckdose Strom liefert. Drücken Sie die POWER-Taste am Fernsehgerät, um zu prüfen, ob die Fernbedienung richtig funktioniert.
Eine geplante Aufnahme ist fehlgeschlagen. Lösungen und Erklärungen • • • • Mehrere Aufnahmegeräte sind angeschlossen, aber das Fernsehgerät beendet die Aufnahme. Bei bestimmten Vorgängen, wie Formatierung, Leistungstest, Fehlerprüfung oder Löschen, bei denen auf das Dateisystem eines USB-Geräts zugegriffen wird, werden geplante Aufnahmen deaktiviert. Wenn kein USB-Gerät angeschlossen ist, nimmt das Fernsehgerät auch dann nicht auf, selbst wenn Aufnahmezeit erreicht ist.
Weitere Informationen ¦¦ Lizenz TheaterSound, SRS and the symbol are trademarks of SRS Labs, Inc. TheaterSound technology is incorporated under license form SRS Lab, Inc. Hergestellt unter Lizenz der Dolby Laboratories: Dolby sowie das Doppel-D-Symbol sind Warenzeichen der Dolby Laboratories. Manufactured under license under U.S. Patent #’s: 5,451,942; 5,956,674; 5,974,380; 5,978,762; 6,487,535 & other U.S. and worldwide patents issued & pending. DTS and the Symbol are registered trademarks. & DTS 2.
Bildschirmgröße (Diagonal) UE32C6800 UE37C6800 32 Zoll 37 Zoll Ton (Ausgang) Abmessungen (BxTxH) Gehäuse Mit Fuß Gewicht Ohne Fuß Mit Fuß Modellname Bildschirmgröße (Diagonal) 10W x 2 771 X 29,9 X 480 mm 771 X 240 X 543 mm 894 X 29,9 X 550 mm 894 X 255 X 614 mm 8,3 kg 11,1 kg 10,8 kg 14,4 kg UE40C6800 UE46C6800 40 Zoll 46 Zoll Ton (Ausgang) Abmessungen (BxTxH) Gehäuse Mit Fuß Gewicht Ohne Fuß Mit Fuß Modellname Bildschirmgröße (Diagonal) 10W x 2 958 X 29,9 X 585 mm 958 X 255 X 649 mm 1093 X
Weitere Informationen Index A H Alle wählen AllShare Anschließen an ein Audiogerät Anschließen an einen PC Anynet+ AUDIO OUT Aufnahme Aufstellbereich Auto. Lautst. Autom. Einstellung 16 50 10 27 44 10 45 2 21 20 B Balance L/R Basisansicht Batterien Bearbeiten von Kanälen Bildformat 20 42 6 16 19, 43 D Diashow DIGITAL AUDIO OUT DivX® VOD Drehen D-Sub Dynamisch 41 10, 42 43 43 27 17 E Eigendiagnose Eingang einrichten Empfänger Energiesparmodus Equalizer Ext.
05 Weitere Informationen This page is intentionally left blank. Deutsch [UC6800]BN68-02842A-00L04.
Les figures et illustrations contenues dans ce mode d’emploi sont fournies pour référence uniquement. Elles peuvent différer de l’aspect réel du produit. La conception et les spécifications du produit sont susceptibles d’être modifiées sans préavis. Avis concernant le téléviseur numérique 1. 2. 3. 4. 5. 6.
Contenu Mise en route 4 Connexions 8 4 5 6 7 7 Accessoires Présentation du panneau de configuration Présentation de la télécommande Raccordement à une antenne Plug & Play (configuration initiale) 8 Connexion à un périphérique AV 10 Connexion à un système audio 11 Changement de la source d’entrée 12 12 12 12 14 17 20 22 26 Navigation dans les menus Utilisation du bouton INFO (Guide Now & Next) Planification des émissions à regarder Menu Canal Menu Image Menu Son Menu Configuration Menu Assistance F
Mise en route Accessoires ✎✎Vérifiez que les éléments suivants sont fournis avec votre téléviseur à LED. S’il manque des éléments, contactez votre revendeur. ✎✎Les couleurs et les formes des éléments peuvent varier en fonction des modèles. ✎✎Les câbles qui ne se trouvent pas dans le contenu de l’emballage peuvent être achetés séparément.
01 Présentation du panneau de configuration Mise en route ✎✎La couleur et la forme du produit peuvent varier en fonction du modèle. Témoin d’alimentation Capteur de la télécommande Haut-parleurs Témoin d’alimentation Clignote, puis s’arrête lorsque le téléviseur est allumé. S’allume en mode Veille. Capteur de la télécommande Dirigez la télécommande vers ce point du téléviseur. SOURCEE Bascule entre toutes les sources d’entrée disponibles.
Mise en route Présentation de la télécommande POWER Permet d’allumer et d’éteindre le téléviseur. ON/OFF Active ou désactive l’éclairage de la télécommande. Lorsque l’éclairage est activé, les boutons enfoncés restent allumés pendant quelques instants. (Utiliser la télécommande lorsque ce bouton est réglé sur OFF réduit la durée de vie de la pile.) SOURCE Permet d’afficher et de sélectionner les sources vidéo disponibles (p. 11). Donne un accès direct aux chaînes.
01 Raccordement à une antenne Mise en route Lorsque vous allumez le téléviseur pour la première fois, des réglages de base s’effectuent de manière automatique. ✎✎Préréglage: connexion du câble d’alimentation et de l’antenne.
Connexions Connexion à un périphérique AV Utilisation d’un câble HDMI ou HDMI/DVI : connexion HD (jusqu’à 1 080 p) Périphériques disponibles: lecteur DVD, lecteur Blu-ray, décodeur câble HD, récepteur satellite HD (boîtier décodeur), décodeur câble, récepteur satellite (décodeur) HDMI OUT Lecteur DVD/ Blu-ray DVI OUT PC IN R W Rouge Blanc Lecteur DVD/ Blu-ray AUDIO OUT R-AUDIO-L ✎✎HDMI IN 1(DVI), 2, 3, 4, PC/DVI AUDIO IN xx Lorsque vous utilisez une connexion avec câble HDMI/DVI, vous devez utilis
02 Utilisation d’un câble Composante (jusqu’à 1080p) ou Audio/Vidéo (480i uniquement) et utilisation d’un câble Péritel Périphériques disponibles: magnétoscope, DVD, lecteur Blu-ray, décodeur câble, récepteur satellite (boîtier externe) COMPONENT OUT Magnétoscope / lecteur DVD PR PB Y R B G Connexions Lecteur DVD/ Blu-ray Magnétoscope AUDIO OUT AUDIO OUT R-AUDIO-L R-AUDIO-L VIDEO OUT P R W R W Y R G B R EXT B G R W R Y W W R Bleu Vert Rouge Blanc Rouge Jaune Jaune Y
Connexions Connexion à un système audio Utilisation d’une connexion de câble optique (numérique) ou audio (analogique) ou d’une sortie casque Périphériques disponibles: système audio numérique, amplificateur, système home cinéma DVD amplificateur, home cinéma DVD système audio numérique OPTICAL ✎✎DIGITAL AUDIO OUT (OPTICAL) xx Lorsqu’un système audio numérique est relié à la prise DIGITAL AUDIO OUT (OPTICAL), baissez le volume du téléviseur et du système.
02 Emplacement COMMON INTERFACE pour les connexions Connexions Pour regarder les chaînes payantes, la carte d’interface commune (CI(CI+) CARD) doit être insérée. yy Si vous ne l’insérez pas, certaines chaînes afficheront le message “Signal brouillé”. yy Les informations de pairage contenant un numéro de téléphone, l’ID de la carte d’interface commune (CI(CI+) CARD), l’ID de l’hôte et d’autres informations s’afficheront dans 2 ou 3 minutes.
Fonctions de base PRE-CH TTX/MIX Navigation MUTE dans les menus Utilisation du bouton INFO (Guide Now & Next) Avant d’utiliser le téléviseur, procédez comme suit pour apprendre à naviguer dans le menu afin deCHsélectionner et de régler les LIST différentes fonctions. MENU CONTENT GUIDE TOOLS INFO RETURN EXIT 3 1 2 A B C L’affichage identifie la chaîne en cours et l’état INFO de certains paramètres audio et vidéo.
2:10 Mar 1 Jui DTV Air 800 five Family Affairs 18:00 - 18:30 Chaînes: affiche la liste des chaînes selon le type de chaîne. ■■ * Mes chaînes: affiche le groupe du canal. ■■ Satellite: affiche la liste des canaux en fonction du signal du satellite. ■■ Programmé: affiche tous les programmes réservés actuellement. Drama Tanya confesses all to a stunned Babs. Conrad is anxious to hear...
Fonctions de base Menu Canal ¦¦ Utilisation des chaînes favorites ¦¦ Réinitialisation des chaînes * Mes chaînes (dans Gestion chaînes) Affiche toutes les chaînes favorites. Antenne (Hertzien / Câble / Satellite) ■■ Modifier mes chaînes t: vous pouvez définir les chaînes sélectionnées dans le groupe Mes chaînes souhaité. ✎✎Le symbole “*” s’affiche et la chaîne est définie en tant que Ma chaîne. 1. Sélectionnez une chaîne et appuyez sur le bouton TOOLS. 2.
Configuration du système satellite ■■ Type de canal (Tous / TV / Radio): sélectionnez le type de canal à mémoriser. L’écran de saisie du code PIN apparaît. Entrez votre code PIN à quatre chiffres. La fonction Configuration du système satellite est disponible lorsque l’option Antenne est réglée sur Satellite. Before runZning Mémorisation Auto, set Configuration du système satellite. La recherche des chaînes est alors exécutée normalement.
Fonctions de base –– Aller à une pos. enregistrée: permet de faire pivoter l’antenne jusqu’à la position de satellite enregistrée. –– Position de l’antenne: permet d’ajuster et d’enregistrer la position de l’antenne pour le satellite sélectionné. –– Mémoriser la position actuelle: permet de mémoriser la position actuelle comme limite du positionneur sélectionnée. –– Qualité du signal: permet d’afficher l’état actuel du signal de diffusion.
■■ Infos modif. : modifiez une émission que vous avez réservée. ■■ Annuler progr.: annulez une émission que vous avez réservée. ■■ Information: permet d’afficher les informations relatives à une émission que vous avez réservée (et d’en modifier les informations de réservation). ■■ Sélectionner tout / Désélectionner tout: permet de sélectionner ou de désélectionner tous les programmes réservés. Transfert liste chaînes Entrez votre code PIN à quatre chiffres. Importe ou exporte la carte des chaînes.
Fonctions de base ¦¦ Modification des options d’image Paramètres avancés (Disponible en mode Standard / Cinéma) Vous pouvez régler les paramètres avancés de votre écran, notamment la couleur et le contraste. ✎✎En mode PC, vous ne pouvez modifier que les options Contraste Dynamique, Gamma, Balance blancs et Balay. rétro. LED.
modifications aux options Nuance Coul., Taille et Temps protection auto. Options d’image : Normal ► Taille : 16:9 Auto Mode écran : 16:9 Filtre Bruit num. : Auto. Filtre Bruit MPEG : Auto. Niv. noir HDMI : Normal Mode Film : Arrêt xx Les options disponibles peuvent varier en fonction du mode sélectionné. xx En mode PC, seuls les modes 16:9 et 4:3 peuvent être réglés. xx Les paramètres peuvent être réglés et mémorisés pour chaque dispositif externe connecté à une entrée du téléviseur.
Fonctions de base ■■ 100Hz Motion Plus (Arrêt / Précis / Standard / Fluide / Personnalisé / Démo): supprime les traînées des scènes rapides avec beaucoup de mouvements, ce qui rend l’image plus claire. ✎✎ Si des parasites apparaissent sur l’écran, configurez la fonction 100Hz Motion Plus sur Arrêt. Si la fonction 100Hz Motion Plus est définie sur Personnalisé, vous pouvez configurer manuellement l’option Réduction de flou, Réduc. vibrations ou Réinit..
(mode de son standard uniquement) Cette fonction garantit un son surround virtuel 5.1 canaux par le biais de deux haut-parleurs ou d’un casque grâce à la technologie HRTF (Head Related Transfer Function - Fonction de transfert asservie aux mouvements de la tête). SRS Clarté Dialogues (Arrêt / Activé) (mode de son standard uniquement) Cette fonction permet d’accentuer l’intensité d’une voix par rapport au fond musical ou aux effets sonores, de manière à rendre les dialogues plus clairs.
Fonctions de base ■■ Comp Dolby Digital (Line / RF): cette fonction réduit la disparité entre un signal Dolby Digital et un signal vocal (à savoir, Audio MPEG, HE-AAC, Son ATV). ✎✎ Sélectionnez Line pour obtenir un son dynamique et RF pour réduire la différence entre les sons forts et faibles pendant la nuit. Line : permet de définir le niveau de sortie des signaux supérieurs ou inférieurs à -31 dB (référence) sur -20 dB ou -31 dB.
téléviseur est allumé par le minuteur) : le téléviseur est mis hors tension automatiquement après trois heures d’inactivité pour éviter toute surchauffe.
Fonctions de base Réseau (Type de réseau / Config. du réseau / Test réseau / SWL (Samsung Wireless Link) / Connexion SWL) ¦¦ Autres fonctionnalités Langue ■■ Langue des menus: définissez la langue des menus. Pour plus d’informations sur la configuration des options, reportezvous à la section “Connexion réseau” (p. 28). ■■ Langue du télétexte: sélectionnez la langue de votre choix pour le télétexte. Général ✎✎ L’anglais est utilisé par défaut si la langue sélectionnée n’est pas diffusée.
prenant en charge BD Wise via un câble HDMI. ■■ Transparence menu (Lumineux / Sombre): permet de définir la transparence du menu. ■■ Mélodie (Arrêt / Bas / Moyen / Elevé): cette option permet de définir la lecture d’une mélodie lors de la mise en marche ou l’arrêt du téléviseur. ¦¦ Interface commune ■■ CI Menu: permet à l’utilisateur d’opérer une sélection dans le menu du module CAM. Sélectionnez le CI Menu en fonction du menu Carte PC.
Fonctions de base Menu Assistance Installation de la version la plus récente Diagnostic automatique ✎✎Le diagnostic automatique peut prendre quelques minutes ; ce phénomène est normal. ■■ Test de l’image (Oui / Non): utilisez cette option pour rechercher d’éventuels problèmes d’image. ■■ Test du son (Oui / Non): utilisez la mélodie intégrée pour rechercher d’éventuels problèmes sonores.
Fonctions avancées 04 Connexion à un ordinateur Fonctions avancées Utilisation d’un câble HDMI/DVI / D-Sub DVI OUT AUDIO OUT PC IN AUDIO OUT PC OUT Modes d’affichage (Entrées D-Sub et HDMI/DVI) La résolution optimale est de 1920 X 1080 à 60 Hz.
Fonctions avancées Connexion réseau Vous pouvez configurer votre téléviseur de telle sorte qu’il puisse accéder à Internet par le biais de votre réseau local (LAN) à l’aide d’une connexion câblée ou sans fil. ¦¦ Connexion à un réseau câblé Vous pouvez connecter votre téléviseur au réseau local de trois manières différentes : yy En connectant le port LAN situé à l’arrière du téléviseur à un modem externe à l’aide d’un câble de catégorie 5. Voir le schéma cidessous.
Config. du réseau (Manuel) Utilisez l’option Config. du réseau Auto. lors de la connexion du téléviseur à un réseau prenant en charge le protocole DHCP. Pour configurer automatiquement la connexion réseau par câble de votre téléviseur, procédez comme suit: Utilisez l’option Config. du réseau Manuel lors de la connexion du téléviseur à un réseau qui nécessite une adresse IP statique. 1. Connectez votre téléviseur au réseau local en suivant la procédure décrite à la section précédente. 2.
Fonctions avancées ¦¦ Connexion à un réseau sans fil Pour établir une connexion sans fil entre le téléviseur et le réseau, vous avez besoin d’un routeur ou d’un modem et d’un adaptateur LAN sans fil Samsung (WIS09ABGN), que vous connectez à la prise USB située sur le panneau latéral ou arrière du téléviseur. Voir l’illustration ci-dessous. ✎✎ Pour utiliser la fonction SWL(Samsung Wireless Link), connectez-la au port USB 1 (HDD).
04 Avis Méthode 1 Méthode 2 Connexion à l’aide de l’adaptateur USB à angle droit Connexion via un câble d’extension Fonctions avancées L’image peut apparaître altérée ou statique pour certaines chaînes lorsque le téléviseur est connecté à l’adaptateur LAN sans fil Samsung. Le cas échéant, établissez une connexion à l’aide de l’une des méthodes suivantes : ou Config. du réseau (Configuration automatique Samsung) 4.
Fonctions avancées Config. du réseau Sélectionnez un réseau. : Non sélectionné ► Config. prot. Internet : Auto. Adresse IP : Masque de sous-réseau : Passerelle : DNS : Auto. Serveur DNS : 5. Si la fenêtre contextuelle Sécurité/PIN s’affiche, passez à l’étape 6. Si l’écran de connexion réseau apparaît, passez à l’étape 10. 6. Appuyez sur le bouton ▲ ou ▼ pour sélectionner Sécurité ou PIN. Pour la plupart des réseaux domestiques, vous devez choisir Sécurité (pour Code de sécurité).
Config. du réseau (Manuel) l’adaptateur LAN sans fil Samsung vous permet de vous connecter à un périphérique mobile sans faire usage d’un point d’accès, en utilisant un réseau point-à-point. Si les autres méthodes ne fonctionnent pas, vous devez saisir manuellement les valeurs de configuration du réseau. Wireless Link) est défini sur Arrêt. Procédure de connexion au nouvel appareil ad hoc 1. Suivez les étapes 1 à 6 de la section “Configuration à l’aide de la méthode PBC (WPS)” (p. 31). 2.
Fonctions avancées SWL(Samsung Wireless Link) Si le téléviseur ne parvient pas à se connecter à Internet Cette fonction vous permet de connecter, au téléviseur, un appareil Samsung prenant en charge PBC (WPS). Vous pouvez connecter des appareils au téléviseur, même si ce dernier n’est pas relié à un routeur.
Vous pouvez lire les fichiers télévisuels, les photos, la musique et/ou les films enregistrés sur un périphérique USB de type MSC et/ou sur votre ordinateur. Fonctions avancées MEDIA.P 04 Media Play MediaPlay Videos View Devices E Enter R Return Change Device SUM ¦ Connexion d’un périphérique USB 1. Allumez votre téléviseur. 2.
Fonctions avancées ✎✎Fonctions non prises en charge lors de la connexion à l’ordinateur via le réseau: xx Fonctions Fond musica et Paramètres de musique de fond. xx Tri des fichiers par préférence dans les dossiers Photos, Musique et Vidéos. xx Bouton� (Retour arrière) ou µ (Avance rapide) pendant la lecture d’un film. ✎✎Les sous-titres intégrés multi-audio Divx DRM ne sont pas pris en charge. ✎✎Samsung PC Share Manager doit être autorisé par le pare-feu de l’ordinateur.
04 ¦¦ Affichage ✎✎Prise en charge de Afficher périph. et Accueil dans la page d’accueil Media Play. Information: Vous pouvez vérifier le nom du fichier sélectionné, le nombre de fichiers, ainsi que la page. Vidéos /Movie 01.avi Movie 01.avi Movie 03.avi Movie 05.avi Section Liste de tri: Affiche l’ordre de tri standard. 1/1 Page Jan.10.2010 Jan.10.2010 Jan.10.2010 Movie 07.avi Movie 02.avi Movie 04.avi Movie 06.avi Movie 09.avi fonction du contenu. SUM Jan.10.2010 Jan.10.2010 Jan.10.
Fonctions avancées Utilisation de la fonction Mode Timeshift t Si vous avez manqué une émission en direct, cette fonction vous permet de regarder son enregistrement. Lorsque Mode Timeshift est réglé sur Auto., le téléviseur mémorise le canal que vous êtes en train de regarder pour effectuer un enregistrement automatique. Lorsque Mode Timeshift est réglé sur Manuel, si vous appuyez sur le bouton � (Lecture), le téléviseur mémorise le canal à partir du point où vous lancez l’enregistrement.
04 Vidéos Fonctions avancées Lecture de vidéo 1. Appuyez sur le bouton ◄ ou ► pour sélectionner Vidéos, puis appuyez sur ENTERE dans le menu Media Play. 2. Appuyez sur le bouton ◄ / ► / ▲ / ▼ pour sélectionner le fichier de votre choix dans la liste des fichiers. 3. Appuyez sur le bouton ENTERE ou � (Lecture). –– Le fichier sélectionné s’affiche en haut de l’écran, avec le temps de lecture.
Fonctions avancées Autres restrictions ✎✎ REMARQUE xx Si le contenu d’un codec présente un problème, ce dernier ne sera pas pris en charge. xx Si les informations concernant un conteneur sont incorrectes et que le fichier présente une erreur, le conteneur ne pourra pas effectuer une lecture correcte. xx Le son ou la vidéo peuvent ne pas fonctionner si le contenu a un débit binaire/une fréquence d’images standard supérieur aux taux d’images par seconde repris dans le tableau ci-dessus.
04 Musique 1. Appuyez sur le bouton ◄ ou ► pour sélectionner Musique, puis appuyez sur ENTERE dans le menu Media Play. 2. Appuyez sur le bouton ◄ / ► / ▲ / ▼ pour sélectionner le fichier de votre choix dans la liste des fichiers. 3. Appuyez sur le bouton ENTERE ou � (Lecture). Liste lect –– Pendant la lecture de la Musique, vous pouvez effectuer une recherche à l’aide des boutons ◄ et ►. –– Les boutons � (Retour arrière) et µ (Avance rapide) ne fonctionnent pas durant la lecture.
Fonctions avancées ¦¦ Lecture de plusieurs fichiers Lecture des fichiers musicaux / vidéo / photo sélectionnés 1. 2. Appuyez sur le bouton jaune dans la liste des fichiers pour sélectionner le fichier de votre choix. Videos Répétez l’opération ci-dessus pour sélectionner plusieurs fichiers. Movie 01.avi ✎✎ REMARQUE Movie 03.avi Jan.10.2010 Movie 06.avi Movie 09.avi Jan.10.2010 Movie 10.avi Jan.10.2010 SUM Jan.10.2010 Movie 08.avi Jan.10.
04 Menu des options de lecture de vidéos/musique/photos/programmes TV enregistrés Catégorie Opérations Progr. TV enreg. Vidéos Musique Photos Titre Vous pouvez déplacer directement l’autre fichier. > > Mode Répétition Vous pouvez lire des fichiers musicaux, vidéo et enregistrés en boucle > > Format de l’image Vous pouvez régler le format de l’image suivant vos préférences > > Réglage de l’image Vous pouvez régler les paramètres d’image (p. 17, 18, 19, 20).
Fonctions avancées Anynet+ Qu’est-ce qu’Anynet+? t Anynet+ est une fonction qui vous permet de contrôler tous les appareils Samsung connectés compatibles Anynet+ à l’aide de votre télécommande Samsung. Le système Anynet+ peut être utilisé uniquement avec les appareils Samsung disposant de la fonction Anynet+. Pour être sûr que votre appareil Samsung dispose de cette fonction, vérifiez qu’il comporte le logo Anynet+.
04 Menu Anynet+ Le menu Anynet+ varie selon le type et l’état des appareils Anynet+ connectés au téléviseur. (nom_appareil) INFO Enregistrement: (*enregistreur) Arrêter Enr.: (*enregistreur) Récepteur Description Fait basculer le mode Anynet+ en mode de diffusion TV. Affiche la liste des appareils Anynet+. Affiche les menus de l’appareil connecté. Par exemple, si un graveur DVD est connecté, son menu de disque s’affiche. Affiche le menu de lecture de l’appareil connecté.
Fonctions avancées ¦¦ Ecoute via un récepteur Vous pouvez diffuser du son via un récepteur (c’est-à-dire un système home cinéma) au lieu du Haut-parleur TV. 1. Sélectionnez Récepteur et définissez l’option sur Activé. 2. Appuyez sur le bouton EXIT pour quitter le menu. ✎✎ Si votre récepteur ne prend en charge que l’audio, il se peut qu’il ne figure pas dans la liste d’appareils.
04 Internet@TV P.SIZE Recommandé Internet@TV vous permet de disposer, sur votre téléviseur, de contenu utile et ludique en provenance directe du Web. par date 1/1 Mes applications Samsung Apps Fonctions avancées ¦ Mise en route d’Internet@TV Paramètres Connexion B Marquer comme favori Trier par R Retour ✎ REMARQUE x Vous devez configurer les paramètres réseau avant d’utiliser Internet@TV. Pour plus d’informations, reportez-vous à la section “Connexion réseau” (p. 28).
Fonctions avancées ■■ Config. système Connexion au compte Si l’application contient plusieurs comptes, utilisez les boutons ◄ et ► pour y accéder. ✎✎ Connexion admin Mode Utilisateur: Ex. auto. téléscr. (Arrêt / Activé): active/désactive l’exécution automatique du message déroulant lors de la mise sous tension du téléviseur. L’application Téléscripteur fournit des informations utiles sur l’actualité, la météo et les cours boursiers.
Utilisation de Samsung Apps par catégorie Samsung Apps est un site de téléchargement d’applications utilisables sur les appareils TV/AV de marque Samsung. Les utilisateurs peuvent bénéficier d’un large éventail de contenu, tel que des vidéos, de la musique, des photos, des jeux, des informations utiles, etc., à l’aide des applications téléchargées. D’autres applications seront disponibles ultérieurement. Samsung Apps Nouveautés Vidéo Cités You Tube Sports Les plus téléch.
Fonctions avancées AllShare Message / Média / ScreenShare ¦¦ A propos de AllShare AllShare connecte votre téléviseur, vos téléphones portables et d’autres appareils compatibles par l’intermédiaire d’un réseau. Vous pouvez ainsi être averti, sur l’écran de votre téléviseur, de la réception d’appels, lire des messages SMS ou encore afficher les programmes définis sur votre téléphone portable.
Utilisation de la fonction ScreenShare Si vous recevez un appel alors que vous regardez la télévision, la fenêtre d’alarme s’affiche. ScreenShare affiche la même page Web que celle fournie sur le téléphone portable. La fonction ScreenShare vous permet d’ouvrir les différents types de contenu enregistrés sur un téléphone portable. Ainsi, l’image de droite illustre une page d’accès au contenu d’un téléphone portable.
Informations supplémentaires Fonction Télétexte de chaîne analogique La page d’index du télétexte contient des instructions sur l’utilisation du service. Pour que les informations du télétexte s’affichent correctement, la réception des chaînes doit être stable. Autrement, des informations pourraient manquer ou certaines pages ne pas s’afficher. ✎✎Vous pouvez changer de page de télétexte en appuyant sur les boutons numériques de la télécommande.
05 Assemblage des câbles Informations supplémentaires Type support Insérez les câbles dans l’attache de câble, de telle sorte qu’ils ne soient pas visibles à travers le pied transparent. 1 1 2 2 3 3 Type montage mural ✎✎Ne tirez pas trop sur les câbles lorsque vous les manipulez. Les bornes de connexion du produit risqueraient d’être endommagées. Français [UC6800]BN68-02842A-00L04.
Informations supplémentaires Installation du support mural Assemblage du cache Si vous fixez le téléviseur à un mur, attachez le cache de la manière indiquée sur le dessin. Cache Assemblage du cordon d’alimentation Si vous fixez le téléviseur à un mur, attachez le cordon d’alimentation comme illustré. 1 2 3 1. Retirez la vis illustrée dans la première image ci-dessus. 2. Fixez l’attache du cordon d’alimentation à ce dernier. 3.
05 Caractéristiques du kit de fixation murale (VESA) Installez votre fixation murale sur un mur solide perpendiculaire au sol. Si vous souhaitez la fixer sur d’autres matériaux de construction, veuillez prendre contact avec votre revendeur le plus proche. Si vous l’installez au plafond ou sur un mur non droit, la fixation risque de tomber et de provoquer de graves blessures. ✎✎REMARQUE xx Les dimensions standard pour tous les kits de fixation murale sont indiquées dans le tableau ci-dessous.
Informations supplémentaires Verrou antivol Kensington Le verrou antivol Kensington n’est pas fourni par Samsung. L’antivol Kensington est un dispositif utilisé pour fixer physiquement le système lorsqu’il est utilisé dans un endroit public. L’aspect du verrou et la méthode de verrouillage peuvent différer de l’illustration en fonction du fabricant. Consultez le manuel fourni avec le verrou Kensington pour obtenir des instructions d’utilisation supplémentaires.
05 Dépannage Problèmes Solutions et explications Qualité de l’image Exécutez tout d’abord le Test de l’image pour vérifier que votre téléviseur affiche correctement l’image de test. (Accédez à MENU - Assistance - Diagnostic automatique - Test de l’image) (p. 26) Si l’image de test s’affiche correctement, sa qualité médiocre peut être due à la source ou au signal. La qualité de l’image affichée par le téléviseur n’est pas aussi bonne que dans le magasin.
Informations supplémentaires Problèmes Solutions et explications Aucune image, aucune vidéo La télévision ne s’allume pas. • • • Le téléviseur s’éteint automatiquement. • • • • Une image/vidéo est affichée. • • • • Vérifiez que le cordon d’alimentation secteur est branché correctement sur la prise murale et sur le téléviseur. Vérifiez que la prise murale est opérationnelle. Essayez d’appuyer sur le bouton POWER du téléviseur pour vérifier que la télécommande fonctionne correctement.
Solutions et explications • • • • Le téléviseur arrête d’enregistrer alors que plusieurs périphériques d’enregistrement sont connectés. Les enregistrements programmés sont désactivés pour certaines opérations (formatage, test de performance, vérification d’erreur, suppression) qui accèdent au système de fichiers d’un périphérique USB. Si aucun périphérique USB n’est connecté, le téléviseur n’enregistre pas à l’heure de début programmée.
Informations supplémentaires ¦¦ Licence TheaterSound, SRS and the symbol are trademarks of SRS Labs, Inc. TheaterSound technology is incorporated under licence form SRS Lab, Inc. Fabriqué sous licence Dolby Laboratories. Dolby et le symbole du double D sont des marques de Dolby Laboratories. Manufactured under licence under U.S. Patent #’s: 5,451,942; 5,956,674; 5,974,380; 5,978,762; 6,487,535 & other U.S. and worldwide patents issued & pending. DTS and the Symbol are registered trademarks. & DTS 2.
UE37C6800 32 pouces 37 pouces Son (Sortie) Dimensions (L x P x H) Corps Avec socle 10W x 2 771 X 29.9 X 480 mm 771 X 240 X 543 mm 894 X 29.9 X 550 mm 894 X 255 X 614 mm 8.3 kg 11.1 kg 10.8 kg 14.4 kg Nom du modèle UE40C6800 UE46C6800 Taille de l’écran (diagonale) 40 pouces 46 pouces Poids Sans socle Avec socle Son (Sortie) Dimensions (L x P x H) Corps Avec socle 10W x 2 958 X 29.9 X 585 mm 958 X 255 X 649 mm 1093 X 29.9 X 660 mm 1093 X 275 X 723 mm 12.3 kg 15.
Informations supplémentaires Index A F Aff. de base AllShare Amplifier Antenne Anynet+ Attache de câble AUDIO OUT 42 50 20 14 44 4, 53 10 B Balance blancs Balance G/D Bouton ON/OFF 18 20 6 43 19, 43 39 14 H Haut-parleur externe Haut-parleur TV HDMI Home cinéma Horloge Cache Capteur Eco Caractéristiques techniques Carnation Casques Chaude Composant Config. du réseau Connexion à un ordinateur Connexion à un système audio Connexion réseau Contraste Dyn.
05 Informations supplémentaires This page is intentionally left blank. Français [UC6800]BN68-02842A-00L04.
Le figure e le illustrazioni presenti in questo Manuale dell’utente sono fornite unicamente a titolo di riferimento e possono differire da quelle del prodotto attuale. Le specifiche e il design del prodotto possono variare senza preavviso. Avviso relativo alla trasmissione TV digitale 1. 2. 3. 4. 5. 6.
Contenuti Per iniziare 4 4 5 6 7 7 Accessori Vista del Pannello di controllo Vista del telecomando Collegamento all’antenna Plug & Play (Impostazione iniziale) 8 Collegare un dispositivo AV 10 Collegamento a un dispositivo audio 11 Cambiare la sorgente di ingresso Funzioni base 12 12 12 12 14 17 20 22 26 Come scorrere i menu Uso del tasto INFO (Guida Now & Next) Pianificare la visione Menu Canale Menu Immagine Menu Suono Menu Impostazione Menu Supporto Funzioni avanzate 27 27 28 35 44 47 50 Coll
Per iniziare Accessori ✎✎Controllare che nella confezione del TV LED siano contenuti i seguenti componenti. Se eventuali componenti risultassero mancanti, contattare il rivenditore. ✎✎La forma e il colore dei componenti possono variare in base al modello.
01 Per iniziare Vista del Pannello di controllo ✎✎La forma e il colore del prodotto possono variare in base al modello. Indicatore di alimentazione Sensore del telecomando Altoparlanti Indicatore di alimentazione Sensore del telecomando SOURCEE MENUm Y z P (Alimentazione) Lampeggia e si spegne quando l’alimentazione è attiva, si accende in modalità standby. Puntare il telecomando in direzione di questo punto sul televisore. Alterna tutte le sorgenti d’ingresso disponibili.
Per iniziare Vista del telecomando POWER Spegne e accende il televisore. ON/OFF Accende/Spegne la luce del telecomando. Questa funzione attiva l’illuminazione momentanea dei tasti quando questi vengono premuti. (L’uso del telecomando con questa funzione impostata su Off riduce l’uso della batteria.) SOURCE Visualizza e seleziona le sorgenti video disponibili (p. 11). Accesso diretto ai canali. Seleziona alternativamente le modalità Teletext, Doppia o Mista.
01 Per iniziare Collegamento all’antenna Quando il televisore viene acceso per la prima volta, le impostazioni di base vengono visualizzate automaticamente. ✎✎Preimpostato: Collegare l’alimentazione e l’antenna.
Collegamenti Collegare un dispositivo AV Uso di un cavo HDMI o HDMI/DVI: Connessione HD (fino a 1080p) Dispositivi disponibili: Lettore DVD, Blu-ray, ricevitore via cavo HD, ricevitore satellitare HD STB (Set-Top-Box), ricevitore via cavo, ricevitore satellitare (STB) HDMI OUT DVD / lettore Blu-ray DVI OUT PC IN R AUDIO OUT DVD / lettore Blu-ray W R-AUDIO-L Rosso Bianco ✎✎HDMI IN 1(DVI), 2, 3, 4, PC/DVI AUDIO IN xx Quando per la connessione si usa un cavo HDMI/DVI, è necessario utilizzare il jack
02 Collegamenti Usare un cavo Component (fino a 1080p) o Audio/Video (solo 480i) e un cavo Scart Dispositivi disponibili: Videoregistratore, lettore DVD, Blu-ray, ricevitore via cavo, ricevitore satellitare STB DVD / lettore Blu-ray COMPONENT OUT Videoregistratore /DVD PR PB Y R B G Videoregistratore AUDIO OUT AUDIO OUT R-AUDIO-L R-AUDIO-L VIDEO OUT P R W R W Y R G B R EXT B Rosso Blu R G W R Y W W R Rosso Bianco Rosso Bianco Giallo Y W R Verde ✎✎In modalità Est.
Collegamenti Collegamento a un dispositivo audio Uso di un collegamento ottico (digitale), audio (analogico) o cuffie Dispositivi disponibili: sistema audio digitale, amplificatore, DVD home theatre sistema audio digitale OPTICAL ✎✎DIGITAL AUDIO OUT (OPTICAL) xx Quando un sistema audio digitale è collegato alla porta DIGITAL AUDIO OUT (OPTICAL), ridurre il volume sia del televisore sia del sistema.
02 Collegamenti Slot per CONNESSIONI COMMON INTERFACE Per visualizzare canali a pagamento, è necessario inserire una “SCHEDA CI o CI+”. yy Se non si inserisce una “SCHEDA CI o CI+”, alcuni canali visualizzeranno il messaggio “Segnale criptato”. yy Le informazioni di pairing che contengono un numero telefonico, l’ID della “SCHEDA CI o CI+”, l’ID host e altri dati verranno visualizzati entro 2~3 minuti. Se viene visualizzato un messaggio di errore, contattare il fornitore del servizio.
Funzioni base PRE-CH TTX/MIX MUTE i menu Come scorrere Uso del tasto INFO (Guida Now & Next) Prima di utilizzare il televisore, seguire questi passaggi per imparare a scorrere i menu,CH selezionando e regolando le LIST diverse funzioni. MENU CONTENT GUIDE TOOLS INFO RETURN EXIT 3 1 2 A B C 4 D 1 ENTERE / Tasto di direzione: Sposta il cursore e I-II seleziona una voce. Conferma l’impostazione. MEDIA.P INTERNET DUAL V 2 Tasto RETURN: Ritorna @alTmenu precedente.
Guida 2:10 Mar 1 Giu DTV Air 800 five Family Affairs 18:00 - 18:30 ■■ Canali: Mostra l’elenco canali a seconda del tipo di canale. ■■ * Miei canali: Mostra il gruppo del canale. ■■ Satellite: Mostra l’elenco canali a seconda del segnale satellitare. ■■ Programmato: Mostra tutti i programmi attualmente prenotati. Drama Tanya confesses all to a stunned Babs. Conrad is anxious to hear...
Funzioni base Menu Canale ¦¦ Uso dei Canali Preferiti ¦¦ Ritorno ai canali * Miei canali (in Gestione canali) Mostra tutti i canali preferiti. Antenna (Antenna / Cavo / Satellite) ■■ Modifica Miei canali t : E’ possibile impostare i canali selezionati nel gruppo Mio canale. ✎✎Il simbolo “*” verrà evidenziato e il canale verrà impostato nel gruppo Mio canale. 1. Selezionare un canale e premere il tasto TOOLS. 2. Aggiungere o eliminare un canale nei gruppi Mio canale quali 1, 2, 3 e 4.
Impostazione sistema satellitare ■■ Tipo canale (Tutto / TV / Radio): Seleziona il tipo di canale da memorizzare. Viene visualizzata la finestra di immissione del PIN. Digitare il PIN a quattro cifre. Impostazione sistema satellitare è disponibile quando l’opzione Antenna è impostata su Satellite. Prima di eseguire la funzione Memoriz. automatica, avviare la procedura Impostazione sistema satellitare. La ricerca del canale verrà eseguita normalmente. ■■ Satellite: Seleziona il satellite da ricercare.
Funzioni base sulla posizione memorizzata del satellite. –– Posizione antenna: Regola e memorizza la posizione dell’antenna per il satellite selezionato. –– Memorizza posizione corrente: Memorizza la posizione corrente come il limite posizionatore selezionato. –– Qualità del segnale: Visualizza lo stato corrente del segnale trasmesso. Modalità Installatore: Impostare i limiti per il raggio d’azione dell’antenna satellitare, oppure reimpostare la posizione.
(in Gestione canali) E’ possibile visualizzare, modificare o eliminare un programma prenotato. ■■ Modifica info: Per modificare un programma prenotato. ■■ Annulla Programmazioni: Per annullare un programma prenotato. ■■ Informazioni: Per visualizzare un programma prenotato. (E’ inoltre possibile modificare le informazioni relative alla prenotazione.) ■■ Seleziona tutto / Deseleziona tutto: Per selezionare o deselezionare tutti i programmi prenotati. Trasferim.
Funzioni base ¦¦ Modifica delle Opzioni immagine Impostazioni avanzate (disponibile in modalità Standard / Film) E’ possibile regolare le impostazioni avanzate dello schermo compresi il colore e il contrasto. ✎✎In modalità PC, è possibile modificare solo i parametri Contrasto Dinamico, Gamma, Bilan bianco e LED movim avanzato.
✎✎In modalità PC, è possibile modificare solo i parametri Toni colore, Dimensioni e Ora protezione auto. Toni colore : Normale ► Dimensioni : Auto Wide Mod schermo : 16:9 Filtro disturbo digitale : Automatico Filtro disturbo MPEG : Automatico Livello di nero HDMI : Normale selezionata. xx In modalità PC, è possibile regolare solo i formati 16:9 e 4:3. xx Le impostazioni possono essere modificate e : Off memorizzate per ogni dispositivo esterno collegato al televisore.
Funzioni base ■■ 100Hz Motion Plus (Off / Chiaro / Standard / Lineare / Personalizza / Demo): Elimina l’effetto ’trascinamento’ dalle scene in rapido movimento per offrire una visione più nitida delle immagini. ✎✎ Se lo schermo è disturbato, impostare la modalità 100Hz Motion Plus su Off. Se 100Hz Motion Plus è impostata su Personalizza, è possibile impostare manualmente le opzioni Riduz distorsioni, Riduz vibrazioni o Reset.
SRS TruSurround HD (Off / On) t (solo modalità audio standard) Questa funzione produce un audio virtuale a 5.1 canali surround attraverso una coppia di altoparlanti o di cuffie mediante l’uso della tecnologia HRTF (Head Related Transfer Function). SRS TruDialog (Off / On) (solo modalità audio standard) Questa funzione permette di incrementare l’intensità della voce rispetto alla musica di sottofondo o agli effetti audio in modo che sia possibile udire meglio i dialoghi durante la visione di un programma.
Funzioni base ■■ Comp Dolby Digital (Line / RF): Questa funzione minimizza la disparità dei segnali tra un segnale dolby digital e un segnale vocale (per es. audio MPEG, HEAAC, audio ATV). Selezionare Line per ottenere un audio dinamico, e RF per ridurre la differenza tra i suoni alti e bassi durante la notte. Line : Impostare il livello di uscita dei segnali maggiori o minori di -31dB (riferimento) su -20dB o -31dB.
■■ Timer 1 / Timer 2 / Timer 3: Possono essere impostate tre diverse opzioni del Timer. Prima è necessario impostare l’orologio. ▲ ▼ 00 00 00 00 Orario TV off Disattiva Sorgente Volume 10 Ripetizione 1 volta Antenna TV Dom Mar ¦¦ Blocco programmi Canale ATV Lun Mer 1 Gio Ven Sicurezza Sab L Sposta U Regola E Conferma R Ritorna Orario TV on / Orario TV off: Per impostare l’ora e i minuti e attivare / disattivare l’opzione.
Funzioni base Rete (Tipo di rete / Impostazione rete / Test di rete / SWL(Samsung Wireless Link) / Connessione SWL) ¦¦ Altre funzioni Lingua ■■ Lingua menu : Imposta la lingua dei menu. Per l’impostazione delle opzioni, vedere le istruzioni riportate alla sezione “Connessione di rete” (p. 28). ■■ Lingua Teletext : Imposta la lingua desiderata per il servizio Teletext. Generale ✎✎ La lingua predefinita è l’inglese, nel caso in cui la trasmissione non supporti la lingua selezionata.
✎✎ Disponibile in caso di connessione di prodotti Samsung che supportano BD Wise mediante cavo HDMI. ■■ Trasparenza menu (Luminoso / Scuro): Imposta la trasparenza del menu. ■■ Melodia (Off / Basso / Medio / Alto): Per riprodurre una melodia all’accensione o allo spegnimento del televisore. ¦¦ Interfaccia comune ■■ Menu CI: Permette all’utente di accedere al menu del modulo CAM. Selezionare il Menu CI in base alla scheda PC.
Funzioni base Menu Supporto Installare la versione più recente Auto diagnosi ✎✎La funzione di auto diagnosi potrebbe richiedere alcuni secondi; questa operazione rientra nel normale funzionamento del televisore. ■■ Test immagine (Sì / No): Utilizzato per controllare eventuali problemi di visualizzazione delle immagini. ■■ Test audio (Sì / No): Usare la melodia predefinita per verificare eventuali problemi audio.
Funzioni avanzate 04 Funzioni avanzate Collegamento a un PC Uso di un Cavo HDMI/DVI / D-sub DVI OUT AUDIO OUT PC IN AUDIO OUT PC OUT Modalità di visualizzazione (ingresso D-Sub e HDMI/DVI) La risoluzione ottimale è 1920 X 1080 a 60 Hz.
Funzioni avanzate Connessione di rete E’ possibile impostare il televisore in modo da poter accedere a Internet attraverso una LAN con un collegamento via cavo o wireless. ¦¦ Collegamento a una rete cablata Vi sono tre modi per collegare il televisore alla LAN via cavo: yy E’ possibile collegare il televisore alla LAN connettendo la porta LAN sul retro del televisore a un modem esterno mediante un cavo Cat 5. Vedere lo schema riportato sotto.
Impostazione rete (Manuale) Durante la connessione del televisore a una rete che supporta il protocollo DHCP, configurare Impostazione rete su Auto. Per impostare automaticamente la connessione di rete via cavo del televisore, seguire questi passaggi: Configurare Impostazione rete su Manuale quando si collega il televisore a una rete che richiede un indirizzo IP statico.
Funzioni avanzate ¦¦ Collegamento a una rete wireless Per collegare il televisore a una rete wireless, è necessario disporre di un router o di un modem wireless e di un adattatore LAN wireless Samsung (WIS09ABGN) da collegare al jack USB sul pannello posteriore o laterale del televisore. Vedere la figura riportata sotto. ✎✎ Per utilizzare la funzione SWL(Samsung Wireless Link), effettuare il collegamento alla porta USB 1 (HDD).
04 Funzioni avanzate Avviso Quando il televisore è collegato a un adattatore Samsung Wireless LAN Adapter, alcuni canali potrebbero visualizzare le immagini in modo anomalo. In tal caso, effettuare un collegamento mediante uno dei seguenti metodi: Metodo 1 Mediante l’adattatore angolare USB Metodo 2 Mediante un cavo di prolunga o Impostazione rete (Configurazione automatica Samsung) Questa funzione è disponibile negli AP (Access Point) che supportano la modalità Configurazione automatica Samsung.
Funzioni avanzate Impostazione rete Seleziona una rete : Non selezionato ► Impostazione IP : Automatico Indirizzo IP : Maschera sottorete : Gateway : DNS : Automatico Server DNS : 5. Se compare la finestra PIN/Sicurezza, andare al passaggio 6. Se compare la schermata di connessione rete, andare al passaggio 10. 6. Premere il tasto ▲ o ▼ per selezionare Sicurezza o PIN. Per la maggior parte delle reti domestiche, selezionare Sicurezza (per Chiave di sicurezza).
Impostazione rete (Manuale) E’ possibile collegarsi a un dispositivo mobile senza Access Point tramite la scheda “Samsung Wireless LAN Adapter” usando un network peer-to-peer. Se gli altri metodi non funzionano, digitare le impostazioni di rete manualmente. ✎✎Questa funzione è disponibile quando SWL(Samsung Wireless Link) è impostato su Off. Procedura per il collegamento a un nuovo dispositivo Ad-hoc 1. Seguire i passaggi da 1 a 6 della “Procedura per l’impostazione mediante PBC (WPS)” (p. 31).
Funzioni avanzate SWL(Samsung Wireless Link) Se il televisore non riesce a stabilire una connessione a Internet Questa funzione permette di collegare un dispositivo Samsung che supporta PBC (WPS) al televisore. E’ possibile collegare altri dispositivi al televisore anche se a quest’ultimo non è collegato un router.
MEDIA.P Godetevi i programmi TV registrati, le foto, la musica o i film salvati su un dispositivo USB Mass Storage Class (MSC) e/o sul PC. 04 Funzioni avanzate Media Play MediaPlay Videos SUM View Devices E Enter R Return Change Device ¦ Collegamento di un dispositivo USB Pannello posteriore del televisore 1. Accensione del televisore. 2. Collegare un dispositivo USB contenente programmi TV registrati, foto, musica o film al jack USB 1 (HDD) o USB 2 ul pannello laterale del televisore. 3.
Funzioni avanzate ✎✎Nessuna funzione è supportata in caso di collegamento al PC tramite rete: xx Funzioni Musica di sottof e Impostazione musica di sottofondo. xx Ordinamento dei file in base alle preferenze nelle cartelle Foto, Musica e Video. xx Premere i tasti � (REW) o µ (FF) durante la riproduzione di un film. ✎✎Le didascalie incorporate, Divx DRM, Multi-audio, non sono supportate. ✎✎Samsung PC Share Manager deve essere autorizzato dal programma firewall del PC.
04 Funzioni avanzate ¦¦ Visualizzazione a schermo Posizionarsi sul file desiderato usando i tasti su/giù/sinistra/destra, quindi premere ENTERE o � (Riproduci). Il file selezionato verrà visualizzato. ✎✎Supporta Visual. dispos. e Pag. iniziale nella homepage Media Play. Informazioni: E’ possibile verificare il nome del file selezionato e il numero di file e di pagine. Video /Movie 01.avi Movie 01.avi Movie 03.avi Movie 05.avi Sezione Elenco ordinamento: Visualizza lo standard di ordinamento. Jan.10.
Funzioni avanzate ✎✎NOTA xx Non è possibile riprodurre video registrati e DRM (Digital Rights Management) protetti su un PC o su altri televisori, nemmeno nel caso sia stata cambiata la scheda madre del televisore. xx Le trasmissioni dati non possono essere registrate. xx La disponibilità delle funzioni di registrazione e Mod. TimeShift può dipendere dalla qualità delle immagini e dallo spazio libero sul disco rigido.
Riproduzione di video 1. Premere il tasto ◄ o ► per selezionare Video, quindi premere ENTERE nel menu Media Play. 2. Premere ◄/►/▲/▼ per selezionare il file desiderato tra quelli riportati in elenco. 3. Premere ENTERE o il tasto � (Riproduci). –– Il file selezionato verrà visualizzato in alto con il relativo tempo di riproduzione. –– Se le informazioni sulla durata del video non sono disponibili, il tempo di riproduzione e la barra di avanzamento non vengono visualizzati.
Funzioni avanzate Altre limitazioni ✎✎ NOTA xx In caso di problemi con i contenuti di un codec, il codec non verrà supportato. xx Se le informazioni relative a un Contenitore sono incorrette e il file è in errore, il Contenitore non sarà in grado di riprodurlo correttamente. xx Le funzioni audio e video possono non funzionare se i contenuti hanno un bitrate/frame rate standard superiore al Frame/sec compatibile elencato nella tabella precedente.
Riproduzione di musica 1. Premere il tasto ◄ o ► per selezionare Musica, quindi premere ENTERE nel menu Media Play. Elenco 2. Premere ◄/►/▲/▼ per selezionare il file desiderato tra quelli riportati in elenco. 3. Premere ENTERE o il tasto � (Riproduci). –– Durante la riproduzione di un Musica, è possibile eseguire ricerche utilizzando i tasti ◄ e ►. –– I tasti � (REW) e µ (FF) non sono attivi durante la riproduzione. ✎✎Visualizza solo i file con estensione MP3 e PCM.
Funzioni avanzate ¦¦ Riproduzione di più file Riproduzione di filmati/brani musicali/foto selezionati 1. Premere il tasto giallo per selezionare il file desiderato tra quelli riportati in elenco. Videos 2. Ripetere l’operazione per selezionare più file. 2 files selected /Movie 01.avi Movie 01.avi Movie 02.avi Jan.10.2010 ✎✎ NOTA Movie 03.avi Movie 05.avi Jan.10.2010 Movie 07.avi tasto giallo. xx Per deselezionare tutti i file, premere il tasto TOOLS e selezionare Deseleziona tutto. Jan.10.
During playing a file, press the TOOLS button. Categoria TV registrata Video Titolo E’ possibile spostare l’altro file direttamente. Operazioni > > Modalità Ripeti E’ possibile riprodurre ripetutamente contenuti registrati, film o brani musicali. > > Formato immagine E’ possibile regolare la dimensione dell’immagine in base alle proprie preferenze. > > Impostazioni E’ possibile regolare l’impostazione dell’immagine (p. 17~23).
Funzioni avanzate Anynet+ Cos’è Anynet+? t Anynet+ è una funzione che permette di controllare mediante il telecomando del televisore Samsung tutti i dispositivi Samsung collegati che supportano Anynet+. Il sistema Anynet+ può essere usato solo con i dispositivi Samsung dotati della funzione Anynet+. Per controllare se il dispositivo Samsung in uso è dotato di questa funzione, verificare la presenza del logo Anynet+.
Il menu Anynet+ può variare a seconda del tipo e dello stato del dispositivo Anynet+ collegato al televisore. Menu Anynet+ Visualizza TV Elenco dispositivi (nome_dispositivo) MENU Descrizione La modalità Anynet+ passa alla modalità di trasmissione TV. Visualizza l’elenco dei dispositivi Anynet+. Mostra i menu del dispositivo collegato. Ad esempio, se è collegato un registratore DVD, comparirà il menu del disco del registratore DVD.
Funzioni avanzate ¦¦ Ascolto tramite il ricevitore È possibile ascoltare l’audio tramite un ricevitore (per es. un Home Theatre) anzichè dall’Altoparlante TV. 1. Selezionare Ricevitore e impostarlo su On. 2. Premere EXIT per uscire. ✎✎ Se il ricevitore supporta solo l’audio, potrebbe non comparire nell’elenco dei dispositivi. ✎✎ Il ricevitore è operativo solo se è collegata in modo appropriato la porta Optical In del ricevitore alla porta DIGITAL AUDIO OUT (OPTICAL) del televisore.
¦ Guida introduttiva di Internet@TV @TV INTERNET Raccomandato Internet@TV fornisce alcuni utili e interessanti contenuti e servizi direttamente dal web al televisore. Applicazioni personali Samsung Apps dal giorno 1/1 04 Funzioni avanzate Internet@TV Impostaz. Login B Segna come Preferito Ordina per R Ritorna ✎ NOTA x Configurare le impostazioni di rete prima di usare Internet@TV. Per maggiori informazioni vedere la sezione “Connessione di rete” (p. 28).
Funzioni avanzate ■■ Impost sistema Login account Per una applicazione dotata di più account, usare ◄ e ► per accedere ai vari account. ✎✎ Login admin Account utente : Autoeseg Ticker (Off / On): Abilita/Disabilita l’esecuzione automatica del ticker all’accensione del televisore. L’applicazione Più chiaro fornisce informazioni utili attraverso notiziari, meteo e borse valori. E’ necessario scaricare l’applicazione Più chiaro su Internet@TV per utilizzare questa funzione.
Uso di Samsung Apps per categoria Samsung Apps Samsung Apps consente di scaricare applicazioni da utilizzare su dispositivi Samsung TV/AV. Gli utenti possono godere di una varietà di contenuti quali video, musica, foto, giochi, informazioni utili e molto altro ancora utilizzando le applicazioni scaricate. Ulteriori applicazioni saranno disponibili in seguito. Samsung Apps Novità? Video Sport Raccomand.
Funzioni avanzate AllShare Messag / Media / ScreenShare ¦¦ Informazioni su AllShare AllShare collega il televisore a telefoni cellulari e altri dispositivi compatibili mediante una rete. Sul televisore è possibile visualizzare le chiamate in arrivo, gli SMS e i promemoria impostati sul proprio cellulare. Inoltre, è possibile riprodurre contenuti multimediali compresi video, foto e musica memorizzati sul proprio cellulare o su altri dispositivi (per es il PC) e controllarli sul televisore mediante la rete.
Uso della funzione ScreenShare Se arriva una chiamata mentre si guarda il televisore, viene visualizzata la finestra degli allarmi. Screenshare visualizza la stessa pagina web del cellulare. Mediante la funzione ScreenShare, è possibile aprire i vari contenuti memorizzati nel cellulare. Ad esempio, l’immagine sotto visualizza una pagina di accesso per i contenuti provenienti da un cellulare. E’ possibile leggere i vari file contenuti nel cellulare e visualizzare la rubrica e il calendario sul televisore.
Altre informazioni Funzione Teletext dei canali analogici La pagina dell’indice del servizio Teletext contiene informazioni sull’uso del servizio. Per visualizzare correttamente le informazioni del servizio Teletext, è necessario che la ricezione del canale sia stabile. In caso contrario, alcune informazioni potrebbero essere perse o alcune pagine potrebbero non essere visualizzate correttamente. ✎✎E’ possibile cambiare le pagine Teletext premendo i tasti numerici sul telecomando.
05 Altre informazioni Assemblaggio dei cavi Tipo piedistallo Racchiudere i cavi nel fermacavi in modo che non siano visibili attraverso il piedistallo trasparente. 1 1 2 2 3 3 Tipo montaggio a parete ✎✎Non tirare eccessivamente i cavi durante la loro disposizione. In caso contrario, i terminali di connessione del prodotto potrebbero subire danni. Italiano [UC6800]BN68-02842A-00L04.
Altre informazioni Installazione del supporto a parete Montaggio della staffa preforata Durante l’installazione del televisore a parete, fissare la staffa preforata come mostrato di seguito. Staffa preforata Collegamento del cavo di alimentazione Durante l’installazione del televisore a parete, fissare il cavo di alimentazione . 1 V 2 3 1. Rimuovere la vite indicata nella prima immagine in alto. 2. Fissare il morsetto del cavo di alimentazione al cavo stesso. 3.
✎✎ Il kit di montaggio a parete non è fornito in dotazione ma è venduto separatamente. Installare il supporto su una parete solida perpendicolare al pavimento. Se il supporto deve essere fissato ad altri tipi di materiale, consultare il rivenditore di zona. Una installazione a soffitto o su pareti inclinate può provocare la caduta dell’unità e lesioni personali. ✎✎NOTA xx Nella tabella sotto riportata vengono indicate le dimensioni standard dei kit di montaggio a parete.
Altre informazioni Blocco antifurto Kensington Il blocco Kensington non è fornito da Samsung. Si tratta di un dispositivo che assicura fisicamente il sistema qualora utilizzato in luogo pubblico. L’aspetto del dispositivo e il metodo di blocco possono variare in base alla marca del prodotto. Per informazioni sull’uso, consultare il manuale fornito insieme al blocco Kensington. Pannello posteriore del televisore 1 2 ✎✎Trovare l’icona “K” sul retro del televisore.
In caso di domande sul funzionamento del televisore, consultare per prima cosa l’elenco sottostante. Se nessuno dei consigli sottoriportati si dimostra utile per risolvere il problema, visitare il sito “www.samsung.com”, quindi fare clic sulla voce Assistenza, oppure chiamare il numero del Call Center riportato in ultima pagina.
Altre informazioni Problemi Soluzioni e spiegazioni Nessuna immagine, video spento Il televisore non si accende. • • • Il televisore si spegne automaticamente. • • • • Nessuna immagine/video. • • • • Verificare che la spina del cavo di alimentazione CA sia correttamente collegata a una presa a muro e il televisore sia acceso. Accertarsi che la presa a muro sia funzionante. Provare a premere il tasto POWER sul televisore per verificare che il problema non sia il telecomando.
Una registrazione programmata non si è avviata. Soluzioni e spiegazioni • • • • Nonostante il collegamento di diversi dispositivi di registrazione, il televisore interrompe la registrazione. La funzione di registrazione programmata non è disponibile per determinate operazioni (formattazione, test prestazioni, controllo errori, cancellazione) che accedono al file system di un dispositivo USB. In mancanza di un dispositivo USB collegato, il televisore non effettuerà la registrazione programmata.
Altre informazioni ¦¦ Licenza TheaterSound, SRS and the symbol are trademarks of SRS Labs, Inc. TheaterSound technology is incorporated under license form SRS Lab, Inc. Fabricado bajo licencia de Dolby Laboratories. Dolby y el símbolo de la doble D son marcas comerciales de Dolby Laboratories. Manufactured under license under U.S. Patent #’s: 5,451,942; 5,956,674; 5,974,380; 5,978,762; 6,487,535 & other U.S. and worldwide patents issued & pending. DTS and the Symbol are registered trademarks. & DTS 2.
Dimensione schermo (Diagonale) UE32C6800 UE37C6800 32 poll. 37 poll. Audio (Uscita) Dimensioni (Lar x Pro x Alt) Corpo Con piedistallo Peso Senza piedistallo Con piedistallo Nome modello Dimensione schermo (Diagonale) 10W x 2 771 X 29,9 X 480 mm 771 X 240 X 543 mm 894 X 29,9 X 550 mm 894 X 255 X 614 mm 8,3 kg 11,1 kg 10,8 kg 14,4 kg UE40C6800 UE46C6800 40 poll. 46 poll.
Altre informazioni Indice A H Aggiornamento software AllShare Altoparlante esterno Altoparlante TV Amplificazione Antenna Anynet+ AUDIO OUT Auto diagnosi 26 50 21 21 20 14 44 10 26 B Batterie Bilan bianco Bilanciamento L/R Blocco 6 18 20 16 8, 44 10, 44 I Impostazione rete Incarnato Indicatore di alimentazione Informazioni sul segnale Internet@TV 29 18 5 26 47 L Licenza Lingua Luminosità 60 24 17 M C Caldo 19 Cambia PIN 23 Collegamento a un dispositivo audio10 Collegamento a un PC 27 Component
05 Altre informazioni This page is intentionally left blank. Italiano [UC6800]BN68-02842A-00L04.