Contact SAMSUNG WORLDWIDE If you have any questions or comments relating to Samsung products, please contact the SAMSUNG customer care centre. Country Customer Care Centre Web Site AUSTRIA 0810 - SAMSUNG (7267864, € 0.07/min) www.samsung.com/at 02 201 2418 www.samsung.com/be www.samsung.com/be_fr 800 - SAMSUNG (800-726786) www.samsung.com/cz BELGIUM CZECH REPUBLIC Distributor pro Českou republiku: Samsung Zrt.
❑ Digital TV Notice 1. Functionalities related to Digital TV(DVB) are only available in countries/areas where DVB-T (MPEG2 and MPEG4 AVC) digital terrestrial signals are broadcasted or where you are able to access to a compatible DVB-C(MPEG2 and MPEG4 AAC) cableTV service. Please check with your local dealer the possibility to receive DVB-T or DVB-C signal. 2.
Media Play (USB) Setting up Your TV ■ Viewing the Control Panel.................................................................. 2 ■ Accessories........................................................................................ 3 ■ Viewing the Connection Panel............................................................ 4 ■ Viewing the Remote Control............................................................... 7 ■ Installing Batteries in the Remote Control..........................................
Setting up Your TV N Figures and illustrations in this User Manual are provided for reference only and may differ from actual product appearance. Product design and specifications may be changed without notice in order to enhance product performance. ¦ Viewing the Control Panel N The product colour and shape may vary depending on the model. N The front panel buttons can be activated by touching it with your finger.
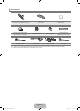
¦ Accessories Remote Control & Batteries (AAA x 2) Cover-Bottom Cleaning Cloth Warranty Card / Safety Guide (Not available in all locations) Holder-Wire Stand Holder-Ring (4ea) Holder-Wire Cable (Depending on the model) Component Cable SCART Cable Holder-Wire (3ea) AV Cable N Please make sure the following items are included with your LED TV. If any items are missing, contact your dealer. N The items colour and shape may vary depending on the model. English - BN68-02328D-00L04.
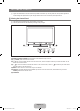
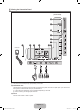
¦ Viewing the Connection Panel [TV Rear Panel] @ ! 0 9 8 7 1 2 3 4 56 Power Input N The product colour and shape may vary depending on the model. 1 KENSINGTON LOCK The Kensington Lock (optional) is a device used to physically fix the system when used in a public place. If you want to use a locking device, contact the dealer where you purchased the TV. N The location of the Kensington Lock may be different depending on its model. N When connecting, use the appropriate connector.
3 EXT (RGB) Inputs or outputs for external devices, such as VCR, DVD, video game device or video disc players. N When connecting, use the appropriate connector. N In EXT Mode, DTV Out supports MPEG SD Video and Audio only. Input/Output Specification Connector EXT Video O Input Audio (L / R) O RGB O Output Video + Audio (L / R) Only TV or DTV output is available. 4 AV IN [VIDEO] / [R-AUDIO-L] Video and audio inputs for external devices, such as a camcorder or VCR.
0 DIGITAL AUDIO OUT (OPTICAL) Connects to a Digital Audio component such as a Home theatre receiver. N When a Digital Audio System is connected to the DIGITAL AUDIO OUT (OPTICAL) jack: Decrease the volume of the TV and adjust the volume level with the system’s volume control. N 5.1CH audio is possible when the TV is connected to an external device supporting 5.1CH. N When the receiver (home theatre) is set to On, you can hear sound output from the TV’s Optical jack.
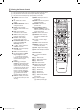
¦ Viewing the Remote Control N You can use the remote control up to a distance of about 23 feet from the TV. N The performance of the remote control may be affected by bright light. N The product colour and shape may vary depending on the model. 1 POWER : Turns the TV on and off. ^ MENU : Displays the main onscreen menu. 2 TV : Selects the TV mode directly. & GUIDE : Electronic Programme Guide (EPG) display 3 NUMERIC BUTTONS : Press to change the channel. * RETURN : Returns to the previous menu 4 FAV.
¦ Installing Batteries in the Remote Control 1. Lift the cover at the back of the remote control upward as shown in the figure. 2. Install two AAA size batteries. N Make sure to match the ‘+’ and ‘–’ ends of the batteries with the diagram inside the compartment. 3. Replace the cover. N Remove the batteries and store them in a cool, dry place if you won’t be using the remote control for a long time. (Assuming typical TV usage, the batteries should last for about one year.
¦ Placing Your Television in Standby Mode Your set can be placed in standby mode in order to reduce the power consumption. The standby mode can be useful when you wish to interrupt viewing temporarily (during a meal, for example). 1. Press the POWERP button on the remote control. N The screen is turned off and a standby indicator appears on your set. 2. To switch your set back on, simply press the POWERP button again.
¦ Viewing the Display The display identifies the current channel and the status of certain audio-video settings. O Press the INFO button to viewing the information. abc1 18:11 Thu 6 Jan Life On Venus Avenue DTV Air 15 Unclassified No Detaild Information 18:00 ~ 6:00 E Watch ' Information CH Press the INFO button on the remote control. The TV will display the channel, the type of sound, and the status of certain picture and sound settings. ● ▲, ▼: You can view other channel’s information.
❑ Manual Store N Scans for a channel manually and stores it in the TV’s memory. N If a channel is locked using the Child Lock function, the PIN input window appears. ■ Digital Channel Manual store for digital channels. N Digital Channel is only available in DTV mode. ● Channel: Set the Channel number using the ▲, ▼ or number (0~9) buttons. ● Frequency: Set the frequency using the number buttons. ● Bandwidth: Set the bandwidth using the ▲, ▼ or number (0~9) buttons.
❑ Default Guide → Full Guide Mini / Guide You can decide whether to display either the Full Guide or the Mini Guide when the GUIDE button on the remote control is pressed. ❑ Channel List For detailed procedures on using the Channel List, refer to the Managing Channels instructions. O You can select these options by simply pressing the CH LIST button on the remote control. ❑ Channel Mode When press the P >/< button, Channels will be switched within the selected channel list. ■ Added Ch.
¦ Managing Channels Using this menu, you can add / delete or set favourites channels and use the programme guide for digital broadcasts. ■ ■ ■ Added Channels ■ All Channels Shows all currently available channels. Added Channels Shows all added channels. Favourites Shows all favourite channels. O To select the favourites channels you have set up, press the FAV.CH button on the remote control.
■ Timer Viewing If you reserve a programme you want to watch, the channel is automatically switched to the reserved channel in the Channel List; even when you are watching another channel. To reserve a programme, set the current time first. N Only memorized channels can be reserved. N You can set the channel, day, month, year, hour and minute directly by pressing the number buttons on the remote control. N Reserving a programme will be shown in the Programmed menu.
PICTURE ¦ Configuring the Picture Menu ❑ Mode ■ Dynamic Selects the picture for increased definition in a bright room. ■ Standard Selects the picture for the optimum display in a normal environment. ■ Natural Selects the picture for an optimum and eye-comfortable display. N This function is not available in PC mode. ■ Movie Selects the picture for viewing movies in a dark room. Picture You can select the type of picture which best corresponds to your viewing requirements.
■ Colour Space Colour space is a colour matrix composed of red, green and blue colours. Select your favourites colour space to experience the most natural colour. ● Auto: Auto Colour Space automatically adjusts to the most natural colour tone based on Programme sources. ● Native: Native Colour Space offers deep and rich colour tone. ● Custom: Adjusts the colour range to suit your preference. N Changing the adjustment value will refresh the adjusted screen.
❑ Picture Options N In PC mode, you can only make changes to the Colour Tone and Size from among the items in Picture Options. ■ Colour Tone → Cool / Normal / Warm1 / Warm2 / Warm3 N Warm1, Warm2 or Warm3 is only activated when the picture mode is Movie. N Settings can be adjusted and stored for each external device you have connected to an input of the TV.
■ Film Mode → Off / Auto1 / Auto2 The TV can be set to automatically sense and process film signals from all sources and adjust the picture for optimum quality. N Film Mode is supported in TV, AV, COMPONENT(480i / 1080i) and HDMI(480i / 1080i). ● Off: Turn the Film Mode function off. ● Auto1: Automatically adjusts the picture for the best quality when watching a film. ● Auto2: Automatically optimizes the video text on the screen (not including closed captions) when watching a film.
¦ Using Your TV as a Computer (PC) Display Setting Up Your PC Software (Based on Windows XP) The Windows display-settings for a typical computer are shown below. The actual screens on your PC will probably be different, depending upon your particular version of Windows and your particular video card. However, even if your actual screens look different, the same basic set-up information will apply in almost all cases. (If not, contact your computer manufacturer or Samsung Dealer.) 1.
¦ Setting up the TV with your PC N Preset: Press the SOURCE button to select PC mode. ❑ Auto Adjustment Brightness Sharpness Picture Use the Auto Adjust function to have the TV automatically adjust the video signals it receives. The function also automatically fine-tunes the settings and adjusts the frequency values and positions. T Press the TOOLS button to display the Tools menu. You can also set the Auto Adjustment by selecting Tools → Auto Adjustment. N This function does not work in DVI-HDMI mode.
SOUND ¦ Configuring the Sound Menu ❑ Mode → Standard / Music / Movie / Clear Voice / Custom Sound T Press the TOOLS button to display the Tools menu. You can also set the sound mode by selecting Tools → Sound Mode. ● Standard: Selects the normal sound mode. ● Music: Emphasizes music over voices. ● Movie: Provides the best sound for movies. ● Clear Voice: Emphasizes voice over other sounds. ● Custom: Recalls your customized sound settings.
❑ Speaker Select When you watch TV with it connecting to a Home theatre, turn the TV speakers off so you can listen to sound from the Home theatre’s (external) speakers. ● External Speaker: Used to listen to the sound of the External (Home Theatre) Speakers. ● TV Speaker: Used to listen to the sound of the TV Speakers. N The volume and MUTE buttons do not operate when the Speaker Select is set to External Speaker.
SETUP ¦ Configuring the Setup Menu ❑ Menu Language You can set the menu language. Plug & Play Setup ❑ Time For detailed procedures on setting up options, refer to the ‘Setting the Time’ instructions. ❑ Broadcast Menu Language : English ▶ Time Broadcast Security General ■ Subtitle You can activate and deactivate the subtitles. Use this menu to set the Subtitle Mode. Normal under the menu is the basic subtitle and Hard of hearing is the subtitle for a hearing-impaired person.
■ Common Interface ● CI Menu This enables the user to select from the CAM-provided menu. Select the CI Menu based on the menu PC Card. ● Application Info. This contains information on CAM inserted in the CI slot and displays it. The Application Info inserting is about the ‘CI(CI+) CARD’. You can install the CAM anytime whether the TV is ON or OFF. 1. Purchase the CI CAM module by visiting your nearest dealer or by phone. 2. Insert the ‘CI(CI+) CARD’ into the CAM in the direction of the arrow until it fits.
■ BD Wise → Off / On Provides the optimal picture quality for SAMSUNG DVD, Blu-ray and Home Theatre products which support BD Wise. You can enjoy a richer picture when using them connected to this Samsung TV. N Connect SAMSUNG products that have BD Wise using an HDMI cable. N When the BD Wise set to On, the picture mode is automatically changed to the optimal resolution. N BD Wise is available in HDMI mode.
¦ Setting the Time ❑ Clock ■ ■ Clock Mode You can set up the current time manually or automatically. ● Auto: Set the current time automatically using the time from the digital broadcast. ● Manual: Set the current time to a manually specified time. N Depending on the broadcast station and signal, the auto time may not be set correctly. If this occurs, set the time manually. N The Antenna or cable must be connected in order to set the time automatically. Clock Set You can set the current time manually.
■ Volume Set the desired volume level. ■ Source → TV / USB You can select the TV or USB device content to be played when the TV turns on automatically. Select TV or USB. (Make sure that an USB device is connected to your TV.) N When there is only one photo file in the USB, Slide Show will not be executed. ■ Antenna (when Source is set to TV) Select ATV or DTV. ■ Channel (when Source is set to TV) Select the desired channel.
INPUT / SUPPORT ¦ Input Menu ❑ Source List ■ Input Use to select TV or other external input sources such as DVD / Blu-ray players / Cable Box / Satellite receivers (Set-Top Box) connected to the TV. Use to select the input source of your choice. O Press the SOURCE button on the remote control to view an external signal source. TV mode can be selected by pressing the TV button. Source List Edit Name TV / Ext.
■ Signal Information (digital channels only) Unlike analogue channels, which can vary in reception quality from ‘snowy’ to clear, digital (HDTV) channels have either perfect reception quality or you will not receive them at all. So, unlike analogue channels, you cannot fine tune a digital channel. You can, however, adjust your antenna to improve the reception of available digital channels.
Media Play (USB) ¦ Connecting a USB Device 1. Press the POWER button to turn the TV on. 2. Connect a USB device containing photo and/or music files to the USB1 jack on the side of the TV. TV Rear Panel 3. When the Application selection screen is displayed, press the ENTERE button to select Media Play (USB). USB Drive N MTP (Media Transfer Protocol) is not supported. N The file system supports FAT16, FAT32 and NTFS. N Certain types of USB Digital camera and audio devices may not be compatible with this TV.
¦ Media Play Function This function enables you to view and listen to photo and/or music files saved on a USB Mass Storage Class (MSC) device. N It might not work properly with unlicensed multimedia files. INFO Entering the Media Play (USB) Menu 1. Press the MENU button. Press the ▲ or ▼ button to select Application, then press the ENTERE button. SUM 851.86MB/993.02MB Free CH PHOTO LI ST 2. Press the ▲ or ▼ button to select Media Play (USB), then press the ENTERE button.
1 View Groups: The sort group where the currently selected file is contained is highlighted. 2 Currently selected file: The selected file is the file you can now control. Photo file are displayed as thumbnail images. 3 Current Device: Shows the currently selected device name. Press the Red button to select a device. Red (Device) button: Selects a connected device. 4 Item Selection Information: Shows the number of files that are selected by pressing the Yellow button.
¦ Viewing a Photo or Slide Show Viewing a Slide Show 1. Press the ▼ button to select the File List Section. 1 2 INFO 5/15 2. Press the TOOLS button. 1231.jpg 1233.jpg 1235.jpg 1234.jpg 1236.jpg 1237.jpg ../Photo/ SUM Device N During the slide show, files are displayed in order from the currently shown file. N The Slide Show progresses in the order sorted in the File List Section. Select T Tools R Upper Folder CH 3.
● Alternatively 1. In the File List Section, press the Yellow buttons to select the desired photos. 2. Press the TOOLS button. 3. Press the ▲ or ▼ button to select Slide Show, then press the ENTERE button. N The selected files will be used for the Slide Show. ¦ Slide Show Option Menu 1. During a slide show (or when viewing a photo), press the TOOLS button to set the option. 2. Press the ▲ or ▼ button to select the desired option, then press the ENTERE button.
¦ Music List Option Menu 1. Press the MEDIA.P button. 2. Press the ◄ or ► button to select Music, then press the ENTERE button. 3. Press the ◄ or ► button to select the desired Music file. N Selecting Multiple Music Files Press the ◄ or ► button to select the desired music file. Then press the Yellow button. Repeat the above operation to select multiple music files. The mark c appears to the selected music file. 4. Press the TOOLS button. N The option menu changes according to the current status.
¦ Playing Music Playing a music file 1. Press the ▼ button to select the File List Section. ▶ 00:00:04 / 00:04:04 3/37 2. Press the ◄ or ► button to select a music file to be played. Way I Love You HaHaHa 3. Press the ∂ (Play)/ENTERE button. N This menu only shows files with the MP3 file extension. Files with other file extensions are not displayed, even if they are saved on the same USB device.
¦ Music Play option Menu Music Play Option Menu Tools ❑ Repeat Mode → On / Off Repeat Mode ◀ On ▶ Picture Setting You can play music files repeatedly. Sound Setting Information Remove Safely ❑ Picture Setting / Sound Setting You can configure the picture and sound settings. U Move L Adjust e Exit ❑ Information The music file information is displayed. ❑ Remove Safely You can remove the device safely from the TV.
ANYNET+ ¦ Connecting Anynet+ Devices What is Anynet+? Anynet+ is a function that enables you to control all connected Samsung devices that support Anynet+ with your Samsung TV’s remote. The Anynet+ system can be used only with Samsung devices that have the Anynet+ feature. To be sure your Samsung device has this feature, check if there is an Anynet+ logo on it. To connect to a TV TV Anynet+ Device 1 Anynet+ Device 2 Anynet+ Device 3 Anynet+ Device 4 HDMI 1.3 Cable HDMI 1.3 Cable HDMI 1.3 Cable HDMI 1.
1. Connect the HDMI IN (1(DVI), 2, 3 or 4) jack on the TV and the HDMI OUT jack of the corresponding Anynet+ device using an HDMI cable. 2. Connect the HDMI IN jack of the home theatre and the HDMI OUT jack of the corresponding Anynet+ device using an HDMI cable. N Connect the Optical cable between the DIGITAL AUDIO OUT (OPTICAL) jack on your TV and the Digital Audio Input on the Home Theatre. N When following the connection above, the Optical jack only outputs 2 channel audio.
¦ Switching between Anynet+ Devices 1. Press the TOOLS button. Press the ENTERE button to select Anynet+ (HDMI-CEC). 2. Press the ▲ or ▼ button to select Device List, then press the ENTERE button. N Anynet+ devices connected to the TV are listed. N If you cannot find a device you want, press the red button to scan for devices. View TV Device List Recording DVDR MENU DVDR INFO Receiver Setup : DVDR : Off 3. Press the ▲ or ▼ button to select a particular device and press the ENTERE button.
¦ Recording You can make a recording of a TV Programme using a Samsung recorder. 1. Press the TOOLS button. Press the ENTERE button to select Anynet+ (HDMI-CEC). 2. Press the ▲ or ▼ button to select Recording Immediately and press the ENTERE button. Recording begins. N When there is more than one recording device When multiple recording devices are connected, the recording devices are listed. Press the ▲ or ▼ button to select a recording device and press the ENTERE button. Recording begins.
¦ Troubleshooting for Anynet+ Problem Anynet+ does not work. ● Possible Solution Check if the device is an Anynet+ device. The Anynet+ system supports Anynet+ devices only. Connect only one receiver (home theatre). Check if the Anynet+ device power cord is properly connected. Check the Anynet+ device’s Video/Audio/HDMI 1.3 cable connections. Check whether Anynet+ (HDMI-CEC) is set to On in the Anynet+ setup menu. Check whether the TV remote control is in TV mode.
RECOMMENDATIONS ¦ Teletext Feature Most television stations provide written information services via Teletext. The index page of the Teletext service gives you information on how to use the service. In addition, you can select various options to suit your requirements by using the remote control buttons. N For Teletext information to be displayed correctly, channel reception must be stable. Otherwise, information may be missing or some pages may not be displayed. 1 : (exit) Exit from the Teletext display.
The Teletext pages are organized according to six categories: Part A B C D E F Contents Selected page number. Broadcasting channel identity. Current page number or search indications. Date and time. Text. Status information. FASTEXT information.
¦ Disconnecting the Stand 1. Remove screws from the back of the TV. 2. Separate the stand from the TV. N Two or more people should carry the TV. 3. Cover the bottom hole with the cover. ¦ Installing the Wall Mount Kit Wall mount items (sold separately) allow you to mount the TV on the wall. For detailed information on installing the wall mount, see the instructions provided with the Wall Mount items. Contact a technician for assistance when installing the wall mounted bracket.
¦ Assembling the Cables ❑ Stand Type N Enclose the cables in the Holder-Wire Cable so that the cables are not visible through the transparent stand. 1 1 2 2 3 3 ❑ Wall-Mount Type 1 1 N Do not pull the cables too hard when arranging them. This may cause damage to the product’s connection terminals. ¦ Preparing before installing Wall-Mount Case A. Installing the SAMSUNG Wall-Mount Case B. Installing another company’s Wall-Mount 1 1 To install a wall-mount, use the Holder-Ring 1.
¦ Securing the Installation Space Keep the required distances between the product and other objects (e.g. walls) to ensure proper ventilation. Failing to do so may result in fire or a problem with the product due to an increase in the internal temperature of the product. Install the product so the required distances shown in the figure are kept. N When using a stand or wall-mount, use parts provided by Samsung Electronics only.
¦ Troubleshooting: Before Contacting Service Personnel No sound or picture Check that the mains lead has been connected to a wall socket. Check that you have pressed the button on your set. Check the picture contrast and brightness settings. Check the volume. Normal picture but no sound Check the volume. Check whether the MUTEM button has been pressed on the remote control. Check the Speaker Select settings.
¦ Specifications Model Name Screen Size (Diagonal) PC Resolution (Optimum) Sound (Output) Dimensions (WxDxH) Body With stand Weight With Stand Environmental Considerations Operating Temperature Operating Humidity Storage Temperature Storage Humidity Stand Swivel (Left / Right) Model Name Screen Size (Diagonal) PC Resolution (Optimum) Sound (Output) Dimensions (WxDxH) Body With stand Weight With Stand Environmental Considerations Operating Temperature Operating Humidity Storage Temperature Storage Humidity S
● ● ● This product uses parts of the software from the Independent JPEG Group. This product uses parts of the software owned by the Freetype Project (www.freetype.org). This product uses some software programs which are distributed under the GPL/LGPL license. Accordingly, the following GPL and LGPL software source codes that have been used in this product can be provided after asking to vdswmanager@ samsung.com.
A “covered work” means either the unmodified Program or a work based on the Program. To “propagate” a work means to do anything with it that, without permission, would make you directly or secondarily liable for infringement under applicable copyright law, except executing it on a computer or modifying a private copy. Propagation includes copying, distribution (with or without modification), making available to the public, and in some countries other activities as well.
5. Conveying Modified Source Versions. You may convey a work based on the Program, or the modifications to produce it from the Program, in the form of source code under the terms of section 4, provided that you also meet all of these conditions: a) The work must carry prominent notices stating that you modified it, and giving a relevant date. b) The work must carry prominent notices stating that it is released under this License and any conditions added under section 7.
The requirement to provide Installation Information does not include a requirement to continue to provide support service, warranty, or updates for a work that has been modified or installed by the recipient, or for the User Product in which it has been modified or installed. Access to a network may be denied when the modification itself materially and adversely affects the operation of the network or violates the rules and protocols for communication across the network.
10. Automatic Licensing of Downstream Recipients. Each time you convey a covered work, the recipient automatically receives a license from the original licensors, to run, modify and propagate that work, subject to this License. You are not responsible for enforcing compliance by third parties with this License. An “entity transaction” is a transaction transferring control of an organization, or substantially all assets of one, or subdividing an organization, or merging organizations.
14. Revised Versions of this License. The Free Software Foundation may publish revised and/or new versions of the GNU General Public License from time to time. Such new versions will be similar in spirit to the present version, but may differ in detail to address new problems or concerns. Each version is given a distinguishing version number.
¦ GNU Lesser General Public License (LGPL) Version 3, 29 June 2007 Copyright (C) 2007 Free Software Foundation, Inc. Everyone is permitted to copy and distribute verbatim copies of this license document, but changing it is not allowed. Preamble The GNU General Public License is a free, copyleft license for software and other kinds of works. The licenses for most software and other practical works are designed to take away your freedom to share and change the works.
1. Source Code. The “source code” for a work means the preferred form of the work for making modifications to it. “Object code” means any non-source form of a work. A “Standard Interface” means an interface that either is an official standard defined by a recognized standards body, or, in the case of interfaces specified for a particular programming language, one that is widely used among developers working in that language.
A compilation of a covered work with other separate and independent works, which are not by their nature extensions of the covered work, and which are not combined with it such as to form a larger program, in or on a volume of a storage or distribution medium, is called an “aggregate” if the compilation and its resulting copyright are not used to limit the access or legal rights of the compilation’s users beyond what the individual works permit.
When you convey a copy of a covered work, you may at your option remove any additional permissions from that copy, or from any part of it. (Additional permissions may be written to require their own removal in certain cases when you modify the work.) You may place additional permissions on material, added by you to a covered work, for which you have or can give appropriate copyright permission.
11. Patents. A “contributor” is a copyright holder who authorizes use under this License of the Program or a work on which the Program is based. The work thus licensed is called the contributor’s “contributor version”.
15. Disclaimer of Warranty. THERE IS NO WARRANTY FOR THE PROGRAM, TO THE EXTENT PERMITTED BY APPLICABLE LAW. EXCEPT WHEN OTHERWISE STATED IN WRITING THE COPYRIGHT HOLDERS AND/OR OTHER PARTIES PROVIDE THE PROGRAM “AS IS” WITHOUT WARRANTY OF ANY KIND, EITHER EXPRESSED OR IMPLIED, INCLUDING, BUT NOT LIMITED TO, THE IMPLIED WARRANTIES OF MERCHANTABILITY AND FITNESS FOR A PARTICULAR PURPOSE. THE ENTIRE RISK AS TO THE QUALITY AND PERFORMANCE OF THE PROGRAM IS WITH YOU.
¦ LICENSE ISSUES The OpenSSL toolkit stays under a dual license, i.e. both the conditions of the OpenSSL License and the original SSLeay license apply to the toolkit. See below for the actual license texts. Actually both licenses are BSD-style Open Source licenses. In case of any license issues related to OpenSSL please contact openssl-core@openssl.org. OpenSSL License Copyright (c) 1998-2007 The OpenSSL Project. All rights reserved.
This page is intentionally left blank. BN68-02328D-00Eng.
❑ Hinweis zu Digitalfernsehen 1. Die Funktionalitäten für Digital TV (DVB) stehen nur in Ländern/Regionen zur Verfügung, in denen digitale terrestrische DVBT-Signale (MPEG2 und MPEG4 AVC) gesendet werden oder in denen Sie Zugang zu einem kompatiblen Kabelfernsehdienst mit DVB-C (MPEG2 und MPEG4 AAC) haben können. Fragen Sie Ihren örtlichen Händler, wenn Sie Informationen über die Verfügbarkeit von DVB-T oder DVB-C in Ihrer Gegend benötigen. 2.
Inhalt Medienwiedergabe (USB & DLNA) Einrichten Ihres Fernsehgeräts ■ Bedienfeld........................................................................................... 2 ■ Zubehör.............................................................................................. 3 ■ Anschlussfeld..................................................................................... 4 ■ Fernbedienung...................................................................................
Einrichten Ihres Fernsehgeräts N Die Abbildungen und Illustrationen in diesem Handbuch dienen nur zur Information und können vom tatsächlichen Aussehen des Geräts abweichen. Technische Änderungen und Änderungen am Design des Geräts, insbesondere zur Verbesserung der Leistungsfähigkeit des Geräts, sind jederzeit vorbehalten. ¦ Bedienfeld N Form und Farbe des Geräts können sich je nach Modell unterscheiden. N Die Tasten auf der Frontblende können Sie durch Berühren mit einem Finger bedienen.
¦ Zubehör Fernbedienung und 2 Batterien (Typ AAA) Untere Abdeckung Reinigungstuch Garantiekarte / Sicherheitshinweise (nicht überall verfügbar) Standfuß mit Kabelhalter Haltering (4 Stück) Kabelschlauch (je nach Modell) Komponentenkabel SCART-Kabel Kabelhalter (3 Stück) AV-Kabel N Überprüfen Sie die Verpackung Ihres LED-Fernsehgeräts auf Vollständigkeit. Falls Komponenten fehlen sollten, setzen Sie sich bitte mit Ihrem Händler in Verbindung.
¦ Anschlussfeld [Rückseite des Fernsehgeräts] @ ! 0 9 8 7 1 2 3 4 56 Netzanschluss N Form und Farbe des Geräts können sich je nach Modell unterscheiden. 1 KENSINGTON-SCHLOSS Das (optionale) Kensington-Schloss dient zur Sicherung des Fernsehgeräts bei Verwendung an einem öffentlichen Ort. Wenn Sie ein Schloss verwenden möchten, wenden Sie sich an den Händler, bei dem Sie das Fernsehgerät erworben haben. N Die Position des Kensington-Schlosses ist modellabhängig.
3 EXT (RGB) Ein- und Ausgänge für externe Geräte wie z. B. Videorecorder, DVD-Player, Spielekonsolen oder Video-Disc-Player. N Verwenden Sie für den Anschluss den richtigen Stecker. N Im EXT-Modus unterstützt DTV Out nur MPEG SD-Video und -Audio. Anschlussmöglichkeiten Anschluss EXT Video O Eingang Audio (L / R) O RGB O Ausgang Video + Audio (L / R) Nur TV- oder DTV-Ausgang verfügbar. 4 AV IN [VIDEO] / [R-AUDIO-L] Video- und Audioeingänge für externe Geräte wie z. B. Camcorder oder Videorecorder.
0 DIGITAL AUDIO OUT (OPTICAL) Anschluss für ein Digitalaudio-Gerät wie z. B. ein Heimkinosystem. N Ein Digital Audio-System ist mit dem DIGITAL AUDIO OUT (OPTICAL)-Anschluss verbunden: Vermindern Sie die Lautstärke des Fernsehers und stellen Sie die Lautstärke mit dem Lautstärkeregler des Systems ein. N 5.1-Kanalton ist möglich, wenn das Fernsehgerät an ein externes Gerät angeschlossen ist, das 5.1-Kanalton unterstützt.
¦ Fernbedienung N Die Reichweite der Fernbedienung beträgt ca. 7 m. N Die Leistungsfähigkeit der Fernbedienung kann durch starke Lichteinstrahlung beeinträchtigt werden. N Form und Farbe des Geräts können sich je nach Modell unterscheiden. 1 POWER: Ein- und Ausschalten des Fernsehgeräts. 2 TV: Hiermit können Sie den TVModus direkt aufrufen. 3 ZIFFERNTASTEN: Hiermit wechseln Sie den Kanal. 4 FAV.CH: Zum Anzeigen von Favorit Kanallisten auf dem Bildschirm.
¦ Batterien in die Fernbedienung einsetzen 1. Heben Sie die Abdeckung auf der Rückseite der Fernbedienung an, wie in der Abbildung dargestellt. 2. Legen Sie zwei AAA-Batterien ein. N Achten Sie darauf, dass die Pole der Batterien wie im Batteriefach angezeigt ausgerichtet sind. 3. Schieben Sie die Abdeckung wieder auf die Fernbedienung. N Wenn die Fernbedienung für einen längeren Zeitraum nicht verwendet wird, nehmen Sie die Batterien heraus, und lagern Sie sie an einem kühlen, trockenen Ort.
¦ Fernsehgerät in den Standby-Modus schalten Um den Stromverbrauchs zu senken, kann das Gerät in den Standby-Modus geschaltet werden. Der Standby-Modus ist nützlich, wenn Sie das Gerät vorübergehend ausschalten möchten (z. B. während einer Mahlzeit). 1. Drücken Sie die Taste POWERP auf der Fernbedienung drücken. N Der Bildschirm wird ausgeschaltet, und auf der Vorderseite des Fernsehgeräts leuchtet die Standby-Anzeige auf. 2. Drücken Sie einfach erneut die Taste POWERP, um das Gerät wieder einzuschalten.
¦ Anzeigen des Bildschirmmenüs Auf dem Bildschirm werden der aktuelle Kanal und bestimmte Audio/Video-Einstellungen angezeigt. O Drücken Sie die Taste INFO, um Informationen anzuzeigen. abc1 18:11 Thu 6 Jan Life On Venus Avenue DTV Air 15 Unclassified No Detaild Information 18:00 ~ 6:00 E Watch ' Information CH Drücken Sie die Taste INFO auf der Fernbedienung. Auf dem Bildschirm werden der Kanal, der Tonmodus sowie die Werte bestimmter Bild- und Toneinstellungen angezeigt.
❑ Sender manuell speichern N Hiermit wird manuell ein Sender gesucht und dieser im Fernsehspeicher abgelegt. N Wenn ein Kanal mit der Funktion Kindersicherung gesperrt wurde, wird das Eingabefenster für die PIN geöffnet. ■ Digitaler Sender Zum manuellen Speichern von digitalen Sendern. N Digitaler Sender ist nur im DTV-Modus verfügbar. ● Kanal: Stellen Sie die Kanalnummer mit den Tasten ▲, ▼ oder einer Zifferntaste (0~9) ein. ● Frequenz: Stellen Sie die Frequenz mithilfe der Zifferntasten ein.
❑ Standard → Ausführlich / Übersicht Mit der Taste GUIDE auf der Fernbedienung können Sie einstellen, ob der Ausführlich oder der Übersicht angezeigt werden soll. ❑ Senderliste Detaillierte Verfahrensbeschreibungen zur Verwendung der Senderliste entnehmen Sie den Beschreibungen unter Verwalten von Kanälen. O Diese Optionen können Sie auch durch Drücken der Taste CH LIST auf der Fernbedienung aufrufen.
¦ Verwalten von Kanälen Mit diesem Menübefehl können Sie Favoriten hinzufügen, löschen oder einstellen und den digitalen Programmführer für Digitalsendungen verwenden. ■ ■ ■ Hinzugefügte Sender Hiermit zeigen Sie alle hinzugefügten Kanäle an. Favorit Hiermit zeigen Sie alle Favoritenkanäle an. O Durch Drücken der Taste FAV.CH auf der Fernbedienung aufrufen können Sie die eingerichteten Favoritenkanäle auswählen. Hinzugefügte Sender ■ Alle Sender Hiermit zeigen Sie alle verfügbaren Kanäle an.
■ Timer-Wiedergabe Wenn Sie ein Programm zum Anschauen vorgemerkt haben, wechselt das Fernsehgerät automatisch zum vorgemerkten Kanal in der Kanalliste, auch wenn Sie gerade einen anderen Kanal anschauen. Um ein Programm vorzumerken, müssen Sie zuerst die Uhrzeit einstellen. N Sie können nur gespeicherte Kanäle vormerken. N Sie können Kanal, Tag, Monat, Jahr, Stunde und Minute auch direkt über die Zifferntasten auf der Fernbedienung einstellen.
BILD ¦ Konfigurieren des Bildmenüs ❑ Modus Bild Sie können den Bildstandard auswählen, der für Ihre Sehgewohnheiten am besten geeignet ist. T Drücken Sie die Taste TOOLS, um das Menü Extras anzuzeigen. Sie können den Bildmodus durch Auswahl von Extras → Bildmodus einstellen. Modus : Standard Hinter.
■ Farbraum Der Farbraum ist eine Farbmatrix bestehend aus den Farben Rot, Grün und Blau. Wählen Sie Ihren bevorzugten Farbraum, um die Welt in den natürlichsten Farben zu erfahren. ● Auto: Bei automatischer Einstellung des Farbraums wird, je nach Programmquelle, der natürlichste Farbton eingestellt. ● Nativ: Der native Farbraum ermöglicht tiefe und lebhafte Farbtöne. ● Benutzerd.: Hiermit stellen Sie den Farbbereich wunschgemäß ein.
❑ Bildoptionen N Im PC-Modus können von den Bildoptionen nur Farbtemp. und Größe eingestellt werden. ■ Farbtemp. → Kalt / Normal / Warm1 / Warm2 / Warm3 N Warm1, Warm2 oder Warm3 nur aktiviert, wenn der Bildmodus auf Film eingestellt ist. N Sie können die Einstellungen für jedes externe Gerät festlegen und speichern, das Sie an einen Eingang des Fernsehgeräts angeschlossen haben. Bildoptionen Farbtemp. : Normal Größe : Auto Breit Bildschirmmodus : 16:9 Digitale RM : Auto HDMI-Schwarzp.
■ Filmmodus → Aus / Auto1 / Auto2 Sie können das Fernsehgerät so einstellen, dass eine Filmsignal aus allen Quellen automatisch empfangen und verarbeitet und das Bild auf die optimale Qualität eingestellt werden kann. N Filmmodus wird bei TV, AV, COMPONENT(480i / 1080i) und HDMI(480i / 1080i). unterstützt. ● Aus: Deaktiviert den Filmmodus. ● Auto1: Hiermit wird das Bild bei Filmanzeige automatisch auf die beste Qualität eingestellt.
¦ Verwenden Ihres Computers als Computerbildschirm (PC) Konfigurieren Ihrer PC-Software (unter Windows XP) Im Folgenden sind die typischen Anzeigeeinstellungen für einen Windows-Computer aufgeführt. Die von Ihrem PC angezeigten Fenster entsprechen je nach installierter WindowsVersion und verwendeter Grafikkarte möglicherweise nicht genau der Abbildung. Dennoch sind die hier nachfolgenden grundlegenden Konfigurationsinformationen in fast allen Fällen anwendbar.
¦ Fernsehgerät mithilfe des PCs einstellen N Voreinstellung: Drücken Sie die Taste SOURCE (Quelle), um den Modus ‘PC’ einzustellen. ❑ Autom. Einstellung Helligkeit Schärfe Bild Verwenden Sie die Funktion zum automatischen Einstellen, damit sich das Fernsehgerät automatisch auf das empfangene Videosignal einstellt. Bei dieser Funktion erfolgt auch automatisch eine Feineinstellung sowie die Anpassung der Frequenzwerte und Positionen. T Drücken Sie die Taste TOOLS, um das Menü Extras anzuzeigen.
TON ¦ Konfigurieren des Tonmenüs ❑ Modus → Standard / Musik / Film / Sprache / Benutzerd. Ton T Drücken Sie die Taste TOOLS, um das Menü Extras anzuzeigen. Sie können den Tonmodus durch Auswahl von Extras → Tonmodus konfigurieren. ● Standard: Auswahl des normalen Tonmodus. ● Musik: Betont die Musik im Verhältnis zu Stimmen. ● Film: Ermöglicht optimale Tonwiedergabe für Filme. ● Sprache: Betont Stimmen im Verhältnis zu anderen Tönen. ● Benutzerd.: Abrufen ihrer benutzerdefinierten Toneinstellungen.
❑ Lautsprecherauswahl Wenn Sie fernsehen, während das Gerät an ein Heimkinosystem angeschlossen ist, schalten Sie die Fernsehlautsprecher aus, damit Sie nur den Ton der (externen) Lautsprecher des Heinkinosystems hören. ● Ext. Lautsprecher: Tonwiedergabe über die externen Lautsprecher (Heimkinosystem). ● TV-Lautsprecher: Verwenden Sie diese Option, um den Ton über die Fernsehlautsprecher wiederzugeben. N Die Lautstärketasten und MUTE sind deaktiviert, wenn Lautsprecherauswahl auf Ext.
EINSTELLUNGEN ¦ Konfigurieren der Menüeinstellungen ❑ Menüsprache Plug & Play ❑ Zeit Genaue Beschreibungen für die Verfahren zum Einstellen der Optionen finden Sie im Kapitel ‘Einstellen der Uhrzeit’. Einstellungen Sie können die Menüsprache festlegen. Menüsprache : Deutsch ▶ Zeit Sendungsoptionen Sicherheit Allgemein ❑ Sendungsoptionen ■ Untertitel Sie können Untertitel aktivieren und deaktivieren. Mit diesem Menü legen Sie den Untertitelmodus fest.
■ Common Interface ● CI-Menü Hiermit kann der Benutzer seine Auswahl in dem vom CAM-Modul bereitgestellten Menü treffen. Wählen Sie das CI-Menü ausgehend vom Menü ‘PC Card’ (PC-Karte). ● Anwendungsinformationen Die folgenden Erklärungen gelten für den Fall, dass ein CAM-Modul in den CI-Schlitz gesteckt ist und angezeigt wird. In den Anwendungsinformationen wird die CI(CI+)-Karte beschrieben. Sie können das CAM-Modul unabhängig davon anschließen, ob das Fernsehgerät angeschaltet ist oder nicht. 1.
■ BD Wise → Aus / Ein Ermöglicht optimale Bildqualität für SAMSUNG DVD, Blu-ray und Heimkinoprodukte ein, die BD Wise unterstützen. Freuen Sie sich bei Anschluss dieser Geräte an das Fernsehgerät von Samsung auf ein detailreicheres Bild. N Schließen Sie Geräte von Samsung, die über Bd Wise verfügen, mit Hilfe eines HDMI-Kabels an. N Wenn BD Wise aktiviert ist Ein, wird der Bildmodus automatisch auf die optimale Auflösung eingestellt. N BD Wise steht nur im HDMI-Modus zur Verfügung. ■ Energiesparmod.
¦ Einstellen der Uhrzeit ❑ Uhr ■ ■ Uhr-Modus Sie können die aktuelle Zeit manuell oder automatisch einstellen. ● Auto: Hiermit stellen Sie die Uhrzeit automatisch anhand der Zeit aus der digitalen Übertragung ein. ● Manuell: Hiermit stellen Sie die aktuelle Zeit auf einen manuell eingestellten Wert ein. N Je nach Sendestation und Signal erfolgt die automatische Zeiteinstellung möglicherweise nicht korrekt. In diesem Fall müssen Sie die Zeit manuell einstellen.
■ Lautst. Stellen Sie die gewünschte Lautstärke ein. ■ Quelle → TV / USB Sie können den Inhalt des TV- oder USB-Gerät einstellen, der beim Anschalten des Fernsehers automatisch wiedergegeben wird. Wählen Sie TV oder USB. (Stellen Sie sicher, dass ein USB-Gerät an das Fernsehgerät angeschlossen ist.) N Wenn auf dem USB-Gerät nur eine Fotodatei gespeichert ist, wird die Diashow nicht wiedergegeben. ■ TV-Empfang (wenn Quelle auf TV eingestellt ist) Wählen Sie ATV oder DTV.
SIGNALQUELLEN / UNTERSTÜTZUNG ¦ Menü Eingang ❑ Quellen ■ Eingang Hiermit wählen Sie, ob das Fernsehgerät mit einem Fernsehsignal versorgt wird oder an andere externe Signaleingänge wie z. B. DVD- bzw. Blu-Ray-Player oder an einen Kabelreceiver / Satellitenreceiver (Set-Top Box) angeschlossen ist. Stellen Sie die gewünschte Signalquelle ein. O Drücken Sie die Taste SOURCE auf der Fernbedienung, um eine externe Signalquelle anzuzeigen. Stellen Sie mit der TV-Taste den TV-Modus ein. TV / Ext.
■ Signalinformation (nur Digitalkanäle) Im Gegensatz zu analogen Kanälen, deren Empfangsqualität von "verregnet" bis ungestört variieren kann, zeichnen sich digitale Kanäle (HDTV) dadurch aus, dass sie entweder perfekte Empfangsqualität bieten oder gar keinen Empfang ermöglichen. Deshalb können Sie anders als bei Analogkanälen keine Feinabstimmung vornehmen. Sie können aber Ihre Antenne so einstellen, dass der Empfang der verfügbaren Digitalkanäle besser wird.
Medienwiedergabe (USB & DLNA) ¦ Anschließen eines USB-Geräts 1. Drücken Sie zum Einschalten des Computers die POWER-Taste. 2. Schließen Sie ein USB-Gerät mit Foto- und/oder Musikdateien an die USB1 -Buchse seitlich am Fernsehgerät an. Rückseite des Fernsehgeräts 3. Wenn das Fenster zur Auswahl der Anwendung angezeigt wird, drücken Sie auf die Taste ENTERE, um Media Play (USB) zu wählen. USB-Laufwerk N MTP (Media Transfer Protocol) wird nicht unterstützt.
¦ Media Play funktion Mit dieser Funktion können Sie auf einem USB-Speichermedium (MSC) gespeicherte Foto- und/oder Musikdateien anzeigen bzw. wiedergeben. INFO N Möglicherweise treten bei lizenzfreien Multimediadateien weniger Probleme auf. Öffnen des Menüs Media Play (USB). 1. Drücken Sie die Taste MENU. Wählen Sie durch Drücken der Tasten ▲ oder ▼ die Option Anwendung, und drücken Sie dann die Taste ENTERE. SUM 851,86 MB/993,02 MB Frei CH PHOTO LI ST 2.
1 Anzeigegruppen: Die Sortiergruppe mit der ausgewählten Musikdatei wird hervorgehoben. 2 Ausgewählte Datei: Die gewählte Datei können Sie nun steuern. Die Fotodateien werden als Miniaturbilder angezeigt. 3 Aktuelles Gerät: Zeigt den Namen des aktuell ausgewählten Geräts an. Wählen Sie mit der roten Taste ein Gerät. Rote Taste (Gerät): Dient zur Auswahl eines angeschlossenen Geräts.
¦ Anzeigen eines Fotos oder einer Diashow Anzeigen von Diashows 1. Drücken die Taste ▼, um den Dateilistenabschnitt zu wählen. 1 2 INFO 2. Drücken Sie die Taste TOOLS. 5/15 3. Wählen Sie durch Drücken der Tasten ▲ oder ▼ die Option Diashow, und drücken Sie dann die Taste ENTERE . N Alle Dateien in der Dateiliste werden für die Diashow verwendet. 1232.jpg 1233.jpg 1235.jpg 1234.jpg 1236.jpg 1237.jpg ..
● Alternative: 1. Wählen Sie die gewünschten Fotos mit der gelben Taste aus der Dateiliste aus. 2. Drücken Sie die Taste TOOLS. 3. Wählen Sie durch Drücken der Tasten ▲ oder ▼ die Option Diashow, und drücken Sie dann die Taste ENTERE . N Die ausgewählten Dateien werden für die Diashow verwendet. ¦ Menü der Optionen für Diashows 1. Während einer Diashow (oder beim Anzeigen eines Fotos) drücken Sie die Taste TOOLS, um die Option einzustellen. 2.
¦ Menü der Optionen für Fotolisten 1. Drücken Sie die Taste MEDIA.P. 2. Wählen Sie durch Drücken der Tasten ◄ oder ► die Option Music, und drücken Sie dann die Taste ENTERE. 3. Drücken Sie die Taste ◄ oder ► , um die gewünschte Musikdatei zu wählen. N Wählen mehrerer Musikdateien Wählen Sie mit den Tasten ◄ oder ► die gewünschte Musikdatei. Drücken Sie dann die gelbe Taste. Wiederholen Sie den obigen Vorgang, um mehrere Musikdateien auszuwählen.
¦ Wiedergeben von Musik Wiedergeben einer Musikdatei 1. Drücken die Taste ▼, um den Dateilistenabschnitt zu wählen. 2. Drücken Sie die Taste ◄ oder ► , um eine Musikdatei zu wählen, die abgespielt werden soll. ▶ 00:00:04 / 00:04:04 3/37 Way I Love You HaHaHa 3. Drücken Sie die Taste ∂ (Wiedergabe)/ENTERE . N Dieses Menü zeigt nur Dateien mit der Dateinamenserweiterung MP3.
¦ Menü der Optionen für die Musikwiedergabe Menü der Optionen für die Musikwiedergabe Extras ❑ Wiederhol-M. → Ein / Aus Wiederhol-Modus ◀ An ▶ Bildeinstellungen Sie können Musikdateien wiederholt abspielen. Toneinstellungen Information Sicher entfernen ❑ Bildeinstellungen / Toneinstellungen Sie können die Bild- und Toneinstellungen konfigurieren. U Navig. L Einst. e Beenden ❑ Information Die Informationen zur Musikdatei werden angezeigt.
ANYNET+ ¦ Anschließen von Anynet+-Geräten Was ist Anynet+? Bei Anynet+ handelt es sich um eine Funktion, mit der Sie alle angeschlossenen Samsung-Geräte, die Anynet+ unterstützen, mit der Fernbedienung für Ihr Samsung-Fernsehgerät steuern können. Das Anynet+-System unterstützt nur Anynet+-fähige SamsungGeräte. Wenn Sie wissen möchten, ob Ihr Samsung-Gerät diese Funktion unterstützt, suchen Sie das Anynet+ auf Ihrem Gerät.
1. Verbinden Sie einen der Anschlüsse HDMI IN (1(DVI), 2, 3 oder 4) am Fernsehgerät mit dem HDMI OUT-Anschluss am entsprechenden Anynet+-Gerät. Verwenden Sie hierfür ein HDMI-Kabel. 2. Verbinden Sie den HDMI IN-Anschluss des Heimkinosystems mit dem HDMI OUT-Anschluss des entsprechenden Anynet+Geräts. Verwenden Sie hierfür das HDMI-Kabel. N Verbinden Sie DIGITAL AUDIO OUT (OPTICAL)-Anschluss am Fernsehgerät und den Digital Audio-Eingang des Heimkinosystems mit Hilfe des Glasfaserkabels.
¦ Wechseln zwischen von Anynet+-Geräten 1. Drücken Sie die Taste TOOLS. Drücken Sie die Taste ENTERE, um Anynet+ (HDMICEC) auszuwählen. Fernsehen 2. Wählen Sie durch Drücken der Tasten ▲ oder ▼ die Option Geräteliste, und drücken Sie Geräteliste Aufnahme : DVDR dann die Taste ENTERE. DVDR MENU N Anynet+-Geräte aufgelistet. DVDR INFO Empfänger : Aus N Wenn Sie das gewünschte Gerät nicht finden, drücken Sie die rote Taste, um nach Einstellungen Geräten zu suchen. 3.
¦ Aufnahme Sie können Fernsehprogramme mit einem Samsung-Recorder aufnehmen. 1. Drücken Sie die Taste TOOLS. Drücken Sie die Taste ENTERE, um Anynet+ (HDMIFernsehen CEC) auszuwählen. Geräteliste Aufnahme : DVDR 2. Wählen Sie durch Drücken der Tasten ▲ oder ▼ ein die Funktion zum sofortigen DVDR MENU DVDR INFO Aufnehmen, und drücken Sie dann die Taste ENTERE. Die Aufnahme beginnt.
¦ Fehlerbehebung für Anynet+ Problem Anynet+ funktioniert nicht. Ich möchte Anynet+ starten. Ich möchte Anynet+ beenden. Die Meldung "Verbinden mit Anynet+-Gerät" wird angezeigt. Keine Wiedergabe mit dem Anynet+-Gerät. Das angeschlossene Gerät wird nicht angezeigt. Das Fernsehprogramm kann nicht aufgezeichnet werden. Die Ausgabe des Fernsehtons erfolgt über den Receiver. Mögliche Lösung ● Überprüfen Sie, ob das Gerät Anynet+-tauglich ist. Das Anynet+-System unterstützt nur Anynet+-fähige Geräte.
EMPFEHLUNGEN ¦ Videotextfunktion Die meisten Fernsehsender bieten über Videotext Informationen an. Auf der Videotext-Indexseite finden Sie Verwendungshinweise zum Videotext. Darüber hinaus können Sie über die Tasten der Fernbedienung nach Bedarf verschiedene Optionen einstellen. N Für die korrekte Anzeige von Videotextinformationen muss der Senderempfang einwandfrei sein. Andernfalls können Informationen unvollständig sein oder einige Seiten nicht angezeigt werden.
Die Videotextseiten sind in sechs Kategorien unterteilt: Sportergebnisse A B C D E F Inhalt Gewählte Seitennummer Senderkennung Aktuelle Seitenzahl oder Suchhinweise Datum und Uhrzeit Text Statusinformation FASTEXT-Informationen N Videotextinformationen sind oft auf mehrere, aufeinander folgende Seiten verteilt, die wie folgt aufgerufen werden können: Eingabe der Seitennummer Auswahl eines Titels in einer Liste Auswahl einer farbigen Überschrift (FASTEXT-System) N Das Fernsehgerät unterstützt Videot
¦ Lösen des Standfußes 1. Entfernen Sie Schrauben von der Rückseite des Fernsehgerätes. 2. Lösen Sie den Standfuß vom Fernsehgerät. N Der Fernseher sollte von mindestens zwei Personen getragen werden. 3. Decken Sie die Aussparung an der Unterseite des Fernsehgeräts mit der Abdeckung ab. ¦ Anbringen der Wandhalterung Mit der separat erhältlichen Wandhalterung können Sie das Fernsehgerät an einer Wand befestigen.
¦ Verlegen der Kabel ❑ Typ des Standfußes N Verstecken Sie die Kabel im Kabelschlauch, damit Sie durch den transparenten Standfuß hindurch nicht zu sehen sind. 1 1 2 2 3 3 ❑ Ausführung für Wandhalterung 1 1 N Ziehen Sie beim Ordnen der Kabel nicht zu fest daran. Auf diese Weise kann es zu Beschädigungen der Geräteanschlüsse kommen. ¦ Vorbereiten für den Einbau der Wandhalterung Fall A. Anbringen der SAMSUNG-Wandhalterung Fall B.
¦ Absichern des Einbaubereichs Halten Sie die erforderlichen Abstände zwischen dem Gerät und anderen Objekten (z.B. Wänden) ein, um ausreichende Lüftung sicherzustellen. Wenn Sie dies nicht tun, besteht die Gefahr, dass aufgrund eines Anstiegs der Temperatur im Innern des Geräts ein Brand ausbricht oder andere Probleme mit dem Gerät auftreten. Stellen Sie das Gerät so auf, dass die in der Abbildung gezeigten Mindestabstände eingehalten werden.
¦ Fehlerbehebung: Vor der Kontaktaufnahme mit dem Kundendienst Kein Ton oder Bild Stellen Sie sicher, dass das Netzkabel an eine Steckdose angeschlossen ist. Stellen Sie sicher, dass Sie auf der Fernbedienung die Taste gedrückt haben. Überprüfen Sie die Einstellungen für Kontrast und Helligkeit. Überprüfen Sie die Lautstärke. Normales Bild, aber kein Ton Überprüfen Sie die Lautstärke. Überprüfen Sie, ob die Taste MUTEM auf der Fernbedienung gedrückt wurde.
¦ Technische Daten Modellname Bildschirmgröße (Diagonal) PC-Auflösung (Optimal) Ton (Ausgang) Abmessungen (BxTxH) Gehäuse Mit Fuß Gewicht Mit Fuß Umgebungsbedingungen Betriebstemperatur Luftfeuchtigkeit (bei Betrieb) Lagerungstemperatur Luftfeuchtigkeit (Lagerung) Drehbarer Fuß (Links und rechts) Modellname Bildschirmgröße (Diagonal) PC-Auflösung (Optimal) Ton (Ausgang) Abmessungen (BxTxH) Gehäuse Mit Fuß Gewicht Mit Fuß Umgebungsbedingungen Betriebstemperatur Luftfeuchtigkeit (bei Betrieb) Lagerungstempera
❑ Notifications pour le téléviseur numérique 1. Les fonctions relatives au téléviseur numérique (DVB) ne sont disponibles que dans les pays ou régions où des signaux terrestres numériques de type DVB-T (MPEG2 et MPEG4 AVC) sont diffusés ou dans lesquels vous avez accès à un service de télévision par câble compatible DVB-C (MPEG2 et MPEG4 AAC). Consultez votre distributeur local pour connaître les possibilités de réception des signaux DVB-T ou DVB-C. 2.
Sommaire Media Play (USB) Installation du téléviseur ■ Présentation du panneau de commande............................................ 2 ■ Accessoires........................................................................................ 3 ■ Présentation du panneau de branchement........................................ 4 ■ Présentation de la télécommande...................................................... 7 ■ Insertion des piles dans la télécommande.........................................
Installation du téléviseur N Les figures et illustrations contenues dans ce mode d'emploi sont fournies pour référence uniquement. Elles peuvent différer de l'aspect réel du produit. La conception et les caractéristiques du produit peuvent être modifiées sans avertissement afin d'améliorer ses performances. ¦ Présentation du panneau de commande N La couleur et la forme du produit peuvent varier en fonction du modèle. N Pour activer les boutons situés en face avant, effleurez-les avec votre doigt.
¦ Accessoires Télécommande et piles (2 x AAA) Couvercle-Fond Chiffon de nettoyage Carte de garantie / Manuel de sécurité (non disponible dans certains pays) Support du serre-câble Anneau de support (4) Serre-câbles (En fonction du modèle) Câble composant Câble PERITEL Serre-câble (3) Câble AV N Vérifiez que les éléments suivants sont fournis avec votre téléviseur à LED. S’il manque des éléments, contactez votre revendeur.
¦ Présentation du panneau de branchement [Panneau arrière du téléviseur] @ ! 0 9 8 7 1 2 3 4 56 Entrée de l'alimentation N La couleur et la forme du produit peuvent varier en fonction du modèle. 1 Verrou KENSINGTON Le verrou Kensington (en option) est un dispositif permettant de fixer physiquement le système en cas d'utilisation dans un lieu public. Si vous désirez utiliser un dispositif de verrouillage, contactez le revendeur auquel vous avez acheté le téléviseur.
3 EXT (RGB) Entrées ou sorties pour périphériques externes tels que des magnétoscopes, des lecteurs DVD, des consoles de jeux vidéo ou des lecteurs de vidéodisques. N Au moment de la connexion, utilisez le connecteur approprié. N En mode EXT, la sortie DTV prend uniquement en charge les signaux audio et vidéo MPEG SD. Spécifications entrée/sortie Connecteur EXT Vidéo O Entrée Audio (G / D) O RVB O Sortie Vidéo + Audio (G / D) Seule la sortie TV ou DTV est disponible.
0 DIGITAL AUDIO OUT (OPTICAL) Pour raccorder un composant audio numérique tel qu'un récepteur home cinéma. N Lorsqu'un système audio numérique est relié à la prise DIGITAL AUDIO OUT (OPTICAL): réduisez le volume du téléviseur et réglez le volume à l'aide du système audio numérique. N L'audio 5.1 est disponible si le téléviseur est relié à un appareil externe le prenant en charge. N Lorsque le récepteur (home cinéma) est activé, vous pouvez écouter le son sortant de la prise optique du téléviseur.
¦ Présentation de la télécommande N Vous pouvez utiliser la télécommande jusqu'à une distance maximale d'environ 7 m du téléviseur. N Une lumière intense peut affecter le bon fonctionnement de la télécommande. N La couleur et la forme du produit peuvent varier en fonction du modèle. ^ MENU : Affiche le menu principal à l'écran. & GUIDE : Affichage du guide électronique des programmes (EPG).
¦ Insertion des piles dans la télécommande 1. Soulevez le couvercle au dos de la télécommande comme illustré dans la figure. 2. Placez-y deux piles AAA. N Assurez-vous que les pôles ‘+’ et ‘–’ des piles correspondent au schéma situé à l'intérieur du compartiment. 3. Replacez le couvercle. N Retirez les piles et stockez-les dans un endroit frais et sec si vous n'utilisez pas la télécommande pendant longtemps. (Les piles devraient durer environ un an en cas d'usage normal).
¦ Mise en mode veille de votre téléviseur Vous pouvez mettre votre téléviseur en mode Veille afin de réduire la consommation électrique. Le mode veille peut être utile si vous souhaitez éteindre votre téléviseur temporairement (pendant un repas par exemple). 1. Appuyez sur le bouton POWERP de la télécommande. N L'écran s'éteint et un voyant de veille apparaît sur votre téléviseur. 2. Pour rallumer le téléviseur, appuyez de nouveau sur le bouton POWERP.
¦ Visualisation de l’affichage L’affichage identifie la chaîne en cours et l’état de certains paramètres audio et vidéo. O Appuyez sur le bouton INFO pour afficher les informations. abc1 18:11 Thu 6 Jan Life On Venus Avenue DTV Air 15 Unclassified No Detaild Information 18:00 ~ 6:00 E Watch ' Information CH Appuyez sur le bouton INFO de la télécommande. La télévision affiche la chaîne, le type de son et l’état de certains paramètres de son et d’image.
❑ Mémorisation Manuelle N Permet de chercher manuellement une chaîne et de l'enregistrer dans la mémoire du téléviseur. N Si une chaîne est verrouillée par la fonction Verrouillage Canal, la fenêtre de saisie du code PIN s'affiche. ■ Canal numérique Enregistrement manuel de chaînes numériques. N Canal numérique est uniquement disponible en mode DTV. ● Canal: Sélectionnez le numéro de chaîne à l'aide des boutons ▲, ▼ ou des chiffres (0-9). ● Fréquence : Sélectionnez la fréquence à l'aide des chiffres.
❑ Par défaut → Guide Complet / Mini Guide Vous pouvez choisir d'afficher le Guide Complet ou le Mini Guide lorsque vous appuyez sur le bouton GUIDE de la télécommande. ❑ Liste des chaînes Pour obtenir plus de détails sur les procédures d'utilisation de la Liste des chaînes, reportez-vous aux instructions de Gestion des chaînes. O Vous pouvez sélectionner ces options en appuyant sur le bouton CH LIST de la télécommande.
¦ Gestion des chaînes Ce menu permet d'ajouter/supprimer ou définir des chaînes favorites et d'utiliser le guide des programmes pour les émissions numériques. Tous les canaux Affiche toutes les chaînes actuellement disponibles. ■ Chaînes ajoutées Affiche toutes les chaînes ajoutées. ■ ■ Chaînes ajoutées ■ Favoris Affiche toutes les chaînes favorites. O Pour sélectionner les chaînes favorites que vous avez configurées, appuyez sur le bouton FAV.CH de la télécommande.
■ Rappel de prog. Si vous réservez un programme que vous souhaitez regarder, la chaîne bascule automatiquement vers la chaîne réservée dans la liste de chaînes, même si vous êtes en train de regarder une autre chaîne. Pour réserver un programme, réglez d'abord l'heure actuelle N Il n'est possible de réserver que des chaînes mémorisées. N Vous pouvez régler directement la chaîne, le jour, le mois, l'heure et les minutes à l'aide des touches numériques de la télécommande.
Image ¦ Configuration du menu Image ❑ Mode ■ Dynamique Sélectionne l'image pour un affichage à plus haute définition dans une pièce lumineuse. ■ Standard Sélectionne l'image pour un affichage optimal dans un environnement normal. ■ Naturel Sélectionne l'image pour un affichage optimal et confortable pour les yeux. N Cette fonction n'est pas disponible en mode PC. ■ Film Sélectionne l'image pour un affichage agréable de films dans une pièce sombre.
■ Espace couleur Un espace colorimétrique est une matrice de couleurs composée de rouge, de vert et de bleu. Sélectionnez votre espace colorimétrique préféré et appréciez la couleur la plus naturelle. ● Auto.: règle automatiquement la nuance de couleur la plus naturelle sur la base des sources de programme. ● Natif: offre une nuance de couleur profonde et riche. ● Personnel: permet de régler l'espace colorimétrique en fonction de vos préférences.
❑ Options d'image N En mode PC, vous ne pouvez modifier que les paramètres Nuance Coul. et Format parmi les options du menu Options d'image. ■ Nuance Coul. → Froide / Normal / Chaude1 / Chaude2 / Chaude3 N Chaude1, Chaude2 ou Chaude3 ne sont activées que si le mode d'image est Film. N Vous pouvez régler et enregistrer des paramètres pour chaque périphérique externe connecté à une entrée du téléviseur. Options d'image Nuance Coul. : Normal Taille : 16/9 auto Mode écran : 16:9 NR numérique : Auto.
■ Mode Film → Arrêt / Auto.1 / Auto.2 Vous pouvez régler le téléviseur de sorte qu'il détecte et traite automatiquement les signaux de cinéma de toutes les sources et adapte l'image pour obtenir une qualité optimale. N Mode Film n'est prise en charge que dans TV, AV, COMPONENT(480i / 1080i) et HDMI(480i / 1080i). ● Arrêt : désactive la fonction Film Mode. ● Auto.1 : règle automatiquement l'image afin d'obtenir une qualité optimale lors du visionnage d'un film. ● Auto.
¦ Utilisation de votre téléviseur comme écran d'ordinateur (PC) Configuration de votre logiciel PC (instructions basées sur Windows XP) Les paramètres d'affichage Windows indiqués ci-dessous sont valables pour ordinateur standard. Les affichages écran sur votre PC seront probablement différents, en fonction de votre version de Windows et votre carte vidéo. Cependant, même si les affichages réels diffèrent, les mêmes informations de configuration de base s'appliquent dans la plupart des cas.
¦ Configuration du téléviseur avec le PC N Préréglage : Appuyez sur le bouton SOURCE pour sélectionner le mode PC. ❑ Réglage Automatique Image Utilisez la fonction Auto Adjust pour que le téléviseur règle automatiquement les signaux vidéo qu'il reçoit. La fonction règle aussi automatiquement les paramètres ainsi que les valeurs et positions de fréquences. T Appuyez sur le bouton TOOLS pour afficher le menu Outils.
SON ¦ Configuration du menu Son ❑ Mode → Standard / Musique / Film / Voix claire / Personnel Son T Appuyez sur le bouton TOOLS pour afficher le menu Outils. Vous pouvez également définir le mode sonore en sélectionnant Outils → Mode Son. ● Standard : Sélectionne le mode son normal. ● Musique : Accentue la musique par rapport aux voix. ● Film : Offre le meilleur son pour les films. ● Voix claire : Accentue les voix par rapport aux autres sons. ● Personnel: Rétablit vos paramètres de son personnalisés.
❑ Sélection Haut-parleur Lorsque vous regardez la télévision alors que vous téléviseur est relié à un système home cinéma, éteignez les haut-parleurs du téléviseur afin d'écouter le son sur les haut-parleurs (externes) du système home cinéma. ● Ht-parl ext : permet d'écouter le son des haut-parleurs externes (ceux du système home cinéma). ● Haut-parleur TV : permet d'écouter le son des haut-parleurs du téléviseur.
Configuration ¦ Configuration du menu Setup ❑ Langue des menus Plug & Play Configuration Permet de définir la langue des menus. ❑ Horloge Pour la procédure détaillée du réglage des options, reportez-vous à la rubrique ‘Réglage de l'heure’. Langue des menus : Français ▶ Horloge Diffuser Sécurité Général ❑ Diffuser ■ Sous-titres Vous pouvez activer ou désactiver les sous-titres. Utilisez ce menu pour définir le mode des sous-titres.
■ Interface commune ● CI Menu Cela aide l'utilisateur à sélectionner un élément du menu pris en charge par CAM. Sélectionnez le menu CI dans le menu PC Card. ● Infos sur l'application Contient des informations sur le module CAM inséré dans la fente CI et les affiche. Les données Application Info concernent la carte d’interface commune (CI(CI+) CARD). Vous pouvez installer le module CAM que le téléviseur soit allumé ou éteint. 1.
■ BD Wise → Arrêt / Marche Fournit une qualité d’image optimale pour les lecteurs DVD, les lecteurs Blu-ray et les système home cinéma SAMSUNG qui prennent en charge le BD Wise. Vous bénéficiez d’une image plus agréable si vous les utilisez conjointement avec ce téléviseur Samsung. N Reliez les appareils SAMSUNG prenant en charge le BD Wise à l’aide d’un câble HDMI. N Lorsque la fonction BD Wise est réglée sur Marche, le mode d’image passe automatiquement en résolution optimale.
¦ Réglage de l'heure ❑ Horloge ■ ■ Mode Horloge Vous pouvez définir l'heure actuelle manuellement ou automatiquement. ● Auto.: Définit l'heure en cours automatiquement en utilisant l'heure de la transmission numérique. ● Manuel : Définit l'heure en cours d'après l'heure entrée manuellement. N En fonction de la station de diffusion et du signal diffusé, il se peut que l'heure ne soit pas réglée correctement. Si cela se produit, réglez l'heure manuellement.
■ Volume Sélectionne le volume désiré. ■ Source → TV / USB Permet d'indiquer le contenu du périphérique TV ou USB qui doit être lu lorsque le téléviseur s'allume automatiquement. Sélectionnez TV ou USB. (Assurez-vous que le périphérique USB est branché sur le téléviseur.) N S'il n'y a qu'un seul fichier image sur le périphérique USB, la fonction Slide Show ne démarre pas. ■ Antenne (lorsque Source est réglé sur TV) Sélectionnez ATV ou DTV.
ENTRÉE / ASSISTANCE ¦ Menu Entrée ❑ Liste Source ■ Entrée Permet de sélectionner le téléviseur ou d'autres sources externes (lecteur DVD, lecteur Blu-ray, décodeur câble, Récepteurs satellite (boîtiers décodeurs) connectés au téléviseur. Permet de sélectionner la source d'entrée de votre choix. O Appuyez sur le bouton SOURCE de la télécommande pour afficher une source de signal externe. Une pression sur le bouton TV sélectionne le mode TV. TV / Ext.
■ Informations de signal (chaînes numériques uniquement) À l'inverse des chaînes analogiques, dont la qualité de réception peut varier de ‘neigeuse’ à claire, les chaînes numériques (HDTV) présentent une qualité de réception parfaite ou bien vous ne les recevez pas. Contrairement aux chaînes analogiques, vous ne pouvez donc pas syntoniser une chaîne numérique. Vous avez toutefois la possibilité de régler votre antenne pour améliorer la réception des chaînes numériques disponibles.
Media Play (USB) ¦ Connexion d'un périphérique USB 1. Appuyez sur le bouton POWER pour allumer le téléviseur. Panneau arrière du téléviseur 2. Connectez un périphérique USB contenant des photos et/ou des fichiers de musique au port USB1 sur le côté du téléviseur. 3. Lorsque l'écran de sélection Application s'affiche, appuyez sur le bouton ENTERE pour sélectionner Media Play (USB). N Le protocole MTP (Media Transfer Protocol) n'est pas pris en charge.
¦ Fonction Media Play Cette fonction vous permet de lire les photos et/ou les fichiers de musique enregistrés sur un périphérique de stockage de masse USB (MSC). N Il est se peut que le fonctionnement ne soit pas correct avec des fichiers multimédias sans licence. INFO Accès au menuMedia Play (USB) 1. Appuyez sur le bouton MENU. Appuyez sur le bouton ▲ ou ▼ pour sélectionner Application, puis sur le bouton ENTERE. SUM 851.86MB/993.02MB Libre CH PHOTO LI ST 2.
1 View Groups : Le groupe de tri contenant le fichier actuellement sélectionné est mis en surbrillance. 2 Fichier actuellement sélectionné: vous pouvez contrôler le fichier sélectionné. Les fichiers de photo sont affichés sous la forme de miniatures. 3 Périphérique actuel: indique le nom du périphérique actuellement sélectionné. Appuyez sur le bouton rouge pour sélectionner un périphérique. rouge (Périph.): Sélectionne un appareil connecté.
¦ Visualisation d'une photo ou d'un diaporama Visualisation d'un diaporama 1. Appuyez sur le bouton ▼ pour sélectionner Section Liste de fichiers. 1 2. Appuyez sur le bouton TOOLS. 2 INFO 5/15 3. Appuyez sur le bouton ▲ ou ▼ pour sélectionner Diaporama, puis appuyez sur le bouton ENTERE. N Tous les fichiers de la section Liste de fichiers seront utilisés pour le diaporama. 1231.jpg 1232.jpg 1233.jpg Diaporama Lire gp act. Information Retrait sécurisé 1235.jpg 1234.jpg 1236.jpg 1237.jpg ..
● 1. 2. 3. Ou Dans File List Section, appuyez sur les boutons jaunes pour sélectionner les photos de votre choix. Appuyez sur le bouton TOOLS. Appuyez sur le bouton ▲ ou ▼ pour sélectionner Diaporama, puis appuyez sur le bouton ENTERE. N Les fichiers sélectionnés seront utilisés pour le diaporama. ¦ Menu d'options du diaporama 1. Pendant un diaporama (ou l'affichage d'une photo), appuyez sur le bouton TOOLS pour définir l'option. 2.
¦ Menu d'options de la liste musicale 1. Appuyez sur le bouton MEDIA.P. 2. Appuyez sur le bouton ◄ ou ►pour sélectionner Music, puis appuyez sur le bouton ENTERE. 3. Appuyez sur le bouton ◄ ou ► pour sélectionner le fichier musical de votre choix. N Sélection de plusieurs fichiers musicaux Appuyez sur le bouton◄ ou ►pour sélectionner le fichier musical de votre choix. Appuyez ensuite sur le bouton jaune. Répétez l'opération ci-dessus pour sélectionner plusieurs fichiers musicaux.
¦ Lecture de musique Lecture d'un fichier musical 1. Appuyez sur le bouton ▼ pour sélectionner Section Liste de fichiers. ▶ 00:00:04 / 00:04:04 3/37 2. Appuyez sur le bouton◄ ou ►pour sélectionner le fichier musical à lire. I Love You Way HaHaHa 3. Appuyez sur le bouton ∂ (Lire)/ENTERE. N Ce menu affiche uniquement les fichiers portant l'extension MP3.
¦ Menu d'options de lecture de musique Menu d'options de lecture de musique ❑ Mode rep. → Marche / Arrêt Vous pouvez lire des fichiers musicaux en boucle. Outils Modo rep. ❑ Réglage de l'image / Réglage du son ◀ Marche ▶ Réglage de l'image Réglage du son Vous pouvez configurer les réglages de l'image et du son. Information Retrait sécurisé ❑ Information U Déplacer L Régler e Quitter Les informations relatives au fichier musical sont affichées.
ANYNET+ ¦ Connexion de périphériques Anynet+ Qu’est-ce qu'Anynet+? Anynet+ est une fonction qui vous permet de contrôler tous les appareils Samsung connectés compatibles Anynet+ avec votre télécommande Samsung. Le système Anynet+ peut être utilisé uniquement avec les appareils Samsung disposant de la fonction Anynet+. Pour vérifier que votre périphérique Samsung dispose de cette fonction, assurez-vous qu'il porte le logo Anynet+. Connexion à un téléviseur TV Périphérique Anynet+ 1 Câble HDMI 1.
1. A l'aide d'un câble HDMI, reliez la prise HDMI IN (1(DVI), 2, 3 ou 4) du téléviseur à la prise HDMI OUT du périphérique Anynet+ correspondant. 2. A l'aide du câble HDMI, reliez la prise HDMI IN du système home cinéma à la prise HDMI OUT de l'appareil Anynet+ correspondant. N Connectez le câble optique entre la prise DIGITAL AUDIO OUT (OPTICAL) de votre téléviseur et l'entrée Digital Audio (audio numérique) de votre système home cinéma.
¦ Commutation entre périphériques Anynet+ 1. Appuyez sur le bouton TOOLS. Appuyez sur le bouton ENTERE pour sélectionner Anynet+ (HDMI-CEC). Voir télévision 2. Appuyez sur le bouton ▲ ou ▼ pour sélectionner Liste d'appareils, puis appuyez sur le Liste d'appareils Enregistrement : DVDR bouton ENTERE. DVDR MENU DVDR INFO N La liste des périphériques Anynet+ connectés au téléviseur s'affiche.
¦ Enregistrement Vous pouvez enregistrer un programme télévisé à l'aide d'un enregistreur Samsung. 1. Appuyez sur le bouton TOOLS. Appuyez sur le bouton ENTERE pour sélectionner Voir télévision Anynet+ (HDMI-CEC). Liste d'appareils Enregistrement : DVDR 2. Appuyez sur le bouton ▲ ou ▼ pour sélectionner Recording Immediately puis appuyez DVDR MENU DVDR INFO sur le bouton ENTERE. L'enregistrement commence.
¦ Dépannage d'Anynet+ Problème Anynet+ ne fonctionne pas. Solution possible ● Vérifiez si le périphérique est compatible Anynet+. Le système Anynet+ ne prend en charge que les périphériques compatibles Anynet+. ● Ne connectez qu'un seul récepteur (home cinéma). ● Vérifiez si le cordon d'alimentation du périphérique Anynet+ est bien connecté. ● Vérifiez la connexion des câbles vidéo/audio/HDMI 1.3 du périphérique Anynet+.
RECOMMENDATIONS ¦ Fonction Télétexte La plupart des chaînes de télévision offrent des services d'informations écrites via le télétexte. La page d'index du télétexte contient des instructions sur l'utilisation du service. Vous pouvez, en outre, sélectionner différentes options à l'aide des touches de la télécommande. N Pour que les informations du télétexte s'affichent correctement, la réception des chaînes doit être stable.
Les pages de télétexte sont organisées en six catégories : Catégorie A B C D E F Sommaire Numéro de la page sélectionnée. Identité de la chaîne émettrice. Numéro de la page actuelle ou indications de recherche. Date et heure. Texte. Informations sur l'état. Informations FASTEXT. N Les informations du télétexte sont souvent réparties sur plusieurs pages qui s'affichent successivement.
¦ Branchement du socle 1. Retirez les vis situées à l’arrière du téléviseur. 2. Retirez le support du téléviseur. N Le téléviseur doit être porté par au moins deux personnes. 3. Recouvrez le trou inférieur à l'aide du cache. ¦ Installation du kit de montage mural Les éléments du support mural (vendus séparément) permettent de fixer le téléviseur au mur. Pour plus d'informations sur l'installation du support mural, reportez-vous aux instructions fournies avec les éléments de montage mural.
¦ Assemblage des câbles ❑ Type support N Insérez les câbles dans le serre-câbles de telle manière qu’ils ne soient pas visibles à travers le pied transparent. 1 1 2 2 3 3 ❑ Type montage mural 1 1 N Ne tirez pas trop sur les câbles lorsque vous les manipulez. Les bornes de connexion du produit risqueraient d’être endommagées. ¦ Préparation avant l’installation d’un dispositif de fixation murale Cas A. Installation du dispositif de fixation murale SAMSUNG Cas B.
¦ Sécurisation de l'emplacement d'installation Respectez les distances requises entre le produit et d'autres objets (p. ex. murs) pour assurer une ventilation adéquate. Le non-respect de cette consigne pourrait provoquer un incendie ou un problème avec le produit en raison de l'augmentation de la température interne de ce dernier. Installez le produit de manière à respecter les distances requises indiquées sur la figure.
¦ Dépannage : Avant de contacter un technicien Aucune image ni aucun son Vérifiez que le cordon d'alimentation secteur est branché à une prise murale. Vérifiez que vous avez appuyé sur le bouton de marche/arrêt du téléviseur. Vérifiez les réglages du contraste et de la luminosité de l'image. Vérifiez le volume. Image normale, mais aucun son Vérifiez le volume. Vérifiez si le bouton MUTEM de la télécommande a été actionné. Vérifiez les paramètres Sélection Haut-parleur.
¦ Caractéristiques Nom du modèle Taille de l'écran (Diagonale) Résolution du PC (Optimale) Son (Sortie) Dimensions (L x P x H) Corps Avec socle Poids Avec socle Considérations environnementales Température de fonctionnement Humidité en cours de fonctionnement Température de stockage Humidité sur le lieu de stockage Socle orientable (Gauche / droite) Nom du modèle Taille de l'écran (Diagonale) Résolution du PC (Optimale) Son (Sortie) Dimensions (L x P x H) Corps Avec socle Poids Avec socle Considérations env
❑ Avviso relativo alla trasmissione TV digitale 1. Le funzioni relative alla trasmissione televisiva digitale (DVB) sono disponibili solo nei paesi o nelle aree in cui vengono trasmessi segnali digitali terrestri DVB-T (MPEG2 E MPEG4 AVC) o laddove l'utente abbia la possibilità di accedere a un servizio TV via cavo DVB-C (MPEG2 e MPEG4 AAC) compatibile. Verificare con il rivenditore locale la possibilità di ricevere segnali DVB-T o DVB-C. 2.
Contenuti Media Play (USB) Configurazione del televisore ■ Pannello di controllo........................................................................... 2 ■ Accessori............................................................................................ 3 ■ Pannello dei collegamenti................................................................... 4 ■ Telecomando...................................................................................... 7 ■ Installazione delle batterie nel telecomando..
Configurazione del televisore N Le figure e le illustrazioni presenti in questo Manuale dell'utente sono fornite unicamente a titolo di riferimento e possono differire da quelle del prodotto attuale. Il design e le specifiche del prodotto possono variare senza preavviso allo scopo di migliorare costantemente le prestazioni del prodotto. ¦ Pannello di controllo N La forma e il colore del prodotto possono variare in base al modello.
¦ Accessori Telecomando e batterie (2 tipo AAA) Copertura-Fondo Panno per la pulizia Scheda di garanzia / Guida alla sicurezza (non disponibili in tutte le sedi) Ferma cavo piedistallo Anello di ritenuta (4ea) Ferma cavo (In base al modello) Cavo Component Cavo SCART Fermacavo (3ea) Cavo AV N Controllare che nella confezione del TV LED siano contenuti i seguenti componenti. Se qualsiasi componente risultasse mancante, contattare il rivenditore.
¦ Pannello dei collegamenti [Pannello posteriore del televisore] @ ! 0 9 8 7 1 2 3 4 56 Ingresso alimentazione N La forma e il colore del prodotto possono variare in base al modello. 1 BLOCCO KENSINGTON Il blocco Kensington (opzionale) è un dispositivo usato per assicurare fisicamente il sistema quando viene utilizzato in un luogo pubblico. Se si desidera utilizzare un dispositivo di blocco, contattare il punto vendita in cui si è acquistato il televisore.
3 EXT (RGB) Ingressi e uscite di dispositivi esterni quali videoregistratori, DVD, periferiche di gioco o lettori di dischi video. N Per la connessione usare il connettore appropriato. N In modalità EXT, l'uscita DTV supporta solo video e audio SD MPEG. Specifiche Ingressi/Uscite Connettore EXT Video O Ingressi Audio (L / R) O RGB O Uscita Video + Audio (L / R) Solo l'uscita TV o DTV è disponibile.
0 DIGITAL AUDIO OUT (OPTICAL) Collega a un componente Digital Audio quale un ricevitore Home theatre. N Quando un sistema Digital Audio viene collegato alla porta DIGITAL AUDIO OUT (OPTICAL): Diminuire il volume del televisore e regolarlo con la manopola di regolazione del sistema. N L'audio 5.1CH è disponibile quando il televisore è collegato a un dispositivo esterno che lo supporta.
¦ Telecomando N Il telecomando è utilizzabile fino a una distanza di 7 metri dal televisore. N Una illuminazione troppo intensa può avere conseguenze sulle prestazioni del telecomando. N La forma e il colore del prodotto possono variare in base al modello. 1 POWER: Premere per accendere e spegnere il televisore. 2 TV: Seleziona direttamente la modalità TV. 3 TASTI NUMERICI: Premere per cambiare canale. 4 FAV.CH: Utilizzato per visualizzare gli elenchi dei canali preferiti.
¦ Installazione delle batterie nel telecomando 1. Sollevare il coperchio sul retro del telecomando come mostrato in figura. 2. Installare le due batterie AAA. N Fare corrispondere i poli ‘+’ e ‘–’ delle batterie con lo schema riportato all’interno del vano. 3. Riposizionare il coperchio. N Se si prevede di non utilizzare il telecomando per un periodo di tempo prolungato, rimuovere le batterie e riporle in un luogo asciutto e fresco.
¦ Attivazione modalità standby E' possibile attivare la modalità standby del televisore per ridurre il consumo di corrente. La modalità standby è particolarmente utile quando si desidera disattivare temporaneamente il televisore (ad esempio durante i pasti). 1. Premere POWERP sul telecomando. N Lo schermo si spegne e sull’apparecchio compare la spia di standby. 2. Per riattivare il televisore, premere nuovamente il tasto POWERP.
¦ Visualizzazione del display Il display identifica il canale corrente e lo stato di determinate impostazioni audio e video. O Premere il tasto INFO per visualizzare le informazioni. abc1 18:11 Thu 6 Jan Life On Venus Avenue DTV Air 15 Unclassified No Detaild Information 18:00 ~ 6:00 E Watch ' Information CH Premere INFO sul telecomando. Il televisore visualizzerà il canale, il tipo di audio e lo stato di determinate impostazioni immagine e audio.
❑ Memorizzazione manuale N Ricerca un canale manualmente e lo memorizza nella memoria TV. N Se un canale è stato bloccato mediante la funzione Blocco canali, comparirà la schermata di inserimento del PIN. ■ Canale digitale Memorizzazione manuale dei canali digitali. N Canale digitale è disponibile solo in modalità DTV. ● Canale: Impostare il numero del canale mediante i tasti ▲, ▼ o i tasti numerici (0~9). ● Frequenza: Impostare la frequenza utilizzando i tasti numerici. ● Larg.
❑ Guida Predefinita → Guida Compl / Mini Guida E’ possibile scegliere se visualizzare la Guida Compl o la Mini Guida premendo il tasto GUIDE del telecomando. ❑ Elenco canali Per le istruzioni dettagliate sull’uso di Elenco canali, vedere la sezione Gestione dei canali. O È possibile selezionare queste opzioni semplicemente premendo il tasto CH LIST sul telecomando. ❑ Mod. Canale Premendo il tasto P >/<, i canali verranno attivati secondo l'elenco canali selezionato.
¦ Gestione dei canali Usando questo menu è possibile aggiungere, eliminare o impostare i canali preferiti e utilizzare la guida dei programmi per le trasmissioni digitali. ■ Canali aggiunti ■ Tutti i Canali Mostra tutti i canali attualmente disponibili. Canali aggiunti Mostra tutti i canali aggiunti.
■ Timer visione Se si è effettuata la prenotazione di un canale, all’ora stabilita verrà visualizzato il canale prenotato anche durante la visione di un altro canale contenuto nell'Elenco canali. Per prenotare un programma, impostare prima l’orario corrente. N E' possibile prenotare solo i canali memorizzati. N È possibile impostare il canale, il giorno, il mese, l'anno,l'ora e i minuti premendo direttamente i tasti numerici del telecomando.
IMMAGINE ¦ Configurazione del menu Picture ❑ Modalità ■ Dinamica Imposta l’immagine da visualizzare in alta definizione in un ambiente luminoso. ■ Standard Imposta l’immagine per una visualizzazione ottimale in condizioni di luce normali. ■ Naturale Seleziona l'immagine per una visione ottimale, confortevole per la vista. N Questa funzione non è disponibile in modalità PC. ■ Film Imposta l'immagine per una visualizzazione confortevole in un ambiente buio.
■ Spazio colore Spazio colore è la matrice di colori composta dai colori rosso, verde e blu. Per scoprire lo straordinario mondo dei colori naturali basta selezionare lo spazio colore preferito. ● Automatico: Auto Spazio colore regola automaticamente la tonalità più naturale dei colori basata sulle sorgenti del programma. ● Nativa: Native Spazio colore offre tonalità di colore ricche e profonde. ● Personaliz: Regola la gamma colore per adattarla alle proprie preferenze.
❑ Opzioni immagine N In modalità PC, è possibile modificare solo i parametri Toni colore e Formato tra le opzioni della voce Opzioni immagine. ■ Toni colore → Freddo / Normale / Caldo1 / Caldo2 / Caldo3 N Caldo1, Caldo2 o Caldo3 vengono attivate solo quando la modalità Immagine è Film. N Le impostazioni possono essere regolate e memorizzate per ogni dispositivo esterno connesso a un ingresso TV.
■ Modalità Film → Off / Auto1 / Auto2 Il televisore può essere impostato automaticamente nel senso desiderato, per elaborare i segnali dei film provenienti da tutte le sorgenti e per regolare l'immagine in modo da ottenere una visualizzazione ottimale. N Modalità Film è supportata in modalità TV, AV, COMPONENT (480i / 1080i) e HDMI (480i / 1080i). ● Off: Disattiva la funzione Modalità Film. ● Auto1: Regola automaticamente l'immagine alla migliore qualità possibile per la visione di un film.
¦ Uso del televisore come uno schermo PC Impostazione del software del PC (basato su Windows XP) Di seguito vengono illustrate le impostazioni di visualizzazione di Windows per un PC tipico. Le schermate visualizzate sul PC possono differire in base alla versione di Windows e alla scheda video installate. Nel caso le schermate risultassero differenti, le stesse informazioni di base per la configurazione sono applicabili in quasi tutti i casi.
¦ Configurazione del televisore con il PC N Preimpostazione: Premere il tasto SOURCE per selezionare la modalità PC. ❑ Regolazione auto Luminosità Nitidezza immagine Usare la funzione Auto Adjust per far sì che il televisore regoli automaticamente i segnali video che riceve. La funzione sintonizza automaticamente le impostazioni e regola i valori della frequenza e le posizioni. T Premere il tasto TOOLS per visualizzare il menu Strumenti.
SUONO ¦ Configurazione del menu audio ❑ Modalità → Standard / Musica / Film / Voce cristallina / Personaliz Suono T Premere il tasto TOOLS per visualizzare il menu Strumenti. E’ inoltre possibile impostare la modalità audio selezionando Strumenti → Modalità audio. ● Standard: Seleziona la modalità audio normale. ● Musica: Enfatizza la musica rispetto alle voci. ● Film: Offre la migliore qualità audio per la visione di film. ● Voce cristallina: Enfatizza i dialoghi rispetti altri altri suoni.
❑ Selezione altoparlante Durante la visione del televisore con un sistema Home theatre collegato, disattivare gli altoparlanti in modo da poter ascoltare l'audio proveniente dagli altoparlanti esterni del sistema Home theatre. ● Altoparlante est: Per ascoltare l'audio proveniente dagli altoparlanti esterni (Home Theatre). ● Altoparlante TV: Per ascoltare l’audio tramite gli altoparlanti del televisore.
Impostazione ¦ Configurazione del menu Setup ❑ Lingua menu E' possibile impostare la lingua dei menu. Plug & Play Per la descrizione dettagliata delle procedure per l'impostazione delle opzioni, vedere 'Impostazione dell'orario'. Impostazione ❑ Ora Lingua menu : Italiano ▶ Ora Trasmissione Sicurezza Generale ❑ Trasmissione ■ Sottotitoli È possibile attivare e disattivare i sottotitoli. Utilizzare questo menu per impostare la modalità sottotitoli.
■ Interfaccia comune ● Menu CI Ciò permette all'utente di accedere al menu del modulo CAM. Selezionare il Menu CI in base alla scheda PC. ● Info sull'applicazione Contiene informazioni sul modulo CAM inserito nello slot CI e le visualizza. Le informazioni sull’applicazione sono relative alla ‘SCHEDA CI (CI+)’. È possibile installare il modulo CAM in qualsiasi momento sia mentre il televisore è acceso sia mentre è spento. 1. Acquistare il modulo CI CAM presso il rivenditore locale o via telefono. 2.
■ BD Wise → Off / On Fornisce la qualità ottimale delle immagini per i prodotti SAMSUNG DVD, Blu-ray e Home Theatre che supportano il formato BD Wise. Collegando tali dispositivi a questo televisore Samsung le immagini saranno ancora più ricche. N Collegare prodotti SAMSUNG che abbiano BD Wise con un cavo HDMI. N Quando BD Wise è impostato su On, la modalità delle immagini viene automaticamente cambiata alla risoluzione ottimale. N BD Wise è disponibile in modalità HDMI. ■ Risp.
¦ Impostazione dell’orario ❑ Orologio ■ ■ Modalità orologio E’ possibile impostare manualmente o automaticamente l’orario corrente. ● Automatico: Imposta automaticamente l’orario corrente utilizzando l’orario inviato dalla trasmissione digitale. ● Manuale: Imposta manualmente l’ora corrente. N In base all'emittente e al segnale, la funzione dell'impostazione automatica dell'orario potrebbe non essere corretta. In questo caso, impostare l'orario manualmente.
■ Volume Selezionare il livello del volume desiderato. ■ Sorgente → TV / USB E' possibile selezionare il contenuto del dispositivo TV o USB da riprodurre all'accensione automatica del televisore. Selezionare TV o USB. (Assicurarsi che al televisore sia collegato un dispositivo USB.) N Nel caso ci sia un solo file fotografico memorizzato sul dispositivo USB, la funzione Slide Show non è disponibile. ■ Antenna (quando Sorgente è impostata su TV) Selezionare ATV o DTV.
Ingressi / Supporto ¦ Menu Ingressi ❑ Elenco sorgenti ■ Ingressi Per selezionare il televisore o altre sorgenti esterne di ingresso quali DVD / lettori Blu-ray / Cable Box / Ricevitori satellitari (Set-Top Box) collegati al televisore. Utilizzare la funzione per selezionare la sorgente di ingresso desiderata. O Premere il tasto SOURCE sul telecomando per visualizzare una sorgente del segnale esterna. La modalità TV può essere selezionata premendo il tasto TV. TV / Ext.
■ Informazioni sul segnale (solo canali digitali) Diversamente dai canali analogici, la cui qualità di ricezione può variare da ‘molto disturbata’ a 'chiara', i canali digitali (HDTV) sono caratterizzati da una perfetta qualità oppure dalla totale mancanza di ricezione. Non è quindi possibile sintonizzare i canali digitali. Per migliorare la ricezione dei canali digitali disponibili è tuttavia possibile regolare l'antenna.
Media Play (USB) ¦ Collegamento di un dispositivo USB 1. Per accendere il televisore premere il tasto POWER. 2. Collegare un dispositivo USB contenente file fotografici e/o musicali al jack USB1 posto sul pannello laterale del televisore. Pannello posteriore del televisore 3. Quando viene visualizzata la schermata di selezione Applicazione, premere ENTERE per selezionare Media Play (USB). Unità USB N MTP (Media Transfer Protocol) non è supportato. N Il file system supporta FAT16, FAT32 e NTFS.
¦ Funzione Media Play Questa funzione consente di visualizzare e riprodurre file fotografici e/o musicali memorizzati su dispositivi USB MSC (Mass Storage Class). INFO N Utilizzando file multimediali senza licenza, il prodotto potrebbe non funzionare correttamente. Accesso al menu Media Play (USB) SUM 1. Premere il tasto MENU. Premere il tasto ▲ o ▼ per selezionare Applicazione, quindi premere il tasto ENTERE. 851.86MB/993.02MB Libero CH Photo LI ST 2.
1 Visualizza gruppi: Il gruppo di ordinamento che contiene il file attualmente selezionato viene evidenziato. 2 File attualmente selezionato: Il file selezionato è quello che è possibile controllare. I file fotografici vengono visualizzati come miniature. 3 Dispositivo corrente: Mostra il nome del dispositivo attualmente selezionato. Premere il tasto Rosso per selezionare un dispositivo. Tasto Rosso (Dispositivo): Seleziona un dispositivo connesso.
¦ Visualizzazione di una foto o di una proiezione di diapositive Proiezione di diapositive 1. Premere il tasto ▼ per selezionare la sezione Elenco file. 1 2 INFO 2. Premere il tastoTOOLS. 5/15 1231.jpg 1232.jpg 1233.jpg 1235.jpg 1234.jpg 1236.jpg 1237.jpg ../Photo/ SUM Dispositivo CH 3. Premere il tasto ▲ o ▼ per selezionare Slide show, quindi premere il tasto ENTERE . N Nella proiezione di diapositive verranno utilizzate tutte le foto contenute nell’Elenco file.
● In alternativa 1. Nell'Elenco file, premere il tasto giallo per selezionare le foto desiderate. 2. Premere il tasto TOOLS. 3. Premere il tasto ▲ o ▼ per selezionare Slide show, quindi premere il tasto ENTERE . N I file selezionati verranno utilizzati per la proiezione di diapositive. ¦ Menu opzioni di Slide Show 1. Durante una proiezione di diapositive (o la visualizzazione di una foto), premere il tasto TOOLS per impostare l'opzione. 2.
¦ Menu Opzione dell’Elenco musica 1. Premere il tasto MEDIA.P. 2. Premere il tasto ◄ o ► per selezionare Music, quindi premere il tasto ENTERE. 3. Premere il tasto ◄ o ► per selezionare il brano musicale desiderato. N Selezione di più file musicali Per selezionare il brano musicale desiderato, premere il tasto ◄ o ►. Quindi premere il tasto giallo. Ripetere l'operazione per selezionare più file musicali. Il contrassegno c appare per il file musicale selezionato.
¦ Riproduzione di un file musicale Riproduzione di un file musicale 1. Premere il tasto ▼ per selezionare la sezione Elenco file. 2. Premere il tasto ◄ o ► per selezionare un file musicale da riprodurre. ▶ 00:00:04 / 00:04:04 3/37 Way I Love You HaHaHa 3. Premere il tasto ∂ (Riproduci)/ENTERE . N Questo menu mostra solo i file con estensione MP3.
¦ Menu Opzione della riproduzione di file musicali Menu Opzione della riproduzione di file musicali ❑ Mod Ripetiz. → On / Off E’ possibile riprodurre ripetutamente i brani musicali. Strumenti Mod Ripetiz. ◀ On ▶ Impostazioni immagine ❑ Impostazioni immagine / Impostazioni audio Impostazioni audio Informazioni È possibile configurare le impostazioni delle immagini e dell'audio.
ANYNET+ ¦ Collegamento dei dispositivi Anynet+ Cos'è Anynet+? Anynet+ è una funzione che permette di controllare mediante il telecomando del televisore Samsung tutti i dispositivi Samsung collegati che supportano Anynet+. Il sistema Anynet+può essere usato solo con i dispositivi Samsung dotati della funzione Anynet+. Per controllare se il dispositivo Samsung in uso è dotato di questa funzione, verificare la presenza del logo Anynet+.
1. Collegare la porta HDMI IN (1(DVI), 2, 3 o 4) del televisore alla porta HDMI OUT del dispositivo Anynet+ corrispondente tramite un cavo HDMI. 2. Collegare la porta HDMI IN del sistema Home Theatre alla porta HDMI OUT del dispositivo Anynet+ corrispondente tramite un cavo HDMI. N Collegare un cavo ottico tra la porta DIGITAL AUDIO OUT (OPTICAL) del televisore all'ingresso Digital Audio del sistema Home Theatre.
¦ Passaggio tra dispositivi Anynet+ 1. Premere il tasto TOOLS. Premere ENTERE per selezionare Anynet+ (HDMI-CEC). 2. Premere il tasto ▲ o ▼ per selezionare Elenco dispositivi, quindi premere ENTERE. N Vengono elencati tutti i dispositivi Anynet+ collegati al televisore. N Se non si trova il dispositivo desiderato, premere il tasto rosso per eseguire la scansione dei dispositivi. Visualizza TV Elenco dispositivi Registrazione DVDR MENU DVDR INFO Ricevitore Impostazione : DVDR : Off 3.
¦ Registrazione Con un videoregistratore Samsung è possibile registrare un programma televisivo. 1. Premere il tasto TOOLS. Premere ENTERE per selezionare Anynet+ (HDMI-CEC). 2. Premere il tasto ▲ o ▼ per selezionare Recording Immediately, quindi premere ENTERE. La registrazione ha inizio. N Se sono presenti più dispositivi di registrazione Se sono collegati più dispositivi di registrazione, questi vengono elencati. Premere il tasto ▲ o ▼ per selezionare un particolare dispositivo, quindi premere ENTERE .
¦ Risoluzione dei problemi con Anynet+ Problema Anynet+ non funziona. Per avviare Anynet+. Per uscire da Anynet+. Sullo schermo viene visualizzato il messaggio ‘Connecting to Anynet+ device...’. Impossibile avviare la riproduzione sul dispositivo Anynet+. Lo schermo del dispositivo esterno non appare. Possibile soluzione ● Controllare se si sta utilizzando un dispositivo Anynet+. Il sistema Anynet+ può essere utilizzato solo con dispositivi che supportano Anynet+.
RACCOMANDAZIONI ¦ Funzione Teletext La maggior parte delle emittenti televisive fornisce servizi informativi tramite il servizio Teletext. La pagina dell’indice del servizio Teletext contiene informazioni sull’uso del servizio. Inoltre, è possibile selezionare varie opzioni tramite i tasti del telecomando. N Per visualizzare correttamente le informazioni del servizio Teletext, è necessario che la ricezione del canale sia stabile.
Le pagine Teletext sono organizzate in base a sei categorie: Parte A B C D E F Contenuti Numero della pagina selezionata. Identità della stazione emittente. Numero della pagina corrente o stato della ricerca. Data e ora. Testo. Informazioni sullo stato. Informazioni FASTEXT.
¦ Smontare il piedistallo 1. Svitare le viti sul retro del televisore. 2. Separare il piedistallo dal televisore. N Il televisore deve essere sorretto da due o più persone. 3. Coprire il foro sul fondo con l'apposito tappo. ¦ Installazione del Kit di montaggio a parete Gli articoli del kit di montaggio a parete (venduti separatamente) consentono di montare il televisore alla parete.
¦ Assemblaggio dei cavi ❑ Tipo piedistallo N Racchiudere i cavi nel fermacavi in modo che non siano visibili attraverso il piedistallo trasparente. 1 1 2 2 3 3 ❑ Tipo montaggio a parete 1 1 N Non tirare eccessivamente i cavi durante la loro disposizione. In caso contrario, i terminali di connessione del prodotto potrebbero subire danni. ¦ Preparazione per l’installazione di un supporto a parete Esempio A. Installazione del supporto a parete SAMSUNG. Esempio B.
¦ Messa in sicurezza della posizione di installazione Mantenere le distanze necessarie tra il prodotto e gli altri elementi presenti (per esempio le pareti) per garantire un’adeguata ventilazione. La mancata osservanza di tale precauzione può comportare un pericolo d’incendio o un malfunzionamento a causa del surriscaldamento del prodotto. Installare il prodotto mantenendo le distanze indicate in figura.
¦ Risoluzione dei problemi: Prima di contattare l’assistenza Nessun audio o immagine Controllare che il cavo di alimentazione sia collegato alla presa di corrente. Verificare di aver premuto il tasto sul dispositivo. Controllare le impostazioni relative al contrasto e alla luminosità dell’immagine. Controllare il volume. Immagine normale ma audio assente Controllare il volume. Controllare se il tasto MUTEM del telecomando è stato premuto. Verificare le impostazioni dell’opzione Selezione altoparlante.
¦ Specifiche Nome modello Dimensione schermo (Diagonale) Risoluzione PC (Ottimale) Audio (Uscita) Dimensioni (LarxProxAlt) Corpo Con piedistallo Peso Con piedistallo Caratteristiche ambientali Temperatura di esercizio Umidità di esercizio Temperatura di stoccaggio Umidità di stoccaggio Piedistallo ruotabile (Sinistra / Destra) Nome modello Dimensione schermo (Diagonale) Risoluzione PC (Ottimale) Audio (Uscita) Dimensioni (LarxProxAlt) Corpo Con piedistallo Peso Con piedistallo Caratteristiche ambientali Tem
Correct Disposal of This Product (Waste Electrical & Electronic Equipment) (Applicable in the European Union and other European countries with separate collection systems) This marking on the product, accessories or literature indicates that the product and its electronic accessories (e.g. charger, headset, USB cable) should not be disposed of with other household waste at the end of their working life.
Korrekt avfallshantering av produkten (elektriska och elektroniska produkter) Denna markering på produkten, tillbehören och i manualen anger att produkten och de elektroniska tillbehören (t.ex. laddare, headset, USB-kabel) inte bör sorteras tillsammans med annat hushållsavfall när de kasseras. Till förebyggande av skada på miljö och hälsa bör dessa föremål hanteras separat för ändamålsenlig återvinning av beståndsdelarna.
Правилно третиране на изделието след края на експлоатационния му живот (Отпадъци, представляващи електрическо и електронно оборудване)(Важи за държавите на Европейския съюз и други европейски държави със системи за разделно сметосъбиране) Този знак, поставен върху изделието, негови принадлежности или печатни материали, означава, че продуктът и принадлежностите (например зарядно устройство, слушалки, USB кабел) не бива да се изхвърлят заедно с другите битови отпадъци, когато изтече експлоатационният му живот
Õige viis toote kasutuselt kõrvaldamiseks (elektriliste ja elektrooniliste seadmete jäätmed) Selline tähistus tootel või selle tarvikutel või dokumentidel näitab, et toodet ega selle elektroonilisi tarvikuid (nt laadija, peakomplekt, USBkaabel) ei tohi kasutusaja lõppemisel kõrvaldada koos muude olmejäätmetega.
Correct disposal of batteries in this product (Applicable in the European Union and other European countries with separate battery return systems.) This marking on the battery, manual or packaging indicates that the batteries in this product should not be disposed of with other household waste at the end of their working life. Where marked, the chemical symbols Hg, Cd or Pb indicate that the battery contains mercury, cadmium or lead above the reference levels in EC Directive 2006/66.
KKorrekt bortskaffelse af batterierne i dette produkt (Gælder i EU og andre europæiske lande med særlige retursystemer for batterier). Mærket på dette batteri, dokumentationen eller emballagen betyder, at batterierne i dette produkt efter endt levetid ikke må bortskaffes sammen med andet husholdningsaffald. Mærkning med de kemiske symboler Hg, Cd eller Pb betyder, at batteriet indeholder kviksølv, cadmium eller bly over grænseværdierne i EU-direktiv 2006/66.
Správná likvidace baterií v tomto výrobku (Platí v Evropské unii a dalších evropských zemích s vlastními systémy zpětného odběru baterií.) Tato značka na baterii, návodu nebo obalu znamená, že baterie v tomto výrobku nesmí být na konci své životnosti likvidovány společně s jiným domovním odpadem. Případně vyznačené symboly chemikálií Hg, Cd nebo Pb upozorňují na to, že baterie obsahuje rtuť, kadmium nebo olovo v množství překračujícím referenční úrovně stanovené směrnicí ES 2006/66.