Contact SAMSUNG WORLDWIDE If you have any questions or comments relating to Samsung products, please contact the SAMSUNG customer care centre. Country Customer Care Centre Web Site AUSTRIA 0810 - SAMSUNG (7267864, € 0.07/min) www.samsung.com/at 02 201 2418 www.samsung.com/be www.samsung.com/be_fr 800 - SAMSUNG (800-726786) www.samsung.com/cz BELGIUM CZECH REPUBLIC Distributor pro Českou republiku: Samsung Zrt.
Figures and illustrations in this User Manual are provided for reference only and may differ from actual product appearance. Product design and specifications may be changed without notice. ❑ License TruSurround HD, SRS and symbol are trademarks of SRS Labs, Inc. TruSurround HD technology is incorporated under license from SRS Labs, Inc. Manufactured under license from Dolby Laboratories. Dolby and the double-D symbol are trademarks of Dolby Laboratories.
ANYNET+ Setting up Your TV ■ Accessories........................................................................................ 2 ■ Viewing the Control Panel.................................................................. 2 ■ Viewing the Connection Panel............................................................ 3 ■ Viewing the Remote Control............................................................... 6 ■ Mini Remote Control...........................................................................
Setting up Your TV ¦ Accessories Remote Control & Batteries (AAA x 2) Programme CD Cover-Bottom Cleaning Cloth Warranty Card / Safety Guide (Not available in all locations) Mini Remote Control & Batteries (3V) Component Cable Holder-Ring (4ea) Holder-Wire (3ea) Holder-Wire Stand AV Cable SCART Cable Holder-Wire Cable (Depending on the model) Owner’s Instructions N Please make sure the following items are included with your LED TV. If any items are missing, contact your dealer.
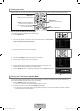
MENU: Press to see an on-screen menu of your TV’s features. 6 SOURCEE: Toggles between all the available input sources. In the on-screen menu, use this button as you would use the ENTERE button on the remote control. 7 SPEAKERS ¦ Viewing the Connection Panel [TV Rear Panel] # @ 0 ! 0 9 8 1 2 3 4 5 67 Power Input N The product colour and shape may vary depending on the model.
1 KENSINGTON LOCK The Kensington Lock (optional) is a device used to physically fix the system when used in a public place. If you want to use a locking device, contact the dealer where you purchased the TV. N The location of the Kensington Lock may be different depending on its model. 2 LAN Connect a LAN cable to this port to connect to the Network. 3 ANT IN Connects to an antenna or cable TV system.
0 USB 1 (HDD) / USB 2 Connector for software upgrades and Media Play, etc. You can connect to Samsung’s network wirelessly using the ‘Samsung Wireless LAN Adapter’ (Sold separately). N For USB HDD, use the USB 1 (HDD) port. ! DIGITAL AUDIO OUT (OPTICAL) Connects to a Digital Audio component such as a Home theatre receiver. N When a Digital Audio System is connected to the DIGITAL AUDIO OUT (OPTICAL) jack: Decrease the volume of the TV and adjust the volume level with the system’s volume control. N 5.
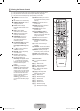
¦ Viewing the Remote Control N You can use the remote control up to a distance of about 23 feet from the TV. N The performance of the remote control may be affected by bright light. N The product colour and shape may vary depending on the model. 1 POWER: Turns the TV on and off. 2 TV: Selects the TV mode directly. 3 NUMERIC BUTTONS : Press to change the channel. 4 FAV.CH: Used to display Favourites Channel Lists on the screen. 5 INFO: Press to display information on the TV screen.
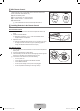
¦ Mini Remote Control The Mini Remote Control is a simplified remote control that consists of the power, channel and volume buttons only. 1 1 Television Standby button 2 2 < : Next channel / > : Previous channel 3 4 3 2 3 + : Volume increase / – : Volume decrease 4 IrDA transmitter N Use the Mini Remote Control so that this part faces the TV. ¦ Installing Batteries in the Remote Control Normal Remote Control 1. Lift the cover at the back of the remote control upward as shown in the figure. 2.
¦ Viewing the menus Before using the TV, follow the steps below to learn how to navigate the menu in order to select and adjust different functions. MENU Button Display the main on-screen menu. RETURN Button Return to the previous menu. ENTERE / DIRECTION Buttons Move the cursor and select an item. Select the currently selected item. Confirm the setting. EXIT Exit the on-screen menu. ❑ How to operate the OSD (On Screen Display) The access step may differ depending on the selected menu. 1.
¦ Plug & Play Feature (depending on the model) When the TV is initially powered on, basic settings proceed automatically and subsequently. 1. Press the POWER button on the remote control. N You can also use the POWERP button on the TV. N The message Select the OSD Language. is displayed. 2. Press the ENTERE button. Select the appropriate language by pressing the ▲ or ▼ button. Press the ENTERE button to confirm your choice. Plug & Play Select the OSD Language. Menu Language : English ▶ 3.
¦ Viewing the Display The display identifies the current channel and the status of certain audio-video settings. O Press the INFO button to viewing the information. Press the INFO button on the remote control. The TV will display the channel, the type of sound, and the status of certain picture and sound settings. ● ▲, ▼: You can view other channel’s information. If you want to move to the currently selected channel, press ENTERE button.
❑ Manual Store N Scans for a channel manually and stores it in the TV’s memory. N If a channel is locked using the Child Lock function, the PIN input window appears. ■ Digital Channel Manual store for digital channels. N Digital Channel is only available in DTV mode. ● Channel: Set the Channel number using the ▲, ▼ or number (0~9) buttons. ● Frequency: Set the frequency using the number buttons. ● Bandwidth: Set the bandwidth using the ▲, ▼ or number (0~9) buttons.
❑ Default Guide → Full Guide / Mini Guide You can decide whether to display either the Full Guide or the Mini Guide when the GUIDE button on the remote control is pressed. ❑ Channel List For detailed procedures on using the Channel List, refer to the ‘Managing Channels’ instructions. O You can select these options by simply pressing the CH LIST button on the remote control. ❑ Channel Mode When press the P >/< button, Channels will be switched within the selected channel list. ■ Added Ch.
¦ Managing Channels Using this menu, you can add / delete or set favourites channels and use the programme guide for digital broadcasts. All Channels Shows all currently available channels. ■ Added Channels Shows all added channels. ■ ■ Added Channels ■ 824 UKTV Gold 825 UKTV style A 1 C -A 2 C -A 3 C -A 4 C -- A 5 C -- Favourites Shows all favourite channels. O To select the favourites channels you have set up, press the FAV.
■ Lock / Unlock You can lock a channel so that the channel cannot be selected and viewed. N This function is available only when the Child Lock is set to On. N The PIN number input screen appears. Enter your 4 digit PIN number. N The default PIN number of a new TV set is 0-0-0-0. You can change the PIN, by selecting Change PIN from the menu. N The ‘\’ symbol will be displayed and the channel will be locked.
PICTURE ¦ Configuring the Picture Menu ❑ Mode ■ Dynamic Selects the picture for increased definition in a bright room. ■ Standard Selects the picture for the optimum display in a normal environment. ■ Natural Selects the picture for an optimum and eye-comfortable display. N This function is not available in PC mode. ■ Movie Selects the picture for viewing movies in a dark room. Picture You can select the type of picture which best corresponds to your viewing requirements.
■ Colour Space Colour space is a colour matrix composed of red, green and blue colours. Select your favourites colour space to experience the most natural colour. ● Auto: Auto Colour Space automatically adjusts to the most natural colour tone based on Programme sources. ● Native: Native Colour Space offers deep and rich colour tone. ● Custom: Adjusts the colour range to suit your preference. N Changing the adjustment value will refresh the adjusted screen.
■ Size Occasionally, you may want to change the size of the image on your screen. Your TV comes with several screen size options, each designed to work best with specific types of video input. Your cable box/satellite receiver may have its own set of screen sizes as well. In general, though, you should view the TV in 16:9 mode as much as possible. T Press the TOOLS button to display the Tools menu. You can also set the size by selecting Tools → Picture Size.
■ 100Hz Motion Plus → Off / Clear / Standard / Smooth / Custom / Demo Removes drag from fast scenes with a lot of movement to provide a clearer picture. N If you enable 100Hz Motion Plus, noise may appear on the screen. If this occurs, set 100Hz Motion Plus to Off. ● Off: Switches 100Hz Motion Plus off. ● Clear: Sets 100Hz Motion Plus to minimum. ● Standard: Sets 100Hz Motion Plus to medium. ● Smooth: Sets 100Hz Motion Plus to maximum.
¦ Using Your TV as a Computer (PC) Display Setting Up Your PC Software (Based on Windows XP) The Windows display-settings for a typical computer are shown below. The actual screens on your PC will probably be different, depending upon your particular version of Windows and your particular video card. However, even if your actual screens look different, the same basic set-up information will apply in almost all cases. (If not, contact your computer manufacturer or Samsung Dealer.) 1.
¦ Setting up the TV with your PC N Preset: Press the SOURCE button to select PC mode. ❑ Auto Adjustment Brightness Sharpness Picture Use the Auto Adjust function to have the TV automatically adjust the video signals it receives. The function also automatically fine-tunes the settings and adjusts the frequency values and positions. T Press the TOOLS button to display the Tools menu. You can also set the Auto Adjustment by selecting Tools → Auto Adjustment. N This function does not work in DVI-HDMI mode.
❑ Audio Language You can change the default value for audio languages. Displays the language information for the incoming stream. N While viewing a digital channel, this function can be selected. N You can only select the language among the actual languages being broadcast. ❑ Audio Format → MPEG / Dolby Digital When sound is emitted from both the main speaker and the audio receiver, a sound echo may occur due to the decoding speed difference between the main speaker and the audio receiver.
¦ Selecting the Sound Mode You can set the sound mode in the Tools menu. When you set to Dual l ll, the current sound mode is displayed on the screen. A2 Stereo NICAM Stereo Audio Type Mono Stereo Dual Mono Stereo Dual Dual 1 / 2 MONO STEREO ↔ MONO DUAL 1 ↔ DUAL 2 MONO MONO ↔ STEREO MONO ↔ DUAL 1 DUAL 2 Default Automatic change DUAL 1 Automatic change DUAL 1 N If the stereo signal is weak and an automatic switching occurs, then switch to the mono.
■ Teletext Language You can set the Teletext language by selecting the language type. N English is the default in cases where the selected language is unavailable in the broadcast. ■ Preference ● Primary Audio Language / Secondary Audio Language / Primary Subtitle Language / Secondary Subtitle Language / Primary Teletext Language / Secondary Teletext Language Using this feature, users can select one of the languages. The language selected here is the default when the user selects a channel.
❑ Network → Network Type / Network Setup For detailed procedures on setting up options, refer to the ‘Setting the Network’ instructions. ❑ General ■ Game Mode → Off / On When connecting to a game console such as PlayStation™ or Xbox™, you can enjoy a more realistic gaming experience by selecting game menu. N Restrictions on game mode (Caution) To disconnect the game console and connect another external device, set Game Mode to Off in the setup menu.
¦ Setting the Time ❑ Clock ■ ■ Clock Mode You can set up the current time manually or automatically. ● Auto: Set the current time automatically using the time from the digital broadcast. ● Manual: Set the current time to a manually specified time. N Depending on the broadcast station and signal, the auto time may not be set correctly. If this occurs, set the time manually. N The Antenna or cable must be connected in order to set the time automatically. Clock Set You can set the current time manually.
¦ Network Connection You can set up the Internet Protocol so that you can communicate with various connected networks. ❑ Network Connection - Cable ■ LAN Connection for a DHCP Environment The procedures to set up the network using Dynamic Host Configuration Protocol (DHCP) are described below. Since an IP address, subnet mask, gateway, and DNS are automatically allocated when DHCP is selected, you do not have to enter them manually. 1.
■ LAN Connection for Static IP Environment The procedures to set up the network using a static IP address are described below. You have to manually enter the IP address, subnet mask, gateway, and DNS that are provided by your Internet Service Provider (ISP). 1. Connect the LAN port on the rear panel of the TV and the LAN port on the wall using the LAN cable. TV Rear Panel The LAN Port on the Wall 1 LAN Cable You can connect the LAN via a Sharer (Router).
N Select a channel for the wireless IP sharer that is not currently being used. If the channel set for the wireless IP sharer is currently being used by another device nearby, this will result in interference and communications may fail. N If you apply a security system other than the systems listed blow, it will not work with the TV. When applying the security key for the AP (wireless IP sharer), only the following is supported.
Cable Network Setup-Manual To connect the TV to the LAN using a static IP address, you must set up the Internet Protocol (IP). 1. Set Network Type to Cable. 2. Select Cable Network Setup. 3. Set Internet Protocol Setup to Manual. Cable Network Setup Internet Protocol Setup : Manual ▶ Network Test IP Address : 0 0 0 0 Subnet Mask : 0 0 0 0 Gateway DNS Server : : 0 0 0 0 0 0 0 0 4. Set up IP Address, Subnet Mask, Gateway and DNS Server.
● If Security Key is not set: When the security setting of AP that supports WPS is NONE, you can select PBC, PIN, None Security. None Security is capable of connecting to AP directly without using WPS function. N Process of PBC, PIN is same as above. Refer to if Security Key is already set. N Try again if connecting operation doesn’t work. Ad-hoc: You can connect to a mobile device without an access point through the ‘Samsung Wireless LAN Adapter’ by using a peer to peer network.
INPUT / SUPPORT ¦ Input Menu ❑ Source List ■ Input Use to select TV or other external input sources such as DVD / Blu-ray players / Cable Box / Satellite receivers (Set-Top Box) connected to the TV. Use to select the input source of your choice. O Press the SOURCE button on the remote control to view an external signal source. TV mode can be selected by pressing the TV button. Source List Edit Name TV / Ext.
Using the Remote Control Buttons in the Product Guide Menu Button Yellow Button ◄/► ENTERE RETURN EXIT Operations Shows the contents of the Product Guide sequentially. (Auto Play) Move the cursor and select an item. Select the currently selected item. Return to the previous menu. Stop the current function and return to the Product Guide main menu. ❑ Self Diagnosis ■ Picture Test Self Diagnosis If you think you have a picture problem, perform the picture test.
❑ Software Upgrade Samsung may offer upgrades for the TV’s firmware in the future. These upgrades can be performed via the TV when it is connected to the Internet, or by downloading the new firmware from samsung.com to a USB memory device. N Current Version is the software already installed in the TV. N Alternative Software (Backup) shows the previous version that will be replaced. N Software is represented as ‘Year/Month/Day_Version’. The more recent the date, the newer the software version.
Media Play (USB & DLNA) ¦ Connecting a USB Device 1. Press the POWER button to turn the TV on. TV Rear Panel 2. Connect a USB device containing photo, music and/or movie files to the USB 1 (HDD) or USB 2 jack on the side of the TV. 3. When the Application selection screen is displayed, press the ENTERE button to select or Media Play (USB & DLNA). N MTP (Media Transfer Protocol) is not supported. N The file system supports FAT16, FAT32 and NTFS.
¦ Media Play Function This function enables you to view and listen to photo, music and/or movie files saved on a USB Mass Storage Class (MSC) device. N It might not work properly with unlicensed multimedia files. Entering the Media Play (USB & DLNA) Menu 1. Press the MENU button. Press the ▲ or ▼ button to select Application, then press the ENTERE button. SUM 2. Press the ▲ or ▼ button to select Media Play (USB & DLNA), then press the ENTERE button. N The Media Play (USB & DLNA) menu is displayed.
5 Help Items • Green (Favourites Settings) button: Changes the Favourites Settings for the selected file. Press this button repeatedly until the desired value appears. • Yellow (Select) button: Selects file from the file list. Selected files are marked with a symbol c. Press the Yellow button again to cancel a file selection. • TOOLS (Tools) button: Displays the option menus. (The option menu changes according to the current status.
¦ Photo / Music / Movie List Option Menu 1. Press the MEDIA.P button. Basic View 2. Press the ◄ or ► button to select Photo, Music or Movie then press the ENTERE button. 3. Press the ◄ or ► button to select the desired file. N Selecting Multiple Files Press the ◄ or ► button to select the desired file. Then press the Yellow button. Repeat the above operation to select multiple files. The mark c appears to the selected file. Timeline Colour Folder 5/15 1231.jpg 1232.jpg SUM 1233.jpg 1234.
¦ Slide Show / Music Play / Movie Play Option Menu 1. During a slide show (or when viewing a photo) or playing a music or movie, press the TOOLS button to set the option. 2. Press the ▲ or ▼ button to select the desired option, then press the ENTERE button. ❑ Picture Setting / Sound Setting Tools You can select the picture and sound settings. Stop Slide Show ❑ Information Slide Show Speed : Normal Slide Show Effect : Fade1 Rotate Zoom Background Music The file information is displayed.
¦ Viewing a Photo or Slide Show Viewing a Slide Show All files in the File List Section will be used for the Slide Show. During the slide show, files are displayed in order from the currently shown file. The Slide Show progresses in the order sorted in the File List Section. Music files can be automatically played during the Slide Show if the Background Music is set to On. O While a photo list is displayed, press the ∂(Play) / ENTERE button on the remote control to start slide show.
¦ Playing Music Playing a music file ▶ 00:00:04 / 00:04:04 3/37 1. Press the ▼ button to select the File List Section. 2. Press the ◄ or ► button to select a music file to be played. Way I Love You HaHaHa 3. Press the ∂ (Play) / ENTERE button. N This menu only shows files with the MP3 file extension. Files with other file extensions are not displayed, even if they are saved on the same USB device.
¦ Playing a Movie File Playing a movie file 1. Press the ▼ button to select the File List Section. ▶ 00:00:01 / 00:05:30 3/37 ABC.avi 2. Pressing the ◄ or ► button to select a movie file to be played. 3. Press the ∂ (Play) / ENTERE button. N The selected file is played. N The selected file is displayed at the top with its playing time.
N Video Play Control Buttons Button ENTERE ∂ ∑ TOOLS ∫ ◄/► ▲/▼ μ Operations Play/Pause the movie file Play the movie file Pause the movie file Run various functions from the Movie menus. Exit play mode and return to the movie list. Skip forwards or backwards through the movie file. Move to the first/last of the file. Play the file at double speed. This function may not be supported depending on the codec. Playing the movie group 1. Press the ▲ button to move to the Sort key Section. 2.
¦ Using the Setup Menu Setup displays the user settings of the Media Play menu. 851.86MB/993.02MB Free SUM 1. Press the MEDIA.P button. 2. Press the ◄ or ► button to select Setup, then press the ENTERE button. SETUP 3. Press the ▲ or ▼ button to select the desired option. 4. Press the ◄ or ► button to select the option. N To exit Media Play mode, press the MEDIA.P button on the remote control. ■ Use Colour View → On / Off You can select sorting photos by colour.
Media Play-DLNA ¦ Setting the DLNA Network DLNA allows you to watch pictures, musics and videos saved on your PC or on your TV through a network connection in Media Play mode. This removes the need to copy them to a USB storage device and then connect the device to your TV. To use DLNA, the TV must be connected to the network and the DLNA application must be installed on your PC.
System Requirements 1. Insert the Programme CD supplied with this TV into your PC. 2. 30MB of free hard disk space is needed for the programme installation. N If you share files, up to 30MB of hard disk drive space is required for each 100 files. N If you cancel file sharing, the hard disk drive space used for the thumbnail information is also freed. Supported Formats ● Image: JPEG/ Audio: MP3/ Video: AVI, MKV, ASF, MP4, 3GPP, PS, TS container.
❑ Share ■ Sharing a Folder You can share a folder from your PC to the TV. ■ Cancelling a Shared Folder You can cancel a shared folder on your PC. Select a folder from the Shared Folder pane and select Unshare Folder. ■ Applying the Current Settings Perform this when synchronization is necessary due to a new shared folder or cancelling a shared folder. The Set Changed State menu applies changes to shared folders to the data saved with the PC share programme.
ANYNET+ ¦ Connecting Anynet+ Devices What is Anynet+? Anynet+ is a function that enables you to control all connected Samsung devices that support Anynet+ with your Samsung TV’s remote. The Anynet+ system can be used only with Samsung devices that have the Anynet+ feature. To be sure your Samsung device has this feature, check if there is an Anynet+ logo on it. To connect to a TV TV Anynet+ Device 1 HDMI 1.3 Cable Anynet+ Device 2 HDMI 1.3 Cable Anynet+ Device 3 HDMI 1.
¦ Setting Up Anynet+ Media Play (USB & DLNA) Application T Press the TOOLS button to display the Tools menu. You can also display Anynet+ menu by selecting Tools → Anynet+ (HDMI-CEC). Anynet+ (HDMI-CEC) Content Library Internet@TV Home Network Centre ❑ Setup ■ ■ Anynet+ (HDMI-CEC) → Off / On To use the Anynet+ Function, Anynet+ (HDMI-CEC) must be set to On. N When the Anynet+ (HDMI-CEC) function is disabled, all the Anynet+ related operations are deactivated.
TV Remote Control Buttons Available in Anynet+ Mode Device Type Operating Status Anynet+ Device After switching to the device, when the menu of the corresponding device is displayed on the screen.
¦ Troubleshooting for Anynet+ Problem Anynet+ does not work. ● Possible Solution Check if the device is an Anynet+ device. The Anynet+ system supports Anynet+ devices only. Connect only one receiver (home theatre). Check if the Anynet+ device power cord is properly connected. Check the Anynet+ device’s Video/Audio/HDMI 1.3 cable connections. Check whether Anynet+ (HDMI-CEC) is set to On in the Anynet+ setup menu. Check whether the TV remote control is in TV mode.
Content Library ¦ Using the Content Library The Content Library allows you to enjoy various content on your TV. You can use the default content stored in the TV memory or you can enjoy new content using a USB device. Gallery Using the Remote Control Button in Content Library Menu Button ▲/▼/◄/► ENTERE RETURN EXIT
Colour button Y / MUTE Gallery Cooking Game Children Wellness R Return e Exit Operations Move the cursor and select an item. Select the currently selected item.
❑ Game This category provides entertainment games for the whole family. N For the buttons used in the games, refer to the directions on the screen. N Colour Buttons for Games Button Red Green Yellow Blue Operations Press to move to the game home screen Press to pause the game Option Key Press to exit the game ❑ Children This is educational and interactive content that children can watch repeatedly. N The copyrights of the Children contents and issues related to them reserved by UpToTen.
Internet@TV If you have some problems while using a widget service, please contact to content provider. In the widget, press the green button and get information of contact or refer to help website for widget provider information. N English may be only supported in widget service depending on region. N This function may not be supported depending on your country.
❑ Screen display ■ Dock mode 1 A welcome banner is shown with your profile name in the top right corner. N This banner disappears after a short delay. 2 The banner highlights two remote control shortcuts. N If you press the blue button (Viewport) on your remote control, the display is toggled between ‘Viewport mode’ and ‘Overlay mode’. In Viewport mode, the TV or video plays in a scaled-down area with graphics outside. In overlay mode, the graphics are displayed on top of the TV or video.
All content and services accessible through this device belong to third parties and are protected by copyright, patent, trademark and/or other intellectual property laws. Such content and services are provided solely for your personal noncommercial use. You may not use any content or services in a manner that has not been authorized by the content owner or service provider.
The Profile Settings menu allows you to customize and protect your profile. ● User profiles can be customized with a unique Name and an Avatar (a picture used to represent your profile). ● Your profile’s Name and Avatar are displayed in the profile snippet in the dock. ● Profiles can be protected by Create Profile PIN. N When setting the PIN for the first time, you can set a Security Question. The Profile Settings menu can limit access to widgets.
¦ Using the Yahoo!® Weather Widget The Yahoo!® Weather Widget provides updates on your local and favourite weather locations. This content dynamically changes with weather conditions. ● Press the green button on the remote control to display the Yahoo!® Weather Widget Settings menu. ● From the Settings menu you can add or remove a city for which you want to view weather information. From the Settings menu: ● Add New City by entering the name of the city.
¦ Using the Yahoo!® Flickr Widget The Flickr Widget can provide you access to your favourite photos from friends and family while watching TV. Share your photos with your family on your big screen TV through a slideshow. ● Personalize the Flickr Widget by logging in with your Yahoo! ID. ● For detailed procedures on log in, refer to the ‘Using the Profile Widget’ instructions. ● For more information on Flickr, visit http://www.flickr.com. N Your Photos shows photos you have registered with Flickr website.
¦ Troubleshooting for internet@TV Problem Possible Solution Some widget services do not work. Check with that service provider. In the widget, press the green button and get contact information or refer to help website for widget service provider information. Refer to Help website page. Some widget contents only have English. How can I change the language? Widget content language may be different from widget user interface language. It depends on service provider.
Internet@TV N This function may not be supported depending on your country. (Not available in all locations) N If you have some problems while using a widget service, please contact to service provider. In the widget, press the green button and get contact information or refer to help website for service provider information. N English may be only supported in widget service depending on region. ¦ Getting Started with Internet@TV Internet@TV provides SAMSUNG’s widget services through a network connection.
❑ System Setup N Ticker Autorun, Ticker Duration may not be supported depending on country. ■ Change the Service Lock password N The default password number of a new TV set is 0-0-0-0. N If you forget the password, press the remote control buttons in the following sequence, which resets the password to 0-0-0-0: POWER (off) → MUTE → 8 → 2 → 4 → POWER (on). ■ Service Duration Select to set the service duration time before the screen saver appears.
¦ Troubleshooting for internet@TV Problem Possible Solution Some widget services do not work. Check with that service provider. In the widget, press the green button and get contact information or refer to help website for widget service provider information. Refer to Help website page. What is the advantage of single sign on? If you create account and register your login information of desired service, you can access personalized content without additional login.
Home Network Centre ¦ Home Network Centre About the Home Network Centre The Home Network Centre connects the TV and mobile phones through a network. You can view call arrivals, text message contents, and schedules set on the mobile phone on the TV using the Home Network Centre. In addition, you can play the media contents saved on the mobile phones such as videos, photos and music by controlling them onto the TV via the network.
¦ Setting Up the Home Network Centre ❑ Message / Media Shows a list of mobile phones which have been set up with this TV to use the Message or Media function. N Media function is available in other mobile devices which support DLNA DMC. ■ ■ ■ Allowed Allows the mobile phone. Home Network Centre Message 111-1234-5671 : Allowed Media 111-1234-5672 : Allowed Setup 111-1234-5673 : Denied 111-1234-5674 : Denied Denied Blocks the mobile phone.
Message View If a new text message (SMS) arrives while you are watching TV, the alarm window appears. If you click the OK button, the contents of the message are displayed. N You can configure the viewing settings for the text message (SMS) contents on the mobile phone. For the procedures, refer to the mobile phone manual. N Some special characters may be displayed as blank or broken characters. Call Arrival Alarm If a call arrives while you are watching TV, the alarm window appears.
RECOMMENDATIONS ¦ Teletext Feature Most television stations provide written information services via Teletext. The index page of the Teletext service gives you information on how to use the service. In addition, you can select various options to suit your requirements by using the remote control buttons. N For Teletext information to be displayed correctly, channel reception must be stable. Otherwise, information may be missing or some pages may not be displayed. 1 : (exit) Exit from the Teletext display.
The Teletext pages are organized according to six categories: Part A B C D E F Contents Selected page number. Broadcasting channel identity. Current page number or search indications. Date and time. Text. Status information. FASTEXT information.
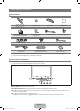
¦ Disconnecting the Stand 1. Remove screws from the back of the TV. 2. Separate the stand from the TV. N Two or more people should carry the TV. 3. Cover the bottom hole with the cover. ¦ Installing the Wall Mount kit Wall mount items (sold separately) allow you to mount the TV on the wall. For detailed information on installing the wall mount, see the instructions provided with the Wall Mount items. Contact a technician for assistance when installing the wall mounted bracket.
¦ Assembling the Cables ❑ Stand Type N Enclose the cables in the Holder-Wire Cable so that the cables are not visible through the transparent stand. 1 1 2 2 3 3 ❑ Wall-Mount Type 1 1 N Do not pull the cables too hard when arranging them. This may cause damage to the product’s connection terminals. English - 6 BN68-02329A-03Eng.
¦ Securing the Installation Space Keep the required distances between the product and other objects (e.g. walls) to ensure proper ventilation. Failing to do so may result in fire or a problem with the product due to an increase in the internal temperature of the product. Install the product so the required distances shown in the figure are kept. N When using a stand or wall-mount, use parts provided by Samsung Electronics only.
¦ Troubleshooting If you have any questions of TV, first refer to this list. If none of these troubleshooting tips apply, please visit ‘www.samsung.com’ site, then click on Support or contact Call Centre on list of last page. Issue Solution Picture Quality TV image does not look as good as it did in the store. First of all, please perform the Picture Test to confirm that your TV is properly displaying test image.
Issue Solution No Picture, No Video TV won’t turn on. ● ● ● Make sure the AC power cord is plugged in securely to the wall outlet and the TV. Make sure the wall outlet is working. Try pressing the POWER button on the TV to make sure the remote is working properly. If the TV turns on, it may be caused by Remote Control. To fix the Remote problem, refer to ‘Remote control does not work’ below. TV turns off automatically. ● ● ● ● Check if the Sleep Timer is set to On in the Setup menu.
Issue Solution Others Picture is not shown in full screen. ● ● Black bars on each side will be shown on HD channels when displaying upscaled SD (4:3) contents. Black bars on Top & Bottom will be shown on movies that have aspect ratios different from your TV. Adjust picture size option on your external device or TV to full screen. Remote control does not work. ● ● ● Replace the remote control batteries with correct polarity (+ -). Clean the transmission window located on the top of the remote.
¦ Specifications Model Name Screen Size (Diagonal) PC Resolution (Optimum) Sound Output Dimensions (WxDxH) Without Stand With stand Weight With Stand Environmental Considerations Operating Temperature Operating Humidity Storage Temperature Storage Humidity Stand Swivel (Left / Right) UE32B7000, UE32B7020 UE40B7000, UE40B7020 32 inch 40 inch 1920 x 1080 @ 60 Hz 1920 x 1080 @ 60 Hz 10W X 2 10W x 2 813 X 30 X 520 mm 813 X 240 X 585 mm 996 X 30 X 630 mm 996 X 255 X 692 mm 14 kg 19 kg Model Name Scr
● ● ● This product uses parts of the software from the Independent JPEG Group. This product uses parts of the software owned by the Freetype Project (www.freetype.org). This product uses some software programs which are distributed under the GPL/LGPL license. Accordingly, the following GPL and LGPL software source codes that have been used in this product can be provided after asking to vdswmanager@ samsung.com.
A “covered work” means either the unmodified Programme or a work based on the Programme. To “propagate” a work means to do anything with it that, without permission, would make you directly or secondarily liable for infringement under applicable copyright law, except executing it on a computer or modifying a private copy. Propagation includes copying, distribution (with or without modification), making available to the public, and in some countries other activities as well.
5. Conveying Modified Source Versions. You may convey a work based on the Programme, or the modifications to produce it from the Programme, in the form of source code under the terms of section 4, provided that you also meet all of these conditions: a) The work must carry prominent notices stating that you modified it, and giving a relevant date. b) The work must carry prominent notices stating that it is released under this License and any conditions added under section 7.
The requirement to provide Installation Information does not include a requirement to continue to provide support service, warranty, or updates for a work that has been modified or installed by the recipient, or for the User Product in which it has been modified or installed. Access to a network may be denied when the modification itself materially and adversely affects the operation of the network or violates the rules and protocols for communication across the network.
10. Automatic Licensing of Downstream Recipients. Each time you convey a covered work, the recipient automatically receives a license from the original licensors, to run, modify and propagate that work, subject to this License. You are not responsible for enforcing compliance by third parties with this License. An “entity transaction” is a transaction transferring control of an organization, or substantially all assets of one, or subdividing an organization, or merging organizations.
14. Revised Versions of this License. The Free Software Foundation may publish revised and/or new versions of the GNU General Public License from time to time. Such new versions will be similar in spirit to the present version, but may differ in detail to address new problems or concerns. Each version is given a distinguishing version number.
¦ GNU Lesser General Public License (LGPL) Version 3, 29 June 2007 Copyright (C) 2007 Free Software Foundation, Inc. Everyone is permitted to copy and distribute verbatim copies of this license document, but changing it is not allowed. Preamble The GNU General Public License is a free, copyright license for software and other kinds of works. The licenses for most software and other practical works are designed to take away your freedom to share and change the works.
1. Source Code. The “source code” for a work means the preferred form of the work for making modifications to it. “Object code” means any non-source form of a work. A “Standard Interface” means an interface that either is an official standard defined by a recognized standards body, or, in the case of interfaces specified for a particular programming language, one that is widely used among developers working in that language.
A compilation of a covered work with other separate and independent works, which are not by their nature extensions of the covered work, and which are not combined with it such as to form a larger program, in or on a volume of a storage or distribution medium, is called an “aggregate” if the compilation and its resulting copyright are not used to limit the access or legal rights of the compilation’s users beyond what the individual works permit.
When you convey a copy of a covered work, you may at your option remove any additional permissions from that copy, or from any part of it. (Additional permissions may be written to require their own removal in certain cases when you modify the work.) You may place additional permissions on material, added by you to a covered work, for which you have or can give appropriate copyright permission.
11. Patents. A “contributor” is a copyright holder who authorizes use under this License of the Programme or a work on which the Programme is based. The work thus licensed is called the contributor’s “contributor version”.
15. Disclaimer of Warranty. THERE IS NO WARRANTY FOR THE PROGRAM, TO THE EXTENT PERMITTED BY APPLICABLE LAW. EXCEPT WHEN OTHERWISE STATED IN WRITING THE COPYRIGHT HOLDERS AND/OR OTHER PARTIES PROVIDE THE PROGRAM “AS IS” WITHOUT WARRANTY OF ANY KIND, EITHER EXPRESSED OR IMPLIED, INCLUDING, BUT NOT LIMITED TO, THE IMPLIED WARRANTIES OF MERCHANTABILITY AND FITNESS FOR A PARTICULAR PURPOSE. THE ENTIRE RISK AS TO THE QUALITY AND PERFORMANCE OF THE PROGRAM IS WITH YOU.
¦ LICENSE ISSUES The OpenSSL toolkit stays under a dual license, i.e. both the conditions of the OpenSSL License and the original SSLeay license apply to the toolkit. See below for the actual license texts. Actually both licenses are BSD-style Open Source licenses. In case of any license issues related to OpenSSL please contact openssl-core@openssl.org. OpenSSL License Copyright (c) 1998-2007 The OpenSSL Project. All rights reserved.
Les figures et illustrations contenues dans ce mode d’emploi sont fournies pour référence uniquement. Elles peuvent différer de l’aspect réel du produit. La conception et les spécifications du produit sont susceptibles d’être modifiées sans préavis. ❑ Licence TruSurround HD, SRS et le symbole sont des marques de SRS Labs, Inc. La technologie TruSurround HD est incorporée sous licence de SRS Labs, Inc. Fabriqué sous licence de Dolby Laboratories.
Sommaire ANYNET+ Installation du téléviseur CANAL ■ Menu Canal...................................................................................... 10 ■ Gestion des chaînes . ...................................................................... 13 Image ■ Configuration du menu Image.......................................................... 15 ■ Visualisation d'une image dans l'image............................................ 18 ■ Utilisation de votre téléviseur comme écran d'ordinateur (PC).........
Installation du téléviseur ¦ Accessories Télécommande et piles (2 x AAA) CD du programme Couvercle-Fond Chiffon de nettoyage Carte de garantie / Manuel de sécurité (non disponible dans certains pays) Mini télécommande et piles (3V) Câble composant Anneau de support (4) Serre-câble (3) Support du serre-câble Câble AV Câble PERITEL Serre-câbles (En fonction du modèle) Instructions d’utilisation N Vérifiez que les éléments suivants sont fournis avec votre téléviseur à LED.
5 MENU : Permet d'afficher un menu à l'écran des fonctions du téléviseur. 6 SOURCEE Bascule entre toutes les sources d'entrée disponibles. Dans le menu à l'écran, utilisez ce bouton de la même façon que le bouton ENTERE de la télécommande. 7 HAUT-PARLEURS ¦ Présentation du panneau de branchement [Panneau arrière du téléviseur] # @ 0 ! 0 9 8 1 2 3 4 5 67 Entrée de l'alimentation N La couleur et la forme du produit peuvent varier en fonction du modèle.
1 Verrou KENSINGTON (en fonction du modèle) Le verrou Kensington (en option) est un dispositif permettant de fixer physiquement le système en cas d'utilisation dans un lieu public. Si vous désirez utiliser un dispositif de verrouillage, contactez le revendeur auquel vous avez acheté le téléviseur. N L'emplacement du verrou Kensington peut varier en fonction du modèle. 2 LAN Connectez un câble réseau à ce port pour connecter le téléviseur au réseau.
0 USB 1 (HDD) / USB 2 Prise utilisée pour les mises à jour logicielles, la fonction Media Play, etc. Vous pouvez vous connecter au réseau Samsung sans fil en utilisant l’adaptateur "Samsung Wireless LAN Adapter" (vendu séparément). N Pour branchez un disque dur USB, utilisez le port USB 1 (HDD). ! DIGITAL AUDIO OUT (OPTICAL) Pour raccorder un composant audio numérique tel qu'un récepteur home cinéma.
¦ Présentation de la télécommande N Vous pouvez utiliser la télécommande jusqu'à une distance maximale d'environ 7 m du téléviseur. N Une lumière intense peut affecter le bon fonctionnement de la télécommande. N La couleur et la forme du produit peuvent varier en fonction du modèle. 1 POWER: Pour allumer et éteindre la télévision. ^ MENU: Affiche le menu principal à l'écran. 2 TV: Sélectionne directement le mode TV. & GUIDE: Affichage du guide électronique des programmes (EPG).
¦ Mini télécommande La mini télécommande est une télécommande simplifiée contenant uniquement les touches d’alimentation, de chaînes et de volume. 1 1 Bouton de mise en veille du téléviseur 2 2 < : Chaîne suivante / > : Chaîne précédente 3 3 + : Augmentation du volume / – : Réduction du volume 4 3 2 4 Emetteur IrDA N Utilisez la mini télécommande de façon à ce que cette partie soit dirigée vers le téléviseur. ¦ Insertion des piles dans la télécommande Télécommande normale 1.
¦ Affichage des menus Avant d'utiliser le téléviseur, procédez comme suit pour apprendre à naviguer dans le menu afin de sélectionner et de régler les différentes fonctions. Bouton MENU Afficher le menu principal à l'écran. Bouton RETURN Revient au menu précédent. Bouton ENTERE / DIRECTIONNELLES Déplace le curseur pour sélectionner un élément. Valide l'élément actuellement sélectionné. Confirmer un paramétrage. EXIT Fermer le menu affiché à l'écran.
¦ Fonction Plug & Play (En fonction du modèl) Lorsque vous allumez le téléviseur pour la première fois, des réglages de base s'effectuent l'un après l'autre de manière automatique. 1. Appuyez sur le bouton POWERP de la télécommande. N Vous pouvez également utiliser le bouton POWERP du téléviseur. N Le message Select the OSD Language. s'affiche à l'écran. Plug & Play 2. Appuyez sur le bouton ENTERE. Sélectionnez la langue de votre choix en appuyant sur le bouton ▲ ou ▼.
¦ Visualisation de laffichage L’affichage identifie la chaîne en cours et l’état de certains paramètres audio et vidéo. O Appuyez sur le bouton INFO pour afficher les informations. Appuyez sur le bouton INFO de la télécommande. La télévision affiche la chaîne, le type de son et l’état de certains paramètres de son et d’image. ● ▲, ▼: Vous pouvez afficher des informations relatives à une autre chaîne. Pour accéder à la chaîne actuellement sélectionnée, appuyez sur le bouton ENTERE.
❑ Mémorisation Manuelle N Permet de chercher manuellement une chaîne et de l'enregistrer dans la mémoire du téléviseur. N Si une chaîne est verrouillée par la fonction Verrouillage Canal, la fenêtre de saisie du code PIN s'affiche. ■ Canal numérique Enregistrement manuel de chaînes numériques. N Canal numérique est uniquement disponible en mode DTV. ● Canal: Sélectionnez le numéro de chaîne à l'aide des boutons ▲, ▼ ou des chiffres (0-9). ● Fréquence : Sélectionnez la fréquence à l'aide des chiffres.
❑ Par défaut → Guide Complet / Mini Guide Vous pouvez choisir d'afficher le Guide Complet ou le Mini Guide lorsque vous appuyez sur le bouton GUIDE de la télécommande. ❑ Liste des chaînes Pour obtenir plus de détails sur les procédures d'utilisation de la Liste des chaînes, reportez-vous aux instructions de ‘Gestion des chaînes’. O Vous pouvez sélectionner ces options en appuyant sur le bouton CH LIST de la télécommande.
¦ Gestion des chaînes Ce menu permet d'ajouter/supprimer ou définir des chaînes favorites et d'utiliser le guide des programmes pour les émissions numériques. ■ 824 UKTV Gold 825 UKTV style Chaînes ajoutées ■ Tous les canaux Affiche toutes les chaînes actuellement disponibles. Chaînes ajoutées Affiche toutes les chaînes ajoutées.
■ Verrouil. / Déverr. Vous pouvez verrouiller une chaîne afin qu'elle ne puisse pas être sélectionnée ni visualisée. N Cette fonction n'est disponible que si l'option Verrouillage Canal est définie sur Marche. N L'écran de saisie du code PIN s'affiche. Entrez votre code PIN à quatre chiffres. N Le code PIN par défaut d’un nouveau téléviseur est 0-0-0-0. Vous pouvez modifier le code PIN en sélectionnant Modifier PIN dans le menu. N Le symbole '\' s'affiche et la chaîne est verrouillée. ■ Rappel de prog.
Image ¦ Configuration du menu Image ❑ Mode ■ Dynamique Sélectionne l'image pour un affichage à plus haute définition dans une pièce lumineuse. ■ Standard Sélectionne l'image pour un affichage optimal dans un environnement normal. ■ Naturel Sélectionne l'image pour un affichage optimal et confortable pour les yeux. N Cette fonction n'est pas disponible en mode PC. ■ Film Sélectionne l'image pour un affichage agréable de films dans une pièce sombre.
■ Espace couleur Un espace colorimétrique est une matrice de couleurs composée de rouge, de vert et de bleu. Sélectionnez votre espace colorimétrique préféré et appréciez la couleur la plus naturelle. ● Auto.: règle automatiquement la nuance de couleur la plus naturelle sur la base des sources de programme. ● Natif: offre une nuance de couleur profonde et riche. ● Personnel: permet de régler l'espace colorimétrique en fonction de vos préférences.
■ Taille Vous pouvez parfois modifier la taille de l’image sur votre écran. Votre télévsieur dispose de plusieurs options relatives à la taille de l'écran, chacune d'entre elles étant conçue pour fonctionner au mieux avec un certain type d'entrée vidéo. Votre découdeur câble / récepteur satellite peut également avoir son propre jeu de tailles d'écran. Toutefois, il est conseillé d’utiliser le mode 16:9, autant que possible. T Appuyez sur le bouton TOOLS pour afficher le menu Outils.
■ 100Hz Motion Plus → Arrêt / Clair / Standard / Fluide / Personnel / Démo Supprime les traînées des scènes rapides avec beaucoup de mouvements, ce qui rend l’image plus claire. N Des parasites peuvent apparaître à l'écran lorsque la fonction 100Hz Motion Plus est activée. Si cela ce produit, réglez la fonction 100Hz Motion Plus sur Arrêt. ● Arrêt : désactive la fonction 100Hz Motion Plus. ● Précis : règle la fonction 100Hz Motion Plus au minimum.
¦ Utilisation de votre téléviseur comme écran d'ordinateur (PC) Configuration de votre logiciel PC (instructions basées sur Windows XP) Les paramètres d'affichage Windows indiqués ci-dessous sont valables pour ordinateur standard. Les affichages écran sur votre PC seront probablement différents, en fonction de votre version de Windows et votre carte vidéo. Cependant, même si les affichages réels diffèrent, les mêmes informations de configuration de base s'appliquent dans la plupart des cas.
¦ Configuration du téléviseur avec le PC N Préréglage: Appuyez sur le bouton SOURCE pour sélectionner le mode PC. ❑ Réglage Automatique Luminosité Netteté Image Utilisez la fonction Auto Adjust pour que le téléviseur règle automatiquement les signaux vidéo qu'il reçoit. La fonction règle aussi automatiquement les paramètres ainsi que les valeurs et positions de fréquences. T Appuyez sur le bouton TOOLS pour afficher le menu Outils.
❑ Langue audio Vous pouvez modifier la langue par défaut des sous-titres et de l'audio. Affiche les informations relatives à la langue pour le flux entrant. N Cette fonction peut être sélectionnée pendant que vous regardez une chaîne numérique. N Vous pouvez sélectionner la langue uniquement parmi les langues en cours de diffusion.
¦ Sélection du mode son Vous pouvez configurer le mode son dans le menu Outils. Lorsque vous définissez Dual l ll, le mode son actuel est affiché à l'écran. Stéréo A2 NICAM stéréo Type d'audio Mono Stéréo Dual Mono Stéréo Dual Dual 1 / 2 MONO STEREO ↔ MONO DUAL 1 ↔ DUAL 2 MONO MONO ↔ STEREO MONO ↔ DUAL 1 DUAL 2 Par défaut Changement automatique DUAL 1 Changement automatique DUAL 1 N Si le signal stéréo est faible et qu'une commutation automatique se produit, passez alors en Mono.
■ Langue du télétexte Vous pouvez définir la langue du télétexte en sélectionnant le type de langue. N L'Français est la langue par défaut si la langue sélectionnée n'est pas diffusée. ■ Préférence ● Première Langue Audio / Deuxième Langue Audio / Langue princ. sous-titres / Langue sec. sous-titres / Première Langue Télétexte / Deuxième Langue Télétexte Cette fonction permet de sélectionner une des langues disponibles. La langue sélectionnée ici est la langue par défaut de la chaîne sélectionnée.
❑ Réseau → Type de réseau / Config. du réseau Pour la procédure détaillée du réglage des options, reportez-vous à la rubrique 'Configuration du réseau'. ❑ Général ■ Mode Jeu → Arrêt / Marche En reliant le téléviseur à une console de jeu telle que PlayStation™ ou Xbox™, vous pouvez profiter d'une expérience de jeu plus réaliste en sélectionnant le menu de jeu.
¦ Réglage de l'heure ❑ Horloge ■ ■ Mode Horloge Vous pouvez définir l'heure actuelle manuellement ou automatiquement. ● Auto.: Définit l'heure en cours automatiquement en utilisant l'heure de la transmission numérique. ● Manuel : Définit l'heure en cours d'après l'heure entrée manuellement. N En fonction de la station de diffusion et du signal diffusé, il se peut que l'heure ne soit pas réglée correctement. Si cela se produit, réglez l'heure manuellement.
¦ Connexion réseau Vous pouvez régler les paramètres IP afin de pouvoir communiquer avec divers réseaux. ❑ Connexion réseau - Câble ■ Connexion LAN pour un environnement DHCP Les paragraphes qui suivent décrivent les procédures à suivre pour configurer le réseau avec le protocole DHCP (Dynamic Host Configuration Protocol).
■ Connexion LAN pour un environnement IP statique Les paragraphes qui suivent décrivent les procédures à suivre pour configurer le réseau avec une adresse IP statique. Vous devez entrer manuellement l'adresse IP, le masque de sous-réseau, la passerelle et le serveur DNS de votre fournisseur d'accès. 1. Raccordez le port LAN à l'arrière du téléviseur et le connecteur LAN à l'aide d'un câble LAN. Panneau arrière du téléviseur Connecteur LAN mural 1 Câble LAN Vous pouvez connecter le réseau via un routeur.
N Sélectionnez un canal inutilisé pour le routeur IP sans fil. Si le canal affecté au routeur IP sans fil est actuellement utilisé par un autre périphérique dans le voisinage, il y aura des interférences et la communication peut échouer. N Si vous utilisez des paramètres de sécurité différents de ceux indiqués ci-dessous, le routeur ne fonctionnera pas avec le téléviseur. Pour la clé de sécurité du routeur IP, les options suivantes sont obligatoires.
Configuration internet-Manuel Pour connecter le téléviseur au réseau en utilisant une adresse IP statique, vous devez configurer les paramètres IP (Internet Protocol). 1. Réglez Type de réseau sur Câble. Configuration internet Config. prot. Internet : Manuel Adresse IP 2. Sélectionnez Configuration internet. 3. Réglez Config. prot. Internet sur Manuel.
● Si le paramètre Sais. clé séc. n'est pas encore réglé : Si le paramètre de sécurité du point d'accès prenant en charge le WPS est réglé sur NONE, vous pouvez sélectionner PBC, PIN, Aucune sécurité. Aucune sécurité autorise la connexion directe au point d'accès sans faire appel à la fonction WPS. N La marche à suivre pour PBC, PIN est identique à ce qui précède. Consultez les pages précédentes si le paramètre Sais. clé séc. est déjà réglé. N Si cela ne fonctionne pas, réessayez.
ENTRÉE / Assistance ¦ Menu Entrée ❑ Liste Source ■ Entrée Permet de sélectionner le téléviseur ou d'autres sources externes (lecteur DVD, lecteur Blu-ray, décodeur câble, Récepteurs satellite (boîtiers décodeurs) connectés au téléviseur. Permet de sélectionner la source d'entrée de votre choix. O Appuyez sur le bouton SOURCE de la télécommande pour afficher une source de signal externe. Une pression sur le bouton TV sélectionne le mode TV. TV / Ext.
Utilisation des boutons de la télécommande dans le menu Guide Produit Bouton Bouton jaune ◄/► ENTERE RETURN EXIT Opération Affiche le contenu du Guide Produit dans l'ordre (lecture automatique) Déplace le curseur pour sélectionner un élément. Valide l'élément actuellement sélectionné. Revient au menu précédent. Arrête la fonction en cours et revient au menu principal du Guide Produit.
❑ Mise à niveau du logiciel A l'avenir, Samsung peut proposer des mises à niveau pour le micrologiciel de votre téléviseur. Ces mises à jour peuvent être installées sur le téléviseur lorsque celui-ci se connecte à Internet ou peuvent être téléchargées manuellement sur le site samsung.com et installées via une clé USB. N Version actuelle indique la version du logiciel installé sur votre téléviseur. N Autre logiciel (sauvegarde) indique la version précédente, qui sera remplacée.
Media Play (USB & DLNA) ¦ Connexion d'un périphérique USB 1. Appuyez sur le bouton POWER pour allumer le téléviseur. Panneau arrière du téléviseur 2. Connectez un périphérique USB contenant des fichiers photo, musicaux et/ou film à la prise USB 1 (HDD) ou USB 2 située sur le côté du téléviseur. 3. Lorsque l'écran de sélection Application s'affiche, appuyez sur le bouton ENTERE pour ou sélectionner Media Play (USB & DLNA). N Le protocole MTP (Media Transfer Protocol) n'est pas pris en charge.
¦ Fonction Media Play Cette fonction vous permet de lire des photos, de la musique et/ou des films enregistrés sur un périphérique de stockage de masse USB (MSC). N Il est se peut que le fonctionnement ne soit pas correct avec des fichiers multimédias sans licence. Entrée dans le menu Media Play (USB & DLNA) 1. Appuyez sur le bouton MENU. Appuyez sur le bouton ▲ ou ▼ pour sélectionner Application, puis sur le bouton ENTERE. 2.
5 Options d'aide • Bouton vert (Favoris): modifie le réglage des favoris pour le fichier sélectionné. Appuyez plusieurs fois sur ce bouton jusqu'à ce que la valeur voulue apparaisse. • Bouton jaune (Sélection): sélectionne le fichier dans la liste. Les fichiers sélectionnés sont marqués du symbole c. Appuyez une nouvelle fois sur le bouton jaune pour annuler la sélection d'un fichier. • Bouton TOOLS (Outils): affiche les menus d'options (le menu varie en fonction de l'état actuel).
¦ Menu d'options de la liste des fichiers photo / musical / film 1. Appuyez sur le bouton MEDIA.P. Aff. de base Date 2. Appuyez sur le bouton ◄ ou ► pour sélectionner Photo, Music ou Movie, puis sur le bouton ENTERE. 3. Appuyez sur le bouton ◄ ou ►pour sélectionner le fichier de votre choix. N Sélection de plusieurs fichiers Appuyez sur le bouton ◄ ou ► pour sélectionner le fichier de votre choix. Appuyez ensuite sur le bouton jaune. Répétez l'opération ci-dessus pour sélectionner fichiers photo.
¦ Menu d’options Diaporama / Lecture de musique / Lecture de film 1. Pendant un diaporama (ou l'affichage d'une photo), appuyez sur le bouton TOOLS pour définir l'option. 2. Appuyez sur le bouton ◄ ou ► pour sélectionner l'option, puis appuyez sur le bouton ENTERE. ❑ Réglage de l'image / Réglage du son Outils Vous pouvez sélectionner les réglages de l'image et du son. Arrêter le diaporama ❑ Information Vitesse du diaporama : Normal Effet du diaporama Fondu1 : Rotat.
¦ Visualisation d'une photo ou d'un diaporama Visualisation d'un diaporama Tous les fichiers de la section Liste de fichiers seront utilisés pour le diaporama. Durant le diaporama, les fichiers s'affichent dans l'ordre à partir du fichier à l'écran. Le diaporama progresse dans l'ordre de tri choisi dans la section Liste de fichiers. Des fichiers musicaux peuvent être lus automatiquement pendant le diaporama, si l'option Fond musical est définie sur Marche.
¦ Lecture de musique Lecture d'un fichier musical 1. Appuyez sur le bouton ▼ pour sélectionner Section Liste de fichiers. 2. Appuyez sur le bouton ◄ ou ► pour sélectionner le fichier musical à lire. ▶ 00:00:04 / 00:04:04 3/37 Way I Love You HaHaHa 3. Appuyez sur le bouton ∂ (Lecture) / ENTERE. N Ce menu affiche uniquement les fichiers portant l'extension MP3.
¦ Lecture d'un fichier film Lecture d'un fichier film 1. Appuyez sur le bouton ▼ pour sélectionner Section Liste de fichiers. 2. Appuyez sur le bouton ◄ ou ► pour sélectionner un film à lire. ▶ 00:00:01 / 00:05:30 3/37 ABC.avi 3. Appuyez sur le bouton ∂ (Lecture) / ENTERE. N La lecture du fichier sélectionné commence. N Le fichier sélectionné s'affiche en haut de l'écran, avec la durée de lecture.
N Boutons de commande de lecture vidéo Bouton ENTERE ∂ ∑ TOOLS ∫ ◄/► ▲/▼ μ Opération Lit/interrompt le fichier film. Lit le fichier film. Interrompt la lecture du fichier film. Exécute diverses fonctions dans les menus Film. Quitte le mode de lecture et revient à la liste des films. Avance ou recule dans le film en cours de lecture. Affiche le premier/dernier fichier. Lit le fichier à double vitesse. Selon le codec, cette fonction peut ne pas être prise en charge. Lecture du groupe de films 1.
¦ Utilisation du menu Setup Le menu Setup affiche les paramètres utilisateur du menu Media Play. SUM 1. Appuyez sur le bouton MEDIA.P. 2. Appuyez sur le bouton ◄ ou ► pour sélectionner Setup, puis sur le bouton ENTERE. 851.86MB/993.02MB Libre SETUP 3. Appuyez sur le bouton ▲ ou ▼ pour sélectionner l'option de votre choix. 4. Appuyez sur le bouton ◄ ou ► pour sélectionner l'option. N Pour quitter le mode Media Play, appuyez sur le bouton MEDIA.P de la télécommande.
Media Play-DLNA ¦ Définition du réseau DLNA DLNA vous permet de visionner, sur votre téléviseur, des vidéos, de la musique et des images enregistrées sur votre ordinateur via une connexion réseau en mode Media Play. Cela vous évite de devoir les copier sur une unité de stockage USB, puis de connecter cette unité au téléviseur. Pour utiliser DLNA, le téléviseur doit être connecté au réseau et l'application DLNA doit être installée sur votre ordinateur.
Configuration requise 1. Introduisez le CD du programme fourni avec le téléviseur dans le lecteur approprié de votre ordinateur. 2. L'installation du programme nécessite 30 Mo d'espace libre sur le disque dur. N Si vous partagez des fichiers, jusqu'à 30 Mo d'espace disque est nécessaire par lot de 100 fichiers. N Si vous annulez le partage de fichiers, l'espace disque utilisé pour les informations sur les miniatures est également libéré.
❑ Partager ■ Partage d'un Dossier Vous pouvez partager un dossier de votre ordinateur sur le téléviseur. ■ Annulation d'un Partager le dossier Vous pouvez annuler un dossier partagé sur votre ordinateur. Sélectionnez un dossier dans le volet Partager le dossier, puis cliquez sur Annuler le partage du dossier. ■ Application des réglages actuels Effectuez cette opération lorsqu'une synchronisation s'avère nécessaire à la suite du partage d'un nouveau dossier ou de l'annulation d'un partage.
ANYNET+ ¦ Connexion de périphériques Anynet+ Qu’est-ce qu'Anynet+? Anynet+ est une fonction qui vous permet de contrôler tous les appareils Samsung connectés compatibles Anynet+ avec votre télécommande Samsung. Le système Anynet+ peut être utilisé uniquement avec les appareils Samsung disposant de la fonction Anynet+. Pour vérifier que votre périphérique Samsung dispose de cette fonction, assurez-vous qu'il porte le logo Anynet+.
¦ Configuration d'Anynet+ ❑ Configuration ■ ■ Media Play (USB & DLNA) Application T Appuyez sur le bouton TOOLS pour afficher le menu Outils. Vous pouvez également afficher le menu Anynet+ en sélectionnant Outils → Anynet+ (HDMI-CEC). Anynet+ (HDMI-CEC) Content Library Internet@TV Centre de réseau domestique Anynet+ (HDMI-CEC) → Arrêt / Marche Pour utiliser la fonction Anynet+, l'option Anynet+ (HDMI-CEC) doit être activée (Marche).
Boutons de la télécommande du téléviseur disponibles en mode Anynet+ Type de périphérique Périphérique Anynet+ Périphérique à tuner intégré Périphérique audio État de fonctionnement Après basculement vers le périphérique, lorsque son menu s'affiche à l'écran. Après basculement vers le périphérique, pendant la lecture d'un fichier. Après le basculement vers l'appareil, lorsque vous regardez un programme télévisé Lorsque le récepteur est activé.
¦ Dépannage d'Anynet+ Problème Anynet+ ne fonctionne pas. ● ● ● ● ● ● ● ● ● Je veux démarrer Anynet+. ● ● ● Je veux quitter Anynet+. ● ● ● Le message ‘Connexion à Anynet+...’ s’affiche à l’écran. ● ● La lecture ne démarre ● pas sur l'appareil Anynet+. Le périphérique connecté ● ne s'affiche pas. ● ● ● ● Appuyez sur P >/<, PRE-CH et FAV.CH pour modifier le mode TV. (remarque : le bouton de chaîne ne fonctionne que si aucun périphérique Anynet+ à tuner intégré n'est connecté).
Content Library ¦ Utilisation de la Content Library La Content Library permet de visualiser divers contenus sur votre téléviseur. Vous pouvez utiliser le contenu par défaut enregistré dans la mémoire du téléviseur ou visualiser d'autres contenus à l'aide d'un périphérique USB.
❑ Jeu Cette catégorie propose du divertissement pour toute la famille. N Pour connaître les boutons utilisés dans les différents jeux, reportez-vous aux instructions à l'écran. N Boutons de couleur pour les jeux Bouton Rouge Vert Jaune Bleu Opération Accède à l'écran d'accueil des jeux Interrompt le jeu Touche Option Quitte le jeu ❑ Enfants Ce contenu éducatif et interactif fera le bonheur de vos enfants.
Internet@TV Si vous rencontrez des problèmes avec le service d'un widget, contactez le propriétaire du contenu. Dans le widget, appuyez sur le bouton vert et accédez aux informations de contact ou reportez-vous au site Web d'aide pour connaître les coordonnées du fournisseur du widget. N En fonction de votre pays, il se peut que seul l'anglais soit pris en charge dans le service du widget. N En fonction de votre pays, il se peut que cette fonction ne soit pas prise en charge.
❑ Affichage ■ Mode dock 1 Une bannière de bienvenue apparaît dans l'angle supérieur droit; elle indique le nom de votre profil. N Cette bannière disparaît rapidement. Salut John! 1 2 2 La bannière met en surbrillance deux raccourcis de la télécommande. N Si vous appuyez sur le bouton bleu (Viewport) de la télécommande, l'affichage passe du mode Viewport au mode de superposition. En mode Viewport, la télévision ou la vidéo est affichée dans une zone miniature, graphismes à l'extérieur.
SAMSUNG N’OFFRE AUCUNE GARANTIE D’ACCÈS AUX CONTENUS ET SERVICES FOURNIS PAR DES TIERCES PARTIES, NI AUCUNE GARANTIE, QUELLE QU’ELLE SOIT, IMPLICITE OU EXPLICITE, QUANT AUX CONTENUS ET AUX SERVICES FOURNIS PAR DES TIERCES PARTIES. SAMSUNG DÉCLINE EXPRESSÉMENT TOUTE GARANTIE ET TOUTE CONDITION QUANT AUX CONTENUS ET AUX SERVICES FOURNIS PAR DES TIERCES PARTIES, Y COMPRIS, MAIS DE FAÇON NON LIMITATIVE, TOUTE GARANTIE ET TOUTE CONDITION RELATIVES À LA QUALITÉ MARCHANDE OU À LA CONVENANCE À UN USAGE PARTICULIER.
Le menu Paramètres du profil vous permet de personnaliser et de protéger votre profil. ● Les profils utilisateur peuvent être personnalisés au moyen d'un Nom unique et d'un Avatar (image représentant votre profil). ● Le Nom et l'Avatar de votre profil sont affichés dans le snippet de profil, dans le dock. ● Vous pouvez protéger vos profils au moyen de l'option Créer code PIN du profil. N Lors du réglage du code PIN pour la première fois, vous pouvez définir une Question secrète.
¦ Utilisation du widget Météo Yahoo!® Le widget Météo Yahoo!® fournit des informations météorologiques actualisées sur votre zone géographique et sur vos emplacements préférés. Ce contenu évolue de façon dynamique en fonction des conditions météorologiques. ● Appuyez sur le bouton vert de la télécommande pour afficher le menu Yahoo!® Weather Widget Paramètres. ● Dans le menu Paramètres, vous pouvez ajouter ou supprimer la ville pour laquelle vous voulez consulter la météo.
¦ Utilisation du widget Flickr Yahoo!® Le widget Flickr vous permet d'accéder aux photos favorites de votre famille et de vos amis tout en regardant la télévision. Partagez vos photos avec votre famille en les présentant sous forme de diaporama sur votre téléviseur grand écran. ● Personnalisez le widget Flickr en vous connectant avec votre ID Yahoo! ID. ● Pour plus de détails sur les procédures de connexion, reportez-vous aux instructions de la section Utilisation du widget Profil.
¦ Dépannage d'Internet@TV Problème Solution possible Certains services du widget ne fonctionnent pas. Contactez le prestataire de service. Dans le widget, appuyez sur le bouton vert et accédez aux informations de contact ou reportez-vous au site Web d'aide pour connaître les coordonnées du fournisseur du widget. Reportez-vous au site Web d'aide. Certains contenus de widget sont uniquement en anglais.
Internet@TV N En fonction de votre pays, il se peut que cette fonction ne soit pas prise en charge. (Non disponible dans tous les pays) N Si vous rencontrez des problèmes avec le service d'un widget, contactez le prestataire de service. Dans le widget, appuyez sur le bouton vert et accédez aux informations de contact ou reportez-vous au site Web d'aide pour connaître les coordonnées du prestataire de service.
❑ Installation du système N Ex. auto. téléscr., Durée téléscripteur ne soit pas prise en charge. ■ Modifier le mot de passe du service de verrouillage N Le mot de passe par défaut d’un nouveau téléviseur est réglé sur 0-0-0-0. N Si vous avez oublié le mot de passe, appuyez sur les boutons de la télécommande dans l'ordre suivant, ce qui remet le code à 0-0-0-0 : POWER (Arrêt) → MUTE → 8 → 2 → 4 → POWER (Marche).
¦ Dépannage d'Internet@TV Problème Solution possible Certains services du widget ne fonctionnent pas. Contactez le prestataire de service. Dans le widget, appuyez sur le bouton vert et accédez aux informations de contact ou reportez-vous au site Web d'aide pour connaître les coordonnées du fournisseur du widget. Reportez-vous au site Web d'aide.
Centre de réseau domestique ¦ Centre de réseau domestique A propos du Centre de réseau domestique Le Centre de réseau domestique connecte votre téléviseur et vos téléphones portables via un réseau. Vous pouvez afficher les appels reçus, le contenu des messages texte et les programmes définis sur le téléphone portable sur le téléviseur à l'aide du Centre de réseau domestique. En outre, vous pouvez lire le contenu multimédia enregistré sur les téléphones portables (vidéos, photos, musique, etc.
¦ Configuration du Centre de réseau domestique ❑ Message / Média Affiche la liste des téléphones portables qui vous permettent d'utiliser la fonction Message. N La fonction Media est disponible sur d'autres appareils mobiles prenant en charge la fonction DLNA DMC. Centre de réseau domestique Message 111-1234-5671 : Autor. Média 111-1234-5672 : Autor. Conf. 111-1234-5673 : Refusé 111-1234-5674 : Refusé ■ Autor. Autorise le téléphone portable. ■ Refusé Bloque le téléphone portable. ■ Supp.
Affichage du message Si un nouveau message texte (SMS) arrive lorsque vous regardez la télévision, la fenêtre d'alarme s'affiche. Si vous cliquez sur le bouton OK, le contenu du message s'affiche. N Vous pouvez configurer les paramètres de consultation du contenu des messages texte (SMS) sur le téléphone portable. Pour obtenir des informations sur les procédures concernées, reportez-vous au manuel du téléphone portable.
RECOMMENDATIONS ¦ Fonction Télétexte La plupart des chaînes de télévision offrent des services d'informations écrites via le télétexte. La page d'index du télétexte contient des instructions sur l'utilisation du service. Vous pouvez, en outre, sélectionner différentes options à l'aide des touches de la télécommande. N Pour que les informations du télétexte s'affichent correctement, la réception des chaînes doit être stable.
Les pages de télétexte sont organisées en six catégories : Catégorie A B C D E F Sommaire Numéro de la page sélectionnée. Identité de la chaîne émettrice. Numéro de la page actuelle ou indications de recherche. Date et heure. Texte. Informations sur l'état. Informations FASTEXT. N Les informations du télétexte sont souvent réparties sur plusieurs pages qui s'affichent successivement.
¦ Branchement du socle 1. Retirez les vis situées à l’arrière du téléviseur. 2. Retirez le support du téléviseur. N Le téléviseur doit être porté par au moins deux personnes. 3. Recouvrez le trou inférieur à l'aide du cache. ¦ Installation du kit de montage mural Les éléments du support mural (vendus séparément) permettent de fixer le téléviseur au mur. Pour plus d'informations sur l'installation du support mural, reportez-vous aux instructions fournies avec les éléments de montage mural.
¦ assemblage des câbles ❑ Type support N Insérez les câbles dans le serre-câbles de telle manière qu’ils ne soient pas visibles à travers le pied transparent. 1 1 2 2 3 3 ❑ Type montage mural 1 1 N Ne tirez pas trop sur les câbles lorsque vous les manipulez. Les bornes de connexion du produit risqueraient d’être endommagées. Français - 6 BN68-02329A-03Fre.
¦ Sécurisation de l'emplacement d'installation Respectez les distances requises entre le produit et d'autres objets (p. ex. murs) pour assurer une ventilation adéquate. Le non-respect de cette consigne pourrait provoquer un incendie ou un problème avec le produit en raison de l'augmentation de la température interne de ce dernier. Installez le produit de manière à respecter les distances requises indiquées sur la figure.
¦ Dépannage Si vous avez des questions relatives au téléviseur, commencez par consulter la liste ci-dessous. Si aucune de ces astuces de dépannage ne s'applique à votre problème, rendez-vous sur le site 'www.samsung.com', puis cliquez sur Support ou contactez le centre d'appel dont les coordonnées figurent sur la dernière page. Problème Qualité de l'image La qualité de l'image sur le téléviseur n'est pas aussi bonne que dans le magasin.
Problème Aucune image, aucune vidéo Le téléviseur ne s'allume pas. Solution ● ● ● Le téléviseur s'éteint automatiquement. ● ● ● ● Aucune image/vidéo. ● ● ● ● Connexion RF (câble/antenne) Impossible de recevoir toutes les chaînes. L'image est déformée : macrobloc, petit bloc, points, pixelisation ● ● ● ● ● Vérifiez que le cordon d'alimentation secteur est branché correctement dans la prise murale et sur le téléviseur. Vérifiez que la prise murale est opérationnelle.
Problème Autres L'image ne s'affiche pas en plein écran. Solution ● ● ● La télécommande ne fonctionne pas. ● ● ● Impossible de contrôler l'alimentation ou le volume du téléviseur avec la télécommande du décodeur câble/boîtier décodeur. Message ‘Mode non pris en charge’. ● Impossible de désactiver l'Effet lumineux sur le cadre avant (en dessous du logo SAMSUNG). Odeur de plastique émise par le téléviseur.
¦ Caractéristiques Nom du modèle Taille de l'écran (diagonale) Résolution du PC (optimale) Son Sortie Dimensions (LxPxH) Sans socle Avec socle Poids Avec socle Considérations environnementales Température de fonctionnement Humidité en cours de fonctionnement Température de stockage Humidité sur le lieu de stockage Socle orientable (gauche / droite) UE32B7000, UE32B7020 UE40B7000, UE40B7020 32 pouces 40 pouces 1920 x 1080 à 60 Hz 1920 x 1080 à 60 Hz 10 W X 2 10 W X 2 813 X 30 X 520 mm 813 X 240 X 58
Cette page est laissée intentionnellement en blanc. BN68-02329A-03Fre.
Die Abbildungen und Illustrationen in diesem Handbuch dienen nur zur Information und können vom tatsächlichen Aussehen des Geräts abweichen. Änderungen an Ausführung und technischen Daten vorbehalten. ❑ Lizenz TruSurround HD, SRS und das Symbol sind eingetragene Marken von SRS Labs, Inc.Die TruSurround HD-Technologie wird unter Lizenz von SRS Labs, Inc. in das System integriert. Hergestellt unter Lizenz der Dolby Laboratories: Dolby sowie das Doppel-D-Symbol sind Warenzeichen der Dolby Laboratories.
Inhalt ANYNET+ Einrichten Ihres Fernsehgeräts ■ Zubehör.............................................................................................. 2 ■ Bedienfeld........................................................................................... 2 ■ Anschlussfeld..................................................................................... 3 ■ Fernbedienung................................................................................... 6 ■ Mini-Fernbedienung.............................
Einrichten Ihres Fernsehgeräts ¦ Zubehör Fernbedienung und 2 Batterien (Typ AAA) Software-CD Untere Abdeckung Reinigungstuch Garantiekarte / Sicherheitshinweise (nicht überall verfügbar) Mini-Fernbedienung & Batterien (3 V) Komponentenkabel Haltering (4 Stück) Kabelhalter (3 Stück) Standfuß mit Kabelhalter AV-Kabel SCART-Kabel Kabelschlauch (je nach Modell) Bedienungsanleitung N Überprüfen Sie die Verpackung Ihres LED-Fernsehgeräts auf Vollständigkeit.
5 MENU: Drücken Sie diese Taste, um ein Bildschirmmenü zu den Funktionen Ihres Fernsehgeräts einzublenden. 6 SOURCEE: Schaltet zwischen allen verfügbaren Signalquellen um. Im Bildschirmmenü können Sie diese Taste wie die ENTERE auf der Fernbedienung verwenden. 7 LAUTSPRECHER ¦ Anschlussfeld [Rückseite des Fernsehgeräts] # @ 0 ! 0 9 8 1 2 3 4 5 67 Netzanschluss N Form und Farbe des Geräts können sich je nach Modell unterscheiden.
1 KENSINGTON-SCHLOSS Das (optionale) Kensington-Schloss dient zur Sicherung des Fernsehgeräts bei Verwendung an einem öffentlichen Ort. Wenn Sie ein Schloss verwenden möchten, wenden Sie sich an den Händler, bei dem Sie das Fernsehgerät erworben haben. N Die Position des Kensington-Schlosses ist modellabhängig. 2 LAN Schließen Sie ein Netzwerkkabel zur Verbindung mit dem Server an diesen Anschluss an. 3 ANT IN Anschluss an eine Antenne oder eine Kabelfernsehanlage.
0 USB 1 (HDD) / USB 2 Anschluss für Softwareaktualisierungen und Media Play, usw. Mit dem WLAN-Adapter von Samsung (gesondert erhältlich) können Sie eine Verbindung zum Netzwerk von Samsung herstellen. N Verwenden Sie für eine USB-Festplatte den Anschluss USB 1 (HDD). ! DIGITAL AUDIO OUT (OPTICAL) Anschluss für ein Digitalaudio-Gerät wie z. B. ein Heimkinosystem.
¦ Fernbedienung N Die Reichweite der Fernbedienung beträgt ca. 7 m. N Die Leistungsfähigkeit der Fernbedienung kann durch starke Lichteinstrahlung beeinträchtigt werden. N Form und Farbe des Geräts können sich je nach Modell unterscheiden. 1 POWER: Ein- und Ausschalten des Fernsehgeräts. 2 TV: Hiermit können Sie den TVModus direkt aufrufen. 3 ZIFFERNTASTEN: Hiermit wechseln Sie den Kanal. 4 FAV.CH: Zum Anzeigen von Favorit Kanallisten auf dem Bildschirm.
¦ Mini-Fernbedienung Die Mini-Fernbedienung ist eine vereinfachte Fernbedienung, die nur über Tasten zum Ein- und Ausschalten, zum Auswählen des Kanals und zum Einstellen der Lautstärke verfügt. 1 Standby-Taste des Fernsehgeräts. 4 1 2 3 2 < : Nächster Kanal / > : Vorheriger Kanal 3 2 3 + : Lauter / – : Leiser 4 IrDA-Sender N Halten Sie die Mini-Fernbedienung so, dass dieses Teil zum Fernsehgerät weist. ¦ Batterien in die Fernbedienung einsetzen Normale Fernbedienung 1.
¦ Anzeigen von Menüs Vor dem ersten Einsatz des Fernsehgeräts führen Sie die folgenden Schritte aus, um zu erfahren, wie Sie im Menü navigieren, um die verschiedenen Funktionen auszuwählen und einzustellen. MENU-Taste Bildschirmmenü anzeigen. RETURN-Taste Zurück zum vorherigen Menü. ENTERE / NAVIGATIONS-Taste Cursor bewegen und Elemente auswählen. Markiertes Element auswählen. Einstellung bestätigen. EXIT Bildschirmmenü schließen.
¦ Plug & Play-Funktion (je nach Modell) Wenn das Fernsehgerät zum ersten Mal eingeschaltet wird, werden automatisch die Grundeinstellungen vorgenommen. 1. Drücken Sie die Taste POWERP auf der Fernbedienung. N Sie können auch die Netztaste (POWERP) des Fernsehgeräts verwenden. N Die Meldung Select the OSD Language. wird angezeigt. Plug & Play 2. Drücken Sie die Taste ENTERE. Wählen Sie die gewünschte Sprache mit den Tasten Select the OSD Language. ▲ oder ▼ aus.
¦ Anzeigen des Bildschirmmenüs Auf dem Bildschirm werden der aktuelle Kanal und bestimmte Audio/Video-Einstellungen angezeigt. O Drücken Sie die Taste INFO, um Informationen anzuzeigen. Drücken Sie die Taste INFO auf der Fernbedienung. Auf dem Bildschirm werden der Kanal, der Tonmodus sowie die Werte bestimmter Bild- und Toneinstellungen angezeigt. ● ▲, ▼: Sie können Informationen anderer Kanäle anzeigen. Wenn Sie zum ausgewählten Sender wechseln möchten, drücken Sie auf die ENTERE-Taste.
❑ Sender manuell speichern N Hiermit wird manuell ein Sender gesucht und dieser im Fernsehspeicher abgelegt. N Wenn ein Kanal mit der Funktion Kindersicherung gesperrt wurde, wird das Eingabefenster für die PIN geöffnet. ■ Digitaler Sender Zum manuellen Speichern von digitalen Sendern. N Digitaler Sender ist nur im DTV-Modus verfügbar. ● Kanal: Stellen Sie die Sendernummer mit den Tasten ▲, ▼ oder einer Zifferntaste (0 ~ 9) ein. ● Frequenz: Stellen Sie die Frequenz mithilfe der Zifferntasten ein.
❑ Standard → Ausführlich / Übersicht Mit der Taste GUIDE auf der Fernbedienung können Sie einstellen, ob der Ausführlich oder der Übersicht angezeigt werden soll. ❑ Senderliste Detaillierte Verfahrensbeschreibungen zur Verwendung der Senderliste entnehmen Sie den Beschreibungen unter 'Verwalten von Kanälen'. O Diese Optionen können Sie auch durch Drücken der Taste CH LIST (Kanalliste) auf der Fernbedienung aufrufen.
¦ Verwalten von Kanälen Mit diesem Menübefehl können Sie Favoriten hinzufügen, löschen oder einstellen und den digitalen Programmführer für Digitalsendungen verwenden. ■ Hinzugefügte Sender ■ Alle Sender Hiermit zeigen Sie alle verfügbaren Kanäle an. Hinzugefügte Sender Hiermit zeigen Sie alle hinzugefügten Kanäle an.
■ Sperren / Freigabe Sie können einen Kanal sperren, sodass er nicht ausgewählt und angezeigt werden kann. N Diese Funktion ist nur verfügbar, wenn die Kindersicherung aktiviert ist (Ein). N Der Eingabebildschirm für die PIN wird geöffnet. Geben Sie nun Ihre vierstellige PIN ein. N Der Standard-PIN-Code eines neuen Fernsehgeräts lautet 0-0-0-0. Sie können die PIN ändern, indem Sie im Menü den Befehl PIN ändern wählen. N Das Symbol \ wird angezeigt, und der Kanal wird gesperrt.
BILD ¦ Konfigurieren des Bildmenüs ❑ Modus Bild Sie können den Bildstandard auswählen, der für Ihre Sehgewohnheiten am besten geeignet ist. T Drücken Sie die Taste TOOLS, um das Menü Extras anzuzeigen. Sie können den Bildmodus durch Auswahl von Extras → Bildmodus einstellen. Modus : Standard Hinter.
■ Farbraum Der Farbraum ist eine Farbmatrix bestehend aus den Farben Rot, Grün und Blau. Wählen Sie Ihren bevorzugten Farbraum, um die Welt in den natürlichsten Farben zu erfahren. ● Auto: Bei automatischer Einstellung des Farbraums wird, je nach Programmquelle, der natürlichste Farbton eingestellt. ● Nativ: Der native Farbraum ermöglicht tiefe und lebhafte Farbtöne. ● Benutzerd.: Hiermit stellen Sie den Farbbereich wunschgemäß ein.
■ Größe Gelegentlich möchten Sie vielleicht die Größe des auf Ihrem Monitor angezeigten Bilds ändern. Ihr Fernsehgerät bietet Ihnen unterschiedliche Bildformate, die jeweils für einen bestimmten Bildsignaltyp ideal geeignet sind. Möglicherweise verfügt auch Ihr Kabel/Satellitenreceiver über eigene Bildschirmformate. Im Allgemeinen sollten Sie doch so viel wie möglich im 16:9-Format fernsehen. T Drücken Sie die Taste TOOLS, um das Menü Extras anzuzeigen.
■ 100Hz Motion Plus → Aus / Klar / Standard / Glätten / Benutzerd. / Demo Beseitigt das Verschwimmen schneller Szenen mit viel Bewegung und sorgt für ein klareres Bild. N Wenn Sie 100Hz Motion Plus aktivieren, kann es zu Bildrauschen auf dem Bildschirm kommen. In diesem Fall sollten Sie 100Hz Motion Plus deaktivieren (Aus). ● Aus: Hiermit schalten Sie 100Hz Motion Plus aus. ● Klar: Hiermit stellen Sie 100Hz Motion Plus auf den Minimalwert ein.
¦ Verwenden Ihres Computers als Computerbildschirm (PC) Konfigurieren Ihrer PC-Software (unter Windows XP) Im Folgenden sind die typischen Anzeigeeinstellungen für einen Windows-Computer aufgeführt. Die von Ihrem PC angezeigten Fenster entsprechen je nach installierter WindowsVersion und verwendeter Grafikkarte möglicherweise nicht genau der Abbildung. Dennoch sind die hier nachfolgenden grundlegenden Konfigurationsinformationen in fast allen Fällen anwendbar.
¦ Fernsehgerät mithilfe des PCs einstellen N Voreinstellung: Drücken Sie die Taste SOURCE, um den Modus 'PC'einzustellen. ❑ Autom. Einstellung Helligkeit Schärfe Bild Verwenden Sie die Funktion zum automatischen Einstellen, damit sich das Fernsehgerät automatisch auf das empfangene Videosignal einstellt. Bei dieser Funktion erfolgt auch automatisch eine Feineinstellung sowie die Anpassung der Frequenzwerte und Positionen. T Drücken Sie die Taste TOOLS, um das Menü Extras anzuzeigen.
❑ Wiedergabesprache Sie können die Standardsprache für Audio ändern. Zeigt die Sprachinformationen für den eingehenden Audiostream an. N Während Sie ein digitales Programm anschauen, können Sie diese Funktion auswählen. N Sie können nur Sprachen auswählen, die auch tatsächlich übertragen werden.
¦ Tonmodus wählen Sie können den Tonwiedergabemodus im Menü Extras wählen. Wenn Sie Dual l ll einstellen, wird der aktuelle Tonwiedergabemodus auf dem Bildschirm abgebildet. A2-Stereo NICAMStereo Audiosystem Mono Stereo Dual Mono Stereo Dual Dual 1 / 2 MONO STEREO ↔ MONO DUAL 1 ↔ DUAL 2 MONO MONO ↔ STEREO MONO ↔ DUAL 1 DUAL 2 Standard Automatischer Wechsel DUAL 1 Automatischer Wechsel DUAL 1 N Falls das Stereosignal schwach ist und automatisch umgeschaltet wird, sollten Sie zu mono wechseln.
■ Teletextsprache Sie können die Videotextsprache durch Auswählen des Sprachtyps einstellen. N Englisch ist der Standardwert in Fällen, wo die ausgewählte Sprache für die Sendung nicht verfügbar ist. ■ Benutzerdef. ● Primäre Wiedergabesprache / Sekundäre Wiedergabesprache / Primäre Untertitelsprache / Sekundäre Untertitelsprache / Primäre Teletextsprache / Sekundäre Teletextsprache Mit dieser Funktion können Sie eine der verfügbaren Sprachen wählen.
❑ Netzwerk → Netzwerktyp / Eingang einrichten Genaue Beschreibungen für die Verfahren zum Einstellen der Optionen finden Sie im Kapitel "Konfigurieren des Netzwerks". ❑ Allgemein ■ Spielemodus → Aus / Ein Wenn Sie eine Spielekonsole wie PlayStation™ oder Xbox™ anschließen, können Sie durch Auswählen des Spielemenüs ein realitätsnaheres Spielerlebnis genießen.
¦ Einstellen der Uhrzeit ❑ Uhr ■ ■ Uhr-Modus Sie können die aktuelle Zeit manuell oder automatisch einstellen. ● Auto: Hiermit stellen Sie die Uhrzeit automatisch anhand der Zeit aus der digitalen Übertragung ein. ● Manuell: Hiermit stellen Sie die aktuelle Zeit auf einen manuell eingestellten Wert ein. N Je nach Sendestation und Signal erfolgt die automatische Zeiteinstellung möglicherweise nicht korrekt. In diesem Fall müssen Sie die Zeit manuell einstellen.
¦ Netzwerkverbindung Sie können das Internetprotokoll so konfigurieren, dass Sie mit verschiedenen angeschlossenen Netzwerken kommunizieren können. ❑ Netzwerkverbindung - Kabel ■ LAN-Verbindung für eine DHCP-Umgebung Die Verfahren zum Einrichten des Netzwerks mithilfe von DHCP (Dynamic Host Configuration Protocol) werden nachfolgend beschrieben. Da eine IP-Adresse sowie Teilnetzmaske, Gateway und DNS automatisch zugeordnet werden, wenn Sie DHCP wählen, müssen Sie diese Parameter nicht von Hand eingeben.
■ LAN-Verbindung für eine Umgebung mit statischen IP-Adressen Die Verfahren zum Einrichten des Netzwerks mithilfe einer statischen IP-Adresse werden nachfolgend beschrieben. Sie müssen die Ihnen von Ihrem Internet-Provider genannte IP-Adresse, Teilnetzmaske, Gateway und DNS manuell eingeben. 1. Verbinden Sie den LAN-Anschluss auf der Rückseite des Fernsehgeräts über ein LAN-Kabel mit dem LAN-Anschluss in der Wand.
N Wählen Sie einen zurzeit unbenutzten Kanal für den drahtlosen IP-Sharer. Wenn der für den drahtlosen IP-Sharer eingestellte Kanal von einem anderen Gerät in der Nähe belegt ist, führt dies zu Störungen und die Datenübertragung scheitert. N Wenn Sie ein anderes Sicherheitssystem als die nachfolgend angeführten verwenden, so kann dies zusammen mit dem Fernsehgerät nicht eingesetzt werden. Es werden nur folgende Sicherheitsschlüssel für den Zugangspunkt (drahtloser IP-Sharer) unterstützt.
Kabelnetzwerk einrichten-Manuell Wenn Sie das Fernsehgerät mittels einer statischen IP-Adresse mit dem LAN verbinden möchten, müssen Sie das Internetprotokoll (IP) konfigurieren. 1. Stellen Sie Netzwerktyp auf Kabel. 2. Wählen Sie Kabelnetzwerk einrichten. 3. Stellen Sie IP-Konfiguration auf Manuell.
● Drahtlos-Netzwerk einrichten Wenn der SicherSchl. nicht eingestellt ist: Wenn die Sicherheitseinstellung eines Wählen Sie ein Netzwerk 3/9 Zugangspunkts, der WPS unterstützt, NONE lautet, können Sie PBC, PIN, Keine sson SicherSchl. wählen. Mit Keine Sicherheit können Sie die Verbindung zum Zugangspunkt PBC jee PIN direkt und ohne die WPC-Funktion herstellen. Suchlauf AP_1 Keine Sicherheit Ad-hoc Ap_2 N Der Prozess bei PBC, PIN entspricht dem oben beschriebenen. Siehe " Wenn der SicherSchl.
Eingang / UNTERSTÜTZUNG ¦ Menü Eingang ❑ Quellen ■ Eingang Hiermit wählen Sie, ob das Fernsehgerät mit einem Fernsehsignal versorgt wird oder an andere externe Signaleingänge wie z. B. DVD- bzw. Blu-ray-Player oder an einen Kabelreceiver / Satellitenreceiver (Set-Top Box) angeschlossen ist. Stellen Sie die gewünschte Signalquelle ein. O Drücken Sie die Taste SOURCE auf der Fernbedienung, um eine externe Signalquelle anzuzeigen. Stellen Sie mit der TV-Taste den TV-Modus ein. TV / Ext. / AV / Komp.
Verwenden der Fernbedienungstasten im Menü für das Produktdemo. Taste Gelbe Taste ◄/► ENTERE RETURN EXIT Vorgang Zeigt den nacheinander den Inhalt des Produktdemo an. (Auto Play) Cursor bewegen und Elemente auswählen. Markiertes Element auswählen. Zurück zum vorherigen Menü. Beenden der aktuellen Funktion und wechseln zum Hauptmenü des Produktdemo. ❑ Eigendiagnose Bildtest Bei schlechter Bildqualität führen Sie einen Bildtest durch.
❑ Software-Update Möglicherweise wird Samsung in der Zukunft Upgrades der TV-Firmware anbieten. Diese Upgrades können über das Fernsehen ausgeführt werden, sofern es an das Internet angeschlossen ist, oder durch Herunterladen der neuen Firmware von samsung.com auf ein USB-Speichergerät. N Aktuelle Version, wenn die Software bereits im Fernsehgerät installiert ist. N Alternative Software (Sicherung) zeigt die alte Version an, die ersetzt wird. N Die Software wird angegeben als Jahr/Monat/Tag_Version.
Media Play (USB & DLNA) ¦ Anschließen eines USB-Geräts 1. Drücken Sie zum Einschalten des Computers die POWER-Taste. 2. Schließen Sie ein USB-Gerät mit Foto-, Musik und/oder Filmdateien an die USB 1 (HDD) oder USB 2 seitlich am Fernsehgerät an. Rückseite des Fernsehgeräts 3. Wenn das Fenster zur Auswahl der Anwendung angezeigt wird, drücken Sie auf die Taste oder ENTERE, um Media Play (USB & DLNA) zu wählen. N MTP (Media Transfer Protocol) wird nicht unterstützt.
¦ Media Play funktion Mit dieser Funktion können Sie auf einem USB-Speichermedium (MSC) gespeicherte Foto-, Musik und/oder Filmdateien anzeigen bzw. wiedergeben. N Möglicherweise treten bei lizenzfreien Multimediadateien weniger Probleme auf. Starten des Modus Media Play (USB & DLNA). 1. Drücken Sie die Taste MENU. Wählen Sie durch Drücken der Tasten ▲ oder ▼ die Option Anwendung, und drücken Sie dann die Taste ENTERE. 2.
5 Hilfe • Grüne Taste (Favoriten-Einst.): Ändert die Favoriteneinstellung für die gewählte Datei. Drücken Sie diese Taste so oft, bis der gewünschte Wert angezeigt wird. • Gelbe Taste (Wählen): Hiermit wählen Sie eine Datei aus der Dateiliste aus. Die ausgewählten Dateien werden mit dem Symbolcgekennzeichnet. Drücken Sie die gelbe Taste noch einmal, um die Auswahl einer Datei zu stornieren. • TOOLS-Taste (Extras): Hiermit zeigen Sie die Optionsmenüs an.
¦ Optionsmenü für Foto- / Musik- / Filmliste 1. Drücken Sie die Taste MEDIA.P. Basisansicht Erstellung 2. Wählen Sie durch Drücken der Tasten ◄ oder ► die Option Photo, Music oder Movie, und drücken Sie dann die Taste ENTERE. 3. Wählen Sie mit den Tasten ◄ oder ► die gewünschte Option aus. N Wählen mehrerer Dateien Wählen Sie mit den Tasten ◄ oder ► die gewünschte Musikdatei. Drücken Sie dann die gelbe Taste. Wiederholen Sie den obigen Vorgang, um mehrere Dateien auszuwählen.
¦ Optionsmenü für Diashow / Musikwiedergabe / Filmwiedergabe 1. Während einer Diashow (oder beim Anzeigen eines Fotos) der bei der Wiedergabe von Musik oder eines Films drücken Sie die Taste TOOLS, um die Option einzustellen. 2. Wählen Sie durch Drücken der Tasten ▲ oder ▼ die Option, und drücken Sie dann die Taste ENTERE. ❑ Bildeinstellungen / Toneinstellungen Sie können die Bild- und Toneinstellungen festlegen.
¦ Anzeigen eines Fotos oder einer Diashow Anzeigen von Diashows N Alle Dateien in der Dateiliste werden für die Diashow verwendet. N Die Bilder werden nacheinander, beginnend mit der aktuell angezeigten Datei angezeigt. N Die Diashow wird entsprechend der Sortierreihenfolge in der Dateiliste ausgeführt. N Musikdateien können während der Diashow automatisch abgespielt werden, wenn Hintergrundmusik aktiviert (Ein) ist.
¦ Wiedergeben von Musik Wiedergeben einer Musikdatei 1. Drücken die Taste ▼, um den Dateilistenabschnitt zu wählen. 2. Drücken Sie die Taste ◄ oder ►, um eine Musikdatei zu wählen, die abgespielt werden soll. ▶ 00:00:04 / 00:04:04 3/37 Way I Love You HaHaHa 3. Drücken Sie die Taste ∂ (Wiedergabe) / ENTERE. N Dieses Menü zeigt nur Dateien mit der Dateinamenserweiterung MP3.
¦ Wiedergeben einer Filmdatei Wiedergeben einer Filmdatei 1. Drücken die Taste ▼, um den Dateilistenabschnitt zu wählen. 2. Wählen Sie mit den Tasten ◄ oder ► eine Filmdatei, die abgespielt werden soll. ▶ 00:00:01 / 00:05:30 3/37 ABC.avi 3. Drücken Sie die Taste ∂ (Wiedergabe) / ENTERE. N Die gewählte Datei wird wiedergegeben. N Die ausgewählte Datei wird zusammen mit der Abspieldauer oben angezeigt.
N Regler für Videowiedergabe Taste ENTERE ∂ ∑ TOOLS ∫ ◄/► ▲/▼ μ Vorgang Wiedergeben / Anhalten der Filmdatei Wiedergeben der Filmdatei Anhalten der Filmwiedergabe Hiermit führen Sie verschiedene Funktionen aus den Filmmenüs aus. Beenden des Wiedergabemodus und Rückkehr zur Filmliste. Schneller Vor- oder Rücklauf durch den Film in Schritten. Wechseln zur ersten oder letzten Ansicht der aktuellen Datei. Wiedergabe einer Datei mit doppelter Geschwindigkeit.
¦ Verwenden des Menüs Setup Mit dem Setup zeigen Sie die im Media Play-Menü vorgenommenen Benutzereinstellungen an. SUM 1. Drücken Sie die Taste MEDIA.P. 851,86 MB/993,02 MB Frei SETUP 2. Wählen Sie durch Drücken der Tasten ◄ oder ► die Option Setup, und drücken Sie dann die Taste ENTERE. 3. Wählen Sie mit den Tasten ▲ oder ▼ die gewünschte Option aus. 4. Wählen Sie die Option mit den Tasten ◄ oder ► aus. N Um den Media Play-Modus zu beenden, drücken Sie auf der Fernbedienung die Taste MEDIA.P.
Media Play-DLNA ¦ Einrichten des DLNA-Netzwerks Mit DLNA können Sie Videos und Bilder, die auf Ihrem PC gespeichert sind, über eine Netzwerkverbindung im Media Play-Modus anzeigen. Damit brauchen Sie die Dateien nicht mehr auf einen USB-Speicher zu kopieren, den Sie dann an Ihren Fernseher anschließen. Damit Sie DLNA verwenden können, muss der Fernseher mit dem Netzwerk verbunden und die DLNA-Anwendung muss auf Ihrem PC installiert sein.
Systemanforderungen 1. Legen Sie die mit diesem Fernsehgerät gelieferte Programm-CD in den PC ein. 2. Zur Installation des Programms benötigen Sie 30 MB freien Platz auf der Festplatte. N Bei Freigabe der Dateien reichen 30MB Festplattenspeicher für jeweils etwa 100 Dateien. N Wenn Sie die Dateifreigabe beenden, wird auch der Festplattenspeicher freigegeben, der ansonsten für die Miniaturbildinformationen verwendet wird.
❑ Freigeben ■ Freigeben eines Ordner Sie können einen Ordner auf dem PC für das Fernsehgerät freigeben. ■ Aufheben der Freigabe eines Freigegebener Ordner Sie können die Freigabe eines Ordners auf Ihrem PC aufheben. Markieren Sie einen Ordner im Bereich Freigegebener Ordner und klicken Sie dann auf Freigabe aufheben.
ANYNET+ ¦ Anschließen von Anynet+-Geräten Was ist Anynet+? Bei Anynet+ handelt es sich um eine Funktion, mit der Sie alle angeschlossenen Samsung-Geräte, die Anynet+ unterstützen, mit der Fernbedienung für Ihr Samsung-Fernsehgerät steuern können. Das Anynet+-System unterstützt nur Anynet+-fähige SamsungGeräte. Wenn Sie wissen möchten, ob Ihr Samsung-Gerät diese Funktion unterstützt, suchen Sie das Anynet+ auf Ihrem Gerät. Anschließen an ein Fernsehgerät TV Anynet+ Gerät 1 HDMI 1.
¦ Einrichten von Anynet+ ❑ Einstellungen ■ Anynet+ (HDMI-CEC) → Aus / Ein Damit Sie die Funktionen von Anynet+ nutzen können, muss Anynet+ (HDMI-CEC) aktiviert (Ein) sein. N Wenn die Funktion Anynet+ (HDMI-CEC) deaktiviert ist, sind auch alle Funktionen in Verbindung mit Anynet+ deaktiviert. Media Play (USB & DLNA) Anwendung T Drücken Sie die Taste TOOLS, um das Menü Extras anzuzeigen. Sie können das Anynet+-Menü auch durch Auswahl von Extras → Anynet+ (HDMI-CEC) auswählen.
Im Anynet+-Modus verfügbare Tasten der TV-Fernbedienung N N N N N N Gerätetyp Betriebsstatus Anynet+-Gerät Nach dem Wechseln zum Gerät wird das Menü des entsprechenden Geräts auf dem Bildschirm angezeigt.
¦ Fehlerbehebung für Anynet+ Problem Anynet+ funktioniert nicht. ● ● ● ● ● ● ● ● ● Ich möchte Anynet+ starten. ● ● ● Ich möchte Anynet+ beenden. ● ● ● Die Meldung "Verbinden mit Anynet+-Gerät" wird angezeigt. ● Keine Wiedergabe mit dem Anynet+-Gerät. Das angeschlossene Gerät wird nicht angezeigt. ● ● ● Prüfen Sie, ob das Gerät die Anynet+-Funktionen unterstützt. Prüfen Sie, ob das HDMI 1.3-Kabel ordnungsgemäß angeschlossen wurde.
Content Library ¦ Verwenden der Content Library Mit der Content Library können Sie verschiedene Inhalte auf Ihrem Fernseher genießen. Sie können die im Fernsehspeicher abgelegten Standardinhalte verwenden, oder Sie können sich mit neuen Inhalten vom USB-Gerät Spaß ins Zimmer holen.
❑ Spiel In dieser Kategorie finden sich unterhaltsame Spiele für die ganze Familie. N Informationen zu den Schaltflächen in den Spielen erhalten Sie in den Hinweisen auf dem Bildschirm. N Farbtasten für Spiele Taste Rot Grün Gelb Blau Vorgang Mit dieser Taste wechseln Sie zurück zum Startfenster des Spiels. Drücken Sie diese Taste, um das Spiel anzuhalten. Optionstaste Drücken Sie diese Taste, um das Spiel zu beenden.
Internet@TV Bei Problemen mit einem Widget-Dienst wenden Sie sich an den Anbieter der Inhalte. Drücken Sie im Widget die grüne Taste, um Kontaktinformationen abzurufen, oder lesen Sie auf der Hilfe-Website, um Informationen über Dienstanbieter zu erhalten. N Je nach Region wird möglicherweise nur Englisch als Sprache des Widget unterstützt. N Diese Funktion wird, je nach Land, möglicherweise nicht unterstützt.
❑ Bildschirmanzeige ■ Verankerte Fenster 1 Nun wird das Begrüßungsfenster mit Ihrem Profilnamen in der oberen rechten Ecke angezeigt. N Warten Sie einen Augenblick, bis das Fenster geschlossen wird. Hallo John! 1 2 5:15 AM Mo January 19th Viewport Snippet bearbeiten 2 Im Begrüßungsbildschirm werden zwei Fernbedienungstasten hervorgehoben. N Wenn Sie auf Ihrer Fernbedienung die blaue Taste (Viewport) drücken, wechelt die Anzeige zwischen Anzeigefenster und OverlayModus.
Alle über dieses Geräte abrufbaren Inhalte und Dienste gehören Dritten und sind durch gewerbliche Schutzrechte und insbesondere durch Urheberrechte, Patentrechte und Marken geschützt. Die Inhalte und Dienste sind ausschließlich für Ihren persönlichen und nicht für den kommerziellen Gebrauch bestimmt. Sie dürfen die Inhalte und die Dienste ohne die Einwilligung des Rechteinhabers nur in der autorisierten Weise nutzen.
Mit HIlfe des Menüs Profileinstellungen können Sie Profile individuell anpassen und schützen. ● Sie können Benutzerprofilen einen eindeutigen Name und einen Avatar (ein Bild zur Darstellung des Profils) zuordnen. ● Der Name und der Avatar des Profils werden im Profil-Snippet im Dock angezeigt. ● Sie können Profile mit Hilfe von Profil-PIN erstellen schützen. N Wenn Sie den PIN-Code erstmals festlegen, können Sie eine Sicherheitsfrage festlegen.
¦ Verwenden des Wetter-Widget von Yahoo!® Mit dem Wetter-Widget von Yahoo!® werden Sie über das Wetter bei Ihnen vor Ort und an einigen bevorzugten Standorten auf dem Laufenden gehalten. Der Inhalt wechselt je nach den Wetterbedingungen. ● Drücken Sie die grüne Taste auf der Fernbedienung, um das menü Einstellungen des WetterWidget von Yahoo!® anzuzeigen. ● Vom Einstellungsmenü aus können Sie Städte hinzufügen oder entfernen, für die Sie Wetterinformationen anzeigen möchten.
¦ Verwenden des Flickr-Widget von Yahoo!® Mit dem Flickr-Widget erhalten Sie beim Fernsehen Zugriff auf die Fotos von Freunden und Verwandten. Genießen Sie Ihre Fotos gemeinsam mit Ihrer Familie in einer Diashow auf Ihrem Großbildschirm. ● Personalisieren Sie das Flickr-Widget durch Anmelden mit Ihrer Yahoo!-Kennung. anmelden. ● Detaillierte Anweisungen zum Anmelden finden Sie unter "Verwenden des Profil-Widget". ● Weitere Informationen zu Flickr erhalten Sie auf www.flickr.com.
¦ Fehlerbehebung für Internet@TV Problem Mögliche Lösung Einige Widget-Dienste funktionieren nicht. Wenden Sie sich an den entsprechenden Dienstanbieter. Drücken Sie im Widget die grüne Taste, um Kontaktinformationen abzurufen, oder lesen Sie auf der Hilfe-Website, um Informationen über Anbieter von Widget-Diensten zu erhalten. Siehe Hilfe-Website. Die Inhalte mancher Widgets liegen nur in englischer Sprache vor.
Internet@TV N Diese Funktion wird, je nach Land, möglicherweise nicht unterstützt. (nicht überall verfügbar) N Bei Problemen mit einem Widget-Dienst wenden Sie sich an den Dienstanbieter. Drücken Sie im Widget die grüne Taste, um Kontaktinformationen abzurufen, oder lesen Sie auf der Hilfe-Website, um Informationen über Dienstanbieter zu erhalten. N Je nach Region wird möglicherweise nur Englisch als Sprache des Widget unterstützt.
❑ Systemkonfiguration N Ticker-Autostart, Tickeranzeigedauer werden je nach Land möglicherweise nicht unterstützt. ■ Ändern Sie das Kennwort der Dienstsperre N Der Standard-PIN-Code eines neuen Fernsehgeräts lautet 0-0-0-0. N Wenn Sie das Kennwort vergessen haben, drücken Sie die Fernbedienungstasten in der folgenden Reihenfolge, um das Kennwort auf 0-0-0-0 zurückzusetzen: POWER (Aus) → MUTE → 8 → 2 → 4 → POWER (Ein).
¦ Fehlerbehebung für Internet@TV Problem Mögliche Lösung Einige Widget-Dienste funktionieren nicht. Wenden Sie sich an den entsprechenden Dienstanbieter. Drücken Sie im Widget die grüne Taste, um Kontaktinformationen abzurufen, oder lesen Sie auf der Hilfe-Website, um Informationen über Anbieter von WidgetDiensten zu erhalten. Siehe Hilfe-Website.
Home Network Centre ¦ Home Network Centre Informationen zum Home Network Centre Das Home Network Centre verbindet das Fernsehgerät und Mobiltelefone über ein Netzwerk. Sie können die eingegangenen Anrufe, Textnachrichten und Zeitpläne vom Mobiltelefon auf dem Fernseher anzeigen. Verwenden Sie hierfür das Home Network Centre. Außerdem können Sie die auf Mobiltelefonen gespeicherten Medieninhalte wie Videos, Photos und Musik abspielen, indem Sie sie über das Netzwerk auf dem Fernseher steuern.
¦ Einrichten des Home Network Centre ❑ Message / Medien Hiermit zeigen Sie eine Liste der Mobiltelefone an, mit denen Sie die Nachrichtenoder Medienfunktion in Verbindung mit diesem Fernsehgerät verwenden können. N Die Medienfunktion steht auch in anderen Mobilgeräten zur Verfügung, sofern diese DLNA DMC unterstützen.
Nachrichtenansicht Wenn eine neue Textnachricht (SMS) ankommt, während Sie fernsehen, wird das Alarmfenster geöffnet. Wenn Sie auf OK klicken, wird der Inhalt der Nachricht angezeigt. N Sie können die Anzeigeeinstellungen für den Inhalt von Textnachrichten (SMS) auf dem Mobiltelefon konfigurieren. Anweisungen finden im Handbuch des Mobiltelefons. N Manche Sonderzeichen werden möglicherweise als Leerzeichen oder unlesbar angezeigt.
EMPFEHLUNGEN ¦ Videotextfunktion Die meisten Fernsehsender bieten über Videotext Informationen an. Auf der Videotext-Indexseite finden Sie Verwendungshinweise zum Videotext. Darüber hinaus können Sie über die Tasten der Fernbedienung nach Bedarf verschiedene Optionen einstellen. N Für die korrekte Anzeige von Videotextinformationen muss der Senderempfang einwandfrei sein. Andernfalls können Informationen unvollständig sein oder einige Seiten nicht angezeigt werden.
Die Videotextseiten sind in sechs Kategorien unterteilt: Sportergebnisse A B C D E F Inhalt Gewählte Seitennummer Senderkennung Aktuelle Seitenzahl oder Suchhinweise Datum und Uhrzeit Text Statusinformation FASTEXT-Informationen N Videotextinformationen sind oft auf mehrere, aufeinander folgende Seiten verteilt, die wie folgt aufgerufen werden können: Eingabe der Seitennummer Auswahl eines Titels in einer Liste Auswahl einer farbigen Überschrift (FASTEXT-System) N Das Fernsehgerät unterstützt Videot
¦ Lösen des Standfußes 1. Entfernen Sie Schrauben von der Rückseite des Fernsehgerätes. 2. Lösen Sie den Standfuß vom Fernsehgerät. N Der Fernseher sollte von mindestens zwei Personen getragen werden. 3. Decken Sie die Aussparung an der Unterseite des Fernsehgeräts mit der Abdeckung ab. ¦ Anbringen der wandhalterung Mit der separat erhältlichen Wandhalterung können Sie das Fernsehgerät an einer Wand befestigen.
¦ Verlegen der Kabel ❑ Typ des Standfußes N Verstecken Sie die Kabel im Kabelschlauch, damit Sie durch den transparenten Standfuß hindurch nicht zu sehen sind. 1 1 2 2 3 3 ❑ Ausführung für wandhalterung 1 1 N Ziehen Sie beim Ordnen der Kabel nicht zu fest daran. Auf diese Weise kann es zu Beschädigungen der Geräteanschlüsse kommen. Deutsch - 6 BN68-02329A-03Ger.
¦ Absichern des Einbaubereichs Halten Sie die erforderlichen Abstände zwischen dem Gerät und anderen Objekten (z.B. Wänden) ein, um ausreichende Lüftung sicherzustellen. Wenn Sie dies nicht tun, besteht die Gefahr, dass aufgrund eines Anstiegs der Temperatur im Innern des Geräts ein Brand ausbricht oder andere Probleme mit dem Gerät auftreten. Stellen Sie das Gerät so auf, dass die in der Abbildung gezeigten Mindestabstände eingehalten werden.
¦ Fehlerbehebung Bei Fragen zum Fernsehen schauen Sie zuerst in dieser Liste nach. Wenn keiner dieser Tipps zur Fehlerbehebung weiterhilft, öffnen Sie die Website 'www.samsung.com' und klicken Sie dort auf Unterstützung oder wenden Sie sich an das in der Liste auf der letzten Seite angegebene Callcenter. Problem Bildqualität Das Fernsehbild sieht nicht so gut wie im Geschäft aus. Lösung Führen Sie zu allererst den Bildtest durch, um zu bestätigen, dass Ihr Fernsehgerät das Testbild korrekt anzeigt.
Problem Kein Bild, kein Video Der Fernseher kann nicht eingeschaltet werden. Lösung ● ● ● Das Fernsehgerät schaltet sich automatisch aus. ● ● ● ● Kein Bild/Video. ● ● ● ● HF-Anschluss (Terrestrisch/Kabel) Es werden nicht alle Kanäle empfangen. Das Bild ist verzerrt: Große und kleine Blöcke, Punkte, Pixelfehler ● ● ● ● ● Vergewissern Sie sich, dass das Netzkabel sicher mit der Wandsteckdose und dem Fernsehgerät verbunden ist. Vergewissern Sie sich, dass die Netzsteckdose Strom liefert.
Problem Weitere Das Bild wird nicht als Vollbild ausgegeben. Lösung ● ● Die Fernbedienung funktioniert nicht. ● ● ● ● Die Lautstärke bzw. Leistung des Fernsehers kann mit der Fernbedienung des Kabel/Satellitenreceivers nicht reguliert werden. Meldung ‘Modus nicht unterstützt’. ● Der Lichteffekt auf dem Geräterahmen kann nicht abgeschaltet werden. (Unterhalb vom SAMSUNGLogo) Plastikgeruch vom Fernsehen.
¦ Technische Daten Modellname Bildschirmgröße (Diagonal) PC-Auflösung (Optimal) Ton Ausgang Abmessungen (BxTxH) Ohne Fuß Mit Fuß Gewicht Mit Fuß Umgebungsbedingungen Betriebstemperatur Luftfeuchtigkeit (bei Betrieb) Lagerungstemperatur Luftfeuchtigkeit (Lagerung) Drehbarer Fuß (Links und rechts) UE32B7000, UE32B7020 UE40B7000, UE40B7020 32 Zoll 40 Zoll 1920 x 1080 bei 60 Hz 1920 x 1080 bei 60 Hz 2 X 10W 2 X 10W 813 X 30 X 520 mm 813 X 240 X 585 mm 996 X 30 X 630 mm 996 X 255 X 692 mm 14 kg 19 kg
Diese Seite wurde absichtlich leer gelassen. BN68-02329A-03Ger.
De figuren en illustraties in deze gebruikershandleiding dienen alleen ter referentie en kunnen afwijken van het werkelijke uiterlijk van het product. Productontwerp en -specificaties kunnen zonder aankondiging worden gewijzigd. ❑ Licentie TruSurround HD, SRS en het symbool zijn handelsmerken van SRS Labs, Inc. TruSurround HD technologie valt onder licentie van SRS Labs, Inc. Geproduceerd onder licentie van Dolby Laboratories.
Inhoud ANYNET+ De tv klaar maken voor gebruik ■ Accesoires.......................................................................................... 2 ■ Overzicht van het bedieningspaneel.................................................. 2 ■ Overzicht van het aansluitpaneel....................................................... 3 ■ Overzicht van de afstandsbediening.................................................. 6 ■ Miniafstandsbediening...................................................................
De tv klaar maken voor gebruik ¦ Accesoires Afstandsbediening en batterijen (AAA x 2) Prog.-cd Deksel onderkant Schoonmaakdoekje Garantiekaart / Veiligheidsvoorschriften (niet beschikbaar op alle locaties) Miniafstandsbediening en batterijen (3 V) Componentkabel Houderring (4ea) Snoerklem (3ea) Snoervoet AV-kabel SCART-kabel Snoerhouder (Afhankelijk van het model) Gebruikershandleiding N Controleer of de volgende onderdelen bij uw LED-tv zijn geleverd.
5 MENU: Druk hierop om een schermmenu met de functies van de tv te openen. 6 SOURCEE: Hiermee wisselt u tussen alle beschikbare invoerbronnen. Gebruik deze toets in het schermmenu zoals u de toets ENTERE op de afstandsbediening gebruikt. 7 LUIDSPREKERS ¦ Overzicht van het aansluitpaneel [Achterpaneel van de tv] # @ 0 ! 0 9 8 1 2 3 4 5 67 Stroominvoer N De vorm en kleur van het product kunnen variëren, afhankelijk van het model.
1 KENSINGTON-SLOT Het Kensington-slot (optioneel) is een vergrendeling waarmee u het systeem fysiek kunt vastzetten voor gebruik in het openbaar. Als u een vergrendelingsapparaat wilt gebruiken, neemt u contact op met de leverancier bij wie u de tv hebt aangeschaft. N De plaats van het Kensington-slot kan variëren afhankelijk van het model. 2 LAN Sluit een LAN-kabel op deze poort aan om verbinding met het netwerk te maken. 3 ANT IN Maakt verbinding met een antenne of kabeltv-systeem.
0 USB 1 (HDD) / USB 2 Aansluiting voor software-upgrades en Media Play, enz. U kunt verbinding maken met het Samsung-netwerk door middel van de 'Samsung Wireless LAN Adapter' (apart geleverd). N Voor een USB-vaste schijf gebruikt u de USB 1 (HDD)-poort. ! DIGITAL AUDIO OUT (OPTICAL) Maakt verbinding met een digitaal audio-element, zoals de ontvanger van een thuisbioscoop.
¦ Overzicht van de afstandsbediening N U kunt de afstandsbediening gebruiken tot op een afstand van ongeveer 23 meter vanaf de tv. N Fel licht kan de werking van de afstandsbediening beïnvloeden. N De vorm en kleur van het product kunnen variëren, afhankelijk van het model. 1 POWER: Hiermee schakelt u de tv in en uit. 2 TV: Selecteert rechtstreeks de TV-modus. 3 CIJFERTOETSEN: Druk hierop om het kanaal te wijzigen. 4 FAV.CH: Hiermee worden lijsten met favoriete kanalen weergegeven op het scherm.
¦ Miniafstandsbediening De miniafstandsbediening is een vereenvoudigde afstandsbediening met slechts een aan-uittoets, kanalentoets en volumetoets. 4 1 1 Televisiestand-bytoets 2 2 < : Volgend kanaal / > : Vorig kanaal 3 3 2 3 + : Volume verhogen / – : Volume verlagen 4 IrDA-zender N Gebruik de miniafstandsbediening met dit gedeelte naar de tv gericht. ¦ Batterijen in de afstandsbediening plaatsen Normale afstandsbediening 1.
¦ De menu's bekijken Voordat u de tv gebruikt, moet u de stappen hieronder volgen om in het menu verschillende functies te selecteren en bij te stellen. MENU-toets Geeft het hoofdmenu weer. RETURN-toets Terug naar het vorige menu. ENTERE / richtingstoetsen Beweeg de cursor en selecteer een item. Het gemarkeerde item selecteren. De instelling bevestigen. EXIT Het menu verlaten. ❑ Met het schermmenu werken Afhankelijk van het geselecteerde menu kunnen de toegangsstappen verschillen. 1.
¦ Plug & Play-functie (Afhankelijk van het model) Wanneer u de tv voor het eerst inschakelt, worden enkele basisinstellingen automatisch achtereenvolgens uitgevoerd. 1. Druk op de POWER-toets op de afstandsbediening. N U kunt ook de toets POWERP op de tv gebruiken. N Het bericht Select the OSD Language. wordt weergegeven. Plug & Play 2. Druk op de toets ENTERE. Selecteer de gewenste taal door op de toets ▲ of ▼ te drukken. Druk op de toets ENTERE om uw keuze te bevestigen. Select the OSD Language.
¦ Het scherm bekijken Op het scherm worden het huidige kanaal en de status van bepaalde audio-/videoinstellingen weergegeven. O Druk op de toets INFO om de informatie weer te geven. Druk op de INFO-knop op de afstandsbediening. Op het scherm worden het huidige kanaal en de status van bepaalde audio-/video-instellingen weergegeven. ● ▲, ▼: U kunt informatie over andere kanalen bekijken. Als u naar het huidige geselecteerde kanaal wilt gaan, drukt u op de toets ENTERE.
❑ Handm. opslaan N Scant handmatig op een kanaal en slaat het op in het geheugen van de TV. N Wanneer een kanaal is vergrendeld door de functie Kinderslot, verschijnt het invoerscherm voor de pincode. ■ Digitaal kanaal Handmatig opslaan voor digitale kanalen. N Digitaal kanaal is alleen beschikbaar in DTV-modus. ● Kanaal: het kanaalnummer instellen met de pijltoetsen ▲, ▼ of de cijfertoetsen (0~9). ● Frequentie: stel de frequentie in met behulp van de cijfertoetsen.
❑ Standaardgids → Volledige gids / Minigids U kunt de Volledige gids of de Minigids laten weergeven wanneer u de toets Gids op de afstandsbediening indrukt. ❑ Kanalenlijst Raadpleeg de Kanalen beheren-instructies voor de uitgebreide procedures voor het gebruik van de ‘Kanalenlijst’. O U kunt deze opties eenvoudig selecteren door op de toets CH LIST op de afstandsbediening te drukken. ❑ Kanaalmodus Wanneer druk op de toets P >/< , Kanalen wisselen in de lijst met favoriete kanalen. ■ Toegev.
¦ Kanalen beheren Met dit menu kunt u favoriete kanalen toevoegen of verwijderen en de programmagids voor digitale uitzendingen gebruiken. Alle kanalen Toont alle momenteel beschikbare kanalen. ■ Toegev. kan. Toont alle toegevoegde kanalen. ■ ■ Toegev. kan. ■ 824 UKTV Gold 825 UKTV style A 1 C -A 2 C -A 3 C -A 4 C -- A 5 C -- Favoriet Toont alle favoriete kanalen. O Druk op de afstandsbediening op de toets FAV.
■ Vergrend./Slot uit U kunt een kanaal vergrendelen, zodat het kanaal niet geselecteerd en bekeken kan worden. N Deze functie is alleen beschikbaar wanneer Kinderslot is ingesteld op Aan. N Het invoerscherm voor de pincode verschijnt. Voer uw viercijferige pincode in. N De standaardpincode van een nieuw tv-toestel is 0-0-0-0. U kunt de pincode wijzigen door PIN wijzigen uit het menu te selecteren. N Het symbool “\” wordt weergegeven en het kanaal wordt vergrendeld.
Beeld ¦ Het menu Picture configureren ❑ Modus ■ Dynamisch Hiermee stelt u het beeld in voor hoge definitie in een lichte ruimte. ■ Standaard Hiermee stelt u het beeld in voor optimale weergave in een normale omgeving. ■ Natural Kiest de instellingen voor optimale en voor het oog comfortabele weergave. N Deze functie is niet beschikbaar in de pc-modus. ■ Film Hiermee stelt u het beeld in voor weergave van films in een donkere ruimte.
■ Kleurruimte De kleurruimte is een kleurenmatrix opgebouwd uit rood, groen en blauw. Selecteer de kleurruimte van uw voorkeur om een zo natuurgetrouw mogelijke kleurweergave te verkrijgen. ● Auto: bij de instelling Auto worden de kleuren automatisch en natuurlijk aangepast op basis van de programmabron. ● Eigen: Native Colour Space biedt diepe en levendige kleurnuances.
■ Afmet. Soms wilt u misschien de grootte van het schermbeeld aanpassen. De tv bevat diverse schermformaatopties die elk voor specifieke typen video-invoer zijn ontworpen. Ook de aftakdoos/satellietontvanger heeft mogelijk een eigen reeks schermformaten. Over het algemeen dient u echter zo veel mogelijk de 16:9-modus te gebruiken. T Druk op de toets TOOLS om het menu Extra weer te geven. U kunt de beeldgrootte ook instellen door Extra → Beeldformaat te selecteren.
■ 100Hz Motion Plus → Uit / Helder / Standaard / Soepel / Aangepast / Demo Hiermee worden vertragingen verwijderd uit snelle scènes met veel beweging voor een scherper beeld. N Wanneer u 100Hz Motion Plus inschakelt, kan er ruis ontstaan op het scherm. Als dit gebeurt, stelt u 100Hz Motion Plus in op Uit. ● Uit: Schakelt 100Hz Motion Plus uit. ● Helder: Stelt 100Hz Motion Plus in op minimaal. ● Standaard: Stelt 100Hz Motion Plus in op medium. ● Soepel: Stelt 100Hz Motion Plus in op maximaal.
¦ Uw tv als een computermonitor (pc) gebruiken Software configureren (gebaseerd op Windows XP) Hieronder ziet u de Windows-beeldscherminstellingen voor een standaardcomputer. De vensters op uw computer kunnen enigszins afwijken, afhankelijk van de versie van Windows en de geïnstalleerde videokaart. Maar ook dan zijn in de meeste gevallen dezelfde basisinstallatiegegevens van toepassing. (Neem contact op met de computerfabrikant of Samsung-leverancier als dit niet het geval is.) 1.
¦ De tv instellen voor uw pc N Eerst doen: druk op de toets SOURCE om de pc-modus te selecteren. ❑ Autom. afstellen Helderheid Scherpte Beeld Gebruik de functie Auto Adjust om de tv automatisch op de ontvangen videosignalen aan te passen. Deze functie past ook automatisch de instellingen aan en stelt de frequentiewaarden en posities bij. T Druk op de toets TOOLS om het menu Extra weer te geven. U kunt Auto Adjustment ook instellen door Extra → Autom. afstellen te kiezen.
❑ Gesproken taal U kunt de standaardwaarde voor audiotalen wijzigen. Hiermee geeft u de taalinformatie voor het inkomende signaal weer. N Deze functie kan worden geselecteerd terwijl u naar een digitaal kanaal kijkt. N U kunt alleen een taal selecteren uit de talen waarin wordt uitgezonden.
¦ De geluidsmodus selecteren U kunt de geluidsmodus instellen in het menu Extra. Wanneer u de optie Dual l ll instelt, wordt de huidige geluidsmodus op het scherm weergegeven.
■ Teleteksttaal U kunt de taal voor teletekst instellen door deze te selecteren. N Engels is de standaardtaal als de geselecteerde taal niet beschikbaar is in de uitzending. ■ Voorkeur ● Eerste taal voor audio / Tweede taal voor audio / Eerste taal ondertitel / Tweede taal ondertitel / Eerste taal teletekst / Tweede taal teletekst Met deze functie kunnen gebruikers een van de talen selecteren. De geselecteerde taal wordt standaard gebruikt wanneer u een kanaal selecteert.
❑ Netwerk → Type netwerk / Netwerk instellen Raadpleeg voor meer informatie het gedeelte ‘Het netwerk instellen’. ❑ Algemeen ■ Spelmodus → Uit / Aan Wanneer u een spelcomputer aansluit, zoals de PlayStation™ of Xbox™, kunt u een realistischere spelervaring krijgen door Game Mode te selecteren. N Beperkingen van Game Mode (Let Op) Om de spelcomputer los te koppelen en een ander extern apparaat aan te sluiten, zet u in het instellingenmenu Spelmodus op Uit.
¦ De tijd instellen ❑ Klok ■ ■ Klokmodus U kunt de huidige tijd handmatig of automatisch instellen. ● Auto: hierdoor wordt de huidige tijd automatisch ingesteld door de tijd van de digitale uitzending te gebruiken. ● Handm.l: hierdoor wordt de huidige tijd handmatig op een bepaalde tijd ingesteld. N Afhankelijk van de zender en het signaal wordt de tijd wellicht niet juist ingesteld. Als dit gebeurt, stelt u de tijd handmatig in.
¦ Netwerkverbinding U kunt het Internet Protocol instellen zodat u met diverse verbonden netwerken kunt communiceren. ❑ Netwerkverbinding - met gebruik van kabels ■ LAN-verbinding voor een DHCP-omgeving. Hieronder worden de procedures beschreven voor het instellen van een netwerk met DHCP (Dynamic Host Configuration Protocol). Aangezien een IP-adres, subnetmasker, een gateway en DNS automatisch worden toegewezen wanneer DHCP wordt geselecteerd, hoeft u deze niet handmatig in te voeren. 1.
■ LAN-verbinding voor een statische IP-omgeving De procedures voor het instellen van een netwerk met een statisch IP-adres worden hieronder beschreven. U dient handmatig het IP-adres, het subnetmasker, de gateway en de DNS in te voeren. Deze gegevens zijn door uw Internet Service Provider (ISP) geleverd. 1. Sluit de LAN-poort aan op de achterkant van de tv en sluit de LAN-poort aan de wand aan met een LAN-kabel.
N Selecteer een kanaal voor de draadloze IP-verdeler dat momenteel niet wordt gebruikt. Wanneer het voor de draadloze IP-verdeler ingestelde kanaal momenteel wordt gebruikt door een ander dichtbijzijnd apparaat, treedt er storing op en kan de communicatie mislukken. N Wanneer u een ander veiligheidssysteem toepast dan de hieronder genoemde systemen, werkt dit niet bij de tv. Wanneer de veiligheidssleutel op de AP (draadloze IP-verdeler) wordt toegepast, wordt alleen het volgende ondersteund.
Kabelnetwerk instellen - Handm. Om de tv op het LAN aan te sluiten met een statisch IP-adres, dient u het Internet Protocol (IP) in te stellen. 1. Stel Type netwerk in op Kabel. 2. Selecteer Kabelnetwerk instellen. 3. Stel Internetprotokol. in op Handm.. Kabelnetwerk instellen Internetprotokol. : Handm. ▶ Netwerktest: IP-adres : 0 0 0 0 Subnetmasker : 0 0 0 0 Gateway : 0 0 0 0 DNS-server : 0 0 0 0 4.
● Als er Bev.sleutel is ingesteld: Wanneer de beveiligingsinstelling van de AP die WPS ondersteunt NONE is, kunt u PBC, PIN, Geen beveiliging selecteren. Met Geen beveiliging kan er zonder gebruik van de WPS-functie direct met de AP verbinding worden gemaakt. N Het proces voor PBC, PIN is hetzelfde als bovenstaand. Raadpleeg dat als Bev. sleutel reeds is ingesteld. N Probeer het nogmaals als er geen verbinding is gemaakt.
INVOER / ONDERSTEUNING ¦ Het menu Invoer ❑ Bronlijst ■ Invoer Hier selecteert u de tv of een andere, externe invoerbron zoals een dvd-speler / Blu-ray-spelerb / aftakdoos / satellietontvanger (set-top box) die op de tv is aangesloten. Hiermee kunt u de gewenste ingangsbron selecteren. O Druk op de toets SOURCE op de afstandsbediening om een externe signaalbron weer te geven. U kunt de modus TV selecteren door op de toets TV te drukken. TV / Ext.
De toetsen op de afstandsbediening gebruiken in het menu Product Guide. Toets Gele toets ◄/► ENTERE RETURN EXIT Effect De inhoud van de Product Guide in volgorde weergeven. (Automatisch afgespeel) Beweeg de cursor en selecteer een item. Het gemarkeerde item selecteren. Terug naar het vorige menu. De huidige functie stoppen en terugkeren naar het hoofdmenu van de Product Guide. ❑ Zelfdiagnose ■ Het beeld testen Zelfdiagnose Als u denkt een probleem te hebben met het beeld voert u de Picture test uit.
❑ Software Upgrade Samsung kan in de toekomst upgrades voor de firmware van de tv aanbieden. Deze upgrades kunnen worden uitgevoerd via de tv wanneer deze op internet is aangesloten, of door de nieuwe firmware van samsung.com op een USB-stick te downloaden. N Huidige versie is de software die al op de tv is geïnstalleerd. N Alternatieve software (Back-up) is de voorgaande versie die vervangen wordt. N De software wordt weergegeven als ‘Jaar/Maand/Dag_Versie’.
Media Play (USB & DLNA) ¦ Een USB-apparaat aansluiten 1. Druk op de toets POWER om de TV in te schakelen. Achterpaneel van de tv 2. Sluit een USB-apparaat met foto-, muziek en of filmbestanden aan op de USB 1 (HDD)- of USB 2-aansluiting aan de zijkant van de TV. 3. Wanneer het Toepassing-selectiescherm wordt weergegeven, drukt u op de toets of ENTERE om Media Play (USB & DLNA) te selecteren. N MTP (Media Transfer Protocol) wordt niet ondersteund.
¦ De modus Media Play In deze modus kunt u foto-, muziek- en filmbestanden die op een USB MSC-apparaat zijn opgeslagen, bekijken en/of beluisteren. N Werkt mogelijk niet naar behoren met multimediabestanden zonder licentie. De modus Media Play (USB & DLNA) activeren 1. Druk op de toets MENU. Druk op de toets ▲ of ▼ om Toepassing te selecteren en druk vervolgens op de toets ENTERE. 2. Druk op de toets ▲ of ▼ om Media Play (USB & DLNA) te selecteren en druk vervolgens op de toets ENTERE.
5 Helpitems • Groene toets (Fav. inst.): hiermee wijzigt u de voorkeursinstellingen voor het geselecteerde bestand. Druk een aantal keer op deze toets totdat de gewenste waarde verschijnt. • Gele toets (Keuze): hiermee selecteert u een bestand in de bestandenlijst. De geselecteerde bestanden worden gemarkeerd met het symbool c. Druk nogmaals op de gele toets om de selectie van een bestand ongedaan te maken. • TOOLS-toets (Extra): hiermee opent u de optiemenu's.
¦ Menu met opties voor foto-, muziek- of filmlijst 1. Druk op de toets MEDIA.P. Alg. weergave Tijdslijn 2. Druk op de toets ◄ of ► om Photo, Music of Movie te selecteren en druk vervolgens op de toets ENTERE. 3. Druk op de toets ◄ of ► om het gewenste fotobestand te selecteren. N Keuze Multiplex Best. Druk op de toets ◄ of ► om het gewenste muziekbestand te selecteren. Druk vervolgens op de gele toets. Herhaal deze procedure om meerdere filmbestanden te selecteren.
¦ Menu met afspeelopties voor presentaties, muziek en films 1. Druk tijdens een presentatie (of het bekijken van een foto) op de toets TOOLS om een optie in te stellen. 2. Druk op de toets ▲ of ▼ om de optie te selecteren en druk vervolgens op de toets ENTERE. ❑ Afbeeldinginstallatie / Geluidsinstellingen Hiermee kunt u de beeld- en geluidsinstellingen wijzigen. ❑ Informatie Extra Stop diashow Snelh.
¦ Een foto of presentatie bekijken Een presentatie bekijken N Alle bestanden in de Bestandenlijst worden voor de presentatie gebruikt. N Tijdens de presentatie worden de bestanden in volgorde afgebeeld vanaf het huidige bestand. N De presentatie verloopt in de volgorde waarin de Bestandenlijst is gesorteerd. N U kunt tijdens een presentatie automatisch muziekbestanden laten afspelen als Achtergr.kl. op Aan is ingesteld.
¦ Muziek afspelen Een muziekbestand afspelen 1. Druk op de toets ▼ om het gedeelte Bestandenlijst te selecteren. 2. Druk op de toets ◄ of ► om het gewenste muziekbestand te selecteren. ▶ 00:00:04 / 00:04:04 3/37 Way I Love You HaHaHa 3. Druk op de toets ∂ (Afspelen) / ENTERE. N In dit menu ziet u alleen bestanden met de extensie MP3. Bestanden met andere extensies worden niet weergeven, ook al staan ze wel op het USBapparaat.
¦ Een filmbestand afspelen Een filmbestand afspelen 1. Druk op de toets ▼ om het gedeelte Bestandenlijst te selecteren. 2. Druk op de toets ◄ of ► om het gewenste filmbestand te selecteren, ▶ 00:00:01 / 00:05:30 3/37 ABC.avi 3. Druk op de toets ∂ (Afspelen) / ENTERE. N Het geselecteerde bestand wordt afgespeeld. N Het geselecteerde bestand wordt bovenaan weergegeven, compleet met speelduur.
N Toetsen voor het afspelen van video Toets ENTERE ∂ ∑ TOOLS ∫ ◄/► ▲/▼ μ Effect Het filmbestand afspelen/onderbreken Het filmbestand afspelen Het filmbestand onderbreken Verschillende functies uit de filmmenu’s uitvoeren. De afspeelmodus afsluiten en terugkeren naar de filmlijst. Vooruit of achteruit door het filmbestand springen. Naar het begin/eind van het bestand gaan. Het bestand op dubbele snelheid afspelen. Deze functie wordt mogelijk niet door alle codecs ondersteund. De filmgroep afspelen 1.
¦ Het menu Setup gebruiken In Setup vindt u de gebruikersinstellingen van het menu Media Play. SUM 1. Druk op de toets MEDIA.P. 2. Druk op de toets ◄ of ► om Setup te selecteren en druk vervolgens op de toets ENTERE. 851.86MB/993.02MB Vrij SETUP 3. Druk op de toets ▲ of ▼ om de gewenste optie te selecteren. 4. Druk op de toets ◄ of ► om deze optie te selecteren. N U kunt de modus Media Play afsluiten door te drukken op de toets MEDIA.P op de afstandsbediening.
Media Play-DLNA ¦ Het DLNA-netwerk instellen Met DLNA kunt u foto-, video- en muziekbestanden die op uw pc zijn opgeslagen via een netwerkverbinding in de modus Media Play op uw tv bekijken en afspelen. Hierdoor is het niet nodig om de bestanden naar een USB-geheugen te kopiëren en dit op de TV aan te sluiten. Als u DLNA wilt gebruiken, moet de TV op het netwerk zijn aangesloten en moet de DLNA-toepassing op de pc zijn geïnstalleerd.
Systeemvereisten 1. Plaats de programma-cd die bij de TV is geleverd in de pc. 2. Voor de installatie van het programma is 30 MB aan schijfruimte vereist. N Als u bestanden deelt, is voor elke 100 bestanden 30 MB aan vasteschijfruimte nodig. N Als u de bestandsdeling opheft, wordt de vasteschijfruimte die voor de miniatuurafbeeldingen wordt gebruikt ook vrijgegeven. Ondersteunde indelingen ● Afbeeldingen: JPEG / Audio: MP3 / Video: AVI, MKV, ASF, MP4, 3GPP, PS, TS.
❑ Delen ■ Een Map U kunt een map op uw pc delen met de TV. ■ Gedeelde map U kunt het delen van een map op uw pc opheffen. Selecteer een map in het deelvenster Gedeelde map en selecteer delen ongedaan maken. ■ De huidige instellingen toepassen Voer deze handeling uit wanneer dit nodig is in verband met het delen van een nieuwe map of het opheffen van het delen van een map. Het menu Gewijzigde status inst.
ANYNET+ ¦ Anynet+-apparaten aansluiten Wat is Anynet+? Anynet+ is een functie waarmee u alle aangesloten Samsung-apparaten die Anynet+ ondersteunen, kunt bedienen met de afstandsbediening van de Samsung-tv. Het Anynet+-systeem kan alleen worden gebruikt met Samsung-apparaten die de Anynet+functie bezitten. Om u ervan te verzekeren dat uw Samsung-apparaat deze functie heeft, kunt u controleren of er een Anynet+logo op het apparaat aanwezig is. Op een tv aansluiten TV Anynet+ -apparaat 1 HDMI 1.
¦ Anynet+ instellen ❑ Inst. ■ ■ Anynet+ (HDMI-CEC) → Uit / Aan Om de functie Anynet+ te gebruiken, dient Anynet+ (HDMI-CEC) op Aan te zijn ingesteld. N Wanneer de functie Anynet+ (HDMI-CEC) is uitgeschakeld, worden alle bewerkingen betreffende Anynet+ ook uitgeschakeld.
Beschikbare toetsen op de tv-afstandsbediening in de modus Anynet+ Type apparaat Anynet+-apparaat Apparaat met ingebouwde tuner Audioapparaat Bedieningsstatus Nadat u naar het apparaat bent geschakeld, wanneer het menu van het betreffende apparaat wordt weergegeven op het scherm.
¦ Problemen oplossen m.b.t. Anynet+ Probleem Anynet+ werkt niet. ● ● ● ● ● ● ● ● ● Ik wil Anynet+ starten. ● ● ● Ik wil Anynet+ verlaten. ● ● ● Het bericht ‘Verbinden met Anynet+ apparaat...’ verschijnt op het scherm. ● ● Het Anynet+-apparaat ● speelt niets af. Het aangesloten apparaat ● wordt niet weergegeven. ● ● ● ● ● Controleer of het apparaat ondersteuning biedt voor functies van Anynet+. Controleer of de HDMI 1.3-kabel op de correcte manier is aangesloten.
Content Library ¦ De Content Library gebruiken Met de Content Library kunt u van allerlei materiaal op uw TV genieten. U kunt het standaardmateriaal in het tv-geheugen weergeven, maar u kunt ook van nieuw materiaal genieten via een USB-apparaat of internet. Galerie Galerie Koken Spel Kindvr. Fitness R Terug e Sluiten De afstandsbediening gebruiken in het menu van de Content Library Toets ▲/▼/◄/► ENTERE RETURN EXIT
Kleurtoetsen Y / MUTE Effect Beweeg de cursor en selecteer een item.
❑ Spel In deze categorie vindt u ontspannende games voor het hele gezin. N Zie de aanwijzingen op het scherm voor de toetsen die in de games worden gebruikt. N Kleurentoetsen voor de games Toets Rood Groen Geel Blauw Effect Druk hierop om naar het startscherm van de game te gaan. Druk hierop om de game te pauzeren. De optietoets. Druk hierop om de game te verlaten. ❑ Kindvr. Dit is educatief en interactief materiaal dat kinderen herhaaldelijk kunnen bekijken.
Internet@TV Als u problemen ondervindt bij het gebruik van een widget-service, neemt u contact op met de serviceprovider. Druk wanneer u in de widget bent op de groene toets voor de contactgegevens, of bezoek de helpwebsite voor informatie over de widgetserviceprovider. N Afhankelijk van de regio wordt Engels mogelijk niet in de widget-service ondersteund. N Deze functie wordt mogelijk niet in alle landen ondersteund.
❑ Schermweergave ■ Dock mode 1 Er wordt in de rechterbovenhoek een welkomstbericht met uw naam weergegeven. N Dit bericht verdwijnt even later weer. Hello John! 1 2 5:15 AM Ma January 19th Viewport Edit Snippet 2 In het bericht worden twee sneltoetsen op de afstandsbediening getoond. N Als u op de blauwe toets op de afstandsbediening drukt (Viewport) wisselt de weergave tussen het ‘minischerm’ en de gewone weergave.
Alle inhoud en diensten die via dit apparaat beschikbaar zijn, zijn het eigendom van derde partijen en worden beschermd door auteursrecht, handelsmerk en/of andere wetten betreffende intellectueel eigendom. Such content and services are provided solely for your personal noncommercial use. Zulke inhoud en diensten worden uitsluitend geleverd voor persoonlijk, nietcommercieel gebruik.
Met het menu Profile Settings kunt u uw profiel aanpassen en beveiligen. ● Gebruikersprofielen kunnen worden aangepast met een unieke Name en een Avatar (een afbeelding die uw profiel representeert). ● De Name en Avatar van uw profiel worden weergegeven in de profielsnippet in het dock. ● Profielen kunnen worden beveiligd met behulp van Create Profile Pin. N Wanneer u de pincode de eerste keer instelt, kunt u tevens een Security Question instellen.
¦ De Yahoo!® Weather-widget gebruiken De Yahoo!® Weather-widget geeft actuele informatie over het weer in uw woonplaats en in uw favoriete andere locaties. De inhoud wordt steeds aan de veranderende weersomstandigheden aangepast. ● Druk op de groene toets op de afstandsbediening om het instellingenmenu Settings van de Yahoo!® Weather-widget weer te geven. ● In het menu Settings kunt u steden waarvoor het weerbericht wordt weergegeven toevoegen en verwijderen.
¦ De Yahoo!® Flickr-widget gebruiken Met de Flickr-widget hebt u tijdens het tv-kijken toegang tot uw favoriete foto's van vrienden en familie. Deel de foto's met de rest van het gezin via een presentatie op het grote tv-scherm. ● U kunt de Flickr-widget aanpassen door u aan te melden met uw Yahoo! ID. ● Raadpleeg voor meer informatie het gedeelte ‘De Profile-widget gebruiken’. ● Meer informatie over Flickr vindt u op www.flickr.com. N Your Photos toont foto's die u op de Flickr-website hebt geregistreerd.
¦ Problemen oplossen m.b.t. Internet@TV Probleem Mogelijke oplossing Bepaalde widgetservices werken niet. Controleer dit bij de serviceprovider. Druk wanneer u in de widget bent op de groene toets voor de contactgegevens, of bezoek de helpwebsite voor informatie over de widgetserviceprovider. Raadpleeg de Help-websitepagina. Sommige widgets hebben alleen Engelstalig materiaal. Hoe kan ik de taal wijzigen? De taal van het materiaal in de widget kan verschillen van de taal van de gebruikersinterface.
Internet@TV N Deze functie wordt mogelijk niet in alle landen ondersteund. (niet beschikbaar op alle locaties) N Als u problemen ondervindt bij het gebruik van een widget-service, neemt u contact op met de serviceprovider. Druk wanneer u in de widget bent op de groene toets voor de contactgegevens, of bezoek de helpwebsite voor informatie over de serviceprovider. N Afhankelijk van de regio wordt Engels mogelijk niet in de widget-service ondersteund.
❑ Systeeminst. N Ticker aut. afsp., Duur ticker worden mogelijk niet in alle landen ondersteund. ■ Wachtw. voor vergrendelen service wijzigen N De standaardcode van een nieuw tv-toestel is 0-0-0-0. N Als u de pincode bent vergeten, drukt u achtereenvolgens op de volgende toetsen van de afstandsbediening zodat de pincode opnieuw wordt ingesteld op 0-0-0-0: POWER (Uit) → MUTE → 8 → 2 → 4 → POWER (Aan). ■ Duur service Hiermee kunt u de wachttijd instellen voor het inschakelen van de schermbeveiliging.
¦ Problemen oplossen m.b.t. Internet@TV Probleem Mogelijke oplossing Bepaalde widgetservices werken niet. Controleer dit bij de serviceprovider. Druk wanneer u in de widget bent op de groene toets voor de contactgegevens, of bezoek de helpwebsite voor informatie over de widgetserviceprovider. Raadpleeg de Help-websitepagina.
Thuisnetwerkcentrum ¦ Thuisnetwerkcentrum Het Thuisnetwerkcentrum Het Thuisnetwerkcentrum verbindt de tv en een mobiele telefoon via een netwerk met elkaar. Zo kunt u inkomende oproepen, de inhoud van tekstberichten en de agenda van de mobiele telefoon via het Thuisnetwerkcentrum op de tv weergeven. Bovendien kunt u de multimedia op de mobiele telefoon, zoals video's, foto's en muziek via het netwerk naar de tv importeren en deze daar weergeven en afspelen.
¦ Het Thuisnetwerkcentrum ❑ Bericht / Media Hiermee wordt een lijst weergegeven van mobiele telefoons die zijn ingesteld met deze tv voor gebruik van de functie Message of Media. N De functie Media is beschikbaar op andere mobiele apparaten die DLNA DMC ondersteunen. Thuisnetwerkcentrum Bericht 111-1234-5671 : Toegstn Media 111-1234-5672 : Toegstn Inst. 111-1234-5673 : Gweigrd 111-1234-5674 : Gweigrd ■ Toegstn De mobiele telefoon wordt toegestaan.
Berichtweergave Als er een nieuw tekstbericht (SMS) binnenkomt terwijl u tv kijkt, wordt het alarmvenster weergegeven. Als u op de OK-toets drukt, wordt de inhoud van het bericht weergegeven. N U kunt de weergave-instellingen voor de inhoud van tekstberichten (SMS) op de mobiele telefoon configureren. Raadpleeg voor de juiste procedures de handleiding van de mobiele telefoon. N Bepaalde speciale tekens worden mogelijk blanco of als kapotte tekens weergegeven.
AANBEVELINGEN ¦ Teletekstfunctie De meeste televisiekanalen bieden tekstinformatiediensten via teletekst. Op de indexpagina van de teletekstdienst vindt u informatie over het gebruik van de dienst. Ook kunt u naar wens verschillende opties selecteren met de toetsen op de afstandsbediening. N Voor een juiste weergave van teletekstinformatie is een stabiele kanaalontvangst vereist. Anders kan bepaalde informatie ontbreken of worden bepaalde pagina’s niet weergegeven.
De teletekstpagina’s zijn in zes categorieën verdeeld: Onderdeel A B C D E F Inhoud Geselecteerd paginanummer. Aanduiding zendstation. Huidig paginanummer of zoekindicaties. Datum en tijd. Tekst. Statusinformatie. FASTEXT-informatie. N Teletekstinformatie is vaak verdeeld over verschillende pagina’s die achtereenvolgens worden weergegeven.
¦ De voet verwijderen 1. Verwijder de schroeven aan de achterkant van de tv. 2. Verwijder de voet van de tv. N De tv moet door twee of meer mensen worden gedragen. 3. Bedek het gat in de onderzijde met de afdekking. ¦ De muurbevestiging installeren Met de onderdelen voor muurbevestiging (apart verkrijgbaar) kunt u de tv aan de muur bevestigen. Zie de instructies bij de onderdelen voor muurbevestiging als u wilt weten hoe u de muurbevestiging installeert.
¦ De snoeren bij elkaar houden ❑ Type standaard N Stop de kabels in de kabelhouder, zodat de kabels niet zichtbaar zijn door de doorzichtige standaard. 1 1 2 2 3 3 ❑ Type muurbevestiging 1 1 N Trek niet te hard aan de kabels wanneer u deze rechttrekt. Dit kan schade toebrengen aan de aansluitpunten van het product. Nederlands - 6 BN68-02329A-03Dut.
¦ Installatieruimte Bewaar de nodige afstand tussen het product en andere objecten (bijv. muren) zodat er een goede ventilatie mogelijk is. Wanneer u dat niet doet, kunnen er door een stijging van de interne temperatuur brand of problemen bij het product ontstaan. Plaats het product op zo’n manier dat de in de afbeelding aangegeven vereiste afstanden worden aangehouden. N Bij gebruik van een voet of muurbevestiging mogen er alleen onderdelen worden gebruikt die door Samsung Electronics zijn geleverd.
¦ Problemen oplossen Als u vragen hebt over uw tv, raadpleegt u eerst deze lijst. Als geen van deze tips voor probleemoplossing van toepassing is, brengt u een bezoek aan de website www.samsung.com en klikt u vervolgens op Support. U kunt echter ook contact opnemen met het Call Center in de lijst op de laatste pagina. Probleem Beeldkwaliteit Het tv-beeld ziet er niet zo fraai uit als in de winkel.
Probleem Geen beeld, geen video Tv kan niet worden ingeschakeld. Oplossing ● ● ● De vt wordt automatisch uitgeschakeld. ● ● ● ● Geen beeld/video. ● ● ● ● RF-verbinding (kabel/antenne) Niet alle zenders kunnen worden ontvangen. Beeld is vervormd: macroblok, klein blok, puntjes, pixelvorming ● ● ● ● ● Controleer of het netsnoer stevig in het stopcontact zit. Controleer of het stopcontact werkt. Druk op de POWER-knop op de tv om te controleren of de afstandsbediening correct werkt.
Probleem Oplossing Overige Beeld wordt niet op volledig scherm weergegeven. ● ● Afstandsbediening werkt niet. ● ● ● ● Er worden zwarte balken aan elke kant weergegeven bij HD-zender bij weergave van opgeschaalde SD-inhoud (4:3). Er worden zwarte balken weergegeven aan de boven- en onderkant bij films met een beeldverhouding die afwijkt van de beeldverhouding van uw tv. Stel de optie voor het beeldformaat op uw externe apparaat of tv in op volledig scherm.
¦ Specificaties Modelnaam Schermformaat (Diagonaal) Pc-resolutie (Optimaal) Geluid Uitgang Afmetingen (BxDxH) Behuizing Met voet Gewicht Met voet Omgevingsvereisten Gebruikstemperatuur Gebruiksvochtigheid Opslagtemperatuur Opslagvochtigheid Draaivoet (Links/rechts) UE32B7000, UE32B7020 UE40B7000, UE40B7020 32 inch 40 inch 1920 x 1080 bij 60 Hz 1920 x 1080 bij 60 Hz 10 W X 2 10 W X 2 813 X 30 X 520 mm 813 X 240 X 585 mm 996 X 30 X 630 mm 996 X 255 X 692 mm 14 kg 19 kg Modelnaam Schermformaat (Di
Deze pagina is met opzet leeg gelaten. BN68-02329A-03Dut.
Le figure e le illustrazioni presenti in questo Manuale dell’utente sono fornite unicamente a titolo di riferimento e possono differire da quelle del prodotto attuale. Le specifiche e il design del prodotto possono variare senza preavviso. ❑ Licenza TruSurround HD, SRS e il simbolo sono marchi di SRS Labs, Inc. La tecnologia TruSurround HD è utilizzata su licenza di SRS Labs, Inc. Prodotto su licenza di Dolby Laboratories. Dolby e il simbolo della doppia D sono marchi di Dolby Laboratories.
Contenuti ANYNET+ Configurazione del televisore ■ Accessori............................................................................................ 2 ■ Pannello di controllo........................................................................... 2 ■ Pannello dei collegamenti................................................................... 3 ■ Telecomando...................................................................................... 6 ■ Mini telecomando.......................................
Configurazione del televisore ¦ Accessori Telecomando e batterie (2 tipo AAA) CD del programma Copertura-Fondo Panno per la pulizia Scheda di garanzia / Guida alla sicurezza (non disponibili in tutte le nazioni) Mini telecomando e batterie (3V) Cavo Component Anello di ritenuta (4ea) Fermacavo (3ea) Ferma cavo piedistallo Cavo AV Cavo SCART Ferma cavo (In base al modello) Istruzioni dell’utente N Controllare che nella confezione del TV LED siano contenuti i seguenti componenti.
5 MENU: Premere per visualizzare il menu a video con le funzioni del televisore. 6 SOURCEE: Alterna tutte le sorgenti d’ingresso disponibili. Nel menu a video, utilizzare questo tasto come si usa il tasto ENTERE del telecomando. 7 ALTOPARLANTI ¦ Pannello dei collegamenti [Pannello posteriore del televisore] # @ 0 ! 0 9 8 Ingresso 1 2 3 4 5 67 alimentazione N La forma e il colore del prodotto possono variare in base al modello.
1 BLOCCO KENSINGTON Il blocco Kensington (opzionale) è un dispositivo usato per assicurare fisicamente il sistema quando viene utilizzato in un luogo pubblico. Se si desidera utilizzare un dispositivo di blocco, contattare il punto vendita in cui si è acquistato il televisore. N La posizione del blocco Kensington può variare a seconda del modello. 2 LAN Inserire un cavo LAN in questa porta per effettuare il collegamento in rete. 3 ANT IN Collega a un sistema TV via cavo o antenna.
0 USB 1 (HDD) / USB 2 Connettore per aggiornamenti software e Media Play, ecc. E’ possibile collegarsi alla rete Samsung in modalità wireless usando l’adattatore ’Samsung Wireless LAN Adapter’ (venduto separatamente). N Per le unità HDD USB, usare la porta USB 1 (HDD). ! DIGITAL AUDIO OUT (OPTICAL) Collega a un componente Digital Audio quale un ricevitore Home theatre.
¦ Telecomando N Il telecomando è utilizzabile fino a una distanza di 7 metri dal televisore. N Una illuminazione troppo intensa può avere conseguenze sulle prestazioni del telecomando. N La forma e il colore del prodotto possono variare in base al modello. 1 POWER: Premere per accendere e spegnere il televisore. 2 TV: Seleziona direttamente la modalità TV. 3 TASTI NUMERICI: Premere per cambiare canale. 4 FAV.CH: Utilizzato per visualizzare gli elenchi dei canali preferiti.
¦ Mini telecomando Questo Mini telecomando semplificato consente di accendere e spegnere l’apparecchio, selezionare i canali e regolare il volume. 1 Tasto di standby del televisore 4 1 2 2 < : Canale successivo / > : Canale precedente 3 3 + : Aumento volume / – : Diminuzione volume 2 3 4 Trasmettitore IrDA N Puntare il Mini telecomando in modo che questa parte sia diretta verso il televisore. ¦ Installazione delle batterie nel telecomando Telecomando normale 1.
¦ Visualizzazione dei menu Prima di utilizzare il televisore, seguire questi passaggi per imparare a navigare tra i menu, selezionando e regolando le diverse funzioni. Tasto MENU Visualizza il menu a video principale. Tasto RETURN Ritorna al menu precedente. Tasti ENTERE / Tasto di direzione Sposta il cursore e seleziona una voce. Attiva la voce attualmente selezionata. Conferma l'impostazione. EXIT Esce dal menu a video.
¦ Funzioni Plug & Play (In base al modello) Se il televisore viene acceso per la prima volta, alcune impostazioni di base vengono visualizzate automaticamente e in sequenza. 1. Premere POWER sul telecomando. N E' inoltre possibile usare il tasto POWERP sul televisore. N Viene visualizzato il messaggio Select the OSD Language.. Plug & Play 2. Premere ENTERE. Selezionare la lingua desiderata premendo ▲ o ▼. Premere ENTERE per confermare la scelta. Select the OSD Language. Menu Language : English ▶ 3.
¦ Visualizzazione del display Il display identifica il canale corrente e lo stato di determinate impostazioni audio e video. O Premere il tasto INFO per visualizzare le informazioni. Premere INFO sul telecomando. Il televisore visualizzerà il canale, il tipo di audio e lo stato di determinate impostazioni immagine e audio. ● ▲, ▼: E' possibile visualizzare altre informazioni relative al canale. Se si desidera spostarsi sul canale selezionato, premere ENTERE.
❑ Memorizzazione manuale N Ricerca un canale manualmente e lo memorizza nella memoria TV. N Se un canale è stato bloccato mediante la funzione Blocco canali, comparirà la schermata di inserimento del PIN. ■ Canale digitale Memorizzazione manuale dei canali digitali. N Canale digitale è disponibile solo in modalità DTV. ● Canale: Impostare il numero del Canale mediante i tasti ▲, ▼ o i tasti numerici (0~9). ● Frequenza: Impostare la frequenza utilizzando i tasti numerici. ● Larg.
❑ Guida Predefinita → Guida Compl / Mini Guida E’ possibile scegliere se visualizzare la Guida Compl o la Mini Guida premendo il tasto GUIDE del telecomando. ❑ Elenco canali Per le istruzioni dettagliate sull’uso di Elenco canali, vedere la sezione ‘Gestione dei canali’. O È possibile selezionare queste opzioni semplicemente premendo il tasto CH LIST sul telecomando. ❑ Mod. Canale Premendo il tasto P >/<, i canali verranno attivati secondo l'elenco canali selezionato.
¦ Gestione dei canali Usando questo menu è possibile aggiungere, eliminare o impostare i canali preferiti e utilizzare la guida dei programmi per le trasmissioni digitali. ■ Canali aggiunti ■ Tutti i Canali Mostra tutti i canali attualmente disponibili. Canali aggiunti Mostra tutti i canali aggiunti.
■ Blocco / Sblocco E’ possibile bloccare un canale in modo che non possa essere selezionato e visualizzato. N Questa funzione è disponibile solo quando la funzione Blocco canali è impostata su On. N Comparirà la richiesta del PIN. Digitare il PIN a quattro cifre. N Il PIN predefinito di un nuovo apparecchio TV è ‘0-0-0-0’. E’ possibile modificare il PIN selezionando Cambia PIN nel menu. N Verrà visualizzato il simbolo ‘\’ e il canale verrà bloccato.
Immagine ¦ Configurazione del menu Immagine ❑ Modalità ■ Dinamica Imposta l’immagine da visualizzare in alta definizione in un ambiente luminoso. ■ Standard Imposta l’immagine per una visualizzazione ottimale in condizioni di luce normali. ■ Naturale Seleziona l'immagine per una visione ottimale, confortevole per la vista. N Questa funzione non è disponibile in modalità PC. ■ Film Imposta l'immagine per una visualizzazione confortevole in un ambiente buio.
■ Spazio colore Spazio colore è la matrice di colori composta dai colori rosso, verde e blu. Per scoprire lo straordinario mondo dei colori naturali basta selezionare lo spazio colore preferito. ● Automatico: Auto Spazio colore regola automaticamente la tonalità più naturale dei colori basata sulle sorgenti del programma. ● Nativa: Native Spazio colore offre tonalità di colore ricche e profonde. ● Personaliz: Regola la gamma colore per adattarla alle proprie preferenze.
■ Formato Occasionalmente è possibile variare la dimensione dell'immagine sullo schermo. Il televisore ha diverse possibilità di dimensione, ognuna adatta a dare i migliori risultati con specifici tipi di ingressi video. Il ricevitore via cavo/satellitare potrebbe anch'esso avere la propria serie di dimensioni preimpostate. In generale, tuttavia, si consiglia la visione il più possibile nel formato 16:9. T Premere il tasto TOOLS per visualizzare il menu Strumenti.
■ 100Hz Motion Plus → Off / Chiaro / Standard / Lineare / Personaliz / Demo Elimina l’effetto ’trascinamento’ dalle scene in rapido movimento per offrire una visione più nitida delle immagini. N Se si attiva 100Hz Motion Plus, lo schermo potrebbe risultare disturbato. In questo caso, impostare 100Hz Motion Plus su Off. ● Off: Disattiva la modalità 100Hz Motion Plus. ● Chiaro: Imposta la modalità 100Hz Motion Plus al minimo. ● Standard: Imposta la modalità 100Hz Motion Plus su un valore medio.
¦ Uso del televisore come uno schermo PC Impostazione del software del PC (basato su Windows XP) Di seguito vengono illustrate le impostazioni di visualizzazione di Windows per un PC tipico. Le schermate visualizzate sul PC possono differire in base alla versione di Windows e alla scheda video installate. Nel caso le schermate risultassero differenti, le stesse informazioni di base per la configurazione sono applicabili in quasi tutti i casi.
¦ Configurazione del televisore con il PC N Preimpostazione: Premere il tasto SOURCE per selezionare la modalità PC. ❑ Regolazione auto Luminosità Nitidezza Immagine Usare la funzione Auto Adjust per far sì che il televisore regoli automaticamente i segnali video che riceve. La funzione sintonizza automaticamente le impostazioni e regola i valori della frequenza e le posizioni. T Premere il tasto TOOLS per visualizzare il menu Strumenti.
❑ Lingua audio È possibile modificare la lingua predefinita. Visualizza le informazioni sulla lingua relative alla trasmissione in corso. N Durante la visione di un canale digitale, è possibile selezionare questa funzione. N E' possibile selezionare solo una delle lingue trasmesse. ❑ Formato audio → MPEG / Dolby Digital Quando l’audio è generato sia dall’altoparlante principale sia dal ricevitore audio, potrebbe prodursi un effetto di eco a causa della diversa velocità di decodifica dei due dispositivi.
¦ Selezione della modalità audio E’ possibile impostare la modalità audio nel menu Strumenti. Quando si imposta la modalità Dual l ll, la modalità audio corrente viene visualizzata sullo schermo.
■ Lingua Teletext E' possibile impostare la lingua del Teletext. N La lingua predefinita è l'inglese, nel caso in cui la trasmissione non supporti la lingua selezionata. ■ Preferenze ● Lingua principale audio / Lingua secondaria audio / Lingua principale sottotitoli / Lingua secondaria sottotitoli / Lingua principale Teletext / Lingua secondaria Teletext Mediante questa funzione, gli utenti sono in grado di selezionare una delle lingue disponibili.
❑ Rete → Tipo di rete / Impostazione rete Per la descrizione dettagliata delle procedure per l'impostazione delle opzioni, vedere 'Impostazione della rete'. ❑ Generale ■ Modalità gioco → Off / On Durante la connessione a una console per videogiochi come PlayStation™ o Xbox™, il gioco sarà più realistico selezionando il relativo menu.
¦ Impostazione dell’orario ❑ Orologio ■ ■ Modalità orologio E’ possibile impostare manualmente o automaticamente l’orario corrente. ● Automatico: Imposta automaticamente l’orario corrente utilizzando l’orario inviato dalla trasmissione digitale. ● Manuale: Imposta manualmente l’ora corrente. N In base all'emittente e al segnale, la funzione dell'impostazione automatica dell'orario potrebbe non essere corretta. In questo caso, impostare l'orario manualmente.
¦ Connessione di rete E' possibile impostare il Protocollo Internet (IP) in modo da poter comunicare con vari network connessi. ❑ Connessione rete - Cable ■ Connessione LAN via cavo per un ambiente DHCP Di seguito è riportata la procedura per impostare una connessione di rete usando il protocollo DHCP (Dynamic Host Configuration Protocol). Poiché alla selezione di DHCP vengono automaticamente impostati un indirizzo IP, una maschera di sottorete, un gateway e un DNS, non è necessario inserirli manualmente.
■ Connessioni alla LAN per ambienti con IP statico Di seguito viene descritta la procedura per impostare la rete per l'uso di un indirizzo IP statico. L'indirizzo IP, la maschera di sottorete, il gateway e il DNS devono essere inseriti manualmente così come forniti dall'ISP (Internet Service Provider). 1. Collegare la porta LAN sul retro del televisore alla porta LAN a parete mediante un cavo LAN.
N Selezionare un canale per il Router IP wireless che non sia attualmente utilizzato. Se il canale impostato per il Router IP wireless è attualmente utilizzato da un altro dispositivo vicino, ciò comporterà delle interferenze e le comunicazioni potrebbero cadere. N Sistema di sicurezza diversi da quelli elencati sopra non sono compatibili con il televisore. Durante l'applicazione della chiave di sicurezza per l'AP (Router IP wireless), sono supportate solo le seguenti.
Impostazione rete via cavo - Manuale Per collegare il televisore alla LAN mediante un indirizzo IP statico è necessario impostare il protocollo Internet (IP). 1. Impostare Tipo di rete su Cavo. 2. Selezionare Impostazione rete via cavo. 3. Impostare Impostazione IP su Manuale.
● Imp rete wireless Se Chiave sicur non è già impostata: Quando l'impostazione di sicurezza dell'AP che Seleziona una rete 3/9 supporta la WPS è NONE, è possibile selezionare PBC, PIN, Nessuna protezione. sson Nessuna protezione permette la connessione diretta all'AP senza l'uso della funzione PBC jee PIN WPS. Ricerca AP_1 Nessuna protezione Ad-hoc Ap_2 N Il processo di PBC, PIN è uguale a quello descritto sopra. Fare riferimento ad esso se Chiave sicur è già impostata U Verpl. E Conf.
Ingressi / Supporto ¦ Menu Ingressi ❑ Elenco sorgenti ■ Ingressi Per selezionare il televisore o altre sorgenti esterne di ingresso quali DVD / lettori Blu-ray / Cable Box / Ricevitori satellitari (Set-Top Box) collegati al televisore. Utilizzare la funzione per selezionare la sorgente di ingresso desiderata. O Premere il tasto SOURCE sul telecomando per visualizzare una sorgente del segnale esterna. La modalità TV può essere selezionata premendo il tasto TV. TV / Est. / AV / Comp.
Usare i tasti del telecomando nel menu Guida Prodotto. Tasto Tasto giallo ◄/► ENTERE RETURN EXIT Operazioni Mostra i contenuti della Guida Prodotto in modo sequenziale. (Riproduzione automatica) Sposta il cursore e seleziona una voce. Attiva la voce attualmente selezionata. Ritorna al menu precedente. Arresta la funzione corrente e ritorna al menu principale di Guida Prodotto. ❑ Auto diagnosi ■ Test immagine Auto diagnosi In caso di problemi di visualizzazione dell'immagine, eseguire il test pertinente.
❑ Aggiornamento software Samsung potrà in futuro rendere disponibili aggiornamenti del firmware del televisore. Tali aggiornamenti possono essere scaricati mediante il televisore se collegato a Internet, o scaricando il nuovo firmware dal sito samsung.com su un dispositivo USB. N Versione corrente è il software già installato nel televisore. N Software alternativo (Backup) mostra la versione precedente che verrà sostituita. N Il software è rappresentato da ‘Anno/Mese/Giorno_Versione’.
Media Play (USB & DLNA) ¦ Collegamento di un dispositivo USB 1. Per accendere il televisore premere il tasto POWER. Pannello laterale del televisore 2. Collegare un dispositivo USB contenente foto, musica e/o filmati al jack USB 1 (HDD)o USB 2 sul pannello laterale del televisore. 3. Quando la schermata di selezione dell'Applicazione viene visualizzata, premere il tasto o ENTERE per selezionare Media Play (USB & DLNA). N MTP (Media Transfer Protocol) non è supportato.
¦ Funzione Media Play Questa funzione consente di visualizzare e riprodurre file fotografici e audio memorizzati su un dispositivo di memorizzazione di massa USB. N Utilizzando file multimediali senza licenza, il prodotto potrebbe non funzionare correttamente. Accesso al menu Media Play (USB & DLNA) 1. Premere il tasto MENU. Premere il tasto ▲ o ▼ per selezionare Applicazione, quindi premere il tasto ENTERE. SUM 2.
5 Voci della guida • Verde (Impostazioni pref): Modifica le impostazioni preferite per il file selezionato. Premere ripetutamente questo tasto fino a visualizzare il valore desiderato. • Tasto Giallo (Selezione): Seleziona il file dall’elenco. I file selezionati vengono evidenziati con un simbolo c. Premere nuovamente il tasto giallo per deselezionare il file. • Tasto TOOLS (Strumenti): Visualizza i menu delle opzioni. (Il menu delle opzioni varia in base allo stato corrente).
¦ Menu Opzioni Elenco Foto / Musica / Film 1. Premere il tasto MEDIA.P. Visual base Orario 2. Premere il tasto ◄ o ► per selezionare Photo, Music o Movie, quindi premere ENTERE. 3. Per selezionare il file desiderato, premere il tasto ◄ o ►. N Selezione di più file Per selezionare il file desiderato, premere il tasto ◄ o ►. Quindi premere il tasto giallo. Ripetere l'operazione per selezionare più file. Il contrassegno c appare per il file selezionato. Colore Cartella 5/15 1231.jpg 1232.
¦ Menu Opzioni Proiezione diapositive / Riproduzione musica / Riproduzione film 1. Durante una proiezione di diapositive (o la visualizzazione di una foto) o durante la riproduzione di un brano musicale o di un filmato, premere il tasto TOOLS per impostare l'opzione. 2. Premere il tasto ▲ o ▼ per selezionare l'opzione, quindi premere ENTERE. ❑ Impostazioni immagine / Impostazioni audio Strumenti È possibile selezionare le impostazioni delle immagini e dell'audio.
¦ Visualizzazione di una foto o di una proiezione di diapositive Proiezione di diapositive N Nella proiezione di diapositive verranno utilizzate tutte le foto contenute nell’Elenco file. N Durante la proiezione di diapositive, i file appaiono in sequenza a partire da quello correntemente visualizzato. N La proiezione di diapositive prosegue in base all’ordine specificato nell'Elenco file.
¦ Riproduzione di musica Riproduzione di un file musicale 1. Premere il tasto ▼ per selezionare la sezione Elenco file. 2. Premere il tasto ◄ o ► per selezionare un file musicale da riprodurre. ▶ 00:00:04 / 00:04:04 3/37 Way I Love You HaHaHa 3. Premere il tasto ∂ (Riproduci) / ENTERE. N Questo menu mostra solo i file con estensione MP3. I file con altre estensioni non vengono visualizzati, nemmeno se sono stati salvati sul medesimo dispositivo USB.
¦ Riproduzione di un filmato Riproduzione di un filmato. 1. Premere il tasto ▼ per selezionare la sezione Elenco file. ▶ 00:00:01 / 00:05:30 3/37 ABC.avi 2. Premere il tasto ◄ o ► per selezionare un filmato da riprodurre. 3. Premere il tasto ∂ (Riproduci) / ENTERE. N Verrà visualizzato il file selezionato. N Il file selezionato appare in alto con il relativo tempo di riproduzione.
N Tasti di controllo della riproduzione video Tasto ENTERE ∂ ∑ TOOLS ∫ ◄/► ▲/▼ μ Operazioni Riproduci/ Arresta il filmato Riproduce il filmato Interrompe la riproduzione del filmato Esegue varie funzioni nei menu dei filmati. Esce dalla modalità di riproduzione e torna all’Elenco filmati. Salta in avanti o indietro all’interno del filmato. Passa al primo/all'ultimo fotogramma del file. Riproduce il file a doppia velocità. Questa funzione potrebbe non essere supportata in base al codec.
¦ Utilizzo del menu Impostazione Il menu Impostazioni mostra le impostazioni utente del menu Media Play. SUM 1. Premere il tasto MEDIA.P. 2. Premere il tasto ◄ o ► per selezionare Setup, quindi premere il tasto ENTERE. SETUP 3. Per selezionare l’opzione desiderata, premere il tasto ▲ o ▼. 4. Premere ◄ o ► per selezionare l'opzione. N Per uscire dalla modalità Media Play premere il tasto MEDIA.P sul telecomando.
Media Play-DLNA ¦ Impostazione della rete DLNA DLNA permette la visione di immagini, musica e video memorizzati sul PC o sul televisore mediante una connessione di rete in modalità Media Play. Ciò elimina la necessità di copiare i file su un dispositivo di memorizzazione USB per poi collegarlo al televisore. Per utilizzare DLNA, il televisore deve essere collegato alla rete e l’applicazione DLNA deve essere installata sul PC.
Requisiti di sistema 1. Inserire nel PC il CD del programma fornito in dotazione con il televisore. 2. Per l’installazione del programma sono necessari 30MB di spazio libero sul disco rigido. N Se si intende condividere file, è necessario disporre di 30MB di spazio libero sul disco rigido ogni 100 file. N Annullando la condivisione dei file, lo spazio sul disco fisso utilizzato per le informazioni delle miniature verrà liberato.
❑ Dividere ■ Condivisione di una cartella E’ possibile condividere una cartella del PC sul televisore. ■ Annullamento della Cartella condivisa È possibile annullare la condivisione di una cartella sul PC. Selezionare una cartella dal riquadro Cartella condivisa e selezionare Non condividere cartella. ■ Applicazione delle impostazioni correnti Eseguire questa operazione quando la sincronizzazione è necessaria a causa di una nuova cartella condivisa o dell’annullamento di una condivisione.
ANYNET+ ¦ Collegamento dei dispositivi Anynet+ Cos'è Anynet+? Anynet+ è una funzione che permette di controllare mediante il telecomando del televisore Samsung tutti i dispositivi Samsung collegati che supportano Anynet+. Il sistema Anynet+può essere usato solo con i dispositivi Samsung dotati della funzione Anynet+. Per controllare se il dispositivo Samsung in uso è dotato di questa funzione, verificare la presenza del logo Anynet+.
¦ Configurazione di Anynet+ ❑ Impostazione ■ ■ Anynet+ (HDMI-CEC) → Off / On Per utilizzare la funzione Anynet+, Anynet+ (HDMI-CEC) deve essere impostato su On. N Quando la funzione Anynet+ (HDMI-CEC) è disattivata, sono disattivate anche tutte le funzioni relative a Anynet+. Spegnimento auto → No / Sì Impostazione della disattivazione automatica di un dispositivo Anynet+ allo spegnimento del televisore.
Tasti del telecomando disponibili in modalità Anynet+ Tipo dispos Stato operativo Dispositivo Anynet+ Una volta attivato il dispositivo, quando il menu del dispositivo corrispondente appare sullo schermo.
¦ Risoluzione dei problemi con Anynet+ Problema Anynet+ non funziona. ● ● ● ● ● ● ● ● ● Per avviare Anynet+. ● ● ● Per uscire da Anynet+. ● ● ● Sullo schermo viene visualizzato il messaggio ‘‘Connessione a un dispositivo Anynet + ...’. Impossibile avviare la riproduzione sul dispositivo Anynet+. Lo schermo del dispositivo esterno non appare. ● ● ● ● ● ● ● ● ● Il programma TV non può ● essere registrato. L’audio del televisore ● non viene riprodotto attraverso il ricevitore.
Content Library ¦ Uso di Content Library Contenuto libreria consente di utilizzare diversi contenuti sul televisore. È possibile utilizzare i contenuti presenti nella memoria del televisore o nuovi contenuti trasferiti mediante un dispositivo USB. Galleria Galleria Cucina Giochi Bambini Benessere R Ritorno e Esci Uso dei tasti del telecomando nel menu Content Library Tasto ▲/▼/◄/► ENTERE RETURN EXIT
Tasti colorati Y / MUTE Operazioni Sposta il cursore e seleziona una voce.
❑ Giochi Questa categoria mette a disposizione giochi per tutta la famiglia. N Per i tasti utilizzati nei giochi, seguire le istruzioni visualizzate sullo schermo. N Tasti colorati per Giochi Tasto Rosso Verde Giallo Blu Operazioni Premere per passare alla schermata iniziale del gioco Premere per mettere in pausa il gioco Tasto opzione Premere per uscire dal gioco ❑ Bambini Questo è un contenuto educativo e interattivo che i bambini possono vedere più volte.
Internet@TV In caso di problemi nell'uso di un servizio widget, contattare il fornitore del contenuto. In widget, premere il tasto verde per le informazioni di contatto, oppure visitare la guida del sito web per reperire informazioni sul provider del servizio widget. N In base alla regione, il servizio widget potrebbe essere supportato solo in lingua inglese. N Questa funzione potrebbe non essere supportata in base alla nazione.
❑ Schermo ■ Dock mode 1 Sullo schermo verrà visualizzato un banner di benvenuto con il nome del proprio profilo nell'angolo in alto a destra. N Questo banner scompare dopo pochi secondi. Ciao John! 1 2 2 Il banner evidenzia due tasti di scelta rapida sul telecomando. N Premendo il tasto blu (Viewport) del telecomando, il display passa dalla modalità ‘Viewport’ alla modalità ‘Overlay’ e viceversa.
Tutti i contenuti e i servizi accessibili attraverso il presente apparecchio appartengono a terzi e sono protetti dalle leggi in materia di diritto d’autore, brevetti, marchi e/o altre leggi in materia di proprietà intellettuale. Tali contenuti e servizi sono forniti esclusivamente per un Suo uso personale e non commerciale. Lei non può utilizzare alcun contenuto o servizio in modi non autorizzati dal proprietario del contenuto o dal fornitore del servizio.
Il menu Impostazioni profilo permette di personalizzare e proteggere i profili. ● I profili utenti possono essere personalizzati mediante un Nome e un Avatar (una immagine usata per rappresentare il profilo) univoci. ● Il Nome e l'Avatar del profilo vengono visualizzati nello snippet del profilo del dock. ● I profili possono essere protetti mediante Crea PIN profilo. N Quando si imposta il PIN per la prima volta, è possibile impostare una domanda di sicurezza.
¦ Uso di Yahoo!® Weather Widget Yahoo!® Weather Widget fornisce aggiornamenti sulla situazione meteo locale o preferita. Questo contenuto cambia dinamicamente in base alle condizioni climatiche. ● Premere il tasto verde del telecomando per visualizzare il menu Yahoo!® Weather Widget Impostazioni. ● Nel menu Impostazioni è possibile aggiungere o eliminare una città per la quale si desidera visualizzare la situazione meteo. Nel menu Impostazioni: ● Aggiungi nuova città digitando il nome di una città.
¦ Uso del widget Yahoo!® Flickr Il widget Flickr fornisce un accesso alle fotografie preferite di amici e parenti durante la visione del televisore. Ora è possibile condividere le immagini con la famiglia sullo schermo del televisore come una proiezione di diapositive. ● Personalizzare il widget Flickr collegandosi al proprio ID di Yahoo! ID. ● Per le procedure di accesso dettagliate, fare riferimento alle istruzioni ‘Uso del widget Profile’. ● Per ulteriori informazioni su Flickr, visitare il sito www.
¦ Risoluzione dei problemi con internet@TV Problema Possibile soluzione Alcuni servizi widget non funzionano. Verificare il servizio con il fornitore. In widget, premere il tasto verde per le informazioni di contatto, oppure visitare la guida del sito web per reperire informazioni sul provider del servizio widget. Vedere la guida sulla pagina del sito web. Alcuni contenuti degli widget sono solo in Inglese.
Internet@TV N Questa funzione potrebbe non essere supportata in base alla nazione. (non disponibile in tutti i paesi) N In caso di problemi nell'uso di un servizio widget, contattare il fornitore del servizio. In widget, premere il tasto verde per le informazioni di contatto, oppure visitare la guida del sito web per reperire informazioni sul provider del servizio. N In base alla regione, il servizio widget potrebbe essere supportato solo in lingua inglese.
❑ Impost sistema N Autoeseg Ticker, Durata ticker potrebbero non essere supportate nel paese di residenza. ■ Modifica la password per l'opzione Blocco servizio N La password predefinita di un nuovo apparecchio TV è 0-0-0-0. N Qualora si sia dimenticata la password, premere i tasti del telecomando nella sequenza seguente per ripristinare la password predefinita 0-0-0-0: POWER (Off) → MUTE → 8 → 2 → 4 → POWER (On).
¦ Risoluzione dei problemi con internet@TV Problema Possibile soluzione Alcuni servizi widget non funzionano. Verificare il servizio con il fornitore. In widget, premere il tasto verde per le informazioni di contatto, oppure visitare la guida del sito web per reperire informazioni sul provider del servizio widget. Vedere la guida sulla pagina del sito web.
CENTRO RETE DOM ¦ Centro rete dom Informazioni su Centro rete dom Centro rete dom consente di collegare il televisore a un telefono cellulare tramite una rete. È possibile visualizzare sul televisore le chiamate in arrivo, i contenuti dei messaggi di testo e i programmi impostati sul cellulare utilizzando Centro rete dom. Inoltre, è possibile riprodurre i contenuti multimediali salvati sul cellulare, ad esempio video, foto e musica, importandoli sul televisore attraverso la rete.
¦ Impostazione di Centro rete dom ❑ Messag / Media Mostra un elenco di telefoni cellulari configurati con questo televisore per utilizzare le funzioni Message o Media. N La funzione Media è disponibile in altri dispositivi mobili che supportano DLNA DMC. ■ ■ ■ Consent Consente il collegamento del cellulare. Centro rete dom Messag 111-1234-5671 : Consent Media 111-1234-5672 : Consent Impostazione 111-1234-5673 : Negato 111-1234-5674 : Negato Negato Blocca il collegamento del cellulare.
Visualizzazione messaggi Se arriva un nuovo messaggio di testo (SMS) mentre si guarda il televisore, viene visualizzata la finestra degli allarmi. Se si fa clic sul tasto OK, viene visualizzato il contenuto del messaggio. N È possibile configurare le impostazioni di visualizzazione per il contenuto dei messaggi di testo (SMS) sul telefono cellulare. Per le procedure, vedere il manuale del cellulare. N Alcuni caratteri speciali possono essere visualizzati come caratteri vuoti o danneggiati.
RACCOMANDAZIONI ¦ Funzione Teletext La maggior parte delle emittenti televisive fornisce servizi informativi tramite il servizio Teletext. La pagina dell’indice del servizio Teletext contiene informazioni sull’uso del servizio. Inoltre, è possibile selezionare varie opzioni tramite i tasti del telecomando. N Per visualizzare correttamente le informazioni del servizio Teletext, è necessario che la ricezione del canale sia stabile.
Le pagine Teletext sono organizzate in base a sei categorie: Parte A B C D E F Contenuti Numero della pagina selezionata. Identità della stazione emittente. Numero della pagina corrente o stato della ricerca. Data e ora. Testo. Informazioni sullo stato. Informazioni FASTEXT.
¦ Smontare il piedistallo 1. Svitare le viti sul retro del televisore. 2. Separare il piedistallo dal televisore. N Il televisore deve essere sorretto da due o più persone. 3. Coprire il foro sul fondo con l’apposito tappo. ¦ Installazione del Kit di montaggio a parete Gli articoli del kit di montaggio a parete (venduti separatamente) consentono di montare il televisore alla parete.
¦ Assemblaggio dei cavi ❑ Tipo piedistallo N Racchiudere i cavi nel fermacavi in modo che non siano visibili attraverso il piedistallo trasparente. 1 1 2 2 3 3 ❑ Tipo montaggio a parete 1 1 N In caso contrario, i terminali di connessione del prodotto potrebbero subire danni. Italiano - 6 BN68-02329A-03Ita.
¦ Messa in sicurezza della posizione di installazione Mantenere le distanze necessarie tra il prodotto e gli altri elementi presenti (per esempio le pareti) per garantire un’adeguata ventilazione. La mancata osservanza di tale precauzione può comportare un pericolo d’incendio o un malfunzionamento a causa del surriscaldamento del prodotto. Installare il prodotto mantenendo le distanze indicate in figura.
¦ Risoluzione dei problemi In caso di domande sul funzionamento del televisore, consultare per prima cosa l'elenco sottostante. Se nessuno dei consigli sottoriportati si dimostra utile per risolvere il problema, visitare il sito ‘www.samsung.com’, quindi fare clic sulla voce Support (Assistenza), oppure chiamare il numero del Call Center riportato in ultima pagina. Problema Qualità dell'immagine La qualità dell'immagine non sembra all'altezza di quella vista in negozio.
Problema Nessuna immagine, video spento Il televisore non si accende. Soluzione ● ● ● Il televisore si spegne automaticamente. ● ● ● ● Nessuna immagine/Video. ● ● ● ● Connessione RF (Cavo/Antenna) Impossibile ricevere tutti i canali. L'immagine è distorta: sono visibili blocchi grandi, blocchi piccoli, punti e pixel ● ● ● ● ● Connessione PC Messaggio ‘Modo non supportato’. Nell'elenco sorgenti, il PC è sempre evidenziato anche se non è connesso.
Problema Altri L'immagine non viene riprodotta a pieno schermo. Soluzione ● ● ● Il telecomando non funziona. Impossibile controllare il volume o le funzioni di accensione/ spegnimento del televisore con il telecomando del ricevitore via cavo/satellitare. Messaggio ‘Modo non supportato’. Impossibile disattivare l'opzione Effetto luce sulla cornice anteriore. (Sotto il logo SAMSUNG) Il televisore emana odore di plastica. TV Informazioni sul segnale non è disponibile nel menu Self Diagnostic Test.
¦ Specifiche Nome modello Dimensione schermo (Diagonale) Risoluzione PC (Ottimale) Audio Uscita Dimensioni (LarxProxAlt) Senza piedistallo Con piedistallo Peso Con piedistallo Caratteristiche ambientali Temperatura di esercizio Umidità di esercizio Temperatura di stoccaggio Umidità di stoccaggio Piedistallo ruotabile (Sinistra / Destra) UE32B7000, UE32B7020 UE40B7000, UE40B7020 32 poll. 40 poll.
BN68-02329A-03Ita.indb 75 HDMI (4ea) SIF CVBS AV CVBS SVHS YC (SCART1 LR IN) • VSB & QAM Decoder • HDMI Decoder • SD AFE • SIF Decoder • 150MHz ADC INTER SWITCH Arsenal Audio DAC WM8521 HDMI TMDS 3x1 SW TMDS351 RGB HV YPbPr VIDEO S/W TEA6425 SCART CVBS OUT SCART CVBS IN SCART LR SCART RGB (SCART1 LR OUT) DVI Audio PC PC Audio Component AV In S-VHS EXT T-NIM (COFDM/CVBS) Buffer TS parallel Chelsea SIF_I2S SPDIF I2S1_RF WM8593 S/W, A/D D/A*2, AMP SPDIF LVDS PCI BUS USB 2.
Las figuras y las ilustraciones de este Manual del usuario se proporcionan como referencia solamente y pueden ser diferentes del aspecto real del producto. El diseño y las especificaciones del producto están sujetos a cambios sin previo aviso. ❑ Licencia TruSurround HD, SRS y el símbolo son marcas registradas de SRS Labs, Inc. La tecnología TruSurround HD está incorporada bajo licencia de SRS Labs, Inc. Fabricado bajo licencia de Dolby Laboratories.
Contenido ANYNET+ Configuración del televisor ■ Accesorios.......................................................................................... 2 ■ Aspecto general del panel de control................................................. 2 ■ Aspecto general del panel de conexiones.......................................... 3 ■ Aspecto general del mando a distancia.............................................. 6 ■ Minimando a distancia........................................................................
Configuración del televisor ¦ Accesorios Mando a distancia y 2 pilas AAA CD del programa Cubierta del orificio inferior Paño de limpieza Tarjeta de garantía/Guía de seguridad (no disponible en todos los lugares) Minimando a distancia y pilas (3 V) Cable de componentes Soporte anilla (4 unid.) Soporte de cables (3 unid.
5 MENU: Púlselo para ver un menú en pantalla con las opciones del televisor. 6 SOURCEE Cambia entre todas las fuentes de entrada disponibles. En el menú en pantalla, utilice este botón de igual modo que el botón ENTERE del mando a distancia. 7 ALTAVOCES ¦ Aspecto general del panel de conexiones [Panel posterior del TV] # @ 0 ! 0 9 8 1 2 3 4 5 67 Entrada de alimentación N El color y la forma del producto pueden variar según el modelo.
1 BLOQUEO KENSINGTON (según el modelo) El bloqueo Kensington (opcional) es un dispositivo que se utiliza para fijar físicamente el sistema cuando se utiliza en un sitio público. Si desea usar un dispositivo de bloqueo, póngase en contacto con el distribuidor donde adquirió el televisor. N La ubicación del bloqueo Kensington puede variar según los modelos. 2 LAN Conecte un cable LAN a este puerto para conectarse a la red. 3 ANT IN Se conecta a un sistema de televisión por cable o antena.
0 USB 1 (HDD) / USB 2 Conector para actualizaciones de software, Media Play, etc. Se puede conectar la red inalámbrica de Samsung mediante el ‘adaptador de LAN inalámbrica de Samsung’ (se vende por separado). N Para el disco duro de USB, use el puerto USB 1 (HDD). ! DIGITAL AUDIO OUT (OPTICAL) Se conecta a un componente de audio digital como un receptor del sistema Home Cinema.
¦ Aspecto general del mando a distancia N Puede utilizar el mando a una distancia del televisor de hasta 7 metros. N El exceso de luz puede influir en el rendimiento del mando a distancia. N El color y la forma del producto pueden variar según el modelo. 1 POWER: Enciende o apaga el TV. 2 TV: Selecciona directamente el modo TV. 3 BOTONES NUMÉRICOS: Permiten cambiar de canal. 4 FAV.CH: Se usa para mostrar las listas de canales favoritos en la pantalla. 5 INFO: Púlselo para mostrar información en la pantalla.
¦ Minimando a distancia El minimando a distancia es un mando a distancia simplificado que sólo tiene los botones de encendido y del control de los canales y del volumen. 1 Botón de suspensión del televisor 4 1 2 2 < : Canal siguiente / > : Canal anterior 3 3 + : Subir volumen / – : Bajar volumen 2 3 4 Transmisor irDA N Cuando utilice el minimando encare esta parte al televisor. ¦ Instalación de las pilas en el mando a distancia Mando a distancia normal 1.
¦ Visualización de los menús Antes de utilizar el televisor, siga los pasos que se explican a continuación para aprender a desplazarse por el menú a fin de seleccionar y ajustar las diferentes funciones. Botón MENU Mostrar el menú principal en pantalla. Botón RETURN Volver al menú anterior. Botones ENTERE / DIRECCIÓN Mover el cursor y seleccionar una opción. Seleccionar la opción marcada. Confirmar la configuración. EXIT Salir del menú en pantalla.
¦ Función Plug & Play (Según el modelo) Cuando el televisor se enciende por primera vez, los valores se inician correlativamente de forma automática. 1. Pulse el botón POWER del mando a distancia. N También puede usar el botón POWERP del televisor. N Se muestra el mensaje Select the OSD Language.. Plug & Play 2. Pulse el botón ENTERE. Seleccione el idioma con los botones ▲ o ▼. Pulse el botón ENTERE para confirmar la elección. Select the OSD Language. Menu Language : English ▶ 3.
¦ Visualización de la pantalla La pantalla identifica el canal actual y el estado de algunos ajustes de audio-vídeo. O Pulse el botón INFO para ver la información. Pulse el botón INFO del mando a distancia. El televisor mostrará el canal, el tipo de sonido y el estado de ciertos ajustes de imagen y sonido. ● ▲, ▼: Puede ver otra información del canal. Si desea ir al canal actualmente seleccionado, pulse el botón ENTERE. ● ◄, ►: Puede ver la información de programas del canal actual.
❑ Guardado manual N Busca un canal manualmente y lo memoriza en el televisor. N Si el canal está bloqueado con la función Segur. niños aparece la ventana para la introducción del código PIN. ■ Canal digital Almacenamiento manual de canales digitales. N Canal digital sólo está disponible en el modo de TV digital. ● Canal: Establezca el número del canal con los botones ▲, ▼ o numéricos (0~9). ● Frecuencia: Establezca la frecuencia con los botones numéricos.
❑ Guía predeterminada → Guía completa / Miniguía Puede decidir que se muestre la Guía completa o la Miniguía cuando se pulsa el botón GUIDE del mando a distancia. ❑ Lista de canales Para obtener una descripción detallada sobre el uso de la Lista de canales, consulte las instrucciones de ‘Gestión de los canales’. O Puede seleccionar estas opciones simplemente pulsando el botón CH LIST del mando a distancia. ❑ Modo Canal Cuando pulse el P >/<, Los canales se cambiarán en la lista de canales seleccionados.
¦ Gestión de los canales Con este menú puede agregar y borrar los canales o configurarlos como favoritos y usar la guía de programas de las emisoras digitales. ■ Canales añadidos ■ Todos los canales Muestra todos los canales disponibles actualmente. Canales añadidos Muestra todos los canales añadidos.
■ Bloquear / Desbloquear Se puede bloquear un canal para que no se pueda seleccionar ni visualizar. N Está función está disponible sólo cuando Segur. niños está configurado como Act.. N Aparece la pantalla para la introducción del número PIN. Escriba su código PIN de 4 dígitos. N El código PIN predeterminado para un televisor nuevo es 0-0-0-0. Se puede cambiar el PIN seleccionando Cambiar PIN en el menú. N Se muestra el símbolo “\” y el canal queda bloqueado. ■ Visual.
IMAGEN ¦ Configuración del menú de imagen ❑ Modo ■ Dinámico Selecciona la visualización con una definición mejorada, en una habitación luminosa. ■ Estándar Selecciona la visualización óptima de la imagen, en un entorno normal. ■ Natural Selecciona la visualización óptima y más confortable de la imagen. N Esta función no está disponible en el modo PC. ■ Película Selecciona la visualización para ver películas en una sala oscura.
■ Gama de colores La gama de colores es una matriz compuesta por los colores rojo, verde y azul. Seleccione su espacio de color favorito y disfrute de unos colores auténticamente naturales. ● Auto: Ajusta automáticamente al tono de color más natural de acuerdo con las fuentes del programa. ● Original: Proporciona tonos de color profundos y ricos. ● Personal: Ajusta la gama del color según las preferencias del usuario. N Al cambiar el valor de ajuste se actualizará la pantalla ajustada.
■ Tamaño Es posible que alguna vez desee cambiar el tamaño de la imagen en la pantalla. El televisor se suministra con varias opciones de tamaño de la pantalla, cada una diseñada para que funcione lo mejor posible con tipos específicos de entrada de vídeo. Es posible que el receptor de cable o satélite tenga también su propia gama de tamaños de pantalla. Sin embargo, en general, debe ver el televisor en el modo 16:9 tanto como sea posible. T Pulse el botón TOOLS para ver el menú Herramientas.
■ 100Hz Motion Plus → Des. / Claro / Estándar / Suave / Personal / Demo Elimina los retrasos de las escenas rápidas con mucho movimiento para conseguir imágenes más claras. N Si se habilita 100Hz Motion Plus, se puede producir ruido en la pantalla. Si esto ocurre, establezca 100Hz Motion Plus como Des.. ● Des.: Desactiva 100Hz Motion Plus. ● Claro: Establece 100Hz Motion Plus en un valor mínimo. ● Estándar: Establece 100Hz Motion Plus en un valor medio.
¦ Uso del televisor como una pantalla de ordenador (PC) Configuración del software del PC (basado en Windows XP) A continuación se muestra la configuración de pantalla de Windows para un ordenador típico. Probablemente la pantalla real de su PC sea distinta, según la versión concreta de Windows y de la tarjeta de vídeo que tenga. Aunque las pantallas reales sean diferentes, la información de configuración básica que se aplica en casi todos los casos es la misma.
¦ Ajuste del televisor con el ordenador N Preselección: Pulse el botón SOURCE para seleccionar el modo PC. ❑ Ajuste automático Brillo Nitidez Imagen Mediante la función de ajuste automático se puede establecer que el televisor se ajuste automáticamente de acuerdo con las señales de vídeo que reciba. La función también ajusta automáticamente con más precisión y ajusta los valores y las posiciones de la frecuencia. T Pulse el botón TOOLS para ver el menú Herramientas.
❑ Idioma de audio Se pueden cambiar los valores predeterminados para los idiomas del audio. Muestra la información del idioma para el flujo de entrada. N Cuando se visualiza un canal digital se puede seleccionar esta opción. N Sólo se puede seleccionar uno de los idiomas que ofrece la emisora.
¦ Selección del modo de sonido Puede definir el modo de sonido en el menú Herramientas. Cuando se configura Dual I-II, el modo de sonido actual se muestra en la pantalla. A2 estéreo NICAM estéreo Tipo de audio Mono Estéreo Dual Mono Estéreo Dual Dual 1 / 2 MONO Estéreo ↔ MONO DUAL 1 ↔ DUAL 2 MONO MONO ↔ Estéreo MONO ↔ DUAL 1 DUAL 2 Predeterminado Cambio automático DUAL 1 Cambio automático DUAL 1 N Si la señal de estéreo es débil y el modo cambia de forma automática, cambie a mono.
■ Idioma del teletexto Se puede configurar el idioma del teletexto seleccionando el tipo de idioma. N El inglés es el idioma predeterminado cuando en una emisión no está disponible la selección de idiomas. ■ Preferencia ● Idioma principal audio / Idioma secundario audio / Idioma princ. subtítulos / Idioma sec. subtítulos / Idioma principal del teletexto / Idioma secundario del teletexto Con esta función los usuarios pueden seleccionar uno de los idiomas.
❑ Red → Tipo de red / Configuración de red Para conocer el procedimiento detallado sobre las opciones de configuración, consulte la instrucciones de ‘Configuración de la red’. ❑ General ■ Modo Juego → Des. / Act. Cuando se conecta una videoconsola como PlayStation™ o Xbox™, se puede experimentar una sensación más realista al seleccionar el menú de juegos.
¦ Configuración de la hora ❑ Reloj ■ ■ Modo de reloj Se puede configurar la hora actual manual o automáticamente. ● Auto: Configure la hora automáticamente mediante la información de la hora de la emisión digital. ● Manual: Configure la hora actual manualmente. N Según la emisora y la señal, la hora automática no se puede ajustar correctamente. En este caso, ajuste la hora manualmente. N La antena y el cable se deben conectar para ajustar la hora automáticamente.
¦ Conexión de la red Puede configurar el protocolo de Internet para que se pueda comunicar con diversas redes conectadas. ❑ Conexión de la red - Cable ■ Conexión LAN para un entorno DHCP A continuación se describe el procedimiento para configurar la red mediante el protocolo de configuración dinámica de host (DHCP). Dado que la dirección IP, la máscara de subred, la puerta de enlace y el DNS se asignan automáticamente cuando se selecciona DHCP, no es necesario introducirlos manualmente. 1.
■ Conexión LAN para un entorno IP estático A continuación se describe el procedimiento para configurar la red con una dirección IP estática. Se debe introducir manualmente la dirección IP, la máscara de subred, la puerta de enlace y el DNS proporcionados por el proveedor de servicios de Internet (ISP). 1. Conecte el puerto LAN del panel posterior del televisor y el puerto LAN de la pared con un cable LAN.
N Seleccione un canal para el compartidor IP inalámbrico que no se esté usando en ese momento. Si el canal ajustado para el compartidor IP inalámbrico lo está usando en ese momento otro dispositivo cercano, se producirán interferencias y es posible que la comunicación falle. N Si se aplica un sistema de seguridad distinto de los sistemas que se muestran a continuación, no funcionará con el televisor.
Configuración de red por cable-Manual Para conectar el televisor a la LAN mediante una dirección IP estática, se debe configurar el protocolo de Internet (IP). 1. Configure Tipo de red como Cable. Configuración de red por cable Config. protocolo Internet : Manual Dirección IP 2. Seleccione Configuración de red por cable. : 0 : 0 Máscara de subred 3. Configure Config. protocolo Internet como Manual.
● Si Clave segur. no está configurada: Cuando no se ha configurado la clave de seguridad en el punto de acceso compatible con WPS, puede seleccionar PBC, PIN, Ninguna seguridad. Ninguna seguridad permite la conexión directa al punto de acceso sin utilizar la función WPS. N El procedimiento de PBC, PIN es el mismo que el anterior. Consúltelo si Clave segur. ya está configurada. N Si ésta no funciona correctamente, vuelva a intentarlo.
ENTRADA/AYUDA ¦ Menú de entrada ❑ Fuentes ■ Entrada Se utiliza para seleccionar TV u otras fuentes de entrada externas como reproductores de DVD/Blu-ray o receptores de cable o satélite (decodificadores), conectados al televisor. Permite seleccionar la fuente de entrada que se prefiera. O Pulse el botón SOURCE del mando a distancia para ver una fuente de señal externa. El modo TV se puede seleccionar pulsando el botón TV. TV / Ext.
Uso de los botones del mando a distancia en el menú Guía de producto. Botón Botón amarillo ◄/► ENTERE RETURN EXIT Función Muestra el contenido de Guía de producto de forma secuencial. (Reproducción automática) Mover el cursor y seleccionar una opción. Seleccionar la opción marcada. Volver al menú anterior. Detener la función actual y volver al menú principal de Guía de producto. ❑ Autodiagnóstico ■ Prueba de imagen Si cree que tiene un problema con la imagen, efectúe la prueba de imagen.
❑ Software superior Samsung puede ofrecer actualizaciones para el firmware del televisor en el futuro. Estas actualizaciones se pueden llevar a cabo a través del televisor cuando se conecta a Internet o mediante la descarga del nuevo firmware de samsung.com al dispositivo de memoria USB. N Versión actual es el software ya instalado en el televisor. N Software alternativo (copia de seguridad) muestra la versión anterior que se sustituirá. N El software se representa como ‘Año/Mes/Día_versión’.
Media Play (USB & DLNA) ¦ Conexión de un dispositivo USB 1. Pulse el botón POWER para encender el televisor. 2. Conecte un dispositivo USB que contenga archivos de fotos, música o películas al terminal USB1 (HDD) o USB2 del lateral del televisor. Panel posterior del TV 3. Cuando se muestre la pantalla de selección Aplicación, pulse el botón ENTERE para seleccionar Media Play (USB & DLNA). o N MTP (Protocolo de transferencia de recursos) no se admite. N El sistema de archivos admite FAT16, FAT32 y NTFS.
¦ Media Play Funciones Permite ver y escuchar archivos de fotos, música o películas guardados en un dispositivo de clase de almacenamiento masivo USB (MSC). N Puede que no funcione correctamente con archivos multimedia sin licencia. Acceso al menú Media Play (USB & DLNA) 1. Pulse el botón MENU. Pulse el botón ▲ o ▼ para seleccionar Aplicación y, a continuación, pulse el botón ENTERE. 2. Pulse el botón ▲ o ▼ para seleccionar Media Play (USB & DLNA) y, a continuación, pulse el botón ENTERE.
5 Elementos de ayuda • Botón verde (Conf. fav.): Cambia la configuración de favoritos del archivo seleccionado. Pulse este botón varias veces hasta que se muestre el valor que desee. • Botón amarillo (Selecc.): Selecciona un archivo en la lista de archivos. Los archivos seleccionados se marcan con un símbolo c. Vuelva a pulsar el botón amarillo para cancelar la selección del archivo. • TOOLS (Herramientas): Muestra los menús de opciones. (El menú de opciones cambia de acuerdo con el estado actual.
¦ Menús de opciones de la lista de fotos / música / películas 1. Pulse el botón MEDIA.P. Vista básica Cronología 2. Pulse los botones ◄ o ► para seleccionar Photo, Music o Movie y, a continuación, pulse el botón ENTERE. 3. Pulse los botones ◄ o ► para seleccionar el archivo que desee. N Selección de varios archivos Pulse los botones ◄ o ► para seleccionar el archivo que desee. A continuación pulse el botón amarillo. Repita el proceso anterior para seleccionar varios archivos.
¦ Menús de opciones de las presentaciones y la reproducción de música y películas 1. Durante una presentación (o la visualización de una foto) o la reproducción de música o películas, pulse el botón TOOLS para establecer una opción. 2. Pulse el botón ▲ o ▼ para seleccionar la opción deseada y, a continuación, pulse el botón ENTERE. ❑ Configuración de la imagen / Configuración del sonido Puede seleccionar la configuración de la imagen y el sonido. ❑ Información Herramientas Detener presentación Vel.
¦ Visualización de una foto o una presentación Visualización de una presentación N En la presentación se usan todos los archivos de la sección de la lista de archivos. N En la presentación, los archivos se muestran en orden a partir del archivo que se muestra en este momento. N La presentación se ejecuta según el orden de la clasificación de la sección de la lista de archivos. N Los archivos se música se pueden reproducir automáticamente durante la presentación si Música de fondo está configurado como Act..
¦ Reproducción de música Reproducción de un archivo de música 1. Pulse el botón ▼ para seleccionar la sección de la lista de archivos. 2. Pulse los botones ◄ o ► para seleccionar el archivo de música que desee. ▶ 00:00:04 / 00:04:04 3/37 Way I Love You HaHaHa 3. Pulse el botón ∂ (reproducir) / ENTERE. N Este menú sólo muestra archivos con la extensión MP3.
¦ Reproducción de un archivo de película Reproducción de un archivo de película 1. Pulse el botón ▼ para seleccionar la sección de la lista de archivos. 2. Pulse los botones ◄ o ► para seleccionar el archivo de película que desee. ▶ 00:00:01 / 00:05:30 3/37 ABC.avi 3. Pulse el botón ∂ (reproducir) / ENTERE. N El archivo seleccionado se reproduce. N El archivo seleccionado se visualiza en la parte superior con su tiempo de reproducción.
N Botones de control de la reproducción de vídeo Botón ENTERE ∂ ∑ TOOLS ∫ ◄/► ▲/▼ μ Función Reproducir/hacer una pausa en el archivo de película Reproducir el archivo de película Hacer una pausa en el archivo de película Ejecutar varias funciones de los menús de películas. Salir del modo de reproducción y volver a la lista de películas. Saltar hacia adelante o hacia atrás en el archivo de película. Ir al principio o al final del archivo. Reproducir el archivo a doble velocidad.
¦ Uso del menú de Setup Muestra la configuración del usuario del menú Media Play. 851,86MB/993,02MB Free SUM 1. Pulse el botón MEDIA.P. 2. Pulse los botones ◄ o ► para seleccionar Setup y, a continuación, pulse el botón ENTERE. Setup 3. Pulse el botón ▲ o ▼ para seleccionar la opción deseada. 4. Pulse los botones ◄ o ► para seleccionar la opción. N Para salir del modo Media Play, pulse el botón MEDIA.P del mando a distancia. ■ Photo SUM Usar vista de color → Act. / Des.
Media Play -DLNA ¦ Configuración de la red DLNA DLNA permite reproducir imágenes, música y vídeos guardados en el ordenador o en el televisor a través de una conexión de red en modo Media Play. De esta forma se elimina la necesidad de copiarlos en un dispositivo de almacenamiento USB y después conectar éste al televisor. Para utilizar DLNA, es necesario conectar el televisor a la red e instalar la aplicación DLNA en el ordenador.
Requisitos del sistema 1. Inserte en el ordenador el CD del programa suministrado con el televisor. 2. Para instalar el programa se necesitan 30 MB libres de espacio en disco duro. N Si se comparten archivos, se necesitan hasta 30 MB de espacio en disco duro por cada 100 archivos. N Si se cancela el acceso compartido a archivos, también se libera el espacio en el disco duro utilizado para la información de las miniaturas.
❑ Compartir ■ Cómo compartir una Carpeta Se pueden compartir carpetas entre el ordenador y el televisor. ■ Cómo cancelar una Carpeta compartida Se puede cancelar el acceso a una carpeta compartida en el ordenador. Seleccione una carpeta del panel Carpeta compartida y seleccione no compartir carpeta. ■ Aplicación de los ajustes actuales Realice este procedimiento cuando sea necesario sincronizar debido a la creación de una nueva carpeta compartida o a la cancelación de una carpeta compartida.
ANYNET+ ¦ Conexión de dispositivos Anynet+ ¿Qué es Anynet+? Anynet+ es una función que permite controlar con el mando a distancia del televisor Samsung todos los dispositivos de Samsung conectados que sean compatibles con Anynet+. El sistema Anynet+ sólo se puede usar con dispositivos de Samsung que tengan la función Anynet+. Para asegurarse de que el dispositivo de Samsung tenga dicha función, compruebe si lleva el logotipo Anynet+. Para conectar al televisor TV Dispositivo Anynet+ 1 Cable HDMI 1.
¦ Configuración de Anynet+ ❑ Configuración Anynet+ (HDMI-CEC) → Des. / Act. Para usar la función Anynet+, Anynet+ (HDMI-CEC) debe estar configurado como Act.. N Cuando la función Anynet+ (HDMI-CEC) está desactivada, todas las operaciones relacionadas con Anynet+ se desactivan.
Botones del mando a distancia del televisor disponibles en el modo Anynet+ Tipo de dispositivo Dispositivo Anynet+ Dispositivo con sintonizador incorporado Dispositivo de audio Estado de funcionamiento Botones disponibles Después de cambiar al dispositivo, cuando el menú de éste aparece en la pantalla.
¦ Solución de problemas de Anynet+ Problema Anynet+ no funciona. ● ● ● ● ● ● ● ● ● Deseo iniciar Anynet+. ● ● ● Deseo salir de Anynet+. ● ● ● En la pantalla aparece el ● mensaje ‘Conectando a un dispositivo Anynet + ’. ● El dispositivo Anynet+ no reproduce. El dispositivo conectado no se muestra. ● ● ● ● ● ● ● El programa de televisión ● no se puede grabar. El sonido del televisor no ● sale a través del receptor. Posible solución Compruebe si el dispositivo es un dispositivo Anynet+.
Content Library ¦ Uso de la Content Library La biblioteca de contenidos permite disfrutar de diferentes contenidos en el televisor. Se pueden utilizar los contenidos predeterminados almacenados en la memoria del televisor o los contenidos nuevos mediante un dispositivo USB.
❑ Juego Esta categoría ofrece juegos de entretenimiento para toda la familia. N Para conocer qué botones usar en cada juego, consulte las instrucciones que aparezcan en pantalla. N Botones de colores para los juegos Botón Rojo Verde Amarillo Azul Función Púlselo para ir a la pantalla inicial de los juegos Púlselo para poner el juego en pausa Tecla de opciones Púlselo para salir del juego ❑ Niños Incluye contenido educativo e interactivo que pueden ver los niños indefinidamente.
Internet@TV Si tiene problemas cuando utiliza algún servicio widget, póngase en contacto con el proveedor del servicio. En el widget, pulse el botón verde para obtener información de contacto o consulte la página web de ayuda para obtener información del widget. N Según la región, puede que en el servicio del widget sólo se admita el inglés. N Es posible que esta función no se admita, según el país.
❑ Pantalla de visualización ■ Modo Dock 1 Se muestra una pancarta de bienvenida con el nombre del perfil en la esquina superior derecha. N Tras unos momentos desaparece la pancarta. Hello John! 1 2 2 La pancarta resalta dos accesos directos del mando a distancia. N Si pulsa el botón azul (Visor) del mando a distancia, la pantalla cambia entre ‘Viewport mode’ y ‘Overlay mode’. En el modo Viewport, la televisión o el vídeo se reproduce en una área a escala reducida con gráficos en el exterior.
Todos los contenidos y servicios accesibles a través de este dispositivo pertenecen a terceros y se encuentran protegidos por las leyes de derechos de autor, patentes, marcas y demás legislación en materia de propiedad intelectual. Dichos contenidos y servicios se ofrecen únicamente para su uso personal y no comercial. Los contenidos y servicios no podrán ser utilizados de ninguna forma no autorizada por el correspondiente propietario de los contenidos o proveedor del servicio.
El menú Ajustes del perfil permite personalizar y proteger un perfil personal. ● Los perfiles de usuario se deben personalizar con un Nombre y un Avatar exclusivos (un avatar es una imagen que se utiliza para representar el perfil del usuario). ● El Nombre y el Avatar del usuario se muestran en el extracto del perfil en el acoplamiento. ● Los perfiles se pueden proteger con Crear PIN del perfil. N Cuando se configura el PIN por primera vez, se puede establecer una pregunta de seguridad.
¦ Uso del servicio meteorológico de Yahoo!® El servicio meteorológico de Yahoo!® proporciona actualizaciones de la información meteorológica de las ciudades y regiones que se desee. El contenido cambia dinámicamente al mismo tiempo que las condiciones climáticas. ● Pulse el botón verde del mando a distancia para mostrar el menú de Ajustes del servicio meteorológico de Yahoo!®. ● En este menú puede añadir o eliminar una ciudad cuya información meteorológica desee ver.
¦ Uso del servicio Filckr de Yahoo!® El servicio Flickr permite acceder a las fotos favoritas de amigos y familiares mientras se ve la televisión. Comparta sus fotos con su familia en la pantalla grande del televisor viéndolas en forma de presentación. ● Personalice el widget Flickr registrándose con su ID de Yahoo! ID. ● Con el fin de conocer el procedimiento detallado para el inicio de sesión, consulte las instrucciones ‘Uso del widget de un perfil’.
¦ Solución de problemas de internet@TV Problema Posible solución Algunos servicios de widget no funcionan. Compruebe con su proveedor del servicio. En el widget, pulse el botón verde para obtener información de contacto o consulte la página web de ayuda para obtener información del widget. Consulte la página web de la ayuda. Algunos contenidos de los widgets sólo están en inglés. ¿Cómo puedo cambiar el idioma? El idioma del contenido del widget puede ser deferente del idioma de la interfaz del usuario.
Internet@TV N Es posible que esta función no se admita, según el país. (no disponible en todos los lugares) N Si tiene problemas cuando utiliza algún servicio widget, póngase en contacto con el proveedor del servicio. En el widget, pulse el botón verde para obtener información de contacto o consulte la página web de ayuda para obtener información del proveedor del servicio. N Según la región, puede que en el servicio del widget sólo se admita el inglés.
❑ Configuración del sistema N Ejec.auto teletipo, Duración teletipo puede que no se admitan según el país. ■ Cambiar la contraseña de bloqueo del servicio N El número de la contraseña predeterminada para un televisor nuevo es 0-0-0-0. N Si ha olvidado la contraseña, pulse los botones del mando a distancia en la siguiente secuencia para reiniciar la contraseña como 0-0-0-0: POWER (Des.), → MUTE → 8 → 2 → 4 → POWER (Act.).
¦ Solución de problemas de internet@TV Problema Posible solución Algunos servicios de widget no funcionan. Compruebe con su proveedor del servicio. En el widget, pulse el botón verde para obtener información de contacto o consulte la página web de ayuda para obtener información del widget. Consulte la página web de la ayuda.
Centro de red doméstica ¦ Centro de red doméstica Acerca del Centro red doméstica El Centro de red doméstica conecta el televisor y los móviles a través de la red. Puede ver en el televisor las llamadas entrantes, el contenido de los mensajes de texto y las planificaciones programadas en el móvil mediante el Centro de red doméstica. Asimismo, puede reproducir el contenido multimedia guardado en los móviles, como vídeos, fotos y música, controlándolo en el televisor a través de la red.
¦ Configuración del Centro de red doméstica ❑ Mensaje / Multim. Muestra una lista de teléfonos móviles que se han configurado con este televisor para usar la función de mensajería o multimedia. N La función multimedia está disponible en otros teléfonos móviles que admiten DLNA DMC. Centro de red doméstica Mensaje 111-1234-5671 : Permtdo Multim. 111-1234-5672 : Permtdo Configuración 111-1234-5673 : Dnegado 111-1234-5674 : Dnegado ■ Permtdo Permite el móvil. ■ Dnegado Bloquea el móvil.
Visualización del mensaje Si llega un nuevo mensaje de texto (SMS) mientras ve la televisión, aparece la ventana de alarma. Si hace clic en el botón OK, aparecerá el contenido del mensaje. N Puede configurar las opciones de visualización del contenido de los mensajes de texto (SMS) en el móvil. Para conocer los procedimientos, consulte el manual del móvil. N Es posible que algunos caracteres especiales se muestren como caracteres dañados o en blanco.
RECOMENDACIONES ¦ Función de teletexto La mayoría de los canales de televisión proporcionan servicios de información escrita mediante el teletexto. La página de índice de dicho servicio proporciona información sobre el uso de éste. Asimismo, se pueden seleccionar diversas opciones mediante los botones del mando a distancia para ajustar el servicio a las necesidades del usuario. N Para que la información del teletexto se visualice correctamente, la recepción del canal debe ser estable.
Las páginas de teletexto se organizan en seis categorías: Parte A B C D E F Contenido Número de página seleccionado. Identidad del canal. Número de página actual o indicaciones de la búsqueda. Fecha y hora. Texto. Información de estado. Información FASTEXT. N La información de teletexto se suele dividir en varias páginas que aparecen en secuencia y a las que se puede acceder: Introduciendo el número de página. Seleccionando un título de la lista.
¦ Desconexión del soporte 1. Desmonte los tornillos de la parte posterior del televisor. 2. Separe el soporte del TV. N Se necesitan dos o más personas para trasladar el televisor. 3. Cubra el orificio inferior con la tapa. ¦ instalación del equipo de montaje en la pared Los elementos del montaje en la pared (se venden por separado) permiten instalar el televisor en una pared.
¦ Montaje de los cables ❑ Tipo soporte N Sujete los cables con la funda de cables para que éstos no sean visibles a través del soporte transparente. 1 1 2 2 3 3 ❑ Tipo montaje mural 1 1 N No tire de los cables con demasiada fuerza cuando los coloque. Podría dañar los terminales de conexión del producto. Español - 6 BN68-02329A-03Spa.
¦ Seguridad en el espacio de instalación Mantenga la distancia requerida entre el producto y otros objetos (por ejemplo, paredes) para asegurar la ventilación adecuada. En caso contrario, se podría producir un incendio por un incremento de la temperatura interna del producto. Instale el producto a la distancia requerida como se muestra en la ilustración. N Cuando utilice un soporte o un montaje mural, use sólo las piezas proporcionadas por Samsung Electronics.
¦ Solución de problemas Si tiene algún problema con el televisor, consulte esta lista en primer lugar. Si ninguno de los consejos funciona, visite ‘www. samsung.com’ y haga clic en Support o llame al centro de atención al cliente que encontrará en la lista de la última página. Problema Solución En primer lugar, ejecute Prueba de imagen para confirmar que el televisor muestra correctamente la imagen de prueba.
Problema Solución No hay imagen, ni vídeo El televisor no se enciende. ● ● ● El televisor se apaga automáticamente. ● ● ● ● No hay imagen/vídeo. ● ● ● ● Compruebe que el cable de alimentación esté bien conectado en la toma de la pared y en el televisor. Compruebe que la toma de la pared funciona. Pulse el botón POWER del televisor para asegurarse de que el mando a distancia funciona adecuadamente. Si el televisor se enciende, puede ser debido al mando a distancia.
Problema Solución Otros La imagen no se muestra en pantalla completa. ● ● ● El mando a distancia no funciona. ● ● ● En cada lado se muestran barras negras en los canales de alta definición cuando se muestran contenidos SD mejorados (4:3). Barras negras en las partes inferior y superior cuando se ven películas que tienen diferentes formatos que el televisor. Ajuste la opción del tamaño de imagen del dispositivo externo o del televisor al modo de pantalla completa.
pantalla. Estos píxeles no influirán en el rendimiento del aparato. Español - 72 BN68-02329A-03Spa.
Esta página se ha dejado intencionadamente en blanco. BN68-02329A-03Spa.
As imagens e ilustrações neste manual do utilizador servem apenas de referência e podem ser diferentes do produto real. O design e as especificações do produto podem ser alterados sem aviso prévio. ❑ Licença TruSurround HD, SRS e símbolo são marcas comerciais da SRS Labs, Inc. A tecnologia TruSurround HD está incorporada na licença da SRS Labs, Inc. Fabricado sob a licença da Dolby Laboratories. Dolby e o símbolo de duplo D são marcas comerciais da Dolby Laboratories.
Conteúdos ANYNET+ Configurar o televisor ■ Acessórios.......................................................................................... 2 ■ Apresentação do painel de controlo................................................... 2 ■ Apresentação do painel de ligação.................................................... 3 ■ Apresentação do telecomando........................................................... 6 ■ Telecomando Mini............................................................................
Configurar o televisor ¦ Acessórios Telecomando e pilhas (2 pilhas AAA) CD do programa Tampa da parte inferior Pano de limpeza Cartão de garantia / Guia de segurança (Não disponível em todos os locais) Telecomando mini e pilhas (3 V) Cabo componente Anel de suporte (4) Suporte para cabos (3) Base de suporte de cabos Cabo AV Cabo SCART Suporte de cabos (Dependendo do modelo) Manual do utilizador N Verifique se os seguintes acessórios estão incluídos no televisor LED.
5 MENU: carregue para ver o menu das funções do televisor no ecrã. 6 SOURCEE: alterna entre todas as fontes de entrada disponíveis. No menu no ecrã, utilize este botão tal como utiliza o botão ENTERE do telecomando. 7 ALTIFALANTES ¦ Apresentação do painel de ligação [Painel posterior do televisor] # @ 0 ! 0 9 8 1 2 3 4 5 67 Entrada de energia N A cor e a forma do produto podem variar consoante o modelo.
1 DISPOSITIVO DE BLOQUEIO KENSINGTON (consoante o modelo) O dispositivo de bloqueio Kensington (opcional) serve para fixar fisicamente o sistema quando utilizado em locais públicos. Se quiser utilizar um dispositivo de bloqueio, contacte o revendedor onde adquiriu o televisor. N A localização do dispositivo de bloqueio Kensington pode ser diferente consoante o modelo. 2 LAN Ligue um cabo LAN a esta porta para estabelecer a ligação à rede.
0 USB 1 (HDD) / USB 2 Conector para actualizações do software e Media Play, etc. Pode estabelecer a ligação à rede Samsung sem fios utilizando o ‘adaptador de LAN sem fios da Samsung’ (vendido separadamente). N Para USB HDD, utilize a porta USB 1 (HDD). ! DIGITAL AUDIO OUT (OPTICAL) Estabelece a ligação com um componente de áudio digital, tal como um receptor do sistema home theatre.
¦ Apresentação do telecomando N Pode utilizar o telecomando até aproximadamente 7 metros de distância do televisor. N O funcionamento do telecomando pode ser afectado por luzes fortes. N A cor e a forma do produto podem variar consoante o modelo. 1 POWER: liga e desliga o televisor. 2 TV: selecciona o modo TV directamente. 3 BOTÕES NUMÉRICOS: carregue para mudar de canal. 4 FAV.CH: Utilizado para mostrar a Lista de canais favoritos no ecrã. 5 INFO: carregue para apresentar informações no ecrã do televisor.
¦ Telecomando Mini O telecomando Mini é um telecomando simplificado que conta apenas com os botões de alimentação, dos canais e do volume. 1 Botão Standby do televisor 4 1 2 2 < : Canal seguinte / > : Canal anterior 3 3 + : Aumentar volume / – : Diminuir volume 3 2 4 Transmissor IrDA (infravermelhos) N Utilize o telecomando Mini de forma a que esta zona fique virada para o televisor.. ¦ Colocar pilhas no telecomando Telecomando 1.
¦ Aceder aos menus Antes de utilizar o televisor, siga os passos seguintes para saber como navegar no menu e seleccionar ou ajustar diferentes funções. Botão MENU Mostrar o menu principal no ecrã. Botão RETURN Volta ao menu anterior. Botão ENTERE / DIRECÇÃO Mover o cursor e seleccionar um item. Escolhe o item actualmente seleccionado. Confirmar a definição. EXIT Sair do menu no ecrã.
¦ Função Plug & Play (Dependendo do modelo) Quando ligar o televisor pela primeira vez, as definições básicas são utilizadas de forma automática e subsequente. 1. Carregue no botão POWER do telecomando. N Também pode utilizar o botão POWERP do televisor. N A mensagem Select the OSD Language. é apresentada. Plug & Play 2. Carregue no botão ENTERE. Seleccione o idioma apropriado carregando no botão ▲ ou ▼. Carregue no botão ENTERE para confirmar a escolha. Select the OSD Language.
¦ Visualização no ecrã A visualização no ecrã identifica o canal actual e o estado de determinadas definições de áudio-vídeo. O Carregue no botão INFO para visualizar as informações. Carregue no botão INFO no telecomando. O canal, o tipo de som e o estado de determinadas definições de imagem e som são apresentados no televisor. ● ▲, ▼: pode visualizar outras informações do canal. Se quer passar para o canal actualmente seleccionado, carregue no botão ENTERE.
❑ Memor. manual N Procura um canal manualmente e armazena na TV. N Se o canal estiver bloqueado utilizando a função Bloq. crianças, a janela para a introdução do PIN é apresentada. ■ Canal digital Armazenamento manual de canal digital. N Canal digital só está disponível no modo DTV. ● Canal: defina o número do canal utilizando o botão ▲, ▼ ou os botões numéricos (0~9). ● Frequência: defina a frequência utilizando os botões numéricos.
❑ Guia predef. → Guia completo / Mini guia Pode decidir entre apresentar a opção Guia completo ou Mini guia quando carregar no botão GUIDE do telecomando. ❑ Lista canais Para procedimentos detalhados sobre a utilização de Lista canais, consulte as instruções de ‘Gerir canais’. O Para seleccionar estas opções, basta carregar no botão CH LIST do telecomando. ❑ Modo Canal Ao carregar no botão P >/< o canal muda de acordo com a lista de canais seleccionados.
¦ Gerir canais Se utilizar este menu, pode adicionar / eliminar ou definir os canais favoritos e utilizar o guia de programas para transmissões digitais. ■ Canais adicionados ■ Todos os canais Mostra todos os canais disponíveis. Canais adicionados Mostra todos os canais adicionados.
■ Bloquear / Desbloq. Pode bloquear um canal para que o mesmo não seja nem seleccionado nem visualizado. N Esta função só está disponível quando a opção Bloq. crianças está definida para Lig.. N É apresentado o ecrã para a introdução do número PIN. Introduza o número PIN de 4 dígitos. N O número PIN predefinido de um televisor novo é 0-0-0-0. Pode alterar o PIN, seleccionando a opção Alterar PIN do menu. N É apresentado o símbolo “\” e o canal é bloqueado. ■ Visual. temp.
IMAGEM ¦ Configurar o menu Imagem ❑ Modo ■ Dinâmico Selecciona a imagem para que seja exibida com uma maior definição numa sala iluminada. ■ Standard Selecciona a imagem para que seja exibida em condições ideais num ambiente normal. ■ Natural Selecciona uma visualização de imagem óptima e confortável para os olhos. N Esta função não está disponível no modo PC. ■ Filme Selecciona a imagem ideal para ver filmes numa sala escura.
■ Matriz de cores A matriz de cores é um esquema de cores composto por vermelho, verde e azul. Seleccione a sua matriz de cores favorita para obter uma cor mais natural. ● Auto.: a matriz de cores automática ajusta automaticamente a tonalidade de cor mais natural com base em fontes do programa. ● Nativo: a matriz de cores nativa fornece uma tonalidade mais rica e profunda. ● Personalizar: ajusta o intervalo de cores de acordo com a sua preferência.
■ Tamanho Eventualmente, pode pretender alterar o tamanho da imagem no ecrã. O seu televisor inclui várias opções de tamanho de ecrã, cada uma delas concebida para funcionar em conjunto com tipos específicos de entradas de vídeo. A sua caixa de televisão por cabo/receptor de satélite pode ter os seus próprios tamanhos de ecrã. No entanto, regra geral, as imagens apresentadas no televisor encontram-se, maioritariamente, no modo 16:9. T Carregue no botão TOOLS para ver o menu Ferramentas.
■ 100Hz Motion Plus → Deslig. / Nítido / Standard / Suave / Personalizar / Demo Elimina o arrastamento em cenas rápidas com muito movimento para obter uma imagem mais nítida. N Se activar 100Hz Motion Plus, podem surgir interferências no ecrã. Se tal acontecer, defina 100Hz Motion Plus para Deslig.. ● Deslig.: desactiva a opção 100Hz Motion Plus. ● Nítido: define a opção 100Hz Motion Plus para o valor mínimo. ● Standard: define a opção 100Hz Motion Plus para o valor médio.
¦ Utilizar o televisor como monitor de computador (PC) Configurar o software do PC (com base em Windows XP) As definições de visualização do Windows num computador normal são apresentadas abaixo. Os ecrãs que aparecem no monitor do seu PC são provavelmente diferentes, dependendo da sua versão do Windows e da placa de vídeo. Contudo, mesmo que os ecrãs sejam diferentes, em quase todos os casos, aplicam-se as mesmas informações de configuração básicas.
¦ Configurar o televisor com o PC N Predefinição: carregue no botão SOURCE para seleccionar o modo PC. ❑ Ajuste auto. Brilho Nitidez Imagem Utilize a função de ajuste automático para que o televisor ajuste automaticamente os sinais de vídeo recebidos. A função também executa automaticamente a sintonização fina das definições e ajusta as posições e os valores de frequência. T Carregue no botão TOOLS para ver o menu Ferramentas.
❑ Idioma de áudio Pode alterar o valor predefinido dos idiomas de áudio. Apresenta as informações do idioma da transmissão a ser recebida. N Quando estiver a ver um canal digital, pode seleccionar esta função. N Apenas pode seleccionar de entre os idiomas disponíveis pela transmissão.
¦ Seleccionar o modo de Som Pode definir o modo de som no menu Ferramentas. Quando define para Dual l ll, o modo de som actual é apresentado no ecrã. Estéreo A2 NICAM Estéreo Tipo de áudio Mono Estéreo Dual Mono Estéreo Dual Dual 1 / 2 MONO Estéreo ↔ MONO DUAL 1 ↔ DUAL 2 MONO MONO ↔ Estéreo MONO ↔ DUAL 1 DUAL 2 Predefinido Mudança automática DUAL 1 Mudança automática DUAL 1 N Se o sinal de estéreo for fraco e ocorrer uma mudança automática, mude para o modo mono.
■ Idioma do teletexto Pode definir o idioma do Teletexto seleccionando o idioma. N O inglês é a predefinição para os casos em que o idioma seleccionado não esteja disponível na transmissão. ■ Preferência ● Idioma principal / Idioma secundário / Idioma princ. Legendas / Idioma secund. Legendas / Idioma principal do teletexto / Idioma secund. Teletexto Ao utilizar esta funcionalidade, os utilizadores podem seleccionar um dos idiomas.
❑ Rede → Tipo de rede / Configurar Rede Para obter informações detalhadas sobre os procedimentos necessários para configurar opções, consulte as instruções de ‘Definir a rede’. ❑ Geral ■ Modo Jogo → Deslig. / Lig. Quando ligar uma consola de jogos, como a PlayStation™ ou Xbox™, pode tirar partido de uma experiência de jogo mais realista seleccionando o menu Jogos. N Restrições no modo Jogos (Atenção) Para desligar a consola de jogos e ligar outro dispositivo externo, defina Modo Jogo para Deslig.
¦ Acertar a hora ❑ Relógio ■ ■ Modo Relógio Pode definir a hora actual de forma manual ou automática. ● Auto.: defina automaticamente a hora actual, utilizando a hora da transmissão digital. ● Manual: defina manualmente a hora actual para uma hora específica. N Consoante a estação de transmissão e o sinal, a hora actual pode não ser acertada correctamente. Se tal acontecer, acerte a hora manualmente. N A antena ou cabo devem estar ligados para que a hora seja acertada automaticamente.
¦ Ligação à rede Pode configurar o protocolo de Internet para comunicar com várias redes ligadas. ❑ Ligação à rede - Cabo ■ Ligação LAN para um ambiente DHCP Seguem-se os procedimentos necessários para configurar a rede utilizando o protocolo de configuração de servidor dinâmico (DHCP - Dynamic Host Configuration Protocol). Uma vez que o endereço IP, a máscara de sub-rede, a gateway e o DNS são automaticamente atribuídos quando o DHCP é seleccionado, não é necessário introduzi-los manualmente. 1.
■ Ligação LAN para um ambiente de IP estático Seguem-se os procedimentos necessários para configurar a rede utilizando um endereço IP estático. Tem de introduzir manualmente o endereço IP, a máscara de sub-rede, a gateway e o DNS fornecidos pelo seu fornecedor de serviços de Internet (ISP - Internet Service Provider). 1. Ligue a porta LAN no painel traseiro do televisor à porta LAN na parede utilizando o cabo LAN.
N Seleccione um canal para o router IP sem fios que não esteja a ser utilizado actualmente. Se o canal definido para o router IP sem fios estiver a ser utilizado actualmente por outro dispositivo por perto, podem verificar-se interferências e as comunicações podem falhar. N Se aplicar um sistema de segurança diferente dos sistemas listados abaixo, este não funciona com o televisor. Quando aplicar a chave de segurança ao AP (router IP sem fios), só são disponibilizadas as seguintes opções.
Configurar cabo de rede-Manual Para ligar o televisor à LAN utilizando um endereço IP estático, deve configurar o protocolo de Internet (IP - Internet Protocol). 1. Defina Tipo de rede para Cabo. 2. Seleccione Configurar cabo de rede. 3. Defina Config. Protoc. Internet para Manual. Configurar cabo de rede Config. Protoc. Internet : Manual ▶ Teste de rede: Endereço IP : 0 0 0 0 Máscara de sub-rede : 0 0 0 0 Gateway Servidor DNS : : 0 0 0 0 0 0 0 0 4.
● Se a opção Chave segur. não estiver definida: Se o AP que suporta WPS não tiver uma definição de segurança, pode seleccionar PBC, PIN, Sem segurança. A opção Sem segurança permite estabelecer a ligação ao AP directamente sem utilizar a função WPC. N O processo para as opções PBC, PIN é igual ao descrito acima. Consulte-o se a opção Chave segur. já estiver definida. N Tente novamente se a ligação não funcionar.
ENTRADA / Assistência ¦ Menu Entrada ❑ Lista de fontes ■ Entrada Utilize esta opção para seleccionar o televisor ou outras fontes de entrada externas, como leitores de DVD / leitores de Blu-ray / caixa de televisão por cabo / receptores de satélite (settop box) ligados ao televisor. Utilize para seleccionar a sua fonte de entrada preferida. O Carregue no botão SOURCE do telecomando para ver uma fonte de sinal externo. O modo TV pode ser seleccionado carregando no botão TV. TV / Ext.
Utilizar os botões do telecomando no menu Guia de Produto Botão Botão amarelo ◄/► ENTERE RETURN EXIT Operações Mostra os conteúdos da opção Guia de Produto de forma sequencial. (Reprodução automática) Move o cursor e selecciona um item. Escolhe o item actualmente seleccionado. Volta ao menu anterior. Pára a função actual e volta ao menu principal da opção Guia de Produto. ❑ Auto-diagnóstico ■ Teste de imagem Auto-diagnóstico Caso tenha algum problema com a qualidade da imagem, execute o teste de imagem.
❑ Actualização do software Futuramente, a Samsung pode oferecer actualizações para o firmware do televisor. Estas actualizações podem ser efectuadas através do televisor, se este estiver ligado à Internet, ou através da transferência de novo firmware do site samsung.com para um dispositivo de memória USB. N Versão actual é o software já instalado no televisor. N Software Alternativo (Backup) mostra a versão anterior que vai ser substituída. N O software é apresentado como ‘Ano/Mês/Dia_Versão’.
Media Play (USB & DLNA) ¦ Ligar um dispositivo USB 1. Carregue no botão POWER para ligar o televisor. Painel posterior do televisor 2. Ligue um dispositivo USB que contenha ficheiros de fotografia, música e/ou filme à tomada USB1(HDD) ou USB2 na parte lateral do televisor. 3. Quando surgir o ecrã de selecção Aplicação, carregue no botão ENTERE para seleccionar ou Media Play (USB & DLNA). N O MTP (Media Transfer Protocol) não é suportado. N O sistema de ficheiros suporta FAT16, FAT32 e NTFS.
¦ Função Media Play Esta função permite visualizar e ouvir ficheiros de fotografia, música e/ou filme guardados num dispositivo USB de classe de armazenamento de massa (MSC). N O equipamento pode não funcionar correctamente com ficheiros multimédia não licenciados. Entrar no menu Media Play (USB & DLNA) 1. Carregue no botão MENU. Carregue no botão ▲ ou ▼ para seleccionar Aplicação e, em seguida, carregue no botão ENTERE. 2.
5 Itens de ajuda • Botão verde (Def.fav.): altera as definições de Favourites Settings para o ficheiro seleccionado. Carregue várias vezes neste botão até aparecer o valor pretendido. • Botão amarelo (Selec.): selecciona ficheiros da lista de ficheiros. Os ficheiros seleccionados estão marcados com o símbolo c. Carregue novamente no botão amarelo para cancelar a selecção de um ficheiro. • Botão TOOLS (Ferramentas): mostra os menus de opções. (O menu de opções é alterado consoante o estado actual.
¦ Menu de opções da lista de fotografias / músicas / filmes 1. Carregue no botão MEDIA.P. Visual. básica Lin.Tem. 2. Carregue no botão ◄ ou ► para seleccionar Photo, Music ou Movie e em seguida carregue no botão ENTERE. 3. Carregue no botão ◄ ou ► para seleccionar o ficheiro pretendido. N Seleccionar vários ficheiros Carregue no botão ◄ ou ► para seleccionar o ficheiro pretendido. Em seguida, carregue no botão amarelo. Repita a operação acima descrita para seleccionar vários ficheiros.
¦ Menu de opções de Apresentação de diapositivos / Reprodução de música / Reprodução de filmes 1. Durante uma apresentação de diapositivos (ou enquanto visualiza uma fotografia), ou a reprodução de uma música ou filme, carregue no botão TOOLS para definir a opção. 2. Carregue no botão ▲ ou ▼ para seleccionar a opção pretendida e, em seguida, carregue no botão ENTERE. ❑ Definição de Imagem / Definições do Som Ferramentas Pode seleccionar as definições de imagem e de som. Parar apresentação de slides Vel.
¦ Visualizar uma fotografia ou uma apresentação de diapositivos Visualizar uma apresentação de diapositivos N Todos os ficheiros na secção da lista de ficheiros serão utilizados para a apresentação de diapositivos. N Durante a apresentação de diapositivos, os ficheiros são apresentados por ordem a partir do ficheiro actualmente exibido. N O progresso da apresentação de diapositivos é efectuado pela ordem definida na secção da lista de ficheiros.
¦ Reproduzir uma música Reproduzir um ficheiro de música 1. Carregue no botão ▼ para seleccionar a secção da lista de ficheiros. 2. Carregue no botão ◄ ou ► para seleccionar o ficheiro de música que pretende reproduzir. ▶ 00:00:04 / 00:04:04 3/37 Way I Love You HaHaHa 3. Carregue no botão ∂ (Reproduzir) / ENTERE. N Este menu só apresenta ficheiros com a extensão MP3.
¦ Reproduzir um ficheiro de filme Reproduzir um ficheiro de filme 1. Carregue no botão ▼ para seleccionar a secção da lista de ficheiros. 2. Carregue no botão ◄ ou ► para seleccionar o ficheiro de filme que pretende reproduzir. ▶ 00:00:01 / 00:05:30 3/37 ABC.avi 3. Carregue no botão ∂ (Reproduzir) / ENTERE. N O ficheiro seleccionado é reproduzido. N O ficheiro seleccionado é apresentado na parte superior, com o respectivo tempo de reprodução.
N Botões de controlo de reprodução de vídeo Botão ENTERE ∂ ∑ TOOLS ∫ ◄/► ▲/▼ μ Operações Reproduz/interrompe o ficheiro de filme Reproduz o ficheiro de filme Interrompe o ficheiro de filme Executa várias funções a partir dos menus de filme. Sai do modo de reprodução e volta à lista de filmes. Avança ou retrocede no ficheiro de filme. Vai para o primeiro/último ficheiro. Reproduz o ficheiro ao dobro da velocidade. Esta função pode não ser suportada consoante o codec. Reproduzir o grupo de filmes 1.
¦ Utilizar o menu Setup A opção Setup apresenta as definições do utilizador do menu Media Play. SUM 1. Carregue no botão MEDIA.P. 2. Carregue no botão ◄ ou ► para seleccionar Setup e, em seguida, carregue no botão ENTERE. 851,86 MB/993,02 MB Livres SETUP 3. Carregue no botão ▲ ou ▼ para seleccionar a opção pretendida. 4. Carregue nos botões ◄ ou ► para seleccionar a opção. N Para sair do modo Media Play, carregue no botão MEDIA.P do telecomando. ■ Use Cor Ver → Lig. / Deslig.
Media Play-DLNA ¦ Definir a rede DLNA A DLNA permite visualizar imagens, ouvir músicas e ver vídeos guardados no PC ou no televisor através de uma ligação à rede no modo Media Play. Isto elimina a necessidade de copiá-los para um dispositivo de armazenamento USB e, em seguida, ligar o dispositivo ao televisor. Para utilizar a DLNA, o televisor deve estar ligado à rede e a aplicação DLNA deve estar instalada no PC.
Requisitos do sistema 1. Introduza no PC o CD do programa fornecido com este televisor. 2. São necessários 30 MB de espaço livre no disco rígido para a instalação do programa. N Se partilhar ficheiros, é necessário um espaço livre no disco rígido até 30 MB para cada 100 ficheiros. N Se cancelar a partilha de ficheiros, o espaço do disco rígido utilizado para a informação das miniaturas é igualmente libertado.
❑ Partilhar ■ Partilhar uma Pasta Pode partilhar uma pasta do PC no televisor. ■ Cancelar uma Shared Pasta Pode cancelar uma pasta partilhada no PC. Seleccione uma pasta do painel Shared Pasta e escolha Unshare Pasta. ■ Aplicar as definições actuais Efectue esta acção quando for necessário sincronizar devido a uma nova pasta partilhada ou ao cancelamento de uma pasta partilhada. O menu Set Mudar State aplica as alterações nas pastas partilhadas aos dados guardados com o programa de partilha do PC.
ANYNET+ ¦ Ligar dispositivos Anynet+ O que é o Anynet+? Anynet+ é uma função que permite controlar, a partir do telecomando, todos os dispositivos Samsung ligados que suportam Anynet+. O sistema Anynet+ pode ser utilizado com os dispositivos Samsung que tenham a funcionalidade Anynet+. Para se certificar de que o dispositivo Samsung dispõe desta funcionalidade, verifique se existe um logótipo Anynet+. Para ligar ao televisor TV Dispositivo Anynet+ 1 Cabo HDMI 1.
¦ Configurar a função Anynet+ Media Play (USB & DLNA) Aplicação T Carregue no botão TOOLS para ver o menu Ferramentas. Também pode ver o menu Anynet+ seleccionando Ferramentas → Anynet+ (HDMI-CEC). Anynet+ (HDMI-CEC) Content Library Internet@TV Centro rede domést. ❑ Configurar ■ ■ Anynet+ (HDMI-CEC) → Deslig. / Lig. Para utilizar a função Anynet+, o Anynet+ (HDMI-CEC) tem de estar definido para Lig..
Botões do telecomando do televisor disponíveis no modo Anynet+ Tipo de dispositivos Dispositivo Anynet+ Estado de funcionamento Botões disponíveis Depois de alternar para o dispositivo, quando o menu do dispositivo correspondente for apresentado no ecrã.
¦ Resolução de problemas para o Anynet+ Problema O Anynet+ não funciona. ● ● ● ● ● ● ● ● ● Quero iniciar o Anynet+. ● ● ● Quero sair do Anynet+. ● ● ● A mensagem ‘Ligação a Anynet+ dispositivo’ aparece no ecrã. ● ● O dispositivo Anynet+ ● não reproduz. O dispositivo ligado não é ● apresentado. ● ● ● Verifique se o dispositivo suporta as funções Anynet+. Verifique se o cabo HDMI 1.3 está ligado correctamente. Verifique se a função Anynet+ (HDMI-CEC) está definida para Lig.
Content Library ¦ Utilizar a aplicação Content Library A aplicação Content Library permite-lhe desfrutar de vários conteúdos no televisor. Pode utilizar os conteúdos predefinidos guardados na memória do televisor, ou pode desfrutar de novos conteúdos utilizando um dispositivo USB.
❑ Jogos Esta categoria disponibiliza jogos e entretenimento para toda a família. N Para saber quais os botões utilizados nos jogos, consulte as instruções no ecrã. N Botões coloridos para os jogos Botão Vermelho Verde Amarelo Azul Operações Carregue neste botão para ir para o ecrã inicial do jogo Carregue neste botão para interromper o jogo Tecla de opção Carregue neste botão para sair do jogo ❑ Crianças Inclui conteúdos educacionais e interactivos que as crianças podem ver várias vezes.
Internet@TV Se tiver algum problema ao utilizar o serviço widget, contacte o fornecedor de conteúdo. No widget, carregue no botão verde e obtenha informação sobre o contacto ou consulte o website de ajuda para obter informações sobre o fornecedor do serviço widget. N Consoante a região, pode ser suportado apenas o inglês no serviço widget. N Dependendo do país, esta função pode não ser suportada.
❑ Descrição do ecrã ■ Modo de ancoragem 1 Uma faixa de boas-vindas é apresentada com o nome do seu perfil no canto superior direito. N Esta faixa desaparece após um curto espaço de tempo. 2 A faixa realça dois atalhos do telecomando. N Se carregar no botão azul (Viewport) do telecomando, a visualização alterna entre ‘modo Viewport’ e ‘modo Overlay’. No modo Viewport, o televisor ou o vídeo reproduz imagens numa área reduzida com gráficos fora dessa área.
All content and services accessible through this device belong to third parties and are protected by copyright, patent, trademark and/or other intellectual property laws. Such content and services are provided solely for your personal noncommercial use. You may not use any content or services in a manner that has not been authorized by the content owner or service provider.
O menu Profile Settings permite-lhe personalizar e proteger o perfil. ● Os perfis dos utilizadores podem ser personalizados com um Name e um Avatar (uma imagem utilizada para representar o perfil) únicos. ● O Name do perfil e o Avatar são apresentados no snippet do perfil na ancoragem. ● Os perfis podem ser protegidos com a opção Create Profile PIN. N Quando definir o PIN pela primeira vez, pode definir uma pergunta de segurança. O menu Profile Settings pode limitar o acesso a widgets.
¦ Utilizar o Yahoo!® Weather Widget O Yahoo!® Weather Widget fornece-lhe informações actualizadas sobre as suas localizações meteorológicas favoritas. O conteúdo muda de forma dinâmica com as condições meteorológicas. ● Carregue no botão verde do telecomando para visualizar o menu Settings do Yahoo!® Weather Widget. ● A partir do menu Settings pode adicionar ou eliminar uma localidade sobre a qual pretende ver as informações meteorológicas. No menu Settings: ● Add New City introduzindo o nome da localidade.
¦ Utilizar o Yahoo!® Flickr Widget O Flickr Widget pode disponibilizar-lhe o acesso às suas fotografias favoritas de amigos e família enquanto vê televisão. Partilhe as suas fotografias com a sua família no grande ecrã do seu televisor através de uma apresentação de diapositivos. ● Personalize o Flickr Widget registando-se na Yahoo! ID. ● Para obter informações detalhadas sobre os procedimentos de início de sessão, consulte as instruções de ‘Utilizar o widget Profile’.
¦ Resolução de problemas da aplicação Internet@TV Problema Solução possível Alguns serviços widget não funcionam. Fale com o fornecedor de serviço. No widget, carregue no botão verde e obtenha informação sobre contactos ou consulte o website de ajuda para obter informações sobre o fornecedor de serviço widget. Consulte a página de Ajuda do website. Alguns conteúdos de widgets são apenas em inglês.
Internet@TV N Dependendo do país, esta função pode não ser suportada. (Não disponível em todos os locais) N Se tiver algum problema enquanto utiliza um serviço widget, contacte o fornecedor de serviço. No widget, carregue no botão verde e obtenha informação sobre contactos ou consulte o website de ajuda para obter informações sobre o fornecedor de serviço. N Consoante a região, pode ser suportado apenas o inglês no serviço widget.
❑ Config. sistema N Exe.auto do Ticker, Duração do Ticker podem não ser suportadas consoante o país. ■ Alterar a palavra-passe do Bloqueio de serviço N A palavra-passe predefinida de um televisor novo é 0-0-0-0. N Caso se esqueça da palavra-passe, carregue nos botões do telecomando pela seguinte sequência, repondo a palavra-passe para 0-0-0-0: POWER (Deslig.) → MUTE → 8 → 2 → 4 → POWER (Lig.).
¦ Resolução de problemas da aplicação Internet@TV Problema Solução possível Alguns serviços widget não funcionam. Fale com o fornecedor de serviço. No widget, carregue no botão verde e obtenha informação sobre contactos ou consulte o website de ajuda para obter informações sobre o fornecedor de serviço widget. Consulte a página de Ajuda do website.
Centro rede domést. ¦ Centro rede domést. A aplicação Centro rede domést. A aplicação Centro rede domést. liga o televisor a telemóveis através de uma rede. Pode ver as chamadas recebidas, o conteúdo de mensagens de texto e os compromissos definidos no telemóvel através do televisor utilizando a aplicação Centro rede domést. Além disso, pode reproduzir os conteúdos multimédia guardados no telemóvel, como vídeos, fotografias e música controlando-os para o televisor através da rede.
¦ Configurar a aplicação Centro rede domést. ❑ Mensag. / Média Apresenta uma lista de telemóveis que foram configurados com este televisor de modo a utilizar a função Message ou Media. N A função Media encontra-se disponível noutros dispositivos móveis que suportem DLNA DMC. Centro rede domést. Mensag. 111-1234-5671 : Permit. Média 111-1234-5672 : Permit. Configurar 111-1234-5673 : Recus. 111-1234-5674 : Recus. ■ Permit. Autoriza o telemóvel. ■ Recus. Bloqueia o telemóvel.
Visualizar mensagem Se receber uma nova mensagem de texto (SMS) enquanto vê televisão, aparece a janela de alarme. Se clicar no botão OK, os conteúdos da mensagem são apresentados. N Pode configurar as definições de visualização dos conteúdos das mensagens de texto (SMS) no telemóvel. Para obter mais informações sobre os procedimentos, consulte o manual do telemóvel. N Alguns caracteres especiais podem aparecer em branco ou corrompidos.
RECOMENDAÇÕES ¦ Função de teletexto A maioria das estações de televisão fornece serviços de informação por escrito através da função de teletexto. A página de índice do serviço de teletexto fornece informações sobre como utilizar o serviço. Além disso, pode seleccionar várias opções de acordo com os seus requisitos, utilizando os botões do telecomando. N Para que as informações de teletexto sejam apresentadas correctamente, é preciso que a recepção dos canais se processe em boas condições.
As páginas do teletexto estão divididas em seis categorias: Parte A B C D E F Conteúdos Número da página seleccionada. Nome da estação emissora. Número da página actual ou indicações da procura. Data e hora. Texto. Informações sobre o estado. Informações FASTEXT.
¦ Desligar a base 1. Retire os parafusos da parte posterior do televisor. 2. Separe a base do televisor. N O televisor deve ser transportado por duas ou mais pessoas. 3. Tape o orifício inferior com a tampa. ¦ Instalar o kit de montagem na parede Os acessórios de montagem na parede (vendidos em separado) permitem montar o televisor na parede. Para saber mais sobre como instalar o kit de montagem na parede, consulte as instruções que acompanham os respectivos acessórios.
¦ Montar os cabos ❑ Tipo de base N Envolva os cabos no suporte de cabos, para que estes não fiquem invisíveis através da base transparente. 1 1 2 2 3 3 ❑ Tipo de montagem na parede 1 1 N Não puxe demasiado pelos cabos, quando os organizar.. Se o fizer, pode danificar os terminais de ligação do produto. Português - 6 BN68-02329A-03Por.
¦ Manter um espaço de instalação seguro Mantenha as distâncias recomendadas entre o produto e outros objectos (por exemplo, uma parede) para garantir a ventilação adequada. Caso contrário, pode provocar um incêndio ou danificar o produto devido ao aumento de temperatura no interior do mesmo. Instale o produto de modo a que as distâncias recomendadas, assinaladas na figura seguinte, sejam respeitadas.
¦ Resolução de problemas Se tiver alguma dúvida sobre o televisor, consulte primeiro esta lista. Se nenhuma destas sugestões para resolução de problemas se aplicar, consulte o site ‘www.samsung.com’ e, em seguida, clique em Assistência ou contacte o Centro de atendimento na lista da última página. Problema Qualidade de imagem A imagem do televisor não parece ser de tão boa qualidade como na loja.
Problema Sem imagem, sem vídeo O televisor não liga. Solução ● ● ● O televisor desliga-se automaticamente. ● ● ● ● Sem imagem/vídeo. ● ● ● ● Certifique-se de que o cabo de alimentação CA está ligado correctamente à tomada de parede e ao televisor. Verifique se a tomada de parede está a funcionar devidamente. Tente carregar no botão POWER no televisor para ter a certeza de que o telecomando está a funcionar correctamente. Se o televisor ligar, o problema pode ser causado pelo telecomando.
Problema Solução Outros A imagem não é apresentada em ecrã inteiro. ● ● ● Serão apresentadas barras pretas em ambos os lados nos canais HD sempre que forem apresentados conteúdos SD (4:3) actualizados. Serão apresentadas barras pretas na parte superior e inferior dos filmes que tenham um formato diferente do seu televisor. Ajuste a opção de tamanho da imagem no seu dispositivo externo ou televisor para ecrã inteiro. Substitua as pilhas do telecomando com o tipo de polaridade correcto (+ -).
¦ Especificações Nome do modelo Tamanho do ecrã (Diagonal) Resolução do PC (Ideal) Som Saída Dimensões (LxAxP) Caixa Com base Peso Com base Considerações ambientais Temperatura de funcionamento Humidade de funcionamento Temperatura de armazenamento Humidade de armazenamento Base rotativa (esquerda / direita) UE32B7000, UE32B7020 UE40B7000, UE40B7020 32 " 40 " 1920 x 1080 @ 60 Hz 1920 x 1080 @ 60 Hz 10 W X 2 10 W X 2 813 X 30 X 520 mm 813 X 240 X 585 mm 996 X 30 X 630 mm 996 X 255 X 692 mm 14 kg
Esta página foi intencionalmente deixada em branco. BN68-02329A-03Por.
Slike in ilustracije v tem uporabniškem priročniku so samo za referenco: Dejanski izdelek je lahko videti drugačen. Obliko in tehnične lastnosti lahko spremenimo brez predhodnega obvestila. ❑ Licenca TruSurround HD, SRS in simbol so blagovne znamke podjetja SRS Labs, Inc. Tehnologija TruSurround HD je vgrajena pod licenco podjetja SRS Labs, Inc. Izdelano pod licenco podjetja Dolby Laboratories. Dolby in simbol DD sta blagovni znamki podjetja Dolby Laboratories.
Vsebina ANYNET+ Nastavitev televizorja ■ Dodatna oprema................................................................................. 2 ■ Ogled nadzorne plošče....................................................................... 2 ■ Ogled plošče s priključki..................................................................... 3 ■ Ogled daljinskega upravljalnika.......................................................... 6 ■ Mini daljinski upravljalnik.....................................................
Nastavitev televizorja ¦ Dodatna oprema Daljinski upravljalnik in bateriji (AAA x 2) CD s programom Pokrov za podstavek Čistilna krpa Garancijska kartica/Varnostni priročnik (Ni na voljo povsod.) Mini daljinski upravljalnik in bateriji (3 V) Komponentni kabel Držalni obroč (4) Spojnik držala za kable (3) Držalno stojalo za kable Kabel AV Kabel SCART Držalo za kable (odvisno od modela) Uporabnikova navodila N Preverite, ali so televizorju LED priloženi naslednji predmeti.
5 MENU: Pritisnite za ogled menija na zaslonu s funkcijami televizorja. 6 SOURCEE: Za preklapljanje med vsemi razpoložljivimi vhodnimi viri. Ta gumb v meniju na zaslonu uporabljajte kot gumb ENTERE na daljinskem upravljalniku. 7 ZVOČNIKA ¦ Ogled plošče s priključki [Hrbtna plošča televizorja] # @ 0 ! 0 9 8 1 2 3 4 5 67 Vhod za napajanje N Barva in oblika izdelka sta odvisni od modela.
1 KLJUČAVNICA KENSINGTON (odvisno od modela) Ključavnica Kensington (izbirno) je naprava, ki se uporablja za fizično pritrditev sistema pri uporabi na javnem mestu. Če želite uporabljati napravo za zaklepanje, se obrnite na trgovca, pri katerem ste kupili televizor. N Kam se namesti ključavnico Kensington, je odvisno od modela. 2 LAN Na ta vrata povežite kabel LAN, da se povežete z omrežjem. 3 ANT IN Za povezavo z antenskim ali kabelskim televizijskim sistemom.
0 USB 1 (HDD) / USB 2 Spojnik za nadgradnje programske opreme, način predvajanja predstavnosti itd. S Samsungovim omrežjem se lahko povežete brezžično s ‘Samsungovo kartico za brezžični LAN’ (na prodaj posebej). N Za trdi disk USB uporabite vrata USB 1 (HDD). ! DIGITAL AUDIO OUT (OPTICAL) Za povezavo z digitalno avdio komponento, kot je sprejemnik domačega kina.
¦ Ogled daljinskega upravljalnika N Daljinski upravljalnik lahko uporabljate do oddaljenosti približno 7 m od televizorja. N Na delovanje daljinskega upravljalnika lahko vpliva močna svetloba. N Barva in oblika izdelka sta odvisni od modela. 1 POWER: Za vklop in izklop televizorja. % PRE-CH: Za vrnitev na prej gledani kanal. 2 TV: Za neposredno izbiro načina televizorja. ^ MENU: za prikaz glavnega menija na zaslonu. 3 ŠTEVILSKI GUMBI : Pritisnite za menjavo kanala.
¦ Mini daljinski upravljalnik Mini daljinski upravljalnik je poenostavljen daljinski upravljalnik, ki ima samo gumbe za napajanje, kanale in glasnost. 1 1 Gumb za televizor v stanju pripravljenosti 2 2 < : Naslednji kanal / > : Prejšnji kanal 3 4 3 2 3 + : Zvišanje glasnosti / – : Znižanje glasnosti 4 Oddajnik IrDA N Mini daljinski upravljalnik uporabljajte tako, da je ta del usmerjen proti TV-ju. ¦ Vstavljanje baterij v daljinski upravljalnik Običajni daljinski upravljalnik 1.
¦ Ogled menijev Pred uporabo televizorja sledite spodnjim korakom, da se naučite krmariti po meniju in izbrati in prilagoditi različne funkcije. Gumb MENU Za prikaz glavnega menija na zaslonu. Gumb RETURN Za vrnitev v prejšnji meni. ENTERE /SMERNI gumbi Za premikanje kazalca in izbiro elementa. Za izbiro trenutno izbranega elementa. Za potrditev nastavitve. EXIT Za izhod iz menija na zaslonu. ❑ Uporaba prikaza na zaslonu Korak za dostop se lahko razlikuje glede na izbrani meni. 1. Pritisnite gumb MENU.
¦ Funkcija Plug & Play (odvisno od modela) Pri prvem vklopu televizorja se samodejno prikažejo osnovne nastavitve. 1. Pritisnite gumb POWER na daljinskem upravljalniku. N Uporabite lahko tudi gumb POWERP na televizorju. N Prikaže se sporočilo Select the OSD Language.. 2. Pritisnite gumb ENTERE. S pritiskanjem gumba ▲ ali ▼ izberite ustrezno državo. Za potrditev izbire pritisnite gumb ENTERE. Plug & Play Select the OSD Language. 3.
¦ Ogled prikaza Prikaz označuje trenutni kanal in stanje določenih zvočnih in slikovnih nastavitev. O Za ogled informacij pritisnite gumb INFO. Na televizorju se bodo prikazali kanal, vrsta zvoka in stanje določenih slikovnih in zvočnih nastavitev. ● ▲, ▼: Za ogled drugih informacij o kanalu. Če se želite pomakniti na trenutno izbran kanal, Pritisnite ENTERE Gumb. ● ◄, ►: You can view the desired program’s information at the current channel.
❑ Manual Store N Ročno poišče kanal in ga shrani v pomnilnik televizorja. N Če je kanal zaklenjen s funkcijo Child Lock, se prikaže okno za vnos PIN-a. ■ Digital Channel Ročno shranjevanje digitalnih kanalov. N Digital Channel je na voljo samo v načinu DTV. ● Channel: s pritiskanjem gumba ▲, ▼ ali številskimi gumbi (0–9) nastavite številko kanala. ● Frequency: s številskimi gumbi nastavite frekvenco. ● Bandwidth: z gumbom ▲, ▼ ali številskimi gumbi (0–9) nastavite pasovno širino.
❑ Default Guide → Full Guide / Mini Guide Odločite se lahko, ali želite prikazati Full Guide ali Mini Guide, ko pritisnete gumb GUIDE na daljinskem upravljalniku. ❑ Channel List Za podrobne postopke uporabe funkcij Channel List si oglejte navodila ‘Upravljanje kanalov’. O Te možnosti lahko enostavno izberete s pritiskanjem gumba CH LIST na daljinskem upravljalniku. ❑ Channel Mode Ko pritisnete gumb P >/<, preklopite med kanali, ki so na izbranem seznamu kanalov. ■ Added Ch.
¦ Upravljanje kanalov S tem menijem lahko dodate/izbrišete ali nastavite priljubljene kanale in uporabljate programski vodnik za digitalne prenose. All Channels Prikaže vse trenutno razpoložljive kanale. ■ Added Channels Prikaz vseh dodanih kanalov. ■ ■ Added Channels ■ 824 UKTV Gold 825 UKTV style A 1 C -A 2 C -A 3 C -A 4 C -- A 5 C -- Favourites Prikaz vseh priljubljenih kanalov.
■ Lock / Unlock Kanal lahko zaklenete, tako da ga ni mogoče izbrati in gledati. N Ta funkcija je na voljo samo, če je možnost Child Lock nastavljena na On. N Prikaže se zaslon za vnos kode PIN. Vnesite 4-mestno kodo PIN. N Privzeta koda PIN novega televizorja je 0-0-0-0. Kodo PIN lahko spremenite tako, da v meniju izberete Change PIN. N Prikazan bo simbol “\” in kanal bo zaklenjen.
SLIKA ¦ Konfiguriranje menija slike ❑ Mode ■ Dynamic Za izbiro slike za višjo ločljivost v svetlem prostoru. ■ Standard Za izbiro slike za optimalen prikaz v normalnem okolju. ■ Natural Za izbiro slike za optimalen prikaz, ki je udoben za gledanje. N Funkcija ni na voljo v načinu računalnika. ■ Movie Za izbiro slike za gledanje filmov v temnem prostoru. Picture Izberete lahko vrsto slike, ki najbolj ustreza vašim zahtevam. T Pritisnite gumb TOOLS, da prikažete meni Tools.
■ Colour Space Barvni prostor je barvna matrika, ki je sestavljena iz rdeče, zelene in modre barve. Izberite najljubši barvni prostor za prikaz najnaravnejših barv. ● Auto: Samodejni barvni prostor se samodejno prilagodi na najnaravnejši barvni ton glede vire programa. ● Native: nastavitev naravnega barvnega prostora omogoča globoke in bogate barvne tone. ● Custom: prilagoditev barvnega razpona po vaših željah. N Če spremenite vrednost nastavitve, se osveži prilagojeni zaslon.
■ Size Morda boste včasih želeli spremeniti velikost slike na zaslonu. Televizor ima na voljo več možnosti velikosti zaslona; vsaka od njih je zasnovana tako, da zagotavlja optimalno delovanje za posamezne vrste video vhoda. Tudi kabelski/satelitski sprejemnik ima lahko na voljo več možnosti velikosti zaslona. Na splošno je priporočljivo, da televizijo čim več časa gledate v načinu 16:9. T Pritisnite gumb TOOLS, da prikažete meni Tools. Velikost lahko nastavite tudi z izbiro možnosti Tools → Picture Size.
■ 100Hz Motion Plus → Off / Clear / Standard / Smooth / Custom / Demo Odstrani nejasnost, ki nastane pri hitrih prizorih z veliko gibanja, tako da je slika jasnejša. N Če omogočite 100Hz Motion Plus, se lahko na zaslonu pojavijo šumi. V tem primeru nastavite 100Hz Motion Plus na Off. ● Off: Za izklop načina naprednega 100 Hz gibanja. ● Clear: Za nastavitev naprednega 100 Hz gibanja na najnižjo vrednost. ● Standard: Za nastavitev naprednega 100 Hz gibanja na srednjo vrednost.
¦ Uporaba televizorja kot računalniškega zaslona Nastavitev programske opreme računalnika (v okolju Windows XP) Spodaj so prikazane nastavitve zaslona za tipični računalnik v OS Windows. Dejanski prikazi na računalniškem zaslonu bodo najbrž drugačni, odvisno od različice operacijskega sistema Windows in grafične kartice. Četudi se dejanski prikazi razlikujejo, v večini primerov veljajo iste osnovne nastavitvene informacije. (Sicer se obrnite na proizvajalca računalnika ali Samsungovega prodajalca.) 1.
¦ Nastavitev televizorja z računalnikom N Prednastavitev: Pritisnite gumb SOURCE, da izberete način računalnika. ❑ Auto Adjustment Brightness Sharpness Picture S funkcijo samodejne prilagoditve televizor samodejno prilagodi sprejete video signale. S to funkcijo tudi samodejno fino naravnate nastavitve in prilagodite vrednosti in položaje frekvence. T Pritisnite gumb TOOLS, da prikažete meni Tools. Samodejno prilagoditev lahko nastavite tudi z izbiro možnosti Tools → Auto Adjustment.
❑ Audio Language Spremenite lahko privzeto vrednost za jezik avdia. Prikaže informacije o jeziku za dohodni tok. N To funkcijo je mogoče izbrati pri gledanju digitalnega kanala. N Izbirate lahko samo med jeziki, ki so dejansko oddajani. ❑ Audio Format → MPEG / Dolby Digital Pri istočasnem oddajanju zvoka iz glavnega zvočnika in avdio sprejemnika lahko pride do odmeva zaradi različne hitrosti odkodiranja za glavni zvočnik in avdio sprejemnik. V tem primeru uporabite funkcijo zvočnika televizorja.
¦ Izbira zvočnega načina Način zvoka lahko nastavite v meniju Tools. Če nastavite na Dual l ll, se na zaslonu prikaže trenutni zvočni način. A2 Stereo NICAM Stereo Vrsta zvoka Mono Stereo Dual Mono Stereo Dual Dual 1/2 MONO STEREO ↔ MONO DUAL 1 ↔ DUAL 2 MONO MONO ↔ STEREO MONO ↔ DUAL 1 DUAL 2 Privzeto Samodejen preklop DUAL 1 Samodejen preklop DUAL 1 N Če je stereo signal šibak in pride do samodejnega preklopa, preklopite na Mono. N Ta funkcija je aktivirana samo v stereo zvočnem signalu.
■ Teletext Language Nastavite lahko jezik teleteksta, in sicer tako, da izberete vrsto jezika. N Če program ne omogoča izbranega jezika, je privzeti jezik angleščina. ■ Preference ● Primary Audio Language / Secondary Audio Language / Primary Subtitle Language / Secondary Subtitle Language / Primary Teletext Language / Secondary Teletext Language S to funkcijo lahko uporabnik izbere enega od jezikov. Tukaj izbrani jezik je privzeti jezik, ko uporabnik izbere kanal.
❑ Network → Network Type / Network Setup Za podrobne postopke nastavljanja možnosti si oglejte navodila ‘Nastavitev omrežja’. ❑ General ■ Game Mode → Off / On Če priključite igralno konzolo, kot je PlayStation™ ali Xbox™, lahko uživate v bolj realistični izkušnji igre, če izberete meni iger. N Omejitve v načinu iger (pozor) Da izklopite igralno konzolo in povežete drugo zunanjo napravo, v meniju nastavitve nastavite Game Mode na Off.
¦ Nastavitev časa ❑ Clock ■ ■ Clock Mode Trenutni čas lahko nastavite ročno ali samodejno. ● Auto: samodejna nastavitev trenutnega časa z uporabo digitalno oddajanega časa. ● Manual: ročna nastavitev trenutnega časa. N Samodejni čas morda ne bo pravilen, odvisno od oddajne postaje in signala. V tem primeru čas nastavite ročno. N Da je mogoča samodejna nastavitev časa, mora biti povezana antena ali kabel. Clock Set Trenutni čas lahko nastavite ročno.
¦ Omrežna povezava Nastavite lahko internetni protokol, tako da omogočite komuniciranje z različnimi povezanimi omrežji. ❑ Omrežna povezava – kabelska ■ Povezava LAN-a za omrežje DHCP-ja Spodaj so opisani postopki za nastavitev omrežja z uporabo protokola za dinamično konfiguracijo gostitelja (DHCP-ja). Naslov IP, maska podomrežja, prehod in DNS se samodejno dodelijo, ko je izbran DHCP, zato jih ni treba ročno vnesti. 1. S kablom LAN povežite vrata LAN na hrbtni plošči televizorja in zunanji modem. 2.
■ Povezava LAN-a za okolje statičnega IP-ja Spodaj so opisani postopki za nastavitev omrežja z uporabo statičnega naslova IP. Ročno vnesite naslov IP, masko podomrežja, prehod in DNS, ki jih dobite pri vašem internetnem ponudniku (ISP-ju). 1. S kablom LAN povežite vrata LAN na hrbtni plošči televizorja in vrata LAN na steni. Hrbtna plošča televizorja Vrata LAN na steni 1 Kabel LAN LAN lahko povežete prek delilnika (usmerjevalnika).
N Za brezžični delilnik IP izberite kanal, ki trenutno ni v uporabi. Če kanal, nastavljen za brezžični delilnik IP, uporablja druga naprava, ki se nahaja v bližini, bo to povzročilo motnje in komunikacija morda ne bo uspešna. N Če uporabite varnostni sistem, ki ni naveden zgoraj, ne bo deloval pri televizorju. Če za AP (brezžični usmerjevalnik IP) uporabite varnostni ključ, je podprto samo naslednje. 1.) Način preverjanja pristnosti: ODPRTO, V SKUPNI RABI, WPAPSK, WPA2PSK 2.
Cable Network Setup-Manual Da boste lahko povezali televizor in LAN prek statičnega naslova IP, morate nastaviti internetni protokol (IP). 1. Nastavite Network Type na Cable. 2. Izberite Cable Network Setup. 3. Nastavite Internet Protocol Setup na Manual. Cable Network Setup Internet Protocol Setup : Manual ▶ Network Test IP Address : 0 0 0 0 Subnet Mask : 0 0 0 0 Gateway : 0 0 0 0 DNS Server : 0 0 0 0 4.
● Če možnost Security Key ni nastavljena: Če je varnostna nastavitev AP-ja, ki podpira WPS, BREZ, lahko izberete PBC, PIN, None Security. None Security omogoča povezavo z AP-jem neposredno brez uporabe funkcije WPS. N Postopek za PBC, PIN je enak zgornjemu. Oglejte si ga, če je možnost Security Key že nastavljena. N Če se povezava ne vzpostavi, poskusite znova.
VHOD / PODPORA ¦ Meni vhod ❑ Source List ■ Input Uporabite za izbiro televizorja ali drugega zunanjega vhodnega vira, kot je predvajalnik DVD / Blu-Ray / kabelski / satelitski sprejemnik, povezanega s televizorjem. Uporabite za izbiro želenega vhodnega vira. O Če si želite ogledati zunanji signalni vir, pritisnite gumb SOURCE na daljinskem upravljalniku. Način TV lahko izberete s pritiskom gumba TV. Source List Edit Name TV / Ext.
Uporaba gumbov daljinskega upravljalnika v meniju Product Guide. Gumb Rumeni gumb ◄/► ENTERE RETURN EXIT Delovanje Zaporedni prikaz vsebine možnosti Product Guide. (Samodejno predvajanje.) Za premikanje kazalca in izbiro elementa. Za izbiro trenutno izbranega elementa. Za vrnitev v prejšnji meni. Za zaustavitev trenutne funkcije in vrnitev v glavni meni Product Guide. ❑ Self Diagnosis ■ Picture Test Self Diagnosis Če menite, da imate težave s sliko, izvedite preskus slike.
❑ Software Upgrade Samsung bo morda v prihodnje ponudil posodobitve vdelane programske opreme televizorja. Te nadgradnje lahko izvedete prek televizorja, če je ta povezan z internetom, ali s prenosom nove vdelane programske opreme s spletnega mesta samsung.com v pomnilniško napravo USB. N Current Version je programska oprema, ki je že nameščena v televizorju. N Alternative Software (varnostna kopija) prikažete prejšnjo različico, ki jo boste zamenjali.
Media Play (USB & DLNA) ¦ Priključitev naprave USB 1. Za vklop televizorja pritisnite gumb POWER. Hrbtna plošča televizorja 2. Napravo USB, na kateri so foto, glasbene in/ali filmske datoteke, priključite na vtičnico USB 1 (HDD) ali USB 2 ob strani televizorja. 3. Ko je prikazan zaslon za izbiro možnosti Application, pritiskajte gumb ENTERE, da ali izberete Media Play (USB & DLNA). N Protokol MTP (Media Transfer Protocol) ni podprt. N Datotečni sistem podpira FAT16, FAT32 in NTFS.
¦ Funkcija predvajanja predstavnosti Ta funkcija omogoča ogled in poslušanje foto, glasbenih in/ali filmskih datotek, ki so shranjene v napravi USB MSC (Mass Storage Class). N Morda ne bo mogoče predvajati večpredstavnostnih datotek brez veljavnih licenc. Odpiranje menija Media Play (USB & DLNA) 1. Pritisnite gumb MENU. S pritiskanjem gumba ▲ ali▼ izberite možnost Application, nato pritisnite gumb ENTERE. 851.86MB/993.02MB Free SUM 2.
5 Elementi pomoči • Zeleni gumb (Favourites Settings): za spremembo nastavitev priljubljenih za izbrano datoteko. Gumb pritiskajte, dokler se ne prikaže želena vrednost. • Rumeni gumb (Select): za izbiro datoteke s seznama datotek. Izbrane datoteke so označene s simbolom c. Če želite izbiro datoteke preklicati, znova pritisnite rumeni gumb. • TOOLS (Tools): za prikaz menijev z možnostmi. (Meni z možnostmi se spremeni glede na trenutno stanje.
¦ Meni z možnostmi za seznam fotografij / filmov / glasbe 1. Pritisnite gumb MEDIA.P. Basic View 2. S pritiskanjem gumba ◄ ali ► izberite Photo, Music ali Movie, nato pritisnite gumb ENTERE. 3. S pritiskanjem gumba ◄ ali ► izberite želeno datoteko. N Izbiranje več datotek S pritiskanjem gumba ◄ ali ► izberite želeno datoteko. Nato pritisnite rumeni gumb. Če želite izbrati več datotek, ponovite zgornji postopek. Poleg izbrane datoteke se prikaže oznaka c. Timeline Colour Folder 5/15 1231.
¦ Meni z možnostmi za diaprojekcije / predvajanje glasbe / predvajanje filmov 1. Med predvajanjem diaprojekcije (ali ogledom fotografije) ali glasbe ali filma pritisnite gumb TOOLS , da nastavite možnost. 2. S pritiskanjem gumba ▲ ali ▼ izberite želeno možnost, nato pritisnite gumb ENTERE. ❑ Picture Setting / Sound Setting Tools Za izbiro slikovnih in zvočnih nastavitev.
¦ Ogled fotografije ali diaprojekcije Ogled diaprojekcije N V diaprojekcijo bodo vključene vse datoteke iz razdelka s seznamom datotek. N Med diaprojekcijo so datoteke prikazane v zaporedju od trenutno prikazane datoteke naprej. N Fotografije v diaprojekciji si sledijo tako, kot so razvrščene v razdelku s seznamom datotek. N Med diaprojekcijo se lahko samodejno predvajajo glasbene datoteke, če je možnost Background Music nastavljena na On.
¦ Predvajanje glasbe Predvajanje glasbene datoteke 1. S pritiskanjem gumba ▼ izberite razdelek s seznamom datotek. 2. S pritiskanjem gumba ◄ ali ► izberite glasbeno datoteko za predvajanje. ▶ 00:00:04 / 00:04:04 3/37 Way I Love You HaHaHa 3. Pritisnite gumb ∂ (Predvajaj) / ENTERE. N Ta meni prikazuje samo datoteke s končnico za datoteke MP3. Datoteke z drugimi končnicami niso prikazane, tudi če so shranjene v isti napravi USB.
¦ Predvajanje filmske datoteke Predvajanje filmske datoteke 1. S pritiskanjem gumba ▼ izberite razdelek s seznamom datotek. ▶ 00:00:01 / 00:05:30 3/37 ABC.avi 2. S pritiskanjem gumba ◄ ali ► izberite film, ki ga želite predvajati. 3. Pritisnite gumb ∂ (Predvajaj) / ENTERE. N Izbrana datoteka se začne predvajati. N Izbrana datoteka je prikazana na vrhu, skupaj s časom predvajanja.
N Kontrolni gumbi za predvajanje videov Gumb ENTERE ∂ ∑ TOOLS ∫ ◄/► ▲/▼ μ Delovanje Za predvajanje/začasno zaustavitev filmske datoteke Za predvajanje filmske datoteke Za začasno zaustavitev filmske datoteke Za zagon različnih funkcij v menijih za filme. Za izhod iz načina predvajanja in vrnitev na seznam filmov. Za preskok filma naprej ali nazaj. Za pomik na prvo/zadnjo datoteko. Za predvajanje datoteke z dvojno hitrostjo. Funkcija morda ni podprta, odvisno od kodeka. Predvajanje skupine filmov 1.
¦ Uporaba menija Setup V meniju nastavitve so prikazane uporabniške nastavitve menija Media Play. 2. S pritiskanjem gumba ◄ ali ► izberite Setup in nato pritisnite gumb ENTERE. SETUP 3. S pritiskanjem ▲ ali ▼ izberite želeno možnost. 4. S pritiskanjem gumba ◄ ali ► izberite želeno filmsko datoteko. N Za izhod iz načina Media Play pritisnite gumb MEDIA.P na daljinskem upravljalniku. ■ 851.86MB/993.02MB Free SUM 1. Pritisnite gumb MEDIA.P.
Media Play -DLNA ¦ Nastavitev omrežja DLNA Omrežje DLNA omogoča, da si slike, glasbo in videe, shranjene v računalniku ali televizorju, ogledate prek omrežne povezave v načinu predvajanja predstavnosti. Tako vam datotek ni treba več kopirati v shranjevalno napravo USB in priključevati naprave na televizor. Če želite uporabiti DLNA, morate televizor priključiti v omrežje in v računalnik namestiti aplikacijo DLNA.
Sistemske zahteve 1. V računalnik vstavite programski CD, ki ste ga dobili s televizorjem. 2. Za namestitev programa je potrebnega 30 MB prostora na trdem disku. N Če imate datoteke v skupni rabi, je za 100 datotek potrebnega do 30MB prostora na trdem disku. N Če prekličete skupno rabo datotek, se na trdem disku sprosti tudi prostor, ki je bil prej napolnjen z informacijami o sličicah. Podprte oblike zapisa ● Slika: JPEG/avdio: MP3/video: vsebnik oblik zapisa AVI, MKV, ASF, MP4, 3GPP, PS, TS.
❑ Share ■ Folder Mapo, ki je shranjena v računalniku, lahko daste v skupno rabo v televizor. ■ Preklic možnosti Shared Folder Skupno rabo mape v računalniku lahko prekličete. Izberite mapo v podoknu Shared Folder in nato Unshare Folder. ■ Uveljavitev trenutnih nastavitev Ta postopek izvedite, kadar je potrebna sinhronizacija zaradi nove mape v skupni rabi ali preklica mape v skupni rabi.
ANYNET+ ¦ Povezava naprav, ki podpirajo Anynet+ Kaj je Anynet+? Anynet+ je funkcija, ki omogoča upravljanje vseh povezanih Samsungovih naprav, ki podpirajo Anynet+, z daljinskim upravljalnikom Samsungovega televizorja. Sistem Anynet+ lahko uporabljate pri Samsungovih napravah, ki imajo funkcijo Anynet+. Prepričajte se, da ima vaša Samsungova naprava to funkcijo, in sicer tako, da preverite, ali je na njej logotip Anynet+.
¦ Nastavitev sistema Anynet+ Media Play (USB in DLNA) Application T Pritisnite gumb TOOLS, da prikažete meni Tools. Meni Anynet+ lahko prikažete tudi tako, da izberete Tools → Anynet+ (HDMI-CEC). Anynet+(HDMI-CEC) Content Library Internet@TV Home Network Centre ❑ Setup ■ Anynet+ (HDMI-CEC) → Off / On Če želite uporabljati funkcijo Anynet+, mora biti možnost Anynet+ (HDMI-CEC) nastavljena na On. N Ko je funkcija Anynet+ (HDMI-CEC) onemogočena, so deaktivirane vse operacije, povezane s sistemom Anynet+.
Gumbi na daljinskem upravljalniku televizorja, ki so na voljo v načinu Anynet+ Vrsta naprave Naprava, ki podpira Anynet+ Naprava z vgrajenim kanalnikom Avdio naprava Stanje delovanja Po preklopu na napravo, ko se na zaslonu prikaže meni ustrezne naprave. Po preklopu na napravo, medtem ko se predvaja datoteka.
¦ Odpravljanje težav s funkcijo Anynet+ Težava Anynet+ ne deluje. ● ● ● ● ● ● ● ● ● Želim zagnati Anynet+. ● ● ● Želim zapreti Anynet+. ● ● ● Na zaslonu se prikaže sporočilo ‘Connecting to Anynet+ device...’. ● Naprava, ki podpira Anynet+, ne predvaja. Povezana naprava ni prikazana. ● ● ● Preverite, ali naprava podpira funkcije Anynet+. Preverite, ali je kabel HDMI 1.3 pravilno povezan. Preverite, ali je možnost Anynet+ (HDMI-CEC) nastavljena na On v meniju Setup sistema Anynet+.
Content Library ¦ Uporaba možnosti Content Library Content Library omogoča, da na televizorju predvajate različne vsebine.. Uporabite lahko privzeto vsebino, shranjeno v pomnilniku televizorja, ali pa uživate v novi vsebini, shranjeni v napravi USB. Gallery Gallery Cooking Game Children Wellness R Return e Exit Uporaba gumba daljinskega upravljalnika v meniju Content Library Gumb ▲/▼/◄/► ENTERE RETURN EXIT
Barvni gumb Y /MUTE Delovanje Za premikanje kazalca in izbiro elementa.
❑ Game Ta kategorija nudi zabavne igre za vso družino. N Opise gumbov, uporabljenih v igrah, najdete v navodilih na zaslonu. N Barvni gumbi za igre Gumb Rdeči Zeleni Rumeni Modri Delovanje Pritisnite za pomik domačega zaslona za igre Pritisnite za začasno zaustavitev igre Tipka za možnosti Pritisnite za izhod iz igre ❑ Children Poučna in interaktivna vsebina, ki jo lahko otroci predvajajo večkrat. N Avtorske pravice vsebin v možnosti Children in z njimi povezane zadeve so last podjetja UpToTen.
Internet@TV Če pri uporabi storitve gradnikov naletite na težave, se obrnite na ponudnika vsebine. V gradniku pritisnite zeleni gumb za podatke o stiku ali pa na spletnem mestu s pomočjo poiščite podatke o ponudniku gradnikov. N Storitev gradnika morda podpira samo angleščino, odvisno od regije. N Funkcija morda ni podprta, odvisno od države. (Ni na voljo povsod.) ¦ Uvod v Internet@TV Internet@TV s podporo mehanizma Yahoo!® Widget Engine nudi celovito izkušnjo interneta in televizije.
❑ Prikaz na zaslonu ■ Dock mode 1 V zgornjem desnem kotu je prikazan pozdravni trak z imenom vašega profila. N Po krajši zakasnitvi ta trak izgine. Hello John! 1 2 2 Na traku sta navedeni bližnjici daljinskega upravljalnika. N Če na daljinskem upravljalniku pritisnete modri gumb (Viewport), zaslon preklopite med 'načinom poglednega okna' in 'načinom prekrivanja'. V načinu poglednega okna se televizijski program ali video predvaja v manjšem oknu, pri čemer je grafika ločena.
All content and services accessible through this device belong to third parties and are protected by copyright, patent, trademark and/or other intellectual property laws. Such content and services are provided solely for your personal noncommercial use. You may not use any content or services in a manner that has not been authorized by the content owner or service provider.
Meni Profile Settings omogoča prilagoditev in zaščito profila. ● Uporabniške profile je mogoče prilagoditi z enoličnim Name in Avatar (slika, ki predstavlja vaš profil). ● Name in Avatar vašega profila sta prikazana v delčku profila v sidrišču. ● Profile je mogoče zaščititi z možnostjo Create Profile PIN. N Pri prvi nastavitvi PIN-a lahko nastavite varnostno vprašanje. Meni Profile Settings lahko omeji dostop do gradnikov.
¦ Uporaba gradnika informacij o vremenu Yahoo!® Gradnik informacij o vremenu Yahoo!® nudi posodobljene informacije o vremenu za lokalne in priljubljene lokacije. Vsebina se dinamično posodablja glede na vremenske razmere. ● Pritisnite zeleni gumb na daljinskem upravljalniku za prikaz menija Settings gradnika informacij o vremenu Yahoo!®. ● V meniju Settings lahko dodajate ali brišete mesta, za katera želite videti informacije o vremenu. V meniju Settings: ● Add New City za vnos imena mesta.
¦ Uporaba gradnika storitve Flickr Yahoo!® Storitev gradnika Flickr omogoča dostop do priljubljenih fotografij prijateljev in družine med gledanjem televizije. Delite svoje fotografije z družino na televizijskem zaslonu v obliki diaprojekcije. ● Prilagodite si storitev gradnika Flickr tako, da se prijavite s svojo identifikacijsko številko Yahoo!. ID. ● Za podrobne postopke o prijavi si oglejte navodila ‘Uporaba gradnika profila’. ● Za več informacij o storitvi Flickr obiščite http://www.flickr.com.
¦ Odpravljanje težav s storitvijo internet@TV Težava Možna rešitev Nekatere storitve gradnikov ne delujejo. Preverite pri ponudniku storitev. V gradniku pritisnite zeleni gumb za podatke o stiku ali pa na spletnem mestu s pomočjo poiščite podatke o ponudniku storitev gradnikov. Oglejte si spletno mesto s pomočjo. Nekatere vsebine gradnikov so na voljo samo v angleškem jeziku.
Internet@TV N Funkcija morda ni podprta, odvisno od države. (Ni na voljo povsod.) N Če pri uporabi storitve gradnikov naletite na težave, se obrnite na ponudnika vsebine. V gradniku pritisnite zeleni gumb za podatke o stiku ali pa na spletnem mestu s pomočjo poiščite podatke o ponudniku storitev. N Storitev gradnika morda podpira samo angleščino, odvisno od regije. ¦ Uvod v Internet@TV Internet@TV nudi storitve gradnikov družbe SAMSUNG prek omrežne povezave.
❑ System Setup N Ticker Autorun, Ticker Duration morda nista podprti, odvisno od države. ■ Sprememba gesla za zaklep storitve N Privzeta številka gesla novega televizorja je 0-0-0-0. N Če pozabite geslo, pritisnite gumbe na daljinskem upravljalniku v naslednjem zaporedju, s čimer geslo ponastavite na 0-0-0-0: POWER (izklop) → MUTE → 8 → 2 → 4 → POWER (vklop). ■ Service Duration Za nastavitev časa trajanja storitve, po preteku katerega naj se prikaže ohranjevalnik zaslona.
¦ Odpravljanje težav s storitvijo internet@TV Težava Možna rešitev Nekatere storitve gradnikov ne delujejo. Preverite pri ponudniku storitev. V gradniku pritisnite zeleni gumb za podatke o stiku ali pa na spletnem mestu s pomočjo poiščite podatke o ponudniku storitev gradnikov. Oglejte si spletno mesto s pomočjo. Kaj je prednost enotne prijave? Če ustvarite račun in registrirate podatke za prijavo v želeno storitev, lahko do prilagojene vsebine dostopate brez dodatne prijave.
Home Network Centre ¦ Home Network Centre O možnosti Home Network Centre Z možnostjo Home Network Centre prek omrežja povežete televizor in mobilne telefone. Z uporabo možnosti Home Network Centre si lahko na televizorju ogledate prejeme klicev, vsebino besedilnih sporočil in razporede, nastavljene v mobilnem telefonu. Poleg tega lahko predvajate predstavnostno vsebino, shranjeno v mobilnih telefonih, npr. videe, fotografije in glasbo, tako, da jih prek omrežja uvozite v televizor.
¦ Nastavitev možnosti Home Network Centre ❑ Message / Media Shows a list of mobile phones which have been set up with this TV to use the Message or Media function. N Media function is available in other mobile devices which support DLNA DMC. ■ ■ ■ Allowed Dovoli mobilni telefon. Home Network Centre Message 111-1234-5671 : Allowed Media 111-1234-5672 : Allowed Setup 111-1234-5673 : Denied 111-1234-5674 : Denied Denied Za blokiranje mobilnega telefona.
Ogled sporočila Če medtem ko gledate televizijo, prejmete novo besedilno sporočilo (SMS), se prikaže okno alarma. Če kliknete gumb OK, se prikaže vsebina sporočila. N Konfigurirate lahko nastavitve ogleda vsebine besedilnih sporočil (SMS) v mobilnem telefonu. Za postopke si oglejte priročnik mobilnega telefona. N Posebni znaki so lahko prikazani kot manjkajoči ali okvarjeni. Alarm prejema klica Če medtem ko gledate televizijo, prejmete klic, se prikaže okno alarma.
PRIPOROČILA ¦ Funkcija teleteksta Večina televizijskih postaj nudi informacije v pisni obliki prek teleteksta. Na začetni stran teleteksta boste dobili informacije o tem, kako uporabljati storitev. Poleg tega lahko z gumbi na daljinskem upravljalniku izbirate različne možnosti, ki bodo zadovoljile vaše potrebe. N Za pravilen prikaz informacij teleteksta mora biti sprejem kanala stabilen. V nasprotnem primeru lahko manjka kakšna informacija, ali pa nekatere strani ne morejo biti prikazane.
Strani teleteksta so organizirane v šestih kategorijah: Del A B C D E F Vsebina Številka izbrane strani. Identiteta televizijskega kanala. Številka trenutne strani ali indikatorji iskanja. Datum in čas. Besedilo. Informacije o stanju. Informacije FASTEXT. N Informacije teleteksta so pogosto razdeljene na več zaporednih strani, do katerih imate dostop z: vnosom številke strani izbiro naslova na seznamu izbiro obarvanega naslova (sistem FASTEXT) N Televizor podira različico teleteksta 2.
¦ Odstranjevanje stojala 1. Odstranite vijake s hrbtne strani televizorja. 2. Stojalo ločite od televizorja. N Televizor naj nosita vsaj dve osebi. 3. Spodnjo luknjo pokrijte s pokrovom. ¦ Namestitev kompleta za pritrditev na steno Z elementi za pritrditev na steno (naprodaj posebej) lahko televizor pritrdite na steno. Za podrobne informacije o pritrditvi na steno si oglejte navodila, ki so priložena elementom za pritrditev na steno.
¦ Združitev kablov ❑ Stoječi N Kable ovijte z držalom za kable, tako da jih ni mogoče videti skozi prozorno stojalo. 1 1 2 2 3 3 ❑ za namestitev na steno 1 1 N Ko urejate kable, jih ne vlecite premočno. S tem lahko poškodujete priključke izdelka. Slovenščina - BN68-02329A-03Sln.
¦ Zaščita prostora za namestitev Izdelek mora biti na zahtevani oddaljenosti od ostalih predmetov (npr. sten), da zagotovite ustrezno prezračevanje. Sicer lahko pride do požara ali težave z izdelkom zaradi povišanja notranje temperature izdelka. Izdelek namestite na zahtevani oddaljenosti, ki je navedena na sliki. N Če želite uporabiti stojalo ali opremo za pritrditev na steno, uporabite samo dele, ki jih nudi podjetje Samsung Electronics.
¦ Odpravljanje težav Če imate vprašanja glede televizorja, si najprej oglejte ta seznam. Če noben od nasvetov za odpravljanje težav ni ustrezen, obiščite spletno mesto ‘www.samsung.com’ in nato kliknite Support ali pa pokličite klicni center, ki je na seznamu na zadnji strani. Težava Rešitev Kakovost slike Televizijska slika ni videti tako dobro kot v trgovini. Najprej izvedite Picture Test, da preverite, ali televizor pravilno prikazuje preskusno sliko.
Težava Rešitev Ni slike, ni videa Televizorja ni mogoče vklopiti. ● ● ● Televizor se samodejno izklopi. ● ● ● ● Ni slike/videa. ● ● ● ● Poskrbite, da je napajalni kabel za izmenični tok trdno priključen na stensko vtičnico in televizor. Preverite, ali stenska vtičnica deluje. Pritisnite gumb POWER na televizorju, da preverite, ali daljinski upravljalnik deluje pravilno. Če se televizor vklopi, je morda razlog daljinski upravljalnik.
Težava Rešitev Drugo Slika ni prikazana celozaslonsko. ● ● ● Na kanalih visoke ločljivosti je pri prikazu izboljšane vsebine standardne ločljivosti (4:3) na obeh straneh zaslona črna obroba. Pri filmih z drugačnim razmerjem stranic slike, kot je razmerje na televizorju, je nad sliko in pod njo prikazana črna obroba. Prilagodite možnost velikosti slike na zunanji napravi ali televizorju na celozaslonsko. Daljinski upravljalnik ne deluje.
¦ Specifikacije Ime modela Velikost zaslona (diagonala) Ločljivost računalnika (optimalno) Zvok izhod Dimenzije (Š x G x V) Osrednji del S stojalom Teža S stojalom Okoljski vidiki Delovna temperatura Delovna vlažnost Temperatura shranjevanja Vlažnost pri shranjevanju Vrtenje stojala (levo/desno) UE32B7000,UE32B7020 UE40B7000,UE40B7020 32 palcev 40 palcev 1920 x 1080 pri 60 Hz 1920 x 1080 pri 60 Hz 10 W x 2 10 W x 2 813 X 30 X 520 mm 813 X 240 X 585 mm 996 X 30 X 630 mm 996 X 255 X 692 mm 14 kg 1
Ta stran je namerno puščena prazna. BN68-02329A-03Sln.
Bu Kullanıcı Kılavuzundaki şekiller ve resimler yalnızca referans amaçlı verilmiştir ve gerçek ürünün görünümünden farklı olabilir. Ürün tasarımı ve belirtimleri herhangi bir bildirim yapılmaksızın değiştirilebilir. ❑ Lisans TruSurround HD, SRS ve sembolü SRS Labs, Inc.'in ticari markalarıdır. TruSurround HD teknolojisi SRS Labs, Inc. lisansı ile bu cihaza dahil edilmiştir. Dolby Laboratories lisansı altında üretilmiştir. Dolby ve double-D (çift D) sembolü, Dolby Laboratories'in ticari markalarıdır.
İçindekiler ANYNET+ TV'nizin ayarlanması ■ Aksesuarlar......................................................................................... 2 ■ Kontrol Paneline Bakış....................................................................... 2 ■ Bağlantı Paneline Bakış..................................................................... 3 ■ Uzaktan Kumandaya Bakış................................................................ 6 ■ Mini Uzaktan Kumanda........................................................
TV'nizin ayarlanması ¦ Aksesuarlar Uzaktan Kumanda ve Piller (AAA x 2) Program CD'si Kapak-Alt Temizleme Bezi Garanti Kartı / Güvenlik Kılavuzu (Her yerde yoktur) Mini Uzaktan Kumanda ve Piller (3V) Parça Kablosu Tutucu-Halka (4ea) Tutucu-Tel (3ea) Tutucu-Halka Standı AV Kablosu SCART Kablosu Tutucu-Tel Kablo (Modele bağlı olarak) Kullanıcı Talimatları N LED TV'nizle birlikte aşağıdaki öğelerin verildiğinden emin olun. Öğelerden herhangi biri eksikse bayinizle görüşün.
5 MENU: TV'nizin özellikler ekran menüsünü görmek için basın. 6 SOURCEE: Mevcut tüm giriş kaynakları arasında geçiş yapar. Ekran menüsünde, bu düğmeyi uzaktan kumanda üzerindeki ENTERE düğmesini kullandığınız gibi kullanın. 7 HOPARLÖRLER ¦ Bağlantı Paneline Bakış [TV Arka Paneli] # @ 0 ! 0 9 8 1 2 3 4 5 67 Güç Girişi N Ürünün rengi ve şekli, modele bağlı olarak farklılık gösterebilir.
1 KENSINGTON KİLİDİ (modele bağlıdır) Kensington kilidi, (isteğe bağlı) halka açık bir ortamda kullanıldığında sistemi fiziksel olarak sabitlemek için kullanılan bir aygıttır. Bir kilitleme cihazı kullanmak isterseniz, TV'yi satın aldığınız bayi ile görüşün. N Kensington Kilidinin konumu, modeline bağlı olarak farklılık gösterebilir. 2 LAN Ağa bağlanmak için bu bağlantı noktasına bir LAN kablosu bağlayın. 3 ANT IN Bir antene ya da kablolu TV sistemine bağlanır.
0 USB 1 (HDD) / USB 2 Yazılım yükseltmeleri ve Media Play, vb için konektör. 'Samsung Kablosuz LAN Adaptörü' (Ayrı satılır) kullanarak Samsung’un ağına kablosuz olarak bağlanabilirsiniz. N USB HDD için USB 1 (HDD) bağlantı noktasını kullanın. ! DIGITAL AUDIO OUT (OPTICAL) Ev sineması alıcısı gibi bir Dijital Ses bileşenine bağlanır. N DIGITAL AUDIO OUT (OPTICAL) jakına bir Dijital Ses Sistemi bağlandığında: TV'nin sesini kısın ve ses seviyesini sistemin ses kontrolü ile ayarlayın. N TV, 5.
¦ Uzaktan Kumandaya Bakış N Uzaktan kumandayı TV'den en fazla 23 fit kadar uzakta kullanabilirsiniz. N Uzaktan kumandanın performansı parlak ışıktan etkilenebilir. N Ürünün rengi ve şekli, modele bağlı olarak farklılık gösterebilir. 1 POWER: TV'yi açar ve kapatır. 2 TV: Doğrudan TV modunu seçer. 3 SAYISAL DÜĞMELER: Kanalı değiştirmek için basın. 4 FAV.CH: Ekranda Favori Kanal Listelerini görüntülemek için kullanılır. 5 INFO: TV ekranında bilgi görüntülemek için basın.
¦ Mini Uzaktan Kumanda Mini Uzaktan Kumanda, yalnızca güç, kanal ve ses düğmelerinden oluşan basitleştirilmiş bir uzaktan kumandadır. 1 1 Televizyon Beklemede düğmesi 2 2 < : Sonraki kanal / > : Önceki kanal 3 4 3 2 3 + : Ses seviyesinin arttırılması / – : Ses seviyesinin azaltılması 4 IrDA verici N Mini Uzaktan Kumandayı bu kısmı TV’ye dönük olacak şekilde kullanın. ¦ Uzaktan Kumandaya Pil Takma Normal Uzaktan Kumanda 1. Resimde gösterildiği gibi uzaktan kumandanın arkasındaki kapağı kaldırın. 2.
¦ Menülere bakış TV'yi kullanmadan önce, değişik fonksiyonları seçmek ve ayarlamak için menüde nasıl dolaşılabileceğini öğrenmek amacıyla aşağıdaki adımları izleyin. MENU Düğmesi Ana ekran menüsünü görüntüler.. RETURN Düğmesi Önceki menüye geri döner. ENTERE / YÖN Düğmeleri İmleci hareket ettirir ve öğeyi seçer. Geçerli olarak seçili olan öğeyi seçer. Ayarları onaylar EXIT Ekran menüsünden çıkar. ❑ OSD (On Screen Display) Nasıl Çalışır Erişim adımı seçilen menüye göre farklılık gösterebilir. 1.
¦ Plug & Play Özelliği (Modele bağlı olarak) TV ilk kez açıldığında, temel ayarlar otomatik olarak başlar ve birbiri ardına devam eder. 1. Uzaktan kumandadaki POWER düğmesine basın. N Ayrıca TV'deki POWERP düğmesini de kullanabilirsiniz. N Select the OSD Language. mesajı gösterilir. 2. ENTERE düğmesine basın. ▲ veya ▼ düğmesine basarak uygun dili seçin. Seçiminizi onaylamak için ENTERE düğmesine basın. Plug & Play Select the OSD Language. 3.
¦ Monitöre Bakış Ekran, geçerli kanalı ve bazı belirli ses-video ayarlarının durumunu tanımlar. O Bilgileri görüntülemek için INFO düğmesine basın. Uzaktan kumandadaki PAIRING düğmesine basın. TV; kanalı, sesin türünü ve belirli görüntü ve ses ayarlarının durumunu görüntüleyecektir. ● ▲, ▼: Diğer kanal bilgilerini görüntüleyebilirsiniz. Geçerli durumda seçili kanala gitmek istediğinizde, ENTERE düğmesine basın. ● ◄, ►: Geçerli kanalda istenen programın bilgilerini görüntüleyebilirsiniz.
❑ Elle kayıt N Bir kanalı elle tarar ve bunu TV'nin hafızasına kaydeder. N Bir kanal Çocuk Kilidi işlevi kullanılarak kilitlenmişse, PIN giriş penceresi görünür. ■ Dijital Kanal Dijital kanalların elle kaydedilmesi. N Dijital Kanal yalnızca DTV modunda geçerlidir. ● Kanal: ▲, ▼ ya da sayı (0~9) düğmelerini kullanarak Kanal numarasını ayarlayın. ● Frekans: Sayı düğmelerini kullanarak frekansı ayarlayın. ● Bant genişliği: ▲, ▼ ya da sayı (0~9) düğmelerini kullanarak bant genişliğini ayarlayın.
❑ Varsayılan Kılavuz → Tam Kılavuz / Mini Kılavuz Uzaktan kumandadaki GUIDE düğmesi basıldığında Tam Kılavuz ya da Mini Kılavuz görüntülemeyi seçebilirsiniz. ❑ Kanal Listesi Kanal Listesi kullanma hakkında ayrıntılı prosedürler için 'Kanalları Yönetmek' talimatlarına bakın. O Uzaktan kumanda üzerindeki CH LIST düğmesine basarak bu seçenekleri belirleyebilirsiniz. ❑ Kanal modu P >/< düğmesine basıldığında, Kanallar seçilen kanal listesi içerisinde değiştirilir.
¦ Kanalları Yönetme Bu menüyü kullanarak favori kanalları ekleyebilir / silebilir ya da ayarlayabilir ve dijital yayınlar için program kılavuzunu kullanabilirsiniz. ■ Eklenen Kanallar ■ Tüm Kanallar O anda mevcut tüm kanalları gösterir. Eklenen Kanallar Tüm eklenmiş kanalları gösterir. 824 UKTV Gold 825 UKTV style A 1 C -A 2 C -A 3 C -A 4 C -- A 5 C -A 6 C -- A 7 C -A 8 C -- ■ Favori Tüm favori kanalları gösterir.
■ Kilit / Kilit aç Bir kanalı kilitleyebilirsiniz, böylece kanal seçilemez ve izlenemez. N Bu işlev yalnızca Çocuk Kilidi öğesi Açık olarak ayarlandığında kullanılabilir. N PIN numarası giriş ekranı görünür. 4 basamaklı PIN numaranızı girin. N Yeni bir TV'nin varsayılan PIN numarası 0-0-0-0dır. Menüden PIN Değiştir seçimini yaparak PIN'i değiştirebilirsiniz. N "\" sembolü gösterilecek ve kanal kilitlenecektir.
RESİM ¦ Resim Menüsünü Yapılandırma ❑ Modu ■ Dinamik Aydınlık bir odada artırılmış tanımlamalı görüntü için resim türünü seçer. ■ Standart Normal bir odada en iyi görüntü için resim türünü seçer. ■ Doğal En iyi ve göze en rahat görünen görünüm için resimleri seçer. N Bu işlev PC modunda kullanılamaz. ■ Film Karanlık bir odada film izlemek için görüntü türünü seçer. Görüntü İzleme gereksinimlerinize en uygun resim türünü seçebilirsiniz. T Araçlar menüsünü görüntülemek için TOOLS düğmesine basın.
■ Renk Alanı Renk alanı kırmızı, yeşil ve mavi renklerden oluşan bir renk tablosudur. En doğal renkleri yaşamak için beğendiğiniz renk alanını seçin. ● Oto: Auto Colour Space, program kaynaklarına dayalı en doğal renk tonunu otomatik olarak ayarlar. ● Doğal: Native Colour Space, derinliği olan zengin bir renk tonu sunar. ● Özel: Renk aralığını tercihinize göre ayarlar. N Ayar değerinin değiştirilmesi ayarlanmış ekranı yenileyecektir.
■ Boyut Ara sıra ekrandaki görüntü boyutunu değiştirmek isteyebilirsiniz. TV'niz çeşitli ekran boyutu seçenekleri ile birlikte gelir, bunların her biri belirli video giriş türleriniz ile en iyi çalışacak şekilde tasarlanmıştır. Kablo TV alıcınız/uygu alıcınızın da kendi ekran boyutu ayarları olabilir. Bununla birlikte genel olarak TV'yi olabildiğince 16:9 modun da izlemeniz gerekir. T Araçlar menüsünü görüntülemek için TOOLS düğmesine basın.
■ 100Hz Motion Plus → Kapalı / Net / Standart / Yumuşak / Özel / Demo Daha net resimler elde etmek için birçok hareket içeren hızlı sahnelerden yavaş hareketleri kaldırır. N 100Hz Motion Plus özelliğini etkinleştirirseniz, ekranda parazit olabilir. Bu olursa 100Hz Motion Plus öğesini Kpalı olarak ayarlayın. ● Kpalı: 100Hz Motion Plus'ı kapalı konumuna getirir. ● Netleştir: 100Hz Motion Plus'ı en düşük ayara getirir. ● Standart: 100Hz Motion Plus'ı orta olarak ayarlar.
¦ TV'nizi Bilgisayar (PC) Ekranı Olarak Kullanma PC Yazılımınızın Ayarlanması (Windows XP'ye göre) Tipik bir bilgisayarın Windows ekran ayarları aşağıda gösterilmektedir. Kullandığınız Windows'un sürümüne ve video kartınıza bağlı olarak PC'nizin gerçek ekranı büyük olasılıkla bundan farklıdır. Ancak, sizin bilgisayarınızda açılan ekranlar farklı görünse de, çoğu durumda aynı temel ayar bilgileri geçerli olacaktır. (Değilse, bilgisayar üreticinize ya da Samsung Bayiine başvurun.) 1.
¦ TV'nizin PC'nizle Ayarlanması N Ön ayar: PC modunu seçmek için SOURCE düğmesine basın. ❑ Otomatik Ayarlama Parlaklık Netlik Görüntü TV'nin aldığı video sinyallerini otomatik ayarlaması için Otomatik Ayarlama işlevini kullanın. İşlev ayrıca ayarların ince ayarlamalarını da yapar ve frekans değerleri ile konumlarını düzenler. T Araçlar menüsünü görüntülemek için TOOLS düğmesine basın. Auto Adjustment değerini ayrıca Araçlar → Otomatik Ayarlama öğesini seçerek de ayarlayabilirsiniz.
❑ Ses Dili Ses dillerinin varsayılan ayarını değiştirebilirsiniz. Gelen akışın dil bilgilerini görüntüler. N Bir dijital kanal izlerken bu işlev seçilebilir. N Yalnızca gerçekte yayınlanan diller arasından dil seçebilirsiniz. ❑ Ses Biçimi → MPEG / Dolby Digital Hem ana hoparlörden hem ses alıcısından ses verildiğinde, ana hoparlör ve ses alıcısı arasındaki şifre çözme hızı farkından dolayı ses yankısı oluşabilir. Bu durumda, TV Hoparlörü işlevini kullanın. N Bir dijital kanal izlerken bu işlev seçilebilir.
¦ Ses Modunun Seçilmesi Tools menüsünde ses modunu ayarlayabilirsiniz. Dual l ll konumuna ayarladığınızda geçerli ses modu ekranda görüntülenecektir. A2 Stereo NICAM Stereo Ses Türü Mono Stereo DUAL Mono Stereo DUAL DUAL 1 / 2 MONO STEREO ↔ MONO DUAL 1 ↔ DUAL 2 MONO MONO ↔ Stereo MONO ↔ DUAL 1 DUAL 2 Varsayılan Otomatik değiştirme DUAL 1 Otomatik değiştirme DUAL 1 N Stereo sinyali zayıfsa ve otomatik geçiş meydana geliyorsa mono moduna geçin. N Bu işlev yalnızca stereo ses sinyalinde etkinleştirilir.
■ Teletekst Dili Dil türünü seçerek teletekst dilini ayarlayabilirsiniz. N Seçilen dilin yayında kullanılabilir olmaması durumunda İngilizce varsayılan dildir. ■ Tercihler ● Birinci Yayın Dili / İkinci Yayın Dili / Birinci Altyazı Dili / İkinci Altyazı Dili / Birinci Teletekst Dili / İkinci Teletekst Dili Bu özelliği kullanarak kullanıcılar dillerden birini seçebilir. Kullanıcı bir kanal seçtiğinde, burada seçilen dil varsayılan olarak kullanılır.
❑ Şebeke → Ağ Türü / Ağ Kurulumu Seçeneklerin ayarlanması hakkındaki ayrıntılı prosedürler için ‘Ağ Ayarlama’ talimatlarına bakın. ❑ Genel ■ Oyun Modu → Kpalı / Açık PlayStation™ ya da Xbox™ gibi bir oyun konsoluna bağladığınızda, oyun menüsünü seçerek daha gerçekçi bir oyun deneyiminin keyfini çıkartabilirsiniz. N Oyun modundaki kısıtlamalar (Dikkat) Oyun konsoluyla bağlantıyı kesip başka bir harici cihaza bağlanmak için, ayar menüsünde Oyun Modu öğesini Kpalı olarak ayarlayın.
¦ Saati Ayarlama ❑ Saat ■ ■ Saat Modu Geçerli saati elle ya da otomatik olarak ayarlayabilirsiniz. ● Oto: Geçerli saati, dijital yayından gelen saat ile otomatik olarak ayarlayın. ● Manuel: Geçerli saati belirli bir saate elle ayarlayın. N Yayın istasyonuna ve sinyale bağlı olarak, otomatik saat doğru olarak ayarlanabilir. Bu durumda saati elle ayarlayın. N Saati otomatik olarak ayarlamak için anten veya kablo bağlı olmalıdır. Saat Ayarı Geçerli saati elle ayarlayabilirsiniz.
¦ Ağ Bağlantısı Internet Protokolünü bağlanmış çeşitli ağlar ile iletişim kurabileceğiniz şekilde kurabilirsiniz. ❑ Ağ Bağlantısı - Kablo ■ Bir DHCP Ortamı İçin LAN Bağlantısı Dinamik Ana Bilgisayar Yapılandırma Protokolü (DHCP) kullanılarak ağ kurulum prosedürleri aşağıda açıklanmıştır. DHCP seçildiğinde bir IP adresi, alt ağ maskesi, ağ geçidi ve DNS otomatik olarak atandığından, bunları elle girmenize gerek yoktur. 1.
■ Statik IP Ortamı İçin LAN Bağlantısı Bir statik IP adresi kullanılarak ağ kurulum prosedürleri aşağıda açıklanmıştır. Internet Servis Sağlayıcını (ISS) tarafından sağlanan IP adresi, alt ağ maskesi, ağ geçidi ve DNS'i elle girmeniz gerekir. 1. TV'nin arka panelindeki LAN bağlantı noktasını LAN kablosu ile duvardaki LAN bağlantı noktasına bağlayın. Duvardaki LAN Bağlantı Noktası TV Arka Paneli 1 LAN Kablo LAN bağlantısını bir Paylaştırıcı (Yönlendirici) üzerinden yapabilirsiniz.
N Kablosuz IP paylaştırıcı için o anda kullanılmayan bir kanal seçin. Kablosuz IP paylaştırıcı için seçilen kanal o anda yakındaki başka bir cihaz tarafından kullanılıyorsa, bu parazite neden olacaktır ve bağlantı başarısız olabilir. N Aşağıda listelenenler dışında bir güvenlik sistemi uygularsanız, TV ile çalışmayacaktır. AP (kablosuz IP paylaştırıcı) için güvenlik kodu uygulandığında, yalnızca aşağıdaki desteklenmektedir.
Kablolu Ağ Kurulumu-Manuel TV'yi LAN'a bir statik IP adresi kullanarak bağlamak için Internet Protokolünü (IP) ayarlamalısınız. 1. Ağ Türü öğesini Kablo olarak ayarlayın. 2. Kablolu Ağ Kurulumu seçeneğini seçin. 3. Internet Protokolü Ayarları öğesini Manuel olarak ayarlayın. Kablolu Ağ Kurulumu Internet Protokolü Ayarları : Manuel ▶ Ağ Testi IP Adresi : 0 0 0 0 Alt Ağ Maskesi : 0 0 0 0 Ağ Geçidi : 0 0 0 0 DNS Sunucusu : 0 0 0 0 4.
● Güvn Anh Grş öğesi ayarlanmamışsa: WPS desteği sunan AP'nin güvenlik ayarı NONE ise, PBC, PIN, Güvenlik Yok seçeneğini seçebilirsiniz. Güvenlik Yok, AP'yi doğrudan WPC işlevini kullanmadan bağlayabilir. N PBC, PIN işlemi yukarıdaki ile aynıdır. Güvn Anh Grş zaten ayarlanmışsa bakın. N Bağlantı işlemi çalışmıyorsa tekrar deneyin. Geçici: Bir mobil aygıtı bir erişim noktası olmadan, ‘Samsung Kablosuz LAN Adaptörü’ üzerinden, eşler arası bir ağ kullanarak bağlayabilirsiniz.
GİRİŞ / DESTEK ¦ Giriş Menüsü ❑ Kaynak Listesi ■ Giriş TV'yi ya da DVD / Blu-ray oynatıcılar / Kablo TV alıcısı / Uydu alıcısı (Set Üstü Kutu) gibi TV'ye bağlanacak diğer harici giriş kaynaklarını seçmek için kullanın. Tercih ettiğiniz giriş kaynağını seçmek için kullanın. O Bir harici sinyal kaynağını izlemek için uzaktan kumandadaki SOURCE düğmesine basın. TV modu, TV düğmesine basılarak seçilebilir.
Ürün Kılavzna Menüsünde Uzaktan Kumanda Düğmelerini Kullanma Düğme Sarı Düğme ◄/► ENTERE RETURN EXIT İşlemler Ürün Kılavzna içeriğini sıralı olarak görüntüler. (Otomatik Çal) İmleci hareket ettirir ve öğeyi seçer. Geçerli olarak seçili olan öğeyi seçer. Önceki menüye geri döner. Geçerli işlevi durdurur ve Ürün Kılavzna ana menüsüne geri döner. ❑ Kendi Kendini Tanıma ■ Görüntü Testi Kendi Kendini Tanıma Resim sorunu olduğunu düşünüyorsanız, resim testini gerçekleştirin.
❑ Yazılım Yükseltme Samsung, gelecekte TV yerleşik belleği için yükseltmeler sunabilir. Bu yükseltmeler Internet'e bağlandığında TV aracılığıyla da ya da yeni yerleşik belleği samsung.com adresinden bir USB bellek aygıtına alarak gerçekleştirilebilir. N Geçerli Sürüm, TV'nizde yüklü olarak gelen yazılımdır. N Alternatif Yazılım (Yedek) değiştirilecek olan önceki sürümü gösterir. N Yazılım ‘Yıl/Ay/Gün_Sürüm’ şeklinde sunulur. Tarih ne kadar yakınsa yazılım sürümü o kadar yenidir.
Media Play (USB & DLNA) ¦ Bir USB Aygıtını Bağlama 1. POWER düğmesine basarak, TV'yi açın. TV Arka Paneli 2. Fotoğraf, müzik ve/veya film dosyalarını içeren bir USB aygıtını USB 1 (HDD) veya USB 2 jakına bağlayın. 3. Uygulama seçimi ekranı görüntülendiğinde, Media Play (USB & DLNA) ENTERE ya da düğmesine basın. N MTP (Media Transfer Protocol) desteklenmez. USB Sürücüyü N Dosya sistemi FAT16, FAT32 ve NTFS'yi destekler. N Bazı USB Dijital fotoğraf makinesi ve ses aygıtları bu TV ile uyumlu olmayabilir.
¦ Media Play İşlevi Bu işlev, bir USB Yığın Depolama Sınıfı (MSC) aygıtında kayıtlı olan fotoğraf müzik ve/veya film dosyalarını izlemenize ve dinlemenize olanak sağlar. N Lisanslı olmayan multimedya dosyaları ile düzgün çalışmayabilir. Media Play (USB & DLNA) Menüsüne girme 1. MENU düğmesine basın. Uygulama seçeneğini seçmek için ▲ veya ▼ düğmesine, ardından da ENTERE düğmesine basın. 2. ▲ veya ▼ düğmesine basarak Media Play (USB & DLNA) öğesini seçin, ardından ENTERE düğmesine basın.
5 Yardım Öğeleri • Yeşil (Sık kullanılanlara ayarla) düğme: Seçili dosyanın Favori Ayarlarını değiştirir. İstenen değer görüntülenene kadar, bu düğmeye art arda basın. • Sarı (Seçim) düğme: Dosya listesinden dosya seçer. Seçilen dosyaların yanında c işareti görüntülenir. Dosya seçimini iptal etmek için tekrar Sarı düğmeye basın. • TOOLS (Araçlar) düğmesi: Seçenek menülerini görüntüler. (Seçenek menüsü geçerli duruma göre değişir.
¦ Fotoğraf / Müzik / Film Listesi Seçenek Menüsü 1. MEDIA.P düğmesine basın. Temel Görünüm Zmn çzgs 2. Photo, Music veya Movie öğesini seçmek için ◄ veya ► düğmesine basın, ardından ENTERE düğmesine basın. 3. İstenen dosyayı seçmek için ◄ veya ► düğmesine basın. N Birden Fazla Dosyanın Seçilmesi İstenen dosyayı seçmek için ◄ veya ► düğmesine basın. Ardından Sarı düğmeye basın. Birden çok dosya seçmek için yukarıdaki işlemi tekrar edin. Seçili dosyada c işareti görüntülenir. Renk Klasör 5/15 1231.
¦ Slayt Gösterisi / Müzik Çalma / Film Oynatma Seçenek Menüsü 1. Bir slayt gösterisi sırasında (veya bir fotoğraf görüntülerken) veya bir müzik çalarken veya film oynatırken, seçeneği ayarlamak için TOOLS düğmesine basın. 2. İstenilen seçeneği seçmek için ▲ veya ▼ düğmesine basın, ardından ENTERE düğmesine basın. ❑ Resim Ayarı / Ses Ayarları Resim ve ses ayarlarını seçebilirsiniz.
¦ Fotoğraf ya da Slayt Gösterisi İzleme Slayt Gösterisi İzleme N Slayt Gösterisi için Dosya Listesi Bölümündeki tüm dosyalar kullanılır. N Slayt gösterisi sırasında, dosyalar geçerli olarak gösterilen dosyadan başlayarak sıra ile görüntülenir. N Slayt Gösterisi, Dosya Listesi Bölümündeki sıralamaya göre ilerler. N Fon Müziği ayarı Açık olarak ayarlandıysa, Slayt Gösterisi sırasında müzik dosyaları otomatik olarak oynatılır.
¦ Müzik Çalma Müzik dosyası çalma 1. Dosya Listesi Bölümünü seçmek için ▼ düğmesine basın. 2. Çalınacak müzik dosyasını seçmek için ◄ veya ►düğmesine basın. ▶ 00:00:04 / 00:04:04 3/37 Way I Love You HaHaHa 3. ∂ (Oynat) / ENTERE düğmesine basın. N Bu menü sadece MP3 dosya uzantılı dosyaları gösterir. Başka dosya uzantılarına sahip dosyalar, aynı USB aygıtına kaydedilmiş olsalar bile görüntülenmez.
¦ Film Dosyası Oynatma Film dosyası oynatma 1. Dosya Listesi Bölümünü seçmek için ▼ düğmesine basın. ▶ 00:00:01 / 00:05:30 3/37 ABC.avi 2. Oynatılacak filmi seçmek için ◄ veya ► düğmesine basın. 3. ∂ (Oynat) / ENTERE düğmesine basın. N Seçilen dosya oynatılır. N Seçili dosya, oynatma süresi ile birlikte en üstte görüntülenir. N Dosyanın başlangıcında oynatma süresi bilgisi bulunamazsa, bir film dosyanın oynatma süresi '00:00:00' olarak görüntülenebilir.
N Video Oynatma Kontrol Düğmeleri Düğme ENTERE ∂ ∑ TOOLS ∫ ◄/► ▲/▼ μ İşlemler Film dosyasını oynatır/duraklatır Film dosyasını oynatır Film dosyasını duraklatır Film menülerindeki çeşitli işlevleri çalıştırır. Oynatma modundan çıkar ve film listesine geri döner. Film dosyasında ileri ya da geri atlar. Dosyanın başına/sonuna gider. Dosyayı iki katı hızda oynatır. İşlev codec'e bağlı olarak desteklenmeyebilir. Film grubunu oynatma 1. Sıralama tuşu Bölümüne gitmek için ▲ düğmesine basın. 2.
¦ Setup Menüsünü Kullanma Kurulum Menüsü Media Play menüsünün kullanıcı ayarlarını gösterir. SUM 1. MEDIA.P düğmesine basın. 2. Setup öğesini seçmek için ◄ veya ► düğmesine basın, sonra ENTERE düğmesine basın. 851,86MB/993,02MB Boş SETUP 3. İstediğiniz seçeneğin seçmek için ▲ veya ▼ düğmesine basın. 4. Seçeneği seçmek için ◄ veya ► düğmesine basın. N Media Play modundan çıkmak için, uzaktan kumandadaki MEDIA.P düğmesine basın.
Media Play-DLNA ¦ DLNA Ağını Ayarlama DLNA, Media Play modunda bir ağ bağlantısı aracılığıyla, PC'nizde bulunan resim, müzik ve videoları TV'nizde izlemenize olanak sağlar. Bu dosyaları bir USB depolama aygıtına kopyalama ve aygıtı TV'nize takma ihtiyacını ortadan kaldırır. DLNA özelliğini kullanabilmek için TV'nin ağa bağlı ve DLNA uygulamasının da bilgisayarınızda yüklü olması gerekir.
Sistem Gereksinimleri 1. Bu TV ile birlikte verilen Program CD'sini bilgisayarınıza takın. 2. Program kurulumu için 30MB boş disk alanı gereklidir. N Dosyaları paylaşıyorsanız, her 100 dosya için 30 MB'ye kadar sabit disk sürücüsü alanı gerekir. N Dosya paylaşımını iptal ederseniz, küçük resim bilgileri için kullanılan sabit disk sürücüsü alanı da boşalır. Desteklenen Formatlar ● Resim: JPEG/ Ses: MP3/ Video: AVI, MKV, ASF, MP4, 3GPP, PS, TS kapsayıcı.
❑ paylaş ■ Klasör Paylaşma PC'nizde bulunan bir klasörü TV'nizle paylaşabilirsiniz. ■ Klasörü Paylaş Bilgisayarınızda paylaşılan bir klasörü iptal edebilirsiniz. Klasörü Paylaş bölmesinden bir klasör seçin ve Kasörün Paylaşımını Kaldır öğesini seçin. ■ Geçerli Ayarları Uygulama Bu işlemi, yeni bir klasör paylaştırılması ya da paylaştırılan klasörün iptal edilmesine bağlı olarak eşleştirme yapılmasının gerekli olduğu hallerde yapın.
ANYNET+ ¦ Anynet+ Cihazlarına Bağlanma Anynet+ nedir? Anynet+, Anynet+ özelliğini destekleyen bağlı tüm Samsung cihazlarını Samsung TV'nizin uzaktan kumandası ile kumanda etmenizi sağlar. Anynet+ sistemi yalnızca Anynet+ özelliği olan Samsung cihazları ile kullanılabilir. Samsung cihazınızda bu özelliğin olup olmadığından emin olmak için üstünde bir Anynet+ logosu olup olmadığını kontrol edin. Bir TV'ye bağlamak için TV Anynet+ Cihazı 1 HDMI 1.3 Kablosu Anynet+ Cihazı 2 HDMI 1.
¦ Anynet+ Kurulumu Media Play (USB & DLNA) Uygulama T Araçlar menüsünü görüntülemek için TOOLS düğmesine basın. Anynet+ menüsünü ayrıca Araçlar → Anynet+ (HDMI-CEC) öğesini seçerek de görüntüleyebilirsiniz. Anynet+ (HDMI-CEC) Content Library Internet@TV Ev Ağı Merkezi ❑ Kurulum ■ ■ Anynet+(HDMI-CEC) → Kapalı / Açık Anynet+ İşlevini kullanmak için, Anynet+ (HDMI-CEC), Açık olarak ayarlanmalıdır. N Anynet+ (HDMI-CEC) işlevi devre dışı olduğunda, tüm Anynet+ ile ilgili işlemler devre dışı bırakılır.
Anynet+ Modunda Kullanılabilir TV Uzaktan Kumanda Düğmeleri Cihaz Türü Çalışma Durumu Anynet+ Cihazı Cihaza geçiş yaptıktan sonra, karşılık gelen cihazın menüsü ekranda görüntülendiğinde.
¦ Anynet+ için Sorun Giderme Sorun Anynet+ çalışmıyor. ● ● ● ● ● ● ● ● ● Anynet+ sistemini başlatmak istiyorum. ● ● ● Anynet+ sisteminden çıkmak istiyorum. ● ● ● Ekranda 'Anynet+ cihazına bağlanılıyor...' mesajı görüntülenir. Anynet+ cihazı oynatılmıyor. Bağlanmış cihaz görüntülenmiyor. ● ● ● ● ● ● ● ● ● TV programı ● kaydedilemiyor. TV sesi alıcıdan çıkmıyor. ● Olası Çözüm Cihazın bir Anynet+ cihazı olup olmadığını kontrol edin. Anynet+, yalnızca Anynet+ cihazlarını destekler.
Content Library ¦ Content Library'yi Kullanma Content Library, TV'nizdeki çeşitli içerikten keyif almanızı sağlar. TV belleğinde depolanan varsayılan içeriği kullanabilir veya USB aygıtı kullanarak yeni içeriğin keyfini çıkarabilirsiniz. Galeri Content Library Menüsünde Uzaktan Kumanda Düğmelerini Kullanma Düğme ▲/▼/◄/► ENTERE RETURN EXIT
Renkli düğme Y / MUTE Galeri Yemekler Oyun Çocuk Sağlık R Geri e Çık İşlemler İmleci hareket ettirir ve öğeyi seçer.
❑ Oyun Bu kategori tüm aile için eğlenceli oyunlar sunar. N Oyunlarda kullanılan düğmeler için, ekrandaki yönergelere bakın. N Oyunlar için Renk Düğmeleri Düğme Kırmızı Yeşil Sarı Mavi İşlemler Oyun ana ekranını getirmek için basın Oyunu duraklatmak için basın Seçenek Tuşu Oyundan çıkmak için basın ❑ Çocuk Bu çocukların tekrar tekrar izleyebilecekleri, eğitici ve etkileşimli bir içeriktir.
Internet@TV Pencere öğesi hizmetini kullanırken bazı sorunlar yaşarsanız, lütfen içerik sağlayıcınızla görüşün. Pencere öğesinde, yeşil düğmeye basın ve iletişim bilgilerini alın veya pencere öğesi sağlayıcısı bilgileri için yardım web sitesine bakın. N Bölgeye bağlı olarak pencere öğesi hizmeti için yalnızca İngilizce destekleniyor olabilir. N Bu işlev ülkenize bağlı olarak desteklenmeyebilir.
❑ Ekran görünümü ■ İstasyon modu 1 Sağ üst köşede profil adınızla birlikte bir hoş geldiniz etiketi görüntülenir. N Kısa bir süreden sonra bu etiket kaybolur. 2 Etiket iki uzaktan kumanda kısayolunu vurgular. N Uzaktan kumanda üzerinde mavi düğmeye (Viewport) basarsanız, ekran ‘Viewport mode’ ve ‘Overlay mode’ arasında değişir. Viewport modunda, TV veya video dış kısmında grafikler olan ufaltılmış alan görüntüler. Overlay modunda, grafikler TV'nin veya videonun üst kısmında görüntülenir.
All content and services accessible through this device belong to third parties and are protected by copyright, patent, trademark and/or other intellectual property laws. Such content and services are provided solely for your personal noncommercial use. You may not use any content or services in a manner that has not been authorized by the content owner or service provider.
Profile Settings menüsü profilinizi özelleştirmenizi ve korumanızı sağlar. ● Kullanıcı profilleri benzersiz bir Name ve Avatar (profilinizi temsil etmesi için kullanılan bir resim) ile özelleştirilebilir. ● Profilinizin Name ve Avatarı istasyondaki profil snippet öğesinde görüntülenir. ● Profiller Create Profile PIN ile korunabilir. N İlk defa PIN ayarlıyorsanız, bir Güvenlik Sorusu seçebilirsiniz. Profile Settings menüsü pencere öğelerine erişimi sınırlandırabilir.
¦ Yahoo!® Hava Durumu Pencere Öğesini Kullanma Yahoo!® Hava Durumu Pencere Öğesi yerel ve sık kullanılan hava durumu konumlarınızı günceller. Bu içerik hava koşullarına göre sürekli olarak değişir. ● Yahoo!® Hava Durumu Pencere Öğesi Settings menüsünü görüntülemek için, uzaktan kumanda üzerindeki yeşil düğmeye basın. ● Settings menüsünde, hava bilgilerini görüntülemek istediğiniz bir şehri ekleyebilir veya kaldırabilirsiniz. Settings menüsünde aşağıdakileri yapabilirsiniz: ● Add New City.
¦ Yahoo!® Flickr Pencere Öğesini Kullanma Flickr Pencere Öğesi TV izlerken arkadaşlarınız ve aileniz tarafından gönderilen en sevdiğiniz fotoğraflara erişmenizi sağlar. Bir slayt gösterisi kullanarak büyük TV ekranınızda ailenizle fotoğraf paylaşın. ● Yahoo! nizle oturum açarak Flickr Pencere Öğesini kişiselleştirin. ID. ● Oturum açma hakkında ayrıntılı yöntemler için, 'Profil Pencere Öğesini Kullanma' talimatlarına bakın. ● Flickr hakkında daha fazla bilgi için, http://www.flickr.com adresini ziyaret edin.
¦ internet@TV için Sorun Giderme Sorun Olası Çözüm Bazı pencere öğesi hizmetleri çalışmaz. Servis sağlayıcısıyla kontrol edin. Pencere öğesinde, yeşil düğmeye basın ve iletişim bilgilerini alın veya pencere öğesi hizmet sağlayıcısı bilgileri için yardım web sitesine bakın. Yardım web sitesi sayfasına bakın. Bazı pencere öğesi içerikleri yalnızca İngilizcedir. Dili nasıl değiştirebilirim? Pencere öğesi içerik dili pencere öğesi kullanıcı arayüzü dilinden farklı olabilir.
Internet@TV N Bu işlev ülkenize bağlı olarak desteklenmeyebilir. (Her yerde yoktur) N Pencere öğesi hizmetini kullanırken bazı sorunlar yaşarsanız, lütfen hizmet sağlayıcınızla görüşün. Pencere öğesinde, yeşil düğmeye basın ve iletişim bilgilerini alın veya hizmet sağlayıcı bilgileri için yardım web sitesine bakın. N Bölgeye bağlı olarak pencere öğesi hizmeti için yalnızca İngilizce destekleniyor olabilir.
❑ Sistem Kurulum N Kyn Yz Bnd Oto Çlş, Kayan Yz Bnd Süresi ülkeye bağlı olarak desteklenmeyebilir. ■ Hizmet Kilidi parolasını değiştir. N Yeni bir TV'nin varsayılan şifresi 0-0-0-0dır. N Parolayı unutursanız, parolanın 0-0-0-0 olarak sıfırlanması için uzaktan kumanda düğmelerine aşağıdaki sırayla basın: POWER (Kapalı) → MUTE → 8 → 2 → 4 → POWER (Açık). ■ Hizmet Süresi Ekran koruyucu çalışmaya başlamadan önceki bekleme süresini belirleyin.
¦ internet@TV için Sorun Giderme Sorun Olası Çözüm Bazı pencere öğesi hizmetleri çalışmaz. Servis sağlayıcısıyla kontrol edin. Pencere öğesinde, yeşil düğmeye basın ve iletişim bilgilerini alın veya pencere öğesi hizmet sağlayıcısı bilgileri için yardım web sitesine bakın. Yardım web sitesi sayfasına bakın. Tekli oturum açmanın avantajı nedir? Bir hesap oluşturursanız ve istediğiniz cihaza oturum açma bilgilerini kaydederseniz, ayrıca oturum açmadan kişiselleştirilmiş içeriğe erişebilirsiniz.
Ev Ağı Merkezi ¦ Ev Ağı Merkezi Ev Ağı Merkezi hakkında Ev Ağı Merkezi TV ile cep telefonlarını bir ağ üzerinden bağlar. Cep telefonunuza gelen aramaları, metin mesajı içeriğini ve zamanlamaları Ev Ağı Merkezi kullanarak TV'nizden görüntüleyebilirsiniz. Ek olarak, video, fotoğraf ve müzik gibi cep telefonunda kayıtlı ortam içeriğini ağ aracılığıyla TV üzerinde kontrol ederek oynatabilirsiniz. N Aygıt DLNA DMC (Digital Media Controller) işlevini destekliyorsa, Ev Ağı Merkezi işlevi kullanılabilir.
¦ Ev Ağı Merkezi Kurulumu ❑ Mesaj / Medya Mesaj veya Medya işlevini kullanmak için bu TV ile ayarlanan cep telefonlarının bir listesini görüntüler. N Medya işlevi, DLNA DMC özelliğini destekleyen diğer cep tel efonlarında da mevcuttur. Ev Ağı Merkezi Mesaj 111-1234-5671 : İz vrld Medya 111-1234-5672 : İz vrld Kurulum 111-1234-5673 : Rddedid 111-1234-5674 : Rddedid ■ İz vrld Cep telefonuna izin verir. ■ Rddedid Cep telefonunu engeller. ■ Sil Cep telefonunu listeden siler.
Mesaj Görünümü TV seyrederken yeni bir metin mesajı (SMS) gelirse, uyarı penceresi görüntülenir. Tamam düğmesini tıklatırsanız, mesajın içeriği görüntülenir. N Cep telefonunuzdaki metin mesajının (SMS) içeriğinin görüntülenme ayarlarını yapılandırabilirsiniz. Yöntemler için, cep telefonunuzun kılavuzuna bakın. N Bazı özel karakterler boş olarak veya bozuk olarak görüntülenebilir. Call Arrival Alarm TV seyrederken aranırsanız alarm penceresi görünür.
ÖNERİLER ¦ Teletekst Özelliği Televizyon istasyonlarının çoğu, Teletekst aracılığı ile yazılı bilgi hizmeti sunar. Teletekst hizmetinin dizin sayfasında nasıl kullanılacağıyla ilgili bilgiler bulunur. Ayrıca uzaktan kumanda düğmelerini kullanarak gereksinimlerine uygun seçenekleri belirleyebilirsiniz. N Teletekst bilgilerinin doğru görünmesi için kanal alışının düzenli olması gerekir. Aksi takdirde bilgiler eksik olabilir ya da bazı sayfalar görüntülenmeyebilir. 1 : (çıkış) Teletekst gösteriminden çıkış.
Teletekst sayfaları altı kategoriye göre düzenlenmiştir: Bölüm A B C D E F İçindekiler Seçilen sayfa numarası. Yayın yapan kanalın adı. Geçerli sayfa numarası ya da arama göstergeleri. Tarih ve saat. Metin. Durum bilgileri. FASTEXT bilgileri.
¦ Standın çıkarılması 1. TV’nin arkasındaki vidaları çıkarın. 2. Standı TV'den ayırın. N TV'yi iki veya daha fazla kişi taşımalıdır. 3. Alt deliği kapakla örtün. ¦ Duvara Montaj kitinin Takılması Duvara montaj öğeleri (ayrı satılır) ile TV'yi duvara monte edebilirsiniz. Duvara Montaj kitinin takılmasıyla ilgili daha fazla bilgi için, Duvara Montaj öğeleriyle birlikte verilen talimatlara bakın. Duvara montaj braketini takarken yardım için bir teknisyenle görüşün.
¦ kabloların Montajı ❑ Stand Tipi N Tutucu-Tel Kablo içindeki kabloları, saydam standdan görülmeyecek şekilde sarın. 1 1 2 2 3 3 ❑ Duvara Monteli Tip 1 1 N Kabloları düzenlerken çok sert bir şekilde çekmeyin. Aksi halde ürünün bağlantı terminallerine hasar verebilirsiniz. Türkçe - 6 BN68-02329A-03Tur.
¦ Kurulum Alanının Sabitlenmesi Uygun havalandırma için, ürün ve diğer nesneler (duvar gibi) arasında gerekli mesafeyi bırakın. Buna dikkat edilmemesi ürünün dahili sıcaklığında gerçekleşecek artış nedeniyle yangına veya üründe bir soruna neden olabilir. Ürünü şekilde gösterildiği mesafeyi bırakarak monte edin. N Bir stand veya duvar montajı kullanırken, yalnızca Samsung Electronics tarafından sağlanan parçaları kullanın.
¦ Sorun Giderme TV'ye ilişkin herhangi bir sorunuz varsa, öncelikle bu listeye başvurun. Bu sorun giderme ipuçlarının hiçbiri işe yaramazsa, lütfen ‘www.samsung.com’ sitesini ziyaret edin ve ardından Destek düğmesini tıklatın veya son sayfa listesindeki Çağrı Merkezi ile iletişime geçin. Sorun Çözüm Görüntü Kalitesi TV görüntüsü mağazada olduğu kadar iyi görünmüyor. Öncelikle, lütfen TV'nizin test görüntüyü düzgün bir şekilde görüntülediğini onaylamak için, Görüntü Testi işlemini gerçekleştirin.
Sorun Çözüm Resim Yok, Video Yok TV açılmıyor. ● ● ● TV otomatik olarak kapanıyor. ● ● ● ● Resim/Video yok. ● ● ● ● AC güç kablosu fişinin duvardaki prize ve TV'ye düzgün bir şekilde takıldığından emin olun. Prizin çalıştığından emin olun. Uzaktan kumandanın düzgün bir şekilde çalıştığından emin olmak için, TV'deki POWER düğmesine basın. TV açılırsa, bu durum Uzaktan Kumandadan kaynaklanıyor olabilir. Uzaktan Kumanda sorununu çözmek için, aşağıdaki 'Uzaktan kumanda çalışmıyor' bölümüne bakın.
Sorun Çözüm Diğerleri Resim tam ekran olarak görüntülenmiyor. ● ● Yüksek kalitede SD (4:3) içerikleri görüntülenirken, HD kanallarında her bir kenar üzerinde siyah çubuklar görüntülenir. TV'nizden farklı açı oranlarına sahip filmlerde Üst ve Alt kısımda siyah çubuklar görüntülenir. Harici cihazınızdaki ve TV'nizdeki resim boyutu seçeneğini tam ekran olarak ayarlayın. Uzaktan kumanda çalışmıyor. ● ● ● Uzaktan kumanda pillerini doğru polaritede (+ -) olacak şekilde değiştirin.
¦ Teknik Özellikler Model Adı Ekran Boyutu (Çapraz) PC Çözünürlüğü (En iyi) Ses Çıkış Boyutlar (GxDxY) Gövde Standla Ağırlık Standla Çevre Koşulları Çalışma Sıcaklığı Çalışma Nem Oranı Saklama Sıcaklığı Saklama Nem Oranı Döner Stand (Sol / Sağ) Model Adı Ekran Boyutu (Çapraz) PC Çözünürlüğü (En iyi) Ses Çıkış Boyutlar (GxDxY) Gövde Standla Ağırlık Standla Çevre Koşulları Çalışma Sıcaklığı Çalışma Nem Oranı Saklama Sıcaklığı Saklama Nem Oranı Döner Stand (Sol / Sağ) UE32B7000WWXXC UE40B7000WWXXC 32 inches
İthalatçı Firma ANADOLU ELEKTRONiK ANADOLU ELEKTRONİK ALETLER PAZARLAMA VE TİCARET A.Ş. Esentepe Mah. Anadolu Cad. No: 5 PK38 34870 Kartal-İstanbul/TÜRKİYE Tel: +90 (216) 586 78 00 Fax: +90 (216) 473 60 32 bilgi@anadoluelektronik.com.tr EEE Yönetmeliğine Uygundur. Bu ürünün ortalama yaşam süresi 10 yıldır. İmalatçı SAMSUNG ELECTRONICS CO., LTD.
Correct Disposal of This Product (Waste Electrical & Electronic Equipment) (Applicable in the European Union and other European countries with separate collection systems) This marking on the product, accessories or literature indicates that the product and its electronic accessories (e.g. charger, headset, USB cable) should not be disposed of with other household waste at the end of their working life.
Ustrezno odstranjevanje tega izdelka (odpadna električna in elektronska oprema) Oznaka na izdelku, dodatni opremi ali dokumentaciji pomeni, da izdelka in njegove elektronske dodatne opreme (npr. električni polnilnik, slušalke, kabel USB) ob koncu dobe uporabe ni dovoljeno odvreči med gospodinjske odpadke. Te izdelke ločite od drugih vrst odpadkov in jih odgovorno predajte v recikliranje ter tako spodbudite trajnostno vnovično uporabo materialnih virov.
Σωστή Απόρριψη αυτού του Προϊόντος (Απόβλητα Ηλεκτρικού & Ηλεκτρονικού Εξοπλισμού) (Ισχύει για την Ευρωπαϊκή Ένωση και για άλλες ευρωπαϊκές χώρες με χωριστά συστήματα συλλογής) Αυτό το σήμα που εμφανίζεται επάνω στο προϊόν, στα εξαρτήματά του ή στα εγχειρίδια που το συνοδεύουν, υποδεικνύει ότι το προϊόν και τα ηλεκτρονικά του εξαρτήματα (π.χ. φορτιστής, ακουστικά, καλώδιο USB) δεν θα πρέπει να ρίπτονται μαζί με τα υπόλοιπα οικιακά απορρίμματα μετά το τέλος του κύκλου ζωής τους.
Tinkamas šio gaminio išmetimas (elektros ir elektroninės įrangos atliekos) Šis ženklas, pateiktas ant gaminio, jo priedų ar dokumentacijoje, nurodo, kad gaminio ir jo elektroninių priedų (pvz., įkroviklio, ausinių, USB kabelio) negalima išmesti kartu su kitomis buitinėmis atliekomis gaminio naudojimo laikui pasibaigus.
Correct disposal of batteries in this product (Applicable in the European Union and other European countries with separate battery return systems.) This marking on the battery, manual or packaging indicates that the batteries in this product should not be disposed of with other household waste at the end of their working life. Where marked, the chemical symbols Hg, Cd or Pb indicate that the battery contains mercury, cadmium or lead above the reference levels in EC Directive 2006/66.
KKorrekt bortskaffelse af batterierne i dette produkt (Gælder i EU og andre europæiske lande med særlige retursystemer for batterier). Mærket på dette batteri, dokumentationen eller emballagen betyder, at batterierne i dette produkt efter endt levetid ikke må bortskaffes sammen med andet husholdningsaffald. Mærkning med de kemiske symboler Hg, Cd eller Pb betyder, at batteriet indeholder kviksølv, cadmium eller bly over grænseværdierne i EU-direktiv 2006/66.
Správná likvidace baterií v tomto výrobku (Platí v Evropské unii a dalších evropských zemích s vlastními systémy zpětného odběru baterií.) Tato značka na baterii, návodu nebo obalu znamená, že baterie v tomto výrobku nesmí být na konci své životnosti likvidovány společně s jiným domovním odpadem. Případně vyznačené symboly chemikálií Hg, Cd nebo Pb upozorňují na to, že baterie obsahuje rtuť, kadmium nebo olovo v množství překračujícím referenční úrovně stanovené směrnicí ES 2006/66.