Comuníquese con SAMSUNG WORLD WIDE Si desea formular alguna pregunta o comentario en relación con los productos de Samsung, comuníquese con el centro de atención al cliente de SAMSUNG. Country Customer Care Center Web Site Address MEXICO 01-800-SAMSUNG (726-7864) www.samsung.com C.P 11570 AV. Presidente Masaryk No.111, Int. 701 Col. Chapultepec Morales, Delegacion Miguel Hidalgo Mexico D.F IMPORTADO POR: SAMSUNG ELECTRONICS MÉXICO S.A. de C.V. AV. PRESIDENTE MASARIK #111 INT701 COL.
Figures and illustrations in this User Manual are provided for reference only and may differ from actual product appearance. Product design and specifications may be changed without notice. Still image warning Avoid displaying still images (such as jpeg picture files) or still image elements (such as TV channel logos, panorama or 4:3 image format, stock or news bars at screen bottom etc.) on the screen. Constant displaying of still picture can cause ghosting of LED screen, which will affect image quality.
Contents Getting Started Advanced Features yy yy yy yy yy yy yy yy Network Connection................................................ 25 List of Features.......................................................... 4 Accessories............................................................... 4 Install the Stand......................................................... 5 Viewing the Control Panel.......................................... 6 Viewing the Remote Control.......................................
Getting Started List of Features yy Excellent Digital Interface & Networking: With a built-in HD digital tuner, nonsubscription HD broadcasts can be viewed without a cable box / STB (Set-Top-Box) satellite receiver. yy Media Play: Allows you to play music files, pictures and movies saved on a USB device (p. 31). yy AllShare: AllShare connects your TV and compatible Samsung mobile phones/devices through a network (p. 41). yy Self Diagnosis: You can check to make sure picture and sound operate normally (p.
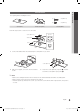
01 Getting Started Install the Stand See separate guide for installing the stand. s s 5EA (M4 X L12) (B) 5EA (M4 X L8) s s s Stand (1EA) (A) Guide Stand (1EA) Screws (10EA) Follow the steps below to connect the TV to the stand. Top view Screws (M4 X L12) s Guide Stand s s s s Front Stand Rear Rear 1. Connect the Guide Stand to the Stand using five screws (M4 X L12) as shown. 2 s s s s s s s s s s s Screws (M4 X L8) 1 2.
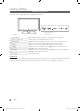
Getting Started Viewing the Control Panel ✎✎The product color and shape may vary depending on the model. Remote control sensor Speakers Power Indicator Power Indicator Blinks and turns off when the power is on and lights up in standby mode. Remote control sensor Aim the remote control towards this spot on the TV. SOURCEE Toggles between all the available input sources. In the on-screen menu, use this button as you would use the ENTERE button on the remote control.
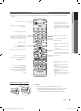
✎✎This is a special remote control for the visually impaired and has Braille points on the Power, Channel and Volume buttons. Turns the TV on and off. POWER ON/OFF Turns the remote control light on or off. When on, the buttons become illuminated for a moment when pressed. (Using the remote control with this button set to ON will reduce the battery usage time.) SOURCE Displays and selects the available video sources (p. 12).
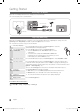
Getting Started Connecting to an Antenna When the TV is initially powered on, basic settings proceed automatically. ✎✎Connecting the power cord and antenna. VHF/UHF Antenna Antenna Cable (Not Supplied) Cable or ANT OUT Power Input Plug & Play (Initial Setup) When the TV is initially powered on, a sequence of on-screen prompts will assist in configuring basic settings. Press the POWERP button. Plug & Play is available only when the Input source is set to TV.
Connections 02 Connections Connecting to an AV Device ✎✎The product color and shape may vary depending on the model. Using an HDMI or HDMI/DVI cable: HD connection (up to 1080p) We recommend using the HDMI connection for the best quality HD picture.
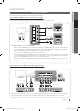
Connections Connecting to an Audio Device Using an Optical (Digital) or Audio (Analog) Cable Connection Available devices: Digital Audio System, Amplifier, DVD home theater R W Red Audio Cable (Not Supplied) White Amplifier / DVD home theater AUDIO IN R-AUDIO-L Optical Cable (Not Supplied) Digital Audio System OPTICAL ✎✎DIGITAL AUDIO OUT (OPTICAL) xx When a Digital Audio System is connected to the DIGITAL AUDIO OUT (OPTICAL) jack, decrease the volume of both the TV and the system. xx 5.
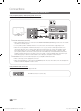
02 Connections Connecting to a PC Using an HDMI/DVI Cable or a D-sub Cable HDMI to DVI Cable (Not Supplied) DVI OUT AUDIO OUT Audio Cable (Not Supplied) AUDIO OUT PC OUT D-Sub Cable (Not Supplied) Display Modes (D-Sub and HDMI/DVI Input) Optimal resolution is 1920 X 1080 @ 60 Hz.
Connections Changing the Input Source Edit Name OO MENUm → Input → Edit Name → ENTERE Source List Use to select TV or an external input sources such as a DVD / Blu-ray player / cable box / STB satellite receiver. SOURCE OO MENUm → Input → Source List → ■■ VCR / DVD / Cable STB / Satellite STB / PVR STB / AV Receiver / Game / Camcorder / PC / DVI PC / DVI Devices / TV / IPTV / Blu-ray / HD DVD / DMA: Name the device connected to the input jacks to make your input source selection easier.
¦¦ Using Favorite Channels OO MENUm → Channel → Channel List → ENTERE ¦¦ Seeing Channels Add to Favorite / Delete from Favorite Channel List t Add, delete or set Favorite channels and use the program guide for digital broadcasts. CH LIST OO MENUm → Channel → Channel List → ENTERE Added Channels 6 6-1 Air * TV #6 7 Air 8 9 9-1 10 10-1 11-1 Air Antenna Air Air * TV #9 Air * TV #10 * TV #11 Zoom 2. Add or delete a channel using the Add to Favorite or Delete from Favorite menu respectively.
Basic Features xx After all the available channels are stored, it starts to remove scrambled channels. The Auto Program menu then reappears. ■■ Timer Viewing: You can set a desired channel to be displayed automatically at the reserved time. Set the current time first to use this function. ¦¦ Editing Channels 1. Press the ◄ / ► / ▲ / ▼ buttons to select the desired channel in Channel List. OO MENUm → Channel → Channel List → ENTERE 2. Press the TOOLS button, then select Timer Viewing.
¦¦ Economical Solutions (analog channels only) If the reception is clear, you do not have to fine tune the channel, as this is done automatically during the search and store operation. If the signal is weak or distorted, fine tune the channel manually. Scroll to the left or right until the image is clear. The Eco Function can be used to enhance your power savings. ✎✎Settings are applied to the channel you're currently watching.
Basic Features ■■ Black Tone (Off / Dark / Darker / Darkest): Select the black level to adjust the screen depth. ■■ Dynamic Contrast (Off / Low / Medium / High): Adjust the screen contrast. ■■ Shadow Detail (-2~+2): Increase the brightness of dark images. ■■ Gamma: Adjust the primary color intensity. ■■ Expert Pattern (Off / Pattern1 / Pattern2): By running the Expert Pattern function, the picture can be calibrated.
of borders displayed on the left, right and center of the screen may cause image retention (screen burn) which are not covered by the warranty. Screen Fit: Displays the full image without any cut-off when HDMI (720p / 1080i / 1080p) or Component (1080i / 1080p) signals are inputted. ✎✎NOTE xx After selecting Zoom1, Zoom2 or Wide Fit: 1. Press the ► button to select Position. 2. Press the ENTERE button. 3. Press the ▲ or ▼ button to move the picture up or down. 4. Press the ENTERE button. 5.
Basic Features Screen ¦¦ Adjusting Sound Settings ■■ Coarse / Fine: Removes or reduces picture noise. If the noise is not removed by Fine-tuning alone, then adjust the frequency as best as possible (Coarse) and Finetune again. After the noise has been reduced, readjust the picture so that it is aligned to the center of screen. OO MENUm → Sound → Equalizer → ENTERE ■■ Position: Adjust the PC’s screen positioning if it does not fit the TV screen. Press the ▲ or ▼ button to adjust the Vertical-Position.
(analog channels only) ■■ Mono: Choose for channels that are broadcasting in mono or if you are having difficulty receiving a stereo signal. MTS 03 Basic Features Setup Menu Multi-Track Sound (MTS) t ¦¦ Setting the Time OO MENUm → Setup → Time → ENTERE ■■ Stereo: Choose for channels that are broadcasting in stereo. Time ■■ SAP: Choose to listen to the Separate Audio Program, which is usually a foreign-language translation. ■■ Clock: Setting the clock is for using various timer features of the TV.
Basic Features ¦¦ Setting the On / Off Timer ¦¦ Locking Programs OO MENUm → Setup → Time → Timer 1 → OO MENUm → Setup → Security → ENTERE You can set the TV to turn on automatically at a preset time. Security ENTERE ■■ Timer 1 / Timer 2 / Timer 3: Three different on / off timer settings can be made. You must set the clock first.
category that deals with more sensitive material. For example, if you block the PG-13 category, then R, NC-17 and X will automatically be blocked. Canadian English: You can block TV programs depending on their Anglophone Canadian rating. –– C: Programming intended for children under age 8. / C8+: Programming generally considered acceptable for children 8 years and over to watch on their own. / G: General programming, suitable for all audiences. / PG: Parental Guidance.
Basic Features ■■ Caption Mode: You can select the desired caption mode. ✎✎ The availability of captions depends on the program being broadcast. Default / CC1~CC4 / Text1~Text4: (analog channels only) The Analog Caption function operates in either analog TV channel mode or when a signal is supplied from an external device to the TV (Depending on the broadcasting signal, the Analog Caption function may or may not work with digital channels.).
OO MENUm → Support → ENTERE PIP t You can watch the TV tuner and one external video source simultaneously. PIP (Picture-in-Picture) does not function in the same mode. OO MENUm → Setup → PIP → ENTERE ✎✎NOTE xx For PIP sound, refer to the Sound Select instructions. xx If you turn the TV off while watching in PIP mode, the PIP window will disappear. xx You may notice that the picture in the PIP window becomes slightly unnatural when you use the main screen to view a game or karaoke.
Basic Features Software Upgrade ■■ By Online: Upgrade the software using the Internet. Software Upgrade can be performed by network connection or downloading the latest firmware from “www. samsung.com,” to a USB memory device. Current Version - the software already installed in the TV. ✎✎Software is represented as “Year/Month/Day_Version”.
Advanced Features You can set up your TV so that it can access the Internet through your local area network (LAN) using a wired or wireless connection. ¦¦ Connecting to a Wired Network You can attach your TV to your LAN using cable in three ways: yy You can attach your TV to your LAN by connecting the LAN port on the back of your TV to an external modem using a Cat 5 cable. See the diagram below.
Advanced Features Network Setup (Auto) Network Setup (Manual) Use the Automatic Network Setup when connecting your TV to a network that supports DHCP. To set up your TV’s wired LAN connection automatically, follow these steps: Use the Manual Network Setup when connecting your TV to a network that requires a Static IP address. How to set up automatically To get the Network connection values on most Windows computers, follow these steps: 1. Right click the Network icon on the bottom right of the screen.
To connect your TV to your network wirelessly, you need a wireless router or modem and a Samsung Wireless LAN Adapter (WIS09ABGN, WIS09ABGN2, WIS10ABGN), which you connect to your TV’s back or side panel USB jack. See the illustration below.
Advanced Features Notice The picture may appear corrupted or have static for some channels when the TV is connected to the Samsung Wireless LAN Adapter. In such a case, establish a connection using one of the following methods or connect the Samsung Wireless LAN Adapter using a USB cable in a place that is not affected by radio interference.
To set up the wireless connection automatically, follow these steps: 1. Follow Steps 1 through 6 in the “How to set up using PBC (WPS)” (p. 28). 9. When done, press the Blue button on your remote. The Network Connecting screen appears. 10. Wait until the connection confirmation message is displayed, and then press the ENTERE button. The Network Setup screen re-appears. 2. Press the ▼ button to select Internet Protocol Setup, and then press the ENTERE button.
Advanced Features Network Setup (Manual) If the other methods do not work, you need to enter the Network setting values manually. Getting the Network Connection Values To get the Network connection values on most Windows computers, follow these steps: 1. Right click the Network icon on the bottom right of the screen. 2. In the pop-up menu, click Status. 3. On the dialog that appears, click the Support tab. 4. On the Support tab, click the Details button. The Network settings are displayed.
MEDIA.P 04 Advanced Features Media Play MediaPlay Enjoy photos, music and/or movie files saved on a USB Mass Storage Class (MSC) device. Videos O MENUm → Application → Media Play → ENTERE SUM Change Device View Devices E Enter R Return ¦ Connecting a USB Device 1. Turn on your TV. TV Rear Panel 2. Connect a USB device containing photo, music and/or movie files to the USB 1 (HDD) or USB 2 port on the back or side panel of the TV. 3. When USB is connected to the TV, a popup window appears.
Advanced Features ✎✎Functions that are not supported when connecting to a PC through a network: xx The Background Music and Background Music Setting functions. xx Sorting files by preference in the Photos, Music, and Videos folders. xx The � (REW) or µ (FF) button while a movie is playing. ✎✎Divx DRM, Multi-audio, embedded captions are not supported. ✎✎Samsung PC Share manager should be permitted by the firewall program on your PC.
Move to the desired file using the up/down/right/left buttons and then press the ENTERE or � (Play) button. The file is played. ✎✎Supports the View Devices and Home in Media Play homepage. Information: You can ascertain the selected file name and the number of files and page. Videos Movie 01.avi Movie 03.avi Movie 05.avi Sort List Section: Displays the sorting standard. Jan.10.2010 Jan.10.2010 Jan.10.2010 Movie 07.avi Movie 02.avi Movie 04.avi Movie 06.avi Movie 09.avi SUM Jan.10.2010 Jan.10.
Advanced Features yy Supported Video Formats File Extension Video Codec Resolution Frame rate (fps) Bit rate (Mbps) Divx 3.11 / 4.x / 5.1 / 6.0 1920x1080 6 ~ 30 8 XviD 1920x1080 6 ~ 30 8 H.264 BP / MP / HP 1920x1080 6 ~ 30 25 MPEG4 SP / ASP 1920x1080 6 ~ 30 8 Container *.avi *.mkv AVI MKV Divx 4.x / 5.1 / 6.0 1920x1080 6 ~ 30 8 *.asf ASF XviD 1920x1080 6 ~ 30 8 MPEG4 SP / ASP 1920x1080 6 ~ 30 8 *.wmv ASF Window Media Video v9 1920x1080 6 ~ 30 25 H.
If you exit the playing movie function, the movie can be played later from the point where it was stopped. ✎✎If the index information is damaged or unsupported, you will not be able to use the Chaptering function. 1. Select the movie file you want to play continuously by pressing the ◄ or ► button to select it from the file list section. 2. Press the � (Play) / ENTERE button. 00:04:03 / 00:07:38 1/1 Movie 01.avi 3. Select Play Continuously (Resume Play) by pressing the Blue button.
Advanced Features Photos Viewing a Photo (or Slide Show) 1. Press the ◄ or ► button to select Photos, then press the ENTERE button in the Media Play menu. Normal Image1024.jpg 1024x768 2010/2/1 3/15 2. Press the ◄/►/▲/▼ button to select the desired photo in the file list. 3. Press the ENTERE button or � (Play) button. –– While a photo list is displayed, press the � (Play) / ENTERE button on the remote control to start the slide show.
During file playback, press the TOOLS button. Category Operation Videos Music Photos Title You can move directly to another Title. > Repeat Mode You can play movie and music files repeatedly. > Picture Size (Mode1 / Mode2 / Original) You can adjust the picture size to your preference. Picture Setting You can adjust the picture setting. (p. 5, 16, 17, 18) > Sound Setting You can adjust the sound setting. (p. 18, 19 > Subtitle Setting You can play the video with Subtitles.
Advanced Features Anynet+ What is Anynet+? t Anynet+ is a function that enables you to control all connected Samsung devices that support Anynet+ with your Samsung TV’s remote. The Anynet+ system can be used only with Samsung devices that have the Anynet+ feature. To be sure your Samsung device has this feature, check if there is an Anynet+ logo on it.
The Anynet+ menu changes depending on the type and status of the Anynet+ devices connected to the TV. Anynet+ Menu View TV Device List (device_name) MENU (device_name) INFO Recording: (*recorder) Stop Recording: (*recorder) Receiver Description Changes Anynet+ mode to TV broadcast mode. Shows the Anynet+ device list. Shows the connected device menus. E.g. If a DVD recorder is connected, the disc menu of the DVD recorder will appear. Shows the play menu of the connected device. E.g.
Advanced Features ¦¦ Listening through a Receiver You can listen to sound through a receiver (i.e Home Theater) instead of the TV Speaker. 1. Select Receiver and set to On. 2. Press the EXIT button to exit. ✎✎ If your receiver supports audio only, it may not appear in the device list. ✎✎ The receiver will work when you have properly connected the optical in jack of the receiver to the DIGITAL AUDIO OUT (OPTICAL) jack of the TV. ✎✎ When the receiver (i.
Message / Media / ScreenShare OO MENUm → Application → AllShare → ENTERE ¦¦ About AllShare Shows a list of mobile phones or connected devices which have been set up with this TV for using the Message, Media, or ScreenShare function. ✎✎The Media function is available in all mobile devices AllShare connects your TV and compatible Samsung mobile phones/ devices through a network. On your TV, you can view call arrivals, SMS messages and schedules set on your mobile phones.
Advanced Features Call Arrival Alarm Using ScreenShare Function If a call arrives while you are watching TV, the alarm window appears. Using ScreenShare, you can browse various web contents provided by the mobile phone. For example, the image below displays an access page for contents on a mobile. You can read the mobile’s files and view the phone book and calendar on the TV. Also, in the phone book, you can make a call to another person, or send to SMS.
Other Information 05 Other Information Assembling the Cables Stand Type Enclose the cables in the Cable Tie so that the cables are not visible through the transparent stand. 1 1 2 3 2 3 Wall-Mount Type ✎✎Do not pull the cables too hard when arranging them. This may cause damage to the product’s connection terminals. English [UC6300(X4)-ZX]BN68-03165C-01L02.
Other Information Installing the Wall Mount Attaching the Blanking Bracket When installing the TV onto a wall, attach the Blanking Bracket as shown. Blanking Bracket Assembling Power-Cord When Installing the TV onto a wall, attach the Power-Cord as shown. 1 2 3 1. Remove the screw shown in the first picture above. 2. Attach the power cord clamp to the power cord. 3. Mount the power cord clamp to the TV, using the removed screw, as shown.
specifications. Screws that are too long may cause damage to the inside of the TV set. xx For wall mounts that do not comply with the VESA standard screw specifications, the length of the screws may differ depending on the wall mount specifications. xx Do not fasten the screws too strongly; this may damage the product or cause the product to fall, leading to personal injury. Samsung is not liable for these kinds of accidents.
Other Information Securing the TV to the Wall Caution: Pulling, pushing, or climbing onto the TV may cause the TV to fall. In particular, ensure that your children do not hang over or destabilize the TV; doing so may cause the TV to tip over, resulting in serious injuries or death. Follow all safety precautions provided in the included Safety Flyer. For added stability and safety, install the anti-fall device as follows. ¦¦ To Avoid the TV from Falling 1.
If the TV seems to have a problem, first try this list of possible problems and solutions. If none of these troubleshooting tips apply, visit "www.samsung.com,” then click on Support, or contact a Samsung customer service center. Issues Solutions and Explanations Poor picture First of all, please perform the Picture Test and confirm that your TV is properly displaying test image. (go to MENU - Support - Self Diagnosis - Picture Test) (p.
Other Information Issues Solutions and Explanations No Picture, No Video The TV won’t turn on. • • • Make sure the AC power cord is securely plugged in to the wall outlet and the TV. Make sure the wall outlet is working. Try pressing the POWER button on the TV to make sure the problem is not the remote. If the TV turns on, refer to ‘Remote control does not work’ below. The TV turns off automatically. • • • • Ensure the Sleep Timer is set to Off in the Setup menu (p. 19).
Solutions and Explanations A “Mode Not Supported” message appears. • Check the supported resolution of the TV, and adjust the external device’s output resolution accordingly. Refer to the resolution settings on page 11 of this manual. Caption on TV menu is greyed out. • • Caption can not be selected in the TV menu when connected via HDMI or Component (p. 21). Caption must be activated on the external device (p. 21). There is a plastic smell from the TV.
Other Information License TheaterSound, SRS and the symbol are trademarks of SRS Labs, Inc. TheaterSound technology is incorporated under license from SRS Labs, Inc. Manufactured under license from Dolby Laboratories. Dolby and the double-D symbol are trademarks of Dolby Laboratories. Manufactured under license under U.S. Patent #’s: 5,451,942; 5,956,674; 5,974,380; 5,978,762; 6,487,535 & other U.S. and worldwide patents issued & pending. DTS and the Symbol are registered trademarks. & DTS 2.
Display Resolution 1920 x 1080 Environmental Considerations Operating Temperature Operating Humidity Storage Temperature Storage Humidity 50°F to 104°F (10°C to 40°C) 10% to 80%, non-condensing -4°F to 113°F (-20°C to 45°C) 5% to 95%, non-condensing Stand Swivel (Left / Right) -20˚ ~ 20˚ Model Name UN37C6300 UN40C6300 Screen Size 37 inches 40 inches Sound (Output) Dimensions (WxDxH) Body 05 Other Information Specifications 10 W X 2 35,2 X 1,2 X 21,7 inches (894 X 29,9 X 550 mm) 35,2 X 10,0 X
Other Information Index A F AllShare Amplify Antenna Anynet+ AUDIO OUT Auto Adjustment Auto Volume 41 18 13 38 10 17 19 7, 13 13 17 15 16 11 H B Background Music Balance L/R Basic View Batteries Black Tone Blanking Bracket Brightness 37 18 36 7 16 44 15 HDMI Home Theater Installation Space Cable Tie 4, 43 Change PIN 21 Channel Menu 13 Clock 19 Color Tone 16 Componet 9 Connecting to a PC 11 Connecting to an Audio Device 10 2 L 21 50 M Media Play Melody Menu Transparency Mono Music 31 22 22 19
This page is intentionally left blank. [UC6300(X4)-ZX]BN68-03165C-01L02.
Las figuras y las ilustraciones de este Manual del usuario se proporcionan como referencia solamente y pueden ser diferentes del aspecto real del producto. El diseño y las especificaciones del producto están sujetos a cambios sin previo aviso. Antes de usar el equipo lea este manual para evitar fallas y guarde para futuras referencias.
Contenido Introducción Funciones avanzadas yy yy yy yy yy yy yy yy Conexión de la red................................................... 25 Listado de características.......................................... 4 Accesorios................................................................. 4 Instale el soporte........................................................ 5 Aspecto general del panel de control......................... 6 Aspecto general del mando a distancia......................
Introducción Listado de características yy Excelente interfaz digital y capacidad de trabajo en red: El sintonizador digital HD incorporado permite ver las emisiones HD que no exigen una suscripción sin que sea necesario disponer de un receptor de televisión por cable/satélite (decodificador). yy Media Play: Permite reproducir algunos archivos de música, imágenes y películas guardados en un dispositivo USB (pág. 32).
01 Instale el soporte Introducción Consulte la guía para instalar el soporte. s s 5 unid. (M4 x L12) (B) 5 unid. (M4 x L8) s s s Soporte (1 unidad) (A) Soporte de la guía (1 unidad) Tornillos (10 unid.) Siga los pasos que se indican a continuación para conectar el televisor al soporte. Vista superior Tornillos (M4 x L12) s Soporte de la guía s s s s Parte frontal Soporte Parte posterior 1.
Introducción Aspecto general del panel de control ✎✎El color y la forma del producto pueden variar según el modelo. Altavoces Indicador de encendido Sensor del mando a distancia Indicador de encendido Parpadea y se apaga cuando se enciende el aparato y se ilumina en el modo en espera. Sensor del mando a distancia El mando a distancia debe dirigirse hacia este punto del televisor. SOURCEE Cambia entre todas las fuentes de entrada disponibles.
01 Aspecto general del mando a distancia Introducción ✎✎Es un mando a distancia especial para personas con discapacidades visuales y presenta puntos Braille en los botones de encendido, de canales y del volumen. Enciende y apaga el televisor. POWER ON/OFF Activa o desactiva la luz del mando a distancia. Cuando está activada, los botones se iluminan durante un momento cuando se pulsan. (El uso del mando a distancia con este botón activado reduce el tiempo de uso de las pilas.
Introducción Conexión de una antena Cuando el televisor se enciende por primera vez, los parámetros básicos se inician de forma automática. ✎✎Conexión del cable de alimentación y la antena. Antena VHF/UHF Cable o ANT OUT Entrada de alimentación Plug & Play (configuración inicial) Cuando el televisor se enciende por primera vez, una secuencia de indicaciones en pantalla permite configurar los parámetros básicos. Pulse el botón POWERP.
Conexiones 02 Conexión a un dispositivo AV Conexiones ✎✎El color y la forma del producto pueden variar según el modelo. Uso de un cable HDMI o HDMI/DVI: Conexión HD (hasta 1080p) Para conseguir una mejor calidad de imagen HD es aconsejable utilizar la conexión HDMI.
Conexiones Conexión a un dispositivo de audio Uso de una conexión de cable óptico (digital) o de audio (analógico) Dispositivos disponibles: sistema de audio digital, amplificador, sistema Home Theater DVD R W Rojo Blanco Amplificador / DVD para Home Theater AUDIO IN R-AUDIO-L Sistema de audio digital OPTICAL ✎✎DIGITAL AUDIO OUT (OPTICAL) xx Cuando un sistema de audio digital se conecta al terminal DIGITAL AUDIO OUT (OPTICAL), se reduce el volumen del televisor y del sistema.
02 Conexión a un PC Conexiones Uso de cables HDMI/DVI o D-sub DVI OUT AUDIO OUT AUDIO OUT PC OUT Modos de visualización (entradas D-Sub y HDMI/DVI) La resolución óptima es 1920 x 1080 a 60 Hz.
Conexiones Cambio de la fuente de entrada Editar Nombre OO MENUm → Entrada → Editar Nombre → ENTERE Lista de Entradas Se utiliza para seleccionar TV u otras fuentes de entrada externas como reproductores de DVD/Blu-ray/ decodificadores o receptores por satélite STB.
Menú de canales Agregar a Favoritos / Borrar de Favoritos Lista de canales t Añadir, borrar o establecer los canales favoritos y usar la guía de programas de las emisiones digitales. CH LIST OO MENUm → Canal → Lista de canales → ENTERE Canales agregados Aire ■■ 6 6-1 Air * TV #6 7 Air Antena Air Air * TV #9 Air * TV #10 * TV #11 Zoom 2. Añada o borre un canal mediante el menú Agregar a Favoritos o Borrar de Favoritos, respectivamente.
Funciones básicas xx Una vez guardados todos los canales disponibles, se inicia la eliminación de los canales codificados. Vuelve a mostrarse el menú Prog. Auto. ¦¦ Edición de canales OO MENUm → Canal → Lista de canales → ENTERE ■■ Visual. tempor.: Se puede establecer que el canal que se desee se muestre automáticamente a una hora reservada. Para utilizar esta función, en primer lugar configure la hora actual. 1. Pulse los botones ◄ / ► / ▲ / ▼ para seleccionar el canal que desee en la Lista de canales.
¦¦ Soluciones económicas (sólo canales analógicos) Si la recepción es clara, no tiene que realizar la sintonización fina del canal, ya que esta operación se hace de forma automática durante la búsqueda y la memorización. Si la señal es débil o está distorsionada, realice manualmente la sintonización fina del canal. Desplácese a izquierda o derecha hasta que la imagen se vea clara. La función ecológica se puede utilizar para mejorar el ahorro de energía.
Funciones básicas ■■ Tono del negro (Apagado / Oscuro / Más oscuro / El más oscuro): Seleccione el nivel de negro para ajustar la profundidad de la pantalla. ■■ Contraste Dinám. (Apagado / Bajo / Medio / Alto): Ajuste el contraste de la pantalla. ■■ Detalle de sombra (-2~+2): Aumente el brillo de las imágenes oscuras. ■■ Gamma: Ajuste la intensidad del color primario. ■■ Patrón experto (Apagado / Patrón1 / Patrón2): Con la función Patrón experto, se puede calibrar la imagen.
Ajuste pantalla: Muestra la imagen completa sin cortes cuando la entrada de la señal es HDMI (720p/1080i/1080p) o Componente (1080i/1080p). ✎✎NOTA xx Después de seleccionar Zoom1, Zoom2 o Ajuste ancho: 1. Pulse el botón ► para seleccionar Posición. 2. Pulse el botón ENTERE. 3. Pulse los botones ▲ o ▼ para desplazar la imagen hacia arriba o hacia abajo. 4. Pulse el botón ENTERE. 5. Pulse el botón ► para seleccionar Rein.. 6.
Funciones básicas Pantalla ¦¦ Ajuste de la configuración del sonido ■■ Grueso / Fino: Elimina o reduce el ruido de la imagen. Si el ruido no desaparece sólo con la sintonización fina, realice los ajustes de frecuencia hasta el máximo (Grueso) y vuelva a realizar la sintonización fina. Después de reducir el ruido, vuelva a ajustar la imagen para que quede alineada en el centro de la pantalla.
■■ Mono: Elija para canales que emiten en monoaural o si tiene dificultades con la recepción de señales estéreo. MTS ■■ Estéreo: Elija para canales que emiten en estéreo. ■■ SAP: Elija esta opción para escuchar el programa de audio independiente, que normalmente es una traducción de otro idioma. ✎✎En función del programa concreto que se emita, puede escuchar en modo Mono, Estéreo o SAP. Vol.
Funciones básicas ¦¦ Activación y desactivación del temporizador ¦¦ Programas de bloqueo OO MENUm → Configuración → Hora → Temporizador 1 → OO MENUm → Configuración → Seguridad → ENTERE Puede ajustar el TV para que se encienda automáticamente a la hora prefijada. Seguridad ENTERE ■■ Temporizador 1 / Temporizador 2 / Temporizador 3: La activación y desactivación del temporizador se puede configurar de tres maneras. Debe ajustar el reloj en primer lugar.
xx Aunque configure la visualización en pantalla en otro Inglés Canadiense: Puede bloquear los programas de TV según la clasificación Inglés Canadiense. –– C: Programación para niños menores de 8 años. / C8+: Programación generalmente considerada aceptable para niños mayores de 8 años sin acompañamiento de adultos. / G: Programación general, ideal para todas las audiencias. / PG: Supervisión paterna. / 14+: La programación contiene temas y contenidos que puede que no sean adecuados para menores de 14 años.
Funciones básicas ■■ Modo de Subtítulo: Puede seleccionar el modo de subtítulo deseado. ✎✎ La disponibilidad de los subtítulos depende del programa que se esté emitiendo. Programado / CC1~CC4 / Texto1~Texto4: (sólo canales analógicos) La función de subtítulos analógicos funciona tanto en el modo de canal de televisión analógica como cuando la señal se dirige de un dispositivo externo al televisor. (Según la señal de transmisión, la función de subtítulos analógicos puede funcionar con canales digitales.
Puede ver simultáneamente el sintonizador de televisión y otra fuente de vídeo externa. PIP (Picture-in-Picture), no se admite en el mismo modo. OO MENUm → Configuración → PIP → ENTERE ✎✎NOTA xx Para obtener información sobre el sonido de PIP, consulte las instrucciones de Sel. Sonido. xx Si apaga el televisor mientras mira la televisión en el modo PIP, la ventana PIP desaparecerá.
Funciones básicas Actualización del software ■■ En línea: Actualice el software a través de Internet. Actualización del software se puede efectuar a través de una conexión de red o descargando el último firmware desde “www.samsung.com,” en un dispositivo de memoria USB. Versión actual - es el software ya instalado en el televisor. ✎✎El software se representa como “Año/Mes/Día_Versión”.
Funciones avanzadas 04 Conexión de la red ¦¦ Conexión a una red por cable Puede conectar el televisor o la red LAN mediante un cable de tres modos: yy Puede conectar el televisor a la red LAN si conecta el puerto LAN de la parte posterior del televisor con un módem externo, mediante un cable Cat 5. Véase el siguiente diagrama. Funciones avanzadas Puede configurar el televisor de forma que se pueda acceder a Internet a través de la red de área local (LAN) mediante una conexión con o sin cable.
Funciones avanzadas Configuración de red (Auto) Configuración de red (Manual) Utilice la Configuración de red automática cuando conecte el televisor a una red que sea compatible con DHCP. Para configurar automáticamente la conexión de red con cable del televisor, siga estos pasos: Utilice la Configuración de red manual cuando conecte el televisor a una red que necesite una dirección IP estática. Configuración automática 1. Conecte el televisor a la red LAN, tal como se indica en la sección anterior.
04 ¦¦ Conexión a una red inalámbrica Puerto LAN en la pared Compartidor IP inalámbrico (Servidor DHCP con PA) Funciones avanzadas Si desea conectar sin cables el televisor a la red, necesita un módem o enrutador inalámbrico y un adaptador LAN inalámbrico de Samsung (WIS09ABGN, WIS09ABGN2, WIS10ABGN), que debe conectar al terminal USB del panel lateral o posterior del televisor. Véase la siguiente ilustración.
Funciones avanzadas Avisoe La imagen puede aparecer dañada o con interferencias en algunos canales cuando el televisor se conecta al adaptador de LAN inalámbrica de Samsung. En tal caso, realice la conexión mediante uno de los siguientes métodos o conecte el adaptador LAN inalámbrico de Samsung con un cable USB en un lugar que no resulte afectado por interferencias de radio.
10. Espere a que aparezca el mensaje de confirmación de la conexión y, a continuación, pulse el botón ENTERE. Vuelve a aparecer la pantalla Configuración de red. 2. Pulse el botón ▼ o para seleccionar Config. protocolo Internet y, a continuación, pulse el botón ENTERE. Pulse los botones ▲ o ▼ para seleccionar Auto, a continuación, pulse el botón ENTERE. 3. Pulse el botón ▲ para ir a Seleccionar una red y, a continuación, pulse el botón ENTERE. La función Red busca redes inalámbricas disponibles.
Funciones avanzadas Configuración de red (Manual) Si los otros métodos no funcionan, debe especificar manualmente los valores de configuración de la red. Obtención de los valores de conexión de red Para obtener los valores de conexión de red en la mayoría de ordenadores con Windows, siga estos pasos: 1. Haga clic con el botón derecho en el icono de Red, en la esquina inferior derecha de la pantalla. 2. En el menú emergente, haga clic en Estado. 3.
Disfrute de archivos de fotos, música y películas almacenados en un dispositivo de clase de almacenamiento masivo (MSC) USB. O Funciones avanzadas MEDIA.P 04 Media Play MediaPlay Vídeos MENUm → Aplicaciones → Media Play → ENTERE SUM Camb. dispos. Ver dispositivos E Entrar R Regresar ¦ Conexión de un dispositivo USB 1. Encienda el televisor. 2. Conecte un dispositivo USB que contenga archivos de fotos, música o películas al puerto USB 1 (HDD) o USB 2 del panel lateral o posterior del televisor.
Funciones avanzadas ✎✎Funciones que no se admiten cuando se conecta un PC a través de una red: xx Las funciones Musique de fond y Configuración de la música de fondo. xx Clasificación de archivos por preferencias en las carpetas Fotos, Música y Videos. xx Los botones � (REW) o µ (FF) durante la reproducción de una película. ✎✎No se admite el subtítulo incorporado, Multi-audio ni DivX DRM. ✎✎Samsung PC Share Manager debe ser compatible con el programa cortafuegos del ordenador.
04 ¦¦ Pantalla de visualización ✎✎Admite Ver dispositivos y Inicio en la página de inicio de Media Play. Información: Puede confirmar el nombre del archivo seleccionado y el número de archivos y páginas. Vídeos 1/1 Página /Movie 01.avi Movie 01.avi Movie 03.avi Movie 05.avi Sección de la lista de clasificación: Muestra la norma de clasificación. Movie 07.avi ✎✎ La norma de clasificación es Movie 09.avi Movie 02.avi Ene.10.2010 Movie 04.avi Ene.10.2010 Movie 06.avi Ene.10.
Funciones avanzadas yy Formatos de vídeo admitidos Extensión del archivo Contenedor *.avi *.mkv AVI MKV Códec de vídeo Resolución Velocidad de transferencia (fps) Velocidad en bits (Mbps) Divx 3.11 / 4.x /5.1 / 6.0 1920 x 1080 6 ~ 30 8 XviD 1920 x 1080 6 ~ 30 8 H.264 BP / MP / HP 1920 x 1080 6 ~ 30 25 MPEG4 SP / ASP 1920 x 1080 6 ~ 30 8 Divx 4.x / 5.1 / 6.0 1920 x 1080 6 ~ 30 8 *.asf ASF XviD 1920 x 1080 6 ~ 30 8 MPEG4 SP / ASP 1920 x 1080 6 ~ 30 8 *.
04 Continuación de la reproducción de una película (reanudar reproducción) Si sale de la función de reproducción de la película, ésta se puede reproducir posteriormente desde el punto en que se detuvo. Seleccione el archivo de película que desee seguir reproduciendo pulsando los botones ◄ o ► en la sección de la lista de archivos. 2. Pulse el botón � (Reproducir) / ENTERE. 3. Seleccione Contin. (reanudar reproducción) con el botón azul. La película se reproducirá desde el punto en que se detuvo.
Funciones avanzadas Fotos Visualización de una foto (o una presentación) 1. 2. 3. Pulse los botones ◄ o ► para seleccionar Fotos y, a continuación, pulse el botón ENTERE en el menú Media Play. Pulse los botones ◄/►/▲/▼ para seleccionar el foto que desee en la lista de archivos. Pulse los botones ENTERE o � (reproducir). –– Mientras se muestra una lista de fotos, pulse los botones � (reproducir) / ENTERE del mando a distancia para iniciar la presentación.
04 Menú de opciones de reproducción de vídeos/música/fotos Pulse el botón TOOLS durante la reproducción de un archivo. Funcionamiento Vídeos Música Fotos Puede ir directamente a otro título. > Modo de repetición Puede reproducir archivos de películas o de música repetidamente. > Imagen Tamaño (Modo1 / Modo2 / Original) Puede ajustar el tamaño de la imagen según las preferencias. Configuración de la imagen Puede ajustar la configuración de la imagen. (pág.
Funciones avanzadas Anynet+ ¿Qué es Anynet+? t Anynet+ es una función que permite controlar con el mando a distancia del televisor Samsung todos los dispositivos de Samsung conectados que sean compatibles con Anynet+. El sistema Anynet+ sólo se puede usar con dispositivos de Samsung que tengan la función Anynet+. Para asegurarse de que el dispositivo de Samsung tenga dicha función, compruebe si lleva el logotipo Anynet+.
04 Menú Anynet+ Menú Anynet+ Ver TV Lista Disp. MENU (nombre_dispositivo) INFO (nombre_dispositivo) Grabación: (*grabador) Detener grabación: (*grabador) Receptor Descripción Cambia el modo Anynet+ al modo de emisión de TV. Muestra la lista de dispositivos de Anynet+. Muestra los menús del dispositivo conectado. Por ejemplo, si se ha conectado un grabador de DVD, se muestra el menú del disco del grabador de DVD. Muestra el menú de reproducción del dispositivo conectado.
Funciones avanzadas ¦¦ Escucha a través de un receptor Se puede escuchar sonido a través de un receptor (como Home Theater) en lugar de hacerlo mediante el Altavoz de TV. 1. Seleccione Receptor y configure como Encendido. 2. Pulse el botón EXIT para salir. ✎✎ Si el receptor sólo admite audio, quizás no se muestre la lista de dispositivos. ✎✎ El receptor no funcionará si no se ha conectado correctamente el terminal de entrada óptico del receptor con el terminal DIGITAL AUDIO OUT (OPTICAL) del televisor.
AllShare ¦¦ Acerca de AllShare Muestra una lista de teléfonos móviles o dispositivos conectados que se han configurado en el televisor para utilizar las funciones Mensaje, Multim. o ScreenShare. ✎✎La función Multim. está disponible en todos los dispositivos AllShare conecta el televisor y los dispositivos/teléfonos móviles compatibles de Samsung a través de una red. En el televisor se pueden ver la llamadas entrantes, los mensajes de SMS y las planificaciones de los teléfonos móviles.
Funciones avanzadas Alarma de llamada entrante Uso de la función ScreenShare Si entra una llamada mientras ve la televisión, aparece la ventana de alarma. Mediante ScreenShare, se pueden examinar diferentes contenidos web proporcionados por el teléfono móvil. Por ejemplo, la imagen siguiente muestra una página de acceso a los contenidos en un teléfono móvil. Puede leer archivos del teléfono móvil y ver la agenda y el calendario en el televisor.
Información adicional 05 Montaje de los cables Información adicional Tipo soporte Sujete los cables con el sujetacables para que éstos no sean visibles a través del soporte transparente. 1 1 2 3 2 3 Tipo montaje mural ✎✎No tire de los cables con demasiada fuerza cuando los coloque. Podría dañar los terminales de conexión del producto. Español [UC6300(X4)-ZX]BN68-03165C-01L02.
Información adicional Instalación del montaje mural Montaje del soporte de protección Al instalar el televisor en una pared, coloque el soporte de protección como se indica. Soporte de protección Montaje del cable de alimentación Al instalar el televisor en una pared, coloque el cable de alimentación como se indica. 1 2 3 1. Quite el tornillo como se muestra en la primera ilustración. 2. Monte la brida del cable de alimentación. 3.
xx No use tornillos con una longitud superior a la medida estándar o que no cumplan con las especificaciones de tornillos estándar VESA. Los 05 xx Para montajes murales que no cumplen las especificaciones de tornillos estándar VESA, la longitud de éstos puede variar dependiendo de Información adicional tornillos que sean demasiado largos pueden causar daños en el interior del televisor. las especificaciones del montaje mural.
Información adicional Fijación del televisor a la pared Precaución: Tirar del televisor, empujarlo o colgarse de él puede provocar su caída. En especial, procure que los niños no se cuelguen del televisor ni lo desestabilicen; éste podría caerse sobre ellos y causarles lesiones graves o incluso la muerte. Siga las precauciones de seguridad del folleto de seguridad incluido con el producto. Para mejorar la estabilidad instale un dispositivo antivuelco, como se explica a continuación.
05 Solución de problemas Problemas Soluciones y explicaciones Imagen deficiente En primer lugar, ejecute la Prueba de imagen para confirmar que el televisor muestra correctamente la imagen de prueba. (Vaya a MENU - Soporte técnico - Autodiagnóstico - Prueba de imagen) (pág. 23) Si la imagen de la prueba se muestra correctamente, la mala calidad de la imagen puede deberse a la fuente o a la señal. La imagen del televisor no se ve tan bien como en la tienda.
Información adicional Problemas Soluciones y explicaciones No hay imagen, no hay vídeo El televisor no se enciende. • • • Compruebe que el cable de alimentación CA esté bien conectado en la toma de la pared y en el televisor. Compruebe que la toma de la pared funcione. Intente pulsar el botón POWER del televisor para asegurarse de que el problema no está en el mando a distancia. Si el televisor se enciende, consulte ‘El mando a distancia no funciona’ a continuación.
Soluciones y explicaciones 05 Problemas • Compruebe la resolución que admite el televisor y ajuste en consecuencia la resolución de salida del dispositivo externo. Consulte cómo configurar la resolución en la página 11 de este manual. Subtítulo en el menú del televisor aparece atenuado. • • No se puede seleccionar Caption Subtítulo en el menú del televisor cuando está conectado a través de HDMI o Component (pág. 21). Se debe activar Subtítulo en el dispositivo externo (pág. 21).
Información adicional Licencia TheaterSound, SRS and the symbol are trademarks of SRS Labs, Inc. TheaterSound technology is incorporated under license from SRS Labs, Inc. Fabricado bajo licencia de Dolby Laboratories. Dolby y el símbolo de la doble D son marcas comerciales de Dolby Laboratories. Manufactured under license under U.S. Patent #’s: 5,451,942; 5,956,674; 5,974,380; 5,978,762; 6,487,535 & other U.S. and worldwide patents issued & pending. DTS and the Symbol are registered trademarks. & DTS 2.
Información adicional Resolución de pantalla 05 Especificaciones 1920 x 1080 Consideraciones medioambientales Temperatura de funcionamiento Humedad de funcionamiento Temperatura de almacenamiento Humedad de almacenamiento 10°C a 40°C (50°F a 104°F) 10% al 80%. sin condensación -20°C a 45°C (-4°F a 113°F) 5% al 95%.
Información adicional Índice A F Actualización del software Ahorro energía Ajuste automático AllShare Altavoz de TV Altavoz externo Amplificar Antena Anynet+ AUDIO OUT Autodiagnóstico 24 15 17 41 19 19 18 13 38 10 23 B Balance de blanco Balance I/D Botón FAV.CH Botón ON/OFF Brillo 16 18 7, 13 7 15 C Cambiar Código Canal favorito Componet Conexión a un dispositivo de audio Conexión a un PC Conexión de la red Configuración de red Contraste Dinám.