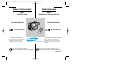
00732F VP-L900-UK+ESP (1-19) 3/23/04 11:19 AM Page 101 ENGLISH ESPAÑOL Video Camcorder Videocámara 8mm COLOUR LCD 8mm PANTALLA LCD DE COLOR VP-L900/L906/L907 VP-L900/L906/L907 ST ST ART/ OP SE TIM LF ER Hi DI SP LA Y ST ILL VP-L900/L906/L907 Owner’s Instruction Book Before operating the unit, please read this instruction book thoroughly, and retain it for future reference. This product meets the intent of Directive 89/336 CEE, 73/23 CEE, 93/68 CEE.
00732F VP-L900-UK+ESP (1-19) 3/23/04 11:19 AM Page 2 ENGLISH Table of Contents Precautions and Safety Instructions Getting to Know Your Camcorder Features......................................................................................... 8 Descriptions ■ Front View/Side View/Rear View ............................. 9, 10, 11 ■ OSD (On Screen Display).................................................. 12 Accessories Supplied with Camcorder ........................................
00732F VP-L900-UK+ESP (1-19) 3/23/04 11:19 AM Page 3 ENGLISH ESPAÑOL Table of Contents (continued) Índice BLC (Back light compensation) ................................................... 37 Program AE (Automatic Exposure).............................................. 38 DSE (Digital Special Effects) in CAMERA mode......................... 40 Setting and Recording DATE/TIME ............................................. 42 Selecting and Recording a Title..................................................
00732F VP-L900-UK+ESP (1-19) 3/23/04 11:19 AM Page 4 ENGLISH ESPAÑOL Precautions and Safety Instructions Precauciones e instrucciones de seguridad Precautions regarding rotation of LCD screen Precauciones relacionadas con la rotación de la pantalla LCD Please rotate the LCD screen carefully as illustrated. Over rotation may cause damage to the inside of the hinge that connects the LCD screen to the Camcorder. Por favor, gire cuidadosamente la pantalla según se indica en la ilustración.
00732F VP-L900-UK+ESP (1-19) 3/23/04 11:19 AM Page 5 ENGLISH ESPAÑOL Precautions and Safety Instructions Precauciones e instrucciones de seguridad Precautions regarding the electronic viewfinder Precauciones con el VISOR 1) Do not place the 2 1 camcorder so that the viewfinder is pointing towards the sun. Direct sunlight can damage the inside of the viewfinder. Be careful when placing the camcorder under sunlight or by a window. 2) Do not pick up the camcorder by the viewfinder.
00732F VP-L900-UK+ESP (1-19) 3/23/04 11:19 AM Page 6 ENGLISH ESPAÑOL Precautions and Safety Instructions Precauciones e instrucciones de seguridad Precautions regarding the battery pack ✤ ✤ ✤ ✤ ✤ ✤ Make sure that the battery pack is charged before shooting outdoors. To preserve battery power, keep your camcorder turned off when you are not operating it.
00732F VP-L900-UK+ESP (1-19) 3/23/04 11:19 AM Page 7 ENGLISH ESPAÑOL Precautions and Safety Instructions Precauciones e instrucciones de seguridad Precautions when Recording or Playback using LCD Precauciones que deben tomarse cuando se graba o reproduce empleando la LCD 1) High precision technology is used to manufacture the LCD Screen. However, there may be some tiny black specks (red, blue or green in colour) that constantly appear on the LCD Screen.
00732F VP-L900-UK+ESP (1-19) 3/23/04 11:19 AM Page 8 ENGLISH ESPAÑOL Getting to Know Your Camcorder Conozca su videocámara Features Características Your camcorder has many features available when recording or during playback. Su videocámara incluye una gran variedad de características para la grabación y la reproducción. MULTI OSD LANGUAGE You can select the appropriate OSD Language among English, French, Spanish.
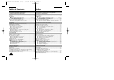
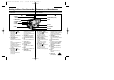
00732F VP-L900-UK+ESP (1-19) 3/23/04 11:19 AM Page 9 ENGLISH ESPAÑOL Getting to Know Your Camcorder Conozca su videocámara Front View 2. REC SEARCH Vista Frontal (REW) 3. LIGHT (PLAY/STILL) 6. TAPE EJECT 4. REC SEARCH (FF) 5. DATE/TIME (STOP) 7. EVF 13. VIDEO LIGHT 1. LENS 9. Remote Sensor 10. LCD 8. MIC 1. Lens (see page 68) 2. REC SEARCH (REW) REC SEARCH works in STANDBY mode. (see page 24) REW works in PLAYER mode. (see page 55) 3.
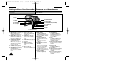
00732F VP-L900-UK+ESP (1-19) 3/23/04 11:19 AM Page 10 ENGLISH ESPAÑOL Getting to Know Your Camcorder Conozca su videocámara Side View Vista lateral 24. BLC 14. MENU ON/OFF 23. FADE 15. ENTER (MF) 16. UP/DOWN Dial (VOLUME) 20. SPEAKER 22. LCD Open 17. S-VIDEO out 18. P.AE 19. DSE 21. Lithium Battery 14. MENU ON/OFF (see page 26) 19. DSE (see page 40, 57) MENU ON/OFF works in DSE works in CAMERA and CAMERA and PLAYER mode. PLAYER mode. 15. ENTER (MF) (see page 26) 20. ENTER works in MENU mode.
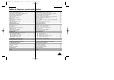
00732F VP-L900-UK+ESP (1-19) 3/23/04 11:19 AM Page 11 ENGLISH ESPAÑOL Getting to Know Your Camcorder Conozca su videocámara Vista posterior Rear View 25. ZOOM 26. CASSETTE Compartment 36. BATTERY EJECT 27. Hooks for shoulder strap 37. SNAP SHOT/D.ZOOM 28. AUDIO/VIDEO Out 39. USB JACK (VP-L907 only) 32. START/STOP MIC 33. External MIC (VP-L906/L907 only) 35. Battery Pack Compartment 38. Recharging Indicator 29. LENS Cap 34. DC Jack 30. Hand Strap 31. POWER Switch 25. ZOOM (see page 30) 26.
00732F VP-L900-UK+ESP (1-19) 3/23/04 11:19 AM Page 12 ENGLISH ESPAÑOL Getting to Know Your Camcorder Conozca su videocámara OSD (On Screen Display) OSD (Visualizador en pantalla) ✤ You can turn the OSD on/off by setting the Display menu on/off. ✤ The TITLE, DATE/TIME, EASY and CUSTOM functions can be operated even after the OSD is turned off. ✤ The OSD is displayed in the viewfinder and the LCD monitor. a. Zoom position (see page 30) Indicates zoom position. b.
00732F VP-L900-UK+ESP (1-19) 3/23/04 11:19 AM Page 13 ENGLISH ESPAÑOL Getting to Know Your Camcorder Conozca su videocámara OSD (On Screen Display) j. k. l. m. n. o. p. q. r. s. t. u. v. w. x. y. z. Time (see page 42) Shows the time the recording was made. Title (see page 44) Shows the title of the recording. It is superimposed on the scene. Self diagnosis (see page 64) (TAPE!, TAPE END!, PROTECTION!) Checks the operation of the Camcorder.
00732F VP-L900-UK+ESP (1-19) 3/23/04 11:19 AM Page 14 ENGLISH ESPAÑOL Getting to Know Your Camcorder Conozca su videocámara Accessories Supplied with Camcorder Make sure that the following basic accessories are supplied with your camcorder. Accesorios suministrados con la videocámara 1. AC Power Adapter (AA-E8 TYPE) 2. AC cord 3. Battery Pack Accesorios básicos Basic Accessories 4. AUDIO/VIDEO Cable 7. Remote Control ILL ST R TE T UN SE CO RE LF SE ER TIM LE TE 13.
00732F VP-L900-UK+ESP (1-19) 3/23/04 11:19 AM Page 15 ENGLISH ESPAÑOL Getting to Know Your Camcorder Conozca su videocámara Remote Control (VP-L906/L907 only) Mando a distancia (VP-L906/L907) Description of Parts Descripción de partas 1. Start/Stop (see page 23) 2. Self Timer 3. Still (see page 55) 4. WIDE (see page 30) 5. TELE (see page 30) 6. Display (see page 12) 7. (Play) (see page 54) 8. (FF) (see page 55) 9. (REW) (see page 55) 10. (Stop) (see page 54) 11. Counter Reset (see page 55) 12.
00732F VP-L900-UK+ESP (1-19) 3/23/04 11:19 AM Page 16 ENGLISH ESPAÑOL Preparing 1. Set the power switch to CAMERA mode. 2. Press the Self Timer button on the remote until the appropriate setting is displayed on the LCD: ■ WAIT-10S/SELF-30S ■ WAIT-10S/SELF-END 3. To start the delayed recording, press the START/STOP button. : After waiting for 10 seconds, recording starts. : If you have selected SELF-30S, recording stops automatically after 30 seconds.
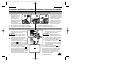
00732F VP-L900-UK+ESP (1-19) 3/23/04 11:19 AM Page 17 ENGLISH ESPAÑOL Preparing Configuración de la videocámara Attaching the Lens Cover 1 Sujeción de la cubierta del objetivo 2 Lithium Battery Installation ✤ ✤ ✤ 1. 2. 3. The lithium battery maintains the clock function, title and preset contents of the memory; even if the battery pack or AC power adapter is removed. The lithium battery for the camcorder lasts about 8~10 months from the time of installation under normal operation.
00732F VP-L900-UK+ESP (1-19) 3/23/04 11:19 AM Page 18 ENGLISH Preparing Connecting the Power Source ✤ There are two ways to connect to a power source. - Using the AC Power Adapter : used for indoor recording. - Using the Battery Pack: used for mobile/outdoor recording. To use the AC Power Adapter 1. Connect the AC Power Adapter to the AC power cord. 2. Connect the AC cord to a wall socket. Note: The plug and wall socket type can be 2 different according 1 to the regional conditions. 3.
00732F VP-L900-UK+ESP (1-19) 3/23/04 11:19 AM Page 19 ENGLISH Preparing ESPAÑOL Configuración de la videocámara To use the Battery Pack Uso de la batería How long will the battery last for shooting? ¿Qué duración tendrá la batería para filmar? ✤ Depends on how often you are likely to use the zoom feature during recording. ✤ Depende de la frecuencia con que se emplee el zoom. Prepare tantas baterías como sea posible Recharging the Battery Pack Recarga de la batería 1.
00732F VP-L900-UK+ESP (20-45) 3/23/04 11:20 AM Page 20 ENGLISH ESPAÑOL Preparing Configuración de la videocámara Using the Battery Pack Uso de la batería Table of continuous recording time based on model and battery type. ✤ Tabla de tiempo de grabación continua basada en el modelo y tipo de batería.
00732F VP-L900-UK+ESP (20-45) 3/23/04 11:20 AM Page 21 ENGLISH ESPAÑOL Preparing Configuración de la videocámara Display of Battery Level ✤ The battery level display indicates the amount of power remaining in the battery pack. Indicador de carga de la batería ✤ El visualizador del nivel de batería muestra la cantidad de energía que aún queda en la batería. 1. 2. 3. 4. 5. 6.
00732F VP-L900-UK+ESP (20-45) 3/23/04 11:20 AM Page 22 ENGLISH ENGLISH ESPAÑOL Preparing Configuración de la videocámara Inserting and Ejecting a Cassette ✤ Introducir y extraer un videocasete ✤ Existen diferentes tipos de videocasetes dependiendo de: - Sistema de color utilizado. - Tiempo de filmación y reproducción. - Hi8 There are several cassette types, depending on: Colour system used Recording/playback time. Hi8 Introducir y extraer un videocasete Inserting and Ejecting a Cassette ✤ 1. 2.
00732F VP-L900-UK+ESP (20-45) 3/23/04 11:20 AM Page 23 ENGLISH ESPAÑOL Basic Shooting Filmación básica Making your First Recording Primera grabación Please make these preparations before shooting. ■ Have you connected a power source? (Battery Pack or AC Power Adapter) ■ BATTERY Asegúrese de que ha preparado adecuadamente la videocámara.
00732F VP-L900-UK+ESP (20-45) 3/23/04 11:20 AM Page 24 ENGLISH ESPAÑOL Basic Shooting b. Filmación básica To stop shooting, press the red START/STOP button again. When recording stops, STBY will be displayed on the LCD. STBY Y:YY:YY b. Para detener la filmación, pulse de nuevo el botón START/STOP. La filmación se detendrá y el indicador STBY aparecerá en la pantalla LCD.
00732F VP-L900-UK+ESP (20-45) 3/23/04 11:20 AM Page 25 ENGLISH Basic Shooting Tips for Stable recording ■ ■ While recording, it is very important to hold the camcorder correctly. When recording, clip the LENS cover on the hand strap to avoid the risk of the lens cover swinging into shot. (refer to figure) Recording with the LCD Screen 1. 2. 3. 4. 5. 6. Hold the camcorder firmly using the hand strap. (see page 16) Place your right elbow against your side.
00732F VP-L900-UK+ESP (20-45) 3/23/04 11:20 AM Page 26 ENGLISH Basic Shooting Adjusting the LCD ✤ You can view the image you are recording or watch a playback of recordings made by using your camcorder’s 2.5 inch colour Liquid Crystal Display (LCD) screen. ✤ Under curtain conditions you may need to adjust the settings for the LCD Screen (outdoors for example). Adjustment can be made to the: ■ Brightness ■ Colour 1. Make sure that the battery pack is in place. 2. Set power switch to CAMERA mode.
00732F VP-L900-UK+ESP (20-45) 3/23/04 11:20 AM Page 27 ENGLISH ESPAÑOL Basic Shooting Filmación básica 9. Turn the UP/DOWN dial to adjust the LCD colour setting. 9. Gire el disco selector UP/DOWN para ajustar la LCD. 10. Press the ENTER. ■ For further adjustment, repeat steps 7, 8, 9. 10. Pulse ENTER. ■ Para posteriores ajustes, repita los pasos 7, 8, 9. 11. Press the MENU ON/OFF button to exit the menus. 11. Pulse el botón MENU ON/OFF para finalizar la configuración.
00732F VP-L900-UK+ESP (20-45) 3/23/04 11:20 AM Page 28 ENGLISH ESPAÑOL Basic Shooting Filmación básica Playing back the tape on the LCD Reproducción de la cinta en LCD ✤ ✤ You can watch a recording on the LCD Screen. Make sure that the battery pack is in place. 1. Hold down the tab of the power switch and push the switch to select PLAYER mode. 2. ✤ Puede reproducir las imágenes filmadas en el monitor LCD. ✤ Asegúrese de que la batería está instalada correctamente.
00732F VP-L900-UK+ESP (20-45) 3/23/04 11:20 AM Page 29 ENGLISH ESPAÑOL Basic Shooting Filmación básica Adjusting the LCD during PLAY Ajustar la pantalla LCD durante la reproducción The procedure for adjusting the LCD Screen in PLAYER mode is the same as that for adjusting it in CAMERA mode, except that the power switch must be set to PLAYER instead of CAMERA. Please refer to page 26. Puede ajustar la pantalla LCD durante el modo PLAYER.
00732F VP-L900-UK+ESP (20-45) 3/23/04 11:20 AM Page 30 ENGLISH ESPAÑOL Advanced Shooting Filmación avanzada Zooming In and Out ✤ ✤ ✤ ✤ 1. 2. 3. Cómo acercar o alejar la imagen por medio del zoom Zoom is only available in CAMERA mode. Zooming is a technique that lets you magnify the size of the subject in the picture. For a more professional looking recording, don't use the zoom function too often.
00732F VP-L900-UK+ESP (20-45) 3/23/04 11:20 AM Page 31 ENGLISH ESPAÑOL Advanced Shooting Filmación avanzada Digital Zoom ✤ ✤ ✤ ✤ Zoom Digital Digital Zoom is only available in CAMERA mode. Magnification above 22x is achieved using digital technology. The picture quality deteriorates as you go towards the “T” side. It is recommend that you use the DIS (VP-L906/L907) feature with the DIGITAL ZOOM for picture stability. (see page 35) W T ✤ El zoom sólo funciona en modo CAMERA.
00732F VP-L900-UK+ESP (20-45) 3/23/04 11:20 AM Page 32 ENGLISH Advanced Shooting Switching the DIGITAL ZOOM ON/OFF (VP-L906/L907 only) ✤ The DIGITAL ZOOM feature is explained on page 31. 1. Set the power switch to CAMERA mode. (see page 18) 2. Press the MENU ON/OFF button. ■ The MENU list will be displayed. ESPAÑOL Filmación avanzada Configuración del ZOOM ON/OFF DIGITAL (VP-L906/L907) MENU LCD ADJUST DIS .....................OFF D.ZOOM.............OFF WHITE BAL........AUTO DISPLAY ............
00732F VP-L900-UK+ESP (20-45) 3/23/04 11:20 AM Page 33 ENGLISH Advanced Shooting EASY Mode (for Beginners) ESPAÑOL Filmación avanzada Modo EASY (para principiantes) ✤ Even a beginner can easily make a recording using the EASY mode. ■ The EASY mode only operates in CAMERA mode. ✤ Incluso los principiantes pueden filmar facilmente usando el modo EASY. ■ El modo EASY sólo funciona en modo CAMERA. 1. Set the power switch to CAMERA mode (see page 18). 2.
00732F VP-L900-UK+ESP (20-45) 3/23/04 11:20 AM Page 34 ENGLISH Advanced Shooting CUSTOM-Creating your own customized recording settings ✤ You can customize the settings and save them for future use. ■ The CUSTOM function only operates in CAMERA mode. 1. Set the power switch to CAMERA mode. (see page 18) 2. Press the MENU ON/OFF button, to bring up the MENU list. 3. Turn the UP/DOWN dial until CUSTOM SET is highlighted. 4. Press the ENTER button, the CUSTOM menu will appear.
00732F VP-L900-UK+ESP (20-45) 3/23/04 11:20 AM Page 35 ENGLISH ESPAÑOL Advanced Shooting Filmación avanzada DIS (Digital Image Stabilizer, VP-L906/L907 only) DIS (Estabilizador digital de imagen, sólo en VP-L906/L907) ✤ The DIS function only works in CAMERA mode. ✤ DIS (Digital Image Stabilizer) is a handshake compensation function that compensates for any shaking or moving of the hand holding the camcorder (within reasonable limits).
00732F VP-L900-UK+ESP (20-45) 3/23/04 11:20 AM Page 36 ENGLISH Advanced Shooting MF/AF (Manual Focus/Auto Focus) ✤ The MF/AF function works only in CAMERA mode. ✤ In most situations, it is better to use the Automatic Focus feature, as it enables you to concentrate on the creative side of your shooting. ✤ Manual focusing may be necessary under certain conditions that make automatic focusing inadequate.
00732F VP-L900-UK+ESP (20-45) 3/23/04 11:20 AM Page 37 ENGLISH ESPAÑOL Advanced Shooting Filmación avanzada 4. Turn the UP/DOWN dial up or down until the object is focused. 4. Gire el disco selector hacia arriba o hacia abajo hasta que el objeto quede enfocado. 5. If you can't get a sharp picture, zoom out until you can. 5. Puede obtener una imagen nítida después de alejarla con el zoom. 6. To return to AF(Auto Focus), press the MF button again. MF icon will disappear. 6.
00732F VP-L900-UK+ESP (20-45) 3/23/04 11:20 AM Page 38 ENGLISH Advanced Shooting PROGRAM AE (Automatic Exposure) ✤ The PROGRAM AE function only works in CAMERA mode. ✤ The PROGRAM AE modes allow you to adjust shutter speeds and aperture to suit different recording conditions. ✤ There are 6 automatic exposure modes. ✤ The flicker appears when photographing from the interior fluorescent lamp lower part. 1. AUTO mode ■ Auto balance between the subject and the background. ■ Used in normal conditions.
00732F VP-L900-UK+ESP (20-45) 3/23/04 11:20 AM Page 39 ENGLISH ESPAÑOL Advanced Shooting Filmación avanzada Setting the PROGRAM AE(Automatic Exposure) mode Ajuste del modo PROGRAM AE (Exposicion automatica) 1. Set the power switch to CAMERA mode. (see page 18) 1. 2. Press the P.AE button, the ( symbol will be displayed. ) STBY 0:00:00 3. Press the P.AE button until the appropriate symbol is displayed. ( ➔ ➔ ➔ ➔ ) ■ No Display : Auto mode. Notes: ■ The P.AE chosen will be recorded on the tape.
00732F VP-L900-UK+ESP (20-45) 3/23/04 11:20 AM Page 40 ENGLISH ESPAÑOL Advanced Shooting Filmación avanzada DSE (Digital Special Effects) in CAMERA mode ✤ The digital effects enable you to give a creative look to your recording by adding various special effects. ✤ Select the appropriate digital effect for the type of picture that you wish to shoot and the effect that you wish to give. ✤ There are several DSE modes. (VP-L900: 8 modes, VP-L906/L907: 9 modes) 1. Normal picture. 2.
00732F VP-L900-UK+ESP (20-45) 3/23/04 11:20 AM Page 41 ENGLISH ESPAÑOL Advanced Shooting Filmación avanzada Selecting and recording DSE effects Seleccionar y grabar efectos DSE 1. Set the power switch to CAMERA mode. (see page 18) STBY X:XX:XX 1. Ajuste el power switch en modo CAMERA. (ver pag. 18) SEPIA 2. Press the DSE button, STROBE or SEPIA will be displayed. 2. Pulse la tecla DSE, STROBE o SEPIA aparecerán. 3. Keep pressing the DSE button, until the desired mode is displayed. 3.
00732F VP-L900-UK+ESP (20-45) 3/23/04 11:20 AM Page 42 ENGLISH Advanced Shooting Setting and Recording DATE/TIME ✤ Setting and recording the date/time is only available in CAMERA mode. ✤ You can record the date/time on your recording, so you know when it was made. The date and time are recorded whenever they are displayed on the viewfinder or LCD. ESPAÑOL Filmación avanzada Configurar y grabar una FECHA/HORA ✤ Las funciones de configuración y fecha y hora sólo están activas en el modo CAMERA.
00732F VP-L900-UK+ESP (20-45) 3/23/04 11:20 AM Page 43 ENGLISH Advanced Shooting 7. Press ENTER. ■ The month setting will blink. 8. Turn the UP/DOWN dial to set the desired month. 9. Press ENTER. ■ The day setting will blink. 10. You set the day, hour and minute by following the same procedures used for setting the year and month. 11. Pressing ENTER after setting the minutes causes the clock setting screen to disappear. The entered date and time will then be displayed. Recording a DATE/TIME 1.
00732F VP-L900-UK+ESP (20-45) 3/23/04 11:20 AM Page 44 ENGLISH Advanced Shooting Selecting and Recording a Title ESPAÑOL Filmación avanzada Seleccion y grabacion de un título ✤ Selecting and recording a TITLE is possible in the CAMERA mode only. ✤ The TITLE feature allows you to select a preset title stored in the camcorder’s memory. ✤ You can also select the language of the titles. ✤ La selección y grabación de un TITLE funciona solo en el modo CAMERA.
00732F VP-L900-UK+ESP (20-45) 3/23/04 11:20 AM Page 45 ENGLISH Advanced Shooting 6. Turn the UP/DOWN dial to select the appropriate language. ■ You may select languages among ENGLISH/FRANÇAIS/ DEUTSCH/ITALIANO/ ESPAÑOL/PYCCKNZ. 7. Press ENTER. ■ Then, the title list will appear in the language you chose. 8. Turn UP/DOWN dial to whichever TITLE you desire. 9. Press ENTER. ■ The selected title will appear on the screen for 2 ~ 3 seconds and will disappear.
00732F VP-L900-UK+ESP (46-71) 3/23/04 11:20 AM Page 46 ENGLISH ESPAÑOL Advanced Shooting Filmación avanzada Fade In and Out ✤ ✤ Aparición y desaparición gradual de la imagen (Fundido) The FADE function only works in CAMERA mode. You can give your films a professional look by using special effects such as fade in at the beginning of a sequence or fade out at the end of a sequence. ✤ La función FADE sólo funciona en modo CAMERA.
00732F VP-L900-UK+ESP (46-71) 3/23/04 11:20 AM Page 47 ENGLISH ESPAÑOL Advanced Shooting Filmación avanzada Snap Shot (VP-L906/L907 only) Filmación Instantánea (sólo VP-L906/L907) ✤ With the SNAP SHOT feature, your camcorder can function like a normal film camera, allowing you to take single still pictures. - The SNAP SHOT function only operates in CAMERA mode. 1. Set the power switch to CAMERA mode. 2. Press the SNAP SHOT button when you have the image you wish to photograph in the shot.
00732F VP-L900-UK+ESP (46-71) 3/23/04 11:20 AM Page 48 ENGLISH Advanced Shooting White Balance ESPAÑOL Filmación avanzada Balance de blancos ✤ WHITE BALANCE (WHITE BAL.) is a recording function that preserves the unique colour of the object in any shooting condition. ✤ You may select the appropriate WHITE BALANCE mode to obtain good colour quality of the image. - AUTO: This mode is generally used to control the WHITE BALANCE automatically.
00732F VP-L900-UK+ESP (46-71) 3/23/04 11:20 AM Page 49 ENGLISH Advanced Shooting Selecting the OSD LANGUAGE 1. Press the MENU ON/OFF button. ■ The MENU list will appear. 2. Turn the UP/DOWN dial to LANGUAGE and press the ENTER button. ESPAÑOL Filmación avanzada Selección del idioma de la presentación en pantalla (OSD) MENU LCD ADJUST DIS........................OFF D.ZOOM ..............OFF WHITE BAL ..........AUTO DISPLAY ..............ON LANGUAGE..........ENGLISH WL REMOCON ....ON EXIT: MENU MENU 3.
00732F VP-L900-UK+ESP (46-71) 3/23/04 11:20 AM Page 50 ENGLISH Advanced Shooting Demonstration ✤ Demonstration automatically shows you the major functions that are included with your camcorder so that you may use them more easily. ✤ The DEMO function is only available in CAMERA mode when a tape is not in the camcorder. ✤ The Demonstration operates repeatedly until the POWER switch is set to OFF. 1. Set the power switch to CAMERA mode. 2. Press MENU ON/OFF button, then the MENU list will appear.
00732F VP-L900-UK+ESP (46-71) 3/23/04 11:20 AM Page 51 ENGLISH Advanced Shooting Setting the Date/Title Colour 1. Set the power switch to CAMERA mode. (see page 18) 2. Press the MENU ON/OFF button. ■ The MENU list will appear. 3. Turn the UP/DOWN dial to D/TITLE COLOUR.......WHITE. ESPAÑOL Filmación avanzada Ajuste del color de la fecha y el título 1. Ponga el power switch en modo CAMERA. (ver pag. 18) MENU LCD ADJUST DIS .....................OFF D.ZOOM.............OFF WHITE BAL. ......AUTO DISPLAY .
00732F VP-L900-UK+ESP (46-71) 3/23/04 11:20 AM Page 52 ENGLISH ESPAÑOL Advanced Shooting Filmación avanzada Lighting Techniques Técnicas de iluminación ✤ When you use your camcorder, there are normaly only two main recording environments. - You will be shooting outdoors (Normal recording or through an ND(Neutral Density) filter). - You will be shooting indoors (Video light recommended or required). ✤ The single greatest influence on picture quality is the level of brightness, measured in lux.
00732F VP-L900-UK+ESP (46-71) 3/23/04 11:20 AM Page 53 ENGLISH ESPAÑOL Playing back the Tape Reproducir una cinta ✤ To view a tape that you have recorded. ✤ Playback function works in PLAYER mode only. ✤ There are two ways to see a tape; ■ To view on the LCD: recommended for outdoor use. ■ To view on a TV monitor: recommended for indoor use. ✤ Para ver una cinta que haya filmado. ✤ La función Reproducir funciona sólo en el modo PLAYER.
00732F VP-L900-UK+ESP (46-71) 3/23/04 11:20 AM Page 54 ENGLISH ESPAÑOL Playing back the Tape Reproducir una cinta Notes: ■ VP-L900/L906/L907 feature a monaural audio system. If your TV or VCR are stereo, connect the audio cable to the input “L” of TV or VCR. ■ In case of VP-L900/L906/L907, you can use an S-VIDEO cable to obtain better quality of pictures if you have a S-VIDEO connector on your TV. ■ Close the LCD panel while viewing playback on a TV screen in order to avoid picture distortion.
00732F VP-L900-UK+ESP (46-71) 3/23/04 11:20 AM Page 55 ENGLISH ESPAÑOL Playing back the Tape Reproducir una cinta Various Functions in PLAYER mode Funciones varias en el modo PLAYER To view a STILL picture (Playback pause) Ver una imagen STILL (Pausa en la reproducción) - Press (PLAY/STILL) button during PLAY/STILL playback. - To resume playback, press (PLAY/STILL) button again.
00732F VP-L900-UK+ESP (46-71) 3/23/04 11:20 AM Page 56 ENGLISH Playing back the Tape Adjusting the LCD ✤ The procedure for adjusting the LCD Screen in PLAYER mode is the same as the procedure for adjusting the LCD Screen in CAMERA mode, except that the power switch must be set to PLAYER instead of CAMERA. Please refer to page 26. Setting the Speaker ON/OFF ✤ The speaker will be turned ON/OFF by opening/closing the LCD. ✤ The speaker ON/OFF setting operates when the LCD is opened.
00732F VP-L900-UK+ESP (46-71) 3/23/04 11:20 AM Page 57 ENGLISH Playing back the Tape DSE in PLAYER mode ✤ The procedure for using DSE in PLAYER mode is the same as the procedure for using DSE in CAMERA mode, except that the power switch must be set to PLAYER instead of CAMERA. Please refer to pages 40 and 41. Note: The STROBE, NEG., MIRROR, MOSAIC, CINEMA and 16:9(WIDE) effects will not operate when your camcorder is in PLAYER mode.
00732F VP-L900-UK+ESP (46-71) 3/23/04 11:20 AM Page 58 ENGLISH ESPAÑOL Maintenance Mantenimiento Cleaning the Video Heads Limpieza de los cabezales del vídeo ✤ Para asegurar filmaciones normales e imágenes claras, limpie los cabezales de vídeo. ✤ Si las imágenes reproducidas son borrosas o no se ven fácilmente puede que los cabezales del vídeo estén sucios. ✤ To ensure normal recording and clear pictures, clean the video heads.
00732F VP-L900-UK+ESP (46-71) 3/23/04 11:20 AM Page 59 ENGLISH ESPAÑOL USB interface (VP-L907 only) USB interface (sólo VP-L907) ● Transferring a Digital Image through a USB Connection ✤ You can easily transfer a still image from a camera, tape, memory to a PC without additional add-on cards via a USB connection. ✤ You can transfer an image to a PC via a USB connection. ✤ If you transfer data to a PC, you need to install the software (Driver, Editing software) supplied with the camcorder.
00732F VP-L900-UK+ESP (46-71) 3/23/04 11:20 AM Page 60 ENGLISH ESPAÑOL USB interface (VP-L907 only) USB interface (sólo VP-L907) Installing USB Media 2.0 Program ✤ Do not connect the camcorder to PC before installing the program. ✤ If another camera or scanner is connected, please disconnect it in advance. ✤ This explanation is based on Windows® 98SE OS. Instalación del programa USB Media 2.0 ✤ No conecte la videocámara al ordenador antes de instalar el programa.
00732F VP-L900-UK+ESP (46-71) 3/23/04 11:20 AM Page 61 ENGLISH ESPAÑOL USB interface (VP-L907 only) USB interface (sólo VP-L907) 4. The window below displays the folder to install the program. ■ The program is installed in the following folder. C:\Programfiles\Samsung\ USB Media 2.0 ■ Click folder. 4. La ventana que aparece a continuación muestra la carpeta de instalación del programa. ■ El programa se instala por defecto en la siguiente carpeta: C:\Archivos de programa\ Samsung\USB Media 2.0 4.
00732F VP-L900-UK+ESP (46-71) 3/23/04 11:20 AM Page 62 ENGLISH ESPAÑOL USB interface (VP-L907 only) USB interface (sólo VP-L907) Connecting to a PC Conexión al ordenador 1. Connect a USB cable to the USB port on the PC. 2. Connect the other end of the USB cable into the proper terminal on the camcorder. (USB jack) 3. Connect the audio cable to the Line input jack of the PC. If the PC has no Line input jack, connect the audio cable to the MIC input jack.
00732F VP-L900-UK+ESP (46-71) 3/23/04 11:20 AM Page 63 ENGLISH Using Your Camcorder Abroad Using Your Camcorder Abroad ✤ Each country or area has its own electric and TV colour system. ✤ Before using your camcorder abroad, check the following: Power sources ■ You can use your camcorder in any country or area that uses 100V to 240V, 50/60 Hz. ■ Were necessery, use a commercially available AC plug adapter, depending on the power used.
00732F VP-L900-UK+ESP (46-71) 3/23/04 11:20 AM Page 64 ENGLISH ESPAÑOL Troubleshooting Check Resolución de problemas Troubleshooting Check Resolución de problemas ✤ Before contacting a service centre, perform the following simple checks. They might save you the time and expense of an unnecessary call. ✤ Antes de ponerse en contacto con un centro de servicio, efectúe las sencillas verificaciones siguientes. Le pueden ahorrar el tiempo y el dinero de una visita innecesaria.
00732F VP-L900-UK+ESP (46-71) 3/23/04 11:20 AM Page 65 ENGLISH ESPAÑOL Troubleshooting Check Checking Resolución de problemas ✤ If you run into any problem using the camcorder, use the following table to try to resolve the problem. ✤ If these instructions do not allow you to solve the problem, take a note of: ■ The model and serial number marked on the bottom of the camcorder. ■ Your warranty, if applicable. ✤ Then contact your nearest Samsung authorized service centre.
00732F VP-L900-UK+ESP (46-71) 3/23/04 11:20 AM Page 66 ENGLISH ESPAÑOL Troubleshooting Check Symptom Explanation/Solution Resolución de problemas Síntoma Explicación/Solución La imagen de la reproducción tiene poca calidad. ◆ Los cabezales del vídeo pueden estar sucios. (consulte la página 58) No puede hacer nada con la videocámara. ◆ Probablemente haya ocurrido una avería mecánica. (consulte la página 64) Aparece una línea vertical cuando filma un motivo claro contra un fondo oscuro.
00732F VP-L900-UK+ESP (46-71) 3/23/04 11:20 AM Page 67 ENGLISH Troubleshooting Check Moisture Condensation ✤ ✤ If the camcorder is brought directly from a cold place to a warm place, moisture may form inside the camcorder, on the surface of the tape, or on the lens. In this condition, the tape may stick to the head drum and be damaged or the unit may not operate correctly. To prevent possible damage under these circumstances, the camcorder has the built-in moisture sensor.
00732F VP-L900-UK+ESP (46-71) 3/23/04 11:20 AM Page 68 ENGLISH ESPAÑOL Specifications Especificaciones ✤ The design and technical specifications may be changed without notice. ✤ Estas especificaciones técnicas y diseños pueden ser cambiados sin notificación. System Recording system Video signal Usable cassette Tape speed Speed mode Recording time FF or REW time Image device Optical zoom ratio Focal length: f F Filter diameter Focus system Macro Min.
00732F VP-L900-UK+ESP (46-71) 3/23/04 11:20 AM Page 69 ENGLISH ESPAÑOL Índice Index -AABROAD ....................................63 AC POWER ADAPTER .............18 ADJUST (LCD)...........................26 AF ...............................................36 AUDIO ........................................53 AUTO FOCUSING .....................36 AUTO MODE..............................38 AUTO POWER OFF ..................24 DISPLAY.....................................12 DSE .............................
00732F VP-L900-UK+ESP (46-71) 3/23/04 11:20 AM Page 70 ENGLISH ESPAÑOL Índice Index -OOPERATION MODE ..................13 OSD............................................12 -PPAL .............................................63 PLAY...........................................55 PLAYER......................................55 PORTRAIT MODE .....................38 POWER CONSUMPTION .........68 POWER REQUIREMENT..........68 PROGRAM AE ...........................38 -RRECHARGING...........................
8mm UK+ESP W/C 3/23/04 11:18 AM Page 1 ESPAÑA (SPAIN) Este producto SAMSUNG está garantizado por un período de doce (12) meses a partir de la fecha de compra, contra cualquíer defecto de fábrica, cubriendo la totalidad de sus componentes y la mando de obra neceseria para su reparación. Distribuidores autorizados de SAMSUNG y Centros de Servicios Autorizados en otros países de Europa del Oeste cumplirán con los términos de la garantía emitidos en la compra del paîs concermiente.
00732F VP-L900-UK+ESP (1-19) 3/23/04 11:19 AM Page 100 ENGLISH ESPAÑOL THIS CAMCORDER IS MANUFACTURED BY: ESTA VIDEOCÁMARA HA SIDO FABRICADA POR: ELECTRONICS ELECTRONICS *Samsung Electronics’ Internet Home Page *Samsung Electronics’ Internet Home Page United Kingdom France Australia Germany Sweden Poland Spain Italia United Kingdom France Australia Germany Sweden Poland Spain Italia http://www.samsungelectronics.co.uk http://www.samsung.fr http://www.samsung.com.au http://www.samsung.