COLOUR TELEVISION Owner’s Instructions Before operating the unit, please read this manual thoroughly, and retain it for future reference.
Safety Instructions ENG ◆ Do not expose the television to extreme temperature conditions or to extreme humidity conditions. ◆ Do not expose the television to direct sunlight and other sources of heat. ◆ Do not expose the television to any liquids. ◆ Never put objects of any kind into the television, and do not place a water-containing vessel on the television. ◆ During a storm conditions (especially when there is lightning) unplug the television from the mains socket and aerial.
Caution ENG CAUTION RISK OF ELECTRIC SHOCK DO NOT OPEN CAUTION: TO PREVENT ELECTRICAL SHOCK, DO NOT REMOVE REAR COVER, NO USER SERVICEABLE PARTS INSIDE. REFER SERVICING TO QUALIFIED SERVICE PERSONNEL. WARNING: TO PREVENT DAMAGE WHICH MAY RESULT IN FIRE OR SHOCK HAZARD. DO NOT EXPOSE THIS APPLIANCE TO RAIN OR MOISTURE. ☛ The lightning flash and arrow head within the triangle is a warning sign alerting you of “dangerous voltage” inside the product.
ENG Contents (continued) ◆ FOREWORD ■ ■ Safety Instructions ......................................................................................... Caution .......................................................................................................... 2 3 ◆ CONNECTING AND PREPARING YOUR TELEVISION ■ ■ ■ ■ ■ ■ ■ ■ ■ ■ ■ Control Panel of Your Television ................................................................... 6 Connection Panel of Your Television ..................................
ENG Contents ◆ USING YOUR TELEVISION ■ ■ ■ ■ ■ Setting the Current Date and Time................................................................ Setting the Sleep Timer ................................................................................. Switching the Television On and Off Automatically ....................................... Redirecting an Input to the External Output .................................................. Viewing Pictures From External Sources ...................................
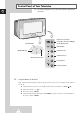
Control Panel of Your Television ➢ ENG The actual configuration on your TV may be different, depending on your model.
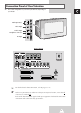
Connection Panel of Your Television ➢ The actual configuration on your TV may be different, depending on your model. ENG Audio Input (R, L) Video Input S-Video Input Headphone connector PC Input Rear of the TV ➢ ☛ For further details about connection, refer to pages 53~57. Whenever you connect an audio or video system to your television, ensure that all elements are switched off.
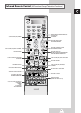
Infrared Remote Control (Television Functions) ENG MAKE THE REMOTE CONTROL WORK FOR TV, VCR, CATV, DVD, STB. TELEVISION STAND-BY DIRECT CHANNEL SELECTION ➢ The remote control might not be compatible with the TV manufactured by another company.
Infrared Remote Control (All Functions Except Television Functions) ENG SUB PICTURE (PIP) FREEZE INTERCHANGE THE MAIN AND SUB PICTURE (PIP) PIP ON/OFF TELETEXT NEXT PAGE/ TELEWEB FORWARD SUB PICTURE (PIP) NEXT CHANNEL TELETEXT PREVIOUS PAGE/ TELEWEB BACKWARD TELETEXT INDEX TELETEXT DISPLAY/ MIX BOTH TELETEXT INFORMATION AND THE NORMAL BROADCAST SUB PICTURE (PIP) LOCATION SELECTION SUB PICTURE (PIP) SIZE SELECTION TELETEXT REVEAL TELEWEB DISPLAY DVR SETUP MENU DISPLAY SUB PICTURE (PIP) PREVIOUS
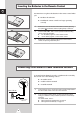
Inserting the Batteries in the Remote Control ENG You must insert or replace the batteries in the remote control when you: ◆ Purchase the television ◆ Find that the remote control is no longer operating correctly 1 Remove the cover on the rear of the remote control by pressing the symbol ( ) downwards and then pulling firmly to remove it. 2 Insert two R03, UM4, “AAA” 1.
Switching Your Television On and Off ENG The mains lead is attached to the rear of your television. ☛ If you have purchased this television in the United Kingdom, refer to page 61 for further instructions on plug wiring. 1 Plug the mains lead into an appropriate socket. 2 Press the “ main voltage is indicated on the rear of the television ➢ The and the frequency is 50 or 60Hz. Result: 3 Front of the TV ” button (On/Off) on the front of the television.
Placing Your Television in Standby Mode ENG Your television can be placed in Standby mode, in order to reduce the power consumption. TV The Standby mode can be useful when you wish to interrupt viewing temporarily (during a meal, for example). 1 Press the POWER button on the remote control. Result: 2 To switch the television back on, simply press again the POWER button on the remote control. ☛ 12 The screen is turned off and the Standby indicator on the front of the television lights up.
Becoming Familiar with the Remote Control ENG The remote control is used mainly to: ◆ Change channels and adjust the volume ◆ Set up the television using the on-screen menu system The following table presents the most frequently used buttons and their functions. Button to MUTE MENU EXIT/TV Viewing Function Menu Function Used to display the next stored channel. - Used to display the previous stored channel. - Used to display the corresponding channels. Used to increase the volume.
Plug and Play Feature ENG When the television is initially powered on, several basic customer settings proceed automatically and subsequently. The following settings are available. Plug & Play Press ENTER to start Plug & Play. Start 1 Exit If the television is in Standby mode, press the POWER button on the remote control. Result: Language 2 The Plug & Play is displayed. To start the Plug & Play, press the ENTER button. English Result: Ь А The Language menu is displayed.
Plug and Play Feature ENG If you want to reset this feature... Setup 1 Press the MENU button. Result: 2 The main menu is displayed. Press the † or … button to select Setup. Result: The options available in the Setup group are displayed. Move 3 Enter Return Press the ENTER button. Result: 4 √ √ √ √ √ Plug & Play Language : English Time Teletext Source : Main AV Setup The Plug & Play is selected. Press the ENTER button again.
Storing Channels Automatically ENG Channel √ Belgium √ Croatia √ Denmark √ Finland √ Country ATM Manual Store Channel Edit Fine Tune : Austria Austria France You can scan for the frequency ranges available to you (and availability depends on your country). Automatically allocated programme numbers may not correspond to actual or desired programme numbers. However you can sort numbers manually and clear any channels you do not wish to watch. 1 Press the MENU button. The main menu is displayed.
Storing Channels Manually ENG You can store the television channels, including those received via cable networks. Channel Country ATM Manual Store Channel Edit Fine Tune When storing channels manually, you can choose: ◆ Whether or not to store each of the channels found ◆ The programme number of each stored channel which you wish to identify Move 1 √ √ √ √ √ : Austria Enter Return Press the MENU button. Result: The main menu is displayed. Manual Store 2 Press the † or … button to select Channel.
Storing Channels Manually (continued) ENG 9 Manual Store Prog. No Color Sound -- AUTO BG Channel Search Store C-- 887MHz ? Move Adjust ◆ Press the œ or √ button to select Channel. ◆ Press the † or … button to select C (Air channel) or S (Cable channel). ◆ Press the √ button Return ◆ Press the numeric buttons (0~9) to select the required number. (The input range for numeric buttons may vary within different regions.) Manual Store Prog.
Skipping Unwanted Channels ENG You can exclude the channels of your choice from the channel scan operation. When you scan through the stored channels, those that you have chosen to skip are thus not displayed. All channels that you do not specifically choose to skip are displayed during scanning. 1 Channel Country ATM Manual Store Channel Edit Fine Tune Press the MENU button. Result: The main menu is displayed. Move 2 Enter Return Press the † or … button to select Channel.
Sorting the Stored Channels ENG Channel Country ATM Manual Store Channel Edit Fine Tune √ √ √ √ √ : Austria This operation allows you to change the programme numbers of stored channels. This operation may be necessary after using auto store. You can delete the channels you do not want to keep. 1 Result: 2 Move Enter Return √ √ √ √ √ Enter Press the ENTER button. 4 Press the † or … button to select Channel Edit. Press the ENTER button. Result: Return Sort Prog.
Assigning Names to Channels ENG Channel names will be assigned automatically when channel information is broadcast. These names can be changed, allowing you to assign new names. 1 Press the MENU button. Result: 2 The main menu is displayed. The options available in the Channel group are displayed. 3 Press the ENTER button. 4 Press the † or … button to select Channel Edit. Press the ENTER button. Result: Enter Return Name Prog. No 1 2 3 4 5 The Channel Edit menu is displayed.
Using the LNA (Low Noise Amplifier) Feature ENG Channel Edit √ √ √ √ √ Add/Delete Sort Name LNA Child Lock This function is very useful in the situation that the TV is used in weak signal. LNA amplifies the TV signal in the weak signal area, but not noise. This feature is working only weak signal condition, and that is memorized on current channel, additional. 1 Move Enter Press the MENU button. Result: Return 2 Press the † or … button to select Channel. Result: LNA The main menu is displayed.
Activating the Child Lock ENG This feature allows you to lock the television so that it cannot be switched on via the front panel. It can, however, still be switched on via the remote control. Thus, by keeping the remote control away from unauthorised users, such as children, you can prevent them from watching unsuitable programme. 1 Channel Edit Press the MENU button. Result: The main menu is displayed.
Fine Tuning Channel Reception ENG Channel Country ATM Manual Store Channel Edit Fine Tune √ √ √ √ √ : Austria If the reception is clear, you do not have to fine tune the channel, as this is done automatically during the search and store operation. If the signal is weak or distorted, you may have to fine tune the channel manually. 1 Press the MENU button. Result: Move Enter Return 2 Press the † or … button to select Channel.
Changing the Picture Standard ENG You can select the type of picture which best corresponds to your viewing requirements. 1 Press the MENU button. Result: 2 The options available in the Picture group are displayed. The Picture Mode is selected. : Dynamic Dynamic √ Standard √ : Natural Scan √ Movie √ : Off Custom √ : Off √ † More Press the ENTER button. Result: 3 Picture Picture Mode Custom Picture Scan Mode Digital NR DNIe PIP Move Enter Return Press the ENTER button again.
Viewing the Picture In Picture (PIP) (continued) ENG Picture Picture Mode Custom Picture Scan Mode Digital NR DNIe PIP : Dynamic : Natural Scan : Off : On √ √ √ √ √ √ You can display a sub picture within the main picture of TV program or external A/V devices. In this way you can watch TV program or monitor the video input from any connected devices while watching TV or other video input. ➢ If the current (main) picture is the DVR, DVD or PC mode, the PIP feature does not work.
Viewing the Picture In Picture (PIP) ENG PIP Press the † or … button to select Size. Press the ENTER button. 8 Result: PIP TV/Video Swap Size Position Prog. No The sizes available are displayed. (Large) - (Small) - (Double) - (16-PIP) Select a size of the sub picture by pressing the † or … button. Press the ENTER button. 9 ➢ 10 You can select these options simply by pressing the SIZE button. Move ➢ You can select these options simply by pressing the button.
Selecting the Picture Size (depending on the model) ENG You can select the picture size which best corresponds to your viewing requirements. Picture … More Blue Screen : √ √ √ Off Tilt Size Move Enter 1 Press the MENU button. Result: 2 Press the ENTER button. 3 Press the † or … button to select Size. Press the ENTER button.
Extra Picture Settings ENG ◆ Scan Mode You will normally find that scan mode is best set to Natural Scan to reduce any slight picture flicker. However, it is possible that some occasional broadcasts (NTSC-M) may benefit by changing the scan mode. The Natural Scan, Digital Scan and Progressive modes are available.
Changing the Sound Standard ENG You can select the type of special sound effect to be used when watching a given broadcast. Sound Sound Mode : Standard Standard Custom Sound Music Headphone Movie Dolby Digital Speech Ext. Audio Custom Audio Out : Volume Int. mute : Off Move Enter √ √ √ √ √ √ √ 1 Press the MENU button. Result: 2 Press the † or … button to select Sound. Result: Return 3 The options available in the Sound group are displayed. Press the ENTER button.
Adjusting Your Headphone Preferences ENG You can adjust the headphone settings to suit your preferences. The following headphone settings are available: Sound ◆ Volume, Bass, Treble, Balance. 1 Press the MENU button. Result: 2 Sound Mode : Standard Custom Sound Headphone Dolby Digital Ext. Audio Audio Out : Volume Int. mute : Off The main menu is displayed. Press the † or … button to select Sound. Result: Move Enter √ √ √ √ √ √ √ Return The options available in the Sound group are displayed.
Setting the Dolby Digital (continued) ENG Sound Sound Mode : Standard Custom Sound Headphone Dolby Digital Ext. Audio Audio Out : Volume Int. mute : Off Move Enter √ √ √ √ √ √ √ The Dolby Digital mode allows you enjoy Dolby Digital sound effect fully with the speakers are connected to the television. This allows various modes for the main, center, surround and woofer speakers to be selected. 1 Result: 2 Return Press the MENU button. Press the † or … button to select Sound.
Setting the Dolby Digital ENG Dolby Digital 8 Press the † or … button to select Speaker Setting. Press the ENTER button. Result: 9 The Speaker Setting menu is displayed with the main left speaker is selected. Press the † or … button to select your required option of selected speaker. 11 When you have finished the speaker settings, press the MENU button. Result: 12 Move Select the speaker (Front L, Center, Front R, Rear R, Rear L, Sub Woofer) to be adjusted by pressing the † or … button.
Setting the Dolby Prologic II ENG In case of “Dolby Prologic II : Off” Output Input (Source) Main Left Center Main Right Rear Right Left Sub Woofer (L/R Small) Sub Woofer (L/R Large) ✔ ✔ ✔ PCM Stereo (L/R) ✔ ✔ ✔ Mono ✔ ✔ ✔ Lo/Ro ✔ ✔ ✔ Lt/Rt ✔ ✔ 5.1ch ✔ ✔ ✔ ✔ ✔ ✔ ✔ ✔ ✔ ✔ ✔ ✔ ✔ ✔ Sub Woofer (L/R Large) Mono Dolby Digital DTS ➢ ✔ In case of DTS, DTS 5.1 is employed.
Setting the Dolby Prologic II ENG In case of “Dolby Prologic II : Music” Main Left Center Main Right Right Left Sub Woofer (L/R Small) Mono ✔ ✔ ✔ ✔ ✔ ✔ PCM Stereo (L/R) ✔ ✔ ✔ ✔ ✔ ✔ Output Input (Source) Dolby Digital Rear Sub Woofer (L/R Large) Mono ✔ ✔ ✔ ✔ ✔ ✔ Lo/Ro ✔ ✔ ✔ ✔ ✔ ✔ Lt/Rt ✔ ✔ ✔ ✔ ✔ ✔ 5.
Setting the External Digital Sound ENG This feature allows you enjoy Digital sound when the equipment with Digital output is connected to the television. Sound Sound Mode : Standard Custom Sound Headphone Dolby Digital Ext. Audio Audio Out : Volume Int. mute : Off Move Enter √ √ √ √ √ √ √ Return 1 Press the MENU button. The main menu is displayed. Result: 2 Press the † or … button to select Sound. The options available in the Sound group are displayed. Result: 3 Press the ENTER button.
Selecting the Sound Mode (depending on the model) ENG The “DUAL MODE I-II” button displays/controls the processing and output of the audio signal. When power is switched on, the mode is automatically preset to either “Dual-I ” or “Stereo”, depending on the current transmission.
Setting the Current Date and Time ENG Setup √ √ √ √ √ Plug & Play Language : English Time Teletext Source : Main AV Setup You can set the current date and time so that they are displayed by pressing the “Info.” button. You must also set the time if you wish to use the automatic on or off timers. ➢ 1 Move Enter Return Move 2 √ √ √ √ √ Enter Year Month Date 2 14 Move Adjust Press the ENTER button. 4 Press the † or … button to select Time. Press the ENTER button.
Setting the Sleep Timer ENG You can select a time period of between 10 and 180 minutes after which the television automatically switches to Standby mode. 1 Press the MENU button. Result: 2 Time The main menu is displayed. Press the † or … button to select Setup. Result: The options available in the Setup group are displayed. 3 Press the ENTER button. 4 Press the † or … button to select Time. Press the ENTER button.
Switching the Television On and Off Automatically ENG You can set the On/Off timers so that the television will: ◆ Switch on automatically and tune to the channel of your choice at the time you select Time √ √ √ √ √ Date Clock Sleep Timer On Time Off Time Move Enter ◆ Switch off automatically at the time you select ➣ Return 1 Press the MENU button. The main menu is displayed. Result: 2 Press the † or … button to select Setup. The options available in the Setup group are Result: displayed.
Redirecting an Input to the External Output ENG Your television enables you to choose which audio/video signals are output to the external connector. 1 Press the MENU button. Result: 2 Setup The main menu is displayed. Press the † or … button to select Setup. Result: The options available in the Setup group are displayed. 3 Press the ENTER button. 4 Press the † or … button to select AV Setup. Press the ENTER button.
TeleWeb Feature (depending on the model) (continued) ENG Setup Plug & Play Language Time TeleWeb AV Setup √ √ √ √ √ : English TeleWeb is the new television broadcasting standard for Teletext services. TeleWeb is similar to Teletext, just easy to use. TeleWeb can transmit the News, TV programme information, and advertising in excellent picture quality and directly access via the remote control. 1 Press the MENU button. Result: Move Enter 2 Press the † or … button to select Setup.
TeleWeb Feature (depending on the model) ENG 8 TeleWeb Press the TeleWeb button to enter the TeleWeb mode. 9 If you want to download the TeleWeb information before switch the television off, select Download by pressing the † or … button. Press the ENTER button. 10 Select On by pressing the † or … button. Press the ENTER button.
Using the TeleWeb Menu after Displaying the TeleWeb ENG Bookmarking the current page. TeleWeb 1 √ Bookmark List Add Bookmark Result: Home Page Current program * Selected provider * 2 Enter ➢ Return The TeleWeb menu is displayed. Press the † or … button to select Add Bookmark is selected. Press the ENTER button. Result: Service is loading Move On the page you wish to add to the bookmark list press the MENU button. The current page is added to the bookmark list.
Easy Accessing the TeleWeb Service via the Remote Control ENG Button TeleWeb HOME Function Activate or deactivate the TeleWeb feature directly. Move the home page of the TeleWeb. Display the forward page of the TeleWeb. Display the backward page of the TeleWeb. Select a option. Confirm your choice.
DVR (Digital Video Recorder) Feature ENG DVR converts analog video and sound signal to digital signal and saves to HDD. DVR √ √ √ Power On Record : Off Off Timer Record On Record List Move Enter Return 1 Press the MENU button. The main menu is displayed. Result: 2 Press the † or … button to select DVR . Press the ENTER button. The options available in the DVR group are displayed Result: with the Power On Record selected. 3 Press the ENTER button again. Select On by pressing the † or … button.
Setting up the DVR ENG 1 Press the DVR button. The message DVR Initializing is displayed and Result: change to the DVR mode. 2 Press the DVR MENU button. The DVR SETUP menu is displayed. Result: 3 Select the required option by pressing the † or … button. Press the ENTER button. Change the setting. When you have finished, press the ENTER button to confirm. DVR Initializing ◆ Program List Displays the record list saved on HDD.
Easy Accessing the DVR Feature via the Remote Control ENG Button DVR MENU (Red button) Function Displays the DVR SETUP menu in the DVR mode. DVR Changes to DVR mode. LIVE Moves to the live video when program list is displayed. REC Starts recording. QUICK REPLAY Moves back to the program played 8 seconds before. REW Reverses the program being played searches in faster speed. STOP Stops the program being played. PLAY/PAUSE Starts playing or instantly stops.
Teletext Feature ENG Most television channels provide written information services via teletext. Information provided includes: ◆ Television programme times ◆ News bulletins and weather forecasts ◆ Sports results ◆ Travel information This information is divided into numbered pages (see diagram). Part Contents A Selected page number. B Broadcasting channel identity. C Current page number or search indications. D Date and time. E Text. F Status information. FASTEXT information.
Displaying the Teletext Information ENG You can display Teletext information at any time on your television. Teletext information to be displayed correctly, ☛ For channel reception must be stable; otherwise: ◆ Information may be missing ◆ Some pages may not be displayed 1 Select the channel providing the Teletext service using the P or P button. 2 Press the TTX/MIX button to activate the teletext mode. The contents page is displayed.
Selecting the Teletext Source (depending on the model) ENG When you watching the current channel you can display the Teletext information of other channel. 1 Press the MENU button. Result: 2 Setup Plug & Play Language : English Time Teletext Source : Main Main AV Setup Sub The main menu is displayed. Press the † or … button to select Setup. Result: The options available in the Setup group are displayed. 3 Press the ENTER button. 4 Press the † or … button to select Teletext Source.
Selecting a Teletext Page ENG You can enter the page number directly by pressing the numeric buttons on the remote control. 1 Enter the three-digit page number given in the content by pressing the corresponding numeric buttons. Result: The current page counter is incremented and the page is then displayed. If the selected page is linked with several secondary pages, the secondary pages are displayed in sequence.
Connecting to the External Input/Output ENG “EXT 1” is used for the equipment with an RGB output, such as video game devices or video disc players.
Connecting to the Audio Outputs ENG The AUDIO OUT connectors are used for equipment, such as an audio system or external amplifier (to take full advantage of the Surround sound effect). Rear of the TV Audio System/ External Amplifier ➢ External speakers not supplied must be purchased seperately. Connecting to the Digital Audio Inputs The COAXIAL and OPTICAL connectors are used for equipment with a digital output (to take digital sound).
Connecting Headphones ENG You can connect a set of headphones to your television if you wish to watch a television programme without disturbing the other people in the room. ➢ Side of the TV Prolonged use of headphones at a high volume may damage your hearing. Connecting Additional Speakers To take advantage of the surround sound system, connect additional speakers.
Connecting to the Audio/Video Input ENG The RCA (AUDIO-L/R + VIDEO) connectors are used for equipment such as camcorders, video disc players and some video game devices. Camcorder Side of the TV Video disc player Video game device Connecting to the S-Video Input The S-VIDEO and RCA (AUDIO-L/R) connectors are used for equipment with an S-Video output, such as a camcorder or VCR. Side of the TV ① and ① To play pictures and sound, both the S-VIDEO and RCA connectors must be used.
Connecting to the PC Input ENG The PC INPUT and RCA(AUDIO-L/R) connectors are used for interfacing with your PC. Side of the TV Personal Computer and Setting up Your PC Software (Windows only) The Windows display-settings for a typical computer are shown below. But the actual screens on your PC will probably be different, depending upon your particular version of Windows and your particular video card.
Programming the Remote Control for Other Components ENG This TV’s remote control can operate almost any VCR, Cable box, or DVD, in addition to controlling the TV. ➢ VCR The remote control might not be compatible with the TV manufactured by another company. 1 Turn off your VCR, Cable box, or DVD. 2 Press the SELECT button repeatedly to activate another component (TV, VCR, CATV, DVD).
Programming the Remote Control for Other Components ENG VCR Remote Control Codes Admiral 020 Marantz Aiwa 025 Marta Akai 004, 027, 032 Audio Dynamics 007, 026 007, 008, 018, 021, 026, 036, 037, 062 006 MEI Memorex 021 006, 021, 024, 025 Bell&Howell 018 MGA 034 Broksonic 022 Midland 005 Candle 002, 003, 006, 008, 015, 055 Minolta Canon 021, 056 Citizen 002, 003, 006, 008, 015, 055 Colortyme Craig 007 002, 024 Curtis Mathes 002, 007, 008, 017, 021, 025, 056, 064, Daewoo 003,
Programming the Remote Control for Other Components ENG VCR Remote Control Codes (continued) Sylvania 021, 025, 036, 056, 059 Symphonic 025 018, 025 Tandy Tashika Tatung 002 Vector Research Victor 037 Video Concepts 021 Technics 002, 006 Unitech 006 025, 037, 068 Teac Totevision 007, 026 026 007, 026 Videosonic Wards 002 002, 003, 006, 019, 020, 021, 024, 025, 006, 021, 025, 031 Teknika 066 TMK 003, 019, 029, 051, 052 Toshiba 034, 038, 041 Yamaha Zenith 007, 008, 018, 026, 037 02
SCART Connector Wiring (EXT1, EXT2 or EXT3) ENG If you wish to connect other equipment via the SCART connectors on your television, contact your dealer or a qualified technician to wire the A/V cable as illustrated below.
Troubleshooting: Before Contacting Service Personnel ENG Before contacting Samsung after-sales service, perform the following simple checks. If you cannot solve the problem using the instructions below, note the model and serial number of the television and contact your local dealer. No sound or picture ◆ Check that the mains lead has been connected to a wall socket. ◆ Check that you have pressed the “ ” button (On/Off) and the POWER button. ◆ Check the picture contrast and brightness settings.
Technical Specifications ENG The descriptions and characteristics in this booklet are given for information purposes only and are subject to modification without notice. WS32Z10 Model name 16:9 Tube type 32 inch (76/82 cm) Screen size PAL (PAL60), SECAM, NTSC3.58 (OPTION), NTSC4.
- AFTER SALES SERVICE - Do not hesitate to contact your retailer or service agent if a change in the performance of your product indicates that a faulty condition may be present.