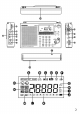
Control Locations Power/Sleep Power On/off/Alarm off/sleep function Display Switch between radio frequency and time while radio is power on Mode Mode set up (please see below mode button set up) Radio alarm Buzzer alarm Tuning Up/Down Enter command button for frequency and time set Selection cancel Numbered buttons and memory scan (the 0 Button) Memory set buttons and AM/PM selection for 24-hour format Real/dual time button and SW memory page SW meter band selection Band selection Tuning LED indicator (Gree
Choosing a power supply This radio can be operated using. 4 Alkaline UM-3(LR6)(AA size)batteries. Household AC adapter(not supplied). Installing batteries 1.Position the radio face down 2.Press the catch marked " " and slide in the direction shown. 3.Insert the 4 UM-2 (LR6)(AA size) batteries. 4. Replace the battery cover. Battery replacement The battery indicator will display the battery condition for approx.7 seconds after the radio is switched off. If the battery strength indicator is shown below2.
The real time can be set. 1. When the radio is switched off 2 . I f t h e r a d i o s w i t c h e d o n , p r e s s D I S P L AY b u t t o n t o t i m e s t a t u s . 3. Press "ENTER" button for more than 2 seconds until " " real time symbol and 4. Set the correct time by pressing the numbered buttons. As you press each button, the corresponding number will show on the display. 5. If you press wrong button, after pressing the ENTER button. The radio will beep and "Err" flashed in the display. 6.
Waveband selection There are four waveband selection by pressing BAND button Waveband Frequency coverage Aerial Type -------------------------------------------------------------------------------------------FM 87.50- 108 MHz Telescopic Full extend the aerial, angle and rotate for best reception. MW SW 520- 1710 kHz 1711- 29999 kHz Internal Telescopic Fully extend the aerial for best reception.
Note: Each press of Up or Down button will change the frequency in increment of FM: 100kHz or 200kHz depending on the versions. MW: 9kHz or 10kHz depending on the versions. SW: 5kHz L W: 9 k H z Manual tuning by Rotary tuning knob Rotary tuning is accomplished using the convenient Rotary Tuning Knob. Original tuning step is as below but can be changed by the MODE button as described later.
3.Press the button marked M (memory), display M and suggested preset number will flash, press ENTER to store your station in that memory position. 4.Preset positions may be exchanged easily. Select preset station that is to be changed, press memory button ( M and existing memory position will flash). select new preset position. Preset will be exchanged automatically. 5 . S W b a n d h a s 1 8 p r e s e t s ( i n t w o p a g e s ) .
3 . P r e s s Tu n i n g U P a n d D O W N b u t t o n a t t h e s a m e t i m e f o r m o r e t h a n 2 s e c o n d s . The radio will beep and then scan from the lowest frequency on the selected band. Automatically storing stations in preset memory based on signal strength. 4.After APS is completed, a beep will be heard. The display will show M1 and the strongest station for your area. 5.If during APS operation, no stations are found, display will show lowest frequency of selected band. Note: 1 .
Note: 1.When alarm is on, press POWER button to turn off the alarm for 24 hours. 2.Radio alarm on will last for one hour if not turned off by pushing the POWER button. 3.Turn the radio to the required station before setting the radio alarm. When the alarm is on, the radio will play last station selected. S e t t i n g t h e H W S ( H u m a n e Wa k e S y s t e m ) a l a r m A repeating beep tone will sound when using the HWS alarm.
Numbered key 1 2. 8 key FM 100kHz 1 key FM 200 kHz tuning step tuning step MW 9 kHz MW 10 kHz 3 12 hour format 24 hour format 4 Beep tone off Beep tone on 5 Memory Rearranged Complete with ENTER button For example, if you like to change from MW 10 kHz to 9 kHz, press MODE, numbered button 2 , 0 , then complete with ENTER button.
FM Mono/Stereo To listen to FM stereo broadcasts, tune to the required station, plug in headphones and set the FM ST./MO. Switch located on the left side of the radio to to FM ST. (stereo) position, If the station being received is weak some hiss may be audible, to reduce the hiss, set the switch to FM MO. (mono) position to return to mono operation. Note: FM stereo is only available via earphones. Headphones (or earphones) jack plug.
Troubleshooting/RESET button If the radio fails to operate correctly, or some digits on the display are missing or incomplete. carry out the following procedure. 1.Switch off the radio and remove the batteries. 2.With the aid of a suitable implement (the end of paper clip or pen), press the RESET button located at the bottom side for at least 1 seconds, this will reset the Microprocessor, clock time and clear all stations stored in the preset memory.
Specifications content Power requirement 6V Batteries 4 X IEC size LR6 (AA) (UM-3) Circuit features Semiconductors 1 LSI 7 IC's, 35 transistors, 7 FET, 33 diodes, 3 LED Aerial system AM/LW Built in ferrite aerial SW Telescopic aerial FM Telescopic aerial Output Power 300 mW 10% T.H.D. Sockets Headphones socket 3.5 mm dia. stereo DC in 6 volts center pin negative Accessories Carrying pouch and earphones (Accessories may be different from each market.) Dimension (mm) 214 (W)X128 (H) X 38.