
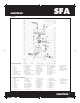
Installation Guide


4.2 - DISASSEMBLY FOR LITTLE INTERVENTION
As the unit is connected to the water and electrical supply,
it is important to check that the following actions have been
taken before removing the unit:
1. If possible, close off the water supply to the tank and close
the ball or gate valve on the outlet pipe.
2. Pull the electrical cord out of the receptacle before
removing unit.
3. Empty out as much water as possible from the toilet tank
and the toilet bowl.
4. Disconnect toilet from unit. Remove toilet bowl and set
aside against a wall to prevent from tipping over.
5. The use of a dry/wet type vacuum cleaner might assist you
greatly in removing the residual water in the bowl or
macerating unit.
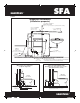
6. When you have to remove the macerating unit, carefully
disconnect the inlet drainpipes, (there might be residual
water inside).
7. Side inlet valves clogged: remove the sleeves and use a
screwdriver to free or clean the rubber flap if necessary.
8. For Saniplus, use the WC inlet to remove a foreign object
with the help of a folded wire.
4.3 - RETURN AND REPAIR OF THE MACERATING UNIT
In the event that the unit needs to be returned for service,
please call for possible options, or to inquire about an
authorized repair shop in your area. When you are required to
return the macerating unit to the manufacturer, please ensure
that prior to shipping, the unit has been cleaned and
disinfected inside and outside. A labour charge will be in
effect for cleaning ($50.00). Before returning any unit, a return
authorization is needed from the manufacturer. Units returned
without prior RGA number will be refused and returned collect.
If you return the macerating unit in its original packaging,
please remove the discharge elbow and retain until
re-assembly. If elbow is not removed, damage due to
shipping might occur.
Please package the macerating unit properly with adequate
shock absorbent material around it.
Send this package prepaid to the manufacturer, making sure
to insure against loss and/or transit damage, (the amount of
$300.00 will suffice).
If any repairs are done outside the warranty period, or when
the user has damaged the macerating unit, you will be
apprised of repair costs. All repair work will be conducted on
a pre-paid basis only.
5
MAINTENANCE (for qualified personnel only)
5.1 - See paragraph 4 PROBLEM SOLVING (4.1 and 4.2)
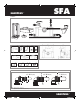
5.2 - If you need to open the macerating unit, first release the
discharge elbow, unclip the lid and pull up lid. In some cases
the lid might be stuck to the case very tightly, (during
assembly soapy water is used which dries up in time).
If required to remove motor from the case, unscrew motor retai-
ning screws. Also release the insulator cable to the lid. Lift out
motor assembly. Do not attempt to dismantle the motor assem-
bly itself as it is “clipped” together. These clips may break off
when trying to unclip them. In addition to damaging the clips
the motor seals may be damaged when the lid is removed
from the motor housing. The motor is filled with dielectric oil,
do not remove it or replace with regular oil. Please note, the
distributor purposely does not keep seals, bearings, or oil in
stock.
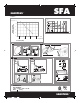
5.3 - SANIPLUS FUNCTION CHECKUP IMPELLER
Invert motor to gain access to pump chamber at the base.
Unclip pump cover plate from motor housing.
Unscrew the pump impeller counter clockwise, releasing it
from the spindle (block the spindle to unscrew). Clean pump
chamber and discharge elbow and pipe work to ensure no
blockage exists. Check that drive shaft rotates freely. Also
check that the air relief-hole in the wall of the chamber is
clear.
CUTTER BLADE
The blades can be easily removed if they ever require
replacement. Simply remove the retaining circlip on top of
the blade/rotor assembly and lift rotor/blade assembly off the
spindle. The blades can now be slid sideways, removed and
replaced.
Safety note: The blades are sharp and should be handled
with extreme care.
5.4 - CAUTIONARY NOTE
Do not immerse unit totally in water. Do not let water enter the
electrical cord entrance opening.
5.5 - REASSEMBLY OF THE LID
When replacing the lid grease the rubber gasket lightly with
soapy water or dishwasher liquid. (Do not use Vaseline as this
may expand the neoprene materials).The gasket must be
inside the lid first. Start by pushing the lid down at the cord
side first, then work your way around and tap on the lid with a
rubber mallet or bloc
8452 229 SANIPLUS USA Notice.indd 8 5/01/10 12:02:17