
Use and Care Guide
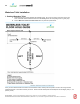
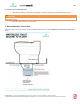
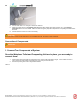
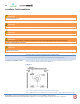
Table Of Contents
- TOC-Important-Installation-Guidelines
- TOC-Model-Differences
- TOC-Check-Contents-of-Box
- TOC-Do-Not-Remove-Paper-Mat
- TOC-Important-Notices
- TOC-Ready-to-Go-
- TOC-90-Bends-in-Vent
- TOC-1.-Position-Toilet
- TOC-1
- TOC-2.-Cut-Vent-Hole-in-Roof-Ceiling
- TOC-2
- TOC-3.-Vent-Roof-Stack-Installation
- TOC-3
- TOC-4.-Insert-Vent-Pipe-into-System
- TOC-4
- TOC-5.-Attach-Union-Coupling-Optional-
- TOC-5
- TOC-6.-Connect-Remaining-Vent-Pipe
- TOC-7.-Install-Drain
- TOC-8.-Seal-All-Vent-Connections
- TOC-9.-Insulate-Exposed-Pipe
- TOC-6
- TOC-10.-Attach-Rain-Cap-or-Wind-Turbine
- TOC-Protect-from-the-Elements
- TOC-Install-Rigid-Vent-Pipe-not-supplie
- TOC-Connect-Flexible-Vent-and-Rigid-Pip
- TOC-Attach-Wind-Turbine-Ventilator-
- TOC-Seal-All-Vent-Connections
- TOC-Install-Vacuum-Toilet
- TOC-Install-Drain
- TOC-Connect-Three-Components-of-System
- TOC-Start-Here
- TOC-Position-the-System
- TOC-Connect-Vacuum-Toilet-to-Vacuum-Gen
- TOC-Connect-Vacuum-Generator-to-Compost
- TOC-Fasten-Vacuum-Generator-Unit-and-Co
- TOC-Connect-Vacuum-Generator-to-12v-Pow
- TOC-Connect-Composting-System-to-AC-Ele
- TOC-Plug-Play-Wiring-Connection
- TOC_Do_Not_Add__3175881415145758
- TOC_Rated_Capacity_4164048674046512
- TOC_Operation_is_Easy_8826685531918387
- 1_System_Operation_09638061436967571
- TOC_1_Initial_System_Start_Up_1095042459
- TOC-1.-Initial-System-Start-Up
- TOC_2_Power_Control_42472747931111743
- TOC-2.-Power-Control
- Non_Electric_SystemsNot_applic_933833838
- FlushSmart_VF_models_Always_tu_554945394
- TOC_12VDC_Systems_12964841970897056
- TOC-12VDC-Systems
- FlushSmart_VF_models_Always_tu
- 5_Weekly_Operation_5923775715714038
- TOC-Typical-Emptying-Times
- TOC-Indications-of-Emptying-Required
- TOC-Before-you-Empty
- TOC_Introduction_3353822634090_525738961
- Proper_System_Operation_1312612757753413
- TOC_Outside_Odour_901114465392_444162368

Use as directed. To ensure proper performance, please be sure to contact us if you have installation or operation questions.
ENVIROLET®/SG INSTALLATION & OPERATION MANUAL (7MINS11D 12.15) • Envirolet® is a registered trademark. ©2016, Sancor Industries Ltd.
21
H. Seal All Vent Connections
I. Insulate Exposed Pipe
J. Attach Rain Cap or Wind Turbine Ventilator
1. Position Toilet
IMPORTANT
It is recommended that your Envirolet®/SG vent system is installed completely “vertical” (or straight-up) for best
operation. However, if an angled vent system is required be sure to use only two 45° elbows maximum without consulting us for
advise. An optional inline Turbo Fan may be required for extended, angled, or difficult vent designs or installations.
IMPORTANT
An angled vent system is not recommended for Non-Electric and 12VDC system installations.
IMPORTANT
Do not use any 90° angles in your vent system.
IMPORTANT
Inside odour can be caused by an improperly installed vent system.
A. Position Envirolet®/SG Waterless Self-Contained System in bathroom in location where it will remain. Try to keep
the system in area with an ambient temperature above 12°C (55°F) for optimum composting.
B. Be sure to select a location that allows you to access the front of the unit to remove the emptying tray (30”/76cm or
more is ideal). Also, keep the vent location in mind when positioning in front of windows or other wall elements so
they are not obstructed by vent pipe.
2. Cut Vent Hole in Roof/Ceiling
IMPORTANT
It is always best to error on the side of making your vent hole too small because you can always make it bigger!
A. Align the center of the vent connection on your Envirolet®/SG System (located at the top-left on DC and AC
models and directly center on Non-Electric models) with the center mark (where hole will go) on roof and/or ceiling
of bathroom. For best results, use a plumb line to center.
B. Mark center spot before cutting/drilling.
C. Cut or drill 3”/75mm diameter hole(s) through roof and/or ceiling. You may want to use section of vent pipe as a
template.
3. Vent/Roof Stack Installation
Installation of Insulated Roof Stack:
A. Apply liberal amount of silicone sealant around cut hole on roof to prevent any leakage (from rain, snow).
B. Slide provided 12”/30cm x 12”/30cm Rubber Roof Flashing over Insulated Roof Stack portion (on top of 3”/75mm
White Pipe).
C. Slide protruding 3”/75mm White Pipe through 3”/75mm hole on roof.
D. Ensure that the Rubber Roof Flashing is well sealed with silicone sealant (over bottom & around edges). Also seal
with silicone sealant around the bottom edge of Insulated Roof Stack to secure and prevent any leakage.
4. Insert Vent Pipe into System
A. Apply silicone sealant around outside bottom edge of one section of 3”/75mm x 36” White Vent Pipe section and
insert securely into the Vent Connection opening on the Top Panel of the system.
B. Seal with silicone sealant around the top edge of the Vent Connection and outside edge of the vent pipe to properly.