
Use and Care Guide


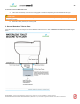


Table Of Contents
- TOC-Important-Installation-Guidelines
- TOC-Model-Differences
- TOC-Check-Contents-of-Box
- TOC-Do-Not-Remove-Paper-Mat
- TOC-Important-Notices
- TOC-Ready-to-Go-
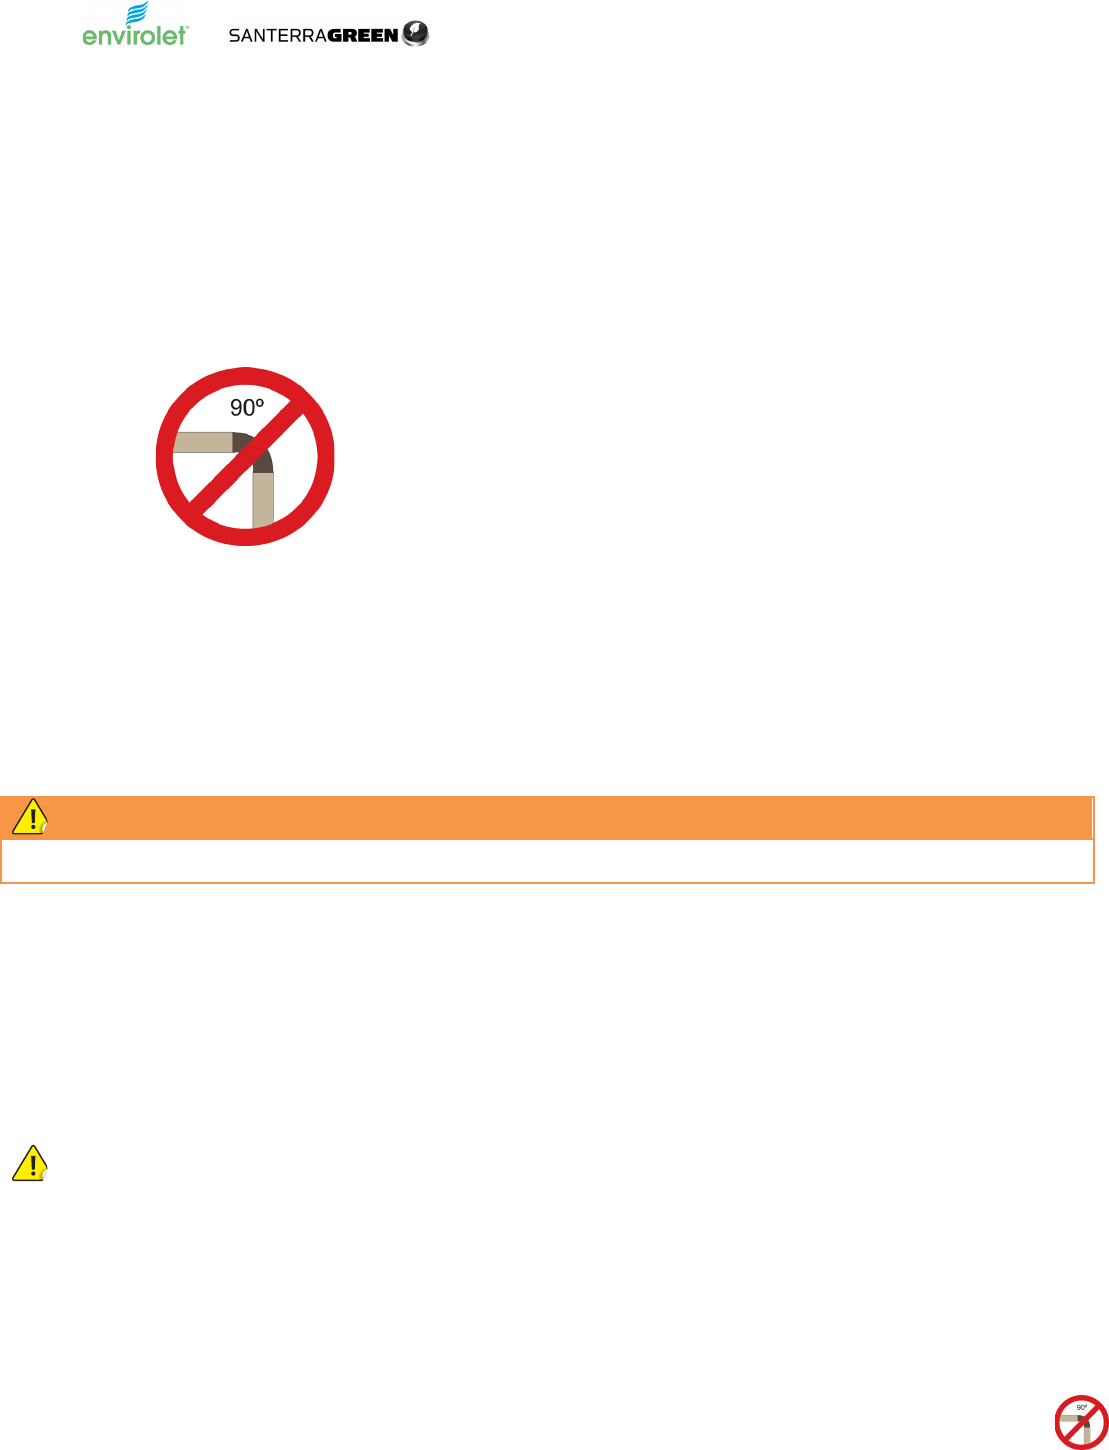
- TOC-90-Bends-in-Vent
- TOC-1.-Position-Toilet
- TOC-1
- TOC-2.-Cut-Vent-Hole-in-Roof-Ceiling
- TOC-2
- TOC-3.-Vent-Roof-Stack-Installation
- TOC-3
- TOC-4.-Insert-Vent-Pipe-into-System
- TOC-4
- TOC-5.-Attach-Union-Coupling-Optional-
- TOC-5
- TOC-6.-Connect-Remaining-Vent-Pipe
- TOC-7.-Install-Drain
- TOC-8.-Seal-All-Vent-Connections
- TOC-9.-Insulate-Exposed-Pipe
- TOC-6
- TOC-10.-Attach-Rain-Cap-or-Wind-Turbine
- TOC-Protect-from-the-Elements
- TOC-Install-Rigid-Vent-Pipe-not-supplie
- TOC-Connect-Flexible-Vent-and-Rigid-Pip
- TOC-Attach-Wind-Turbine-Ventilator-
- TOC-Seal-All-Vent-Connections
- TOC-Install-Vacuum-Toilet
- TOC-Install-Drain
- TOC-Connect-Three-Components-of-System
- TOC-Start-Here
- TOC-Position-the-System
- TOC-Connect-Vacuum-Toilet-to-Vacuum-Gen
- TOC-Connect-Vacuum-Generator-to-Compost
- TOC-Fasten-Vacuum-Generator-Unit-and-Co
- TOC-Connect-Vacuum-Generator-to-12v-Pow
- TOC-Connect-Composting-System-to-AC-Ele
- TOC-Plug-Play-Wiring-Connection
- TOC_Do_Not_Add__3175881415145758
- TOC_Rated_Capacity_4164048674046512
- TOC_Operation_is_Easy_8826685531918387
- 1_System_Operation_09638061436967571
- TOC_1_Initial_System_Start_Up_1095042459
- TOC-1.-Initial-System-Start-Up
- TOC_2_Power_Control_42472747931111743
- TOC-2.-Power-Control
- Non_Electric_SystemsNot_applic_933833838
- FlushSmart_VF_models_Always_tu_554945394
- TOC_12VDC_Systems_12964841970897056
- TOC-12VDC-Systems
- FlushSmart_VF_models_Always_tu
- 5_Weekly_Operation_5923775715714038
- TOC-Typical-Emptying-Times
- TOC-Indications-of-Emptying-Required
- TOC-Before-you-Empty
- TOC_Introduction_3353822634090_525738961
- Proper_System_Operation_1312612757753413
- TOC_Outside_Odour_901114465392_444162368
Use as directed. To ensure proper performance, please be sure to contact us if you have installation or operation questions.
ENVIROLET®/SG INSTALLATION & OPERATION MANUAL (7MINS11D 12.15) • Envirolet® is a registered trademark. ©2016, Sancor Industries Ltd.
27
3. Install Rigid Vent Pipe (not supplied)
Rigid Vent
Not included, due to transportation costs, is 10’/3m to 20’/6m (for a typical installation) of rigid ABS or PVC Pipe that is required to
complete vent installation. This rigid pipe travels up along the wall of your structure above the roof line (minimum 2’/0.6m) and is fitted
with the included Wind Turbine Ventilator. The rigid pipe connects to the 4”/110mm Flex Vent Pipe via an attached 4”/110mm
coupling provided. This low-cost rigid pipe can be easily acquired from your local dealer or at your local hardware, plumbing or home
center.
A. Determine length of 4”/110mm rigid vent pipe required for your installation. To properly determine length of rigid
vent pipe required be sure to allow a minimum of 2’/0.6m – 3’/0.9m rigid vent pipe to extend above the structure
roof line to ensure proper vent draft and maximum performance of the 4”/110mm Wind Turbine Ventilator.
B. Position rigid pipe as close as possible to the vent exit on the Envirolet®/SG Composting Unit.
C. Again, it is very important to avoid any 90° bends in your vent installation.
D. Attach rigid pipe securely to wall from just above Envirolet®/SG Composting Unit entire way up wall to above roof
line. Each installation will vary significantly, depending on location requirements. For added performance insulate
all rigid vent pipe.
4. Connect Flexible Vent and Rigid Pipe
Connect the flexible vent with supplied (Scandinavia only) 110mm Coupling to rigid pipe.
5. Attach Wind Turbine Ventilator
A. Attach the 4”/110mm Wind Turbine Ventilator to the top of the rigid vent pipe using straight coupling (not supplied).
B. Secure the Wind Turbine Ventilator with silicone sealant and at least 3-4 tapping screws (not supplied).
IMPORTANT
Extend the 4”/110mm rigid vent pipe higher than 3’/0.9m minimum for any installation surrounded by high trees, hills, other structures
and/or with a high roof peak and/or located in a valley.
6. Seal All Vent Connections
A. Seal all vent connections with silicone sealant. This is an important step because it will help prevent any odour
leakage. Even a small hole can lead to odour escape, so please double check.
7. Install Drain (if required)
Non-Electric and 12VDC models come standard with a drain that must be connected to an acceptable drain site. The drain is optional
on AC Electric models. If your system requires a drain please follow the directions below.
A. Connect one side of “T” portion of quick connect breather “T” to ½”/13mm drain (5’/152cm included standard) line that
exits Compost Unit (bottom right-hand side when facing tank).
Important
Make sure open part of “T” (middle) is facing up to prevent air-lock.