
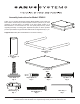
User manual
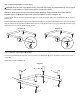

Step 1 - Attach Carpet Spikes or Floor Glides.
CAUTION: the ends of the Carpet Spikes are very sharp and may scratch non-carpeted ooring, or they may be
hazardous to small children. For these reasons Sanus includes Floor Glides.
If the Floor Glides (D) are used, do not install the Carpet Spikes (E), simply thread the Floor Glides into the
threaded holes in the Metal Base (B) instead of the Carpet Spikes as shown in Diagram 1A.
Thread a Spike Nut (F) onto each Carpet Spike (E); then, thread the Carpet Spikes into the Metal Base (B) as shown in
Diagram 1B.
Stand the Metal Base (B) upright and screw the Carpet Spikes (E) in or out until the Metal Base is level; then, turn the Spike
Nuts (F) until they are snug against the Metal Base to lock the Carpet Spikes in place. If the Floor Glides (D) are used, simply
thread them in or out until the Metal Base (D) is level.
Diagram 1A Diagram 1B
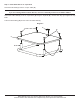
Step 2 - Attach 3″ Cope Tubes to Metal Base
Place a Pan Head Bolt (I) through each of the four holes in the Metal Base (B); then, thread them into the four 3″ Cope
Tubes (A).
Tighten the four Pan Head Bolts (I).
Diagram 2
D
B
B
F
E
A
A
A
A
I
I
I
I
B