LF228 Instruction Manual n llatio Insta eo vid at able v a ail .com s sanu We are here to help! Please contact Customer Service with any questions. Customer Service Americas: 800-359-5520 • 651-484-7988 • info@sanus.com Europe, Middle East, and Africa: + 31 40 2324700 • europe.sanus@milestone.com Asia Pacific: 86 755 8996 9226 • sanus.ap@milestone.com SANUS • 2221 Hwy 36 West • Saint Paul, MN 55113 USA ©2011 Milestone AV Technologies, a Duchossois Group Company. All rights reserved.
English - How to use this manual Suomi - Oppaan käyttäminen For best results, reference both the text and illustrations. OR Select one item or the other. Saavutat parhaan tuloksen tutustumalla sekä tekstiin että kuviin. Leikkaa katkoviivaa pitkin ja yhdistä kuvat ja suomenkielinen teksti. OR Valitse toinen vaihtoehdoista. OR OPT This item is optional English Text Pages 3-13 OPT OR Tämä vaihtoehto on valinnainen.
X WIDTH .465 0.00 24.000 609.60 16.000 406.40 English IMPORTANT SAFETY INSTRUCTIONS – SAVE THESE INSTRUCTIONS – PLEASE READ ENTIRE MANUAL PRIOR TO USE Specifications 19.281 ÙÙ ÙÙ ÙÙ ÙÙ 11.560 293.62 489.75 15.600 Weight capacity-DO NOT EXCEED: 61 kg (135 lb.) includes TV and any accessories 396.24 Swivel: ±90° Tilt: +5° to –15° Level: ±5° 16.000 CAUTION: Avoid potential personal injuries and property damage! 406.40 Do not use this product for any purpose not explicitly specified by manufacturer.
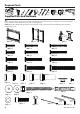
Required Tools 5.5mm (7/32 in.) 13 mm (1/2 in.) 10 mm (3/8 in.) Supplied Parts and Hardware WARNING: This product contains small items that could be a choking hazard if swallowed. Before starting assembly, verify all parts are included and undamaged. If any parts are missing or damaged, do not return the damaged item to your dealer; contact Customer Service. Never use damaged parts! NOTE: M4, M5, M6, or M8 describes the diameter, mm describes the length of screws that are labeled M# X ##mm.
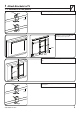
1 Attach Brackets to TV 1-1 Determine TV hole pattern [31] Loosen the upper (A) and lower (B) fasteners. (A) [02] (B) Adjust the monitor plate [02] to fit the hole pattern of your TV. 002545.eps LF228-Center column [02] 41 - 61 cm (16 - 24 in.) Be sure that the center column is aligned with the center of your TV. 002545.eps LF228-Center column [02] [31] Tighten the upper (A) and lower (B) fasteners. Do not overtighten. (A) [02] (B) 002543.
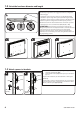
1-2 Select the hardware diameter and length Your TV type will help you determine which hardware configuration to use. Match your type of TV to the suggested hardware configuration on the next page. A. Installation option using 4 or 7mm spacers (TVs with flat backs) B. Installation option using 14mm spacers (TVs with irregular backs) C. Installation option using 24 or 38mm spacers (For TVs with irregular backs that require more length than the 14mm spacer provides.
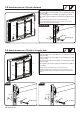
1-4 Attach brackets to a TV with a flat back In step 1-2, If you selected the: M4 x 20mm [04] or M5 x 20mm [07] bolt, use the M4/M5 washer [23] and spacer [16]. M6 x 25mm bolt [10] use the M6/M8 washer [24] and spacer [17]. M8 x 25mm diameter bolt [13] use the M6/M8 washer [24] and spacer 002538.eps [16]. Confirm that the brackets are level on the back of the TV. 6801-000121 hardwar If you require additional space for cables, recesses, or protrusions, choose one of the configurations below.
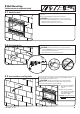
2 Wall Mounting Wood stud 2-1 Locate studs 13 mm (1/2 in.) 5.5mm (7/32 in.) For assistance in determining wall plate location, see Height Finder at sanus.com. Verify the center of the stud(s) using an awl, a thin nail, or an edge to edge stud finder. 41 - 61 cm (16 - 24 in.) CAUTION: Avoid potential personal injuries and property damage! < 16 mm (5/8 in.) 2-2 Mark the wall ÙÙ Any material covering the wall must not exceed 16 mm (5/8 in.). ÙÙ Minimum wood stud size: common 2 x 4 in (nominal 1.5 x 3.
2 Wall Mounting Solid concrete or concrete block 2-1 Mark the wall 001439.eps Attach Plate to Wall 13 mm (1/2 in.) 10 mm (3/8 in.) For assistance in determining wall plate location, see Height Finder at sanus.com. [01] 2-2 Drill pilot holes Level the wall plate [01] and mark the hole locations. CAUTION: Avoid potential injuries or property damage! ÙÙ Mount the wall plate [01] directly onto the concrete surface. ÙÙ Minimum solid concrete thickness: 8 in.
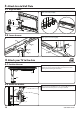
3 Attach Arm to Wall Plate 3-1 Align the holes Align the holes at the top and bottom of the arm [03] to the holes in the wall plate [01]. [03] [01] 3-2 Secure the arm Secure the arm assembly [03] to the wall plate [01] using bolt [28]. Tighten with allen key [32]. [01] [03] [32] [28] [28] [01] [31] 4 Attach your TV to the Arm 4-1 Position the arm Position arm [03] so the elbow is pressed against the wall.
4-3 Secure the arm TILT TV UPWARD. Install and tighten locking screw [22].
5-3 Adjust up/down tilt tension [03] 5-4 Adjust arm tension 001452.e FPM70-E [03] [31] [01] 5-5 Adjust height [32] 5-6 Adjust level Loosen screws. Adjust level. Re-tighten.
6 Cable Management 1 1. Fully extend the arm [03]. Remove cable covers (C). 2. Install the cable tie clips [29] and ties [30] into the bottom of the arm, as shown. 2 (C) [29] [30] [03] [29] 3 [01] 3. Pull each arm to its full extension then route the cables through the arm, leaving enough slack to prevent stretching the cables when the arm is moved. 4. Reattach covers (C). 4 (C) [03] Troubleshooting and Maintenance To remove the TV: (See illustrations in step 4.) 1.
Français CONSIGNES DE SÉCURITÉ IMPORTANTES – CONSERVEZ CES INSTRUCTIONS – VEUILLEZ LIRE ATTENTIVEMENT LE MANUEL AVANT D’UTILISER CE PRODUIT Caractéristiques techniques Voir les illustrations de la page 3. Capacité de charge – NE PAS DÉPASSER : 61 kg (135 lb) incluant le téléviseur et tous les accessoires.
2 Installation sur des murs à montant de bois 2-1 Trouvez les montants Voir les illustrations de la page 8. Pour obtenir de l'aide afin de déterminer l’emplacement de la plaque murale, consultez le site sanus.com sous la rubrique « Height Finder ». Vérifiez le centre du montant à l’aide d’un poinçon ou d’un clou fin, ou utilisez un localisateur bord à bord. ÙÙ ÙÙ ATTENTION : Évitez les dommages matériels et les blessures! L’épaisseur du matériau de revêtement de mur ne doit pas excéder 16 mm (5/8 po).
Deutsch WICHTIGE SICHERHEITSHINWEISE – BEWAHREN SIE DIESE HINWEISE SORGFÄLTIG AUF – LESEN SIE VOR DEM GEBRAUCH DES PRODUKTS BITTE DAS GESAMTE HANDBUCH Spezifikationen Siehe Abbildungen auf Seite 3. Höchstzulässiges Gesamtgewicht-NICHT ÜBERSCHREITEN: 61 kg (135 lb.) inkl.
2 Wandmontage Holzbalken 2-1 Suchen Sie die Balken Siehe Abbildungen auf Seite 8. Hilfe zum Bestimmen der geeigneten Wandplattenposition finden Sie unter Height Finder auf sanus.com. Stechen Sie mit einer Ahle oder einem dünnen Nagel die Mitte des Balkens bzw. der Balken an, oder verwenden Sie einen Kante-zu-Kante-Balkensucher. ÙÙ ÙÙ ACHTUNG: Vermeiden Sie Verletzungen und Sachschäden! Jegliches Material, das die Wand bedeckt, darf 16 mm (5/8 Zoll) nicht überschreiten.
Español INSTRUCCIONES IMPORTANTES DE SEGURIDAD. GUARDE ESTAS INSTRUCCIONES. LEA TODO EL MANUAL ANTES DE UTILIZAR ESTE PRODUCTO. Especificaciones Consulte los gráficos en la página 3. Peso máximo-NO SUPERAR: 61 kg (135 lb.) incluidos el televisor y los accesorios Giro: ±90° Inclinación: +5° a –15° Nivelación: ±5° ÙÙ ÙÙ ÙÙ ÙÙ PRECAUCIÓN: Evite posibles lesiones personales y daños materiales.
2 Montaje en pared Montante de madera 2-1 Localice los montantes Consulte las ilustraciones en la página 8. Si necesita ayuda para determinar la posición de la placa de pared, consulte Height Finder en sanus.com. Verifique el centro de los montantes utilizando un punzón, un clavo fino o un localizador de montantes de borde a borde. ÙÙ ÙÙ PRECAUCIÓN: Evite posibles lesiones personales y daños materiales. Ningún material que cubra la pared debe superar los 16 mm (5/8 in.).
Português INFORMAÇÕES DE SEGURANÇA IMPORTANTES – GUARDE ESTAS INSTRUÇÕES – LEIA O MANUAL INTEIRO ANTES DE USAR Especificações Consulte as ilustrações na página 3. Capacidade de peso—NÃO EXCEDER: 61 kg (135 lb.), incluindo TV e acessórios Giro: ±90° Inclinação: +5° a -15° Nível: ±5° ÙÙ ÙÙ ÙÙ ÙÙ CUIDADO: Evite possíveis ferimentos pessoais e dano à propriedade! ÙÙ ÙÙ ÙÙ ÙÙ ÙÙ Não use este produto para uma finalidade diferente daquela explicitamente especificada pelo fabricante.
2 Pino de madeira montado na parede 2-1 Localize os pinos Consulte as ilustrações na página 8. Para obter assistência na determinação do local da placa da parede, consulte sanus.com. Verifique o centro do(s) pino(s) com um furador ou um prego fino, ou use um localizador de pino borda a borda. ÙÙ ÙÙ CUIDADO: Evite possíveis ferimentos pessoais e dano à propriedade! Qualquer material que cubra a parede não deve exceder 16 mm (5/8 pol.). Tamanho mínimo do pino de madeira: comum 51x102 mm (2 x 4 pol.
Nederlands BELANGRIJKE VEILIGHEIDSINSTRUCTIES – BEWAAR DEZE INSTRUCTIES – LEES DE VOLLEDIGE HANDLEIDING VOORAFGAAND AAN HET GEBRUIK Specificaties Raadpleeg de afbeeldingen op pagina 3 Gewichtscapaciteit-NIET OVERSCHRIJDEN: 61 kg (135 lb.
2 Wandmontage Houten drager 2-1 Plaats de dragers Zie de afbeeldingen op pagina 8. Voor hulp bij het bepalen van de locatie voor de wandplaat, zie Height Finder op sanus.com. Zoek het midden van de drager(s) met een priem of een dunne spijker, of gebruik een balkzoeker van rand tot rand. ÙÙ ÙÙ LET OP: Voorkom mogelijk persoonlijk letsel en apparatuurschade! Materialen die de muur bedekken, mogen niet dikker zijn dan 16 mm (5/8 in).
Italiano ISTRUZIONI DI SICUREZZA IMPORTANTI – CONSERVARE QUESTE ISTRUZIONI – LEGGERE TUTTE LE ISTRUZIONI PRIMA DI USARE QUESTO PRODOTTO Specifiche Vedere le illustrazioni a pagina 3.
2 Montaggio a parete Montante di legno 2-1 Individuare i montanti Vedere le illustrazioni a pagina 8. Per determinare la posizione della piastra, è possibile consultare la funzione di assistenza Height Finder sul sito sanus.com. Verificare il centro del montante o dei montanti con un punteruolo, un chiodo sottile, oppure con un cercamontanti per rilevare la distanza da bordo a bordo.
Suomi TÄRKEITÄ TURVALLISUUSOHJEITA – SÄILYTÄ NÄMÄ OHJEET – LUE OPAS KOKONAAN ENNEN LAITTEEN KÄYTTÄMISTÄ Tekniset tiedot Katso kuvat sivulta 3. Painokapasiteetti-ÄLÄ YLITÄ: 61 kg (135 lb.) mukaan lukien TV ja mahdolliset lisälaitteet Kääntö: ±90° Kallistus: +5° - –15° Taso: ±5° ÙÙ ÙÙ ÙÙ ÙÙ VAROITUS: Vältä mahdolliset henkilövahingot ja laitevauriot! ÙÙ ÙÙ ÙÙ ÙÙ ÙÙ Käytä laitetta vain valmistajan ilmoittamiin käyttötarkoituksiin. Seinän täytyy kestää viisi kertaa näytön ja telineen yhteispaino.
2 Kiinnittäminen seinälle Koolauspuut 2-1 Etsi koolauspuut Katso kuvat sivulta 8. Jos tarvitset apua seinälevyn sijainnin määrittämisessä, tutustu Height Finder -sovellukseen osoitteessa sanus.com. Etsi koolauspuiden keskikohta lävistimellä, ohuella naulalla tai mittarilla. ÙÙ ÙÙ VAROITUS: Vältä mahdolliset henkilövahingot ja laitevauriot! Seinää peittävän materiaalin paksuus saa olla enintään 16 mm (5/8 in.). Koolauspuiden vähimmäiskoko: tavallinen 51x102 mm (2 x 4 in.) (nimelliskoko 38x89 mm /1.5 x 3.
Svenska VIKTIGA SÄKERHETSANVISNINGAR – SPARA DESSA ANVISNINGAR – LÄS HELA BRUKSANVISNINGEN INNAN DU ANVÄNDER DENNA PRODUKT Specifikationer Se bilder på sidan 3. Viktkapacitet – ÖVERSKRID INTE: 61 kg (135 lb.), inkluderar TV och tillbehör Vridning: ±90° Lutning: +5° till –15° Jämn: ±5° ÙÙ ÙÙ ÙÙ ÙÙ FÖRSIKTIGT: Undvik risk för personskador och materiella skador! ÙÙ ÙÙ ÙÙ ÙÙ ÙÙ Använd inte denna produkt för andra ändamål än dem som uttryckligen omnämns av tillverkaren.
2 Väggmontering Träregel 2-1 Leta upp reglarna Se bilder på sidan 8. Du kan få hjälp med att besluta var väggplattan ska placeras genom att gå till höjdfinnaren (Height Finder) på sanus.com. Markera regelns/reglarnas mitt med en pryl eller en smal spik, eller använd en regelsökare (kant till kant). ÙÙ ÙÙ VARNING: Undvik risk för personskador och materiella skador! Material som täcker väggen får inte överstiga 16 mm (5/8 tum).
Русский ВАЖНЫЕ ИНСТРУКЦИИ ПО ТЕХНИКЕ БЕЗОПАСНОСТИ – СОХРАНИТЕ ЭТИ ИНСТРУКЦИИ – ПЕРЕД ЭКСПЛУАТАЦИЕЙ ПОЛНОСТЬЮ ПРОЧТИТЕ ДАННОЕ РУКОВОДСТВО Технические характеристики Нагрузка на изделие – НЕ ПРЕВЫШАТЬ: 61 кг (135 фунтов), включая телевизор и все необходимые принадлежности. Угол поворота: ±90° Угол наклона: от +5° до –15° Выравнивание: ±5° ÙÙ ÙÙ ÙÙ ÙÙ ÙÙ ÙÙ ÙÙ ÙÙ См. иллюстрацию на стр. 3.
2 Установка на стену с деревянным каркасом 2-1 Определите положение стоек См. иллюстрацию на стр 8. Для определения расположения стеновой пластины воспользуйтесь приложением Height Finder на sanus.com. Определите центр стойки с помощью шила или тонкого гвоздя, также для этого можно использовать искатель краев. ÙÙ ÙÙ ПРЕДОСТЕРЕЖЕНИЕ! Соблюдайте правила безопасности, чтобы предотвратить возможные травмы и повреждение имущества! Толщина материала, покрывающего стену, не должна превышать 16 мм (5/8 дюйма).
Polski WAŻNE INSTRUKCJE BEZPIECZEŃSTWA – ZACHOWAĆ TE INSTRUKCJE – PRZED UŻYCIEM PRZECZYTAĆ CAŁY PODRĘCZNIK Opis techniczny Patrz ilustracje na stronie 3. Nośność – NIE PRZEKRACZAĆ: 61 kg (135 lb), w tym telewizor i akcesoria. Obrót: ±90° Nachylenie: +5° do –15° Poziomowanie: ±5° ÙÙ ÙÙ ÙÙ ÙÙ UWAGA: Należy unikać potencjalnych obrażeń ciała i uszkodzenia mienia! ÙÙ ÙÙ ÙÙ ÙÙ ÙÙ Produkt nie powinien być wykorzystywany do celów innych, niż określonych przez producenta.
2 Montaż na ścianie Belki drewniane 2-1 Znaleźć belki Patrz ilustracje na stronie 8. Aby uzyskać pomoc w określeniu położenia na płycie ściennej, patrz Height Finder na stronie sanus.com. Sprawdzić położenie środka słupa za pomocą szydła, długiego gwoździa albo wykrywacza belek. ÙÙ ÙÙ PRZESTROGA: Należy unikać potencjalnych obrażeń ciała i uszkodzenia mienia! Grubość materiału stanowiącego pokrycie ściany nie może przekraczać 16 mm (5/8 cala).
Česky DŮLEŽITÉ BEZPEČNOSTNÍ POKYNY – BEZPEČNĚ JE ULOŽTE – PŘED POUŽITÍM TOHOTO VÝROBKU SI PŘEČTĚTE CELOU PŘÍRUČKU Specifikace ÙÙ ÙÙ ÙÙ ÙÙ Viz ilustrace na str. 3 Nosnost-NEPŘEKRAČOVAT: 61 kg (135 lb.) zahrnuje televizor a všechna příslušenství Otáčení: ±90° Náklon: +5° až –15° Vyrovnání: ±5° POZOR: Zabraňte možným úrazům a hmotným škodám! ÙÙ ÙÙ ÙÙ ÙÙ ÙÙ Nepoužívejte tento výrobek k žádnému účelu, který nebyl výslovně specifikován výrobcem.
2 Montáž na zeď Dřevěné nosníky 2-1 Vyhledání nosníků Viz ilustrace na str. 8. Pomoc s určením umístění montážní desky viz Height Finder (Výškoměr) na webových stránkách sanus.com. Střed nosníků ověřte pomocí šídla, tenkého hřebíčku nebo použijte detektor nosníků. ÙÙ ÙÙ POZOR: Zabraňte možným úrazům a hmotným škodám! Jakýkoli materiál pokrývající stěnu nesmí být silnější než 16 mm (5/8 in.). Minimální velikost dřevěného nosníku: obecná 51x102 mm (2 x 4 in.) (jmenovitá 38x89 mm /1,5 x 3,5 in.
日本語 安全のための重要な説明 – この説明書を保管しておいてください – 本製品を使用する前に、説明書全体をよくお読みください 仕様 ÙÙ ÙÙ ÙÙ ÙÙ ÙÙ ÙÙ ÙÙ ÙÙ 3ページの図を参照 耐荷重 - 超過しないようにしてください : 61 kg (135 lb.
2 ウォールマウント 木製スタッド 2-1 スタッドを探す 8ページの図を参照 ウォールプレートの取り付け位置を決めるには、sanus.com の Height Finder ( 高さ検索機能 ) をご利用ください。 千枚通しや細い釘などを使って、またはスタッドチェッカーを使って、スタッドの中央を確認します。 ÙÙ ÙÙ 注意 : ケガをしたり、壁面を破損しないように注意してください。 壁面を覆う材料が 16 mm (5/8 in.) を超えないようにします。 最小の木製スタッドの寸法 : 通常 51 x 102 mm (2 x 4 in.)( 小型 38 x 89 mm /1.5 x 3.5 in.) 2-2 壁に印を付ける 8ページの図を参照 ウォールプレート [01] を水平にし、穴の場所に印を付けます。 2-3 パイロット穴を開ける 8ページの図を参照 注意 : ケガをしたり、壁面を破損しないように注意してください。パイロット穴は、5.5 mm (7/32 in.) 径のドリルビットを使って、必ず 89 mm (3.5 in.
中文 重要安全说明 – 保存这些说明 – 使用之前,请阅读完本说明书 规格 ÙÙ ÙÙ ÙÙ ÙÙ 参见第 3 页图示。 承重能力 --请勿超过:61 kg (135 磅)含电视机及任何附件 水平摆动:±90° 竖向摆动:+5° 至 –15° 水平:±5° 注意:避免潜在人身伤害和财产损毁! ÙÙ ÙÙ ÙÙ ÙÙ ÙÙ 请勿将此产品用于制造商明确指定以外的其他目的。 墙壁的承重力必须至少达到显示器和墙壁支架总重量的五倍。 本产品不适用于金属墙柱墙! 如您不理解这些说明,或对本产品的安全安装、拆卸或使用存有疑问,请联系客户服务部门,或致电合格的承建商以咨询相关信息。 对因不当安装或不当使用而造成的损失或伤害,制造商不承担任何责任。 技术规格 参见第 3 页图示。 需要的工具 参见第 4 页图示。 配套零件和配件 参见第 4 页图示。 警告:此产品包含若吞咽可能引致窒息危险的小部件。 开始装配以前,先确定所有零件均已提供且完好无损。如果任何零件缺失或受损,请勿将受损零件返还给零售商,请联系客户服务部门。切勿使用受损零件! 注意:M4、M5、M6 或 M8 描述直径,mm 描述标识为 M#
2 墙壁安装 木墙柱 2-1 找到木墙柱 参见第 8 页图示。 如需帮助确定壁板的位置,请参考 sanus.com 网站上的测高器。 使用尖钻、细钉或者使用边到边墙柱查找器确定墙柱的中心。 注意:避免潜在人身伤害和财产损毁! ÙÙ 墙上覆盖的任何东西不能超过 16 mm (5/8 in.)。 ÙÙ 最小木墙柱尺寸:通常 51x102 mm (2 x 4 in.)(标称 38x89 mm /1.5 x 3.5 in.)。 2-2 标注墙 参见第 8 页图示。 将壁板 [01] 放置水平并标注孔位置。 2-3 打钻导孔 参见第 8 页图示。 注意:避免潜在人身伤害或财产损毁!使用直径 2-4 紧固方头螺栓 参见第 8 页图示。 5.5 mm (7/32 in.) 的钻头打钻导孔,深度必须达到 89 mm (3.5 in.
English Suomi Milestone AV Technologies and its affiliated corporations and subsidiaries (collectively, “Milestone”), intend to make this manual accurate and complete. However, Milestone makes no claim that the information contained herein covers all details, conditions, or variations. Nor does it provide for every possible contingency in connection with the installation or use of this product. The information contained in this document is subject to change without notice or obligation of any kind.