
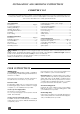
Technical data
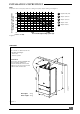


10
INSTALLATION INSTRUCTIONS
VERTICAL FLUE INSTALLATION
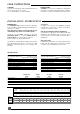
A .................................................................... Gasket
B ..................................................... Vertical adaptor
C .................................................................... ‘O’ ring
D....................................................................... Collar
E ...................................................................... Clamp
F ...................................................................... Screws
G .................................................................. Terminal
H ...................................................................... Screws
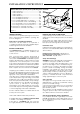
· Fit gasket (C) onto underside of vertical adaptor
(B)..
· Carefully insert ‘O’ ring (A) into vertical adaptor
inner spigot.
· Fit adaptor correctly onto fan outlet.
· For flat roof installation, fit flat roof flashing collar
(part no. 85107)
· Fit flue terminal (L) onto roof ensuring flashing
makes a watertight joint.
· For pitch roof installation, fit pitch roof flashing
collar (part no. 85105)
· Fit flue terminal (G) onto roof ensuring flashing
makes a watertight joint.
NOTE: Maximum vertical height with no bends is 4 m.
Note: Should it be necessary to cut the flue, always
cut equal amounts from both inner and outer pipes.
Maximum vertical flue run 11.5m
For each 90
o
flue bend fitted, reduce overall flue
height by 1 m.
For each 45
o
flue bend fitted, reduce overall flue
height by 0.5 m.
Vertical flue terminal (Black) 85103
Pitched roof flashing 85105
Flat roof flashing 85107
Flue extension pipe 85099
90
o
bend kit 85101
45
o
bend kit 85102
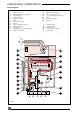
Diagram 12
Show vertical kit adaptor & terminal
Diagram 12
A
B
E
C
F
H
D
G