.--...
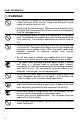
A1748607 -., I In accordance with ISO Standard 7001, this machine uses the following-- symbols for the main switch: I I 0 Q) I For good copy quality, Ricoh recommends means POWER ON. means POWER OFF. means STAND BY. that you use genuine Ricoh toner. I Ricoh shall not be responsible for any damage or expense that may result from the use of parts other than genuine Ricoh parts in your Ricoh office product. I Note: Some illustrations may be slightly different from your machine.
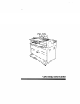
INTRODUCTION This copier is a desktop plain paper copier carefully manufactured to exacting standards of high performance. It consistently yields high contrast copies with a superior finish. This manual contains detailed instructions on the operation and maintenance of this copier. To get maximum versatility from this copier, all operators should carefully read and follow the instructions in this manual. Please keep this manual in a handy place near the copier.
SAFETY INFORMATION R WARNINGS: m m q r m s r m ii • Only connect the copier to the power source described on the inside front cover of this manual. Avoid multi-writing as it could cause an electric shock or a fire. • Avoid using an extension cord. Make sure the wall outlet is near the copier and freely accessible so that in event of an emergency it can be unplugged easily. • Do not damage, break or make any modifications to the power cord.
SAFETY INFORMATION R Cautions: o m r t m r o m n R • After you move the copier, lock it in position with the caster fixture. If you do not, the copier might move or fall causing personal injury. • Do not lean on the original tray or copy table otherwise they might fall causing personal injury. • When you move the copier, unplug the power cord form the wall outlet to avoid fire or electric shock.
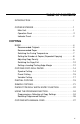
TABLE OF CONTENTS INTRODUCTION . . . . . . . . . . . . . . . . . . . . . . . . . . . . . . . . . . . . . . i COPIER EXTERIOR . . . . . . . . . . . . . . . . . . . . . . . . . . . . . . . . . . . 1 Main Unit . . . . . . . . . . . . . . . . . . . . . . . . . . . . . . . . . . . . . . . . . . 1 Operation Panel . . . . . . . . . . . . . . . . . . . . . . . . . . . . . . . . . . . . 2 Indicator Panel. . . . . . . . . . . . . . . . . . . . . . . . . . . . . . . . . . . . . . 2 COPYING BASIC. . . . . . . . . . .
TABLE OF CONTENTS WHAT TO DO IF SOMETHING GOES WRONG WHEN THE "WAIT" INDICATOR IS LIT . . . . . . . . . . . . . . . . . . . . 30 IF YOUR COPIER DOES NOT OPERATE AS YOU WANT . . . . . 31 WHEN A OR x IS LIT. . . . . . . . . . . . . . . . . . . . . . . . . . . . . . . . . When A and Are Lit . . . . . . . . . . . . . . . . . . . . . . . . . . . . . . When x and Are Lit . . . . . . . . . . . . . . . . . . . . . . . . . . . . . . When Is Lit. . . . . . . . . . . . . . . . . . . . . . . . . . . . . . . . . . . .
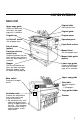
COPIER EXTERIOR Main Unit Upper copy guide Copies are delivered here when the upper copy exit is selected. Original table Set originals here. Original guide Original tray Original cover 1st/2nd roll feeder Operation panel Set roll paper here. Paper Path section 3rd roll feeder (option) Manual Feed Front/rear delivery switch lever Set sheet paper here. Switches between the rear stock and the front delivery when the lower copy exit is selected.
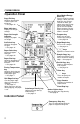
COPIER EXTERIOR Operation Panel Edge indicators Displays the margin settings. Clear Modes/Energy Saver key Cancels all of the current settings. When you hold down this key for three seconds or more, the copier enters the Energy Saver mode allowing you to conserve power. When you press the key again, the Energy Saver mode is cleared. Paper Cut Length indicator Displays the paper cut length. Program key Allows you to store various copy settings. → See page 24. Cut Select key Switches the paper cut type.
COPYING BASIC . . . . . . . . . . . . . . . . . . . . . . . . . . . . . . . . . . . . . . . . . . . Recommended Originals . . . . . . . . . . . . . . . . . . . . . . . . . Recommended Paper . . . . . . . . . . . . . . . . . . . . . . . . . . . . Switching the Fusing Temperature . . . . . . . . . . . . . . . . . . Setting the Number of Copies (Repeated Copying) . . . . . Adjusting Copy Density . . . . . . . . . . . . . . . . . . . . . . . . . . . Switching the Copy Exit . . . . . . . . . . . . . . . . . . .
BASIC This section describes how to set the functions and recommended originals and paper. Recommended Originals S When you copy the following originals, use the carrier sheet (option) to set them: ☞ See page 62, "OTHER OPTIONS" • • • • • Thin originals Torn originals Folded originals Curled originals Pasted originals S You can set originals having the thickness of 21 g/m2, 6 lb to 157 g/m2, 41 lb in this copier. S When you copy the following originals, set them in the rear table: • Thick originals (0.
BASIC 2 Remove the upper copy guide. 3 Insert the original face down into the table along the size indication. ✏ Do not release the original until it is fed into the copier. S Set a leading margin of 5 mm, 0.2" or more when you copy an original whose leading edge has a large solidly-shaded area. ☞ See page 11, "Setting a Leading/Trailing Edge Margin" Recommended Paper This section describes recommended paper sizes and types. S Standard paper sizes that can be used in this copier are shown below.
BASIC S When you make a copy on a non-standard size of paper, set the paper on the manual feed table. S Paper of about the thickness of 51 to 134 g/m2, 14 lb to 36 lb is suitable for this copier. ✏ Do not use the following paper. • • • • • • Otherwise, a paper jam might occur.
BASIC Switching the Fusing Temperature When you make a copy on translucent paper or transparent film, switch the fusing unit temperature to stabilize toner fusing. S If you make a copy in the condition unsuitable for copy paper, the copy might be creased or a part of the image might not be copied. S Turn on the "HIGH" indicator for translucent paper and "LOW" for transparent film.
BASIC Setting the Number of Copies (Repeated Copying) Repeated copying means to make two or more copies of one original. This function allows you to make up to 10 copies in the size of 1,200 × 914 mm, 49" × 36" to B5 K. S In repeated copying, the image might be copied slantly depending on the original size, type, and condition (e.g., curl, wave). In such a case, make one copy at a time.
BASIC Adjusting Copy Density The "Auto Image Density" function means to adjust copy density automatically to mask out dark backgrounds of an original. If you cannot make copies as you want with the Auto Image Density function, adjust the copy density manually. S When you turn on the copier, the "Auto Image Density" indicator lights. S You can adjust copy density in 26 steps; 13 steps when the "Lighter Copy" indicator is on and 13 when the indicator is off.
BASIC Switching the Copy Exit This function switches the copy exit direction to the upper or lower according to the copy paper size. S Select the lower copy exit when copying onto A0, 36" × 48" K or A1, 24" × 36" K paper. If you use the upper copy exit to copy onto these paper, delivered copies might remain inside the copier causing a paper jam. S Select the upper copy exit when copying onto A4 K or 9" × 12" K paper. If you select the lower copy exit, copies might not be stocked properly.
BASIC 2 When you take copies out of the rear side of the copier in the lower copy exit mode, pull out the delivery switch levers until they stop, as shown in the figure on the right. ✏ You must pull out both levers at the same time. When you take copies out of the front side of the copier in the lower copy exit mode, press the delivery switch levers until they stop, as shown in the figure on the right. ✏ You must press both levers at the same time.
BASIC Setting a Leading/Trailing Edge Margin You can set a margin at the leading or trailing edge of the copy. You can also make a copy using a narrower margin than that on the original. Leading margin Original Copy Trailing margin S You can set up to ±99 mm, ±4.0" margin in 1 mm, 0.1" steps at either the leading or trailing edge. S You can set a trailing margin only when you select the Synchro Cut function. S When you set a leading margin, the copy image is shifted to the trailing edge for the margin.
BASIC 2 Press the + and - keys to specify a leading edge margin. ✏ Press the + key to increase the margin width and - to decrease the width. ✏ If you enter a wrong value, press the Clear/Stop key and reenter a correct value. 3 Press the Edge Margin key. The specified value goes on. The "Trailing Edge" indicator flashes when the "Synchro Cut" mode is selected. ✏ You can start copying here when the "Manual Feed," "Preset Cut," or "Variable Cut" mode is selected.
COPYING ONTO ROLL PAPER You can copy onto roll paper in the following three ways: synchro cutting, preset cutting, and variable cutting. S If roll paper is damp, cut it in about 1,000 mm, 39.4" immediately before copying. ☞ See page 41, "Cutting the Paper Automatically/Manually" Synchro Cutting This function cuts roll paper automatically according to the original length. S The synchro cut can handle the cut length from 245 to 3,600 mm, 9.6" to 142".
COPYING ONTO ROLL PAPER 3 Insert the original lightly along the original guide. The copier starts copying. ✏ Do not release the original until it is fed into the copier. Preset Cutting This function cuts roll paper in a selected length. The paper is cut regardless of the original size. S The preset cut length is divided into five types.
COPYING ONTO ROLL PAPER Inch version: Roll width 36" 24" 18" 12" 9" Preset length Paper size and direction 48" EK 24" DL 36" DK 18" CL 24" CK 12" BL 18" BK 12" AK 1 Press the Cut Select key to display a length of the "Preset Cut". 2 Set the original guide to match the original width and direction.
COPYING ONTO ROLL PAPER 3 Insert the original lightly along the original guide. The copier starts copying. ✏ Do not release the original until it is fed into the copier. Variable Cutting This function cuts roll paper in a length you specify. S The variable cut can handle the cut length from 245 to 3,600 mm, 9.6" to 142". 1 Press the Cut Select key to turn on the "Variable Cut" indicator. 2 Press the + and - keys to specify the length for the variable cut.
COPYING ONTO ROLL PAPER 3 Set the original guide to match the original width and direction. 4 Insert the original lightly along the original guide. The copier starts copying. ✏ Do not release the original until it is fed into the copier.
PARTIAL COPYING The Partial Copy function copies only a part of an original. This function specifies the start and end points in the original feed direction. S The Partial Copy function cannot apply to originals having a length of less than 245 mm, 9.6" in the paper feed direction. S The Partial Copy function cannot be used in the rear table. S The Partial Copy function cannot be used when the Sample Copy function is selected. S The start and end points cannot be set within 162 mm, 6.
PARTIAL COPYING 3 Press the Partial Copy key when the leading edge of the area to be copied comes to the position where it is covered with the original table cover. The indicator on the Partial Copy key lights. ✏ If you do not press the Partial Copy key, the original is delivered without partial copying. Original feed direction 4 Press the Partial Copy key when the trailing edge of the area to be copied comes to the position where it is covered with the original table cover.
SAMPLE COPYING The Sample Copy function copies an original in 245 mm, 9.6" from its leading edge in the paper feed direction. This allows you to check the copy condition of the current settings in advance. 1 Press the Sample Copy key. The indicator on the Sample Copy key is lit. ✏ When you press the Sample Copy key again, you can cancel sample copying. 2 Set your original. ✏ Do not release the original until it is fed into the copier. 3 The copier starts copying.
PAPER TYPE/ROLL WIDTH ENTRY FUNCTION This function allows you to store the paper type and roll width for a selected paper feeder. When you change the paper feeder to the specified one, the paper type and roll width are set to the stored values. 1 Press the Paper Select key until your desired paper feeder indicator blinks. The paper feeder indicator blinks. The roll paper width is displayed in the paper cut length indicator. ✏ You can press the Clear Modes key to cancel the indication.
PAPER TYPE/ROLL WIDTH ENTRY FUNCTION 5 Press the Fusing Temperature key to select the paper type. 6 Press the Enter key. The above settings are stored. ✏ If you do not want to store the settings, press the Clear Modes key.
USING THE PROGRAM FUNCTION The Program function allows you to store a collection of copy settings as programs 1 to 9 and switch them as needed. Programming a Collection of Copy Settings 1 Press the Program key. The indicator on the Program key blinks. The copy counter displays the current program number. 2 Use the and keys to select a program number for which you store copy settings. ✏ You cannot change settings in Program No. 0. Each time you make a copy, the copy settings are stored in Program No. 0.
USING THE PROGRAM FUNCTION 4 Specify values for each setting. You can store the following settings with the Program function. For the way to specify values, see the corresponding pages. • Sample copying → See page 21. • Partial copying (The start and end points cannot be stored) → See page 19. • • • • • • • Paper feeder → See page 22. Copy exit → See page 10. Margins → See page 12. Cut type → See page 14. Number of copies → See page 8. Copy density → See page 9. Fusing temperature → See page 7.
USING THE PROGRAM FUNCTION Recalling Programmed Settings 1 Press the Program key. The indicator on the Program key blinks. 2 Use the and keys to select a program number. 3 Press the Program key. The Program key lights and the programmed settings are recalled. ✏ When you press the Program key again, you can cancel the program recall.
COPYING WITH MANUAL FEED When you make a copy with manual feed, you need not replace paper even if the required size or type of paper is not set in the copier. S Set a sheet of paper at a time on the manual feed table. S You cannot use the repeated copying function during manual copying in the default setting. To change the setting, contact your service representative. S You can set either paper or an original first. When you have set both of them, the copier starts copying automatically.
COPYING WITH MANUAL FEED 3 Set the copy paper guide to match the paper width and direction (the copy paper guide is an option). 4 Insert the paper lightly along the copy paper guide (the copy paper guide is an option). ✏ Do not release the paper until it is fed into the copier. 5 Set the original guide to match the original width and direction. 6 Insert the original lightly along the original guide. 7 The copier starts copying.
WHAT TO DO IF SOMETHING GOES WRONG WHEN THE "WAIT" INDICATOR IS LIT. . . . . . . . . . . . . . . . . 30 IF YOUR COPIER DOES NOT OPERATE AS YOU WANT . 31 WHEN A OR x IS LIT . . . . . . . . . . . . . . . . . . . . . . . . . . . . . When A and Are Lit . . . . . . . . . . . . . . . . . . . . . . . . . . . When x and Are Lit . . . . . . . . . . . . . . . . . . . . . . . . . . . When Is Lit . . . . . . . . . . . . . . . . . . . . . . . . . . . . . . . . . . 33 34 35 37 WHEN C IS LIT . . . . . . . . . . . . . .
WHEN THE "WAIT" INDICATOR IS LIT You cannot start copying while the "Wait" indicator is lit. Check indicators on the operation panel and take action according to the instructions shown below. S If no indicator is lit on the operation panel, check that the power is on. Indication Corrective action x is lit. Remove the misfed paper. → See page 35. A is lit. Remove the misfed original. → See page 34. C is lit. Load paper in the roll feeder. → See page 38. D is lit or blinking. Add toner.
IF YOUR COPIER DOES NOT OPERATE AS YOU WANT The following table shows the causes of problems and the corrective actions when your copier does not operate as you want. If the same problem remains even when you take the corresponding action, contact your service representative. Dirty Copies Cause Corrective action The copy density is too dark. Reduce the copy density. → See page 9. The exposure glass is dirty. Clean the exposure glass. → See page 53.
IF YOUR COPIER DOES NOT OPERATE AS YOU WANT Waved Copies Cause Corrective action The fusing temperature is Switch the fusing temperature according to the not appropriate. paper type. → See page 7. The paper texture flow di- Use paper of the appropriate texture flow rection is not appropriate. direction. Inappropriate copy paper is Use only recommended paper. → See page 5. used. Creased Copies Cause The copy paper is damp. Corrective action See "Blurred Copies." → See page 30.
WHEN A OR x IS LIT A paper jam has occurred. The corrective action varies depending on the location having the misfed paper. Remove the paper according to the corresponding instruction shown below. ✏ Be sure to remove the paper completely without tearing it. If a piece of the paper remains inside the copier, the paper jam might recur or another fault might occur. not remove any covers or screws other than those RWARNING: Do specified in this manual.
WHEN A OR x IS LIT When A and Are Lit 1 Open the original cover. 2 Remove the original. ✏ If you can remove it, go to 6. 3 If you cannot remove the original, open the original table. 4 Remove the original.
WHEN A OR x IS LIT 5 Close the original table until it clicks. ✏ When you close the original table, hold its left and right sides. 6 Close the original cover. When x and Are Lit 1 Open the image producing unit by pulling up the left and right knobs. ✏ You must open this unit completely. 2 Remove the misfed paper.
WHEN A OR x IS LIT 3 If you cannot remove the paper, open the rear cover. 4 Remove the paper. ✏ You should remove it from the front side of the copier. 5 Close the rear cover. 6 Close the image producing unit until it clicks. ✏ Close this unit completely. Otherwise, a paper misfeed might recur.
WHEN A OR x IS LIT When Is Lit 1 Pull out the roll feeder. ✏ Pull out the feeder until it stops. 2 If a paper misfeed occurs at the third roll, open the third roll feeder cover. 3 Remove the roll paper gently. ✏ When you remove the roll paper, it is recommended to roll back the paper than to pull it out. ✏ If the paper edge is torn or folded, cut it with a scissors or cutter. 4 Follow 7 and later steps shown in "WHEN C IS LIT". → See page 40.
WHEN C IS LIT The roll feeder runs out of paper or the roll paper is not set properly. Set paper in the roll feeder. S Set roll paper for each roll. S When you remove roll paper from a paper spool or set new paper on a spool, place the spool horizontally on a flat surface. S Even if the roll feeder runs out of paper during repeated copying, you can make the rest of the copies after loading paper. 1 Pull out the roll feeder. ✏ Pull out the feeder until it stops. 2 Remove the roll paper.
WHEN C IS LIT 4 Remove the roll paper while pressing the paper release lever on the right edge of the paper spool as shown in the figure on the right. 5 Set new paper on the paper spool making sure that the paper is rolled in the proper direction. ✏ While pressing the paper release lever, align the paper with the size indication on the paper spool. 6 Set the roll paper in the roll feeder.
WHEN C IS LIT 7 Feed the paper under the paper feed roller until it stops. Then turn the knob until the paper edge extrudes from under the cover by about 150 mm, 5.9" (cover closed). ✏ If the roll paper is damp, rotate the knob so that the paper edge extrudes from under the cover by about 1,000 mm, 39.4" (cover closed). 8 For the third roll, feed the paper under the paper feed roller. Then rotate the knob until the paper edge appears in the center of the paper confirmation window.
WHEN C IS LIT Cutting the Paper Automatically S You can cut roll paper either manually or automatically. S When removing any jammed paper, cut the paper manually. When loading new paper, you can cut it both manually and automatically. 9 Close the roll feeder gently. a Press the Roll Edge Cut key. b Remove the cut paper from the roll feeder.
WHEN C IS LIT Cutting the Paper Manually 9 Cut the roll paper with the paper cutter and rotate the knob to roll back the paper in about 50 mm, 2.0". ✏ Move the paper cutter once in either the left or right direction. ✏ When you cut the roll paper with the paper cutter, rotate the knob to roll back the paper slightly. a Close the roll feeder gently.
WHEN D IS LIT OR BLINKING The "Add Toner" indicator blinks when toner is running short, and is continuously lit when toner has run out. Replace the toner cartridge (toner container). ✏ Do not reuse once-used toner because it affects the copy quality. ✏ You can make some copies even if the "Add Toner" indicator blinks. However, you should replace the toner as soon as possible. ✏ If no toner remains, the "Add Toner" indicator is lit and you cannot make any copy. not incinerate toner or toner containers.
WHEN D IS LIT OR BLINKING 3 Rotate the toner cartridge downward and press it to the right to remove it from the copier. ✏ Dispose of the used toner container according to local regulations. 4 Shake the new toner cartridge lightly five to ten times to remove lumps. 5 Insert the toner cartridge from its left end. 6 Remove the green seal only.
WHEN D IS LIT OR BLINKING 7 Rotate the toner cartridge by pulling up the tab on its right end as shown in the figure on the right. 8 Close the toner cartridge cover. 9 Close the original table and manual feed table. ✏ It takes about a minute to add the toner. A sound might be heard from inside the copier.
MAINTAINING YOUR COPIER FUNCTIONS THAT CAN BE RESET . . . . . . . . . . . . . . . . . . . 48 COPY MAGNIFICATION/CUT LENGTH ADJUSTMENT. . . . 49 DO’S AND DON’TS . . . . . . . . . . . . . . . . . . . . . . . . . . . . . . . . 51 DAILY MAINTENANCE . . . . . . . . . . . . . . . . . . . . . . . . . . . . . 53 PAPER/TONER . . . . . . . . . . . . . . . . . . . . . . . . . . . . . . . . . . . 54 WHERE TO PUT YOUR COPIER . . . . . . . . . . . . . . . . . . . . .
FUNCTIONS THAT CAN BE RESET You can make the copier easier to use by resetting some functions to meet your copying needs. When you want to reset a function, contact your service representative. You can reset the following functions: Changing the Auto Reset time The copier resets itself to the initial settings if it is idle for about 2 minutes during or after copying. This is called "Auto Reset". The auto reset time can be set from 1 to 5 minutes, or it can be turned off.
COPY MAGNIFICATION/CUT LENGTH ADJUSTMENT This function adjusts the copy magnification and paper cut length in the paper feed direction. The copy magnification can be adjusted from -1 to 1 % in 0.05 % steps and the paper cut length from -10 to 10 mm, -0.5 to 0.5" in 1 mm, 0.1" steps. 1 Press the Enter key until "A.1" appears on the Trailing Edge indicator. The Trailing Edge indicator blinks. The paper cut length indicator lights. 2 Use the and keys to select an item to be adjusted. Select "A.
COPY MAGNIFICATION/CUT LENGTH ADJUSTMENT 4 Use the and keys to enter a value to be set. When you press the Clear/Stop key, "0" is entered for the value to be set. 5 Press the Enter key. The Trailing Edge indicator blinks. The paper cut length indicator lights. 6 Repeat 2 to 5 for all the settings. 7 Press the Enter key until "A.1" disappears from the Trailing Edge indicator. ✏ You can also let "A.
DO’S AND DON’TS S Since some parts of the copier are supplied with high electrical voltage, touch only the parts specified in this manual. S While copying, do not turn off the main switch. When you turn off the copier, confirm that all copy runs have finished. S Do not step on or trip on the power cord. S Do not unplug the power cord even after copying. This copier has the anticondensation heaters to protect the internal parts from dew when the ambient temperature changes.
DO’S AND DON’TS S To avoid possible build-up ozone, make sure to locate this copier in a large well-ventilated room that has an air turnover of more than 30 m3/hr/person. S When the main switch is in the Stand-by position, the anticondensation heaters are on. In case of emergency, unplug the machine’s power cord. Then contact your service representative.
DAILY MAINTENANCE If the exposure glass is dirty, you cannot make copies as you want. Clean it if you find it dirty. S When you clean the exposure glass, use the following clothes: • Well-wrung damp cloth • Dry cloth S For cleaning internal parts other than the exposure glass, contact your service representative. ✏ Do not use any chemical cleaner or organic solvent such as thinner and benzine. If they get into the copier or melt plastic parts, a failure might occur.
PAPER/TONER Notes on Paper S Do not set the following paper. Otherwise, a paper jam might occur. • Bent, folded, or creased paper • Torn paper • Perforated paper • Non-smooth paper • Slippery paper • Thin paper that has low stiffness S Do not make a copy on paper with any kind of coating, such as thermosensitive paper, art paper, aluminum foil, and carbon paper. Otherwise, a fault might occur. S If you make a copy on edged paper, the copy might be creased or a part of the image might not be copied.
WHERE TO PUT YOUR COPIER This section shows the precautions you should follow when you move the copier if your office changes the equipment layout or moves to another location. S When you move the copier, contact your service representative. Installation Conditions S Install the copier in a location with the following range of temperature and humidity. Otherwise, the copier might not operate properly or the main frame might be deformed.
WHERE TO PUT YOUR COPIER S When you install the copier near another electronic equipment, they might affect each other. In particular, when the copier is placed near a television or radio, their programs might be hampered by noises. In such a case, take the following actions: • Leave enough space between the copier and the television or radio. • Reorient the television or radio antenna. • Use two outlets separately for the copier and the television or radio.
WHERE TO PUT YOUR COPIER Power Connection connect the copier to the power source described on RWARNING: Only the inside front cover of this manual. Avoid multi-wiring as it could cause an electric shock or a fire. Avoid using an extension cord. Make sure the wall outlet is near the copier and freely accessible so outlet is near the copier and freely accessible so that in event of an emergency it can be unplugged easily. not damage, break or ake any modifications to the RWARNING: Do power cord.
SPECIFICATIONS SPECIFICATIONS . . . . . . . . . . . . . . . . . . . . . . . . . . . . . . . . . 60 OTHER OPTIONS . . . . . . . . . . . . . . . . . . . . . . . . . . . . . . . . .
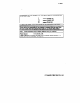
SPECIFICATIONS Spirio 700W Configuration Console Scanning Original moving over a fixed fiber optics array Photosensitivity Type OPC drum Copy Process Dry electrostatic transfer system Development Dry two-component magnetic brush system Fusing Heating roll system (oilless) Originals Sheet Original Size Maximum: 914(W) × 3,600(L) mm, 36" × 142" (Maximum width that can be fed: 960 mm, 37.
SPECIFICATIONS Power Source See inside this manual’s front cover. Power Consumption Maximum 1.41 kW Copy cycle condition 1.36 kW Warm up condition 1.21 kW Stand by condition 0.1 ~ 1.2 kW Roll feed copying: Less than 76 dB (A) Noise emission: Sound pressure level (The measurements are made according to ISO 7779 at the operator position.) Noise emission: Roll feed copying: Less than 65 dB (A) Sound power level (The measurements are made according to ISO 7779.
OTHER OPTIONS This copier has the following options in addition to those shown in this manual. For more information, contact your local dealer. Product name Use Paper Spool When you use several types of roll paper, you can replace the roll paper quickly by setting one paper roll on the paper spool in advance. Manual table guide Use the guide to keep the copy paper going straight as you feed them into the copier.