
Assembly


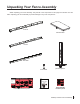


SawStop
Fig. 16
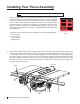
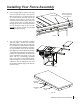
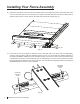
15. The holes in the bottom of the front rail are oversized to allow you to adjust the position of the main tube on the
rail. To set the main tube in the correct position, rst pull the main tube away from the cast-iron table as far as
possible. Next, place your fence down on the main tube near the left end (see Fig. 15).
main tube
Fig. 15
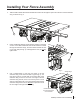
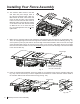
16. Press down on the fence handle to clamp the fence to the main tube. If the fence does not clamp tightly
enough to hold its position against a moderate amount of force, you can increase the clamping pressure by
turning both parallelism adjustment screws clockwise using a 3 mm hex key. Those screws are located in the
vertical portion of the fence cross-bracket (see Fig. 16). Alternatively, if too much force is required to push the
fence handle down to clamp the fence to the main tube, you can reduce the clamping pressure by turning both
parallelism adjustment screws counter-clockwise.
parallelism
adjustment
screw
parallelism
adjustment
screw
Installing Your Fence Assembly
8 SawStop Premium Fence Assembly