
Assembly


1
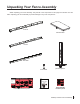
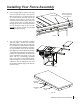
1. Before you begin installing the Premium Fence Assembly, locate the front rail, the
rear rail, and the fence assembly hardware pack (see Fig. 1). All of the hardware
needed to install the fence system is located on the fence assembly hardware
pack. In order to easily identify the hardware used in each of the following steps,
the different pieces of hardware are numbered on the hardware pack and in the
gures. If you are missing the fence assembly hardware pack or any of the other
fence system components shown on page 1, call the SawStop Service Department
at 503-582-9934.
You will also need the following tools to complete the fence assembly installation:
• a 3 mm hex key
• a 5 mm hex key
• a 13 mm wrench
• a straight-edge
Fig. 1
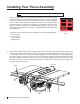
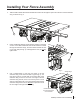
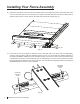
2. Take the front rail (the larger of the two rails) and align it to the front edge of your saw by centering the notches
in the rail with the two miter slots in the table and aligning the two holes between the notches with the two
corresponding holes in the front edge of the table. Aligning the two holes between the notches aligns all the
other holes used in mounting the front rail to your saw; different holes are used for different saws. When
the holes are aligned, mount the front rail to the saw by taking four M8x1.25x16 at head socket bolts and
threading one into each of the four threaded holes in the front edge of the main table (see Fig. 2). Tighten the
four bolts using a 5 mm hex key.
Fig. 2
notches
Note: Your saw must be fully assembled before installing the fence system.
miter slots
front rail
2 SawStop Premium Fence Assembly
Installing Your Fence Assembly
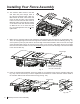
Fence Assembly Hardware Pack
2
Flat Head Socket Bolts,
M8x1.25x25 (8)
Flat Head Socket Bolts,
M8x1.25x16 (8)
1
Washers,
M8x23x2 (15 + 1 extra)
3
Lock Washers,
M8 (15 + 1 extra)
4
Hex Nuts,
M8x1.25 (8)
5
6
Hex Head Bolts,
M8x1.0x16 (7)