
Assembly


!
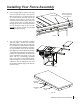
WARNING
Mo
vin
g g
ea
rs and p
art
s
can
p
in
ch, cut or crush.
Do not op
erate wit
h
door open
.
12
13
14
15
12
12
Fig. 6
!
WARNING
Moving gears and parts
can pinch, cut or
c
rush
.
Do not operat
e
w
ith
door open.
1
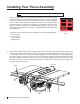
6. Take the rear rail (the smaller of the two rails) and align it to the rear edge of your saw by centering the notches
in the rail with the two miter slots in the table and aligning the left-most hole between the notches with the
corresponding hole in the rear edge of the table. There are three holes in the rail between the notches, one
solitary hole and two holes paired together, and the left-most hole is the solitary hole. Not all of the holes are
used to mount the rail to your saw; different holes are used for different saws. Aligning the left-most hole aligns
all the other holes used in mounting the rear rail to your saw. When the holes are aligned, mount the rear rail
to the saw by taking four M8x1.25x16 at head socket bolts and threading one into each of the four threaded
holes in the rear edge of the main table (see Fig. 6). Tighten the four bolts using a 5 mm hex key.
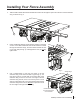
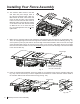
7. Take two M8x1.25x25 at head socket bolts and insert one through the open hole at the end of each extension
wing. Place an M8x23x2 washer and an M8 lock washer on the back of each bolt and then thread an
M8x1.25 hex nut on each bolt (see Fig. 7). Hand tighten the nuts; do not fully tighten them.
Fig. 7
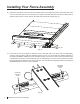
rear rail
Installing Your Fence Assembly
align the left-most hole
between the notches
4 SawStop Premium Fence Assembly