
Assembly

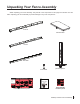
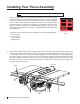
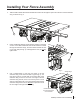

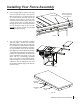
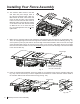


Fig. 8
8. Use a straight-edge to level the rear edge
of the left extension wing to the cast iron
table top (see Fig. 8). You may have to pull
up or push down on the outer edge of the
extension wing to level it. Once the rear
edge of the left extension wing is level, use
a 5 mm hex key and a 13 mm wrench to
fully tighten the nut on the bolt that mounts
the left extension wing to the rear rail.
Repeat this process to level the rear edge
of the right extension wing.
Fig. 9b
Fig. 9a
9. The next step of the assembly is easiest
with two people. Position the extension
table between the front and rear rails (see
Fig. 9a). Make sure that the table is oriented
so that the adjustment bracket is closest to
the right extension wing. Tilt the extension
table slightly so that the adjustment bracket
can t under the edge of the extension wing.
Position the extension table so that the end
of the adjustment bolt (shown in Fig. 9b)
aligns with the corresponding threaded
hole in the bottom of the extension wing.
With the weight of the extension table still
supported, turn the adjustment bolt until
the extension table is roughly ush with the
extension wing.
level the extension
wing and tighten the
nut on this bolt
straight-edge
Installing Your Fence Assembly
adjustment
bracket
adjustment
bolt
extension
table
SawStop Premium Fence Assembly 5