Dear Sceptre Customer, Congratulations on your new SCEPTRE X40 High Definition LCD Television purchase. Thank you for your support. To ensure safety and many years of trouble free operation of your TV, please read the manual carefully before making any adjustments, and keep them in a safe place for future reference. We hope you enjoy your new SCEPTRE X40 High Definition LCD Television.
IMPORTANT INFORMATION -2www.SCEPTRE.
SAFETY INSTRUCTIONS Electricity is used to perform many useful functions, but it can also cause personal injuries and property damage if improperly handled. This product has been engineered and manufactured with the highest priority on safety. However, improper use can result in electric shock and / or fire. In order to prevent potential danger, please observe the following instructions when installing, operating and cleaning the product.
SAFETY INSTRUCTIONS INSTRUCTIONS This product is designed and manufactured to operate within defined design limits, and misuse may result in electric shock or fire. To prevent the product from being damaged, the following rules should be observed for the installation, use and maintenance of the product. Read the following safety instructions before operating the display. Keep these instructions in a safe place for future reference.
• • • • • • • • plug, have an electrician install the correct outlet, or use an adapter to ground the appliance safely. Do not defeat the safety purpose of the grounded plug. Do not overload power strips and extension cords. Overloading can result in fire or electric shock. The wall socket should be installed near the equipment and should be easily accessible. Only the marked power source can be used for the product. Any power source other than the specified one may cause fire or electric shock.
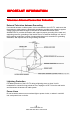
IMPORTANT INFORMATION Television Antenna Connection Protection External Television Antenna Grounding If an outside antenna or cable system is to be connected to the LCD TV, make sure that the antenna or cable system is electrically grounded to provide some protection against voltage surges and static charges.
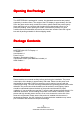
Opening the Package The SCEPTRE X40 is packaged in a carton. Any standard accessories are packed separately in another carton. The weight of the LCD display is approximately 49.6 lbs. Since the glass can be easily scratched or broken, please handle the product gently. Never place the unit on a surface with the glass facing downwards unless it is on protective padding. When opening the carton, check that the product is in good condition and that all standard accessories and items are included.
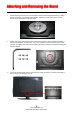
Attaching and Removing the Stand 1. Please handle the TV with two or more people. Please locate a large flat surface (i.e. table) and put a soft cloth (i.e. blanket) on the surface. Please set the TV facing up on the flat surface so the panel does not get damaged. 2. Please connect the stand to the TV and secure the connection with a screw driver and the 6 screws included in the accessory box. You can screw them in from the bottom of the stand.
Table of Contents IMPORTANT INFORMATION.............................................................................................................. 2 SAFETY INSTRUCTIONS.................................................................................................................... 3 SAFETY INSTRUCTIONS.................................................................................................................... 4 IMPORTANT INFORMATION...............................................................
Identifying Front and Rear Panel Front View INDICATOR LIGHT – The light is red when power is plugged in but the TV is not turned on. The light turns blue when the TV is turned on. REMOTE SENSOR – The remote sensor receives all the commands from the remote control. - 10 www.SCEPTRE.
Rear View Mounting Pattern Mounting Specification: 400mm x 200mm using screw M6 (6 mm) diameter screws. Side Control Buttons VOL(+/-) – These buttons increase or decrease the TV’s volume. If a submenu is active, pressing these buttons will move the selection left or right. CH(+/-) – These buttons change the TV channel up or down. If the OSD is active, these buttons function as up or down controls for the menu. MENU – This button activates the On Screen Display (OSD).
Rear View Connections The following descriptions are for connections from left to right. 1. 2. 3. 4. 5. 6. 7. 8. 9. 10. 11. 12. 13. HEADPHONE – This connection port is for people who wants to use a headphone. HDMI3 – HDMI connects to devices that use HDMI cable, such as Blu-ray or HD DVD player, or HD cable / satellite set-top box. This connection port receives pure digital audio and high definition signal through one single cable. This port also can accept a HDCP video device for video.
SCEPTRE X40 Remote Control - 13 www.SCEPTRE.
For universal remotes, this TV follows SONY’s universal remote code. You need to find the actual code from your cable or satellite or universal remote provider. 1. 2. 3. 4. 5. 6. 7. 8. 9. 10. 11. 12. 13. 14. 15. 16. 17. 18. 19. 20. 21. 22. POWER – Turns the TV on or off. 0~9 – Sets the channels. Dash (-) – Inserts the dash for selecting digital channels directly. GUIDE – Opens the current digital channel information guide. CH(+)▲ / CH(-)▼ / VOL(-)◄ / VOL(+)► – Selects and moves the item on screen.
Connection Connection Suggestions If You Have Digital Cable without Cable Box or Antenna… 1. 2. 3. 4. 5. Make sure the power of X40 LCD HDTV is turned off. Connect the Coaxial RF cable from your antenna or digital cable to the TV port on the back of your X40 LCD HDTV. Turn on X40 LCD HDTV. Select TV (Air) for antenna or TV (Cable) for digital cable from either your remote control’s source button or source button on the TV. Use the On Screen Display to scan for channels.
1. 2. 3. 4. 5. 6. 7. 8. Make sure the power of X40 LCD HDTV and your DVD player is turned off. Obtain a Component Cable. Connect the green color connector to both your DVD player and YPbPr’s green connector port on the back of your X40 LCD HDTV. Connect the blue color connector to both your DVD player and YPbPr’s blue connector port on the back of your X40 LCD HDTV. Connect the red color connector to both your DVD player and YPbPr’s red connector port on the back of your X40 LCD HDTV.
Connecting DVD player with Composite… 1. 2. 3. 4. 5. 6. Make sure the power of X40 LCD HDTV and your DVD player is turned off. Obtain a Yellow Video Cable. Connect the Yellow Video connector to both your DVD player and AV’s Yellow Video connector port on the back of your X40 LCD HDTV. Obtain a RCA Audio Cable. Connect the white color connector to both your DVD player and AV’s white connector port on the back of your X40 LCD HDTV.
3. 4. Turn on the X40 LCD HDTV and your set-top box. Use the remote control’s source button or the source button on the TV to switch to HDMI. Please Note : • • Please reference the set-top box’s manual, to make sure the set-top box is configured to output correctly to the TV. Sceptre’s X40 LCD HDTV supports SONY’s universal remote code. Please look up SONY’s codes in your universal remote’s hand book. Connecting Connecting to a PC with VGA and 3.5 mm minijack … 1. 2. 3. 4. 5. 6. 7. 8. 9.
Connecting a Digital Audio Receiver with Optical SPDIF… 1. 2. 3. Make sure the power of X40 LCD HDTV and your receiver is turned off. Obtain an optical SPDIF cable, connect it to your receiver’s optical SPDIF digital input and the optical SPDIF connection on the LINE OUT port on the back of the X40 LCD HDTV. Turn on the X40 LCD HDTV and your receiver. Please Note : • • • If you want pure digital stream for your receiver to decode, you must also configure the TV’s OSD Sound->Digital Audio Out function.
Ready to Watch Some TV? Starting up the X40 LCD HDTV 1. 2. 3. 4. Make sure your power cable is connected and the standby red light in the front of the TV is lit up. Check all your connection cables off the side or the back of your TV and also your AV devices. Make sure they are all connected securely. Turn on your TV and other AV devices if necessary. Select the correct source according to the Connecting pages.
3. 4. 5. Use the ◄ or ► buttons to select the options AIR or CABLE. If you have an antenna connected to the X40 LCD HDTV, please select AIR. If you have cable connected to your X40 LCD HDTV, please select CABLE. 6. Once you have made the selection, press the ▼ button to highlight the AUTO SCAN function and press ↵ to start scanning for channels. Once the scanning is done, you can watch the TV. 7. Please Note : • • • Not all broadcasts are in High Definition (HD).
OSD (On Screen Display) Controls Via Remote Control In order to adjust most of the options inside the On Screen Display (OSD), the picture below shows all the buttons used on the remote control. ▲ – This button changes the channel to a higher number and also functions as up direction in the OSD. ▼ – This button changes the channel to a lower number and also functions as down direction in the OSD. ◄ – This button decreases the volume and also functions as left direction in the OSD.
OSD (On Screen Display) Options PICTURE – PICTURE has functions for changing the picture settings for all ports, such as tint, contrast, sharpness, and saturation. AUDIO – AUDIO has functions for changing sound settings for all ports, such as SPDIF type, treble, bass….etc. TIME – TIME has functions for only the TV tuner port. Some of the functions are sleep, time zone, daylight saving time.
PICTURE This option chooses various picture setting functions for changing picture quality. 1. 2. 3. Press MENU to open the OSD. Press ◄ or ► to move to PICTURE and press ↵. Use ▲ or ▼ to select the one you want to adjust and use ◄ or ► to adjust them. • PICTURE MODE – This function allows you to adjust the video through preset modes, standard, custom, vivid, and mild. • CONTRAST – This function adjusts the white levels in a picture.
AUDIO This option allows users to adjust the TV’s sound functions. 1. 2. 3. Press MENU to open the OSD Press ◄ or ► to move to AUDIO and press ↵. Use ▲ or ▼ to select the option you want to adjust and use ◄ or ► to adjust them. • AUDIO MODE – This function allows you to adjust audio preset modes custom, standard, sports, speech, movie, and music. • BASS – This function adjusts the level of low pitch sound in a TV. • TREBLE – This function adjusts the level of a high pitch sound in a TV.
TIME This option allows user to adjust the TV’s time functions. 1. 2. 3. Press MENU to open the OSD. Press ◄ or ► to move to TIME and press ↵. Use ▲ or ▼ to select the one you want to adjust and use ◄ or ► to adjust them. • SLEEP – This function allows you to tell the TV to auto shut off after the given minutes. The minute ranges from 10-120 minutes. • TIME ZONE – This function allows you to select the time zone you are located in.
SETUP This option allows user to adjust the TV’s miscellaneous options such as PC, closed captioning, zoom mode, backlight, and menu language. 1. 2. 3. Press MENU to open the OSD. Press ◄ or ► to move to SETUP and press ↵. Use ▲ or ▼ to select the one you want to adjust and use ◄ or ► to adjust them. • MENU LANGUAGE – This function allows you to change the language of the OSD menu. • MENU OPACITY – This function allows you to turn on transparency for the OSD menu.
I. II. III. IV. V. • I. II. III. IV. H-POS – This adjusts the screen’s horizontal position. V-POS – This adjusts the screen’s vertical position. CLOCK – This adjusts the screen’s syncing in a large increment. PHASE – This adjusts the screen’s syncing in a small increment. AUTO – This automatically adjusts the screen’s syncing. CLOSED CAPTION – This function allows you to adjust the closed captioning of channels under TV tuner. CC MODE – This function turns on the closed captioning for the TV tuner.
d) e) f) g) h) i) • • FONT EDGE STYLE – This adjusts the outlining of the closed captioning font. FONT EDGE COLOR – This adjusts the color of the out lining. FG COLOR – This adjusts the foreground color. BG COLOR – This adjusts the background color. FG OPACITY – This adjusts the foreground transparency. BG OPACITY – This adjusts the background transparency. ADVANCED I. BACKLIGHT – This will adjust the TV’s backlight luminance level. II.
i. • • • TV – This function filters TV shows played on the TV’s tuner. To block the TV rating you want just highlight the rating you want to block under the column labeled ALL and press ENTER. To block by content, highlight the content you want to block and press ENTER. To understand what the abbreviations mean please refer to Detailed Explanations section of this manual. ii. MPAA – This function filters movies played on the TV’s tuner.
CHANNEL This option allows user to adjust the TV’s channel preference and scan for channels. 1. 2. 3. Press MENU to open the OSD. Press ◄ or ► to move to CHANNEL and press ↵. Use ▲ or ▼ to select the one you want to adjust and use ◄ or ► to adjust them. • ANTENNA – This function selects the tuner tuning between air (which is antenna) and cable. • AUTO SCAN – Press ENTER to use this function. This functions lets you select the cable system to scan for (if you are using air, this is disabled).
• SHOW / HIDE – Press ENTER to use this function. This function lets you hide channels you do not want to see. To use the function, highlight the channel you want to hide and press ENTER. • CHANNEL NO. – This function allows you to switch to other channels to see their digital channel strength or change channel labels. CHANNEL LABEL – Press ENTER to use this function. This function allows users to label channels to their liking. To use the function use the direction buttons to select the letter you want.
Detailed Explanations Explanations Aspect Ratio Explained The X40 is a widescreen TV, but most TV programs are still broadcasting in a square format, therefore the TV is offering two ways of viewing videos. There are mainly two types of signal format, 16:9, 4:3, and ZOOM. Simply use the ASPECT button on the TV to cycle between both modes. 1. Wide This mode will stretch the picture to a widescreen ratio. If you have a perfect 16:9 ratio picture you will not see any black bars.
Closed Captioning (digital and analog) Explained • Your TV is equipped with an internal Closed Caption decoder. It allows you to view conservations, narration and sound effects as subtitles on your TV. Closed Captions are available on most TV program, and on some VHS home video tapes, at the election of the program provider. • Digital Closed Caption service is a new caption service available on digital TV programs (also at the election of the service provider).
and/or the program contains one or more of the following: moderate violence (V), some sexual situations (S), infrequent coarse language (L), or some suggestive dialogue (D). TV-14 (USTV) – Parents Strongly Cautioned This program contains some material that many parents would find unsuitable for children less than 14 years of age. Parents are strongly urged to exercise greater care in monitoring this program and are cautioned against letting children under the age of 14 watches unattended.
BROWSING CHANNELS WITH THE FAVORITE LIST 1. 2. Press the FAVORITE button, and the list of channels you have added will be in a box on the lower left hand side of the TV screen. Use the ▲ or ▼ buttons to select the channel you want to jump to and press ↵ to confirm. INFO TITLE BAR WHILE USING ANTENNA The Info bar provides information on the current digital channel you are watching. 1. Press the INFO button once to see the channel number and call sign. 2.
Preset Modes Explained The TV features different preset modes of settings for audio and video. For people who like to optimize the TV for whichever program it is playing but do not want to individually tweak every setting, the preset modes are used. For Video To switch between the various modes, press the PICTURE button continuously. 1. 2. 3. 4. CUSTOM – This mode saves the user’s tweaked settings. If you changed settings under the PICTURE, the settings would be saved under CUSTOM mode.
Progressive Scan – A way to scan vertical lines onto a TV picture by scanning all the lines consecutively (progressively). In a fast moving action picture or sports channel, this type of scanning will show NO pixilation. How do I clean the TV ? IMPORTANT 1. 2. The power cable has to be removed from the socket before cleaning the TV. Do not use volatile solvent (alcohol, rosin, and toluene) to clean the TV. These types of chemicals might damage the housing and the LCD glass.
Troubleshooting The following table contains the common problems and the solutions to these problems. Please check this list before you contact the technicians. Problems Solutions Connect power cord correctly. Turn on power. NO PICTURE Connect video cable correctly. Select the input signal source with proper cable connection with the source button. ABNORMAL Match the colors on the cables to the ports off the back of the COLORS television. I.E. red cable to red colored port.
Problems TV CHANNELS ARE BLOCKED UNIVERSAL REMOTE CODE THE TV TURNS ON OR OFF SLOWLY AND THE SCREEN SHOWS UP SLOWLY NO SOUND ON PC Solutions Check your auto lock function’s settings inside the OSD. You may have locked up some channels but forgot about them. This TV follows SONY’s universal remote code. Please check your hand book for SONY’s codes then apply them. This TV is a High Definition liquid crystal display panel TV. It requires a few more seconds than normal TVs to power up and show the picture.
Problems SWITCHING A CHANNEL OR SOURCE CHANGES THE VOLUME Solutions Different channels and inputs will sometimes have this effect because the channel signal’s own volume is already loud. There is no way remove this completely. The TV has an AUTO VOLUME LEVEL function that can combat this type of effect. Please make sure that function is turned on.
Call Us If You Need Help! Products are often returned due to a technical problem rather than a defective product that may result in unnecessary shipping charges billed to you. Our trained support personnel can often resolve the problem over the phone or email. For more information on warranty services or repairs after the warranty period, please contact our support department at the number below. For technical help, contact our Sceptre Technical Support Group via email or phone.
Specification Display panel Illustration Item Active Area / Screen Size Diagonal 40.00 inches Aspect Ratio Widescreen 16:9 Pixel Pitch 0.46 (H) x RGB x 0.46 (V)mm Max. of Pixels (Resolution) HD (1920 x 1080 pixels) resolution Brightness 550 nits (Typical) Contrast 2000:1 (Typical) Response Time 4.5ms (gray to gray) Typical 178 / 178 Degree Viewing Angle (Horizontal/Vertical) Lamp Life of Backlight > 50,000hrs TV DISPLAY 38.98“(W)x25.7“(H)x4.2”(D) inch without Base 38.98“(W)x27.
Tone Bass / Treble / Balance Auto Volume Level (AVL) Yes SPDIF Out Yes Speakers 7 watt per channel (3) General Hybrid TV Tuner Channel auto scan Sleep timer Standby power Timing support-Video PC timing NTSC / ATSC / QAM (Digital Cable Ready) Yes Off /10mins /20mins /30mins /40mins /50mins /60mins /90mins /120mins < 2W (AC 110V) 480i / 480p / 720p / 1080i / 1080p 1920*1080@60Hz(NATIVE) 1024*768@60Hz, 75Hz 800*600@60Hz, 75Hz 640*480@60Hz, 75Hz (4)NTSC/ATSC NTSC Sound: Mono / Stereo / SAP Favorite
LIMITED PRODUCT WARRANTY Please read this warranty card carefully, it is a “ONE-YEAR LIMITED WARRANTY” on parts and labor and is only valid when purchased from an Authorized Reseller, only on new and non-refurbished product, and available to customers in the Continental US, Alaska, Hawaii and Puerto Rico. See below for the SCEPTRE Extended Service warranty.
Disclaimer, Trademarks, & Copyright Information • “HDMI, the HDMI logo and High-Definition Multimedia Interface are trademarks or registered trademarks of HDMI Liscensing LLC.” • SCEPTRE is a trademark or registered trademark of Sceptre Group. • Sceptre, Inc. shall not be liable for technical or editorial errors or omissions contained herein; nor for incidental or consequential damages resulting from furnishing this material, or the performance or use of this product.
FCC Compliance Statement This device complies with Part 15 of the FCC Rules. Operation is subject to the following conditions: This device may not cause harmful interference This device must accept any interference received, including interference that my cause undesired operation. Please Note: This equipment has been tested and found to comply with the limits for a Class B digital device, pursuant to part 15 of the FCC Rules.