
Installation Guide


4
©2017 Pinnacle Climate Technologies. All rights reserved. 3-1-2017
A DIVISION OF PINNACLE CLIMATE TECHNOLOGIES
www.schaeferventilation.com • 1.800.779.3267
4
Pinnacle Climate Technologies Limited Warranty Policy
Pinnacle Climate Technologies (PCT) provides the following limited warranty from the date of invoice to the initial purchaser of our prod-
ucts or to its customer with a dated proof of purchase:
Two-year coverage (unless otherwise indicated below) applies to all products, components and assemblies provided by PCT that prove to be defec-
tive in material or workmanship. Any such defective product will be repaired or replaced at PCT’s option, with the defective product or component
returned upon approval to PCT, F.O.B. Sauk Rapids, Minnesota.
This warranty does not cover: failure, damage or malfunction as a result of: Improper installation or installation not in accordance with installation
instructions. Operating conditions that vary from PCT’s operating instructions. Misuse, abuse, negligence, alteration, or accident. Transporting the
product. Improper operation or lack of appropriate or regular maintenance of the product. Loss of time, inconvenience, loss of use of the product or
other consequential or incidental damages. Parts that need replacement due to normal wear and tear. Superficial or cosmetic rust or corrosion. Any
product whose name plate has been removed.
A full warranty statement may be printed or downloaded from www.schaeferventilation.com.
WARRANTY
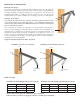
Attach the Fan:
THE HARDWARE TO ATTACH YOUR FAN TO THE FAN MOUNT BRACKET IS NOT SUPPLIED IN THIS KIT.
Note: Fasteners are supplied with all current Schaefer circulation fans.
Note: Stainless steel fasteners should be coated with a lubricant (WD-40) to prevent thread galling and
allow subsequent adjustment.
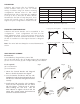
Install (1) 3/8" x 1-1/4” bolt, (2) washers and (1) Nylock nut through Swivel Tab hole
Install (1) 1/4" x 1” bolt, (2) washers and (1) Nylock nut through Swivel Tab slot
Once fan is securely attached to the Swivel Tab, orient
the fan horizontally and tighten the Swivel Tab hardware
to prevent the fan from turning.
Adjust the fan to desired angle and
securely tighten the hardware.
CAUTION: Fasteners will loosen over time. It is important to check and tighten fasteners frequently.
CAUTION: Inspect mounts and fasteners frequently for corrosion. Replace any corroded fasteners or parts.
Large
Guard
Wires
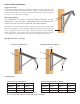
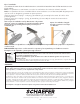
Safety Cable: (
Safety Cable Kit sold separately.)
A SECONDARY SUPPORT CABLE SHOULD BE INSTALLED ANY TIME THE FAN IS MOUNTED OVERHEAD FOR
ADDITIONAL SAFETY.
Safety Cable must go around the Large Diameter Wires of the Front and Rear Guards.
The other end of Safety Cable must be securely fastened to a building joist, truss, or beam near the fan. Take up
all unnecessary slack in the cable.