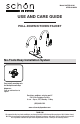
Model #67558-0101 67558-0108D2 USE AND CARE GUIDE PULL-DOWN KITCHEN FAUCET No-Tools Easy Installation System Easy install mounting nuts for deck plate and soap dispenser: Push up and hand-turn to tighten Questions, problems, missing parts? Call Schön Customer Service 8 a.m. - 6 p.m., EST, Monday - Friday (800) 880-8164 www.schonsimplymodern.com THANK YOU We appreciate the trust and confidence you have placed in Schön through the purchase of this kitchen faucet.
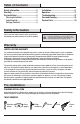
Table of Contents Safety Information ....................................2 Warranty ...................................................2 Pre-Installation .........................................2 Planning Installation ..............................2 Tools Required .......................................2 Package Contents ..................................3 Installation ................................................4 Operation ..................................................11 Troubleshooting..........
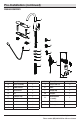
Pre-Installation (continued) PACKAGE CONTENTS A G H I L J M K B N C D E O P F Part Quantity Part A Description Faucet assembly 1 J Description Easy install nut Quantity 2 B Rubber washer 1 K Hose 1 C Metal washer 1 L Weight clip 1 D Nut 1 M Weights 1 E Protective cap 1 F Wrench 1 N Quick connect assembly 1 G Escutcheon 1 O Control box 1 H Shank 2 P Battery pack 1 I Base plate 1 3 www.schonsimplymodern.
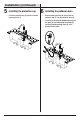
Installation 1 Installing the faucet assembly 2 Installing the escutcheon CAUTION: Always turn off the water supply before removing an existing faucet or replacing any part of a faucet. Open the faucet handle to relieve water pressure and ensure that the water is completely shut off. NOTE: This step is for escutcheon installation (optional). If the escutcheon will not be used, install the faucet assembly as described in step 1. □ Shut off the water supply. Remove the old faucet.
Installation (continued) 3 Installing the faucet assembly 4 Securing the faucet assembly □ NOTE: This step is for escutcheon installation (optional). If the escutcheon will not be used, install the faucet assembly as described in step 1. □ Install the faucet body (A)-including hoses and data cable (1)-through the hole in the escutcheon (G). Install the rubber washer (B), and metal washer (C) onto the threaded mounting shank. Thread the nut (D) onto the mounting shank using the wrench (F).
Installation (continued) 5 Installing the protective cap 6 □ Screw the protective cap (E) onto the threaded mounting shank (1). Installing the pulldown hose □ Before installing the hose (K), ensure that the protective cap (1) is on the end of the hose (K). □ Insert the small end of the pulldown hose (K) into the spout (2) and feed through faucet body (A) and the threaded mounting shank (3) in the direction shown below.
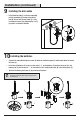
Installation (continued) the quick connector 7 Attaching 8 to the hose □ Before installing the quick connector, remove and discard the protective cap (1) from the pulldown hose (K). Attach the quick connector (N) by screwing it onto the threaded end of the hose (K) in a clockwise motion. Hand tighten only. Attaching the quick connector to the receiving block NOTE: The face with "in" and "out" on the control box (O) must be in the front, the end with "in" must be up, as shown.
Installation (continued) 9 Installing the data cable □ Install the data cable (1) to the corresponding push fit connection (2) on top of the control box (O). Ensure that the data cable (1) is fully inserted and secure it by tightening the nut (3) by hand in a clockwise direction. 1 O 3 2 10 Installing the batteries □ Squeeze the side indicated by the arrows (5) below on the battery pack (P) and then pull down to remove the cover (1).
Installation (continued) 11 Installing the battery pack □ Before installation, select the location for the battery pack (P) and verify that the battery pack wire will reach the connection on the bottom of the control box (O). □ One option to install the battery pack is with the tap (2). First, attach one side of the tap to the wall. Then attach the other piece to the back of the battery pack seat (1). Finally, put the battery pack (P) into the battery pack seat (1).
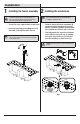
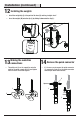
Installation (continued) 12 Installing the weights □ Install the weight clip (L) at the point of the hose (K) marking “weights here”. □ Insert the weights (M) onto the clip (L) by sliding it down onto the clip (L). Weights here M L Weights K here the waterline 13 Making connections □ 14 Remove the quick connector □ Thread the nut (1) on the supply line onto the outlet of the water supply valve (2) and tighten with a wrench. Do not overtighten.
Operation 1 Flushing and checking for leaks IMPORTANT: After installation is completed, turn on the hot and cold water supplies. Check for leaks. Do not lose the gasket (1) in the hose. □ Pull the hose assembly out of the spout and remove the spray head by unscrewing it from the hose in a counterclockwise direction. Be sure to hold the end of the hose down into the sink and turn the faucet to the warm position where it mixes hot and cold water. 1 □ Flush the water lines for one minute.
Troubleshooting 1 The cartridge is damaged □ When you turn the handle to the full on position, the water will turn on. □ But when you turn the handle to the full off position without contacting the sensor, the water does not turn off. □ This indicates that the cartridge is damaged. Turn off the water supply, remove the handle and replace the cartridge (1). 2 The control box is damaged 1 □ When you turn the handle to the full on position, the water will turn on.
Troubleshooting (continued) 3 □ 3 The control box and cartridge is damaged □ When you turn the handle to the full on position, the water will turn on. The control box and cartridge is damaged (continued) This indicates that the control box and cartridge is damaged. Turn off the water supply and remove the control box (1). Then remove the handle and replace the cartridge (2). 1 □ However, when you move your hand in front of the sensor, the water does not turn off as it should.
Troubleshooting (continued) 4 The handle is closed or the batteries are not working 5 The washer is dirty or damaged □ Water does not come out of the spray head. □ There is a low water-flow pattern. □ If the handle is closed, open the handle and move your hand in the sensor area to test that the sensor flashes 10 times continuously and slowly. If this occurs, you need to replace the batteries in the sensor. □ This indicates that the washer in the "in" end of the control box is dirty or damaged.
Care and Cleaning □ □ □ Do not use abrasive cleaners when cleaning this faucet.
Questions, problems, missing parts? Call Schön Customer Service 8 a.m. - 6 p.m., EST, Monday - Friday (800) 880-8164 www.schonsimplymodern.com Retain this manual for future use.
Modelo Núm.: 67558-0101 67558-0108D2 GUÍA DE USO Y MANTENIMIENTO GRIFO RETRÁCTIL PARA COCINA Sistema de fácil instalación que no requiere herramientas Tuercas de montaje de fácil colocación para placas de cubierta y dispensador de jabón: Empuja hacia arriba y gira para ajustar ¿Problemas, preguntas o piezas faltantes? Llama al servicio al cliente de Schön de lunes a viernes de 8 a.m. a 6 p.m., hora estándar del este (800) 880-8164 www.schonsimplymodern.
Tabla de contenido Información de seguridad ......................18 Garantía...................................................18 Pre-instalación .......................................18 Planificación de la instalación .............18 Herramientas necesarias ....................18 Contenido del paquete.........................19 Instalación ..............................................20 Funcionamiento ......................................27 Solución de problemas ..........................
Pre-instalación (continuación) CONTENIDO DEL PAQUETE A G H I L J M K B N C D E O P F Pieza Descripción Cantidad Pieza Descripción Cantidad A Ensamblaje del grifo 1 B Arandela de goma 1 C Arandela metálica 1 D Tuerca 1 L Sujetador con peso 1 M Pesos 1 N Ensamblaje del conector rápido 1 J Tuerca fáciles de instalar 2 K Manguera 1 E Tapa protectora 1 F Llave 1 G Placa protectora 1 H Vástago 2 O Caja de control 1 I Placa base 1 P Paquete de baterías 1
Instalación instalar el ensamblaje instalar la placa 1 Cómo del grifo 2 Cómo protectora PRECAUCIÓN: Cierra siempre el suministro de agua antes de quitar un grifo existente o reemplazar cualquier pieza de un grifo. Abre la llave del grifo para liberar la presión de agua y asegúrate de que el suministro de agua esté completamente cerrado. □ Cierra el suministro de agua. Retira el grifo anterior.
Instalación (continuación) fijar el ensamblaje del instalar el ensamblaje 4 Cómo grifo 3 Cómo del grifo □ NOTA: Este paso es para la instalación de la placa protectora (opcional). Si no usarás la placa protectora, instala el ensamblaje del grifo como se describe en el paso 1. □ Instala el cuerpo del grifo (A) (incluso las mangueras y los cables de datos (1)) a través del orificio en la placa protectora (G). Instala la arandela de goma (B) y la arandela de metal (C) en el vástago de montaje roscado.
Instalación (continuación) instalar la tapa 5 Cómo protectora □ 6 Enrosca la tapa protectora (E) en el vástago de montaje roscado (1). 1 E Cómo instalar la manguera retráctil □ Antes de instalar la manguera (K), asegúrate de que la tapa protectora (1) esté en el extremo de la manguera (K). □ Inserta el extremo pequeño de la manguera retráctil (K) en el caño (2) y colócala a través el cuerpo del grifo (A) y el vástago de montaje roscado (3) en la dirección que se muestra a continuación.
Instalación (continuación) montar el conector 7 Cómo rápido en la manguera □ 8 Antes de instalar el conector rápido, quita y desecha la tapa protectora (1) de la manguera retráctil (K). Fija el conector rápido (N) enroscándolo en el extremo roscado de la manguera (K) en dirección de las agujas del reloj. Ajusta únicamente con la mano.
Instalación (continuación) 9 Cómo instalar el cable de datos □ Instala el cable de datos (1) en la conexión a presión correspondiente (2) de la parte superior de la caja de control (O). Asegúrate de que el cable de datos (1) se inserte por completo y asegúralo ajustando la tuerca (3) con la mano en dirección de la agujas del reloj.
Instalación (continuación) 11 Cómo instalar el paquete de las baterías □ Antes de la instalación, elige el lugar para el paquete de las baterías (P) y asegúrate de que el cable de este alcanzará la conexión en la parte inferior de la caja de control (O). □ Una opción para instalar el paquete de las baterías es con la cinta adhesiva (2). Primero, fija un lado de la cinta adhesiva en la pared. Luego, fija el otro lado en la parte trasera de la base del paquete de las baterías (1).
Instalación (continuación) 12 Cómo instalar los pesos □ Instala el sujetador con peso (L) en el punto de la manguera con la marca “weights here” (pesos aquí). □ Inserta los pesos (M) en el sujetador (L) deslizándolos en este (L). Weights here M L Weights K here hacer las conexiones 13 Cómo 14 Quita el conector rápido de las tuberías de agua □ □ Enrosca la tuerca (1) de la línea de suministro en la salida de la válvula de suministro de agua (2) y aprieta con una llave. No aprietes demasiado.
Funcionamiento 1 Cómo purgar las tuberías y comprobar que no haya fugas IMPORTANTE: Luego de terminar la instalación, abre los suministros de agua caliente y fría. Revisa si hay filtraciones. No aflojes la junta (1) en la manguera. □ Retira del caño el ensamblaje de la manguera y retira el cabezal del rociador desenroscándolo de la manguera en el sentido contrario a las manecillas del reloj.
Solución de problemas 1 El cartucho está dañado □ Cuando giras la manija a la posición abierta, se abre el flujo de agua. □ Pero cuando giras la manija a la posición cerrada, sin tocar el sensor, el agua no se corta. □ Esto indica que el cartucho está dañado. Cierra el suministro de agua, quita la manija y reemplaza el cartucho (1). 2 La caja de control está dañada 1 □ Cuando giras la manija a la posición abierta, se abre el flujo de agua.
Solución de problemas (continuación) 3 □ La caja de control y el cartucho están dañados 3 □ Cuando giras la manija a la posición abierta, se abre el flujo de agua. La caja de control y el cartucho están dañados (continuación) Esto indica que la caja de control y el cartucho están dañados. Cierra el suministro de agua y quita la caja de control (1). Entonces quita la manija y reemplaza el cartucho (2).
Solución de problemas (continuación) 4 5 La manija está cerrada o las baterías no funcionan La arandela está sucia o dañada □ No sale agua del cabezal del rociador. □ Hay un bajo nivel de agua. □ Si la manija está cerrada, ábrela y mueve la mano en el área del sensor para verificar si el sensor parpadea 10 veces de forma lenta y constante. Si esto sucede, debes reemplazar las baterías del sensor.
Cuidado y Limpieza □ Conserva el acabado del grifo aplicando cera no abrasiva. □ Cuando uses limpiadores no abrasivos, enjuaga de inmediato cuando termines de limpiar el grifo. □ No uses limpiadores abrasivos para limpiar este grifo.
¿Problemas, preguntas o piezas faltantes? llama a servicio al cliente de Schön de lunes a viernes de 8 a.m. a 6 p.m., hora estándar del este (800) 880-8164 www.schonsimplymodern.com Conserva este manual para uso futuro.
Modèle n°67558-0101 67558-0108D2 GUIDE D'UTILISATION ET D'ENTRETIEN ROBINET DE CUISINE RÉTRACTABLE Système d’installation facile sans outils Écrous de montage faciles à installer pour la plaque décorative et le distributeur de savon : Poussez vers le haut et serrez à la main Questions, problèmes, pièces manquantes? Appelez le service à la clientèle de Schön entre 8 h et 18 h, HNE, du lundi au vendredi au (800) 880-8164 www.schonsimplymodern.
Table des matières Consignes de sécurité ............................34 Garantie...................................................34 Pré-installation .......................................34 ................34 Outils requis .........................................34 Contenu de l’emballage .......................35 Installation ..............................................36 Utilisation................................................43 Dépannage ..............................................
Pré-installation (suite) CONTENU DE L'EMBALLAGE A G H I L J M K B N C D E O P F Pièce Quantité Pièce A Description Robinet 1 I Plaque de base Description Quantité 1 B Rondelle en caoutchouc 1 J Écrou faciles à installer 2 C Rondelle en métal 1 K Rondelle 1 D Écrou 1 L Pince lestée 1 M Pesées 1 N Raccord à branchement rapide 1 E Capuchon de protection 1 F Clé 1 G Rosace 1 O Boîtier de commande 1 H Tige 2 P Compartiment à piles 1 35 www.
Installation de l'ensemble de 1 Installation 2 Installation de la rosace robinetterie ATTENTION : Coupez l’alimentation en eau CAUTION: Always turntoujours off the water supply before avant d’enlever un robinet ou de any remplacer removing an existing faucetexistant or replacing part of a n’importe quelle partie du robinet. Ouvrez la poignée du faucet. Open the faucet handle to relieve water pressure robinet pourthat libérer pression de l’eau et vous and ensure the la water is completely shut off.
Installation (suite) solidement l'ensemble de l'ensemble de 4 Fixer de robinetterie robinetterie 3 Installation □ REMARQUE : Cette étape est pour l'installation de la rosace (facultatif). Si vous n'utilisez pas la rosace, installez l'ensemble de robinetterie comme décrit dans l'étape 2. □ Installez le corps du robinet (A) - y compris les tuyaux flexibles et le câble de transmission de données (1) - dans l’orifice de la rosace (G).
Installation (suite) du capuchon de 5 Installation 6 protection □ Vissez le capuchon de protection (E) sur la tigede montage filetée (1). 1 E Installation du tuyau flexible rétractable □ Avant d’installer le tuyau flexible (K), assurez-vous que le capuchon de protection (1) se trouve à l’extrémité du tuyau flexible (K).
Installation (suite) le raccord à 7 Attacher branchement rapide au tuyau 8 □ Avant d’installer le raccord à branchement rapide, retirez et jetez le capuchon de protection (1) du tuyau flexible rétractable (K). Attachez le raccord à branchement rapide (N) en le vissant sur l’extrémité filetée du tuyau flexible (K) en tournant dans le sens des aiguilles d’une montre. Serrez à la main seulement.
Installation (suite) du câble de 9 Installation transmission des données □ Installez le câble de transmission des données (1) dans le raccord à ajustage correct correspondant (2) en haut du boîtier de commande (O). Assurez-vous que le câble de transmission des données (1) est entièrement inséré et fixez-le fermement en serrant l’écrou (3) à la main dans le sens des aiguilles d’une montre.
Installation (suite) 11 Installation du compartiment à piles □ Avant l’installation, choisissez l’emplacement du compartiment à piles (P) et vérifiez que le fil du compartiment à piles arrivera jusqu’au raccord au fond du boîtier de commande (O). □ Une option consiste à installer le compartiment à piles avec du ruban adhésif (2). Collez tout d’abord un côté du ruban adhésif au mur. Puis, collez l’autre pièce au dos du support du compartiment à piles (1).
Installation (suite) 12 Installation des poids de lest □ Installez la pince lestée (L) au point du tuyau flexible (K) avec la marque «weights here (poids ici)». □ Insérez les poids (M) sur la pince (L) en les faisant glisser sur la pince (L).
Utilisation 1 Purge et recherche de fuites IMPORTANT : Une fois l'installation terminée, ouvrez l’alimentation en eau chaude et en eau froide. Vérifiez s’il y a des fuites. Ne perdez pas le joint d’étanchéité (1) dans le tuyau flexible. □ Retirez du bec l’assemblage du tuyau, puis retirez du tuyau la tête de vaporisation en la tournant dans le sens contraire des aiguilles d’une montre.
Dépannage 1 2 La cartouche est endommagée □ Lorsque vous tournez la manette en position d’ouverture complète, l’eau s’ouvre. □ Mais lorsque vous tournez complètement la manette en position d’arrêt complet sans entrer en contact avec le détecteur, l’eau ne se ferme pas. □ Ceci indique que la cartouche est endommagée. Coupez l’alimentation en eau, retirez la manette et remplacez la cartouche (1).
Dépannage (suite) 3 Le boîtier de commande et la cartouche sont endommagés □ Lorsque vous tournez la manette en position d’ouverture complète, l’eau s’ouvre. 3 □ Le boîtier de commande et la cartouche sont endommagés (suite) Ceci indique que le boîtier de commande et la cartouche sont endommagés. Coupez l’alimentation en eau et retirez le boîtier de commande (1). Retirez alors la manette et remplacez la cartouche (2).
Dépannage (suite) 4 La manette est fermée ou les piles ne fonctionnent pas 5 □ L’eau ne sort pas de la tête de pulvérisation. □ Le débit d’eau est faible. □ Si la manette est fermée, ouvrez la manette et déplacez votre main dans la zone de détection pour voir si le détecteur clignote 10 fois de manière continue et lente. Si c’est le cas, il faut remplacer les piles du détecteur. □ Ceci indique que la rondelle à l’extrémité «in (entrée)» du boîtier de commande est sale ou endommagée.
Entretien et nettoyage □ □ Lors de l’utilisation de nettoyants non abrasifs, rincez immédiatement lorsque vous avez terminé de nettoyer le robinet. □ N’utilisez pas de produits abrasifs pour le nettoyage de ce robinet.
Questions, problèmes, pièces manquantes? Appelez le service à la clientèle de Schön entre 8 h et 18 h, HNE, du lundi au vendredi au (800) 880-8164 www.schonsimplymodern.com Conservez ce manuel pour référence future.