
Installation Guide


4
Installation
CAUTION: Always turn off the water supply before
removing an existing faucet or replacing any part of a
faucet. Open the faucet handle to relieve water pressure
and ensure that the water is completely shut off.
1
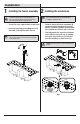
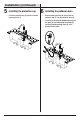
Installing the faucet assembly
□ Shut off the water supply. Remove the old faucet.
□ Install the faucet body (A)-including hoses and
data cable (1)-through the hole in the sink.
NOTE: This step is for no escutcheon installation (optional).
If the escutcheon will be used, install the faucet assembly
as described in step 2.
2
Installing the escutcheon
□ Screw the shanks (H) into the escutcheon (G)
and ensure that the base plate (I) is pressed
onto the escutcheon (G) before the escutcheon
(G) is installed over the three holes in the sink.
□ From underneath sink, secure the escutcheon
to sink with the easy install nuts (J) provided.
Push up the easy install nuts (J) to sink and
hand-turn to tighten, as shown in the Fig 1.
NOTE: If the sink is uneven, use silicone under the base
plate (I).
NOTE: This step is for escutcheon installation (optional).
If the escutcheon will not be used, install the faucet
assembly as described in step 1.
A
1
G
H
I
J
Push
up
Screw
J
Sink
Sink
Fig 1