
Installation Guide


7
Installation (continued)
7
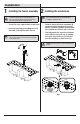
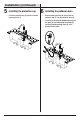
Attaching the quick connector
to the hose
□ Before installing the quick connector, remove
and discard the protective cap (1) from the
pulldown hose (K). Attach the quick connector
(N) by screwing it onto the threaded end of the
hose (K) in a clockwise motion. Hand tighten
only.
8
Attaching the quick connector
to the receiving block
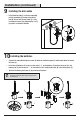
NOTE: The face with "in" and "out" on the control box (O)
must be in the front, the end with "in" must be up, as
shown. So that the hose (K) can pull down freely after
connecting onto the control box (O). The hose (1) with
yellow tag is connected to the end of the control box (O)
with yellow tag, and the hose (K) with green tag is
connected to the end of the control box (O) with green tag.
□ Push the quick connector (3 or 5) rmly upward
and attach it to the receiving block (2 or 4). Pull
down moderately to ensure the connection has
been made.
N
K
3 or 5
2 or 4
2
O
4
K
3
5
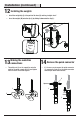
NOTE: If you want to use the faucet without the sensor
feature or without power, you can attach the quick
connector (4) to the receiving block (1). This bypasses the
sensor feature and enables the faucet to work by operating
the handle.
1
K
1
www.schonsimplymodern.com
Please contact (800) 880-8164 for further assistance.