
Full Product Manual


• 4 •
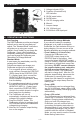
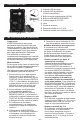
3. FEATURES
1. Voltage indicator LEDs
2. Condition (Override/Fault)
LED indicator
3. GLOW mode button
4. On/Off button
5. 12V DC charging cable
6. Wrench
7. Jumper clamps
8. 12V 10A Input port
9. 5V/2A Micro USB Input port
1
2
3
4
5
7
6
89
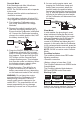
4. OPERATING INSTRUCTIONS
Pre-Charging
The DSR ProBooster must be pre-charged
before it can be used to jump start your
vehicle. The “Standard Mode” instructions
will guide you on using your current
vehicle’s “weak” battery to pre-charge the
ProBooster. If your vehicle’s battery is
completely discharged, or does not allow
you to pre-charge the ProBooster, see
“Alternative Pre-Charge Methods”.
Standard Mode
In most cases, the weak battery can fully
recharge the ProBooster.
Follow these steps to pre-charge your
ProBooster and get your car started:
1. For a negative-ground vehicle (as in
most vehicles), connect the POSITIVE
(RED) clamp to the POSITIVE (POS,
P, +) battery post. Next, connect the
NEGATIVE (BLACK) clamp to the
vehicle chassis or engine block, away
from the battery.
2. For a positive-ground vehicle, connect
the NEGATIVE (BLACK) clamp to the
NEGATIVE (NEG, N, -) battery post.
Next, connect the POSITIVE (RED)
clamp to the vehicle chassis or engine
block away from the battery.
3. The ProBooster will turn on
automatically. Indicators will show the
voltage of the vehicle’s battery.
4. Press the ON/OFF button. The
ProBooster will start to recharge itself.
LED indicators show the ProBooster’s
voltage during charging.
5. After the 14V indicator stops blinking,
turn on the engine.
Alternative Pre-charge Methods
If your vehicle’s battery is completely
discharged, or is unable to charge the
ProBooster, the Fault indicator will turn on
during charging. You can use one of the
following alternative pre-charging methods:
• From a battery (i.e, friend’s car)
Connect the ProBooster’s red
(POSITIVE) output clamp to the
POSITIVE post of the battery. Next,
connect the black (NEGATIVE) output
clamp to a heavy, unpainted metal part of
the chassis or engine block, away from
the battery. DO NOT connect clamp to
the negative battery post, carburetor,
fuel line or a sheet metal part. Press
the ON/OFF button. The ProBooster
will start to charge itself. After the 14V
indicator stops blinking, disconnect the
ProBooster by removing the output
clamp from the chassis or engine block,
followed by the output clamp from the
battery post.
• From a USB
The ProBooster can be recharged from
any 5V 2A USB port, using a Micro USB
adapter (not included). Recharging starts
automatically.
• From a 12V socket
The ProBooster can be recharged from
a donor car’s 12Vsocket. Plug in the 12V
adapter. Charging starts automatically.
Once you have fully charged your
ProBooster, you can continue with the
connection and starting instructions in
Standard Mode. If your vehicle’s battery
is completely discharged, and you are
unable to start the vehicle in Standard
Mode, you may need to use the Override
Mode starting instructions.