MODEL / MODELO / MODÈLE : DSR131 Battery Charger & Engine Starter Cargador de baterías y arrancador Chargeur de batterie et aide de démarrage OWNERS MANUAL / MANUAL DEL USUARIO / MANUEL D’UTILISATION PLEASE SAVE THIS OWNERS MANUAL AND READ BEFORE EACH USE. This manual will explain how to use the battery charger safely and effectively. Please read and follow these instructions and precautions carefully. POR FAVOR CONSERVE ESTE MANUAL DEL USUARIO Y LEALO ANTES DE CADA USO.
1. IMPORTANT SAFETY INSTRUCTIONS SAVE THESE INSTRUCTIONS. 1.1 SAVE THESE INSTRUCTIONS – This manual contains important safety and operating instructions. 1.2 This charger is not intended for use by children. 1.3 Do not expose the charger to rain or snow. 1.4 Use of an attachment not recommended or sold by the battery charger manufacturer may result in a risk of fire, electric shock or injury to persons. 1.
. PREPARING TO CHARGE 3.1 If necessary to remove battery from battery without removable cell caps, such vehicle to charge, always remove as valve regulated lead acid batteries, grounded terminal from battery first. Make carefully follow manufacturer’s recharging sure all accessories in the vehicle are off, instructions. so as not to cause an arc. 3.5 Study all battery manufacturer’s 3.2 Be sure area around battery is well specific precautions while charging and ventilated while battery is being charged.
7. FOLLOW THESE STEPS WHEN BATTERY IS OUTSIDE VEHICLE WARNING: A SPARK NEAR THE BATTERY MAY CAUSE A BATTERY EXPLOSION. TO REDUCE THE RISK OF A SPARK NEAR THE BATTERY: 7.1 Check polarity of battery posts. POSITIVE (POS, P, +) battery post usually has a larger diameter than NEGATIVE (NEG, N, –) post. 7.2 Attach at least a 24-inch-long 6-gauge (AWG) insulated battery cable to NEGATIVE (NEG, N, –) battery post. 7.3 Connect POSITIVE (RED) charger clip to POSITIVE (POS, P, +) post of battery. 7.
Boost mode: Voltage > OFF > Amperage… Charge/Maintain mode: Voltage > OFF > Battery Percentage > Amperage… Engine Start mode: Voltage (No Amperes or Battery Percentage Mode) If the process is stopped on any mode (by pressing the START/STOP button), the display will show “OFF”. NOTE: When in Charge/Maintain mode, the display will automatically go into sleep mode (shut-off) after 2 minutes. To turn the display back on, press any push-button.
11. OPERATING INSTRUCTIONS CHARGING THE BATTERY Keep in mind: when charging a battery, the more a battery is discharged, the faster it absorbs charge from the charger. In other words, it takes longer for the battery to absorb the last few percents of charge than the first several percents. WARNING: When the START button is pressed in either Boost mode, Charge/ Maintain mode or Engine Start mode, the clamps are energized and will spark if touched together. A spark near the battery may cause an explosion.
Engine Start Mode 1. Set the ON/OFF switch to the OFF (center) position. 2. Connect the charger to the battery and AC power, as explained in sections 6 and 7. 3. With the charger plugged in and connected to the battery of the vehicle, set the ON/OFF switch to the Engine Start position. If the battery is properly connected, the yellow/orange Engine Start LED will light solid and the display will show the current voltage of the battery. If the display shows “0.0”, check the battery connections. 4.
12. MAINTENANCE AND CARE A minimal amount of care can keep your battery charger working properly for years. • Clean the clamps each time you are finished charging. Wipe off any battery fluid that may have come in contact with the clamps to prevent corrosion. • Occasionally cleaning the case of the charger with a soft cloth will keep the finish shiny and help prevent corrosion. • Coil the input and output cords neatly when storing the charger.
PROBLEM Engine start does not work. POSSIBLE CAUSE Drawing more than the Engine Start rate. SOLUTION Crank time varies with the amount of current drawn. If cranking draws more than the Engine Start rate, crank time may be less than 5 seconds. Failure to wait 3 minutes (180 When the Engine Start LED blinks, seconds) between cranks. wait 3 minutes of rest time before the next crank. The charger may be overheated. The thermal protector may have tripped and needs a little longer to reset.
16. LIMITED WARRANTY WARRANTY NOT VALID IN MEXICO. SCHUMACHER ELECTRIC CORPORATION, 801 BUSINESS CENTER DRIVE, MOUNT PROSPECT, IL 60056-2179, MAKES THIS LIMITED WARRANTY TO THE ORIGINAL RETAIL PURCHASER OF THIS PRODUCT. THIS LIMITED WARRANTY IS NOT TRANSFERABLE OR ASSIGNABLE. Schumacher Electric Corporation (the “Manufacturer”) warrants this battery charger for two (2) years from the date of purchase at retail against defective material or workmanship that may occur under normal use and care.
1. INSTRUCCIONES IMPORTANTES DE SEGURIDAD GUARDE ESTAS INSTRUCCIONES. 1.1 GUARDE ESTAS INSTRUCCIONES – Este manual contiene instrucciones operativas y de seguridad de importancia. 1.2 Este cargador no está destinado para ser usado por niños. 1.3 No exponga el cargador a la lluvia o a la nieve. 1.4 El uso de un accesorio no recomendado o suministrado por por el fabricante del cargador de baterías puede provocar riesgo de incendio, descarga eléctrica o lesiones a personas. 1.
como para soldar un anillo o provocar cargador de batería para cargar baterías efectos similares sobre el metal, de pila seca que por lo general se utilizan causando una quemadura de gravedad. con artefactos domésticos. Estas baterías podrían explotar y provocar lesiones a 2.8 Utilice este cargador solamente para personas o daño a la propiedad. cargar baterías recargables de tipo PLOMO-ÁCIDO (Estándar, AGM o Gel) 2.9 NUNCA cargue una batería congelada. con recomienda usar capacidad de la 2.
6.3 Verifique la polaridad de los bornes de cuerpos metálicos. Conecte a una pieza la batería. El borne POSITIVO (POS, metálica de calibre grueso del marco o P, +) de la batería generalmente posee del bloque motor. un diámetro mayor al borne NEGATIVO 6.6 En un vehículo con descarga a tierra (NEG, N, -). por borne positivo, conecte el gancho 6.
8.3 USO DE UN CABLE DE EXTENSIÓN El uso de una extensión no se recomienda. Si debe usar una extensión, siga estas pautas: • Las clavijas del enchufe del cable de extensión debe ser el mismo número, tamaño y forma que las del enchufe del cargador. • Asegúrese de que el cable de extensión esté conectado correctamente y en buenas condiciones eléctricas.
BOTÓN DE SELECCIÓN DE VELOCIDAD Cuando se encuentre en el modo de Impulsar o Carga/Mantenimiento, utilice este botón para seleccionar una de las siguientes potencias: 50A Impulsar – Para la incorporación rápida de la energía a una batería muy descargada o de gran capacidad. 6<>2A Carga / Mantenimiento – Para la carga de baterías pequeñas y grandes.
11. INSTRUCCIONES DE OPERACIÓN CARGA DE LA BATERÍA Tenga en cuenta que cuando carga una batería, mientras más descargada esté, absorberá de forma más rápida la carga del cargador. En otras palabras, toma más tiempo que la batería absorba los últimos porcentajes de carga que los primeros porcentajes. ADVERTENCIA: Cuando se pulsa el botón START, ya sea en el modo de Impulsar, Carga/Mantenimiento o Arranque del motor, las abrazaderas estarán energizadas y producirán chispas si se tocan entre sí.
NOTA: Si el motor gira, pero no enciende, no existe un problema con el sistema de arranque, sino en cualquier otra parte del vehículo. DEJE de darle arranque al motor hasta que el otro problema se diagnostique y se corrija. NOTA: Durante el clima extremadamente frío o si la batería tiene menos de dos voltios; primero, aumente la batería en modo de Impulsar de 50 A por al menos algunos minutos antes de usar la función de Arranque del motor.
MANTENIENDO UNA BATERÍA El DSR131 carga y mantiene las baterías de 6 y 12 voltios, manteniéndolas a carga completa. NOTA: La tecnología de modo de mantenimiento le permite cargar de forma segura y mantener una batería en buen estado durante largos períodos de tiempo. Ahora, los problemas con la batería, problemas eléctricos del vehículo, conexiones equivocadas u otras condiciones que surgan, podrías causar absorsión de corriente excesiva.
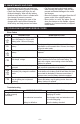
Localización y Solución de Problemas PROBLEMA CAUSA POSIBLE El cargador no se Tomacorriente de CA fuera de enciende incluso al funcionamiento. estar bien conectado. Sin inicio al arrancar el motor. La pantalla muestra “bAD / bAt / F01 ”. La pantalla muestra “bAD / bAt / F02”. La pantalla muestra “bAD / bAt / F05”. SOLUCIÓN Controle la posible presencia de fusibles abiertos o disyuntores que suministren energía al tomacorriente de CA. Conexión eléctrica deficiente.
15. ESPECIFICACIONES UL Entrada................................................. 120V AC @ 60Hz, 11A continuo, 50A intermitente Salida.......................................... 6/12V CC, 6A; 50A int, 60 seg. max en, 180 seg. min off 6/12V CC, 125/250A int., 5 seg. max. en, 180 seg. min. off cUL Entrada................................................. 120V AC @ 60Hz, 11A continuo, 50A intermitente Salida.......................................... 6/12V CC, 6A; 35A int, 60 seg. max en, 180 seg.
1. CONSIGNES DE SÉCURITÉ IMPORTANTES CONSERVER CES INSTRUCTIONS. 1.1 CONSERVER CES INSTRUCTIONS – Ce manuel contient des instructions importantes concernant la sécurité et le fonctionnement. 1.2 Ne pas laisser à la portée des enfants. 1.3 Ne pas exposer le chargeur à la pluie ou la neige. 1.4 N’utilisez que les accessoires recommandés. L’utilisation d’accessoires non recommandés ou vendus par le fabricant du chargeur de batterie peut engendrer un risque d’incendie, un choc électrique ou des blessures. 1.
recommandé de 12Ah (6V) et 22-59Ah 2.9 NE JAMAIS charger une batterie gelée. (12V). Il n’est pas conçu pour alimenter un 2.10 AVERTISSEMENT : Ce produit contient système électrique à basse tension autre un ou plusieurs produits chimiques que dans une application d’un démarreur. reconnus par l’État de Californie pour Ne pas utiliser ce chargeur de batterie causer cancer, des malformations pour recharger des piles sèches qui sont congénitales ou d’autres troubles de la utilisées en électroménager.
l’étape 6.5. Si la borne positive est raccordée au châssis, voir l’étape 6.6. 6.5 Si la borne négative est mise à la masse, raccorder la pince POSITIVE (ROUGE) du chargeur à la borne POSITIVE (POS, P, +) non mise à la masse de la batterie. Raccorder la pince NÉGATIVE (NOIRE) au châssis du véhicule ou au moteur, loin de la batterie. Ne pas raccorder la pince au carburateur, aux canalisations d’essence ni aux pièces de la carrosserie en tôle.
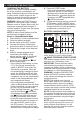
9. DIRECTIVES D’ASSEMBLAGE 9.1 Enlever tous les cordons dérouler sur les câbles avant d’utiliser le chargeur de batterie. 9.2 Tirez la poignée vers le haut pour l’étendre jusqu’à ce qu’elle se ferme. (Si nécessaire, appuyez sur les petits boutons argentés vers l’intérieur.) 10. PANNEAU DE CONTRÔLE SELECTEUR MARCHE / ARRÊT Utilisez ce sélecteur pour choisir entre la Charge / Maintien, Boost ou le mode de Aide-Démarrage.
– Le chargeur a détecté qu’une batterie est branchée et effectue l’opération sélectionnée. Chargé / Maintien – La batterie est complètement chargée et le chargeur est en mode maintien. Pinces Inversées – Les connexions sont inversées. REMARQUE : Consultez la section des Consignes d’Utilisation pour une description complète des modes de chargeur. BOUTON DE TYPE DE BATTERIE Utilisez ce bouton pour sélectionner le type de batterie.
enfoncée ou que l’interrupteur principal MARCHE/ARRÊT soit réglé sur ARRÊT. L’appareil ne changera pas automatiquement en débit Charge / Maintenir pour terminer la charge. 8. Appuyer sur la touche START. • Si l’appareil passe automatiquement en mode Boost, mais que le débit Charge / Maintenir 6 <> 2 A est préféré, appuyez sur la touche Sélection de débit (tout en amplifiant) jusqu’à ce que le voyant DEL de Charge / Maintenir s’allume. 9.
CHARGE AVORTE Si la charge ne peut être achevé normalement, la charge avorté. Lorsque la charge est abandonnée, la sortie du chargeur est coupée. L’écran affiche « bad / bat » et un code d’erreur. N’essayez pas de continuer le chargement de cette batterie. Vérifiez la batterie et remplacez-la si nécessaire. MODE DE DÉSULFATATION L’écran affichera « SUL » lorsqu’une batterie sulfatée est détectée, puis le chargeur passera au mode désulfatation.
13. TABLEAU DE DÉPANNAGE ET CODES D’ÉCHEC Codes d’échec CODE bAd bAT F01 SUL bAd bAT F02 DESCRIPTION La tension de batterie est toujours en dessous de 10 V (pour une batterie de 12V) or 5V (pour une batterie de 6V) après 2 heures de chargement. Le chargeur a détecté une batterie sulfatée. Le chargeur ne peut pas désulfurer la batterie. RAISON / SOLUTION La batterie pourrait être mauvaise; faites-la vérifier ou remplacer. Le chargeur passera au mode désulfatation.
PROBLÈME L’écran affiche « bAD / bAt / F01 ». L’écran affiche « bAD / bAt / F0 2 ». L’écran affiche « bAD / bAt / F0 5 ». CAUSE POSSIBLE La tension de batterie est toujours en dessous de 10 V (pour une batterie de 12V) or 5V (pour une batterie de 6V) après 2 heures de chargement. La désulfatation n’a pas réussi après 10 heures. Le manque de progrès est détecté après que 12 heures au mode maintien se soient écoulées. SOLUTION La batterie pourrait être mauvaise.
16. GARANTIE LIMITÉE GARANTIE N’EST PAS VALIDE AU MEXIQUE. SCHUMACHER ELECTRIC CORPORATION, 801 BUSINESS CENTER DRIVE, MOUNT PROSPECT, IL 60056-2179, DONNE CETTE GARANTIE LIMITÉE POUR PREMIER ACHETEUR DE CE PRODUIT. CETTE GARANTIE LIMITÉE N’EST PAS TRANSFÉRABLES NI CESSIBLES.
WARRANTY CARD / TARJETA DE GARANTÍA SAVE ON POSTAGE! ACTIVATE YOUR WARRANTY ONLINE – THE QUICK AND EASY WAY! Go to www.batterychargers.com to register your product online. (No internet access? Send in the completed warranty card.) 2 YEAR LIMITED WARRANTY PROGRAM REGISTRATION MODEL:______________________ DESCRIPTION:_________________________ This is the only express limited warranty, and the manufacturer neither assumes nor authorizes anyone to assume or make any other obligation.
CARTE DE GARANTIE PAS BESOIN DE VOIE POSTAL ! ACTIVEZ VOTRE GARANTIE SUR INTERNET – LA VOIE PLUS RAPIDE ET FACILE! Aller sur www.batterychargers.com pour enregistrer votre produit en ligne. (Pas d’accès internet? Envoyer la carte de garantie par poste.