SF 9003 BT SAT FINDER SAT Finder USER GUIDE SAT Finder HD for 12 satellite positions
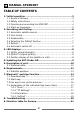
MANUAL SF9003BT TABLE OF CONTENTS 1. Initial operation.................................................................3 1.1 Scope of delivery............................................................ 3 1.2 Safety instructions.......................................................... 3 1.3 Mounting and connecting the SF9003BT.....................................4 1.4 Start-up procedure.......................................................... 5 2. Searching and finding....................................
MANUAL SF9003BT 1. INITIAL OPERATION 1.1 Contents • • • • • • • SAT Finder HD 1m connection cable 2x BNC adapter Adapter cable Retaining strap Bag Instruction Manual 1.2 Safety instructions Please read the safety instructions carefully before using the SAT-Finder HD for the first time in order to be able to exclude possible sources of error and dangers. Pay attention to your safety at the installation site of the system (e.g. a slippery roof which can lead to a risk of falling).
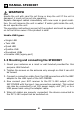
MANUAL SF9003BT WARNING Handle the unit with care! Do not throw or drop the unit! If the unit is damaged, it must not be put into operation. Replace damaged cables immediately with new ones in good condition. Do not immerse the unit in water! If water gets inside the unit, do not operate the unit.
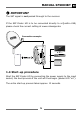
MANUAL SF9003BT IMPORTANT The SAT signal is not passed through to the receiver. If the SAT-Finder HD is to be connected directly to a Quattro LNB, please check the current setting at www.schwaiger.de. Connection example TV Receiver Powerbank 1.4 Start-up procedure Start the SAT-Finder HD by connecting the power supply to the input socket; the boot process of the unit will then begin (power LED "on"). The entire start-up process takes approx. 12 seconds.
MANUAL SF9003BT 2. SEARCHING AND FINDING 2.1 Automatic satellite search When the green ON LED lights up, the SAT-Finder HD is ready for operation and you can align the satellite dish. Be careful not to tilt the satellite dish too far otherwise you could easily skip the satellite you are looking for. In this, the following applies: Pre-adjusting the dish vertically beforehand will make the subsequent search much easier. Tilt the SAT dish vertically, depending on your location.
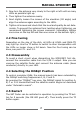
MANUAL SF9003BT 3. Now turn the antenna very slowly to the right or left until as many LEDs as possible light up. 4. Then tighten the antenna evenly. 5. Next slightly loosen the screws of the elevation (tilt angle) and align the antenna again according to the LEDs. 6. Tighten all screws and check that the level and quality do not deteriorate. To prevent the antenna from twisting when tightening, we recommend tightening the screws crosswise.
MANUAL SF9003BT 2.6 Automatic switch-off The satellite finder switches off if there is no satellite signal within 7 minutes. 3. LED DISPLAYS 3.1 LEVEL (signal strength) To ensure that the signal strength is determined as accurately and finely as possible, the SAT-Finder has 8 yellow LEDs. Each of these has 3 different light states (off, flashing, permanently on). This indicates to the user the signal strength at which the input signal is being received.
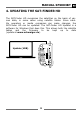
MANUAL SF9003BT 4. UPDATING THE SAT-FINDER HD The SAT-Finder HD recognises the satellites on the basis of various data, in some cases using satellite tables. Since satellite operators or media companies can make changes, the SAT-Finder HD can be updated. The SAT-Finder HD Updater is a software for Windows that does this. This allows both the satellite tables and the firmware to be kept up to date (update at www.schwaiger.de).
MANUAL SF9003BT 5.
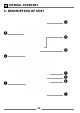
MANUAL SF9003BT Connectors Buttons LEDs 1 DC 5 - 18 V Connection for power supply (power adapter, receiver, power bank ...) 2 LNB: Connection to the LNB 3 TP Short press switches between the transponders 4 SAT Display Position 5 ON Operating voltage is present, the unit is ready for operation.
MANUAL SF9003BT 5.1 Technical data Frequency range 950 - 2150 MHz Operating Voltage 5 - 18V DC Demodulation QPSK / 8PSK / 16APSK / 32APSK Impedance 75 Ohm Symbol rate 45 Msps (QPSK,8PSK,16APSK) 37 Msps (32APSK) Input level range 44 - 110 dBμV Frequency band and max. Transmit power of Bluetooth® 4.0 interface 2402 - 2480 MHz 2.5 mW / 4 dBM Operating temperature range 0° C ~ +60° C Dimensions 160 x 89 x 27 mm 6.
MANUAL SF9003BT 6.1 Satellite positions 12 satellites are already pre-programmed by the manufacturer. You can switch between four different frequencies per satellite with the "TP" button. Satellite Orbit position HISPASAT 30°W AMOS 4°W ASTRA 4 5°E EUTELSAT 7 7°E EUTELSAT 9 9°E HOTBIRD 13°E EUTELSAT 16 16°E ASTRA 19.2°E ASTRA 3 23.5°E ASTRA 2 28.
MANUAL SF9003BT 7. BLUETOOTH® AND APP FUNCTION The Satfinder SF 9003 BT has a Bluetooth® interface and can be set and used via this App.
MANUAL SF9003BT 7.2 Start app Before starting the app, you should activate "Bluetooth®" on your smartphone and put the satellite finder into operation. IMPORTANT: The satellite finder must NOT be paired. Only open the app! Close the Bluetooth window opened on the smartphone. After starting the app, the following menu appears: Click on "Scan" to search for the satellite finder. Click on the satellite finder you have found.
MANUAL SF9003BT 7.3 Use app to set up the antenna. After successful connection, the following main menu now appears: As soon as the app is connected, the set satellite and transponder data are downloaded from the satellite finder. To change the satellite and transponder data: • Select the desired satellite under "Satellite". • For LNB, the oscillator frequency can be set. For most satellites it should be "9.750/10.600" (universal).
MANUAL SF9003BT 7.4 Explanation of the individual App menu items 7.4.1 "More" C/N: (level difference between the usable signal and the background noise). This value indicates how much the wanted signal is above the background noise of the LNB. The higher the C/N value, the better the signal. A good value is between 5 and 10. (10 = very good) If the value is 4 or less, reception is impaired. LEVEL: (Level) Indicates the level in the unit dBμV. The higher, the better. 7.4.
MANUAL SF9003BT 7.4.3 Emulation The display of the elevation angle depends on the location and the selected satellite.
MANUAL SF9003BT 7.4.4 "Settings" Change device To disconnect the satellite finder (in order to be able to connect another satellite finder). Restore Reset Satfinder to factory settings Attention: The data stored in the app is also reset. Sound Here you can switch the signal tone of the satellite finder on or off. DiSEqC Switching A-B-C-D Version Indicates which App version is used Language The App supports several languages and is automatically set to the system language of the smartphone.
MANUAL SF9003BT 8. TROUBLESHOOTING Problem Possible cause Possible solution Only the LEVEL LEDs are lit You are aiming at the wrong satellite Turn the antenna further until the QUALITY LEDs also light up. All LEDs are off. The satellite finder Check whether the is not receiving any power supply connected supply voltage. to the connection "DC5 V-18V" is switched on. Antenna rotates, but the satellite finder shows no deflection. Antenna tilt not set correctly or direction incorrect.
MANUAL SF9003BT 9.
MANUAL SF9003BT Warranty conditions The statutory warranty period is 2 years. During this period, all damage caused by material or manufacturing defects will be repaired free of charge. Our warranty does not cover natural wear and tear, parts subject to wear and tear or transport damage, nor does it cover damage resulting from non-compliance with the operating instructions or improper installation.
MANUAL SF9003BT Disposal Never disassemble an SF9003BT. Packaging and packaging aids are recyclable and should always be recycled. Packaging materials such as plastic bags should not be left in the hands of children. User information on the disposal of electrical and electronic equipment in private households. This symbol on products and/or accompanying documents means that electrical and electronic products must be disposed of separately from household waste at the end of their working life.
SF 9003 BT At SCHWAIGER, customer satisfaction is our top priority. If you have any questions, suggestions or problems in connection with your SCHWAIGER product, please contact us at the address below. Service hotline: +49 (0)9101 702-299 Service fax: +49 (0)9101 702-121 Schwaiger GmbH Würzburger Straße 17 90579 Langenzenn Scan this QR code and you will be taken directly to the product. Further information on the product and the current operating instructions can be found on the Internet at www.schwaiger.