
Manual

7
MANUAL SF9003BT
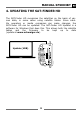
3. Now turn the antenna very slowly to the right or left until as many
LEDs as possible light up.
4. Then tighten the antenna evenly.
5. Next slightly loosen the screws of the elevation (tilt angle) and
align the antenna again according to the LEDs.
6. Tighten all screws and check that the level and quality do not dete-
riorate. To prevent the antenna from twisting when tightening, we
recommend tightening the screws crosswise. (alternately tighten
one screw on the top left and then one screw on the bottom right).
2.2 Fine tuning
Depending on the size of the dish, all LEDs at LEVEL and QUALITY
may light up. Use the TP button to switch to other transponders until
the LEDs no longer show a full beam. Now the fine tuning can be
done, see point 3.1. and 3.2.
2.3 Disassembly
To avoid a short circuit when dismantling the SF9003BT, first dis-
connect the connection cable from the 5/18 V output. Now you can
unscrew the satellite finder and connect the antenna cable (down
conductor) directly to your LNB.
2.4 Selecting the DiSEqC Position
To control monobloc LNBs, the manual search has been extended by
the DiSEqC switching frequencies A, B, C and D.
By pressing the "DiSEqC" key once, the DiSEqC signal for position A,
B, C or D is transmitted and the satellite search begins as described
under "Automatic search".
2.5 Restart
The SAT finder can be restarted in operation by pressing the TP but-
ton for 5 seconds (the ON LED goes off). Then briefly press the TP
button again.