
Owner's Manual


2
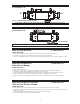
"A"
LEFT
"A"
RIGHT
A SPACER
A SPACER
ATTACH "A" SPACERS BEHIND SHADED BRACKETS
1985-91 Ford Aerostar
Radio Removal:
1. Remove two #8 Phillips head sheet metal screws from the bottom edge of the radio trim panel.
2. Pull down two snaps above air-conditioning outlet vents and remove radio trim panel.
3. Remove four #8 Phillips head sheet metal screws from radio mounting bracket. Disconnect wiring, and remove radio.
See Illustration "A"
1983-88 Ford Bronco II
1983-88 Ford Ranger
Radio Removal:
1. Remove knobs from radio.
2. Remove four screws from top leading edge of instrument cluster trim panel. Carefully pry top edge loose.
3. Carefully pry out trim strip below dash pocket, right and left of ashtray strip.
4. Depress spring clips behind light switch knob and remove knob. Carefully pry out trim strip from this location.
5. Remove remaining four screws from bottom edge of instrument cluster trim panel, and remove.
6. Remove four screws securing radio assembly to dash. Pull radio outward, disconnect power, antenna, speaker
1987-91 Ford Bronco Full Size
1987-91 Ford F-Series Pickup
Radio Removal:
1. Firmly pull on the edges of the radio trim panel to release the trim panel clips and remove the panel.
2. Remove four screws from the radio mounting bracket. Slide the radio out of the dash, disconnect the wiring harnesses,
and remove the radio.
3. Secure the radio/kit assembly to the dash using the four screws removed earlier.
4. Reassemble dash by reversing steps in the radio removal.
See Illustration "A"
See Illustration "A"
See Illustration "A"
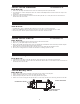
See Illustration "B"
USE THIS BRACKET
USE THIS BRACKET
USE THE SHADED MOUNTING TABS AND THE INDICATED BRACKETS. CUT OFF THE REMAINING TABS AND DISCARD.
USE THE SHADED MOUNTING TABS AND THE INDICATED BRACKETS. CUT OFF THE REMAINING TABS AND DISCARD.